SlideShare a Scribd company logo
1 of 35
Download to read offline
Tutorial on How to
Load images in Crystal Reports dynamically
Using Visual Basic 6 and Access 2000
By Aeric Poon
Introduction
This tutorial will show you how to create a Visual Basic 6 project which will generate a report using Seagate Crystal
Reports 8.5 Developer Edition. You will save the path of the image files in a MS Access database where it is protected
by password. This project will use an external Crystal Report file and will be previewed using Crystal Viewer control.
Get Ready
In this tutorial, I will use some small images I get from forwarded email. I created a folder name Tutorial where all the
files will be store inside this folder. I also created some images with different type like bmp, jpg, gif, png and tif which
will be stored inside a folder name Cake.
Contents
Step 1 Create a Database file using MS Access
Step 2 Create a Crystal Reports file
Step 3 Create a Visual Basic Project
Step 1
Create a Database file using MS Access
Run MS Access to create a blank database. Create a folder name Data. In the File New Database dialogue box, type
the name dbCake (dbCake.mdb) and click on Create to save this file inside folder Data.
You have now created a database file.
Click on Create table in Design view. Click the Design button to create a new table.
Create the following fields in the new table:
CakeID (Text), CakeName (Text), FileName (Text)
Set focus at CakeID and then click the Primary Key button to make this field as Primary Key.
Close the Table window or click Save button. Save this table name as Cake.
Right click and Open table Cake.
Insert some records in the table Cake. Save and Close the table Cake.
Set a Database Password. For this tutorial, I set the password as yuMMy20.
Click OK and Close this file. Now you have a database file ready.
Step 2
Create a Crystal Reports file
Run Crystal Reports 8.5 Developer. Click on As a Blank Report radio button in the Crystal Report Gallery dialogue
box and click OK.
You will see a Data Explorer dialogue box. Click on the plus sign of More Data Sources.
Click on the plus sign of Active Data and then click on Active Data (ADO).
You will see a Select Data Source dialogue box. Choose MS Access Database from the dropdown list and click OK.
Browse for the Data folder where we store the database file, click dbCake.mdb and then click OK.
A Login dialogue will pop out. Enter yuMMy20 for the password and click OK.
Then you will be asking to choose the database again. Click on dbCake.mdb and click OK.
You will be brought back to Data Explorer and you will notice there is an icon for ado. We have successfully
connected the Report with the database. Click on Add button.
You will see a Select Recordset dialogue box.
Click on SQL radio button so you can change the query if you want to do so. This is useful if you have WHERE
keyword in the SQL statement to filter the records.
After you have modified your SQL query, click on OK. Now you can see there is a green tick at the ado icon in Data
Explorer. Click Close.
Now you will see a Field Explorer dialogue box. Click on the plus sign next to Database Fields:.
Click on the plus sign next to ado and you will see all the fields generated from the SQL query.
Drag and drop or click on the field and press Enter to insert the field to the report.
Add more fields to the report in Details section and resize the width as your preference.
Click on Insert Picture icon to insert image file. If you couldn t find the tool, click on menu View, Toolbars and
check the Supplementary Tools checkbox.
Browse for an image to insert. Resize it to fit your report. Format the appearance of the picture object like adding
borders.
You can modify the report design by adding lines, box, labels for company title and address or put a logo.
Click on Preview tab to show how the report will look like. In this stage, the picture is fixed.
Click on menu File and uncheck the Save Data with Report option.
Save this report with filename Catalogue (Catalogue.rpt) inside folder Report.
Step 3
Create a Visual Basic Project
You have the database and report file ready. So, the final step is to create the front-end using MS Visual Basic 6.
Create a new Standard EXE by clicking Open.
Right click the Toolbar and click on Components
Scroll down to look for Crystal Report Viewer Control. Check the checkbox next to it.
Click on Designers tab. Check on Crystal Reports 8.5 and click OK.
Click on menu Project and click References
Look for Microsoft ActiveX Data Objects 2.8 Library (Latest version of ADO control). Check the checkbox next to it.
Add also the Crystal Reports 8.5 ActiveX Designer Run Time Library and click OK.
Right click the Project Explorer, click Add and then click on Crystal Reports 8.5
Click on the From an Existing Report radio button and click OK.
Browse for the report file we have designed just now and click Open.
On the Crystal Report Expert dialogue box, click No radio button for the upper option.
You can notice that Details section is named Section5 in bracket. You can change the name of the section if you like.
To hide the FileName field, right click the FileName field and click on Format .
On the Common tab, check the checkbox next to Suppress.
Hide the Report Header and Report Footer by right click the section separator and click on Suppress (No Drill-Down).
If you have made changes in the database table, right click the ado and click verify database.
You will be asked for the database password. Key in the password and click OK.
A Select Recordset dialogue box will appear. Click OK if the SQL is correct.
A message will pop up to inform you that the ado has changed. Click OK.
I have added a new field Price in the database table. Click OK to continue.
Now, click at the plus sign of ado and you can see the new field is added.
Drag and drop the new field and set HorAlignment to crLeftAlign.
Rename Picture1 as picCake and Field5 for FileName as adoFileName.
Right click inside any section, click on Report and click Save to Crystal reports File .
Browse for the report file and click Yes to replace it. Make a backup if you wish to do so.
Click OK to proceed.
Remove the report designer if you want as we are going to use the external report file.
Right click on the Project Explorer and click on Module.
Click Open to add the new Module.
Insert the following code and save the module as modCake.
Option Explicit
Public cn As ADODB.Connection
Public crx As New CRAXDRT.Application
Public Function OpenDatabase() As Boolean
On Error GoTo checkErr
Set cn = New ADODB.Connection
cn.Provider = "Microsoft.Jet.OLEDB.4.0"
cn.ConnectionString = "Data Source=" & App.Path & "DatadbCake.mdb"
cn.Properties("Jet OLEDB:Database Password") = "yuMMy20"
cn.Open
OpenDatabase = True
Exit Function
checkErr:
MsgBox Err.Description, vbExclamation, Err.Number
End Function
The code above is for connecting to the Access 2000 database with password protected using ADO. It is
recommended to encrypt the password for higher security. The Crystal Report Application is also set in this module as
a Public variable.
Click on Form1. Add a button name cmdPrint on Form1. Change the button caption to Print Catalogue.
Change Form1 BorderStyle as Fixed Single and caption or icon if you like.
Click View Code and insert the following code in Form1 and save it as frmPrint.
Option Explicit
Private Sub cmdPrint_Click()
frmReport.WindowState = 2
frmReport.Show
Unload Me
End Sub
Private Sub Form_Load()
If OpenDatabase = False Then
Unload Me
Exit Sub
End If
End Sub
The above code will connect to the database when the Form loads.
If the database failed to load, check the database path, filename and password.
If the application failed to start, it will quit.
The print button will open a report form which we are going to create later.
The report form will be open as a Maximized window.
Now add a new form. Click CRViewer to add a Crystal Report Viewer object on this form.
Add the following code and save the form as frmReport.
Option Explicit
Dim rpt As CRAXDRT.Report
Dim db As CRAXDRT.Database
Dim rs As New ADODB.Recordset
Dim WithEvents sect As CRAXDRT.Section
Private Sub Form_Load()
Screen.MousePointer = vbHourglass
Set rpt = crx.OpenReport(App.Path & "ReportCatalogue.rpt")
Set db = rpt.Database
Set sect = rpt.Sections("Section5")
rs.Open "SELECT * FROM Cake", cn, 1, 1
rpt.Database.SetDataSource rs, 3, 1
CRViewer1.ReportSource = rpt
CRViewer1.ViewReport
CRViewer1.Zoom 1
Screen.MousePointer = vbDefault
End Sub
Private Sub Form_Resize()
CRViewer1.Top = 0
CRViewer1.Left = 0
CRViewer1.Height = ScaleHeight
CRViewer1.Width = ScaleWidth
End Sub
Private Sub Form_Unload(Cancel As Integer)
cn.Close
End Sub
Private Sub sect_Format(ByVal pFormattingInfo As Object)
Dim bmp As StdPicture
On Error Resume Next
With sect.ReportObjects
Set .Item("picCake").FormattedPicture = LoadPicture(App.Path & "Cakeck99.gif") 'default
If .Item("adoFileName").Value <> "" Then
Set bmp = LoadPicture(App.Path & "Cake" & .Item("adoFileName").Value)
Set .Item("picCake").FormattedPicture = bmp
End If
End With
End Sub
Now we have finished all the coding. Click on Start button to execute the project.
Click on the Print Catalogue button.
The report preview will show up. Click the printer button if you want to print the report.
This is how the trick works. Happy Coding.
Please send me an email at aeric80 [at] gmail [dot] com if you found any mistakes in this document or you want to
suggest any improvement.

More Related Content

What's hot

Excel Crash Course: Pivot Tables
Excel Crash Course: Pivot TablesExcel Crash Course: Pivot Tables
Excel Crash Course: Pivot Tables
Bobby Jones
 
Step by step guide to basic web dynpro abap
Step by step guide to basic web dynpro abapStep by step guide to basic web dynpro abap
Step by step guide to basic web dynpro abap
Kranthi Kumar
 
Formatting Worksheets
Formatting WorksheetsFormatting Worksheets
Formatting Worksheets
coachhahn
 
Formularios e informes en access 2010
Formularios e informes en access 2010Formularios e informes en access 2010
Formularios e informes en access 2010
Omarluis8
 

What's hot (20)

برنامج اكسل
برنامج اكسلبرنامج اكسل
برنامج اكسل
 
Excel Crash Course: Pivot Tables
Excel Crash Course: Pivot TablesExcel Crash Course: Pivot Tables
Excel Crash Course: Pivot Tables
 
Step by step guide to basic web dynpro abap
Step by step guide to basic web dynpro abapStep by step guide to basic web dynpro abap
Step by step guide to basic web dynpro abap
 
Microsoft power point 2010 publish
Microsoft power point 2010 publishMicrosoft power point 2010 publish
Microsoft power point 2010 publish
 
Libre Office Writer Lesson 4: Working with tables and templates
Libre Office Writer Lesson 4: Working with tables and templatesLibre Office Writer Lesson 4: Working with tables and templates
Libre Office Writer Lesson 4: Working with tables and templates
 
Introduction to Microsoft PowerPoint 2010 for Microsoft Windows Slides
Introduction to Microsoft PowerPoint 2010 for Microsoft Windows SlidesIntroduction to Microsoft PowerPoint 2010 for Microsoft Windows Slides
Introduction to Microsoft PowerPoint 2010 for Microsoft Windows Slides
 
[Easy] How to use Trello: Beginner's Guide
[Easy] How to use Trello: Beginner's Guide[Easy] How to use Trello: Beginner's Guide
[Easy] How to use Trello: Beginner's Guide
 
Formatting Worksheets
Formatting WorksheetsFormatting Worksheets
Formatting Worksheets
 
Microsoft Excel 101
Microsoft Excel 101Microsoft Excel 101
Microsoft Excel 101
 
Excel exercise pdf
Excel exercise pdfExcel exercise pdf
Excel exercise pdf
 
Build Restful Service using ADFBC
Build Restful Service using ADFBCBuild Restful Service using ADFBC
Build Restful Service using ADFBC
 
Microsoft office power point 2007 365
Microsoft office power point 2007 365Microsoft office power point 2007 365
Microsoft office power point 2007 365
 
Microsoft Office Word Basics Training
Microsoft Office Word Basics TrainingMicrosoft Office Word Basics Training
Microsoft Office Word Basics Training
 
Formularios e informes en access 2010
Formularios e informes en access 2010Formularios e informes en access 2010
Formularios e informes en access 2010
 
Libre Office Writer Lesson 2
Libre Office Writer Lesson 2Libre Office Writer Lesson 2
Libre Office Writer Lesson 2
 
Oracle EBS Self service from A to Z
Oracle EBS Self service from A to ZOracle EBS Self service from A to Z
Oracle EBS Self service from A to Z
 
Excel 2007- Enter Formulas
Excel 2007- Enter FormulasExcel 2007- Enter Formulas
Excel 2007- Enter Formulas
 
Basic Ms excel
Basic Ms excelBasic Ms excel
Basic Ms excel
 
Ms excel 2007
Ms excel 2007Ms excel 2007
Ms excel 2007
 
How to extend an outbound i doc
How to extend an outbound i docHow to extend an outbound i doc
How to extend an outbound i doc
 

Similar to Tutorial on how to load images in crystal reports dynamically using visual basic 6 and access 2000

Cis407 a ilab 3 web application development devry university
Cis407 a ilab 3 web application development devry universityCis407 a ilab 3 web application development devry university
Cis407 a ilab 3 web application development devry university
lhkslkdh89009
 
Create a basic performance point dashboard epc
Create a basic performance point dashboard   epcCreate a basic performance point dashboard   epc
Create a basic performance point dashboard epc
EPC Group
 
Previous weeks work has been uploaded as well as any other pieces ne.docx
Previous weeks work has been uploaded as well as any other pieces ne.docxPrevious weeks work has been uploaded as well as any other pieces ne.docx
Previous weeks work has been uploaded as well as any other pieces ne.docx
keilenettie
 
Dynamic Web Pages Ch 4 V1.0
Dynamic Web Pages Ch 4 V1.0Dynamic Web Pages Ch 4 V1.0
Dynamic Web Pages Ch 4 V1.0
Cathie101
 
How to Download IDEA for Windows Based ComputersSelect the dow.docx
How to Download IDEA for Windows Based ComputersSelect the dow.docxHow to Download IDEA for Windows Based ComputersSelect the dow.docx
How to Download IDEA for Windows Based ComputersSelect the dow.docx
wellesleyterresa
 
( 5 ) Office 2007 Create A Business Data Catolog
( 5 ) Office 2007   Create A Business Data Catolog( 5 ) Office 2007   Create A Business Data Catolog
( 5 ) Office 2007 Create A Business Data Catolog
LiquidHub
 
CIS 3100 - Database Design and ImplementationProducts on Sale Da.docx
CIS 3100 - Database Design and ImplementationProducts on Sale Da.docxCIS 3100 - Database Design and ImplementationProducts on Sale Da.docx
CIS 3100 - Database Design and ImplementationProducts on Sale Da.docx
mccormicknadine86
 
- Database Design and ImplementationProducts on Sale Database fo.docx
- Database Design and ImplementationProducts on Sale Database fo.docx- Database Design and ImplementationProducts on Sale Database fo.docx
- Database Design and ImplementationProducts on Sale Database fo.docx
gertrudebellgrove
 
A. Lab # BSBA BIS245A-7B. Lab 7 of 7 Database Navigation.docx
A. Lab #  BSBA BIS245A-7B. Lab 7 of 7  Database Navigation.docxA. Lab #  BSBA BIS245A-7B. Lab 7 of 7  Database Navigation.docx
A. Lab # BSBA BIS245A-7B. Lab 7 of 7 Database Navigation.docx
ransayo
 
Product Supplier59,58,8,2.50CIS 3100 - Database Desig.docx
Product Supplier59,58,8,2.50CIS 3100 - Database Desig.docxProduct Supplier59,58,8,2.50CIS 3100 - Database Desig.docx
Product Supplier59,58,8,2.50CIS 3100 - Database Desig.docx
stilliegeorgiana
 

Similar to Tutorial on how to load images in crystal reports dynamically using visual basic 6 and access 2000 (20)

Mca 504 dotnet_unit5
Mca 504 dotnet_unit5Mca 504 dotnet_unit5
Mca 504 dotnet_unit5
 
OBIEE 11g : Repository Creation Steps
OBIEE 11g : Repository Creation StepsOBIEE 11g : Repository Creation Steps
OBIEE 11g : Repository Creation Steps
 
Events Registration System Part 1
Events Registration System Part 1Events Registration System Part 1
Events Registration System Part 1
 
Cis407 a ilab 3 web application development devry university
Cis407 a ilab 3 web application development devry universityCis407 a ilab 3 web application development devry university
Cis407 a ilab 3 web application development devry university
 
Create a basic performance point dashboard epc
Create a basic performance point dashboard   epcCreate a basic performance point dashboard   epc
Create a basic performance point dashboard epc
 
Previous weeks work has been uploaded as well as any other pieces ne.docx
Previous weeks work has been uploaded as well as any other pieces ne.docxPrevious weeks work has been uploaded as well as any other pieces ne.docx
Previous weeks work has been uploaded as well as any other pieces ne.docx
 
Dynamic Web Pages Ch 4 V1.0
Dynamic Web Pages Ch 4 V1.0Dynamic Web Pages Ch 4 V1.0
Dynamic Web Pages Ch 4 V1.0
 
How to Download IDEA for Windows Based ComputersSelect the dow.docx
How to Download IDEA for Windows Based ComputersSelect the dow.docxHow to Download IDEA for Windows Based ComputersSelect the dow.docx
How to Download IDEA for Windows Based ComputersSelect the dow.docx
 
( 5 ) Office 2007 Create A Business Data Catolog
( 5 ) Office 2007   Create A Business Data Catolog( 5 ) Office 2007   Create A Business Data Catolog
( 5 ) Office 2007 Create A Business Data Catolog
 
Database development connection steps
Database development connection stepsDatabase development connection steps
Database development connection steps
 
Fr net programmermanual-en
Fr net programmermanual-enFr net programmermanual-en
Fr net programmermanual-en
 
Creating a repository using the oracle business intelligence administration tool
Creating a repository using the oracle business intelligence administration toolCreating a repository using the oracle business intelligence administration tool
Creating a repository using the oracle business intelligence administration tool
 
Oracle ADF 11g Tutorial
Oracle ADF 11g TutorialOracle ADF 11g Tutorial
Oracle ADF 11g Tutorial
 
Oracle Forms
Oracle FormsOracle Forms
Oracle Forms
 
oracle-forms
oracle-formsoracle-forms
oracle-forms
 
CIS 3100 - Database Design and ImplementationProducts on Sale Da.docx
CIS 3100 - Database Design and ImplementationProducts on Sale Da.docxCIS 3100 - Database Design and ImplementationProducts on Sale Da.docx
CIS 3100 - Database Design and ImplementationProducts on Sale Da.docx
 
XPages - The Ties That Bind
XPages - The Ties That BindXPages - The Ties That Bind
XPages - The Ties That Bind
 
- Database Design and ImplementationProducts on Sale Database fo.docx
- Database Design and ImplementationProducts on Sale Database fo.docx- Database Design and ImplementationProducts on Sale Database fo.docx
- Database Design and ImplementationProducts on Sale Database fo.docx
 
A. Lab # BSBA BIS245A-7B. Lab 7 of 7 Database Navigation.docx
A. Lab #  BSBA BIS245A-7B. Lab 7 of 7  Database Navigation.docxA. Lab #  BSBA BIS245A-7B. Lab 7 of 7  Database Navigation.docx
A. Lab # BSBA BIS245A-7B. Lab 7 of 7 Database Navigation.docx
 
Product Supplier59,58,8,2.50CIS 3100 - Database Desig.docx
Product Supplier59,58,8,2.50CIS 3100 - Database Desig.docxProduct Supplier59,58,8,2.50CIS 3100 - Database Desig.docx
Product Supplier59,58,8,2.50CIS 3100 - Database Desig.docx
 

Recently uploaded

The title is not connected to what is inside
The title is not connected to what is insideThe title is not connected to what is inside
The title is not connected to what is inside
shinachiaurasa2
 
%+27788225528 love spells in Colorado Springs Psychic Readings, Attraction sp...
%+27788225528 love spells in Colorado Springs Psychic Readings, Attraction sp...%+27788225528 love spells in Colorado Springs Psychic Readings, Attraction sp...
%+27788225528 love spells in Colorado Springs Psychic Readings, Attraction sp...
masabamasaba
 
%+27788225528 love spells in new york Psychic Readings, Attraction spells,Bri...
%+27788225528 love spells in new york Psychic Readings, Attraction spells,Bri...%+27788225528 love spells in new york Psychic Readings, Attraction spells,Bri...
%+27788225528 love spells in new york Psychic Readings, Attraction spells,Bri...
masabamasaba
 
introduction-to-automotive Andoid os-csimmonds-ndctechtown-2021.pdf
introduction-to-automotive Andoid os-csimmonds-ndctechtown-2021.pdfintroduction-to-automotive Andoid os-csimmonds-ndctechtown-2021.pdf
introduction-to-automotive Andoid os-csimmonds-ndctechtown-2021.pdf
VishalKumarJha10
 

Recently uploaded (20)

The title is not connected to what is inside
The title is not connected to what is insideThe title is not connected to what is inside
The title is not connected to what is inside
 
Microsoft AI Transformation Partner Playbook.pdf
Microsoft AI Transformation Partner Playbook.pdfMicrosoft AI Transformation Partner Playbook.pdf
Microsoft AI Transformation Partner Playbook.pdf
 
%+27788225528 love spells in Colorado Springs Psychic Readings, Attraction sp...
%+27788225528 love spells in Colorado Springs Psychic Readings, Attraction sp...%+27788225528 love spells in Colorado Springs Psychic Readings, Attraction sp...
%+27788225528 love spells in Colorado Springs Psychic Readings, Attraction sp...
 
%in kaalfontein+277-882-255-28 abortion pills for sale in kaalfontein
%in kaalfontein+277-882-255-28 abortion pills for sale in kaalfontein%in kaalfontein+277-882-255-28 abortion pills for sale in kaalfontein
%in kaalfontein+277-882-255-28 abortion pills for sale in kaalfontein
 
The Ultimate Test Automation Guide_ Best Practices and Tips.pdf
The Ultimate Test Automation Guide_ Best Practices and Tips.pdfThe Ultimate Test Automation Guide_ Best Practices and Tips.pdf
The Ultimate Test Automation Guide_ Best Practices and Tips.pdf
 
OpenChain - The Ramifications of ISO/IEC 5230 and ISO/IEC 18974 for Legal Pro...
OpenChain - The Ramifications of ISO/IEC 5230 and ISO/IEC 18974 for Legal Pro...OpenChain - The Ramifications of ISO/IEC 5230 and ISO/IEC 18974 for Legal Pro...
OpenChain - The Ramifications of ISO/IEC 5230 and ISO/IEC 18974 for Legal Pro...
 
%+27788225528 love spells in new york Psychic Readings, Attraction spells,Bri...
%+27788225528 love spells in new york Psychic Readings, Attraction spells,Bri...%+27788225528 love spells in new york Psychic Readings, Attraction spells,Bri...
%+27788225528 love spells in new york Psychic Readings, Attraction spells,Bri...
 
Define the academic and professional writing..pdf
Define the academic and professional writing..pdfDefine the academic and professional writing..pdf
Define the academic and professional writing..pdf
 
Reassessing the Bedrock of Clinical Function Models: An Examination of Large ...
Reassessing the Bedrock of Clinical Function Models: An Examination of Large ...Reassessing the Bedrock of Clinical Function Models: An Examination of Large ...
Reassessing the Bedrock of Clinical Function Models: An Examination of Large ...
 
AI & Machine Learning Presentation Template
AI & Machine Learning Presentation TemplateAI & Machine Learning Presentation Template
AI & Machine Learning Presentation Template
 
%in Stilfontein+277-882-255-28 abortion pills for sale in Stilfontein
%in Stilfontein+277-882-255-28 abortion pills for sale in Stilfontein%in Stilfontein+277-882-255-28 abortion pills for sale in Stilfontein
%in Stilfontein+277-882-255-28 abortion pills for sale in Stilfontein
 
VTU technical seminar 8Th Sem on Scikit-learn
VTU technical seminar 8Th Sem on Scikit-learnVTU technical seminar 8Th Sem on Scikit-learn
VTU technical seminar 8Th Sem on Scikit-learn
 
%+27788225528 love spells in Vancouver Psychic Readings, Attraction spells,Br...
%+27788225528 love spells in Vancouver Psychic Readings, Attraction spells,Br...%+27788225528 love spells in Vancouver Psychic Readings, Attraction spells,Br...
%+27788225528 love spells in Vancouver Psychic Readings, Attraction spells,Br...
 
%in ivory park+277-882-255-28 abortion pills for sale in ivory park
%in ivory park+277-882-255-28 abortion pills for sale in ivory park %in ivory park+277-882-255-28 abortion pills for sale in ivory park
%in ivory park+277-882-255-28 abortion pills for sale in ivory park
 
introduction-to-automotive Andoid os-csimmonds-ndctechtown-2021.pdf
introduction-to-automotive Andoid os-csimmonds-ndctechtown-2021.pdfintroduction-to-automotive Andoid os-csimmonds-ndctechtown-2021.pdf
introduction-to-automotive Andoid os-csimmonds-ndctechtown-2021.pdf
 
Shapes for Sharing between Graph Data Spaces - and Epistemic Querying of RDF-...
Shapes for Sharing between Graph Data Spaces - and Epistemic Querying of RDF-...Shapes for Sharing between Graph Data Spaces - and Epistemic Querying of RDF-...
Shapes for Sharing between Graph Data Spaces - and Epistemic Querying of RDF-...
 
Exploring the Best Video Editing App.pdf
Exploring the Best Video Editing App.pdfExploring the Best Video Editing App.pdf
Exploring the Best Video Editing App.pdf
 
Right Money Management App For Your Financial Goals
Right Money Management App For Your Financial GoalsRight Money Management App For Your Financial Goals
Right Money Management App For Your Financial Goals
 
W01_panagenda_Navigating-the-Future-with-The-Hitchhikers-Guide-to-Notes-and-D...
W01_panagenda_Navigating-the-Future-with-The-Hitchhikers-Guide-to-Notes-and-D...W01_panagenda_Navigating-the-Future-with-The-Hitchhikers-Guide-to-Notes-and-D...
W01_panagenda_Navigating-the-Future-with-The-Hitchhikers-Guide-to-Notes-and-D...
 
%in Durban+277-882-255-28 abortion pills for sale in Durban
%in Durban+277-882-255-28 abortion pills for sale in Durban%in Durban+277-882-255-28 abortion pills for sale in Durban
%in Durban+277-882-255-28 abortion pills for sale in Durban
 

Tutorial on how to load images in crystal reports dynamically using visual basic 6 and access 2000

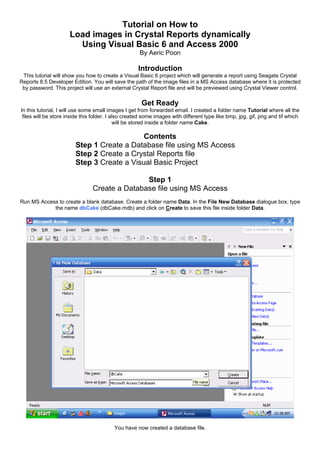
  • 1. Tutorial on How to Load images in Crystal Reports dynamically Using Visual Basic 6 and Access 2000 By Aeric Poon Introduction This tutorial will show you how to create a Visual Basic 6 project which will generate a report using Seagate Crystal Reports 8.5 Developer Edition. You will save the path of the image files in a MS Access database where it is protected by password. This project will use an external Crystal Report file and will be previewed using Crystal Viewer control. Get Ready In this tutorial, I will use some small images I get from forwarded email. I created a folder name Tutorial where all the files will be store inside this folder. I also created some images with different type like bmp, jpg, gif, png and tif which will be stored inside a folder name Cake. Contents Step 1 Create a Database file using MS Access Step 2 Create a Crystal Reports file Step 3 Create a Visual Basic Project Step 1 Create a Database file using MS Access Run MS Access to create a blank database. Create a folder name Data. In the File New Database dialogue box, type the name dbCake (dbCake.mdb) and click on Create to save this file inside folder Data. You have now created a database file.
  • 2. Click on Create table in Design view. Click the Design button to create a new table. Create the following fields in the new table: CakeID (Text), CakeName (Text), FileName (Text) Set focus at CakeID and then click the Primary Key button to make this field as Primary Key.
  • 3. Close the Table window or click Save button. Save this table name as Cake. Right click and Open table Cake.
  • 4. Insert some records in the table Cake. Save and Close the table Cake. Set a Database Password. For this tutorial, I set the password as yuMMy20.
  • 5. Click OK and Close this file. Now you have a database file ready. Step 2 Create a Crystal Reports file Run Crystal Reports 8.5 Developer. Click on As a Blank Report radio button in the Crystal Report Gallery dialogue box and click OK.
  • 6. You will see a Data Explorer dialogue box. Click on the plus sign of More Data Sources. Click on the plus sign of Active Data and then click on Active Data (ADO).
  • 7. You will see a Select Data Source dialogue box. Choose MS Access Database from the dropdown list and click OK. Browse for the Data folder where we store the database file, click dbCake.mdb and then click OK.
  • 8. A Login dialogue will pop out. Enter yuMMy20 for the password and click OK. Then you will be asking to choose the database again. Click on dbCake.mdb and click OK.
  • 9. You will be brought back to Data Explorer and you will notice there is an icon for ado. We have successfully connected the Report with the database. Click on Add button. You will see a Select Recordset dialogue box.
  • 10. Click on SQL radio button so you can change the query if you want to do so. This is useful if you have WHERE keyword in the SQL statement to filter the records. After you have modified your SQL query, click on OK. Now you can see there is a green tick at the ado icon in Data Explorer. Click Close.
  • 11. Now you will see a Field Explorer dialogue box. Click on the plus sign next to Database Fields:. Click on the plus sign next to ado and you will see all the fields generated from the SQL query.
  • 12. Drag and drop or click on the field and press Enter to insert the field to the report. Add more fields to the report in Details section and resize the width as your preference.
  • 13. Click on Insert Picture icon to insert image file. If you couldn t find the tool, click on menu View, Toolbars and check the Supplementary Tools checkbox. Browse for an image to insert. Resize it to fit your report. Format the appearance of the picture object like adding borders.
  • 14. You can modify the report design by adding lines, box, labels for company title and address or put a logo. Click on Preview tab to show how the report will look like. In this stage, the picture is fixed.
  • 15. Click on menu File and uncheck the Save Data with Report option. Save this report with filename Catalogue (Catalogue.rpt) inside folder Report.
  • 16. Step 3 Create a Visual Basic Project You have the database and report file ready. So, the final step is to create the front-end using MS Visual Basic 6. Create a new Standard EXE by clicking Open. Right click the Toolbar and click on Components
  • 17. Scroll down to look for Crystal Report Viewer Control. Check the checkbox next to it. Click on Designers tab. Check on Crystal Reports 8.5 and click OK.
  • 18. Click on menu Project and click References Look for Microsoft ActiveX Data Objects 2.8 Library (Latest version of ADO control). Check the checkbox next to it.
  • 19. Add also the Crystal Reports 8.5 ActiveX Designer Run Time Library and click OK. Right click the Project Explorer, click Add and then click on Crystal Reports 8.5
  • 20. Click on the From an Existing Report radio button and click OK. Browse for the report file we have designed just now and click Open.
  • 21. On the Crystal Report Expert dialogue box, click No radio button for the upper option. You can notice that Details section is named Section5 in bracket. You can change the name of the section if you like.
  • 22. To hide the FileName field, right click the FileName field and click on Format . On the Common tab, check the checkbox next to Suppress.
  • 23. Hide the Report Header and Report Footer by right click the section separator and click on Suppress (No Drill-Down). If you have made changes in the database table, right click the ado and click verify database.
  • 24. You will be asked for the database password. Key in the password and click OK. A Select Recordset dialogue box will appear. Click OK if the SQL is correct.
  • 25. A message will pop up to inform you that the ado has changed. Click OK. I have added a new field Price in the database table. Click OK to continue.
  • 26. Now, click at the plus sign of ado and you can see the new field is added. Drag and drop the new field and set HorAlignment to crLeftAlign.
  • 27. Rename Picture1 as picCake and Field5 for FileName as adoFileName. Right click inside any section, click on Report and click Save to Crystal reports File .
  • 28. Browse for the report file and click Yes to replace it. Make a backup if you wish to do so. Click OK to proceed.
  • 29. Remove the report designer if you want as we are going to use the external report file. Right click on the Project Explorer and click on Module.
  • 30. Click Open to add the new Module. Insert the following code and save the module as modCake. Option Explicit Public cn As ADODB.Connection Public crx As New CRAXDRT.Application Public Function OpenDatabase() As Boolean On Error GoTo checkErr Set cn = New ADODB.Connection cn.Provider = "Microsoft.Jet.OLEDB.4.0" cn.ConnectionString = "Data Source=" & App.Path & "DatadbCake.mdb" cn.Properties("Jet OLEDB:Database Password") = "yuMMy20" cn.Open OpenDatabase = True Exit Function checkErr: MsgBox Err.Description, vbExclamation, Err.Number End Function The code above is for connecting to the Access 2000 database with password protected using ADO. It is recommended to encrypt the password for higher security. The Crystal Report Application is also set in this module as a Public variable.
  • 31. Click on Form1. Add a button name cmdPrint on Form1. Change the button caption to Print Catalogue. Change Form1 BorderStyle as Fixed Single and caption or icon if you like.
  • 32. Click View Code and insert the following code in Form1 and save it as frmPrint. Option Explicit Private Sub cmdPrint_Click() frmReport.WindowState = 2 frmReport.Show Unload Me End Sub Private Sub Form_Load() If OpenDatabase = False Then Unload Me Exit Sub End If End Sub The above code will connect to the database when the Form loads. If the database failed to load, check the database path, filename and password. If the application failed to start, it will quit. The print button will open a report form which we are going to create later. The report form will be open as a Maximized window. Now add a new form. Click CRViewer to add a Crystal Report Viewer object on this form. Add the following code and save the form as frmReport. Option Explicit Dim rpt As CRAXDRT.Report Dim db As CRAXDRT.Database Dim rs As New ADODB.Recordset Dim WithEvents sect As CRAXDRT.Section
  • 33. Private Sub Form_Load() Screen.MousePointer = vbHourglass Set rpt = crx.OpenReport(App.Path & "ReportCatalogue.rpt") Set db = rpt.Database Set sect = rpt.Sections("Section5") rs.Open "SELECT * FROM Cake", cn, 1, 1 rpt.Database.SetDataSource rs, 3, 1 CRViewer1.ReportSource = rpt CRViewer1.ViewReport CRViewer1.Zoom 1 Screen.MousePointer = vbDefault End Sub Private Sub Form_Resize() CRViewer1.Top = 0 CRViewer1.Left = 0 CRViewer1.Height = ScaleHeight CRViewer1.Width = ScaleWidth End Sub Private Sub Form_Unload(Cancel As Integer) cn.Close End Sub Private Sub sect_Format(ByVal pFormattingInfo As Object) Dim bmp As StdPicture On Error Resume Next With sect.ReportObjects Set .Item("picCake").FormattedPicture = LoadPicture(App.Path & "Cakeck99.gif") 'default If .Item("adoFileName").Value <> "" Then Set bmp = LoadPicture(App.Path & "Cake" & .Item("adoFileName").Value) Set .Item("picCake").FormattedPicture = bmp End If End With End Sub
  • 34. Now we have finished all the coding. Click on Start button to execute the project. Click on the Print Catalogue button.
  • 35. The report preview will show up. Click the printer button if you want to print the report. This is how the trick works. Happy Coding. Please send me an email at aeric80 [at] gmail [dot] com if you found any mistakes in this document or you want to suggest any improvement.