Whiteoaks Guide For LinkedIn Profiles
•
1 j'aime•429 vues

internal guide on LinkedIn personal profile best practice

Recommandé
Contenu connexe
Tendances
Tendances (20)
En vedette
Similaire à Whiteoaks Guide For LinkedIn Profiles
Similaire à Whiteoaks Guide For LinkedIn Profiles (20)
Whiteoaks Guide For LinkedIn Profiles
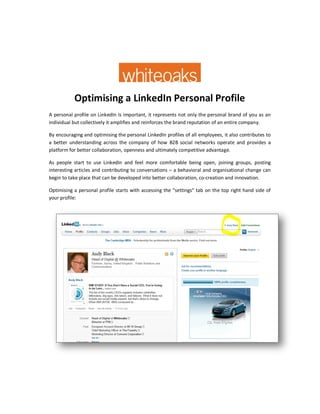
- 1. Optimising a LinkedIn Personal Profile A personal profile on LinkedIn is important, it represents not only the personal brand of you as an individual but collectively it amplifies and reinforces the brand reputation of an entire company. By encouraging and optimising the personal LinkedIn profiles of all employees, it also contributes to a better understanding across the company of how B2B social networks operate and provides a platform for better collaboration, openness and ultimately competitive advantage. As people start to use LinkedIn and feel more comfortable being open, joining groups, posting interesting articles and contributing to conversations – a behavioral and organisational change can begin to take place that can be developed into better collaboration, co-creation and innovation. Optimising a personal profile starts with accessing the “settings” tab on the top right hand side of your profile:
- 2. The “settings” tab is found by clicking on your name, in this example by clicking on the tab for “Andy Black” – this then produces a drop down menu with “settings” and “sign out”, at this point click on “settings”. This then launches another logon screen; please add your normal LinkedIn user name and password. Once you have logged on with your normal LinkedIn user name and password, the “settings” panel is launched. Here you will notice 4 categories – 1 Profile 2 Email Preference 3 Groups/Companies/Applications and 4 Account - these will enable you to configure and optimise your LinkedIn personal profile.
- 3. The first thing to do on the PRIVACY CONTROLS is click on “Turn on/off your activity broadcasts” and UNTICK your activity broadcasts, otherwise all the changes you do will be broadcast to all your connections as you do them – it’s much better to UNTICK and SAVE CHANGES in the activity broadcasts before you do any profile editing but making sure you TICK ON and SAVE CHANGES after you finish editing. Once you have UNTICKED and SAVED CHANGES on the Activity Broadcasts menu, click on “Select who can see your activity feed”
- 4. In the “Who can see your activity feed” click on the drop down menu and select YOUR NETWORK and then click SAVE CHANGES Then click on each of the other PROFILE configurations and select and save as follows: “Select what others see when you view their profile” – click on YOU WILL BE TOTALLY ANONYMOUS and then click SAVE CHANGES “Who can see your connections” – click on YOUR CONNECTIONS and then click SAVE CHANGES “Change your profile photo and visibility” - It is important to have a recent profile picture (a picture taken within the last two years). The picture is the first impression that someone is going to have of you and the only image that represents who you are. Having the same picture on multiple social media channels like Twitter, LinkedIn and Google+ will help build your personal brand and also create brand consistency for your company - UPLOAD A PHOTO (File size limit is 4 MB) and then click on MAKE VISIBLE TO EVERYONE and then click SAVE CHANGES “Show/hide Viewers of this profile also viewed" – showing views of other peoples profiles could drive traffic away from your profile, so UNTICK and SAVE CHANGES Then click on “Manage your Twitter settings” Add your own personal Twitter account, in this example “AndyBlacz”, your company Twitter account, in this example “WhiteoaksPR” and click on EVERYONE Go to “Which Twitter account would you like to share from” and select your company Twitter account, in this example “WhiteoaksPR” Go to “share only Tweets that contain #Li in your LinkedIn status” and TICK the box
- 5. Go to “Tweet Display” and TICK the box, this will allow rich links with pictures to be displayed where possible After this, SAVE CHANGES Next we go to HELPFUL LINKS, where the first thing we CLICK on is “Edit your name, your location and industry” Once you CLICK on “Edit your name, location and industry” the following screen opens:
- 6. On your DISPLAY NAME, TICK on selecting your full name and not an abbreviation For the PROFESSIONAL HEADLINE some people fill it with all the different titles that someone is likely to use to search for someone on LinkedIn. For example, Social Media Marketing Consultant | Social Media Trainer| SMO | Blog Marketing | Internet Marketing Specialist, as in the following example. In my opinion this is overkill as these descriptors can be included in your “SKILLS” section that we will come to later, and the “SKILLS” section has a better search facility. Visually it is better to have fewer words, give your specific job and also include a link to your company, as in the following example: The use of an ampersand (@) also gives the profile a modern look and feel. In the Location and Industry sections make sure to add your Country, Postcode and Location information some of this data appears in other parts of your profile, so it is important to make sure it is correct. A really important Data Field to complete is Industry – your industry sector can be selected from a drop down menu and these industries are searchable by LinkedIn members.
- 7. Under the Location and Industry settings is a section called Badges This section allows you to display Premium Account, OpenLink and Job Seeker logos on the front page of your main profile. I recommend that you investigate becoming a paying Premium Account user as it offers many business benefits. Remember to Save Changes and then Go Back to Settings The next section to complete is Edit Your Profile
- 8. When you click on Edit your Profile the following menu opens: Click on each individual section that has an Edit function and Update and Save as required The Current section is particularly important
- 9. In the Current settings make sure your Company name is correct – it is preferable to select a short form name – ie Whiteoaks and NOT The Whiteoaks Consultancy Ltd as this looks more modern and is visually more appealing - then select your full company profile from the drop down menu in the Change Company link – this process also creates the hyperlink from your profile to the company website, so is particularly important. Add the Time Period data as this is shared across all your profile. Add a Company Description – try and evolve a standardised company descriptor and involve your marketing/PR team in this process or cut and paste your company descriptor from your current marketing material. Remember to click Update when you have finished Then go back to Edit Your Profile and click on the Edit link by Recommendations
- 10. Then Click on the Ask to be Endorsed links, these allows you to request and manage recommendations from former clients, partners and co-workers. It is considered best practice to focus on recommendations from former and not current clients and partners. Many people consider recommendations from former co-workers to have little value, so it might be best to focus on clients and partners. When requesting a recommendation, some people send a rough draft of a proposed recommendation to speed things up and help the recommender edit the wording. Ideally and depending on your experience, 3 to 8 recommendations are ideal and can help provide a fuller picture of your expertise and experience. Without three recommendations you will not have a 100% complete profile according to LinkedIn. Having a 100% complete profile is important because you will be more likely to show up in search if your profile is complete. After you have requested your recommendations, go back to Edit your Profile and click on the Edit link by the section called Websites.
- 11. When you click on the Edit link by the section called Websites, the following VERY IMPORTANT menu is created. Click on the drop down menu tabs on Websites and select Other, this opens up a new data tab on the right where you can add specific descriptors for your company websites, blogs and company Facebook and also add hyperlinks – this information goes on the front of your profile and will drive traffic to these sites. It also looks very professional and polished to have “Whiteoaks website” “Whiteoaks Blog” and “Whiteoaks Facebook” as descriptors. Then add your interests, group memberships and associations – if you do fund raising for charity or other good work please add details. Adding your interests is useful as they give a more rounded picture of you and are often used as ice-breakers on first meetings. When finished, remember to Save Changes Then go back to Edit your Profile
- 12. If you have been following this guide step by step, the optimisation of your Twitter presence was covered in a previous section – please look back and refer to that if you still need to do it. Now click on the Edit link that appears at the end of line called Public Profile. In your Public Profile click on Make my Public Profile Visible to Everyone
- 13. Scroll down to Your Public Profile URL and click on Customise Your Public Profile URL this will allow you to enhance your personal brand by creating a custom URL for your LinkedIn public profile – it also allows you to simply cut and paste your personal profile url to use in a variety of ways. Scroll down to Profile Badges and click on Create a Profile Button This allows you to embed your LinkedIn profile in your blog, website, online proposal etc When finished, click on Back to Edit My Public Profile on the top right of the screen and return to Edit My Public Profile
- 14. The last link on your Profile section is Manage Your Recommendations – this has already been covered in this guide. So click now on the tab Email Preferences. This section will allow you to set up all your LinkedIn email and turn on/off LinkedIn Communications. Firstly click on Select the Messages You’re Willing to Accept link, then select the messages you are willing to accept and also add your preferred contact email and telephone number –
- 15. remember to Save Changes when it is completed. This information appears on the front page of your profile so is important to include Then click on the links Set the frequency of emails and Select who can send you invitations and select your preferred options – remember to Save Changes The most important link in this group is Set the frequency of group digest emails – if you are an active member of a number of LinkedIn groups you may want to monitor and engage with different groups with varying degrees of interaction – if you click on Set the frequency of group digest emails you can configure these settings. Remember to Save Changes
- 16. Then go back to Edit My Personal Settings and click on the tab Groups, Companies and Associations When you click on the tab Groups, Companies and Applications, the following page is launched In the section Groups click on each of the links like Select your group display order and View your groups and configure them as you like – it’s good to include them on your profile and
- 17. perhaps move the most important ones to the top of the listing so they show on your personal profile – logos are good visuals and can also enhance the look and thought-leadership elements of your profile. Remember to Save Changes Then return to your Edit your Profile page, click on Group, Companies and Applications and now go to the Privacy section and click yes on Turn on data sharing with 3rd party applications and remember to Save Changes Then return to your Edit your Profile page, click on Group, Companies and Applications and now go to the Applications section
- 18. This is a VERY IMPORTANT part of your profile, click on Slideshare and add it as an application Install the Slideshare application and remember to TICK YES on the Display on my Profile and Display on LinkedIn Homepage. SlideShare enables you to share presentations and documents with your LinkedIn network, post thought-leading presentations into the stream of your connections, upload portfolios, resume, conference talks, PDFs, marketing/sales presentations etc and display them on your LinkedIn profile - all formats supported: ppt, pps, pptx, odp, pdf, doc, docx, odt, Keynote, iWork pages
- 19. You can also embed YouTube videos in presentations; add audio to make a webinar If you have a SlideShare account, you can import your existing presentations into LinkedIn. If you don’t have one, sign up from LinkedIn to share your presentations worldwide and get more views/traffic. SlideShare is present on both Linkedin and Facebook. Sync both these accounts with SlideShare and you have a holy triad. Upload to any one — SlideShare, Facebook or LinkedIn and it will show up instantly on all three. Don’t add any other apps apart from Slideshare – the reason for this is that in Profile Edit mode you can drag and drop apps into any position on your profile – a good company presentation like a Powerpoint, video or pdf can therefore be positioned at the top part of your profile. Remember to Save Settings Then go back to Edit Your Profile and click on the tab Account The only two areas here we are interested in are: Customise the updates you see on your home page and Manage security settings Click on the link Customise the updates you see on your home page
- 20. Click on each box to receive all the updates on your homepage, and use the drop down menu to set them at 25. Remember to Save changes Then go back to Edit your Profile, click on the Account tab and click on the link Manage security Settings
- 21. Do NOT click on using https to browse LinkedIn, https prevents applications like Slideshare working on LinkedIn. Remember to Save Settings Your profile is nearly complete and now we can add some visual enhancements to make your personal profile stand out
- 22. Recent eye tracking studies conducted by independent researchers indicate that the LinkedIn personal profiles that get the best engagement feature a good personal photograph and additional image based content – the example above shows a normal type profile – the eye tracking study showed readers move from personal photo, the image on a news link that has been posted, current job and then recommendations. To make your personal profile stand out, add the following touches Go to Edit Profile and click on Edit your profile In edit mode and by putting your mouse cursor on the title bar for Skills and Expertise and also Applications you can drag and drop them towards the top of your profile – this makes a visually rich
- 23. profile that will hold attention – if you then regularly add interesting presentations in your Slideshare, post interesting articles (that also appear in the newsfeeds of your connections) and add your skills as a tag cloud – this will imply thought leadership and engagement – if your whole company adopts this approach with their personal profiles, your company brand will be amplified across the industry.