Database Tutorial in .NET
•Download as DOCX, PDF•
0 likes•974 views

I simple "get-you-started" tutorial on creating a .NET database using Visual Studio

Recommended
More Related Content
What's hot
What's hot (18)
Viewers also liked
Similar to Database Tutorial in .NET
Similar to Database Tutorial in .NET (20)
Recently uploaded
Recently uploaded (20)
Database Tutorial in .NET
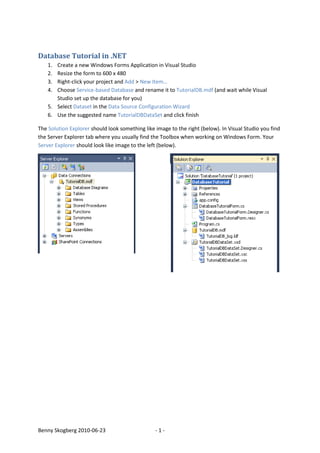
- 1. Database Tutorial in .NET<br />Create a new Windows Forms Application in Visual Studio<br />Resize the form to 600 x 480<br />Right-click your project and Add > New Item…<br />Choose Service-based Database and rename it to TutorialDB.mdf (and wait while Visual Studio set up the database for you)<br />Select Dataset in the Data Source Configuration Wizard<br />Use the suggested name TutorialDBDataSet and click finish<br />3119755675640-4445681990The Solution Explorer should look something like image to the right (below). In Visual Studio you find the Server Explorer tab where you usually find the Toolbox when working on Windows Form. Your Server Explorer should look like image to the left (below).<br />In the Server Explorer, right-click Tables > Add New Table<br />Create Column Name, Data Type and Allow Nulls according to image (below). The Primary Key is set using the Table Designer toolbar<br />When you set the Primary Key to the column ContactID, you specify that this field is required when writing new posts to the database.<br />The data type int, you already know, but if you are unfamiliar with databases, varchar(50) is equivalent to String in .NET limited to 50 character. Data Type bit is equivalent to Boolean using False and True. The datetime data type explains itself as we continue this tutorial.<br />Click the Save-button, type People as the name of the table<br />Expand the Tables folder and right-click the People table. If you select Show Table Data, you get a new window in your workspace. Add a few contacts here, which you later on will see in your Windows Form. The Last Call column should be entered as English date format (mm/dd/yyyy)<br />When you have entered your contacts, close the Table Data file and the People Table file.<br />Select Data menu item and Show Data Sources to view your Data Sources.<br />From the Data Sources view, drag’n’drop the People table to your Windows Form. <br />Select the down-arrow directly following the People table, and select Details. Drag’n’drop the People table once again to your Windows Form, and your solution should look like the following image.<br />Refresh the database, in the Data Sources view.<br />Compile and run your application, and start working with your first database application.<br />