1. Microsoft WORD 2007
Contents:
1. Screen layout
2. Creating a new document
3. Opening an existing document
4. Saving a document
5. Closing a document
6. Home Tab
a. Clipboard
b. Formatting Font
c. Formatting Paragraph
d. Find and replace
7. Insert Tab
a. Table
b. Picture
c. Hyperlink
d. Page Numbers
8. Review Tab
a. Track changes
9. Word keyboard shortcuts
Technology for Teaching English Lab
Eng. Tahani Z. Fourah 1
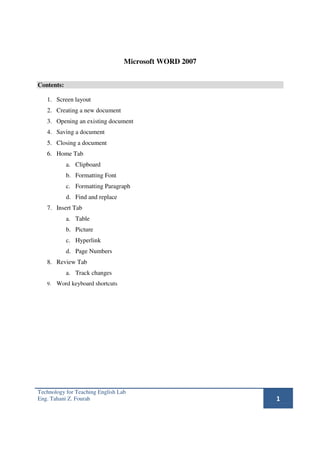
2. 1. Screen Layout
Figure (1)
1. Microsoft Office button
2. Quick Access Toolbar: is a customizable toolbar containing commands used frequently.
By default, Quick Access Toolbar contains save, undo, redo commands.
To add more commands to quick access toolbar:
• Click small arrow beside Quick Access Toolbar as in Figure(2).
• Check the command you want to appear in the toolbar.
Figure (2)
Technology for Teaching English Lab
Eng. Tahani Z. Fourah 2
3. 3. Tabs : There are 7 tabs and each tab contains the following tools:
Home: Clipboard, Fonts, Paragraph, Styles, and Editing.
Insert: Pages, Tables, Illustrations, Links, Header & Footer, Text, and Symbols
Page Layout: Themes, Page Setup, Page Background, Paragraph, Arrange
References: Table of Contents, Footnote, Citation & Bibliography, Captions, Index, and
Table of Authorities
Mailings: Create, Start Mail Merge, Write & Insert Fields, Preview Results, Finish
Review: Proofing, Comments, Tracking, Changes, Compare, Protect
View: Document Views, Show/Hide, Zoom, Window, Macros
We are going to discuss the most important features in Home, Insert and Review Tabs Later.
4. View choices: include
1. View layout of the document
a. Print layout
b.Full screen reading
c. Web layout
d.Outline
e. Draft
2. Zoom
+ for zoom in
- for zoom out
Figure (3)
Technology for Teaching English Lab
Eng. Tahani Z. Fourah 3
4. 2. Creating a New Document
There are several ways to create new documents, open existing documents, and save
documents in Word:
• Click the Microsoft Office Button then Click New
Figure (4)
• Double Click on blank document
Figure (5)
OR by using keyboard shortcuts:
o Press CTRL+N (Depress the CTRL key while pressing the “N”) on the keyboard.
Technology for Teaching English Lab
Eng. Tahani Z. Fourah 4
5. 3. Opening an Existing Document
• Click the Microsoft Office Button and Click Open
Select the file you want to open (with .docx or .doc extension) using the browser window as
shown below.
Figure (6)
OR by using keyboard shortcuts:
o Press CTRL+O (Depress the CTRL key while pressing the “O”) on the
keyboard.
4. Saving a Document
• Click the Microsoft Office Button and Click Save or Save as
• Type the document name
• Select the document type (.docx, .doc, .dot,…..).
Technology for Teaching English Lab
Eng. Tahani Z. Fourah 5
6. Figure (7)
OR by using keyboard shortcuts:
o Press CTRL+S (Depress the CTRL key while pressing the “S”) on the keyboard.
OR by using the Quick Access Toolbar
o Click the File icon.
Figure (8)
You may need to use the Save As feature when you need to save a document under a
different name or to save it for earlier versions of Word.
To use the Save As feature:
• Click the Microsoft Office Button
• Click Save As
• Choose the format of the document (Word Doc, Word Template, word 97-2003..)
• Type in the name for the document
Technology for Teaching English Lab
Eng. Tahani Z. Fourah 6
7. Figure (9)
5. Close a Document
To close a document:
• Click the Office Button
• Click Close
Figure (10)
Technology for Teaching English Lab
Eng. Tahani Z. Fourah 7
8. 6. Home Tab
In Home tab, 4 main features used in formatting text will be demonstrated:
1. Clipboard
2. Formatting Font
3. Formatting Paragraph
4. Find and replace
Figure (11)
1. Clipboard: before applying any feature you have to shade the text, and then you can click
to copy
to cut
to copy formatting from one place and apply it to another
to paste
2. Font: before applying any feature you have to shade the text, and then you can click
To change the font type
To change the font size
To change the font size; to maximize and to minimize
To make the font bold
Technology for Teaching English Lab
Eng. Tahani Z. Fourah 8
9. To make the font italic
To underline the font
To highlight the font
To change the font color
3. Paragraph
to start a bulleted list; Click the arrow to choose different bullet
styles
to start a numbering list; Click the arrow to choose different
numbering format
to decrease the indent level of the paragraph
to increase the indent level of the paragraph
to set the text direction from Left-to-Right
to set the text direction from Right-to-Left
to align the text to the left margin
to align the text to the center margin
to align the text to the right margin
to justify the text ( align the text to both left and right margins)
to change the spacing between lines of the text
to color the background behind the selected text or paragraph
4. Find and replace
To find a particular word or phrase in a document:
• Click Find
• To find and replace a word or phrase in the document, click Replace.
Technology for Teaching English Lab
Eng. Tahani Z. Fourah 9
10. Figure (12)
7. Insert Tab
In Insert tab, we are going to explain 4 main objects to insert:
a. Table
b. Picture
c. Hyperlink
d. Page Numbers
Figure (13)
1. Table:
a. Insert Table
There are many ways to insert a table:
The first way:
• Click on Table in Insert Tab
• Specify number of rows and columns of your table from (10 columns*8
rows matrix)
Figure (14)
Technology for Teaching English Lab
Eng. Tahani Z. Fourah 10
11. The second way: If the number of rows or columns of your table is larger than the
given matrix, then you have to
• click on Insert Table in Insert tab
Figure (15)
• Specify number of rows and columns of your table
Figure (16)
The third way: to draw the table manually by clicking on Draw Table in Insert tab.
Technology for Teaching English Lab
Eng. Tahani Z. Fourah 11
12. Figure (17)
b. Cell alignment
• Select the table by the clicking on in the top corner of the table.
Figure (18)
• Click on Table Tools in the top of menu tab. Table Tools contain all
table properties.
Figure (19)
• Click on Layout below Table Tools
• Select the cell(s) you want to align text in
• Choose the desired alignment as shown in the red rectangle.
Figure (20)
Technology for Teaching English Lab
Eng. Tahani Z. Fourah 12
13. c. Insert new columns
• From Table Tools --> Layout
• Click on insert right to add a new column directly to the right of the
selected column.
• Click on insert left to add a new column directly to the left of the
selected column.
Figure (21)
d. insert new rows
• From Table Tools --> Layout
• Click on insert below to add a new row directly below the selected row.
• Click on insert above to add a new row directly above the selected row.
Figure (22)
e. delete columns, rows, cells, entire table
• From Table Tools --> Layout
• Select columns, rows, cells, entire table you want to delete
• Click on Delete as shown in the figure below.
Figure (23)
f. Merge cells
• From Table Tools --> Layout
• Shade the cells you want to merge them into one cell.
Technology for Teaching English Lab
Eng. Tahani Z. Fourah 13
14. • Click on Merge Cells
Figure (24)
g. Shading
• From Table Tools --> Design
• Select the cells you want to shade them
• Click on shading and choose a suitable color for shading.
Figure (25)
h. Borders ( hidden table): to make a table hidden, i.e., without borders
• From Table Tools --> Design
• Select the table
• Click on Borders.
• Select No Borders form the list
Figure (26)
Technology for Teaching English Lab
Eng. Tahani Z. Fourah 14
15. 2. Picture:
• Click the Insert tab
• Click Picture button
Figure (27)
• Select a picture from your computer
Figure (28)
• Click insert
3. Hyperlink
To create a hyperlink:
• Select the text that will be the link
• Click the Insert Tab
• Click the Hyperlink Button
Figure (29)
• Type in the web address, or URL of the link
Technology for Teaching English Lab
Eng. Tahani Z. Fourah 15
16. Figure (30)
• Click OK
4. Page Numbers
To insert page numbers:
• Click Insert Tab
• Click Page Numbers
• Choose the place where you want to insert page numbers as in figure(31)
Figure (31)
8. Review Tab
a. Track changes
Technology for Teaching English Lab
Eng. Tahani Z. Fourah 16
17. Track Changes is a great feature of Word that allows you to see what changes have been
made to a document.
Figure (32)
To start Track Changes
• Click Review Tab
• Click Track Changes
• Make the changes to your document and you will see any changes you have made.
Figure (33)
Technology for Teaching English Lab
Eng. Tahani Z. Fourah 17
18. 9. Word Keyboard shortcuts
Technology for Teaching English Lab
Eng. Tahani Z. Fourah 18
19. Lab Task (1)
Use the following text to practice using some of the Word keyboard shortcuts.
1. Open new file, Copy the text and past it onto the new file.
2. Title: bold and in center
3. Italicize the terms in blue colour.
4. How many times is the word Twitter mentioned in the text? Highlight them all yellow.
5. Font size: 12 and font type: Times New Roman
6. Double space the 1st two paragraphs, single space the 3rd and 4th , and space the last 5th
and 6th 1.5.
7. Justify the right side margin.
8. Hyperlink the title using the web address at the bottom of the text.
9. Save the file and give it your name.
Technology for Teaching English Lab
Eng. Tahani Z. Fourah 19
20. Lab Task(2)
1. Tabulate the following exercise in a table.
2. Add this phrase in the top column Odd one out.
3. Hide the table borders
1. wind - flood - floor - sandstorm
2. Amman - Nablus - Ramallah - Jerusalem
3. Boat - ship - train - canoe
4. Kettles - apples - bananas – orange
Lab Task (3)
Below is a paragraph written by a secondary school student. It has several mistakes. Correct the
mistakes using Track Changes feature.
I live in gaza which is located in the south of palestine. I has 4 brothers and 4 sisters. My father
is a engineer. He studied in the islamic university of gaza. He works in the ministry of
information. The capital of Palestine is jerusalem which has al-aqsa mosque.
Technology for Teaching English Lab
Eng. Tahani Z. Fourah 20