EVANNEX - Kangaroo Pocket Installation for Tesla Model S
•
1 like•43,059 views

EVANNEX - Kangaroo Pocket Installation for Tesla Model S

Recommended
Recommended
More Related Content
What's hot
What's hot (10)
Similar to EVANNEX - Kangaroo Pocket Installation for Tesla Model S
Similar to EVANNEX - Kangaroo Pocket Installation for Tesla Model S (6)
More from EVANNEX Aftermarket Tesla Accessories
More from EVANNEX Aftermarket Tesla Accessories (17)
Recently uploaded
Recently uploaded (20)
EVANNEX - Kangaroo Pocket Installation for Tesla Model S
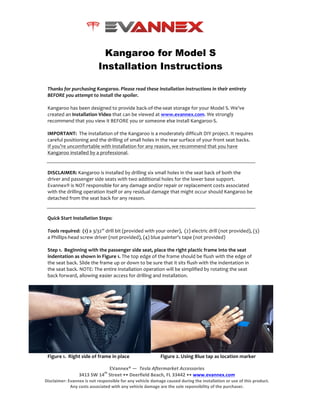
- 1. EVannex® — Tesla Aftermarket Accessories 3413 SW 14 th Street •• Deerfield Beach, FL 33442 •• www.evannex.com Disclaimer: Evannex is not responsible for any vehicle damage caused during the installation or use of this product. Any costs associated with any vehicle damage are the sole reponsibility of the purchaser. Kangaroo for Model S Installation Instructions Thanks for purchasing Kangaroo. Please read these installation instructions in their entirety BEFORE you attempt to install the spoiler. Kangaroo has been designed to provide back-of-the-seat storage for your Model S. We’ve created an Installation Video that can be viewed at www.evannex.com. We strongly recommend that you view it BEFORE you or someone else install Kangaroo-S. IMPORTANT: The installation of the Kangaroo is a moderately difficult DIY project. It requires careful positioning and the drilling of small holes in the rear surface of your front seat backs. If you’re uncomfortable with installation for any reason, we recommend that you have Kangaroo installed by a professional. DISCLAIMER: Kangaroo is installed by drilling six small holes in the seat back of both the driver and passenger side seats with two additional holes for the lower base support. Evannex® is NOT responsible for any damage and/or repair or replacement costs associated with the drilling operation itself or any residual damage that might occur should Kangaroo be detached from the seat back for any reason. Quick Start Installation Steps: Tools required: (1) a 3/32” drill bit (provided with your order), (2) electric drill (not provided), (3) a Phillips-head screw driver (not provided), (4) blue painter’s tape (not provided) Step 1. Beginning with the passenger side seat, place the right plactic frame into the seat indentation as shown in Figure 1. The top edge of the frame should be flush with the edge of the seat back. Slide the frame up or down to be sure that it sits flush with the indentation in the seat back. NOTE: The entire installation operation will be simplified by rotating the seat back forward, allowing easier access for drilling and installation. Figure 1. Right side of frame in place Figure 2. Using Blue tap as location marker