
Recommandé
Contenu connexe
Tendances
Tendances (20)
En vedette
Similaire à Editing process
Similaire à Editing process (20)
Plus de Emzzino
Plus de Emzzino (14)
Dernier
Dernier (20)
Editing process
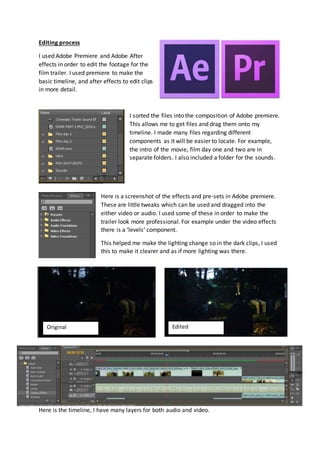
- 1. Editing process I used Adobe Premiere and Adobe After effects in order to edit the footage for the film trailer. I used premiere to make the basic timeline, and after effects to edit clips in more detail. I sorted the files into the composition of Adobe premiere. This allows me to get files and drag them onto my timeline. I made many files regarding different components as it will be easier to locate. For example, the intro of the movie, film day one and two are in separate folders. I also included a folder for the sounds. Here is a screenshot of the effects and pre-sets in Adobe premiere. These are little tweaks which can be used and dragged into the either video or audio. I used some of these in order to make the trailer look more professional. For example under the video effects there is a ‘levels’ component. This helped me make the lighting change so in the dark clips, I used this to make it clearer and as if more lighting was there. Original Edited Here is the timeline, I have many layers for both audio and video.
- 2. When clicking a layer, there is a screen which shows the effect controls, meteda and the source (video). As you can see the file MV1_2092 is currently under the effects control. This allows me to adjust the video in many ways. The opacity, size, colour, blueness and much more. When clicking on audio files, a similar window pops up. This window contains the effects control for the sound files. I can control how to fade the sounds, or make the volume decrease. I can overlap sounds or even change the frequency levels. I made sure to learn how to use the effects control as I will need to overlap some sounds over others. For instance when vocals need to be heard over the soundtrack, I will decrease the soundtrack. I used Adobe after effects in order to create the POV type of effect
- 3. I first imported the files just like I would with Adobe premiere, however this time I downloaded a film recording template which looks like this. I inserted this template to the video clips I wanted to make look as if they were recorded off a handheld camera. To make it even more realistic, I also added a red circle on the video which flashes during the clip making it seem as if it is live. In the effects and pre-sets, I added a night vision effect and managed the opacity to zero. This made the quality of the shot look less and emphasizes the hand held camera look. I also added a sound of a television glitch and inserted a data glitch video. This is simply when the channel is changed a fuzzy noise and look is played. I inserted these into a range of my clips to even make the hand held shots seem more realistic.