SlideShare une entreprise Scribd logo
1  sur  84
Télécharger pour lire hors ligne
Home Built Hydraulic Ram Pumps
Two Useful Designs show you how to pump
water for free.
HydRam Pump
Complete detailed
and illustrated
instructions from
locally available
plumbing parts.
1” Hydraulic RAM
Shown.
N W I N D E P E N D E N T P O W E R R E S O U R C E S
HomeBuiltHydraulicRamPumps
© NW Independent Power Resources 2003
P.O. Box 899 •
North Bend, WA. 98045
Phone 425-888-3580 • Fax 425-831-1892
John Calhoun
john.calhoun@nwipr.com
Table of Contents
Brief History of the Hydraulic Ram Pump… page 3
How does a Ram Pump work anyway?.. page 5
Getting Started on the HRP1-1 & 1-2.. page 14
Initial Assembly of the HRP1-1 & 1-2.. page 23
Initial Assembly Air Pressure Tank.. page 27
Building the Waste / Impetus Valve HRP1-1.. page 31
A firm foundation / concrete base.. page 34
Final Assembly HRP1-1 & 1-2.. page 38
Starting on the HRP2-2.. page 43
Building the Waste / Impetus Valve HRP2-2.. page 46
Initial assembly of the HRP2-2.. page 52
Air Pressure Tank of the HRP2-2.. page 55
HRP2-2 Check Valve with Snifter Port.. page 58
HRP2-2 Final Assembly.. page 62
Gauges and Valves.. page 65
Site Survey and setup.. page 67
Startup and troubleshooting.. page 74
Safety Considerations.. page 76
Authors Test Setup.. page 79
Parting Shot.. page 83
2
Chapter 1:
A Brief History of the Hydraulic Ram Pump.
The Hydraulic Ram uses the energy in flowing water to lift a fraction
of that water to a much greater height.
he Hydraulic Ram Pump has been around for quite some time now, the first device in the
modern era is reported to have been devised by an Englishman John Whitehurst in 1775.
His design was not automatic and was controlled by opening and closing a stopcock.
Easier than carrying water by hand but sure sounds like it was still a lot of work and very
time consuming. The first reported fully automatic hydraulic ram was developed by Joseph and
Etienne Montgolfier (of hot air balloon fame) in the late 1700’s (1793-1797). The original design
performed well on first start-up but suffered from a design flaw which caused a loss or
“dissolving” of air in its pressure chamber. This in turn caused an intensive banging in the entire
mechanism. It was his son Pierce Montgolfier that solved the problem by developing and
designing-in the air or “snifter” valve to reintroduce air into the chamber. (Most home built designs
try to either simplify or work around the complexity of a snifter valve). Skip forward to the present
and not very much has changed design wise in the last couple of hundred years. The UK based
company Green & Carter now holds the original patents of both John Whitehurst and Joseph
Montgolfier and are in business today manufacturing and installing their Vulcan Ram’s the world
over. Visit them on the web at: http://www.greenandcarter.com/
T
In the original Montgolfier design (diagram shown below), a water supply or delivery pipe
feeds into a larger bored pipe that is turned up at the end and also necked down creating both a
pinch point and a venturi effect causing the water to increase in speed and pressure at the exit.
The iron ball, which was most probably a cannon ball that happened to be handy would fit easily
into the larger bored pipe but was larger enough that it could not escape out the venturi at the
end of the pipe. The force of the water flowing into the larger bore pipe would push the “cannon”
ball down the bore and into the venturi suddenly stopping the flow of water. This sudden
blockage of the delivery pipe would cause a dramatic increase in the water pressure behind the
ball commonly referred to as “water hammer:” which in turn forced a small amount of water
through a one-way valve and into the air chamber and delivery pipe. The pressure would then
dissipate and release the iron ball, it would roll back into the larger bore area and the cycle would
begin all over again. In operation the water would have been delivered in short pulses under high
pressure into the air chamber which would act as a buffer, smoothing out the supply of water
heading into the delivery pipe and on its way to the intended destination. The addition later of the
snifter valve allowed a small amount of air to enter into the air chamber keeping the system
operational for much longer periods of time between normal inspections and servicing. Some of
these designs ended up being quite large with drive pipes exceeding 8 inches in diameter. That
must have been quite a site to see them operate. (If anyone has any pictures or comments
please find my contact information on the last page of this manual, I would like to include it in the
future).
3
Modern hydraulic rams all work on the same principle although the “cannon” ball inside a
necked down iron pipe idea has been replaced with modern steel, brass, bronze, PVC and
stainless fittings that can easily be obtained from your local hardware store. (More details on this
later). For well over 100 years from the 1800’s through the early 1900’s rams were very popular
in the United States until the general availability of publicly managed water mains and electric
pumps became the mainstay of American life. Original ram pumps can still be occasionally found
in antique stores the back of barns and other odd places mainly in the Eastern States where they
were originally used in greater numbers. They are a subject of search for enthusiasts to collect
and restore as well as put back into use today. Rams can be used to supply all the water you
would ever need to a summer cottage, mountain cabin or modern homestead. Some of these
systems are reported to have been in continual use supplying water for home and livestock with
very low maintenance for the past 100 years or more.
Antique Rams
4
Chapter 2:
How does a Ram Pump work anyway?
TheHydraulicRamoperatesusingbasicprinciplesofphysics;thekinetic
energyavailableinflowingwaterliftsafractionofthatwatertoamuchgreater
height.
I remember a number of years ago a favorite teacher telling me that all I ever needed to know
about physics is “what goes up must come down”. Maybe that sounds a little too simplistic;
however, much in the same simplistic way, water flowing downstream has a certain amount or
value of energy associated with it. You are going to use that “kinetic” energy to your advantage
by building a simple ram pump with two moving parts that will be able to push 10 to 15 percent of
the collected water up hill into a holding tank or cistern. That might not sound like much volume;
just remember that these pumps keep on going 24 hours a day 7 days a week. That continuous
small flow of water will really add up over a period of time.
Using these simple laws of physics to your advantage you can put this to work. All you need is:
1. A source of flowing water. (A minimum of 4 or 5 gallons a minute will work for the
HRP1-1 Ram, 10 gpm or more is a great goal).
2. Enough of a fall. (This is the “head” 6 to 10 feet will work just fine for our Ram Pump
designs).
3. A delivery storage site that is within a reasonable ratio for the type of pump being
built. (The higher the delivery site is, the higher the working pressure will need to be in
order to deliver the water).
5
Once you have found your source of flowing water you will need to be able to collect it through a
screened intake and route it preferably into a settling tank before sending the water to the ram
pump through a drive pipe. Most installations will benefit from the water first entering this
collection or settling tank. This is the only method that I would recommend you use for two
reasons. First if this is for potable “drinking” water use you may need to collect water from
several locations above the tank and therefore have multiple inputs into the tank from several
different springs or artesian wells. Second the tank will act as a sand and silt trap settling larger
material to the bottom and keeping all but the smallest particles out of your ram pump. This will
greatly increase the longevity of your pump and the amount of time between periodic servicing.
Setting up your barrel’s input and output lines several inches from the bottom will also help keep
debris out of the pump. Another good idea would be to install a short piece of pipe out of the
bottom side with a ball valve or cap on it. This will enable you to periodically open the valve and
flush out much of the sand and silt that will build up over time in the collection tank. This is just
one of the things you will need to do during your normal maintenance routine to keep your
system in prime working condition. What does this look like? Read on.
6
Site Details:
A. Your source of water. (A creek, multiple springs, artesian well). Remember were trying to
get 10GPM or more. Be sure to use a screened intake on these supply lines.
B. Supply pipe(s). This can be inexpensive black poly pipe, sprinkler system pipe etc. from
one or several sources. Consider using ball valves with bulkhead connectors for
maintenance.
C. Settling barrel. Large plastic garbage can, concrete culvert, 55 gallon steel drum. There
are pluses and minuses to each. How long will it last, how easy to obtain or connect pipes
to etc. What you have available will determine the best approach for you. If you’re going to
be drinking the water you’re pumping, keep safety in mind. Be sure to have a way to
securely cover the tank with a lid.
D. The drive pipe. This is where you need a higher quality “rigid” pipe. I have successfully
used the 160psi black poly pipe lifting water to over 90 feet. Installations will benefit from
heavy duty PVC or even steel pipe. Ideally, the length of the pipe needs to be in the range
of 5-7 to 10-12 times the head. (Formulas later on). The length of the drive pipe along with
the waste valve set-up governs the cycle frequency, if it is too long the ram will cycle at a
low or slow value. You will need to run some “tests” to find the middle ground for your
locations best efficiency. The amount of rigidity in the drive pipe will determine the amount
of pressure the system will be able to produce. I have even heard of installations where a
more inexpensive pipe (poly) has been encased in concrete to add strength.
7
E. The Hydraulic Ram itself. Locate the ram up out of the stream bed and harms way from
seasonal high water etc. Build a form and use concrete for a solid foundation. Pay
particular attention to setting it up as vertical and level as possible. This will decrease the
wear and tear on the waste / impetus valve and one way valve’s bushings giving you even
longer service. If you are setting up a year-round permanent installation consider how to
protect your pump from curious animals and freezing by building an insulated enclosure
around it. Also provide a way to drain the drive water back into the stream bed avoiding
unnecessary erosion around your base.
F. Delivery Pipe. Once again this is the place for inexpensive black poly pipe to your holding
tank. Protect the run from animals and freezing by burying it.
G. Tank Drain or Cleanout stub with a cap or ball valve. Be sure to make this a large enough
diameter pipe to get a high volume of flow through to help remove sand, silt or other small
debris. The only other alternative would be to drain and clean the tank as often as your
site requires.
In the next section we will explore the individual sequences that work together for the hydraulic
ram pump to function. This is an exploration of elegant simplicity in action.
8
Hydraulic Ram Sequence 1 illustrated.
Sequence 1:
Water from the source flows through the drive pipe (A) into the ram pump body, fills it and begins
to exit through the waste or “impetus” valve (B).
The Check Valve (C) remains in its normally closed position by both the attached spring and
water pressure in the Tank (D) and the Delivery Pipe (E). (no water in the tank prior to startup)
At this starting point there is no pressure in Tank (D) and no water is being delivered through exit
Pipe (E) to the holding tank destination.
9
Hydraulic Ram Sequence 2 illustrated.
Sequence 2:
Water is entering the pump through the Drive Pipe (A). The velocity and pressure of this column
of water is being directed out the Waste Valve (B) which is overcome, causing it to close
suddenly. This creates a momentary high pressure “water hammer” that in turn forces the Check
Valve (C) to open allowing a high pressure “pulse” of water to enter the Pressure Tank (D). The
air volume in the pressure tank is compressed causing water to begin flowing out of the Delivery
Pipe (E) and at the same time closing the Check Valve (C) not allowing the water a path back
into the pump body. As the air volume in the Pressure Tank (D) continues to re-expand, water is
forced out of the Delivery Pipe (E) to the holding tank.
10
Hydraulic Ram Sequence 3 illustrated.
Sequence 3:
Water has stopped flowing through the Drive Pipe (A) as a “shock wave” created by the “water
hammer” travels back up the Drive Pipe to the settling tank (depicted earlier). The Waste Valve
(B) is closed. Air volume in the Pressure Tank (D) continues expanding to equalize pressure,
pushing a small amount of water out the Delivery Pipe (E).
11
Hydraulic Ram Sequence 4 illustrated.
Sequence 4:
The “shock wave” reaches the holding tank causing a “gasp” for water in the Drive Pipe (A). The
Waste Valve (B) falls open and the water in the Drive Pipe (A) begins to flow into the pump and
out the Waste Valve (B). The Check Valve (C) remains closed. The air volume in the Pressure
Tank (D) has stabilized and water has stopped flowing out the Delivery Pipe (E). At this point
Sequence 1 begins all over again.
12
The cycle is dependent on the length of the drive pipe and should cycle every 1.5 to 2 seconds. If
your cycle is either too fast or too slow the output performance will suffer. Too fast of a cycle is a
symptom of either a drive pipe being too short or the waste valve needing more weight. Try
experimenting with both to determine what works well for your site. Start by keeping the drive
pipe longer and adjusting the waste valve weights. Too long of a cycle is caused by an
excessively long drive pipe or so much weight on the waste valve that the column of water has a
hard time overcoming it. The goal here is to find a happy efficient medium. With a high volume of
water and the 2” pumps be prepared to add quite a bit more weight to the waste valve than with
the 1” pumps.
The ideal length of the drive pipe is in the range of 5-7 to 10-12 times the fall. In order to reduce
head loss due to friction, the length of the pipe divided by the diameter of the pipe should be
within the range of 500 to 1,000. Here is an example using the formula on the high side 7 to 12:
L = length of the drive pipe in inches
D = Diameter of the drive pipe in inches
L / D = 500 to 1000.
12’ of fall with a drive pipe diameter of 2” = 84 to 144’ of drive pipe. (12 x 7 = 84; 12 x 12 = 144)
84’ x 12” = 1008” in length. 1008 / 2” Diameter Pipe = (504) just in the bounds of our L / D.
144’ x 12” = 1728” in length. 1728 / 2” Diameter Pipe = (864) more of a middle ground.
The air dome or pressure chamber is a vital component of the pump, not only improving
efficiency in the process of allowing delivery of water to continue after the check valve has been
closed it also cushions the shock created from the water hammer effect. If the air chamber fills
with water completely, not only does the performance suffer but the ram’s body, drive pipe or the
air chamber itself can be fractured from the resulting overpressure caused by the water hammer.
This is one of the reasons why it is necessary to check the pump at least every 6 months and
service the ram by adding air to the inner tube inside the chamber on designs without a snifter
valve. Of course at the same time cleaning and checking the waste or “impetus” valve, check
valve and pump body. Silt does manage to find its way in there and needs to be periodically
cleaned and rinsed out.
Now that you have a good idea of how the hydraulic ram is intended to operate, it’s time to move
on and look at getting ready to build a working model for your own use.
13
Chapter 3 - Getting Started on the:
HRP1-1 & HRP1-2 Hydraulic Ram Pump.
This chapter will start detailing the construction of the HRP1-1 Ram Pump. The only difference
between the 1” and 2” Ram is the dimension of the waste / impetus valve. If you determine, that
you have the volume of flowing water available, (greater than 10 gallons per minute) and also
need a higher delivery volume then plan on replacing the 1” waste / impetus valve with the 2”
size and that’s all there is to it. This Hydraulic Ram Pump design is efficient and very easy to
build with common hand tools. The parts are readily available. Galvanized and PVC pipe fittings
can be found at any of the larger hardware or plumbing supply stores. The two moving parts in
this pump are the brass (silicon bronze) one way check valves. These are also widely used and
easily found. I recommend that you spend the extra money and make sure you are buying the
highest quality part you can find as these are a primary component of the “engine” that drives
your pump. Some of the best on the market are the valves made by Simmons Manufacturing in
McDonough, Georgia. You can write to them at: P.O. Box 1509; 1608 Conyers Road;
McDonough, GA, 30253 or on line at this web address:
http://www.simmonsmfg.com/online_catalog/valves/valves5.html
HRP1-1 Completed Pump
14
The valves I am recommending you use are the 503-SB 1”and 506-SB 2” Check Valves. In 2003
the 1” valve is about $22.00usd and the 2” valve is about $70.00usd. I have found these size
valves in my local market that are foreign made for roughly half that cost or even less. These are
fine to get started with if that is what your budget will allow, just plan to repair or replace them a
bit sooner. The Simmons valves will last a very long time if care is given to making sure the pump
is vertically oriented in its final installation. The total cost of parts to build the basic 1” pump is just
under $100.00, the 2” pump will be just under $150.00 for the minimum setup. That doesn’t
include any unions, valves or pressure gauges. Give consideration to these “accessories” such
as ball valves and unions to make setup, takedown and maintenance easier. A Pressure gauge
at least on the delivery will help you understand how the pump is performing for your particular
installation. These can all be added at a later time of course. In the end you will have produced a
remarkably portable, efficient, and durable ram pump that will demand very little maintenance
and give you years of service constantly pumping water 24 hours a day.
The tools you will need to build this pump are basic pipe wrenches for the plumbing parts and a
socket set and hand wrenches to modify the check valve into a waste valve or “impetus” valve.
Since one of the check valves will be located inside the pressure tank assembly you will need to
fashion an Air Chamber/Check Mount Unit out of 1” and 2” galvanized street elbows. The 1”
street elbow fits nicely inside the 2” elbow and is held in place temporarily with a stub of 1”
galvanized pipe and gasket (or PVC) enabling you to permanently seal the two pieces together
with fiberglass resin. Fiberglass with the associated hardener is available from any auto parts
store in the auto body section. You will also need a small amount of acetone to thin down the
fiberglass resin and a few acid swabbing brushes to work with the resin later on as it does shrink
some when curing and it is possible to come apart from the 2” street el wall if it cures too fast.
After reviewing the section on how to fabricate the Air Chamber/Check Mount Unit you may
decide not to undertake this step yourself. The actual fabrication is straight forward; however the
clearances are pretty tight for the finished unit and it’s not uncommon for this to take a couple of
tries. Good news here is the parts are relatively inexpensive. If you decide not to undertake
construction of this unit yourself you can order the completed part from me online at
http://www.nwipr.com under “water” products. You can also call and order toll free at: 1-877-212-
3371 or write to me at: NWIPR; P.O. Box 899; North Bend, WA. 98045 costs to you are $65.00
plus shipping and handling to your location via UPS.
Now it’s time to get started! I recommend that you read through the entire process first to get a
clear picture in your mind of what you are going to need to get this project completed. I have
assembled a list that you can take with you to the plumbing supply store to help you get the
fittings and miscellaneous construction materials.
15
HRP1-1 and HRP1-2 Parts List
(Combination of galvanized and PVC as indicated).
Air Chamber Parts Schedule 40 PVC:
1. 4” x 12” (or longer) Schedule 40 PVC Pipe.
2. 4” PVC Pipe Cap. (Rounded high pressure, not waste grade).
3. 4” slip to 2” female pipe thread PVC reducer / adaptor.
4. 12” Wheel Barrow Inner Tube.
Pump Body Parts Galvanized:
5. 2” “T”, Female, (2 each required).
6. 2” Street Elbow
7. 1” Street Elbow
8. 2” X 1” Bushing
9. 2” x ¾” Bushing
10. 2” Close Nipple
11. 2” X 2 1/2” Nipple
12. 1” Close Nipple
13. ¾” Close Nipple
14. 1” Check Valve (2 each Required). Substitute one 2" valve for HRP1-2.
Impetus / Waste Valve Conversion Parts:
15. Stainless Steel Coupling Nut
16. Stainless Steel Bolt
17. Stainless Steel Nut,“s” & Washers (valve weights)
18. Faucet Washer
Construction Material:
19. Fiberglass resin and hardener
20. 11/4" Lavatory Washer
21. 5" stub of 1" threaded pipe
22. 100 grit sandpaper
23. PVC Primer and Cement
24. Black Paint (Spray and liquid rust inhibiting).
25. Teflon Thread Tape
16
Step 1: Getting the parts ready.
The galvanized plumbing parts you buy will be coated with cutting oil and sometimes even have
grease of rust inhibitor sprayed on top of that. This combination will then cause dust and dirt to
stick to them during shipping and handling. All of this oil and dirt build up will need to be
completely removed in order for the paint and resin to properly adhere or “stick” to the fittings of
your finished pump. I have used a combination cleaning process of spraying the parts with oven
cleaner first, letting them sit for 20 minutes and then rinsing and scrubbing them in a 5 gallon
bucket of hot soapy water. Don’t forget to use safety precautions when using products such as
oven cleaner, rubber gloves and eye protection are highly recommended. Next I use a liquid
dishwashing detergent in hot water that handles grease well. Pay special attention to the threads,
use an old tooth brush to get into the thread grooves. Then rinse all your parts thoroughly in
clean water to get the soap off. At this point I use an air compressor to blow off any remaining
water. Compressed air works very well for getting water out of the threaded ends. You could
also use paper towels and a blow dryer to get them as dry as possible fairly quickly. Even setting
the parts out in the sunshine for an hour or two would really help. Leaving water on them will
cause them to quickly develop a fine layer of rust. This is not really a problem; just wipe them
down before final assembly.
Hot soapy water & oven cleaner Galvanized parts with oven cleaner
17
Step 2: Making the Holder Assembly
This is where you will be sealing a 1” street el inside of a 2” street el using fiberglass resin to
bond and permanently seal the parts together. This is the critical piece that separates the high
pressure “output” side of the pump from the low pressure “input” side of the pump. Care needs to
be taken to do the best job you can to eliminate the possibility of air leaks in the system. You will
need to fashion a tool to hold the 1” street el securely with a gasket to keep the resin in place
around the 1” street el until it sets up. This is fairly easy to do with a piece of 1” galvanized pipe a
section of PVC lavatory drain pipe and a modified lavatory drain gasket. The drain gasket fits
nicely around the end of the 1” pipe and is just a little too large to fit inside the 2” street el so you
will need to trim it down some. An easy way to do this is to find an old screw driver where the
handle fits tightly into the 1” pipe, chuck the screwdriver into your drill motor as shown and use
100 grit sandpaper to remove the excess material by running the motor and sanding off a little
gasket material at a time.
Galvanized Holder Tool PVC Holder Tool – Resizing Drain Gasket
Take your time and check the fit often so you don’t remove too much material from the gasket
too fast. Of course check the pipe for burrs and sharp edges prior to sanding, use caution and go
slow. It has been my experience that you can get this resized very accurately in less than five
minutes with lots of test fittings as part of the process. Do your best here as this is one of the
most critical pieces in the production of this mount. It will keep the resin from leaking out before it
completely sets up. This “tool” can also be made with 1” PVC glue on slip fitting and a few inches
of 1” PVC pipe.
18
Step 3: Building the Air Chamber / Check Valve Mount
Parts to construct Valve Mount Fiberglass Resin Supplies
Now that you have cleaned all the oil and grease off of the galvanized parts and dried them
you’re ready to start the construction of the Check Valve Mount. Gather the parts and supplies
together to begin the assembly process. You will need the 1” and 2” Street El’s, the modified
lavatory drain gasket with the holder & a piece of PVC drain pipe, use this to cover the 1” threads
during the resin pour. It’s handy but not necessary if you are careful. This is not a critical piece if
you pour the resin slowly. Get together the rest of your supplies, fiberglass resin and hardener, a
plastic Ziploc bag, scissors, acid swabbing brush and Vaseline to coat and protect the threads
from the fiberglass. I like to use a piece of PVC drain pipe slipped over the 1” holder to back up
the lavatory gasket. Use latex available at the auto parts store to keep the fiberglass resin off of
your hands. They also aid in clean up, you just throw them out.
Leveling the 2” Street Elbow Alternative holder without a vise
19
Secure the 2” street el in a level position during the construction of the mount. I prefer to use a
vise for this. Be careful not to have the vise holding it so tightly that it compresses the fitting out of
round. Another method is to use a couple of other 2” fittings to secure the 2” street el in during
the fiberglass pour if you don’t have a vise handy. Remember that the one way check valve will
be installed on the 1” threads and will need to have a level, even seal. Take your time to get this
as accurate as possible. Using one of your brushes carefully apply Vaseline to the male threads
of the 1” street el and the female threads of the 2” street el. Also put a thin layer of Vaseline on
the threads of the 1” holder tool you made and on the face of the gasket so it will be easy to get
apart after it has set up. Take your time to get the 1” street el carefully positioned inside the 2”
street el so that the check valve will be as vertical as possible and have clearance on all sides.
This is where it is important to use the imported fittings. They have a thinner wall than the US
made fittings and are more forgiving on the clearances. It is possible to make modifications to the
1” street el by carefully grinding the flare down on the female side to get a better fit. This should
not be necessary with the fittings that come from Asia. Once you have the 2” street el in a
supported level position carefully insert the 1” street el inside of it and attach the holder tool with
the gasket. Shine a bright light into the top of the fittings and look from the holder side to see if
there are any gaps around the gasket. If there aren’t any gaps, great, you’re ready to go to the
next step. If you see light coming through then the resin will also come through and you don’t
want that to happen. I have found with certain brands of fittings that you may have to either use
more than one gasket or move the gasket further back on the threads to where the fit and seal is
better. This is not a problem. Just use a thin coat of Vaseline on the parts so that you will be able
to easily get them apart later on. Fiberglass when set up is a very tough and unforgiving material,
great for the strength of the finished fitting not so great when you’re having trouble getting the
holder tool out. During this fitting stage once again make sure that you are able to get the 1”
threads into the center of the 2” female side of the street el. Sometimes with parts made in the
USA the clearances are too tight to make this happen without grinding down some of the flare on
the female side of the 1” street elbow, keep working on it until you have the necessary clearance
for the 1” check valve.
Testing 1” Street El fit Testing Check Valve Fit
20
Now that you have the parts secured and level you’re ready to work with the fiberglass resin.
Pour about 1” of the fiberglass resin into a Ziploc baggy (about 2 ounces or more) add hardener.
Follow the directions on the resin can for adding the hardener; normally it’s about 15 drops of
hardener to 1 oz of resin. Don’t add too much hardener as this will cause the resin to “hot set”
faster than you want it to. I have found that when the weather is cooler about 35 drops into a
baggy with an inch or so of resin seems to work just fine. This is also where a blow dryer can
come in handy to warm up the fittings and also help get the fiberglass mixture warmed up.
Mix the hardener thoroughly into the resin for 7-10 minutes or until the resin is the consistency of
honey, still able to flow easily but not runny. If the resin gets thicker faster than you want it to you
can either add more resin or a small amount of acetone to thin it back down to a workable
consistency. When you’re ready to pour simply snip off one of the corners of the Ziploc bag and
carefully fill the cavity around the 1” street el with the resin up to the level of the threads. At this
point test the position of the 1” street el to make sure that you will have the clearance available
for the 1” check valve. One way to ensure this is to temporarily thread in a 2” PVC fitting and then
the 1” check valve just to make certain of the fit. Put these in finger tight and be careful not to get
resin on them. Use a screwdriver to help orient the one way valve toward the center. Use caution
when doing this to keep the parts level and true. Don’t pry hard enough that you cause the
gasket to skew and the resin to start leaking out. At this point use your blow dryer to warm up the
fittings and help the fiberglass hardening process get moving. Once again don’t get carried away
with the heat here, we don’t want this to set up too quickly.
Ziploc bag to mix the fiberglass resin Right after the pour
21
Give it 24 hours to set up and then check your work. Remove the holder tool and gasket from
the fittings. It is common for the resin to shrink up some during the curing process even to the
point of starting to pull away from the sides of the fittings if it set “hot”. If you didn’t use to much
hardener or external heat source this should not be a problem. Check the resin to make sure that
there are no large cracks in it before continuing on. Check the casting and threads on the fittings;
carefully clean up any globs of resin caused by spills off the insides of the fitting and threads with
a small chisel or knife. Since you coated them with Vaseline any small spills should come off
easily. Finish the clean up by using a small amount of acetone on a cotton shop towel to wipe out
the fittings. At this point it’s a good idea to once again clean the mount unit with hot soapy water
using your old tooth brush to get into the threads. Make sure you completely remove any
Vaseline residue and dry the part thoroughly.
Finished Part Rear View Before Cleaning Finished Part Top View before Cleaning
Now is a good time to double check the fit of the 1” check valve to make sure that it has the
necessary clearance to fit into the neck of the air chamber. If it doesn’t fit you will need to start the
process over again. Good news is that the parts are fairly inexpensive and you now have
experience. Once you have verified the fit is good it’s time to again level the part in the vise or
another 2” fitting. Take a small amount of fiberglass resin thinned down with acetone and
carefully smooth or “paint” it around the top and sides of the original fill. Making sure you get any
small fissures or cracks between the hardened fiberglass and the sides of the 2” street el and
also around the neck of the 1” street elbow. Keep the part level and warm and give it another 24
hours to completely set up. Congratulations you’re now finished with the most complicated piece
of the entire pumps construction! Be sure you do your cleanup in the slop sink not the kitchen
sink to keep your significant other happy!
22
Chapter 4 - Initial Assembly of the
HRP1-1 and HRP1-2 Hydraulic Ram Pump
Main Body
Lay out your parts before you get started just to make sure you aren’t missing any critical pieces.
You will also need to have the following tools and supplies to do the job.
1. Two pipe wrenches capable of handling 2” parts.
2. Adjustable wrenches for installing any gauges or valves.
3. Teflon tape. ½” wide roll for the smaller parts and ¾” or 1” wide roll for the larger parts.
4. Liquid thread sealant to ease the installation of the Tank/Check Valve. It can also be
sealed with Teflon tape and a wood dowel if you’re careful and patient.
5. PVC Primer and PVC Cement.
23
6. Paper towels or cotton shop towels for cleanup.
7. If you don’t have a vise handy you can also use tools with wooden handles to put into the
plumbing parts for leverage and support while tightening the fittings. With that said this is a
great reason to go out and get that bench vise. It will prove to be very useful especially
during this phase of the construction project.
Before you actually begin assembling the pump body, check it over for burrs and sharp edges
that can either cut you during assembly or cause leaks later on. Of course the parts should be
clean dry and oil free from your earlier work scrubbing them down with detergent.
Start off by getting the male threads of your parts wrapped with several layers of Teflon tape. Use
the wider tape for the bigger parts and thinner tape for the smaller parts. Start off by wrapping the
tape on in a clockwise fashion while looking straight at the threads as shown. This will help in the
installation by having the tape wrapped in the reverse direction from when you thread the parts
together. It will help ensure more tape gets pushed into the gaps if the tail doesn’t get bunched
up, not critical but it is helpful. Go ahead and get all the fittings taped up and put aside while
you’re on a roll.
Wrap the Teflon tape clockwise Getting the fittings ready
24
Start with one of the 2” “Tees”, secure it in the vise so you have easy access to the right hand
side and top opening. Thread the Tank / Check Mount into the end of the 2” “T” and torque it in
pretty tight. The goal is to have the Tank / Check Mount as level as possible with the top opening
of the 2” “T” as shown. This is a good time to have a piece of pipe for leverage or have your
weight lifter nephew come over to help grunt out that last quarter turn. This is where having that
vise is going to start paying real dividends.
Now get the output “T” ready by installing the bushing.
Prepare to Paint the inside of the pump body.
25
Seal the holes with PVC plugs or use plastic wrap and rubber bands on the main body of the
pump with the Check / Tank Mount, paint the inside by pouring some of the rust inhibiting paint
directly into the large opening of the “T”. Tip the body back and forth and side to side to make
sure you get good coverage all over the inside. Drain the paint back into the can and set on
cardboard or newspaper with the 2” opening down to allow the excess paint to drain out. Use one
of the inexpensive foam brushes to paint the inside of the other 2” “T” with the bushing. Set aside
and give them time to dry. After a couple of hours come back and take the caps or covering off to
get better air circulation and faster drying times. You could even speed drying a little more by
using a blow dryer to warm the parts up.
Remove the PVC caps or plugs for good air flow and set aside to let dry.
26
Chapter 5 - Initial Assembly of the
HRP1-1 and HRP1-2 Hydraulic Ram Pump
Air - Pressure Tank Assembly.
You will now need to have the length of 4” schedule 40 PVC pipe, rounded pipe cap, 4” PVC
pipe coupler and bushing and the wheel barrow inner tube handy. This is a good time to read the
instructions for the PVC primer and cement that you will be using. Because of the size of these
fittings and the constant “water hammer” effect, use PVC primer as added insurance.
Getting the parts together Sizing the Chamber to fit the inner tube
Determine the length of the pressure chamber. With the 12” inner tube you will need to make
sure you have the necessary room for it inside the pipe. Cut a section at least 10” long, this one
is right at 14”. Since we are using the inner tube to maintain air volume the length is not critical for
this particular design of pump.
27
Cutting the 4” PVC, keep it square File off the sharp burrs and edges
When you cut the pipe try to get the ends as square as possible. This will help ensure that more
surface area is in contact with the fittings when glued together making the assembly as strong as
possible. Once you have cut the section for the pressure tank there will be burrs and sharp
edges. Since you will be installing a rubber inner tube inside this chamber under constant
fluctuating pressure be sure to file off the larger burrs and then sand the shoulders to smooth and
round them off. This will help ensure that the inner tube lasts a long time.
Sanding the cuts smooth Use PVC Primer and Cement
Wipe the filings and sanding residue from the inside of the pipe with shop towels. Get the PVC
glue ready to go by mixing it up well. I like to start by installing the end cap; first step is to apply a
layer of primer on the outside last 2” of the pipe and also inside the cap itself. Then move quickly
to the PVC cement and repeat the process. Cover the last 2” of the pipe over the primer and then
inside the pipe cap. Push the cap onto the pipe while rotating the cap a quarter turn or so. Be
sure that the cap is completely seated onto the pipe. It will have a tendency to want to back off
some for a few seconds, be aware of this and apply constant pressure to keep it well seated until
28
the glue starts to set. This only takes a few seconds but is important to have as much surface
area as possible holding the parts together. Remember that this will be operating under constant
high pressure. The rounded schedule 40 PVC cap verses the cheaper squared off versions will
handle this pressure better.
Next move on to the 4” coupler, prepare the ends of the pipe and the fitting in the same manner
with the primer first and then the cement.
Pipe and Coupling with Purple Primer Pipe and Coupling with PVC Cement
Do your best to work quickly so the PVC “glue” is still pliable and easy to work with during the
assembly process. Remember to give it a good quarter turn while pressing together and hold in
place securely for several seconds so the parts don’t try to back off each other while they are
setting up.
Coupler Glued on Inserting the inner tube with filler out
29
Now is a good time to insert the 12” wheel barrow inner tube into the pressure chamber. With the
filler tube towards the opening of course! You will want to be able to gain access to it periodically
to keep it aired up. This looks like it would be difficult but by using an air chuck that is a longer
one designed for large highway trucks dual tires you can get to it to add air later with very little
trouble.
Inner tube inside the tank Completed Pressure tank setting up
Go ahead and add some air to it right now. There really is no set “pressure” you will want it to be
firm and yet still pliable, the water will compress it further once the pump is in operation so it’s not
really a critical issue. Use the primer and PVC cement to install the 4” Slip to 2” female pipe
bushing. Allow the PVC to set up for the required amount of time, (check the PVC Cement
instructions) and then install the 2” x 21/2” pipe coupler. Be careful when installing the steel pipe
into PVC, pay close attention to threading the nipple in straight. It’s very easy to cross threads
and cause yourself headaches. Also be cautious about how much pressure you put on the 4”
tank while holding it steady in the vise. The PVC cement is completely unforgiving; you don’t
want to have to start over on the tank at this point.
30
Chapter 6 - Waste / Impetus Valve
HRP1-1 & 2 Hydraulic Ram Pump
Conversion of a One Way Valve into a Waste / Impetus Valve.
Cut away view 1” One way check valve disassembled.
For the HRP1-1 Pump you will need to have two each of the 1” one way check valves. For the 2”
pump you will need to make a 2” Waste / Impetus valve conversion much in the same manner.
Or choose another size for your Impetus valve greater than 1” but less than 2”. The only
difference between the HRP1-1 and HRP1-2 is the size of the Waste / Impetus valve. Choosing
the correct size depends on the amount of water flow you have available at the source and the
amount you need to use or pump on any given day. Good rule of thumb would be 5-10 Gallons
per minute stay with the 1”. If you have more than 10 GPM then you can make you choice based
on the amount of water you need delivered and how much you want to spend on the valve. I will
cover the modification of a 2” foot valve into a waste / impetus valve as another option for the
HRP2-2 pump later on.
31
First step in the conversion process is to remove the retaining nut, cup washer and spring as
shown previously.
Waste / Impetus Valve Conversion Parts Faucet Washer and Coupling Nut installed.
You will need the Waste / Impetus Valve conversion parts you picked up off of your earlier list.
The size of the coupling nut, standard nut and bolt is determined by which size valve you will be
converting for your pump.
Stainless steel is recommended but the lighter alloy parts will work well too especially in low
water conditions where you need the lightest parts possible.
The next step is to use a drill bit to enlarge the hole on the faucet washer to fit over the original
valve stem firmly. I recommend you do this by hand and NOT with a drill motor. It will only take a
few minutes and you will be able to have more control over how much material you remove.
Insert the stem back through the body of valve and push the washer onto the end. Thread the
coupling nut onto the stem and tighten securely. You may use a thread locking compound if you
wish but I have never had any trouble with a coupling nut coming loose.
32
Waste / Impetus Valve Weights Completed 1” Valve Conversion
Next you will add the bolt and nut for additional weight to help keep the valve open longer and
opening sooner during the cycle. The amount of weight you use will be based on the volume of
water you have available and experimenting to find a “happy” medium during operation. This is a
great place to start.
That’s all there is to it. You have now converted the one way valve to a Waste / Impetus valve.
Set aside and move on to the next section.
33
Chapter 7 - The Concrete Base
HRP1-1 & 2 Hydraulic Ram Pump
Forming a solid foundation.
Ram Pumps “thump” with each cycle when operating and need to be mounted securely to
ensure that they don’t move around or tip over during operation. For a permanent installation be
prepared to use pipe clamps set in a concrete pad or build a form to encase the lower part of the
ram body in concrete to keep it well secured. Keep in mind that when you have your pump set up
and operating you will want to make sure that the body is level and the air chamber is vertical.
Take the time to get this as true as you can, the pump’s valves will last much longer. This is easy
enough to do by using plumbing clamps, straps or building a small form and encasing the pump
body in concrete. For this construction project I’ll be making a form out of 5/8” chipboard and
encasing the pump body in concrete.
Measuring to size the form – HRP2-2 Pieces for the HRP2-2 form
Start by measuring the length of the pumps body. In this case the HRP2-2 was just over 12” long;
to add weight and stability I’m going to make the base 8” wide. Measuring from what will be the
bottom to the tops of the fittings is right at 4 1/2”. Using these two measurements we’ll cut out the
pieces to build a form from the chipboard.
34
For the HRP2-2 Pump Body: Your measurements may differ slightly based on assembly.
I used 5/8” Chipboard, Drywall screws, and ½ bag of high strength concrete with a trowel and 5
gallon bucket to mix it up in.
The base = 1 piece at: 8” x 12”
The ends = 2 pieces at: 4 ½” x 8”
The sides = 2 pieces at: 4 ½” x 13 ¼” (added 1 ¼” for the chipboard thickness)
Use drywall screws to assemble the form. Be sure to pre-drill the holes or the chipboard will split.
Assembling the form Centering the pump.
Using the pieces you just cut to size assemble the sides around the base of the form. It’s a good
idea to have the pump inside the form for the last piece. The end is being pushed out about 1/8”
by the 2” Street El as you can see in the picture. Also shown are a couple of nuts to put under the
2” “T” collars as spacers to get the concrete completely around the base unit. Use a pencil to
mark the center of the form so you can get the pump body very close to the center when you’re
ready to pour. Don’t forget to stuff rags or paper towels into the pump inlet to keep the concrete
mixture out.
35
For the HRP1-1 & HRP1-2 Pump Body:
I used 5/8” Chipboard, Drywall screws, and ¼ bag of high strength concrete with a trowel and 5
gallon bucket to mix it up in.
The base = 1 piece at: 6 ½ ” x 8 ½”
The ends = 2 pieces at: 4 ½” x 6 ½”
The sides = 2 pieces at: 4 ½” x 9 ¾” (added 1 ¼” for the chipboard thickness)
Use drywall screws to assemble the form. Be sure to pre-drill the holes or the chipboard will split.
Leveling the HRP1-1 in the form HRP1-1 Setting up
Don’t forget to put a couple of nuts or washers between the bottom of the form and the pump
body so you will be able to get the body completely encased in the concrete. Use your torpedo
level before and after the pour to make sure everything is as square and straight as possible.
Use the PVC caps to close and protect the top of the pump and stuff rags or paper towels into
the larger 2” opening to keep the concrete out.
36
Both pumps setting up Be careful not to get concrete inside the body
After pouring set the pumps and forms aside and give them at least 24 hours to set up before
carefully removing the forms.
HRP1-1 after removing forms Cleaning the 2” threads with wire “toothbrush”
After a minimum of 24 hours remove the forms, the rags and paper towels from the pump body
and use a wire brush to get any concrete residue out of the 2” threads. Be extremely careful with
the base at this point as it will crack easily. Concrete does not reach its full strength for almost a
month. You can help the process along by misting the concrete with water a couple of times a
day. The base will turn more of a lighter ash color as id dries out and sets up. Be sure to give it at
least two or three days hardening time before you continue the construction process. Or use
extreme caution not to break the base.
37
Chapter 8 - Final Assembly
HRP1-1 & 2 Hydraulic Ram Pump
Bringing it all together.
At this point there is only one additional modification to check off before the final assembly can
take place. Don’t worry this is a really easy one. The 1” One Way Check valve needs to seat
nicely on the Check / Tank Mount unit you made earlier. Place the valve into your vise bottom
side up, arrow pointing down and draw file the bottom of the valve so that it is square and flat.
One Way Valve after draw filing.
Draw filing is simply the process of laying the flat side of the file onto the work, holding the end of
the file as well as the handle and pulling it towards you. In this manner you are able to keep an
even constant pressure across the valve and get a nice flat area. Be sure to work from several
angles turning 90 degrees one time 45 degrees another etc. until you have it worked down as
shown. This only takes a few minutes as the brass is pretty soft stuff. Be sure to clean the debris
out of the file often to get a nice flat surface area.
38
Applying liquid thread sealant Installing the one way valve. Arrow up.
Installing the One Way Check Valve onto the Tank / Check Mount is the next step. Using a liquid
thread sealant makes the job a lot easier. You can also do this with Teflon tape and the round
wooden handle of a paint brush or piece of dowel. It takes some time to get it wrapped in there
but can be done. Keep in mind that this is the seal between the lower pressure drive side and the
higher pressure output side of the pump. Do your best to make sure this is a secure and leak
proof seal. Thread the valve on by hand as far as you can, then using another tool with a wooden
handle inserted in the pump input for leverage tighten the valve with a pipe wrench. Work
carefully so you do not crack or damage the fiberglass resin.
Attaching the Waste Valve Attaching the “T” with bushing
39
Next thread on the converted Waste / Impetus Valve and tighten down securely. It helps (and
you should have) already installed the bushing into the “T” fitting. Thread this on with a 2” close
nipple and tighten securely. Once again use plenty of Teflon tape and pay close attention to how
much torque is applied being careful not to damage the fiberglass resin inside the Tank / Check
Mount unit. The bushing should end up pointing in the general direction of where you will be
pumping water.
View from above the output “T”
Another trick you can use for leverage is to “gently” secure the handle your using for leverage
into your vise while the other end is inside the pump body.
40
Pressure tank installed Adding ball valves, gauge and union
Install the pressure tank on top of the 2” “T” and tighten it down securely make sure that you
have aired up the inner tube first.
I like to add a pressure gauge, union and shut off valves to my systems. This is not required but
helps a lot with getting the system started as well as determining how it’s functioning. The added
benefit of having a ball valve on the delivery line is that you can disconnect the pump without
draining the water out of the delivery line. If there is any chance that the line will freeze its best to
go ahead and drain it. This aids in servicing the pump and getting it back up and running quickly.
I will go over this in more detail later on.
41
Installing the 2” to 1” PVC Bushing Completed HRP1-1 Pump ready to paint
Final step is installing the drive pipe connection. In this case I am using a 2” PVC Male with a 2”
slip to 1” female pipe thread. Next is a 1” union and then the 1” ball valve with a threaded in
connector for the drive pipe which is 100’ of 1” 160psi black poly pipe for one of the tests. The
output pipe connector is for a couple of hundred feet of ½” black poly sprinkler pipe running up
the hill to my delivery site. As for the HRP1-1 or HRP1-2 Homemade Hydraulic Ram Pumps,
congratulations you’re done. (With this part anyway, next for you is the field work to install and
test).
42
Chapter 9 - Getting Started on the:
HRP2-2 Hydraulic Ram Pump.
This chapter will start detailing the construction of the HRP2-2 Ram Pump. The main difference
between the HRP1-1 & 2 and the HRP2-2 is that we will not be using a captive air system (inner
tube) and due to the larger size there is no benefit to the Tank / Check Mount. We will also
explore using a 2” Brass Foot Valve for the Waste / Impetus Valve. You could just as easily use a
larger 2” One Way Check Valve for this too. The 2” Foot Valve is somewhat cheaper and I want
you to consider other changes and or modifications that may work well for you. There are lots of
ways to accomplish the same end result and this is only one of them. I encourage and solicit
feedback from people all the time and would love to hear about your great idea for a modification.
This Ram is based on the dimension of the waste / impetus valve being 2”. Make sure that you
have done your preliminary site survey and you have the continuous volume of water available to
support this pump. If you determine, that you have the flow of water available, (greater than 10
gallons per minute) and also need the higher delivery volume this pump will produce then lets get
started. This Hydraulic Ram Pump design is efficient and very easy to build with common hand
tools. The parts are readily available. Galvanized and PVC pipe fittings can be found at any of
the larger hardware or plumbing supply stores. The two moving parts in this pump are essentially
the same, one (silicon bronze) one way check valve and one Brass Foot Valve. These are also
widely used and easily found. For a permanent installation spend the extra money on the US
made valves discussed in the earlier chapter.
HRP2-2 Completed Pump, ready to paint
43
HRP2-2 Parts List
(Combination of galvanized and PVC as indicated).
Air Chamber Parts Schedule 40 PVC:
1. 4” x 24” (or longer) Schedule 40 PVC Pipe.
2. 4” PVC Pipe Cap. (Rounded high pressure, not waste grade).
3. 4” slip to 2” female pipe thread PVC reducer / adaptor.
Pump Body Parts Galvanized:
4. 2” “T”, Female, (2 each required).
5. 2” Street Elbow
6. 2” x ¾” Bushing
7. 2” Close Nipple (3 each)
8. 2” X 2 1/2” Nipple
9. ¾” Close Nipple
10. 2” One Way Check Valve
11. 2" Brass Foot Valve (Waste / Impetus Valve).
Impetus / Waste Valve Conversion Parts:
12. Stainless Steel Coupling Nut (size base on the foot valve)
13. Stainless Steel Bolt
14. Stainless Steel Nut,“s” & Washers (valve weights)
15. Faucet Washer
Construction Material:
16. 2" length of #14 Copper Wire
17. 100 grit sandpaper
18. PVC Primer and Cement
19. Black Paint (Spray and liquid rust inhibiting).
20. Teflon Thread Tape
Miscellaneous Material:
21. 100 PSI Gauge
22. Ball Valves and fittings.
44
Getting the parts ready.
As we discussed before the galvanized plumbing parts you buy will be coated with cutting oil and
sometimes even have grease of rust inhibitor sprayed on top of that. This combination will then
cause dust and dirt to stick to them during shipping and handling. All of this oil and dirt build up
will need to be completely removed in order for the paint and resin to properly adhere or “stick” to
the fittings of your finished pump.
Refer to the earlier chapter on cleaning and preparing the fittings to use in this RAM’s
construction.
Hot soapy water & oven cleaner Galvanized parts with oven cleaner
Be sure to use proper safety precautions when using or handling various caustic cleaners, eye
protection, rubber gloves, old clothes etc. Remember what your mom would have said.
45
Chapter 10 - Waste / Impetus Valve for the
HRP2-2 Hydraulic Ram Pump
Conversion of a Foot Valve into a Waste / Impetus Valve.
2” Brass Foot Valve with screen removed
The 2” Foot Valve makes a great Waste / Impetus Valve too when you have enough volume of
water available; in excess of 10 gallons per minute would be a good rule of thumb. Keep in mind
that your drive pipe should be the same size (or pretty close) to the size of your Waste / Impetus
Valve’s NPT measurement.
46
Parts list for this conversion are:
2.5” x 5/16” Bolt; Faucet Washer; 5/16” Coupling Nut; Standard 5/16” Nuts for adjusting weights.
Check the sizes against your particular valve. Using a thread lock compound is once again up to
you.
2” Foot Valve disassembled with parts Drilling out to fit the 5/16” hardware
First step will be to completely disassemble the foot valve. Then using a good quality sharp bit
drill out the top cross-bar to accommodate the 5/16” hardware. It would be best to use a drill
press to create this “bushing” if you have one. It can be done with a hand drill if you are careful
about keeping the bit as straight as you can. If you do use a hand drill plan on reaming the hole
out slightly larger than the 5/16” so there is enough clearance to keep the bolt from binding up.
You can do some test fits later on to make sure that the valve will work properly with no
problems. Also take care not to run the bit into the lower section while drilling. Brass is pretty soft
stuff and easy to gouge. The bit is in this position for a picture reference only. When you are
actually drilling out the top you may want to use a rag to cover and protect the lower bushing.
47
Sizing Valve Stem to add threads Clamping socket in vise to hold Valve
Next you will need to add about four threads to the original valve stem. This isn’t difficult but you
will need to have access to a tap and die set. Mark the stem with a felt pen before you start so
you will be able to easily check your work. Clamp a socket into your vise or hold it firmly with the
wrench or vise grips etc. Place the valve on the socket and use the die set to cut the extra
threads. Go slow and be sure to run the die backwards a couple of times to keep the threads
clean and cutting nicely. It’s also worth noting here that the coupling nuts come in different
lengths. In this case I wound up using a hack saw to cut about a standard nuts width off of the
coupling nut to give me extra clearance to work with. (see photo next page).
Valve stem held in socket Adding 4 more threads to stem
48
Ready to cut the head off bolt Adding chamfer before cutting threads
In this step I am modifying a longer bolt which will allow me to stack on more nuts and washers
for additional weight. I cut the head off of a 4.5” bolt with a hacksaw and am preparing to cut new
threads with the tap and die set. You could use threaded rod for this if you want to. I’m doing it
this way so that the constantly moving bolt be smooth where it runs through the top cross
member of the foot valve.
Marking the travel limits Cutting threads
Temporarily assemble the lower portion of the valve so you will be able to mark the shaft at the
maximum travel limit. Then set up the coupling nut and modified bolt in the vise to cut new
threads down to the limit line. You can even stop a thread short just to be extra careful. All of this
effort will help the valve body to last longer.
49
After cutting threads The finished shaft.
Testing the fit after cutting new threads into the bolt shaft be careful as the threads are sharp and
there is the potential to get metal slivers stuck in your fingers. You can avoid some of this by
lightly sanding the threads. Using cutting oil during this process will help some too.
2” Waste / Impetus Valve
Conversion to Waste / Impetus Valve complete
50
Carefully use a sharp bit to open up the faucet washer to the proper size working by hand. Once
again this is not a good place to use the drill motor. Take your time and go from both directions to
remove material until you get a nice snug fit. Attach the coupling nut to the valve stem with the
faucet washer underneath it. Snug it up; this is a good place to use the thread lock. You want the
valve disc to hang open around 3/8” this is determined by the threads you cut and the washer
thickness. You can add a couple of washer here if need be. Then insert the modified bolt down
through the top and into the coupling nut. Snug up the assembly and make sure that it will open
and close as well as rotate smoothly. If it drags or hangs up anywhere you will need to take care
of that by reaming out the top “bushing” you drilled out earlier. Once it works smooth and easy
you are done with the modifications. Be sure to take quite a few extra nuts and washers with you
to “tune” your pump on the initial setup. Keep in mind the clearance that you have available
under the top cross piece. If you have a lot of volume available you will need quite a bit of weight
for the valve to operate properly. In this case be prepared to either install a larger bolt or use
another coupling nut to be able to add even more weight in the form of nuts and washers.
Remember that the valve has to be able to close completely for the necessary water hammer
effect to take place. Here is an example of what it took to get my 2” test pump working smoothly.
Stacking on the weights!
51
Chapter 11 - Initial Assembly of the
HRP2-2 Hydraulic Ram Pump
Lay out your parts before you get started same as before.
Getting the parts for the HRP2-2 ready to go.
The HRP2-2 is an overall larger pump and does not use the Tank / Check Mount or a Pressure
Chamber with an inner tube. Because were not using an inner tube we will need to create a type
of snifter valve to allow a small amount of air into the pressure chamber with each pump cycle. If
you don’t do that you will either have to shut the pump down every few days and drain out some
water or the air will eventually totally dissolve with the likely result of the air chamber failing under
the resulting pressure. We’ll cover how to accomplish this in the next chapter.
52
You will also need to have the following tools and supplies to do the job.
8. Two pipe wrenches capable of handling 2” parts.
9. Adjustable wrenches for installing any gauges or valves.
10.Teflon tape. ½” wide roll for the smaller parts and ¾” or 1” wide roll for the larger parts.
11.PVC Primer and PVC Cement.
12.Paper towels or cotton shop towels for cleanup.
13.If you don’t have a vise handy you can also use tools with wooden handles to put into the
plumbing parts for leverage and support while tightening the fittings. With that said this is a
great reason to go out and get that bench vise. It will prove to be very useful especially
during this phase of the construction project.
Before you actually begin assembling the pump body, check it over for burrs and sharp edges
that can either cut you during assembly or cause leaks later on. Of course the parts should be
clean dry and oil free from your earlier work scrubbing them down with detergent.
Start off by getting the male threads of your parts wrapped with several layers of Teflon tape. Use
the wider tape for the bigger parts and thinner tape for the smaller parts. Start off by wrapping the
tape on in a clockwise fashion while looking straight at the threads as shown. This will help in the
installation by having the tape wrapped in the reverse direction from when you thread the parts
together. It will help ensure more tape gets pushed into the gaps if the tail doesn’t get bunched
up, not critical but it is helpful. Go ahead and get all the fittings taped up and put aside while
you’re on a roll.
Wrap the Teflon tape clockwise Getting the fittings ready
53
Start with one of the 2” “Tees”, secure it in the vise so you have easy access to the right hand
side and top opening. Thread the Street El into the end of the 2” “T” and torque it in pretty tight.
The goal is to have the Street El as level as possible with the top opening of the 2” “T” as shown.
Run this in good and tight using additional leverage if necessary. Having that vise is going to be a
big help here.
Starting with a 2” “T” in the vise The 2” Street El installed
Since this is a larger and taller pump in the end I added a 2” extension to the body so that the
finished pump would have a larger concrete base to secure it. I used a foam brush to paint the
inside of the pump body and then added the coupler and painted inside of it too. Once again a
blow dryer will come in handy to warm up the parts and get them to dry quickly.
With the 2” Close Nipples in Adding the 2” Coupler after painting inside
54
Chapter 12 - Initial Assembly of the
HRP2-2 Hydraulic Ram Pump
Air - Pressure Tank Assembly.
You’re going to need the same parts as the HRP1-1 and HRP1-2 pressure tank with the
exception being that this tank will not have an inner tube so you will need to have more air
volume available. I have heard that the length of the pressure tank with 4” PVC should be 18”
long at the minimum longer still if you are working with larger sizes of drive pipe. For this model I
have chosen a middle of the road length of 24” not including the pipe cap and coupler.
As with the earlier pressure chamber be sure to use the PVC Primer along with the cement for
the best results. Follow the instructions on the product for drying times to get the best results.
Cut the length of the pressure chamber.
Cutting the 4” PVC, keep it square File off the sharp burrs and edges
When you cut the pipe try to get the ends as square as possible. This will help ensure that more
surface area is in contact with the fittings when glued together making the assembly as strong as
possible. Once you have cut the section for the pressure tank there will be burrs and sharp
edges that should be removed with a round file and sandpaper.
55
Sanding the cuts smooth Use PVC Primer and Cement
Wipe the filings and sanding residue from the inside of the pipe with shop towels. Get the PVC
glue ready to go by mixing it up well. I like to start by installing the end cap; first step is to apply a
layer of primer on the outside last 2” of the pipe and also inside the cap itself. Then move quickly
to the PVC cement and repeat the process. Cover the last 2” of the pipe over the primer and then
inside the pipe cap. Push the cap onto the pipe while rotating the cap a quarter turn or so. Be
sure that the cap is completely seated onto the pipe. It will have a tendency to want to back off
some for a few seconds, be aware of this and apply constant pressure to keep it well seated until
the glue starts to set. This only takes a few seconds but is important to have as much surface
area as possible holding the parts together. Remember that this will be operating under constant
high pressure. The rounded schedule 40 PVC cap verses the cheaper squared off versions will
handle this pressure better.
Next move on to the 4” coupler, prepare the ends of the pipe and the fitting in the same manner
with the primer first and then the cement.
Pipe and Coupling with Purple Primer Pipe and Coupling with PVC Cement
56
Do your best to work quickly so the PVC “glue” is still pliable and easy to work with during the
assembly process. Remember to give it a good quarter turn while pressing together and hold in
place securely for several seconds so the parts don’t try to back off each other while they are
setting up.
Cap Installed Coupler Glued on
4” Slip x 2” FPT Bushing Glued in Completed 24” Pressure tank setting up
Allow the PVC to set up for the required amount of time, (check the PVC Cement instructions)
and then install the 2” x 21/2” nipple. Be careful when installing the steel pipe into PVC, pay close
attention to threading the nipple in straight. It’s very easy to cross threads and cause yourself
headaches. Also be cautious about how much pressure you put on the 4” tank while holding it
steady in the vise.
57
Chapter 13 - Modifying the 2” Check Valve -
Adding a “Snifter” port
HRP2-2 Hydraulic Ram Pump
2” Brass One Way Check Valve
In the last chapter I talked about how we needed to make a modification to the One Way Check
Valve to add a “type” of Snifter Valve or in this case a weep hole. Supplies you will need for this
are a length of #14 copper house wire, a bit that is slightly larger than the wire, a scale, center
punch and small hammer. The object here is to allow a small amount of air back into the low
pressure side of the system on each stroke. Because were not using an inner tube for a captive
air cushion we need to be able to replace the air that will eventually dissolve out of the chamber.
It would then fill with water and stop working and in the process the pressure chamber would
more than likely come apart. I have heard stories of a 4” glued on cap getting blown right off the
end of the pipe destroying the pressure chamber in the process. Let’s agree to avoid that.
58
Measuring depth to seat locating spot to drill weep hole
Take a careful measurement with your scale from the bottom side of the check valve. This is the
side that will be attaching to the HRP2-2 body, the low pressure side of the valve. Make sure you
give yourself enough clearance below the seat, measure the same distance from the outside and
mark with a center punch. Remember that you will need to be able to get to the hole from the
inside to twist the wire. Also keep in mind this is brass so just a “tap” will do.
Drilling the “snifter hole” Adding a chamfer
Drill a hole through the wall of the check valve into the low pressure side. Then use a larger drill
bit with your hand to put a small chamfer on the opening removing any burrs.
59
#14 Copper Wire Wire through weep hole with twists
Take the couple of inches of house wire and put a loop in one end, feed the wire from the inside
of the valve body back out through the hole. Snip off the excess and put another loop in it to
ensure it won’t come out. The wire should be able to wiggle around in the hole and move in
circles freely.
Installing a needle valve for more control.
Needle valve installed.
60
This variation will give you more control over how much water is released each pulse and
conversely how much air is allowed back into the system. I found that it worked very nicely and
would recommend that you spend the extra few dollars to install the adjustable needle valve.
This is also something that can wait until next time as well. I removed the copper wire out of the
snifter hole and drilled and tapped for a 1/8” NPT fitting. I used plenty of Teflon tape on the
threads and tightened it securely. A potential bonus of this in cold climates would be to allow the
water pulse to be diverted down and out a short piece of copper tube. Don’t forget it’s purpose is
to let air back IN the system.
For cold climates I would use a 2” check valve for the waste / impetus valve because you can
install a fitting on it to route the water out of your enclosure. Such as a “T” with a cap on one side
to give you access to start the pump and then once running you can screw back on.
HRP2-2 Completed and ready to test.
61
Chapter 14 - HRP2-2 Final Assembly
HRP2-2 Hydraulic Ram Pump
Bringing it all together, again.
HRP2-2 Concrete Drying HRP2-2 Waste & Check Valve Installed
Remove the forms from the HRP2-2 and allow the concrete to harden off for a few days if you
can. Keep the concrete moist by misting it down with water occasionally. Remember that the
concrete will take around 27 days to completely finish hardening. The first couple of days the
edges will still be able to crumble pretty easily so be somewhat careful when your working with it.
Install the converted Waste Valve (inlet to the left) and the modified One Way Check Valve onto
the body of the pump. Use the wooden handle of a larger tool inserted into the pumps body for
additional leverage and support.
62
Using a 2lb Hammer Handle in the vise for added leverage.
You will probably need to get someone to help you hold the base securely while you torque down
the valves. If you have that vise handy you can securely hold another tool steady in its jaws and
use the handle inside the pump for the extra leverage you will need.
Go ahead and install the second or outlet “T” with the bushing already installed. You will want to
wind up with the bushing at least facing the direction you will need to be pumping water. Be sure
to torque this down plenty and give yourself plenty of clearance to install the delivery lines and
any other fittings you may need later on.
Now it’s time for the Pressure Chamber and the delivery valves and gauge as shown. Use plenty
of Teflon tape when sealing the connections and use due caution when installing the Pressure
Chamber and valves not to damage any of the PVC parts.
63
Pressure Chamber Installed Adding the Pressure Gauge / Ball Valves
Be sure to clean the threads with a wire toothbrush on the inlet prior to installing the valve
assembly for the drive pipe. Once again make sure to use extreme caution when installing PVC
into steel fittings not to cross-thread them. Take your time to look at where the threads start and
match them up carefully. Once installed the HRP2-2 Hydraulic Ram Pump is complete.
Ready for the Drive Valve HRP2-2 Complete Assembly
64
Chapter 15 - Gauges and Valves
All Hydraulic Ram Pumps
Finishing Touches.
I don’t call out the Gauges and Valves during the construction process but they are an integral
part to getting the pump up and running as well as making the pumps easier to service. Gauges
are important to assist in troubleshooting and to let you know how well the pump is performing.
Let’s get started in going over the basic parts you should consider adding to your pump
installation.
Laying out some of the parts Completed Valve / Gauge Assembly
Even with some of the larger 2” pumps that I have made I have yet to install a personal delivery
system with anything but ½” poly pipe. I do like to take the output side from ¾” down to ½” on
most pumps. If you have a need for a higher delivery volume and have the drive water available
go for it. When setting this up be sure to include a valve to shut off the water supply to the
pressure gauge when you’re not actually using it. The constant pulse of water pressure will make
it short lived if you don’t protect it. The union is great for being able to disconnect the pump and
bring it back to the shop to service or what have you. There is an O-ring on these that will come
out really easily, don’t lose it. The Ball valve after that will allow you to get the pump started
quickly and will also keep the delivery pipe full of water when servicing. It takes a while to get it
full again if you don’t have one. Well worth the investment.
65
2” Drive Pipe Connection 1” Drive Pipe Connection
Valves and unions on the input side are a necessary part if you are going to collect the pump in
the winter and put it away or to just make it easier to disconnect and store. On the left is the
connection assembly to go from 2” Schedule 40 PVC drive pipe into the pump. The 2” ball valve
and union add about $20.00 to the cost of the pump. On the right is the slip / clamp connection
for the 1” black poly drive pipe with the 1” ball valve and 1” union into the bushing going back to
2” pipe for the HRP1-1 inlet. It can also be helpful to install a pressure gauge on the inlet side but
is not really necessary. With all of these “accessories” you will be adding an additional $50.00 or
so depending on what you can find or discount. In my opinion the benefit is there to install them.
66
Chapter 16 - Site Survey and Setup
All Hydraulic Ram Pumps
Getting the most out of your system.
There are three main factors that will determine how much water your RAM can pump. They are
the amount (Volume / Quantity) of water available at the source, the distance in vertical feet
between the source and the pump called (FALL), and the vertical distance from the RAM pump
to the end use area or storage tank called (LIFT). These three factors are inter-related and have
the possible changing variable of (Volume / Quantity), therefore, it is very hard to get to an exact
figure of gallons or liters per hour that a given pump will provide. The main objective is that we
can determine whether or not a hydraulic ram will function in a given location. Do you have an
good idea of the amount of water required over a given 24 hour period? Is this critical to your
location and needs or are you able to build or provide a suitable storage tank of sufficient size to
compensate for your average usage? There are formulas available that will help you get in the
ballpark to determine whether or not a hydraulic ram will work at your location and then which
hydraulic ram to build to get the delivery you need. If you have a need for a large quantity of
delivered water and have plenty of volume to spare consider building two or three smaller
hydraulic rams and setting them up in a battery with a single delivery pipe. (each ram must have
it’s own drive pipe).
67
The smaller 1” RAM the HRP1-1 will operate well on around 5 gallons of water flow per minute.
The goal of course is to develop your source to provide at least 10 gallons per minute so this is
eliminated as a critical factor. Beyond 10 gallons per minute consider moving to the 2” ram
designs if you need the higher delivery volumes.
Here is an example of average needs per day for a variety of uses; these figures are based on
requirements for maximum consumption during hot summer weather:
General usage home and farm.
Each person per day, for all purposes: 50 gallons
Each horse, dry cow or beef animal: 12 gallons
Each milking cow: 35 gallons
Each hog per day: 4 gallons
Each sheep per day: 2 gallons
Each 100 chickens per day: 4 gallons
Average usage for home and yard fixtures.
Drinking fountain, continuously flowing 50 to 100 gallons per day
Each shower bath Up to 60 gallons
To fill bathtub 30 gallons average
To flush toilet 6 gallons
To fill lavatory 2 gallons
Dish washer – per load 3 gallons
Automatic clothes washer – per load Up to 50 gallons
68
An easy way to start the site survey is to calculate the volume and vertical distances as close as
possible. Start out by building a small dam and using a 4” piece of PVC pipe (or larger) to catch
the flow into a 5 gallon bucket to accurately estimate the flow of water available. Time the water
flowing into the bucket to the nearest second. This will give you an accurate enough
approximation to determine the flow. If you are working with a spring this can be a bit tricky, you
can dig a small trench to start with and use 4” perforated pipe to collect the water. This will help
you determine total flow. This is especially critical in low flow situations, be as accurate as
possible. If there are multiple springs in the area consider tapping into these and running multiple
collection pipes into your settling barrel until you have plenty of volume to work with.
To determine the (Fall) start at the pumps location with a 5 foot stake and a carpenters level.
Begin by holding the carpenters level on top of the stake, site down the edge of the level to
where the “level-line” intersects the ground. Move the stake to this location and continue on until
you reach the water sources location. If you have a laser pointer handy this can be very helpful
too. If you are using a settling barrel the level of water in the barrel will be the final measurement.
These measurements added together will give you the (Fall).
Level Line Method
Using this same procedure beginning at the ram pump site, determine the elevation or (Lift) to
the storage tank or end use area. Another method of measuring the lift is by determining the
pressure in the delivery pipe. If you already have this set up and it’s filled with water, take the
standing water pressure reading at the ram site. This figure multiplied by 2.31 will give the (Lift) in
feet fairly accurately.
69
My nephew measuring the lift.
Once this information has been collected you can use a calculation to see if the amount of water
needed can be supplied by a ram. Below is a chart based on commercially available hydraulic
rams with an efficiency factor of ~60 percent. With home built rams the rule of thumb is to cut that
efficiency number to 33 percent. Actual numbers for the HRP1-1 are in the 44 percent range. I
believe that this chart is taken from empirical data collected from a university study performed in
the 1950’s. I’m going to include a couple of charts to give you an idea of how much water can be
pumped by determining the differing lift to fall ratios for a hydraulic ram. This is provided to give
an example of the capabilities, especially for larger installations. Larger ram pumps or even site
built commercially sized rams can be used to supply entire communities with a reliable source of
clean water.
70
Maximum Pumping Rate, Q (gpd) Source Flow Rate, S (gpm) Efficiency of 60%.
2 5 10 15 20 30 50 100
2 864 2,160 4,320 6,480 8,640 12,960 21,600 43,200
3 576 1,440 2,880 4,320 5,760 8,640 14,400 28,800
4 432 1,080 2,160 3,240 4,320 6,480 10,800 21,600
5 346 864 1,728 2,592 3,456 5,184 8,640 17,280
Lift to
Fall
Ratio:
L/F
(ft/ft). 6 288 720 1,440 2,160 2,880 4,320 7,200 14,400
7 247 617 1,234 1,851 2,469 3,703 6,171 12,343
8 218 540 1,080 1,620 2,160 3,240 5,400 10,800
9 192 480 960 1,440 1,920 2,880 4,800 9,600
10 173 432 864 1,296 1,728 2,592 4,320 8,640
12 144 360 720 1,080 1,440 2,160 3,600 7,200
14 123 309 617 926 1,234 1,851 3,086 6,171
16 108 270 540 810 1,080 1,620 2,700 5,400
18 96 240 480 720 960 1,440 2,400 4,800
20 86 216 432 648 864 1,296 2,160 4,320
25 69 173 346 518 691 1,037 1,728 3,458
30 58 144 288 432 576 864 1,440 2,880
35 49 123 247 370 494 741 1,234 2,469
40 43 108 216 324 432 648 1,080 2,160
45 38 96 192 288 384 578 960 1,920
50 35 86 173 259 346 518 864 1,728
60 29 72 144 216 288 432 720 1,440
70 25 62 123 185 247 370 617 1,234
80 22 54 108 162 216 324 540 1,080
90 19 48 96 144 192 288 480 960
100 17 43 86 130 173 259 432 864
71
The following charts will be showing liters from empirical studies done at one of the East Coast
Universities in the late 50’s. This information is fairly widely available and is being used by
several manufacturers of hydraulic rams. Since most of the world uses the metric system I
wanted to include this information as well.
The formula is: D = (S X F X E)/L Where:
D = Amount of water delivered per 24 hours.
S = Quantity of water supplied per minute.
F = The Fall or height of the source above the ram.
E = The efficiency of the ram. (Commercially made models use 0.66, home built designs use
0.33 the HRP1-1 is more in the neighborhood of 0.44).
L = The Lift height to the point of use above the ram.
The table below solves this formula (the result in the table is expressed in liters delivered in
24 hours) for rams with efficiencies of 66 percent, a supply of 1 liter per minute, and with the
working fall and lift shown in the table. For supplies greater than 1 liter/minute, simply
multiply by the number of liters supplied.
Working
Fall (m)
Lift - Vertical height to which water is raised above ram (m)
5 7.5 10 15 20 30 40 50 60 80 100 125
1.0 144 77 65 33 29 19.5 12.5
1.5 135 96.5 70 54 36 19 15
2.0 220 156 105 79 53 33 25 19.5 12.5
2.5 280 200 125 100 66 40.5 32.5 24 15.5 12
3.0 260 180 130 87 65 51 40 27 17.5 12
3.5 215 150 100 75 60 46 31.5 20 14
4.0 255 173 115 86 69 43 36 23 16
5.0 310 236 155 118 94 71.5 50 36 23
6.0 282 185 140 112 93.5 64.5 47.5 34.5
7.0 216 163 130 109 82 60 48
8.0 187 149 125 94 69 55
9.0 212 168 140 105 84 62
10.0 245 187 156 117 93 69
12.0 295 225 187 140 113 83
14.0 265 218 167 132 97
16.0 250 187 150 110
18.0 280 210 169 124
20.0 237 188 140
72
The Drive Pipe needs to be made from as rigid and non-flexible materials as you have available
for maximum efficiency. The best performance would be to use galvanized iron pipe followed by
schedule 80 PVC and then schedule 40 down to the 160 psi black poly and so on. The lighter
PVC and poly pipes can also be encased in concrete to accomplish the necessary rigidity.
The ideal length of the drive pipe is in the range of 5-7 to 10-12 times the fall. In order to reduce
head loss due to friction, the length of the pipe divided by the diameter of the pipe should be
within the range of 500 to 1,000. Here is an example using the formula:
L = length of the drive pipe in inches
D = Diameter of the drive pipe in inches
L / D = 500 to 1000.
12’ of fall with a drive pipe diameter of 2” = 84 to 144’ of drive pipe. (12 x 7 = 84; 12 x 12 = 144)
84’ x 12” = 1008” in length. 1008 / 2” Diameter Pipe = (504) just in the bounds of our L / D.
144’ x 12” = 1728” in length. 1728 / 2” Diameter Pipe = (864) more of a middle ground.
Shorter drive pipes equal quicker lighter cycles, longer drive pipes equal slower heavier cycles to
a point. If your drive pipe is too long, then the resulting friction slows down the drive water
velocity. For example if the drive pipe is 2x the recommended length then up to half of the output
can be lost. The goal here is to find the median where you get optimum pump performance, use
the averages and try to get in between them to start. Remember that the drive pipe diameter
should be at least as large as the Waste / Impetus valve opening. Larger is generally ok, smaller
is fine too if you expect the output to be diminished. For example 1.25” for the 1” ram and 1.5” for
the 2” ram. My advice is to stay with the averages for your particular site with the aim of pumping
higher volumes than you will actually use.
Be sure that you are using screened intakes to keep all but the smallest particles out of the pump
and keep the drive pipe as straight as is practical to avoid unnecessary losses due to friction.
Don’t be overly concerned about this unless you are not getting anywhere near the performance
you need from the pump.
73
Chapter 17 - Startup & Troubleshooting
All Hydraulic Ram Pumps
Getting it running.
You’ve done your homework; the collection point is set up with a weir or using drain tile from a
spring into a cistern or barrel through screened intakes. You have the entire drive pipe and
delivery pipe ran, the ram is hooked up to the system and your ready to go.
First step is to purge the air from the drive pipe and fill the body of the pump completely with
water. This is easily accomplished by opening the ball valve on the drive pipe and holding open
the Waste / Impetus valve until clear water with no air in it is rushing out. When you release the
valve it will slam shut suddenly and remain closed. Push it open again and release when the
water builds up some volume. Every time the valve slams shut some water will be forced through
the one way valve into the output side of the pump. If you have installed a valve on the output /
delivery side of the pump you can close that valve and get the pump started very quickly. Once
the pump begins to cycle on its own observe the pressure gauge and slowly open the delivery
valve to allow some of the water to flow out. Once you have filled several vertical feet of the
delivery pipe the backpressure will allow the pump to run continuously on its own and you will be
able to open the delivery valve all the way. At this point the pump is running as it is intended to,
the waste valve opening every second or two allowing water to escape before slamming shut
again. If you do not have a pressure gauge and valve on the delivery side you will need to
manually operate the waste / impetus valve until enough water is driven into the delivery pipe to
create the necessary back pressure for it to operate on its own. The delivery pipe should be of a
relatively small size such as the ½” black poly sprinkler system pipe. Having a larger diameter
delivery pipe on a small system doesn’t gain you anything. In fact it will take longer to fill up and
get the pump operating as well as costing more money. The only time to consider moving to a
larger size pipe would be if you are going to install a battery of rams and even then the gain is
questionable. Another inexpensive solution is to simply use garden hose if your deliver site is
around 100’ or so this would work well. With the HRP1-1 and HRP1-2 types of captive air
systems the bladder (wheel barrow inner tube) will start to lose pressure over time and the pump
will deliver less and less volume. It’s a good idea to just plan on inspect the pump and air up the
inner tube every 6 months or so. Make this a regular part of your preventive maintenance routine.
74
Common Problems
One of the most common problems is allowing air back into the system through the drive pipe.
This happens when the water level in the cistern / barrel falls to the level of the drive pipe intake.
If you observe that the Waste / Impetus valve has a rapid fluttering or chattering or the valve
closes and stays shut. (at this point the cistern / barrel fills back up and you are scratching you
head trying to figure out what happened). Make sure that your intakes are not clogged slowing
the supply of water into the cistern / barrel. If it’s a low water level time of year consider how you
might add to the supply of water into the cistern / barrel. If this is not possible consider adjusting
the waste / impetus valve to a lighter weight. It will cycle using less water, and also pump less but
this may get you through the low flow time.
If the pump is cycling rapidly and you have the proper length of drive pipe installed consider
adding more weight to the Waste / Impetus valve. This is more of an issue with the 2” and larger
pumps.
If you visit the pump and hear a banging or “knocking” sound this is an indication that the
pressure tank has too much water in it. Drain the water out and add air to the inner tube. For
higher lift systems over 100’ keep that inner tube “well” aired up to prevent this problem. For
system with a “snifter” valve you may need to increase the amount of air that is allowed back into
the system on each stroke. Consider drilling a slightly larger hole and moving to #12 wire or
actually drill and tap in an adjustable needle valve.
Needles, leaves and other natural debris have a way of getting into the system. Make sure that
your intakes are screened and have protection from pests etc. Remove the waste / impetus valve
and clean out the body of the ram. During the Fall season check your intakes regularly for
buildup of debris. Keep the cistern / barrel covered with a lid.
Winter time is probably the biggest problem you will encounter if you live in a climate that has
“hard” freezes. If you keep the pump in service during this time of the year be sure to build an
insulated box to cover it. You can install a “T” fitting on the waste / impetus valve of the HRP1-1
and HRP1-2 with a short piece of piping to carry the water outside of the box. In severe cold
climates or for short periods of time it would be best to drain the pump and save the parts so to
speak. The air chamber will be the first part to freeze up on the unit. Use caution when
disconnecting the pump as the output side is under high pressure. Close the delivery valve and
undo the union slowly to allow the pressurized water to escape. Likewise, shut off the drive water
and disconnect the union. Turn the pump over to drain the water out of the body. Especially if you
are going to leave the pump behind instead of taking it back to the house and stowing it in the
garage. Now consider the delivery pipe, is it buried in such a way that you can be sure it won’t
freeze solid? If you’re not sure it’s probably best to drain the water out of the delivery pipe. It is
much easier to restart the pump than to thaw out a frozen delivery line.
75
Chapter 18 - Safety Considerations
All Hydraulic Ram Pumps
Avoiding Common Pollutants.
I want you to be thinking about where the water that powers your system comes from and for
what purposes you will be using the delivered water. If you are collecting water from an open
stream bed, do you know for a fact what that water has gone through before it reaches your
location? If not I would highly recommend that you check it out. If you happen to be below some
kind of current or former industrialized area then the potential for chemical and/or heavy metal
contaminants is substantial. What about through ranch or farm country where there is or may be
the heavy use of fertilizers or pesticides etc. not to mention the possibility of natural biological
contaminants such as Fecal Coliform, E coli, Cryptosporidium and Giardia lamblia to name a few.
Whether or not your planning on drinking this water untreated make sure that you perform due
diligence in having it checked out. Every County in the USA has a County Extension Agent that
can help you determine what has gone on in the agricultural areas currently and in times past.
Most State Universities have departments dealing with water resources in some manner and can
help out with water sampling and testing kits that are either free of charge or are a relatively small
charge. This may be less relevant up in the mountains away from population centers but you
should have knowledge of your water just to be on the safe side. Developing water sources for
personal consumption from natural springs is one of the best tasting, purest and safest methods.
My father did this on some property he purchased in Washington State in 1959 by hand digging
a trench into the side of a ravine where a spring was flowing out. Partially filling the ditch with
gravel and washed rock carried in and laying in the gravel pipe that he had hand drilled hundreds
of holes into. He finished by covering the pipe with more gravel and rock, put layers of
newspapers over the top of the gravel and backfilled the trench. This collected water from the
spring and ran into a concrete distribution box used as a sand trap with a drain and out of this
into a hand built 1000 gallon concrete storage tank. This is still the main and only source of water
for this residence forty some years later. We have periodically had the water tested with no
problems. This is the best tasting water you can imagine, treated water from a plant just cannot
compare.
Microbes are some of the more common things to look out for in your water supply. If you think
there may be even a chance of this then please use some form of purification prior to consuming.
I’m including an additional litany of the types of pollutants that the United States EPA tests for on
a regular basis. Probably not an issue in 99% of installations, however, I really want you to check
out your water supply.
76
Microbes
Coliform bacteria are common in the environment and are generally not harmful. However, the
presence of these bacteria in drinking water is usually a result of a problem with the treatment
system or the pipes which distribute water, and indicates that the water may be contaminated
with germs that can cause disease.
Fecal Coliform and E coli are bacteria whose presence indicates that the water may be
contaminated with human or animal wastes. Microbes in these wastes can cause short-term
effects, such as diarrhea, cramps, nausea, headaches, or other symptoms.
Turbidity has no health effects. However, turbidity can interfere with disinfection and provide a
medium for microbial growth. Turbidity may indicate the presence of disease causing organisms.
These organisms include bacteria, viruses, and parasites that can cause symptoms such as
nausea, cramps, diarrhea, and associated headaches.
Cryptosporidium is a parasite that enters lakes and rivers through sewage and animal waste. It
causes cryptosporidiosis, a mild gastrointestinal disease. However, the disease can be severe or
fatal for people with severely weakened immune systems. EPA and CDC have prepared advice
for those with severely compromised immune systems who are concerned about
Cryptosporidium.
Giardia lamblia is a parasite that enters lakes and rivers through sewage and animal waste. It
causes gastrointestinal illness (e.g. diarrhea, vomiting, and cramps).
77
Inorganic Contaminants
Antimony, Asbestos, Barium, Beryllium Cadmium, Chromium, Copper Cyanide, Mercury, Nitrate
Nitrite, Selenium, Thallium.
Synthetic Organic Contaminants, including pesticides &
herbicides
2,4-D, 2,4,5-TP (Silvex), Acrylamide, Alachlor, Atrazine, Benzoapyrene, Carbofuran, Chlordane,
Dalapon, Di 2-ethylhexyl adipate, Di 2-ethylhexyl phthalate Dibromochloropropane, Dinoseb,
Dioxin (2,3,7,8-TCDD), Diquat, Endothall, Endrin, Epichlorohydrin, Ethylene dibromide,
Glyphosate, Heptachlor, Heptachlor epoxide Hexachlorobenzene, Hexachlorocyclopentadiene,
Lindane, Methoxychlor, Oxamyl [Vydate], PCBs [Polychlorinated biphenyls], Pentachlorophenol,
Picloram, Simazine, Toxaphene,
Volatile Organic Contaminants
Benzene, Carbon Tetrachloride, Chlorobenzene, o-Dichlorobenzene, p-Dichlorobenzene, 1,1-
Dichloroethylene, cis-1,2-Dichloroethylene trans-1,2-Dicholoroethylene, Dichloromethane, 1,2-
Dichloroethane, 1,2-Dichloropropane, Ethylbenzene, Styrene, Tetrachloroethylene, 1,2,4-
Trichlorobenzene, 1,1,1,-Trichloroethane, 1,1,2-Trichloroethane, Trichloroethylene, Toluene,
Vinyl Chloride, Xylenes,
As you can see there is the potential for introduction of various forms of harm in our environment
that come from both natural sources and the use / misuse or improper disposal of various
chemicals and compounds used for all kinds of purposes in our society. Being aware of the
dangers allows you to take the necessary steps to avoid potential harm to your family and
friends.
78
Chapter 19 - Test Setup
HRP1-1 and HRP2-2 Rams
The Test System Install & Results.
First thing is to determine the flow of the stream using a 5 gallon bucket:
Son timing the flow. ~60gpm!
This is a small fast moving stream that has seasonal highs and lows. This was in the late fall
during a pretty wet time in Washington State with a flow of > 60 gallons per minute. We chose to
capture the water upstream where there is a culvert under the road. As you can see from the
debris the stream moves lot’s of silt, sand, rocks and other “junk” downstream all the time.
Especially in the winter months during high run off times. On the plus side this stream comes
right out of a rock face about 2 miles upstream so it’s really the product of a high output spring.
Many more are in the area adding to the flow all the time.
79
The “screened” intake under water. Son and nephew hard at work building dam.
The collection tank used for this setup is a 55 gallon food grade barrel.
Nephew cutting holes for fittings. “Don’t look mom” Barrel placed in the creek bed.
With two 1” pipes feeding into the barrel, we were able to fill it completely to overflowing in just
over three minutes. There is enough Fall in less than 50 feet of supply pipe to overfill the barrel.
80
Hooking up the drive pipe. The 1” pump in action. 160psi poly drive pipe.
Delivery at top of ravine. 1gal in 1:45 The entire crew that helped me get this running.
81
Home Built Hydraulic Ram Pumps - NW Independent Power Resources

Contenu connexe

Tendances

19069321 red-bug-complete-plans-set
19069321 red-bug-complete-plans-set19069321 red-bug-complete-plans-set
19069321 red-bug-complete-plans-setzebratwo
 
Combining Rupture Discs and Safety Relief Valves
Combining Rupture Discs and Safety Relief ValvesCombining Rupture Discs and Safety Relief Valves
Combining Rupture Discs and Safety Relief ValvesCTi Controltech
 
HOE WERKT EEN MOLEN
HOE WERKT EEN MOLENHOE WERKT EEN MOLEN
HOE WERKT EEN MOLENKees Vanger
 
Engineering aspects of basis weight control
Engineering aspects of basis weight controlEngineering aspects of basis weight control
Engineering aspects of basis weight controlDevesh Singhal
 
PRESENTATION ON SURGE ANTICIPATION VALVE.pptx
PRESENTATION ON SURGE ANTICIPATION VALVE.pptxPRESENTATION ON SURGE ANTICIPATION VALVE.pptx
PRESENTATION ON SURGE ANTICIPATION VALVE.pptxholegajendra
 
Babatunde Mobisola - Accumulator Systems
Babatunde Mobisola - Accumulator  SystemsBabatunde Mobisola - Accumulator  Systems
Babatunde Mobisola - Accumulator SystemsMobisola Babatunde
 
Review of Hydraulic Ram Pumps Hydram and Recommendations for Revival
Review of Hydraulic Ram Pumps Hydram and Recommendations for RevivalReview of Hydraulic Ram Pumps Hydram and Recommendations for Revival
Review of Hydraulic Ram Pumps Hydram and Recommendations for Revivalijtsrd
 
Using A Modified Hydraulic Ram to Pump Livestock Wate
Using A Modified Hydraulic Ram to Pump Livestock WateUsing A Modified Hydraulic Ram to Pump Livestock Wate
Using A Modified Hydraulic Ram to Pump Livestock WateFifi62z
 
VALVES AND THEIR TYPES
VALVES AND THEIR TYPESVALVES AND THEIR TYPES
VALVES AND THEIR TYPESMadhur Mahajan
 

Tendances (20)

19069321 red-bug-complete-plans-set
19069321 red-bug-complete-plans-set19069321 red-bug-complete-plans-set
19069321 red-bug-complete-plans-set
 
Combining Rupture Discs and Safety Relief Valves
Combining Rupture Discs and Safety Relief ValvesCombining Rupture Discs and Safety Relief Valves
Combining Rupture Discs and Safety Relief Valves
 
DE SPINNEKOP
DE SPINNEKOPDE SPINNEKOP
DE SPINNEKOP
 
HOE WERKT EEN MOLEN
HOE WERKT EEN MOLENHOE WERKT EEN MOLEN
HOE WERKT EEN MOLEN
 
Stability of ships
Stability of shipsStability of ships
Stability of ships
 
Mechanical seal
Mechanical sealMechanical seal
Mechanical seal
 
De vang
De vangDe vang
De vang
 
Preliminary ship-design
Preliminary ship-designPreliminary ship-design
Preliminary ship-design
 
Engineering aspects of basis weight control
Engineering aspects of basis weight controlEngineering aspects of basis weight control
Engineering aspects of basis weight control
 
Rothe erde kuglibani.pdf
Rothe erde kuglibani.pdfRothe erde kuglibani.pdf
Rothe erde kuglibani.pdf
 
PRESENTATION ON SURGE ANTICIPATION VALVE.pptx
PRESENTATION ON SURGE ANTICIPATION VALVE.pptxPRESENTATION ON SURGE ANTICIPATION VALVE.pptx
PRESENTATION ON SURGE ANTICIPATION VALVE.pptx
 
Pipeline Strainers - A Tutorial
Pipeline Strainers - A TutorialPipeline Strainers - A Tutorial
Pipeline Strainers - A Tutorial
 
Babatunde Mobisola - Accumulator Systems
Babatunde Mobisola - Accumulator  SystemsBabatunde Mobisola - Accumulator  Systems
Babatunde Mobisola - Accumulator Systems
 
Review of Hydraulic Ram Pumps Hydram and Recommendations for Revival
Review of Hydraulic Ram Pumps Hydram and Recommendations for RevivalReview of Hydraulic Ram Pumps Hydram and Recommendations for Revival
Review of Hydraulic Ram Pumps Hydram and Recommendations for Revival
 
De kruibare kap
De kruibare kapDe kruibare kap
De kruibare kap
 
DE KAP
DE KAPDE KAP
DE KAP
 
Using A Modified Hydraulic Ram to Pump Livestock Wate
Using A Modified Hydraulic Ram to Pump Livestock WateUsing A Modified Hydraulic Ram to Pump Livestock Wate
Using A Modified Hydraulic Ram to Pump Livestock Wate
 
NAME 338 , Presentation 1
NAME 338 , Presentation 1NAME 338 , Presentation 1
NAME 338 , Presentation 1
 
Molenwielen
MolenwielenMolenwielen
Molenwielen
 
VALVES AND THEIR TYPES
VALVES AND THEIR TYPESVALVES AND THEIR TYPES
VALVES AND THEIR TYPES
 

Similaire à Home Built Hydraulic Ram Pumps - NW Independent Power Resources

Compendium In Hydraulic Ram-Pumps
Compendium In Hydraulic Ram-PumpsCompendium In Hydraulic Ram-Pumps
Compendium In Hydraulic Ram-PumpsFatin62c
 
Possibilities for Locally Fabricated Hydraulic Ram Pumps
Possibilities for Locally Fabricated Hydraulic Ram PumpsPossibilities for Locally Fabricated Hydraulic Ram Pumps
Possibilities for Locally Fabricated Hydraulic Ram PumpsAnnie Thompson
 
Hydraulic Ram Pumps - Technical Brief - Natural Resources Conservation Service
Hydraulic Ram Pumps - Technical Brief -  Natural Resources Conservation ServiceHydraulic Ram Pumps - Technical Brief -  Natural Resources Conservation Service
Hydraulic Ram Pumps - Technical Brief - Natural Resources Conservation ServiceFatin62c
 
The Basic’s of Hydraulic Ram Pumps - Rain Tree Foundation
The Basic’s of Hydraulic Ram Pumps - Rain Tree FoundationThe Basic’s of Hydraulic Ram Pumps - Rain Tree Foundation
The Basic’s of Hydraulic Ram Pumps - Rain Tree FoundationFifi62z
 
Water-Powered Water Pumping Systems for Livestock Watering
Water-Powered Water Pumping Systems for Livestock WateringWater-Powered Water Pumping Systems for Livestock Watering
Water-Powered Water Pumping Systems for Livestock WateringFifi62z
 
Full report of hydraulic ramp pump
Full report of hydraulic ramp pumpFull report of hydraulic ramp pump
Full report of hydraulic ramp pumpniravdon
 
Full report of hydraulic ramp pump
Full report of hydraulic ramp pumpFull report of hydraulic ramp pump
Full report of hydraulic ramp pumpniravdon
 
Hydraulic Ram Pump Tipsheet - Center for Alternative Technology
Hydraulic Ram Pump Tipsheet - Center for Alternative TechnologyHydraulic Ram Pump Tipsheet - Center for Alternative Technology
Hydraulic Ram Pump Tipsheet - Center for Alternative TechnologyFatin62c
 
Home-Made Hydraulic Ram Pump - Clemson University
Home-Made Hydraulic Ram Pump - Clemson UniversityHome-Made Hydraulic Ram Pump - Clemson University
Home-Made Hydraulic Ram Pump - Clemson UniversityFatin62c
 
Hydraulic Ram Made from Standard Plumbing Parts - University of Georgia
Hydraulic Ram Made from Standard Plumbing Parts - University of GeorgiaHydraulic Ram Made from Standard Plumbing Parts - University of Georgia
Hydraulic Ram Made from Standard Plumbing Parts - University of GeorgiaFatin62c
 
Installation and Drive Pipe Construction of the Bamford Hi-Ram Pump
Installation and Drive Pipe Construction of the Bamford Hi-Ram PumpInstallation and Drive Pipe Construction of the Bamford Hi-Ram Pump
Installation and Drive Pipe Construction of the Bamford Hi-Ram PumpFatin62c
 
Hydraulic Ram Pump Mini-Project Report - Agriculture and Rural Development, A...
Hydraulic Ram Pump Mini-Project Report - Agriculture and Rural Development, A...Hydraulic Ram Pump Mini-Project Report - Agriculture and Rural Development, A...
Hydraulic Ram Pump Mini-Project Report - Agriculture and Rural Development, A...Fatin62c
 
New Developments in Hydraulic Ram Pumping
New Developments in Hydraulic Ram PumpingNew Developments in Hydraulic Ram Pumping
New Developments in Hydraulic Ram PumpingFatin62c
 
Hydraulic Ram Pump: Plans, Assembly and Notes - Clemson University
Hydraulic Ram Pump: Plans, Assembly and Notes - Clemson UniversityHydraulic Ram Pump: Plans, Assembly and Notes - Clemson University
Hydraulic Ram Pump: Plans, Assembly and Notes - Clemson UniversityFatin62c
 
How a Hydraulic Ram Pump Works - Clemson University
How a Hydraulic Ram Pump Works - Clemson UniversityHow a Hydraulic Ram Pump Works - Clemson University
How a Hydraulic Ram Pump Works - Clemson UniversityFatin62c
 

Similaire à Home Built Hydraulic Ram Pumps - NW Independent Power Resources (20)

Home Built Hydraulic Ram Pumps
Home Built Hydraulic Ram PumpsHome Built Hydraulic Ram Pumps
Home Built Hydraulic Ram Pumps
 
Compendium In Hydraulic Ram-Pumps
Compendium In Hydraulic Ram-PumpsCompendium In Hydraulic Ram-Pumps
Compendium In Hydraulic Ram-Pumps
 
Possibilities for Locally Fabricated Hydraulic Ram Pumps
Possibilities for Locally Fabricated Hydraulic Ram PumpsPossibilities for Locally Fabricated Hydraulic Ram Pumps
Possibilities for Locally Fabricated Hydraulic Ram Pumps
 
Hydraulic ram pumps
Hydraulic ram pumpsHydraulic ram pumps
Hydraulic ram pumps
 
Hydraulic Ram Pumps - Technical Brief - Natural Resources Conservation Service
Hydraulic Ram Pumps - Technical Brief -  Natural Resources Conservation ServiceHydraulic Ram Pumps - Technical Brief -  Natural Resources Conservation Service
Hydraulic Ram Pumps - Technical Brief - Natural Resources Conservation Service
 
The Basic’s of Hydraulic Ram Pumps - Rain Tree Foundation
The Basic’s of Hydraulic Ram Pumps - Rain Tree FoundationThe Basic’s of Hydraulic Ram Pumps - Rain Tree Foundation
The Basic’s of Hydraulic Ram Pumps - Rain Tree Foundation
 
Water-Powered Water Pumping Systems for Livestock Watering
Water-Powered Water Pumping Systems for Livestock WateringWater-Powered Water Pumping Systems for Livestock Watering
Water-Powered Water Pumping Systems for Livestock Watering
 
Hydraulic Ram Made from Standard Plumbing Parts
Hydraulic Ram Made from Standard Plumbing PartsHydraulic Ram Made from Standard Plumbing Parts
Hydraulic Ram Made from Standard Plumbing Parts
 
Full report of hydraulic ramp pump
Full report of hydraulic ramp pumpFull report of hydraulic ramp pump
Full report of hydraulic ramp pump
 
Full report of hydraulic ramp pump
Full report of hydraulic ramp pumpFull report of hydraulic ramp pump
Full report of hydraulic ramp pump
 
Hydraulic Ram Pump Tipsheet - Center for Alternative Technology
Hydraulic Ram Pump Tipsheet - Center for Alternative TechnologyHydraulic Ram Pump Tipsheet - Center for Alternative Technology
Hydraulic Ram Pump Tipsheet - Center for Alternative Technology
 
Home-Made Hydraulic Ram Pump - Clemson University
Home-Made Hydraulic Ram Pump - Clemson UniversityHome-Made Hydraulic Ram Pump - Clemson University
Home-Made Hydraulic Ram Pump - Clemson University
 
Hydraulic Ram Made from Standard Plumbing Parts - University of Georgia
Hydraulic Ram Made from Standard Plumbing Parts - University of GeorgiaHydraulic Ram Made from Standard Plumbing Parts - University of Georgia
Hydraulic Ram Made from Standard Plumbing Parts - University of Georgia
 
Installation and Drive Pipe Construction of the Bamford Hi-Ram Pump
Installation and Drive Pipe Construction of the Bamford Hi-Ram PumpInstallation and Drive Pipe Construction of the Bamford Hi-Ram Pump
Installation and Drive Pipe Construction of the Bamford Hi-Ram Pump
 
The Bamford Hi-Ram Pump
The Bamford Hi-Ram PumpThe Bamford Hi-Ram Pump
The Bamford Hi-Ram Pump
 
Hydraulic Ram Pump Mini-Project Report - Agriculture and Rural Development, A...
Hydraulic Ram Pump Mini-Project Report - Agriculture and Rural Development, A...Hydraulic Ram Pump Mini-Project Report - Agriculture and Rural Development, A...
Hydraulic Ram Pump Mini-Project Report - Agriculture and Rural Development, A...
 
Design and Construction of a Hydraulic Ram Pump
Design and Construction of a Hydraulic Ram PumpDesign and Construction of a Hydraulic Ram Pump
Design and Construction of a Hydraulic Ram Pump
 
New Developments in Hydraulic Ram Pumping
New Developments in Hydraulic Ram PumpingNew Developments in Hydraulic Ram Pumping
New Developments in Hydraulic Ram Pumping
 
Hydraulic Ram Pump: Plans, Assembly and Notes - Clemson University
Hydraulic Ram Pump: Plans, Assembly and Notes - Clemson UniversityHydraulic Ram Pump: Plans, Assembly and Notes - Clemson University
Hydraulic Ram Pump: Plans, Assembly and Notes - Clemson University
 
How a Hydraulic Ram Pump Works - Clemson University
How a Hydraulic Ram Pump Works - Clemson UniversityHow a Hydraulic Ram Pump Works - Clemson University
How a Hydraulic Ram Pump Works - Clemson University
 

Plus de Fatin62c

Hydram: A Low Carbon Technology - Lachana Shresthacharya
Hydram: A Low Carbon Technology - Lachana ShresthacharyaHydram: A Low Carbon Technology - Lachana Shresthacharya
Hydram: A Low Carbon Technology - Lachana ShresthacharyaFatin62c
 
Keshav Kumar Hydraulic Ram Pump
Keshav Kumar Hydraulic Ram PumpKeshav Kumar Hydraulic Ram Pump
Keshav Kumar Hydraulic Ram PumpFatin62c
 
Hydraulic Ram Pump Links, Book List and Much More
Hydraulic Ram Pump Links, Book List and Much MoreHydraulic Ram Pump Links, Book List and Much More
Hydraulic Ram Pump Links, Book List and Much MoreFatin62c
 
Nautilus Water Turbine Site Evaluations and Water Power Formulas
Nautilus Water Turbine Site Evaluations and Water Power FormulasNautilus Water Turbine Site Evaluations and Water Power Formulas
Nautilus Water Turbine Site Evaluations and Water Power FormulasFatin62c
 
Meribah Ram Pump: Installation and User Manual
Meribah Ram Pump: Installation and User ManualMeribah Ram Pump: Installation and User Manual
Meribah Ram Pump: Installation and User ManualFatin62c
 
Local Manufacture and Installation of Hydraulic Ram Pumps, for Village Water ...
Local Manufacture and Installation of Hydraulic Ram Pumps, for Village Water ...Local Manufacture and Installation of Hydraulic Ram Pumps, for Village Water ...
Local Manufacture and Installation of Hydraulic Ram Pumps, for Village Water ...Fatin62c
 
Installation of Hydraulic Ram Pump - Thapathali Campus, Kathmandu
Installation of Hydraulic Ram Pump - Thapathali Campus, KathmanduInstallation of Hydraulic Ram Pump - Thapathali Campus, Kathmandu
Installation of Hydraulic Ram Pump - Thapathali Campus, KathmanduFatin62c
 
Hydromissions Ram Pump Schematic - Hawke's Bay Survival
Hydromissions Ram Pump Schematic - Hawke's Bay SurvivalHydromissions Ram Pump Schematic - Hawke's Bay Survival
Hydromissions Ram Pump Schematic - Hawke's Bay SurvivalFatin62c
 
Hydromissions Ram Pump Brochure
Hydromissions Ram Pump BrochureHydromissions Ram Pump Brochure
Hydromissions Ram Pump BrochureFatin62c
 
Hydraulic Rams For Off-Stream Livestock Watering - University of Georgia
Hydraulic Rams For Off-Stream Livestock Watering - University of GeorgiaHydraulic Rams For Off-Stream Livestock Watering - University of Georgia
Hydraulic Rams For Off-Stream Livestock Watering - University of GeorgiaFatin62c
 
Hydraulic Ram; by Allen Inversin, VITA
Hydraulic Ram; by Allen Inversin, VITAHydraulic Ram; by Allen Inversin, VITA
Hydraulic Ram; by Allen Inversin, VITAFatin62c
 
Hydraulic Ram Pumps and Sling Pumps - ZetaTalk
Hydraulic Ram Pumps and Sling Pumps - ZetaTalkHydraulic Ram Pumps and Sling Pumps - ZetaTalk
Hydraulic Ram Pumps and Sling Pumps - ZetaTalkFatin62c
 
Hydraulic Ram Pumping in Rural Community Development - Rijswijk University
Hydraulic Ram Pumping in Rural Community Development - Rijswijk UniversityHydraulic Ram Pumping in Rural Community Development - Rijswijk University
Hydraulic Ram Pumping in Rural Community Development - Rijswijk UniversityFatin62c
 
Hydraulic Ram Pump System Design Manual - US Peace Corps, Philippines
Hydraulic Ram Pump System Design Manual - US Peace Corps, PhilippinesHydraulic Ram Pump System Design Manual - US Peace Corps, Philippines
Hydraulic Ram Pump System Design Manual - US Peace Corps, PhilippinesFatin62c
 
Hydraulic Ram Pump: Consumers guide - Delft University of Technology
Hydraulic Ram Pump: Consumers guide - Delft University of TechnologyHydraulic Ram Pump: Consumers guide - Delft University of Technology
Hydraulic Ram Pump: Consumers guide - Delft University of TechnologyFatin62c
 
Hydraulic Ram Pump - G.U.N.T., Equipment for Engineering Education
Hydraulic Ram Pump - G.U.N.T., Equipment for Engineering Education Hydraulic Ram Pump - G.U.N.T., Equipment for Engineering Education
Hydraulic Ram Pump - G.U.N.T., Equipment for Engineering Education Fatin62c
 
Hydraulic Ram Pump - Centre for Rural Technology, Nepal
Hydraulic Ram Pump - Centre for Rural Technology, NepalHydraulic Ram Pump - Centre for Rural Technology, Nepal
Hydraulic Ram Pump - Centre for Rural Technology, NepalFatin62c
 
Hydraulic Ram Handbook: A Guide for Policy Makers, Technicians and Users Base...
Hydraulic Ram Handbook: A Guide for Policy Makers, Technicians and Users Base...Hydraulic Ram Handbook: A Guide for Policy Makers, Technicians and Users Base...
Hydraulic Ram Handbook: A Guide for Policy Makers, Technicians and Users Base...Fatin62c
 
Hydraulic Piston Pumps Brochure - Ningbo Helm Tower Hydraulic Technology
Hydraulic Piston Pumps Brochure - Ningbo Helm Tower Hydraulic Technology Hydraulic Piston Pumps Brochure - Ningbo Helm Tower Hydraulic Technology
Hydraulic Piston Pumps Brochure - Ningbo Helm Tower Hydraulic Technology Fatin62c
 
Hydram Pumps - Chapter 1: Introduction
Hydram Pumps - Chapter 1: IntroductionHydram Pumps - Chapter 1: Introduction
Hydram Pumps - Chapter 1: IntroductionFatin62c
 

Plus de Fatin62c (20)

Hydram: A Low Carbon Technology - Lachana Shresthacharya
Hydram: A Low Carbon Technology - Lachana ShresthacharyaHydram: A Low Carbon Technology - Lachana Shresthacharya
Hydram: A Low Carbon Technology - Lachana Shresthacharya
 
Keshav Kumar Hydraulic Ram Pump
Keshav Kumar Hydraulic Ram PumpKeshav Kumar Hydraulic Ram Pump
Keshav Kumar Hydraulic Ram Pump
 
Hydraulic Ram Pump Links, Book List and Much More
Hydraulic Ram Pump Links, Book List and Much MoreHydraulic Ram Pump Links, Book List and Much More
Hydraulic Ram Pump Links, Book List and Much More
 
Nautilus Water Turbine Site Evaluations and Water Power Formulas
Nautilus Water Turbine Site Evaluations and Water Power FormulasNautilus Water Turbine Site Evaluations and Water Power Formulas
Nautilus Water Turbine Site Evaluations and Water Power Formulas
 
Meribah Ram Pump: Installation and User Manual
Meribah Ram Pump: Installation and User ManualMeribah Ram Pump: Installation and User Manual
Meribah Ram Pump: Installation and User Manual
 
Local Manufacture and Installation of Hydraulic Ram Pumps, for Village Water ...
Local Manufacture and Installation of Hydraulic Ram Pumps, for Village Water ...Local Manufacture and Installation of Hydraulic Ram Pumps, for Village Water ...
Local Manufacture and Installation of Hydraulic Ram Pumps, for Village Water ...
 
Installation of Hydraulic Ram Pump - Thapathali Campus, Kathmandu
Installation of Hydraulic Ram Pump - Thapathali Campus, KathmanduInstallation of Hydraulic Ram Pump - Thapathali Campus, Kathmandu
Installation of Hydraulic Ram Pump - Thapathali Campus, Kathmandu
 
Hydromissions Ram Pump Schematic - Hawke's Bay Survival
Hydromissions Ram Pump Schematic - Hawke's Bay SurvivalHydromissions Ram Pump Schematic - Hawke's Bay Survival
Hydromissions Ram Pump Schematic - Hawke's Bay Survival
 
Hydromissions Ram Pump Brochure
Hydromissions Ram Pump BrochureHydromissions Ram Pump Brochure
Hydromissions Ram Pump Brochure
 
Hydraulic Rams For Off-Stream Livestock Watering - University of Georgia
Hydraulic Rams For Off-Stream Livestock Watering - University of GeorgiaHydraulic Rams For Off-Stream Livestock Watering - University of Georgia
Hydraulic Rams For Off-Stream Livestock Watering - University of Georgia
 
Hydraulic Ram; by Allen Inversin, VITA
Hydraulic Ram; by Allen Inversin, VITAHydraulic Ram; by Allen Inversin, VITA
Hydraulic Ram; by Allen Inversin, VITA
 
Hydraulic Ram Pumps and Sling Pumps - ZetaTalk
Hydraulic Ram Pumps and Sling Pumps - ZetaTalkHydraulic Ram Pumps and Sling Pumps - ZetaTalk
Hydraulic Ram Pumps and Sling Pumps - ZetaTalk
 
Hydraulic Ram Pumping in Rural Community Development - Rijswijk University
Hydraulic Ram Pumping in Rural Community Development - Rijswijk UniversityHydraulic Ram Pumping in Rural Community Development - Rijswijk University
Hydraulic Ram Pumping in Rural Community Development - Rijswijk University
 
Hydraulic Ram Pump System Design Manual - US Peace Corps, Philippines
Hydraulic Ram Pump System Design Manual - US Peace Corps, PhilippinesHydraulic Ram Pump System Design Manual - US Peace Corps, Philippines
Hydraulic Ram Pump System Design Manual - US Peace Corps, Philippines
 
Hydraulic Ram Pump: Consumers guide - Delft University of Technology
Hydraulic Ram Pump: Consumers guide - Delft University of TechnologyHydraulic Ram Pump: Consumers guide - Delft University of Technology
Hydraulic Ram Pump: Consumers guide - Delft University of Technology
 
Hydraulic Ram Pump - G.U.N.T., Equipment for Engineering Education
Hydraulic Ram Pump - G.U.N.T., Equipment for Engineering Education Hydraulic Ram Pump - G.U.N.T., Equipment for Engineering Education
Hydraulic Ram Pump - G.U.N.T., Equipment for Engineering Education
 
Hydraulic Ram Pump - Centre for Rural Technology, Nepal
Hydraulic Ram Pump - Centre for Rural Technology, NepalHydraulic Ram Pump - Centre for Rural Technology, Nepal
Hydraulic Ram Pump - Centre for Rural Technology, Nepal
 
Hydraulic Ram Handbook: A Guide for Policy Makers, Technicians and Users Base...
Hydraulic Ram Handbook: A Guide for Policy Makers, Technicians and Users Base...Hydraulic Ram Handbook: A Guide for Policy Makers, Technicians and Users Base...
Hydraulic Ram Handbook: A Guide for Policy Makers, Technicians and Users Base...
 
Hydraulic Piston Pumps Brochure - Ningbo Helm Tower Hydraulic Technology
Hydraulic Piston Pumps Brochure - Ningbo Helm Tower Hydraulic Technology Hydraulic Piston Pumps Brochure - Ningbo Helm Tower Hydraulic Technology
Hydraulic Piston Pumps Brochure - Ningbo Helm Tower Hydraulic Technology
 
Hydram Pumps - Chapter 1: Introduction
Hydram Pumps - Chapter 1: IntroductionHydram Pumps - Chapter 1: Introduction
Hydram Pumps - Chapter 1: Introduction
 

Dernier

Sanyam Choudhary Chemistry practical.pdf
Sanyam Choudhary Chemistry practical.pdfSanyam Choudhary Chemistry practical.pdf
Sanyam Choudhary Chemistry practical.pdfsanyamsingh5019
 
Contemporary philippine arts from the regions_PPT_Module_12 [Autosaved] (1).pptx
Contemporary philippine arts from the regions_PPT_Module_12 [Autosaved] (1).pptxContemporary philippine arts from the regions_PPT_Module_12 [Autosaved] (1).pptx
Contemporary philippine arts from the regions_PPT_Module_12 [Autosaved] (1).pptxRoyAbrique
 
Student login on Anyboli platform.helpin
Student login on Anyboli platform.helpinStudent login on Anyboli platform.helpin
Student login on Anyboli platform.helpinRaunakKeshri1
 
1029-Danh muc Sach Giao Khoa khoi 6.pdf
1029-Danh muc Sach Giao Khoa khoi  6.pdf1029-Danh muc Sach Giao Khoa khoi  6.pdf
1029-Danh muc Sach Giao Khoa khoi 6.pdfQucHHunhnh
 
Call Girls in Dwarka Mor Delhi Contact Us 9654467111
Call Girls in Dwarka Mor Delhi Contact Us 9654467111Call Girls in Dwarka Mor Delhi Contact Us 9654467111
Call Girls in Dwarka Mor Delhi Contact Us 9654467111Sapana Sha
 
Beyond the EU: DORA and NIS 2 Directive's Global Impact
Beyond the EU: DORA and NIS 2 Directive's Global ImpactBeyond the EU: DORA and NIS 2 Directive's Global Impact
Beyond the EU: DORA and NIS 2 Directive's Global ImpactPECB
 
Employee wellbeing at the workplace.pptx
Employee wellbeing at the workplace.pptxEmployee wellbeing at the workplace.pptx
Employee wellbeing at the workplace.pptxNirmalaLoungPoorunde1
 
URLs and Routing in the Odoo 17 Website App
URLs and Routing in the Odoo 17 Website AppURLs and Routing in the Odoo 17 Website App
URLs and Routing in the Odoo 17 Website AppCeline George
 
Web & Social Media Analytics Previous Year Question Paper.pdf
Web & Social Media Analytics Previous Year Question Paper.pdfWeb & Social Media Analytics Previous Year Question Paper.pdf
Web & Social Media Analytics Previous Year Question Paper.pdfJayanti Pande
 
Software Engineering Methodologies (overview)
Software Engineering Methodologies (overview)Software Engineering Methodologies (overview)
Software Engineering Methodologies (overview)eniolaolutunde
 
Presentation by Andreas Schleicher Tackling the School Absenteeism Crisis 30 ...
Presentation by Andreas Schleicher Tackling the School Absenteeism Crisis 30 ...Presentation by Andreas Schleicher Tackling the School Absenteeism Crisis 30 ...
Presentation by Andreas Schleicher Tackling the School Absenteeism Crisis 30 ...EduSkills OECD
 
A Critique of the Proposed National Education Policy Reform
A Critique of the Proposed National Education Policy ReformA Critique of the Proposed National Education Policy Reform
A Critique of the Proposed National Education Policy ReformChameera Dedduwage
 
“Oh GOSH! Reflecting on Hackteria's Collaborative Practices in a Global Do-It...
“Oh GOSH! Reflecting on Hackteria's Collaborative Practices in a Global Do-It...“Oh GOSH! Reflecting on Hackteria's Collaborative Practices in a Global Do-It...
“Oh GOSH! Reflecting on Hackteria's Collaborative Practices in a Global Do-It...Marc Dusseiller Dusjagr
 
The Most Excellent Way | 1 Corinthians 13
The Most Excellent Way | 1 Corinthians 13The Most Excellent Way | 1 Corinthians 13
The Most Excellent Way | 1 Corinthians 13Steve Thomason
 
CARE OF CHILD IN INCUBATOR..........pptx
CARE OF CHILD IN INCUBATOR..........pptxCARE OF CHILD IN INCUBATOR..........pptx
CARE OF CHILD IN INCUBATOR..........pptxGaneshChakor2
 
microwave assisted reaction. General introduction
microwave assisted reaction. General introductionmicrowave assisted reaction. General introduction
microwave assisted reaction. General introductionMaksud Ahmed
 

Dernier (20)

Sanyam Choudhary Chemistry practical.pdf
Sanyam Choudhary Chemistry practical.pdfSanyam Choudhary Chemistry practical.pdf
Sanyam Choudhary Chemistry practical.pdf
 
Staff of Color (SOC) Retention Efforts DDSD
Staff of Color (SOC) Retention Efforts DDSDStaff of Color (SOC) Retention Efforts DDSD
Staff of Color (SOC) Retention Efforts DDSD
 
Contemporary philippine arts from the regions_PPT_Module_12 [Autosaved] (1).pptx
Contemporary philippine arts from the regions_PPT_Module_12 [Autosaved] (1).pptxContemporary philippine arts from the regions_PPT_Module_12 [Autosaved] (1).pptx
Contemporary philippine arts from the regions_PPT_Module_12 [Autosaved] (1).pptx
 
Student login on Anyboli platform.helpin
Student login on Anyboli platform.helpinStudent login on Anyboli platform.helpin
Student login on Anyboli platform.helpin
 
Mattingly "AI & Prompt Design: Structured Data, Assistants, & RAG"
Mattingly "AI & Prompt Design: Structured Data, Assistants, & RAG"Mattingly "AI & Prompt Design: Structured Data, Assistants, & RAG"
Mattingly "AI & Prompt Design: Structured Data, Assistants, & RAG"
 
Código Creativo y Arte de Software | Unidad 1
Código Creativo y Arte de Software | Unidad 1Código Creativo y Arte de Software | Unidad 1
Código Creativo y Arte de Software | Unidad 1
 
TataKelola dan KamSiber Kecerdasan Buatan v022.pdf
TataKelola dan KamSiber Kecerdasan Buatan v022.pdfTataKelola dan KamSiber Kecerdasan Buatan v022.pdf
TataKelola dan KamSiber Kecerdasan Buatan v022.pdf
 
1029-Danh muc Sach Giao Khoa khoi 6.pdf
1029-Danh muc Sach Giao Khoa khoi  6.pdf1029-Danh muc Sach Giao Khoa khoi  6.pdf
1029-Danh muc Sach Giao Khoa khoi 6.pdf
 
Call Girls in Dwarka Mor Delhi Contact Us 9654467111
Call Girls in Dwarka Mor Delhi Contact Us 9654467111Call Girls in Dwarka Mor Delhi Contact Us 9654467111
Call Girls in Dwarka Mor Delhi Contact Us 9654467111
 
Beyond the EU: DORA and NIS 2 Directive's Global Impact
Beyond the EU: DORA and NIS 2 Directive's Global ImpactBeyond the EU: DORA and NIS 2 Directive's Global Impact
Beyond the EU: DORA and NIS 2 Directive's Global Impact
 
Employee wellbeing at the workplace.pptx
Employee wellbeing at the workplace.pptxEmployee wellbeing at the workplace.pptx
Employee wellbeing at the workplace.pptx
 
URLs and Routing in the Odoo 17 Website App
URLs and Routing in the Odoo 17 Website AppURLs and Routing in the Odoo 17 Website App
URLs and Routing in the Odoo 17 Website App
 
Web & Social Media Analytics Previous Year Question Paper.pdf
Web & Social Media Analytics Previous Year Question Paper.pdfWeb & Social Media Analytics Previous Year Question Paper.pdf
Web & Social Media Analytics Previous Year Question Paper.pdf
 
Software Engineering Methodologies (overview)
Software Engineering Methodologies (overview)Software Engineering Methodologies (overview)
Software Engineering Methodologies (overview)
 
Presentation by Andreas Schleicher Tackling the School Absenteeism Crisis 30 ...
Presentation by Andreas Schleicher Tackling the School Absenteeism Crisis 30 ...Presentation by Andreas Schleicher Tackling the School Absenteeism Crisis 30 ...
Presentation by Andreas Schleicher Tackling the School Absenteeism Crisis 30 ...
 
A Critique of the Proposed National Education Policy Reform
A Critique of the Proposed National Education Policy ReformA Critique of the Proposed National Education Policy Reform
A Critique of the Proposed National Education Policy Reform
 
“Oh GOSH! Reflecting on Hackteria's Collaborative Practices in a Global Do-It...
“Oh GOSH! Reflecting on Hackteria's Collaborative Practices in a Global Do-It...“Oh GOSH! Reflecting on Hackteria's Collaborative Practices in a Global Do-It...
“Oh GOSH! Reflecting on Hackteria's Collaborative Practices in a Global Do-It...
 
The Most Excellent Way | 1 Corinthians 13
The Most Excellent Way | 1 Corinthians 13The Most Excellent Way | 1 Corinthians 13
The Most Excellent Way | 1 Corinthians 13
 
CARE OF CHILD IN INCUBATOR..........pptx
CARE OF CHILD IN INCUBATOR..........pptxCARE OF CHILD IN INCUBATOR..........pptx
CARE OF CHILD IN INCUBATOR..........pptx
 
microwave assisted reaction. General introduction
microwave assisted reaction. General introductionmicrowave assisted reaction. General introduction
microwave assisted reaction. General introduction
 

Home Built Hydraulic Ram Pumps - NW Independent Power Resources

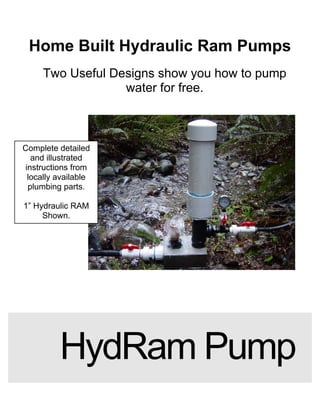
  • 1. Home Built Hydraulic Ram Pumps Two Useful Designs show you how to pump water for free. HydRam Pump Complete detailed and illustrated instructions from locally available plumbing parts. 1” Hydraulic RAM Shown.
  • 2. N W I N D E P E N D E N T P O W E R R E S O U R C E S HomeBuiltHydraulicRamPumps © NW Independent Power Resources 2003 P.O. Box 899 • North Bend, WA. 98045 Phone 425-888-3580 • Fax 425-831-1892 John Calhoun john.calhoun@nwipr.com
  • 3. Table of Contents Brief History of the Hydraulic Ram Pump… page 3 How does a Ram Pump work anyway?.. page 5 Getting Started on the HRP1-1 & 1-2.. page 14 Initial Assembly of the HRP1-1 & 1-2.. page 23 Initial Assembly Air Pressure Tank.. page 27 Building the Waste / Impetus Valve HRP1-1.. page 31 A firm foundation / concrete base.. page 34 Final Assembly HRP1-1 & 1-2.. page 38 Starting on the HRP2-2.. page 43 Building the Waste / Impetus Valve HRP2-2.. page 46 Initial assembly of the HRP2-2.. page 52 Air Pressure Tank of the HRP2-2.. page 55 HRP2-2 Check Valve with Snifter Port.. page 58 HRP2-2 Final Assembly.. page 62 Gauges and Valves.. page 65 Site Survey and setup.. page 67 Startup and troubleshooting.. page 74 Safety Considerations.. page 76 Authors Test Setup.. page 79 Parting Shot.. page 83 2
  • 4. Chapter 1: A Brief History of the Hydraulic Ram Pump. The Hydraulic Ram uses the energy in flowing water to lift a fraction of that water to a much greater height. he Hydraulic Ram Pump has been around for quite some time now, the first device in the modern era is reported to have been devised by an Englishman John Whitehurst in 1775. His design was not automatic and was controlled by opening and closing a stopcock. Easier than carrying water by hand but sure sounds like it was still a lot of work and very time consuming. The first reported fully automatic hydraulic ram was developed by Joseph and Etienne Montgolfier (of hot air balloon fame) in the late 1700’s (1793-1797). The original design performed well on first start-up but suffered from a design flaw which caused a loss or “dissolving” of air in its pressure chamber. This in turn caused an intensive banging in the entire mechanism. It was his son Pierce Montgolfier that solved the problem by developing and designing-in the air or “snifter” valve to reintroduce air into the chamber. (Most home built designs try to either simplify or work around the complexity of a snifter valve). Skip forward to the present and not very much has changed design wise in the last couple of hundred years. The UK based company Green & Carter now holds the original patents of both John Whitehurst and Joseph Montgolfier and are in business today manufacturing and installing their Vulcan Ram’s the world over. Visit them on the web at: http://www.greenandcarter.com/ T In the original Montgolfier design (diagram shown below), a water supply or delivery pipe feeds into a larger bored pipe that is turned up at the end and also necked down creating both a pinch point and a venturi effect causing the water to increase in speed and pressure at the exit. The iron ball, which was most probably a cannon ball that happened to be handy would fit easily into the larger bored pipe but was larger enough that it could not escape out the venturi at the end of the pipe. The force of the water flowing into the larger bore pipe would push the “cannon” ball down the bore and into the venturi suddenly stopping the flow of water. This sudden blockage of the delivery pipe would cause a dramatic increase in the water pressure behind the ball commonly referred to as “water hammer:” which in turn forced a small amount of water through a one-way valve and into the air chamber and delivery pipe. The pressure would then dissipate and release the iron ball, it would roll back into the larger bore area and the cycle would begin all over again. In operation the water would have been delivered in short pulses under high pressure into the air chamber which would act as a buffer, smoothing out the supply of water heading into the delivery pipe and on its way to the intended destination. The addition later of the snifter valve allowed a small amount of air to enter into the air chamber keeping the system operational for much longer periods of time between normal inspections and servicing. Some of these designs ended up being quite large with drive pipes exceeding 8 inches in diameter. That must have been quite a site to see them operate. (If anyone has any pictures or comments please find my contact information on the last page of this manual, I would like to include it in the future). 3
  • 5. Modern hydraulic rams all work on the same principle although the “cannon” ball inside a necked down iron pipe idea has been replaced with modern steel, brass, bronze, PVC and stainless fittings that can easily be obtained from your local hardware store. (More details on this later). For well over 100 years from the 1800’s through the early 1900’s rams were very popular in the United States until the general availability of publicly managed water mains and electric pumps became the mainstay of American life. Original ram pumps can still be occasionally found in antique stores the back of barns and other odd places mainly in the Eastern States where they were originally used in greater numbers. They are a subject of search for enthusiasts to collect and restore as well as put back into use today. Rams can be used to supply all the water you would ever need to a summer cottage, mountain cabin or modern homestead. Some of these systems are reported to have been in continual use supplying water for home and livestock with very low maintenance for the past 100 years or more. Antique Rams 4
  • 6. Chapter 2: How does a Ram Pump work anyway? TheHydraulicRamoperatesusingbasicprinciplesofphysics;thekinetic energyavailableinflowingwaterliftsafractionofthatwatertoamuchgreater height. I remember a number of years ago a favorite teacher telling me that all I ever needed to know about physics is “what goes up must come down”. Maybe that sounds a little too simplistic; however, much in the same simplistic way, water flowing downstream has a certain amount or value of energy associated with it. You are going to use that “kinetic” energy to your advantage by building a simple ram pump with two moving parts that will be able to push 10 to 15 percent of the collected water up hill into a holding tank or cistern. That might not sound like much volume; just remember that these pumps keep on going 24 hours a day 7 days a week. That continuous small flow of water will really add up over a period of time. Using these simple laws of physics to your advantage you can put this to work. All you need is: 1. A source of flowing water. (A minimum of 4 or 5 gallons a minute will work for the HRP1-1 Ram, 10 gpm or more is a great goal). 2. Enough of a fall. (This is the “head” 6 to 10 feet will work just fine for our Ram Pump designs). 3. A delivery storage site that is within a reasonable ratio for the type of pump being built. (The higher the delivery site is, the higher the working pressure will need to be in order to deliver the water). 5
  • 7. Once you have found your source of flowing water you will need to be able to collect it through a screened intake and route it preferably into a settling tank before sending the water to the ram pump through a drive pipe. Most installations will benefit from the water first entering this collection or settling tank. This is the only method that I would recommend you use for two reasons. First if this is for potable “drinking” water use you may need to collect water from several locations above the tank and therefore have multiple inputs into the tank from several different springs or artesian wells. Second the tank will act as a sand and silt trap settling larger material to the bottom and keeping all but the smallest particles out of your ram pump. This will greatly increase the longevity of your pump and the amount of time between periodic servicing. Setting up your barrel’s input and output lines several inches from the bottom will also help keep debris out of the pump. Another good idea would be to install a short piece of pipe out of the bottom side with a ball valve or cap on it. This will enable you to periodically open the valve and flush out much of the sand and silt that will build up over time in the collection tank. This is just one of the things you will need to do during your normal maintenance routine to keep your system in prime working condition. What does this look like? Read on. 6
  • 8. Site Details: A. Your source of water. (A creek, multiple springs, artesian well). Remember were trying to get 10GPM or more. Be sure to use a screened intake on these supply lines. B. Supply pipe(s). This can be inexpensive black poly pipe, sprinkler system pipe etc. from one or several sources. Consider using ball valves with bulkhead connectors for maintenance. C. Settling barrel. Large plastic garbage can, concrete culvert, 55 gallon steel drum. There are pluses and minuses to each. How long will it last, how easy to obtain or connect pipes to etc. What you have available will determine the best approach for you. If you’re going to be drinking the water you’re pumping, keep safety in mind. Be sure to have a way to securely cover the tank with a lid. D. The drive pipe. This is where you need a higher quality “rigid” pipe. I have successfully used the 160psi black poly pipe lifting water to over 90 feet. Installations will benefit from heavy duty PVC or even steel pipe. Ideally, the length of the pipe needs to be in the range of 5-7 to 10-12 times the head. (Formulas later on). The length of the drive pipe along with the waste valve set-up governs the cycle frequency, if it is too long the ram will cycle at a low or slow value. You will need to run some “tests” to find the middle ground for your locations best efficiency. The amount of rigidity in the drive pipe will determine the amount of pressure the system will be able to produce. I have even heard of installations where a more inexpensive pipe (poly) has been encased in concrete to add strength. 7
  • 9. E. The Hydraulic Ram itself. Locate the ram up out of the stream bed and harms way from seasonal high water etc. Build a form and use concrete for a solid foundation. Pay particular attention to setting it up as vertical and level as possible. This will decrease the wear and tear on the waste / impetus valve and one way valve’s bushings giving you even longer service. If you are setting up a year-round permanent installation consider how to protect your pump from curious animals and freezing by building an insulated enclosure around it. Also provide a way to drain the drive water back into the stream bed avoiding unnecessary erosion around your base. F. Delivery Pipe. Once again this is the place for inexpensive black poly pipe to your holding tank. Protect the run from animals and freezing by burying it. G. Tank Drain or Cleanout stub with a cap or ball valve. Be sure to make this a large enough diameter pipe to get a high volume of flow through to help remove sand, silt or other small debris. The only other alternative would be to drain and clean the tank as often as your site requires. In the next section we will explore the individual sequences that work together for the hydraulic ram pump to function. This is an exploration of elegant simplicity in action. 8
  • 10. Hydraulic Ram Sequence 1 illustrated. Sequence 1: Water from the source flows through the drive pipe (A) into the ram pump body, fills it and begins to exit through the waste or “impetus” valve (B). The Check Valve (C) remains in its normally closed position by both the attached spring and water pressure in the Tank (D) and the Delivery Pipe (E). (no water in the tank prior to startup) At this starting point there is no pressure in Tank (D) and no water is being delivered through exit Pipe (E) to the holding tank destination. 9
  • 11. Hydraulic Ram Sequence 2 illustrated. Sequence 2: Water is entering the pump through the Drive Pipe (A). The velocity and pressure of this column of water is being directed out the Waste Valve (B) which is overcome, causing it to close suddenly. This creates a momentary high pressure “water hammer” that in turn forces the Check Valve (C) to open allowing a high pressure “pulse” of water to enter the Pressure Tank (D). The air volume in the pressure tank is compressed causing water to begin flowing out of the Delivery Pipe (E) and at the same time closing the Check Valve (C) not allowing the water a path back into the pump body. As the air volume in the Pressure Tank (D) continues to re-expand, water is forced out of the Delivery Pipe (E) to the holding tank. 10
  • 12. Hydraulic Ram Sequence 3 illustrated. Sequence 3: Water has stopped flowing through the Drive Pipe (A) as a “shock wave” created by the “water hammer” travels back up the Drive Pipe to the settling tank (depicted earlier). The Waste Valve (B) is closed. Air volume in the Pressure Tank (D) continues expanding to equalize pressure, pushing a small amount of water out the Delivery Pipe (E). 11
  • 13. Hydraulic Ram Sequence 4 illustrated. Sequence 4: The “shock wave” reaches the holding tank causing a “gasp” for water in the Drive Pipe (A). The Waste Valve (B) falls open and the water in the Drive Pipe (A) begins to flow into the pump and out the Waste Valve (B). The Check Valve (C) remains closed. The air volume in the Pressure Tank (D) has stabilized and water has stopped flowing out the Delivery Pipe (E). At this point Sequence 1 begins all over again. 12
  • 14. The cycle is dependent on the length of the drive pipe and should cycle every 1.5 to 2 seconds. If your cycle is either too fast or too slow the output performance will suffer. Too fast of a cycle is a symptom of either a drive pipe being too short or the waste valve needing more weight. Try experimenting with both to determine what works well for your site. Start by keeping the drive pipe longer and adjusting the waste valve weights. Too long of a cycle is caused by an excessively long drive pipe or so much weight on the waste valve that the column of water has a hard time overcoming it. The goal here is to find a happy efficient medium. With a high volume of water and the 2” pumps be prepared to add quite a bit more weight to the waste valve than with the 1” pumps. The ideal length of the drive pipe is in the range of 5-7 to 10-12 times the fall. In order to reduce head loss due to friction, the length of the pipe divided by the diameter of the pipe should be within the range of 500 to 1,000. Here is an example using the formula on the high side 7 to 12: L = length of the drive pipe in inches D = Diameter of the drive pipe in inches L / D = 500 to 1000. 12’ of fall with a drive pipe diameter of 2” = 84 to 144’ of drive pipe. (12 x 7 = 84; 12 x 12 = 144) 84’ x 12” = 1008” in length. 1008 / 2” Diameter Pipe = (504) just in the bounds of our L / D. 144’ x 12” = 1728” in length. 1728 / 2” Diameter Pipe = (864) more of a middle ground. The air dome or pressure chamber is a vital component of the pump, not only improving efficiency in the process of allowing delivery of water to continue after the check valve has been closed it also cushions the shock created from the water hammer effect. If the air chamber fills with water completely, not only does the performance suffer but the ram’s body, drive pipe or the air chamber itself can be fractured from the resulting overpressure caused by the water hammer. This is one of the reasons why it is necessary to check the pump at least every 6 months and service the ram by adding air to the inner tube inside the chamber on designs without a snifter valve. Of course at the same time cleaning and checking the waste or “impetus” valve, check valve and pump body. Silt does manage to find its way in there and needs to be periodically cleaned and rinsed out. Now that you have a good idea of how the hydraulic ram is intended to operate, it’s time to move on and look at getting ready to build a working model for your own use. 13
  • 15. Chapter 3 - Getting Started on the: HRP1-1 & HRP1-2 Hydraulic Ram Pump. This chapter will start detailing the construction of the HRP1-1 Ram Pump. The only difference between the 1” and 2” Ram is the dimension of the waste / impetus valve. If you determine, that you have the volume of flowing water available, (greater than 10 gallons per minute) and also need a higher delivery volume then plan on replacing the 1” waste / impetus valve with the 2” size and that’s all there is to it. This Hydraulic Ram Pump design is efficient and very easy to build with common hand tools. The parts are readily available. Galvanized and PVC pipe fittings can be found at any of the larger hardware or plumbing supply stores. The two moving parts in this pump are the brass (silicon bronze) one way check valves. These are also widely used and easily found. I recommend that you spend the extra money and make sure you are buying the highest quality part you can find as these are a primary component of the “engine” that drives your pump. Some of the best on the market are the valves made by Simmons Manufacturing in McDonough, Georgia. You can write to them at: P.O. Box 1509; 1608 Conyers Road; McDonough, GA, 30253 or on line at this web address: http://www.simmonsmfg.com/online_catalog/valves/valves5.html HRP1-1 Completed Pump 14
  • 16. The valves I am recommending you use are the 503-SB 1”and 506-SB 2” Check Valves. In 2003 the 1” valve is about $22.00usd and the 2” valve is about $70.00usd. I have found these size valves in my local market that are foreign made for roughly half that cost or even less. These are fine to get started with if that is what your budget will allow, just plan to repair or replace them a bit sooner. The Simmons valves will last a very long time if care is given to making sure the pump is vertically oriented in its final installation. The total cost of parts to build the basic 1” pump is just under $100.00, the 2” pump will be just under $150.00 for the minimum setup. That doesn’t include any unions, valves or pressure gauges. Give consideration to these “accessories” such as ball valves and unions to make setup, takedown and maintenance easier. A Pressure gauge at least on the delivery will help you understand how the pump is performing for your particular installation. These can all be added at a later time of course. In the end you will have produced a remarkably portable, efficient, and durable ram pump that will demand very little maintenance and give you years of service constantly pumping water 24 hours a day. The tools you will need to build this pump are basic pipe wrenches for the plumbing parts and a socket set and hand wrenches to modify the check valve into a waste valve or “impetus” valve. Since one of the check valves will be located inside the pressure tank assembly you will need to fashion an Air Chamber/Check Mount Unit out of 1” and 2” galvanized street elbows. The 1” street elbow fits nicely inside the 2” elbow and is held in place temporarily with a stub of 1” galvanized pipe and gasket (or PVC) enabling you to permanently seal the two pieces together with fiberglass resin. Fiberglass with the associated hardener is available from any auto parts store in the auto body section. You will also need a small amount of acetone to thin down the fiberglass resin and a few acid swabbing brushes to work with the resin later on as it does shrink some when curing and it is possible to come apart from the 2” street el wall if it cures too fast. After reviewing the section on how to fabricate the Air Chamber/Check Mount Unit you may decide not to undertake this step yourself. The actual fabrication is straight forward; however the clearances are pretty tight for the finished unit and it’s not uncommon for this to take a couple of tries. Good news here is the parts are relatively inexpensive. If you decide not to undertake construction of this unit yourself you can order the completed part from me online at http://www.nwipr.com under “water” products. You can also call and order toll free at: 1-877-212- 3371 or write to me at: NWIPR; P.O. Box 899; North Bend, WA. 98045 costs to you are $65.00 plus shipping and handling to your location via UPS. Now it’s time to get started! I recommend that you read through the entire process first to get a clear picture in your mind of what you are going to need to get this project completed. I have assembled a list that you can take with you to the plumbing supply store to help you get the fittings and miscellaneous construction materials. 15
  • 17. HRP1-1 and HRP1-2 Parts List (Combination of galvanized and PVC as indicated). Air Chamber Parts Schedule 40 PVC: 1. 4” x 12” (or longer) Schedule 40 PVC Pipe. 2. 4” PVC Pipe Cap. (Rounded high pressure, not waste grade). 3. 4” slip to 2” female pipe thread PVC reducer / adaptor. 4. 12” Wheel Barrow Inner Tube. Pump Body Parts Galvanized: 5. 2” “T”, Female, (2 each required). 6. 2” Street Elbow 7. 1” Street Elbow 8. 2” X 1” Bushing 9. 2” x ¾” Bushing 10. 2” Close Nipple 11. 2” X 2 1/2” Nipple 12. 1” Close Nipple 13. ¾” Close Nipple 14. 1” Check Valve (2 each Required). Substitute one 2" valve for HRP1-2. Impetus / Waste Valve Conversion Parts: 15. Stainless Steel Coupling Nut 16. Stainless Steel Bolt 17. Stainless Steel Nut,“s” & Washers (valve weights) 18. Faucet Washer Construction Material: 19. Fiberglass resin and hardener 20. 11/4" Lavatory Washer 21. 5" stub of 1" threaded pipe 22. 100 grit sandpaper 23. PVC Primer and Cement 24. Black Paint (Spray and liquid rust inhibiting). 25. Teflon Thread Tape 16
  • 18. Step 1: Getting the parts ready. The galvanized plumbing parts you buy will be coated with cutting oil and sometimes even have grease of rust inhibitor sprayed on top of that. This combination will then cause dust and dirt to stick to them during shipping and handling. All of this oil and dirt build up will need to be completely removed in order for the paint and resin to properly adhere or “stick” to the fittings of your finished pump. I have used a combination cleaning process of spraying the parts with oven cleaner first, letting them sit for 20 minutes and then rinsing and scrubbing them in a 5 gallon bucket of hot soapy water. Don’t forget to use safety precautions when using products such as oven cleaner, rubber gloves and eye protection are highly recommended. Next I use a liquid dishwashing detergent in hot water that handles grease well. Pay special attention to the threads, use an old tooth brush to get into the thread grooves. Then rinse all your parts thoroughly in clean water to get the soap off. At this point I use an air compressor to blow off any remaining water. Compressed air works very well for getting water out of the threaded ends. You could also use paper towels and a blow dryer to get them as dry as possible fairly quickly. Even setting the parts out in the sunshine for an hour or two would really help. Leaving water on them will cause them to quickly develop a fine layer of rust. This is not really a problem; just wipe them down before final assembly. Hot soapy water & oven cleaner Galvanized parts with oven cleaner 17
  • 19. Step 2: Making the Holder Assembly This is where you will be sealing a 1” street el inside of a 2” street el using fiberglass resin to bond and permanently seal the parts together. This is the critical piece that separates the high pressure “output” side of the pump from the low pressure “input” side of the pump. Care needs to be taken to do the best job you can to eliminate the possibility of air leaks in the system. You will need to fashion a tool to hold the 1” street el securely with a gasket to keep the resin in place around the 1” street el until it sets up. This is fairly easy to do with a piece of 1” galvanized pipe a section of PVC lavatory drain pipe and a modified lavatory drain gasket. The drain gasket fits nicely around the end of the 1” pipe and is just a little too large to fit inside the 2” street el so you will need to trim it down some. An easy way to do this is to find an old screw driver where the handle fits tightly into the 1” pipe, chuck the screwdriver into your drill motor as shown and use 100 grit sandpaper to remove the excess material by running the motor and sanding off a little gasket material at a time. Galvanized Holder Tool PVC Holder Tool – Resizing Drain Gasket Take your time and check the fit often so you don’t remove too much material from the gasket too fast. Of course check the pipe for burrs and sharp edges prior to sanding, use caution and go slow. It has been my experience that you can get this resized very accurately in less than five minutes with lots of test fittings as part of the process. Do your best here as this is one of the most critical pieces in the production of this mount. It will keep the resin from leaking out before it completely sets up. This “tool” can also be made with 1” PVC glue on slip fitting and a few inches of 1” PVC pipe. 18
  • 20. Step 3: Building the Air Chamber / Check Valve Mount Parts to construct Valve Mount Fiberglass Resin Supplies Now that you have cleaned all the oil and grease off of the galvanized parts and dried them you’re ready to start the construction of the Check Valve Mount. Gather the parts and supplies together to begin the assembly process. You will need the 1” and 2” Street El’s, the modified lavatory drain gasket with the holder & a piece of PVC drain pipe, use this to cover the 1” threads during the resin pour. It’s handy but not necessary if you are careful. This is not a critical piece if you pour the resin slowly. Get together the rest of your supplies, fiberglass resin and hardener, a plastic Ziploc bag, scissors, acid swabbing brush and Vaseline to coat and protect the threads from the fiberglass. I like to use a piece of PVC drain pipe slipped over the 1” holder to back up the lavatory gasket. Use latex available at the auto parts store to keep the fiberglass resin off of your hands. They also aid in clean up, you just throw them out. Leveling the 2” Street Elbow Alternative holder without a vise 19
  • 21. Secure the 2” street el in a level position during the construction of the mount. I prefer to use a vise for this. Be careful not to have the vise holding it so tightly that it compresses the fitting out of round. Another method is to use a couple of other 2” fittings to secure the 2” street el in during the fiberglass pour if you don’t have a vise handy. Remember that the one way check valve will be installed on the 1” threads and will need to have a level, even seal. Take your time to get this as accurate as possible. Using one of your brushes carefully apply Vaseline to the male threads of the 1” street el and the female threads of the 2” street el. Also put a thin layer of Vaseline on the threads of the 1” holder tool you made and on the face of the gasket so it will be easy to get apart after it has set up. Take your time to get the 1” street el carefully positioned inside the 2” street el so that the check valve will be as vertical as possible and have clearance on all sides. This is where it is important to use the imported fittings. They have a thinner wall than the US made fittings and are more forgiving on the clearances. It is possible to make modifications to the 1” street el by carefully grinding the flare down on the female side to get a better fit. This should not be necessary with the fittings that come from Asia. Once you have the 2” street el in a supported level position carefully insert the 1” street el inside of it and attach the holder tool with the gasket. Shine a bright light into the top of the fittings and look from the holder side to see if there are any gaps around the gasket. If there aren’t any gaps, great, you’re ready to go to the next step. If you see light coming through then the resin will also come through and you don’t want that to happen. I have found with certain brands of fittings that you may have to either use more than one gasket or move the gasket further back on the threads to where the fit and seal is better. This is not a problem. Just use a thin coat of Vaseline on the parts so that you will be able to easily get them apart later on. Fiberglass when set up is a very tough and unforgiving material, great for the strength of the finished fitting not so great when you’re having trouble getting the holder tool out. During this fitting stage once again make sure that you are able to get the 1” threads into the center of the 2” female side of the street el. Sometimes with parts made in the USA the clearances are too tight to make this happen without grinding down some of the flare on the female side of the 1” street elbow, keep working on it until you have the necessary clearance for the 1” check valve. Testing 1” Street El fit Testing Check Valve Fit 20
  • 22. Now that you have the parts secured and level you’re ready to work with the fiberglass resin. Pour about 1” of the fiberglass resin into a Ziploc baggy (about 2 ounces or more) add hardener. Follow the directions on the resin can for adding the hardener; normally it’s about 15 drops of hardener to 1 oz of resin. Don’t add too much hardener as this will cause the resin to “hot set” faster than you want it to. I have found that when the weather is cooler about 35 drops into a baggy with an inch or so of resin seems to work just fine. This is also where a blow dryer can come in handy to warm up the fittings and also help get the fiberglass mixture warmed up. Mix the hardener thoroughly into the resin for 7-10 minutes or until the resin is the consistency of honey, still able to flow easily but not runny. If the resin gets thicker faster than you want it to you can either add more resin or a small amount of acetone to thin it back down to a workable consistency. When you’re ready to pour simply snip off one of the corners of the Ziploc bag and carefully fill the cavity around the 1” street el with the resin up to the level of the threads. At this point test the position of the 1” street el to make sure that you will have the clearance available for the 1” check valve. One way to ensure this is to temporarily thread in a 2” PVC fitting and then the 1” check valve just to make certain of the fit. Put these in finger tight and be careful not to get resin on them. Use a screwdriver to help orient the one way valve toward the center. Use caution when doing this to keep the parts level and true. Don’t pry hard enough that you cause the gasket to skew and the resin to start leaking out. At this point use your blow dryer to warm up the fittings and help the fiberglass hardening process get moving. Once again don’t get carried away with the heat here, we don’t want this to set up too quickly. Ziploc bag to mix the fiberglass resin Right after the pour 21
  • 23. Give it 24 hours to set up and then check your work. Remove the holder tool and gasket from the fittings. It is common for the resin to shrink up some during the curing process even to the point of starting to pull away from the sides of the fittings if it set “hot”. If you didn’t use to much hardener or external heat source this should not be a problem. Check the resin to make sure that there are no large cracks in it before continuing on. Check the casting and threads on the fittings; carefully clean up any globs of resin caused by spills off the insides of the fitting and threads with a small chisel or knife. Since you coated them with Vaseline any small spills should come off easily. Finish the clean up by using a small amount of acetone on a cotton shop towel to wipe out the fittings. At this point it’s a good idea to once again clean the mount unit with hot soapy water using your old tooth brush to get into the threads. Make sure you completely remove any Vaseline residue and dry the part thoroughly. Finished Part Rear View Before Cleaning Finished Part Top View before Cleaning Now is a good time to double check the fit of the 1” check valve to make sure that it has the necessary clearance to fit into the neck of the air chamber. If it doesn’t fit you will need to start the process over again. Good news is that the parts are fairly inexpensive and you now have experience. Once you have verified the fit is good it’s time to again level the part in the vise or another 2” fitting. Take a small amount of fiberglass resin thinned down with acetone and carefully smooth or “paint” it around the top and sides of the original fill. Making sure you get any small fissures or cracks between the hardened fiberglass and the sides of the 2” street el and also around the neck of the 1” street elbow. Keep the part level and warm and give it another 24 hours to completely set up. Congratulations you’re now finished with the most complicated piece of the entire pumps construction! Be sure you do your cleanup in the slop sink not the kitchen sink to keep your significant other happy! 22
  • 24. Chapter 4 - Initial Assembly of the HRP1-1 and HRP1-2 Hydraulic Ram Pump Main Body Lay out your parts before you get started just to make sure you aren’t missing any critical pieces. You will also need to have the following tools and supplies to do the job. 1. Two pipe wrenches capable of handling 2” parts. 2. Adjustable wrenches for installing any gauges or valves. 3. Teflon tape. ½” wide roll for the smaller parts and ¾” or 1” wide roll for the larger parts. 4. Liquid thread sealant to ease the installation of the Tank/Check Valve. It can also be sealed with Teflon tape and a wood dowel if you’re careful and patient. 5. PVC Primer and PVC Cement. 23
  • 25. 6. Paper towels or cotton shop towels for cleanup. 7. If you don’t have a vise handy you can also use tools with wooden handles to put into the plumbing parts for leverage and support while tightening the fittings. With that said this is a great reason to go out and get that bench vise. It will prove to be very useful especially during this phase of the construction project. Before you actually begin assembling the pump body, check it over for burrs and sharp edges that can either cut you during assembly or cause leaks later on. Of course the parts should be clean dry and oil free from your earlier work scrubbing them down with detergent. Start off by getting the male threads of your parts wrapped with several layers of Teflon tape. Use the wider tape for the bigger parts and thinner tape for the smaller parts. Start off by wrapping the tape on in a clockwise fashion while looking straight at the threads as shown. This will help in the installation by having the tape wrapped in the reverse direction from when you thread the parts together. It will help ensure more tape gets pushed into the gaps if the tail doesn’t get bunched up, not critical but it is helpful. Go ahead and get all the fittings taped up and put aside while you’re on a roll. Wrap the Teflon tape clockwise Getting the fittings ready 24
  • 26. Start with one of the 2” “Tees”, secure it in the vise so you have easy access to the right hand side and top opening. Thread the Tank / Check Mount into the end of the 2” “T” and torque it in pretty tight. The goal is to have the Tank / Check Mount as level as possible with the top opening of the 2” “T” as shown. This is a good time to have a piece of pipe for leverage or have your weight lifter nephew come over to help grunt out that last quarter turn. This is where having that vise is going to start paying real dividends. Now get the output “T” ready by installing the bushing. Prepare to Paint the inside of the pump body. 25
  • 27. Seal the holes with PVC plugs or use plastic wrap and rubber bands on the main body of the pump with the Check / Tank Mount, paint the inside by pouring some of the rust inhibiting paint directly into the large opening of the “T”. Tip the body back and forth and side to side to make sure you get good coverage all over the inside. Drain the paint back into the can and set on cardboard or newspaper with the 2” opening down to allow the excess paint to drain out. Use one of the inexpensive foam brushes to paint the inside of the other 2” “T” with the bushing. Set aside and give them time to dry. After a couple of hours come back and take the caps or covering off to get better air circulation and faster drying times. You could even speed drying a little more by using a blow dryer to warm the parts up. Remove the PVC caps or plugs for good air flow and set aside to let dry. 26
  • 28. Chapter 5 - Initial Assembly of the HRP1-1 and HRP1-2 Hydraulic Ram Pump Air - Pressure Tank Assembly. You will now need to have the length of 4” schedule 40 PVC pipe, rounded pipe cap, 4” PVC pipe coupler and bushing and the wheel barrow inner tube handy. This is a good time to read the instructions for the PVC primer and cement that you will be using. Because of the size of these fittings and the constant “water hammer” effect, use PVC primer as added insurance. Getting the parts together Sizing the Chamber to fit the inner tube Determine the length of the pressure chamber. With the 12” inner tube you will need to make sure you have the necessary room for it inside the pipe. Cut a section at least 10” long, this one is right at 14”. Since we are using the inner tube to maintain air volume the length is not critical for this particular design of pump. 27
  • 29. Cutting the 4” PVC, keep it square File off the sharp burrs and edges When you cut the pipe try to get the ends as square as possible. This will help ensure that more surface area is in contact with the fittings when glued together making the assembly as strong as possible. Once you have cut the section for the pressure tank there will be burrs and sharp edges. Since you will be installing a rubber inner tube inside this chamber under constant fluctuating pressure be sure to file off the larger burrs and then sand the shoulders to smooth and round them off. This will help ensure that the inner tube lasts a long time. Sanding the cuts smooth Use PVC Primer and Cement Wipe the filings and sanding residue from the inside of the pipe with shop towels. Get the PVC glue ready to go by mixing it up well. I like to start by installing the end cap; first step is to apply a layer of primer on the outside last 2” of the pipe and also inside the cap itself. Then move quickly to the PVC cement and repeat the process. Cover the last 2” of the pipe over the primer and then inside the pipe cap. Push the cap onto the pipe while rotating the cap a quarter turn or so. Be sure that the cap is completely seated onto the pipe. It will have a tendency to want to back off some for a few seconds, be aware of this and apply constant pressure to keep it well seated until 28
  • 30. the glue starts to set. This only takes a few seconds but is important to have as much surface area as possible holding the parts together. Remember that this will be operating under constant high pressure. The rounded schedule 40 PVC cap verses the cheaper squared off versions will handle this pressure better. Next move on to the 4” coupler, prepare the ends of the pipe and the fitting in the same manner with the primer first and then the cement. Pipe and Coupling with Purple Primer Pipe and Coupling with PVC Cement Do your best to work quickly so the PVC “glue” is still pliable and easy to work with during the assembly process. Remember to give it a good quarter turn while pressing together and hold in place securely for several seconds so the parts don’t try to back off each other while they are setting up. Coupler Glued on Inserting the inner tube with filler out 29
  • 31. Now is a good time to insert the 12” wheel barrow inner tube into the pressure chamber. With the filler tube towards the opening of course! You will want to be able to gain access to it periodically to keep it aired up. This looks like it would be difficult but by using an air chuck that is a longer one designed for large highway trucks dual tires you can get to it to add air later with very little trouble. Inner tube inside the tank Completed Pressure tank setting up Go ahead and add some air to it right now. There really is no set “pressure” you will want it to be firm and yet still pliable, the water will compress it further once the pump is in operation so it’s not really a critical issue. Use the primer and PVC cement to install the 4” Slip to 2” female pipe bushing. Allow the PVC to set up for the required amount of time, (check the PVC Cement instructions) and then install the 2” x 21/2” pipe coupler. Be careful when installing the steel pipe into PVC, pay close attention to threading the nipple in straight. It’s very easy to cross threads and cause yourself headaches. Also be cautious about how much pressure you put on the 4” tank while holding it steady in the vise. The PVC cement is completely unforgiving; you don’t want to have to start over on the tank at this point. 30
  • 32. Chapter 6 - Waste / Impetus Valve HRP1-1 & 2 Hydraulic Ram Pump Conversion of a One Way Valve into a Waste / Impetus Valve. Cut away view 1” One way check valve disassembled. For the HRP1-1 Pump you will need to have two each of the 1” one way check valves. For the 2” pump you will need to make a 2” Waste / Impetus valve conversion much in the same manner. Or choose another size for your Impetus valve greater than 1” but less than 2”. The only difference between the HRP1-1 and HRP1-2 is the size of the Waste / Impetus valve. Choosing the correct size depends on the amount of water flow you have available at the source and the amount you need to use or pump on any given day. Good rule of thumb would be 5-10 Gallons per minute stay with the 1”. If you have more than 10 GPM then you can make you choice based on the amount of water you need delivered and how much you want to spend on the valve. I will cover the modification of a 2” foot valve into a waste / impetus valve as another option for the HRP2-2 pump later on. 31
  • 33. First step in the conversion process is to remove the retaining nut, cup washer and spring as shown previously. Waste / Impetus Valve Conversion Parts Faucet Washer and Coupling Nut installed. You will need the Waste / Impetus Valve conversion parts you picked up off of your earlier list. The size of the coupling nut, standard nut and bolt is determined by which size valve you will be converting for your pump. Stainless steel is recommended but the lighter alloy parts will work well too especially in low water conditions where you need the lightest parts possible. The next step is to use a drill bit to enlarge the hole on the faucet washer to fit over the original valve stem firmly. I recommend you do this by hand and NOT with a drill motor. It will only take a few minutes and you will be able to have more control over how much material you remove. Insert the stem back through the body of valve and push the washer onto the end. Thread the coupling nut onto the stem and tighten securely. You may use a thread locking compound if you wish but I have never had any trouble with a coupling nut coming loose. 32
  • 34. Waste / Impetus Valve Weights Completed 1” Valve Conversion Next you will add the bolt and nut for additional weight to help keep the valve open longer and opening sooner during the cycle. The amount of weight you use will be based on the volume of water you have available and experimenting to find a “happy” medium during operation. This is a great place to start. That’s all there is to it. You have now converted the one way valve to a Waste / Impetus valve. Set aside and move on to the next section. 33
  • 35. Chapter 7 - The Concrete Base HRP1-1 & 2 Hydraulic Ram Pump Forming a solid foundation. Ram Pumps “thump” with each cycle when operating and need to be mounted securely to ensure that they don’t move around or tip over during operation. For a permanent installation be prepared to use pipe clamps set in a concrete pad or build a form to encase the lower part of the ram body in concrete to keep it well secured. Keep in mind that when you have your pump set up and operating you will want to make sure that the body is level and the air chamber is vertical. Take the time to get this as true as you can, the pump’s valves will last much longer. This is easy enough to do by using plumbing clamps, straps or building a small form and encasing the pump body in concrete. For this construction project I’ll be making a form out of 5/8” chipboard and encasing the pump body in concrete. Measuring to size the form – HRP2-2 Pieces for the HRP2-2 form Start by measuring the length of the pumps body. In this case the HRP2-2 was just over 12” long; to add weight and stability I’m going to make the base 8” wide. Measuring from what will be the bottom to the tops of the fittings is right at 4 1/2”. Using these two measurements we’ll cut out the pieces to build a form from the chipboard. 34
  • 36. For the HRP2-2 Pump Body: Your measurements may differ slightly based on assembly. I used 5/8” Chipboard, Drywall screws, and ½ bag of high strength concrete with a trowel and 5 gallon bucket to mix it up in. The base = 1 piece at: 8” x 12” The ends = 2 pieces at: 4 ½” x 8” The sides = 2 pieces at: 4 ½” x 13 ¼” (added 1 ¼” for the chipboard thickness) Use drywall screws to assemble the form. Be sure to pre-drill the holes or the chipboard will split. Assembling the form Centering the pump. Using the pieces you just cut to size assemble the sides around the base of the form. It’s a good idea to have the pump inside the form for the last piece. The end is being pushed out about 1/8” by the 2” Street El as you can see in the picture. Also shown are a couple of nuts to put under the 2” “T” collars as spacers to get the concrete completely around the base unit. Use a pencil to mark the center of the form so you can get the pump body very close to the center when you’re ready to pour. Don’t forget to stuff rags or paper towels into the pump inlet to keep the concrete mixture out. 35
  • 37. For the HRP1-1 & HRP1-2 Pump Body: I used 5/8” Chipboard, Drywall screws, and ¼ bag of high strength concrete with a trowel and 5 gallon bucket to mix it up in. The base = 1 piece at: 6 ½ ” x 8 ½” The ends = 2 pieces at: 4 ½” x 6 ½” The sides = 2 pieces at: 4 ½” x 9 ¾” (added 1 ¼” for the chipboard thickness) Use drywall screws to assemble the form. Be sure to pre-drill the holes or the chipboard will split. Leveling the HRP1-1 in the form HRP1-1 Setting up Don’t forget to put a couple of nuts or washers between the bottom of the form and the pump body so you will be able to get the body completely encased in the concrete. Use your torpedo level before and after the pour to make sure everything is as square and straight as possible. Use the PVC caps to close and protect the top of the pump and stuff rags or paper towels into the larger 2” opening to keep the concrete out. 36
  • 38. Both pumps setting up Be careful not to get concrete inside the body After pouring set the pumps and forms aside and give them at least 24 hours to set up before carefully removing the forms. HRP1-1 after removing forms Cleaning the 2” threads with wire “toothbrush” After a minimum of 24 hours remove the forms, the rags and paper towels from the pump body and use a wire brush to get any concrete residue out of the 2” threads. Be extremely careful with the base at this point as it will crack easily. Concrete does not reach its full strength for almost a month. You can help the process along by misting the concrete with water a couple of times a day. The base will turn more of a lighter ash color as id dries out and sets up. Be sure to give it at least two or three days hardening time before you continue the construction process. Or use extreme caution not to break the base. 37
  • 39. Chapter 8 - Final Assembly HRP1-1 & 2 Hydraulic Ram Pump Bringing it all together. At this point there is only one additional modification to check off before the final assembly can take place. Don’t worry this is a really easy one. The 1” One Way Check valve needs to seat nicely on the Check / Tank Mount unit you made earlier. Place the valve into your vise bottom side up, arrow pointing down and draw file the bottom of the valve so that it is square and flat. One Way Valve after draw filing. Draw filing is simply the process of laying the flat side of the file onto the work, holding the end of the file as well as the handle and pulling it towards you. In this manner you are able to keep an even constant pressure across the valve and get a nice flat area. Be sure to work from several angles turning 90 degrees one time 45 degrees another etc. until you have it worked down as shown. This only takes a few minutes as the brass is pretty soft stuff. Be sure to clean the debris out of the file often to get a nice flat surface area. 38
  • 40. Applying liquid thread sealant Installing the one way valve. Arrow up. Installing the One Way Check Valve onto the Tank / Check Mount is the next step. Using a liquid thread sealant makes the job a lot easier. You can also do this with Teflon tape and the round wooden handle of a paint brush or piece of dowel. It takes some time to get it wrapped in there but can be done. Keep in mind that this is the seal between the lower pressure drive side and the higher pressure output side of the pump. Do your best to make sure this is a secure and leak proof seal. Thread the valve on by hand as far as you can, then using another tool with a wooden handle inserted in the pump input for leverage tighten the valve with a pipe wrench. Work carefully so you do not crack or damage the fiberglass resin. Attaching the Waste Valve Attaching the “T” with bushing 39
  • 41. Next thread on the converted Waste / Impetus Valve and tighten down securely. It helps (and you should have) already installed the bushing into the “T” fitting. Thread this on with a 2” close nipple and tighten securely. Once again use plenty of Teflon tape and pay close attention to how much torque is applied being careful not to damage the fiberglass resin inside the Tank / Check Mount unit. The bushing should end up pointing in the general direction of where you will be pumping water. View from above the output “T” Another trick you can use for leverage is to “gently” secure the handle your using for leverage into your vise while the other end is inside the pump body. 40
  • 42. Pressure tank installed Adding ball valves, gauge and union Install the pressure tank on top of the 2” “T” and tighten it down securely make sure that you have aired up the inner tube first. I like to add a pressure gauge, union and shut off valves to my systems. This is not required but helps a lot with getting the system started as well as determining how it’s functioning. The added benefit of having a ball valve on the delivery line is that you can disconnect the pump without draining the water out of the delivery line. If there is any chance that the line will freeze its best to go ahead and drain it. This aids in servicing the pump and getting it back up and running quickly. I will go over this in more detail later on. 41
  • 43. Installing the 2” to 1” PVC Bushing Completed HRP1-1 Pump ready to paint Final step is installing the drive pipe connection. In this case I am using a 2” PVC Male with a 2” slip to 1” female pipe thread. Next is a 1” union and then the 1” ball valve with a threaded in connector for the drive pipe which is 100’ of 1” 160psi black poly pipe for one of the tests. The output pipe connector is for a couple of hundred feet of ½” black poly sprinkler pipe running up the hill to my delivery site. As for the HRP1-1 or HRP1-2 Homemade Hydraulic Ram Pumps, congratulations you’re done. (With this part anyway, next for you is the field work to install and test). 42
  • 44. Chapter 9 - Getting Started on the: HRP2-2 Hydraulic Ram Pump. This chapter will start detailing the construction of the HRP2-2 Ram Pump. The main difference between the HRP1-1 & 2 and the HRP2-2 is that we will not be using a captive air system (inner tube) and due to the larger size there is no benefit to the Tank / Check Mount. We will also explore using a 2” Brass Foot Valve for the Waste / Impetus Valve. You could just as easily use a larger 2” One Way Check Valve for this too. The 2” Foot Valve is somewhat cheaper and I want you to consider other changes and or modifications that may work well for you. There are lots of ways to accomplish the same end result and this is only one of them. I encourage and solicit feedback from people all the time and would love to hear about your great idea for a modification. This Ram is based on the dimension of the waste / impetus valve being 2”. Make sure that you have done your preliminary site survey and you have the continuous volume of water available to support this pump. If you determine, that you have the flow of water available, (greater than 10 gallons per minute) and also need the higher delivery volume this pump will produce then lets get started. This Hydraulic Ram Pump design is efficient and very easy to build with common hand tools. The parts are readily available. Galvanized and PVC pipe fittings can be found at any of the larger hardware or plumbing supply stores. The two moving parts in this pump are essentially the same, one (silicon bronze) one way check valve and one Brass Foot Valve. These are also widely used and easily found. For a permanent installation spend the extra money on the US made valves discussed in the earlier chapter. HRP2-2 Completed Pump, ready to paint 43
  • 45. HRP2-2 Parts List (Combination of galvanized and PVC as indicated). Air Chamber Parts Schedule 40 PVC: 1. 4” x 24” (or longer) Schedule 40 PVC Pipe. 2. 4” PVC Pipe Cap. (Rounded high pressure, not waste grade). 3. 4” slip to 2” female pipe thread PVC reducer / adaptor. Pump Body Parts Galvanized: 4. 2” “T”, Female, (2 each required). 5. 2” Street Elbow 6. 2” x ¾” Bushing 7. 2” Close Nipple (3 each) 8. 2” X 2 1/2” Nipple 9. ¾” Close Nipple 10. 2” One Way Check Valve 11. 2" Brass Foot Valve (Waste / Impetus Valve). Impetus / Waste Valve Conversion Parts: 12. Stainless Steel Coupling Nut (size base on the foot valve) 13. Stainless Steel Bolt 14. Stainless Steel Nut,“s” & Washers (valve weights) 15. Faucet Washer Construction Material: 16. 2" length of #14 Copper Wire 17. 100 grit sandpaper 18. PVC Primer and Cement 19. Black Paint (Spray and liquid rust inhibiting). 20. Teflon Thread Tape Miscellaneous Material: 21. 100 PSI Gauge 22. Ball Valves and fittings. 44
  • 46. Getting the parts ready. As we discussed before the galvanized plumbing parts you buy will be coated with cutting oil and sometimes even have grease of rust inhibitor sprayed on top of that. This combination will then cause dust and dirt to stick to them during shipping and handling. All of this oil and dirt build up will need to be completely removed in order for the paint and resin to properly adhere or “stick” to the fittings of your finished pump. Refer to the earlier chapter on cleaning and preparing the fittings to use in this RAM’s construction. Hot soapy water & oven cleaner Galvanized parts with oven cleaner Be sure to use proper safety precautions when using or handling various caustic cleaners, eye protection, rubber gloves, old clothes etc. Remember what your mom would have said. 45
  • 47. Chapter 10 - Waste / Impetus Valve for the HRP2-2 Hydraulic Ram Pump Conversion of a Foot Valve into a Waste / Impetus Valve. 2” Brass Foot Valve with screen removed The 2” Foot Valve makes a great Waste / Impetus Valve too when you have enough volume of water available; in excess of 10 gallons per minute would be a good rule of thumb. Keep in mind that your drive pipe should be the same size (or pretty close) to the size of your Waste / Impetus Valve’s NPT measurement. 46
  • 48. Parts list for this conversion are: 2.5” x 5/16” Bolt; Faucet Washer; 5/16” Coupling Nut; Standard 5/16” Nuts for adjusting weights. Check the sizes against your particular valve. Using a thread lock compound is once again up to you. 2” Foot Valve disassembled with parts Drilling out to fit the 5/16” hardware First step will be to completely disassemble the foot valve. Then using a good quality sharp bit drill out the top cross-bar to accommodate the 5/16” hardware. It would be best to use a drill press to create this “bushing” if you have one. It can be done with a hand drill if you are careful about keeping the bit as straight as you can. If you do use a hand drill plan on reaming the hole out slightly larger than the 5/16” so there is enough clearance to keep the bolt from binding up. You can do some test fits later on to make sure that the valve will work properly with no problems. Also take care not to run the bit into the lower section while drilling. Brass is pretty soft stuff and easy to gouge. The bit is in this position for a picture reference only. When you are actually drilling out the top you may want to use a rag to cover and protect the lower bushing. 47
  • 49. Sizing Valve Stem to add threads Clamping socket in vise to hold Valve Next you will need to add about four threads to the original valve stem. This isn’t difficult but you will need to have access to a tap and die set. Mark the stem with a felt pen before you start so you will be able to easily check your work. Clamp a socket into your vise or hold it firmly with the wrench or vise grips etc. Place the valve on the socket and use the die set to cut the extra threads. Go slow and be sure to run the die backwards a couple of times to keep the threads clean and cutting nicely. It’s also worth noting here that the coupling nuts come in different lengths. In this case I wound up using a hack saw to cut about a standard nuts width off of the coupling nut to give me extra clearance to work with. (see photo next page). Valve stem held in socket Adding 4 more threads to stem 48
  • 50. Ready to cut the head off bolt Adding chamfer before cutting threads In this step I am modifying a longer bolt which will allow me to stack on more nuts and washers for additional weight. I cut the head off of a 4.5” bolt with a hacksaw and am preparing to cut new threads with the tap and die set. You could use threaded rod for this if you want to. I’m doing it this way so that the constantly moving bolt be smooth where it runs through the top cross member of the foot valve. Marking the travel limits Cutting threads Temporarily assemble the lower portion of the valve so you will be able to mark the shaft at the maximum travel limit. Then set up the coupling nut and modified bolt in the vise to cut new threads down to the limit line. You can even stop a thread short just to be extra careful. All of this effort will help the valve body to last longer. 49
  • 51. After cutting threads The finished shaft. Testing the fit after cutting new threads into the bolt shaft be careful as the threads are sharp and there is the potential to get metal slivers stuck in your fingers. You can avoid some of this by lightly sanding the threads. Using cutting oil during this process will help some too. 2” Waste / Impetus Valve Conversion to Waste / Impetus Valve complete 50
  • 52. Carefully use a sharp bit to open up the faucet washer to the proper size working by hand. Once again this is not a good place to use the drill motor. Take your time and go from both directions to remove material until you get a nice snug fit. Attach the coupling nut to the valve stem with the faucet washer underneath it. Snug it up; this is a good place to use the thread lock. You want the valve disc to hang open around 3/8” this is determined by the threads you cut and the washer thickness. You can add a couple of washer here if need be. Then insert the modified bolt down through the top and into the coupling nut. Snug up the assembly and make sure that it will open and close as well as rotate smoothly. If it drags or hangs up anywhere you will need to take care of that by reaming out the top “bushing” you drilled out earlier. Once it works smooth and easy you are done with the modifications. Be sure to take quite a few extra nuts and washers with you to “tune” your pump on the initial setup. Keep in mind the clearance that you have available under the top cross piece. If you have a lot of volume available you will need quite a bit of weight for the valve to operate properly. In this case be prepared to either install a larger bolt or use another coupling nut to be able to add even more weight in the form of nuts and washers. Remember that the valve has to be able to close completely for the necessary water hammer effect to take place. Here is an example of what it took to get my 2” test pump working smoothly. Stacking on the weights! 51
  • 53. Chapter 11 - Initial Assembly of the HRP2-2 Hydraulic Ram Pump Lay out your parts before you get started same as before. Getting the parts for the HRP2-2 ready to go. The HRP2-2 is an overall larger pump and does not use the Tank / Check Mount or a Pressure Chamber with an inner tube. Because were not using an inner tube we will need to create a type of snifter valve to allow a small amount of air into the pressure chamber with each pump cycle. If you don’t do that you will either have to shut the pump down every few days and drain out some water or the air will eventually totally dissolve with the likely result of the air chamber failing under the resulting pressure. We’ll cover how to accomplish this in the next chapter. 52
  • 54. You will also need to have the following tools and supplies to do the job. 8. Two pipe wrenches capable of handling 2” parts. 9. Adjustable wrenches for installing any gauges or valves. 10.Teflon tape. ½” wide roll for the smaller parts and ¾” or 1” wide roll for the larger parts. 11.PVC Primer and PVC Cement. 12.Paper towels or cotton shop towels for cleanup. 13.If you don’t have a vise handy you can also use tools with wooden handles to put into the plumbing parts for leverage and support while tightening the fittings. With that said this is a great reason to go out and get that bench vise. It will prove to be very useful especially during this phase of the construction project. Before you actually begin assembling the pump body, check it over for burrs and sharp edges that can either cut you during assembly or cause leaks later on. Of course the parts should be clean dry and oil free from your earlier work scrubbing them down with detergent. Start off by getting the male threads of your parts wrapped with several layers of Teflon tape. Use the wider tape for the bigger parts and thinner tape for the smaller parts. Start off by wrapping the tape on in a clockwise fashion while looking straight at the threads as shown. This will help in the installation by having the tape wrapped in the reverse direction from when you thread the parts together. It will help ensure more tape gets pushed into the gaps if the tail doesn’t get bunched up, not critical but it is helpful. Go ahead and get all the fittings taped up and put aside while you’re on a roll. Wrap the Teflon tape clockwise Getting the fittings ready 53
  • 55. Start with one of the 2” “Tees”, secure it in the vise so you have easy access to the right hand side and top opening. Thread the Street El into the end of the 2” “T” and torque it in pretty tight. The goal is to have the Street El as level as possible with the top opening of the 2” “T” as shown. Run this in good and tight using additional leverage if necessary. Having that vise is going to be a big help here. Starting with a 2” “T” in the vise The 2” Street El installed Since this is a larger and taller pump in the end I added a 2” extension to the body so that the finished pump would have a larger concrete base to secure it. I used a foam brush to paint the inside of the pump body and then added the coupler and painted inside of it too. Once again a blow dryer will come in handy to warm up the parts and get them to dry quickly. With the 2” Close Nipples in Adding the 2” Coupler after painting inside 54
  • 56. Chapter 12 - Initial Assembly of the HRP2-2 Hydraulic Ram Pump Air - Pressure Tank Assembly. You’re going to need the same parts as the HRP1-1 and HRP1-2 pressure tank with the exception being that this tank will not have an inner tube so you will need to have more air volume available. I have heard that the length of the pressure tank with 4” PVC should be 18” long at the minimum longer still if you are working with larger sizes of drive pipe. For this model I have chosen a middle of the road length of 24” not including the pipe cap and coupler. As with the earlier pressure chamber be sure to use the PVC Primer along with the cement for the best results. Follow the instructions on the product for drying times to get the best results. Cut the length of the pressure chamber. Cutting the 4” PVC, keep it square File off the sharp burrs and edges When you cut the pipe try to get the ends as square as possible. This will help ensure that more surface area is in contact with the fittings when glued together making the assembly as strong as possible. Once you have cut the section for the pressure tank there will be burrs and sharp edges that should be removed with a round file and sandpaper. 55
  • 57. Sanding the cuts smooth Use PVC Primer and Cement Wipe the filings and sanding residue from the inside of the pipe with shop towels. Get the PVC glue ready to go by mixing it up well. I like to start by installing the end cap; first step is to apply a layer of primer on the outside last 2” of the pipe and also inside the cap itself. Then move quickly to the PVC cement and repeat the process. Cover the last 2” of the pipe over the primer and then inside the pipe cap. Push the cap onto the pipe while rotating the cap a quarter turn or so. Be sure that the cap is completely seated onto the pipe. It will have a tendency to want to back off some for a few seconds, be aware of this and apply constant pressure to keep it well seated until the glue starts to set. This only takes a few seconds but is important to have as much surface area as possible holding the parts together. Remember that this will be operating under constant high pressure. The rounded schedule 40 PVC cap verses the cheaper squared off versions will handle this pressure better. Next move on to the 4” coupler, prepare the ends of the pipe and the fitting in the same manner with the primer first and then the cement. Pipe and Coupling with Purple Primer Pipe and Coupling with PVC Cement 56
  • 58. Do your best to work quickly so the PVC “glue” is still pliable and easy to work with during the assembly process. Remember to give it a good quarter turn while pressing together and hold in place securely for several seconds so the parts don’t try to back off each other while they are setting up. Cap Installed Coupler Glued on 4” Slip x 2” FPT Bushing Glued in Completed 24” Pressure tank setting up Allow the PVC to set up for the required amount of time, (check the PVC Cement instructions) and then install the 2” x 21/2” nipple. Be careful when installing the steel pipe into PVC, pay close attention to threading the nipple in straight. It’s very easy to cross threads and cause yourself headaches. Also be cautious about how much pressure you put on the 4” tank while holding it steady in the vise. 57
  • 59. Chapter 13 - Modifying the 2” Check Valve - Adding a “Snifter” port HRP2-2 Hydraulic Ram Pump 2” Brass One Way Check Valve In the last chapter I talked about how we needed to make a modification to the One Way Check Valve to add a “type” of Snifter Valve or in this case a weep hole. Supplies you will need for this are a length of #14 copper house wire, a bit that is slightly larger than the wire, a scale, center punch and small hammer. The object here is to allow a small amount of air back into the low pressure side of the system on each stroke. Because were not using an inner tube for a captive air cushion we need to be able to replace the air that will eventually dissolve out of the chamber. It would then fill with water and stop working and in the process the pressure chamber would more than likely come apart. I have heard stories of a 4” glued on cap getting blown right off the end of the pipe destroying the pressure chamber in the process. Let’s agree to avoid that. 58
  • 60. Measuring depth to seat locating spot to drill weep hole Take a careful measurement with your scale from the bottom side of the check valve. This is the side that will be attaching to the HRP2-2 body, the low pressure side of the valve. Make sure you give yourself enough clearance below the seat, measure the same distance from the outside and mark with a center punch. Remember that you will need to be able to get to the hole from the inside to twist the wire. Also keep in mind this is brass so just a “tap” will do. Drilling the “snifter hole” Adding a chamfer Drill a hole through the wall of the check valve into the low pressure side. Then use a larger drill bit with your hand to put a small chamfer on the opening removing any burrs. 59
  • 61. #14 Copper Wire Wire through weep hole with twists Take the couple of inches of house wire and put a loop in one end, feed the wire from the inside of the valve body back out through the hole. Snip off the excess and put another loop in it to ensure it won’t come out. The wire should be able to wiggle around in the hole and move in circles freely. Installing a needle valve for more control. Needle valve installed. 60
  • 62. This variation will give you more control over how much water is released each pulse and conversely how much air is allowed back into the system. I found that it worked very nicely and would recommend that you spend the extra few dollars to install the adjustable needle valve. This is also something that can wait until next time as well. I removed the copper wire out of the snifter hole and drilled and tapped for a 1/8” NPT fitting. I used plenty of Teflon tape on the threads and tightened it securely. A potential bonus of this in cold climates would be to allow the water pulse to be diverted down and out a short piece of copper tube. Don’t forget it’s purpose is to let air back IN the system. For cold climates I would use a 2” check valve for the waste / impetus valve because you can install a fitting on it to route the water out of your enclosure. Such as a “T” with a cap on one side to give you access to start the pump and then once running you can screw back on. HRP2-2 Completed and ready to test. 61
  • 63. Chapter 14 - HRP2-2 Final Assembly HRP2-2 Hydraulic Ram Pump Bringing it all together, again. HRP2-2 Concrete Drying HRP2-2 Waste & Check Valve Installed Remove the forms from the HRP2-2 and allow the concrete to harden off for a few days if you can. Keep the concrete moist by misting it down with water occasionally. Remember that the concrete will take around 27 days to completely finish hardening. The first couple of days the edges will still be able to crumble pretty easily so be somewhat careful when your working with it. Install the converted Waste Valve (inlet to the left) and the modified One Way Check Valve onto the body of the pump. Use the wooden handle of a larger tool inserted into the pumps body for additional leverage and support. 62
  • 64. Using a 2lb Hammer Handle in the vise for added leverage. You will probably need to get someone to help you hold the base securely while you torque down the valves. If you have that vise handy you can securely hold another tool steady in its jaws and use the handle inside the pump for the extra leverage you will need. Go ahead and install the second or outlet “T” with the bushing already installed. You will want to wind up with the bushing at least facing the direction you will need to be pumping water. Be sure to torque this down plenty and give yourself plenty of clearance to install the delivery lines and any other fittings you may need later on. Now it’s time for the Pressure Chamber and the delivery valves and gauge as shown. Use plenty of Teflon tape when sealing the connections and use due caution when installing the Pressure Chamber and valves not to damage any of the PVC parts. 63
  • 65. Pressure Chamber Installed Adding the Pressure Gauge / Ball Valves Be sure to clean the threads with a wire toothbrush on the inlet prior to installing the valve assembly for the drive pipe. Once again make sure to use extreme caution when installing PVC into steel fittings not to cross-thread them. Take your time to look at where the threads start and match them up carefully. Once installed the HRP2-2 Hydraulic Ram Pump is complete. Ready for the Drive Valve HRP2-2 Complete Assembly 64
  • 66. Chapter 15 - Gauges and Valves All Hydraulic Ram Pumps Finishing Touches. I don’t call out the Gauges and Valves during the construction process but they are an integral part to getting the pump up and running as well as making the pumps easier to service. Gauges are important to assist in troubleshooting and to let you know how well the pump is performing. Let’s get started in going over the basic parts you should consider adding to your pump installation. Laying out some of the parts Completed Valve / Gauge Assembly Even with some of the larger 2” pumps that I have made I have yet to install a personal delivery system with anything but ½” poly pipe. I do like to take the output side from ¾” down to ½” on most pumps. If you have a need for a higher delivery volume and have the drive water available go for it. When setting this up be sure to include a valve to shut off the water supply to the pressure gauge when you’re not actually using it. The constant pulse of water pressure will make it short lived if you don’t protect it. The union is great for being able to disconnect the pump and bring it back to the shop to service or what have you. There is an O-ring on these that will come out really easily, don’t lose it. The Ball valve after that will allow you to get the pump started quickly and will also keep the delivery pipe full of water when servicing. It takes a while to get it full again if you don’t have one. Well worth the investment. 65
  • 67. 2” Drive Pipe Connection 1” Drive Pipe Connection Valves and unions on the input side are a necessary part if you are going to collect the pump in the winter and put it away or to just make it easier to disconnect and store. On the left is the connection assembly to go from 2” Schedule 40 PVC drive pipe into the pump. The 2” ball valve and union add about $20.00 to the cost of the pump. On the right is the slip / clamp connection for the 1” black poly drive pipe with the 1” ball valve and 1” union into the bushing going back to 2” pipe for the HRP1-1 inlet. It can also be helpful to install a pressure gauge on the inlet side but is not really necessary. With all of these “accessories” you will be adding an additional $50.00 or so depending on what you can find or discount. In my opinion the benefit is there to install them. 66
  • 68. Chapter 16 - Site Survey and Setup All Hydraulic Ram Pumps Getting the most out of your system. There are three main factors that will determine how much water your RAM can pump. They are the amount (Volume / Quantity) of water available at the source, the distance in vertical feet between the source and the pump called (FALL), and the vertical distance from the RAM pump to the end use area or storage tank called (LIFT). These three factors are inter-related and have the possible changing variable of (Volume / Quantity), therefore, it is very hard to get to an exact figure of gallons or liters per hour that a given pump will provide. The main objective is that we can determine whether or not a hydraulic ram will function in a given location. Do you have an good idea of the amount of water required over a given 24 hour period? Is this critical to your location and needs or are you able to build or provide a suitable storage tank of sufficient size to compensate for your average usage? There are formulas available that will help you get in the ballpark to determine whether or not a hydraulic ram will work at your location and then which hydraulic ram to build to get the delivery you need. If you have a need for a large quantity of delivered water and have plenty of volume to spare consider building two or three smaller hydraulic rams and setting them up in a battery with a single delivery pipe. (each ram must have it’s own drive pipe). 67
  • 69. The smaller 1” RAM the HRP1-1 will operate well on around 5 gallons of water flow per minute. The goal of course is to develop your source to provide at least 10 gallons per minute so this is eliminated as a critical factor. Beyond 10 gallons per minute consider moving to the 2” ram designs if you need the higher delivery volumes. Here is an example of average needs per day for a variety of uses; these figures are based on requirements for maximum consumption during hot summer weather: General usage home and farm. Each person per day, for all purposes: 50 gallons Each horse, dry cow or beef animal: 12 gallons Each milking cow: 35 gallons Each hog per day: 4 gallons Each sheep per day: 2 gallons Each 100 chickens per day: 4 gallons Average usage for home and yard fixtures. Drinking fountain, continuously flowing 50 to 100 gallons per day Each shower bath Up to 60 gallons To fill bathtub 30 gallons average To flush toilet 6 gallons To fill lavatory 2 gallons Dish washer – per load 3 gallons Automatic clothes washer – per load Up to 50 gallons 68
  • 70. An easy way to start the site survey is to calculate the volume and vertical distances as close as possible. Start out by building a small dam and using a 4” piece of PVC pipe (or larger) to catch the flow into a 5 gallon bucket to accurately estimate the flow of water available. Time the water flowing into the bucket to the nearest second. This will give you an accurate enough approximation to determine the flow. If you are working with a spring this can be a bit tricky, you can dig a small trench to start with and use 4” perforated pipe to collect the water. This will help you determine total flow. This is especially critical in low flow situations, be as accurate as possible. If there are multiple springs in the area consider tapping into these and running multiple collection pipes into your settling barrel until you have plenty of volume to work with. To determine the (Fall) start at the pumps location with a 5 foot stake and a carpenters level. Begin by holding the carpenters level on top of the stake, site down the edge of the level to where the “level-line” intersects the ground. Move the stake to this location and continue on until you reach the water sources location. If you have a laser pointer handy this can be very helpful too. If you are using a settling barrel the level of water in the barrel will be the final measurement. These measurements added together will give you the (Fall). Level Line Method Using this same procedure beginning at the ram pump site, determine the elevation or (Lift) to the storage tank or end use area. Another method of measuring the lift is by determining the pressure in the delivery pipe. If you already have this set up and it’s filled with water, take the standing water pressure reading at the ram site. This figure multiplied by 2.31 will give the (Lift) in feet fairly accurately. 69
  • 71. My nephew measuring the lift. Once this information has been collected you can use a calculation to see if the amount of water needed can be supplied by a ram. Below is a chart based on commercially available hydraulic rams with an efficiency factor of ~60 percent. With home built rams the rule of thumb is to cut that efficiency number to 33 percent. Actual numbers for the HRP1-1 are in the 44 percent range. I believe that this chart is taken from empirical data collected from a university study performed in the 1950’s. I’m going to include a couple of charts to give you an idea of how much water can be pumped by determining the differing lift to fall ratios for a hydraulic ram. This is provided to give an example of the capabilities, especially for larger installations. Larger ram pumps or even site built commercially sized rams can be used to supply entire communities with a reliable source of clean water. 70
  • 72. Maximum Pumping Rate, Q (gpd) Source Flow Rate, S (gpm) Efficiency of 60%. 2 5 10 15 20 30 50 100 2 864 2,160 4,320 6,480 8,640 12,960 21,600 43,200 3 576 1,440 2,880 4,320 5,760 8,640 14,400 28,800 4 432 1,080 2,160 3,240 4,320 6,480 10,800 21,600 5 346 864 1,728 2,592 3,456 5,184 8,640 17,280 Lift to Fall Ratio: L/F (ft/ft). 6 288 720 1,440 2,160 2,880 4,320 7,200 14,400 7 247 617 1,234 1,851 2,469 3,703 6,171 12,343 8 218 540 1,080 1,620 2,160 3,240 5,400 10,800 9 192 480 960 1,440 1,920 2,880 4,800 9,600 10 173 432 864 1,296 1,728 2,592 4,320 8,640 12 144 360 720 1,080 1,440 2,160 3,600 7,200 14 123 309 617 926 1,234 1,851 3,086 6,171 16 108 270 540 810 1,080 1,620 2,700 5,400 18 96 240 480 720 960 1,440 2,400 4,800 20 86 216 432 648 864 1,296 2,160 4,320 25 69 173 346 518 691 1,037 1,728 3,458 30 58 144 288 432 576 864 1,440 2,880 35 49 123 247 370 494 741 1,234 2,469 40 43 108 216 324 432 648 1,080 2,160 45 38 96 192 288 384 578 960 1,920 50 35 86 173 259 346 518 864 1,728 60 29 72 144 216 288 432 720 1,440 70 25 62 123 185 247 370 617 1,234 80 22 54 108 162 216 324 540 1,080 90 19 48 96 144 192 288 480 960 100 17 43 86 130 173 259 432 864 71
  • 73. The following charts will be showing liters from empirical studies done at one of the East Coast Universities in the late 50’s. This information is fairly widely available and is being used by several manufacturers of hydraulic rams. Since most of the world uses the metric system I wanted to include this information as well. The formula is: D = (S X F X E)/L Where: D = Amount of water delivered per 24 hours. S = Quantity of water supplied per minute. F = The Fall or height of the source above the ram. E = The efficiency of the ram. (Commercially made models use 0.66, home built designs use 0.33 the HRP1-1 is more in the neighborhood of 0.44). L = The Lift height to the point of use above the ram. The table below solves this formula (the result in the table is expressed in liters delivered in 24 hours) for rams with efficiencies of 66 percent, a supply of 1 liter per minute, and with the working fall and lift shown in the table. For supplies greater than 1 liter/minute, simply multiply by the number of liters supplied. Working Fall (m) Lift - Vertical height to which water is raised above ram (m) 5 7.5 10 15 20 30 40 50 60 80 100 125 1.0 144 77 65 33 29 19.5 12.5 1.5 135 96.5 70 54 36 19 15 2.0 220 156 105 79 53 33 25 19.5 12.5 2.5 280 200 125 100 66 40.5 32.5 24 15.5 12 3.0 260 180 130 87 65 51 40 27 17.5 12 3.5 215 150 100 75 60 46 31.5 20 14 4.0 255 173 115 86 69 43 36 23 16 5.0 310 236 155 118 94 71.5 50 36 23 6.0 282 185 140 112 93.5 64.5 47.5 34.5 7.0 216 163 130 109 82 60 48 8.0 187 149 125 94 69 55 9.0 212 168 140 105 84 62 10.0 245 187 156 117 93 69 12.0 295 225 187 140 113 83 14.0 265 218 167 132 97 16.0 250 187 150 110 18.0 280 210 169 124 20.0 237 188 140 72
  • 74. The Drive Pipe needs to be made from as rigid and non-flexible materials as you have available for maximum efficiency. The best performance would be to use galvanized iron pipe followed by schedule 80 PVC and then schedule 40 down to the 160 psi black poly and so on. The lighter PVC and poly pipes can also be encased in concrete to accomplish the necessary rigidity. The ideal length of the drive pipe is in the range of 5-7 to 10-12 times the fall. In order to reduce head loss due to friction, the length of the pipe divided by the diameter of the pipe should be within the range of 500 to 1,000. Here is an example using the formula: L = length of the drive pipe in inches D = Diameter of the drive pipe in inches L / D = 500 to 1000. 12’ of fall with a drive pipe diameter of 2” = 84 to 144’ of drive pipe. (12 x 7 = 84; 12 x 12 = 144) 84’ x 12” = 1008” in length. 1008 / 2” Diameter Pipe = (504) just in the bounds of our L / D. 144’ x 12” = 1728” in length. 1728 / 2” Diameter Pipe = (864) more of a middle ground. Shorter drive pipes equal quicker lighter cycles, longer drive pipes equal slower heavier cycles to a point. If your drive pipe is too long, then the resulting friction slows down the drive water velocity. For example if the drive pipe is 2x the recommended length then up to half of the output can be lost. The goal here is to find the median where you get optimum pump performance, use the averages and try to get in between them to start. Remember that the drive pipe diameter should be at least as large as the Waste / Impetus valve opening. Larger is generally ok, smaller is fine too if you expect the output to be diminished. For example 1.25” for the 1” ram and 1.5” for the 2” ram. My advice is to stay with the averages for your particular site with the aim of pumping higher volumes than you will actually use. Be sure that you are using screened intakes to keep all but the smallest particles out of the pump and keep the drive pipe as straight as is practical to avoid unnecessary losses due to friction. Don’t be overly concerned about this unless you are not getting anywhere near the performance you need from the pump. 73
  • 75. Chapter 17 - Startup & Troubleshooting All Hydraulic Ram Pumps Getting it running. You’ve done your homework; the collection point is set up with a weir or using drain tile from a spring into a cistern or barrel through screened intakes. You have the entire drive pipe and delivery pipe ran, the ram is hooked up to the system and your ready to go. First step is to purge the air from the drive pipe and fill the body of the pump completely with water. This is easily accomplished by opening the ball valve on the drive pipe and holding open the Waste / Impetus valve until clear water with no air in it is rushing out. When you release the valve it will slam shut suddenly and remain closed. Push it open again and release when the water builds up some volume. Every time the valve slams shut some water will be forced through the one way valve into the output side of the pump. If you have installed a valve on the output / delivery side of the pump you can close that valve and get the pump started very quickly. Once the pump begins to cycle on its own observe the pressure gauge and slowly open the delivery valve to allow some of the water to flow out. Once you have filled several vertical feet of the delivery pipe the backpressure will allow the pump to run continuously on its own and you will be able to open the delivery valve all the way. At this point the pump is running as it is intended to, the waste valve opening every second or two allowing water to escape before slamming shut again. If you do not have a pressure gauge and valve on the delivery side you will need to manually operate the waste / impetus valve until enough water is driven into the delivery pipe to create the necessary back pressure for it to operate on its own. The delivery pipe should be of a relatively small size such as the ½” black poly sprinkler system pipe. Having a larger diameter delivery pipe on a small system doesn’t gain you anything. In fact it will take longer to fill up and get the pump operating as well as costing more money. The only time to consider moving to a larger size pipe would be if you are going to install a battery of rams and even then the gain is questionable. Another inexpensive solution is to simply use garden hose if your deliver site is around 100’ or so this would work well. With the HRP1-1 and HRP1-2 types of captive air systems the bladder (wheel barrow inner tube) will start to lose pressure over time and the pump will deliver less and less volume. It’s a good idea to just plan on inspect the pump and air up the inner tube every 6 months or so. Make this a regular part of your preventive maintenance routine. 74
  • 76. Common Problems One of the most common problems is allowing air back into the system through the drive pipe. This happens when the water level in the cistern / barrel falls to the level of the drive pipe intake. If you observe that the Waste / Impetus valve has a rapid fluttering or chattering or the valve closes and stays shut. (at this point the cistern / barrel fills back up and you are scratching you head trying to figure out what happened). Make sure that your intakes are not clogged slowing the supply of water into the cistern / barrel. If it’s a low water level time of year consider how you might add to the supply of water into the cistern / barrel. If this is not possible consider adjusting the waste / impetus valve to a lighter weight. It will cycle using less water, and also pump less but this may get you through the low flow time. If the pump is cycling rapidly and you have the proper length of drive pipe installed consider adding more weight to the Waste / Impetus valve. This is more of an issue with the 2” and larger pumps. If you visit the pump and hear a banging or “knocking” sound this is an indication that the pressure tank has too much water in it. Drain the water out and add air to the inner tube. For higher lift systems over 100’ keep that inner tube “well” aired up to prevent this problem. For system with a “snifter” valve you may need to increase the amount of air that is allowed back into the system on each stroke. Consider drilling a slightly larger hole and moving to #12 wire or actually drill and tap in an adjustable needle valve. Needles, leaves and other natural debris have a way of getting into the system. Make sure that your intakes are screened and have protection from pests etc. Remove the waste / impetus valve and clean out the body of the ram. During the Fall season check your intakes regularly for buildup of debris. Keep the cistern / barrel covered with a lid. Winter time is probably the biggest problem you will encounter if you live in a climate that has “hard” freezes. If you keep the pump in service during this time of the year be sure to build an insulated box to cover it. You can install a “T” fitting on the waste / impetus valve of the HRP1-1 and HRP1-2 with a short piece of piping to carry the water outside of the box. In severe cold climates or for short periods of time it would be best to drain the pump and save the parts so to speak. The air chamber will be the first part to freeze up on the unit. Use caution when disconnecting the pump as the output side is under high pressure. Close the delivery valve and undo the union slowly to allow the pressurized water to escape. Likewise, shut off the drive water and disconnect the union. Turn the pump over to drain the water out of the body. Especially if you are going to leave the pump behind instead of taking it back to the house and stowing it in the garage. Now consider the delivery pipe, is it buried in such a way that you can be sure it won’t freeze solid? If you’re not sure it’s probably best to drain the water out of the delivery pipe. It is much easier to restart the pump than to thaw out a frozen delivery line. 75
  • 77. Chapter 18 - Safety Considerations All Hydraulic Ram Pumps Avoiding Common Pollutants. I want you to be thinking about where the water that powers your system comes from and for what purposes you will be using the delivered water. If you are collecting water from an open stream bed, do you know for a fact what that water has gone through before it reaches your location? If not I would highly recommend that you check it out. If you happen to be below some kind of current or former industrialized area then the potential for chemical and/or heavy metal contaminants is substantial. What about through ranch or farm country where there is or may be the heavy use of fertilizers or pesticides etc. not to mention the possibility of natural biological contaminants such as Fecal Coliform, E coli, Cryptosporidium and Giardia lamblia to name a few. Whether or not your planning on drinking this water untreated make sure that you perform due diligence in having it checked out. Every County in the USA has a County Extension Agent that can help you determine what has gone on in the agricultural areas currently and in times past. Most State Universities have departments dealing with water resources in some manner and can help out with water sampling and testing kits that are either free of charge or are a relatively small charge. This may be less relevant up in the mountains away from population centers but you should have knowledge of your water just to be on the safe side. Developing water sources for personal consumption from natural springs is one of the best tasting, purest and safest methods. My father did this on some property he purchased in Washington State in 1959 by hand digging a trench into the side of a ravine where a spring was flowing out. Partially filling the ditch with gravel and washed rock carried in and laying in the gravel pipe that he had hand drilled hundreds of holes into. He finished by covering the pipe with more gravel and rock, put layers of newspapers over the top of the gravel and backfilled the trench. This collected water from the spring and ran into a concrete distribution box used as a sand trap with a drain and out of this into a hand built 1000 gallon concrete storage tank. This is still the main and only source of water for this residence forty some years later. We have periodically had the water tested with no problems. This is the best tasting water you can imagine, treated water from a plant just cannot compare. Microbes are some of the more common things to look out for in your water supply. If you think there may be even a chance of this then please use some form of purification prior to consuming. I’m including an additional litany of the types of pollutants that the United States EPA tests for on a regular basis. Probably not an issue in 99% of installations, however, I really want you to check out your water supply. 76
  • 78. Microbes Coliform bacteria are common in the environment and are generally not harmful. However, the presence of these bacteria in drinking water is usually a result of a problem with the treatment system or the pipes which distribute water, and indicates that the water may be contaminated with germs that can cause disease. Fecal Coliform and E coli are bacteria whose presence indicates that the water may be contaminated with human or animal wastes. Microbes in these wastes can cause short-term effects, such as diarrhea, cramps, nausea, headaches, or other symptoms. Turbidity has no health effects. However, turbidity can interfere with disinfection and provide a medium for microbial growth. Turbidity may indicate the presence of disease causing organisms. These organisms include bacteria, viruses, and parasites that can cause symptoms such as nausea, cramps, diarrhea, and associated headaches. Cryptosporidium is a parasite that enters lakes and rivers through sewage and animal waste. It causes cryptosporidiosis, a mild gastrointestinal disease. However, the disease can be severe or fatal for people with severely weakened immune systems. EPA and CDC have prepared advice for those with severely compromised immune systems who are concerned about Cryptosporidium. Giardia lamblia is a parasite that enters lakes and rivers through sewage and animal waste. It causes gastrointestinal illness (e.g. diarrhea, vomiting, and cramps). 77
  • 79. Inorganic Contaminants Antimony, Asbestos, Barium, Beryllium Cadmium, Chromium, Copper Cyanide, Mercury, Nitrate Nitrite, Selenium, Thallium. Synthetic Organic Contaminants, including pesticides & herbicides 2,4-D, 2,4,5-TP (Silvex), Acrylamide, Alachlor, Atrazine, Benzoapyrene, Carbofuran, Chlordane, Dalapon, Di 2-ethylhexyl adipate, Di 2-ethylhexyl phthalate Dibromochloropropane, Dinoseb, Dioxin (2,3,7,8-TCDD), Diquat, Endothall, Endrin, Epichlorohydrin, Ethylene dibromide, Glyphosate, Heptachlor, Heptachlor epoxide Hexachlorobenzene, Hexachlorocyclopentadiene, Lindane, Methoxychlor, Oxamyl [Vydate], PCBs [Polychlorinated biphenyls], Pentachlorophenol, Picloram, Simazine, Toxaphene, Volatile Organic Contaminants Benzene, Carbon Tetrachloride, Chlorobenzene, o-Dichlorobenzene, p-Dichlorobenzene, 1,1- Dichloroethylene, cis-1,2-Dichloroethylene trans-1,2-Dicholoroethylene, Dichloromethane, 1,2- Dichloroethane, 1,2-Dichloropropane, Ethylbenzene, Styrene, Tetrachloroethylene, 1,2,4- Trichlorobenzene, 1,1,1,-Trichloroethane, 1,1,2-Trichloroethane, Trichloroethylene, Toluene, Vinyl Chloride, Xylenes, As you can see there is the potential for introduction of various forms of harm in our environment that come from both natural sources and the use / misuse or improper disposal of various chemicals and compounds used for all kinds of purposes in our society. Being aware of the dangers allows you to take the necessary steps to avoid potential harm to your family and friends. 78
  • 80. Chapter 19 - Test Setup HRP1-1 and HRP2-2 Rams The Test System Install & Results. First thing is to determine the flow of the stream using a 5 gallon bucket: Son timing the flow. ~60gpm! This is a small fast moving stream that has seasonal highs and lows. This was in the late fall during a pretty wet time in Washington State with a flow of > 60 gallons per minute. We chose to capture the water upstream where there is a culvert under the road. As you can see from the debris the stream moves lot’s of silt, sand, rocks and other “junk” downstream all the time. Especially in the winter months during high run off times. On the plus side this stream comes right out of a rock face about 2 miles upstream so it’s really the product of a high output spring. Many more are in the area adding to the flow all the time. 79
  • 81. The “screened” intake under water. Son and nephew hard at work building dam. The collection tank used for this setup is a 55 gallon food grade barrel. Nephew cutting holes for fittings. “Don’t look mom” Barrel placed in the creek bed. With two 1” pipes feeding into the barrel, we were able to fill it completely to overflowing in just over three minutes. There is enough Fall in less than 50 feet of supply pipe to overfill the barrel. 80
  • 82. Hooking up the drive pipe. The 1” pump in action. 160psi poly drive pipe. Delivery at top of ravine. 1gal in 1:45 The entire crew that helped me get this running. 81