How to Get Started in Social Media for Art League City
Clearing Paper Jams
1. Clearing Paper Jams
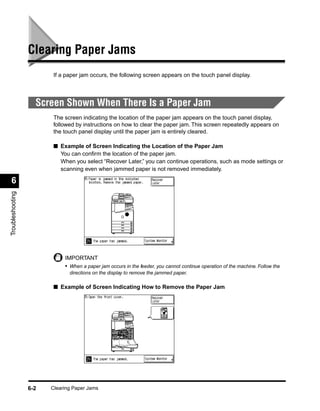
If a paper jam occurs, the following screen appears on the touch panel display.
Screen Shown When There Is a Paper Jam
The screen indicating the location of the paper jam appears on the touch panel display,
followed by instructions on how to clear the paper jam. This screen repeatedly appears on
the touch panel display until the paper jam is entirely cleared.
■ Example of Screen Indicating the Location of the Paper Jam
You can confirm the location of the paper jam.
When you select “Recover Later,” you can continue operations, such as mode settings or
scanning even when jammed paper is not removed immediately.
6
Troubleshooting
IMPORTANT
• When a paper jam occurs in the feeder, you cannot continue operation of the machine. Follow the
directions on the display to remove the jammed paper.
■ Example of Screen Indicating How to Remove the Paper Jam
6-2 Clearing Paper Jams
2. CAUTION
• When removing jammed originals or paper, take care not to cut your hands on the edges
of the original or paper.
• When removing jammed paper or when inspecting the inside of the machine, do not allow
necklaces, bracelets, or other metal objects to touch the inside of the machine, as this
may result in burns or electrical shock.
• When removing paper which has become jammed inside the machine, take care not to
allow the toner on the jammed paper to come into contact with your hands or clothing, as
this will dirty your hands or clothing. If they become dirty, wash them immediately with
cold water. Washing with warm water will set the toner and make it impossible to remove
the toner stains.
• When removing paper which has become jammed inside the machine, remove the
jammed paper gently to prevent the toner on the paper from scattering and entering your
eyes or mouth. If toner enters your eyes or mouth, wash them immediately with cold water
and consult a physician.
1 Inspect all areas indicated on the touch pages display, and remove
any jammed paper. See the appropriate
panel
for instructions on
how to find and remove jammed paper.
If jammed paper tears while being removed, be sure to remove any remaining pieces from
inside the machine. 6
Troubleshooting
● Display indicating locations of the paper jam and page number instructing
how to remove jammed paper.
Duplexing unit
(See ‘Clearing Paper Jams in the
Duplexing Unit,’ on p. 6-9.)
Main unit
(See ‘Clearing Paper Jams in
Exit slot
the Main Unit,’ on p. 6-6.)
(See ‘Clearing Paper Jams in
the Exit Slot,’ on p. 6-11.)
Stack bypass
Lower left cover (See ‘Clearing Paper Jams in
(See ‘Clearing Paper Jams in the Stack Bypass,’ on p. 6-16.)
the Exit Slot,’ on p. 6-11.)
Upper right cover
Paper drawer (See ‘Clearing Paper Jams in
(See ‘Clearing Paper Jams in a the Upper Right Cover,’ on p. 6-
Paper Drawer,’ on p. 6-19.) 14.)
Clearing Paper Jams 6-3
3. 2 If a paper jam occurs within the optional units, see the instructions
on the following pages.
Cassette Feeding Unit-W1
(See ‘Clearing Paper Jams in the Cassette Feeding Unit-W1,’ on p. 7-5.)
Paper Deck-L1
(See ‘Clearing Paper Jams in the Paper Deck-L1,’ on p. 7-10.)
6
Troubleshooting
Feeder (DADF-1)
(See ‘Clearing Paper Jams in the Feeder,’ on p. 7-28.)
6-4 Clearing Paper Jams
4. Finisher-J1
(See ‘Clearing Paper Jams in the Finisher-J1,’ on p. 7-37.)
Saddle Finisher-G1
(See ‘Clearing Paper Jams in the Saddle Finisher-G1,’ on p. 7-52, ‘Clearing Paper
Jams in the Saddle Stitcher Unit,’ on p. 7-54, ‘Clearing Paper Jams in the Puncher
Unit,’ on p. 7-67.)
6
Troubleshooting
Inner 2way tray-A1
(See ‘Clearing Paper Jams in the Inner 2way Tray-A1,’ on p. 7-74.)
Clearing Paper Jams 6-5
5. 3 After you have cleared all paper jams at the locations indicated on
the touch panel display, restore all levers and covers to their original
positions.
4 Continue operations, following the instructions displayed on the
touch panel display.
Once you have cleared the paper jam in locations other than the feeder, the print operation
restarts.
If there is remaining paper to be removed, a screen indicating how to clear that paper jam
appears on the touch panel display. Repeat the procedure from step 1.
Clearing Paper Jams in the Main Unit
If a paper jam occurs in the main unit, a screen similar to the one shown below appears on
the touch panel display. Check where the jam occurred, and follow the procedure described
below and the procedure that appears on the touch panel display, to remove the jammed
paper.
6
Troubleshooting
1 Open the front cover of the main unit.
6-6 Clearing Paper Jams
6. 2 Move the green lever in the direction of the arrow.
3 Remove any paper remaining in the fixing unit.
6
Troubleshooting
4 Turn the green knob (2 places) in the direction of the arrow, and
remove any jammed paper.
CAUTION
• The parts located around the knob are subject to high temperatures. When
removing jammed paper, take care not to touch anything in this area except the
green knob.
Clearing Paper Jams 6-7
7. 5 Return the green lever to its original position.
6 Close the front cover of the main unit.
6
Troubleshooting
CAUTION
• When closing the cover, be careful not to get your fingers caught, as this may result
in personal injury.
7 Follow the instructions on the touch panel display.
NOTE
• For details, see ‘Screen Shown When There Is a Paper Jam,’ on p. 6-2.
6-8 Clearing Paper Jams
8. Clearing Paper Jams in the Duplexing Unit
If a paper jam occurs in the duplexing unit, a screen similar to the one shown below appears
on the touch panel display. Check where the jam occurred, and follow the procedure
described below and the procedure that appears on the touch panel display, to remove the
jammed paper.
1 Open the front cover of the main unit.
6
Troubleshooting
2 Lift the green lever of the duplexing unit with one hand, and pull out
the jammed paper with the other hand.
Clearing Paper Jams 6-9
9. 3 Return the green lever to its original position.
4 Close the front cover of the main unit.
6
Troubleshooting
CAUTION
• When closing the cover, be careful not to get your fingers caught, as this may result
in personal injury.
5 Follow the instructions on the touch panel display.
NOTE
• For details of the screen indicating how to remove the paper jam, see ‘Screen Shown When
There Is a Paper Jam,’ on p. 6-2.
6-10 Clearing Paper Jams
10. Clearing Paper Jams in the Exit Slot
If a paper jam occurs in the exit slot, a screen similar to the one shown below appears on the
touch panel display. Check where the jam occurred, and follow the procedure described
below and the procedure that appears in the touch panel display, to remove the jammed
paper.
1 Open the front cover of the main unit. 6
When the Saddle Finisher-G1 (option; see p. 7-47) is attached, move the finisher away from
the main unit.
Troubleshooting
Clearing Paper Jams 6-11
11. 2 Move the green lever in the direction of the arrow.
3 Open the lower left cover of the main unit.
6
Troubleshooting
4 Lift the green lever and remove any jammed paper.
CAUTION
• The parts located around the green lever of the exit slot guide are subject to high
temperatures. When removing jammed paper, take care not to touch anything in this
area except the lever.
6-12 Clearing Paper Jams
12. 5 Close the lower left cover.
CAUTION
• When closing the cover, be careful not to get your fingers caught, as this may result
in personal injury.
6 Return the green lever to its original position.
6
Troubleshooting
7 Close the front cover.
CAUTION
• When closing the cover, be careful not to get your fingers caught, as this may result
in personal injury.
Clearing Paper Jams 6-13
13. 8 Follow the instructions on the touch panel display.
NOTE
• For details of the screen indicating how to clear the paper jam, see ‘Screen Shown When
There Is a Paper Jam,’ on p. 6-2.
Clearing Paper Jams in the Upper Right Cover
If a paper jam occurs inside the upper right cover, a screen similar to the one shown below
appears on the touch panel display. Check where the jam occurred, and follow the procedure
described below and the procedure that appears on the touch panel display, to remove the
jammed paper.
6
Troubleshooting
1 Open the upper right cover of the main unit.
When the Paper Deck-L1 (option; see p. 7-9) is attached, move the paper deck away from
the main unit.
IMPORTANT
• The upper right cover cannot be opened with the stack bypass opened. If the stack bypass is open,
first close the stack bypass, then open the upper right cover.
6-14 Clearing Paper Jams
14. 2 Remove any jammed paper.
3 Close the upper right cover of the main unit.
When the Paper Deck-L1 (option; see p. 7-9) is attached, reattach the paper deck to the
main unit.
6
Troubleshooting
CAUTION
• When closing the cover, be careful not to get your fingers caught, as this may result
in personal injury.
4 Follow the instructions on the touch panel display.
NOTE
• For details of the screen indicating how to remove the paper jam, see ‘Screen Shown When
There Is a Paper Jam,’ on p. 6-2.
Clearing Paper Jams 6-15
15. Clearing Paper Jams in the Stack Bypass
If a paper jam occurs in the stack bypass, a screen similar to the one shown below appears
on the touch panel display. Check where the jam occurred, and follow the procedure
described below and the procedure that appears on the touch panel display, to remove the
jammed paper.
6
1 Remove all paper from the stack bypass.
Troubleshooting
2 Remove any jammed paper.
6-16 Clearing Paper Jams
16. 3 Close the stack bypass.
4 Open the upper right cover of the main unit.
When the Paper Deck-L1 (option; see p. 7-9) is attached, move the paper deck away from
the main unit.
6
Troubleshooting
5 Remove any jammed paper.
Clearing Paper Jams 6-17
17. 6 Close the upper right cover of the main unit.
When the Paper Deck-L1 (option; see p. 7-9) is attached, reattach the paper deck to the
main unit.
CAUTION
• When closing the cover, be careful not to get your fingers caught, as this may result
in personal injury.
6 7 Follow the instructions on the touch panel display.
NOTE
Troubleshooting
• For details of the screen indicating how to clear the paper jam, see ‘Screen Shown When
There Is a Paper Jam,’ on p. 6-2.
6-18 Clearing Paper Jams
18. Clearing Paper Jams in a Paper Drawer
If a paper jam occurs in a paper drawer, a screen similar to the one shown below appears on
the touch panel display. Check where the jam occurred, and follow the procedure described
below and the procedure that appears on the touch panel display, to remove the jammed
paper.
1 Open the upper right cover of the main unit. 6
When the Paper Deck-L1 (option; See p. 7-9) is attached, move the paper deck away from
the main unit.
Troubleshooting
Clearing Paper Jams 6-19
19. 2 Remove any jammed paper.
3 Press and release the paper drawer release button of the paper
drawer indicated on the touch panel display, until the paper drawer
releases.
6
Troubleshooting
4 Pull out the paper drawer.
6-20 Clearing Paper Jams
20. 5 Remove any jammed paper.
6 Return the paper drawer to its original position.
6
Troubleshooting
CAUTION
• When returning the paper drawer to the original position, be careful not to get your
fingers caught, as this may result in personal injury.
7 Close the upper right cover of the main unit.
When the Paper Deck-L1 (option; see p. 7-9) is attached, reattach the paper deck to the
main unit.
Clearing Paper Jams 6-21
21. 8 Follow the instructions on the touch panel display.
NOTE
• For details of the screen indicating how to clear the paper jam, see ‘Screen Shown When
There Is a Paper Jam,’ on p. 6-2.
6
Troubleshooting
6-22 Clearing Paper Jams