SlideShare une entreprise Scribd logo
1  sur  8
Leave only the bare minimum in the case! You will find it much easier to work with the parts and especially the tubing the more room you have on the inside of the case.
I recommend first installing the radiator, I chose to keep it mounted internally, however not all case allow for this.  Some people with smaller cases mount them off of the back of the case.  I used L brackets mounted in my lower drive bays in my Antec 1200.
Cable management is huge when it comes to airflow in a PC case!  The better routed all of your cables and wires are, the better the airflow.  Improved airflow is always going to help lower your temps.  Before I mounted the radiator, I made sure my 120mm fan wires could easily be tucked away after the radiator was installed.  Thinking ahead goes a long way!
With the Antec 1200 the front 2 120mm fans are installed behind the metal grills behind the filters.  I decided to go with a push/pull configuration on my radiation to keep my temps as low as possible.  So I then mounted 2 Scythe Ultra Kaze fans on the backside of the rad using the pre-tapped 6-32’s holes on the radiator.  I picked up the 6-32 screws at Lowe’s.
This is what the Black Ice Extreme 240mm radiator looks like with the 2 120mm fans mounted on the backside.  Now I am ready to mount the radiator in my case.
As you can see, I made sure that the 4 L brackets were lined up perfectly with the 2 top and 2 bottom screw holes on the rad.  Since my front 2 fans are mounted in the 120mm Antec fan enclosures, all I had to do was shoot the 4 screws through the L brackets and into the radiator.  Be very careful not to go to far, as the screws can damage the radiator fins if the are to long!  Measure the screws carefully, I used a pair of wire strippers/bolt cutters to cut them down to size!
Initially I mounted the reservoir to the back of my case, later I moved it to the inside.  Most cases have holes on the back for water tubes, so mounting the radiator or the reservoir this way is made easier!  Once you have everything mounted, route the tubes and connect everything.
I mounted my Liang D5 pump at the bottom of my case using double sided velcro tape.  It is very strong and works quite well, also it helps with vibration from the pump!  Now that everything is installed, all you have to do is fill the reservoir with distilled water ( I use a silver kill coil instead of a biocide, silver kills anything harmful that could live in your water) and you are ready to go!

Contenu connexe

Similaire à Wcpp.html

TOOLS DOMRAC-WPS Office.ppt
TOOLS DOMRAC-WPS Office.pptTOOLS DOMRAC-WPS Office.ppt
TOOLS DOMRAC-WPS Office.pptJerlizjoyCasaba
 
How To Solder V3.5
How To Solder V3.5How To Solder V3.5
How To Solder V3.5JasonDeMoe
 
Daniel Miersma's Senior Project Final Report
Daniel Miersma's Senior Project Final ReportDaniel Miersma's Senior Project Final Report
Daniel Miersma's Senior Project Final ReportDaniel Miersma
 
Insructables fm listening bug
Insructables   fm listening bugInsructables   fm listening bug
Insructables fm listening bugzubeditufail
 
How to retrofit lancer 2008 headlights
How to retrofit lancer 2008 headlightsHow to retrofit lancer 2008 headlights
How to retrofit lancer 2008 headlightsalxlo
 
Essential for electronic
Essential for electronicEssential for electronic
Essential for electronicmvelozo
 
Believe It or Not
Believe It or NotBelieve It or Not
Believe It or Notg8rbuilder
 
Plumbigate
PlumbigatePlumbigate
Plumbigatewaveone9
 
Hobie revo ff install 2
Hobie revo ff install 2Hobie revo ff install 2
Hobie revo ff install 2Jay Kania
 
Home Projects (1)
Home Projects (1)Home Projects (1)
Home Projects (1)Paul Melton
 
Portable 2in1-disc-drum-sander
Portable 2in1-disc-drum-sanderPortable 2in1-disc-drum-sander
Portable 2in1-disc-drum-sanderRÁNDALL JARA
 
Dynaudio passa 3c build
Dynaudio passa 3c buildDynaudio passa 3c build
Dynaudio passa 3c buildbrunofpguerra
 
Pluto-manual-1.0-compressed.pdf
Pluto-manual-1.0-compressed.pdfPluto-manual-1.0-compressed.pdf
Pluto-manual-1.0-compressed.pdfereztal3
 
A look at electro arc accessories
A look at electro arc accessoriesA look at electro arc accessories
A look at electro arc accessoriesCarrinHarris
 

Similaire à Wcpp.html (20)

TOOLS DOMRAC-WPS Office.ppt
TOOLS DOMRAC-WPS Office.pptTOOLS DOMRAC-WPS Office.ppt
TOOLS DOMRAC-WPS Office.ppt
 
How To Solder V3.5
How To Solder V3.5How To Solder V3.5
How To Solder V3.5
 
Add a radiator
Add a radiatorAdd a radiator
Add a radiator
 
Daniel Miersma's Senior Project Final Report
Daniel Miersma's Senior Project Final ReportDaniel Miersma's Senior Project Final Report
Daniel Miersma's Senior Project Final Report
 
Insructables fm listening bug
Insructables   fm listening bugInsructables   fm listening bug
Insructables fm listening bug
 
How to retrofit lancer 2008 headlights
How to retrofit lancer 2008 headlightsHow to retrofit lancer 2008 headlights
How to retrofit lancer 2008 headlights
 
Essential for electronic
Essential for electronicEssential for electronic
Essential for electronic
 
Desktop assembly
Desktop assemblyDesktop assembly
Desktop assembly
 
Believe It or Not
Believe It or NotBelieve It or Not
Believe It or Not
 
Doc 1010
Doc 1010Doc 1010
Doc 1010
 
Plumbigate
PlumbigatePlumbigate
Plumbigate
 
Hobie revo ff install 2
Hobie revo ff install 2Hobie revo ff install 2
Hobie revo ff install 2
 
Home Projects (1)
Home Projects (1)Home Projects (1)
Home Projects (1)
 
Portable 2in1-disc-drum-sander
Portable 2in1-disc-drum-sanderPortable 2in1-disc-drum-sander
Portable 2in1-disc-drum-sander
 
Dynaudio passa 3c build
Dynaudio passa 3c buildDynaudio passa 3c build
Dynaudio passa 3c build
 
Ht furnace
Ht furnaceHt furnace
Ht furnace
 
Pluto-manual-1.0-compressed.pdf
Pluto-manual-1.0-compressed.pdfPluto-manual-1.0-compressed.pdf
Pluto-manual-1.0-compressed.pdf
 
Counter top purifiers catalogue
Counter top purifiers catalogueCounter top purifiers catalogue
Counter top purifiers catalogue
 
Sauna
SaunaSauna
Sauna
 
A look at electro arc accessories
A look at electro arc accessoriesA look at electro arc accessories
A look at electro arc accessories
 

Wcpp.html

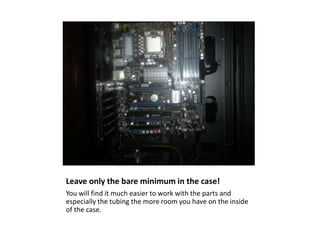
  • 1. Leave only the bare minimum in the case! You will find it much easier to work with the parts and especially the tubing the more room you have on the inside of the case.
  • 2. I recommend first installing the radiator, I chose to keep it mounted internally, however not all case allow for this. Some people with smaller cases mount them off of the back of the case. I used L brackets mounted in my lower drive bays in my Antec 1200.
  • 3. Cable management is huge when it comes to airflow in a PC case! The better routed all of your cables and wires are, the better the airflow. Improved airflow is always going to help lower your temps. Before I mounted the radiator, I made sure my 120mm fan wires could easily be tucked away after the radiator was installed. Thinking ahead goes a long way!
  • 4. With the Antec 1200 the front 2 120mm fans are installed behind the metal grills behind the filters. I decided to go with a push/pull configuration on my radiation to keep my temps as low as possible. So I then mounted 2 Scythe Ultra Kaze fans on the backside of the rad using the pre-tapped 6-32’s holes on the radiator. I picked up the 6-32 screws at Lowe’s.
  • 5. This is what the Black Ice Extreme 240mm radiator looks like with the 2 120mm fans mounted on the backside. Now I am ready to mount the radiator in my case.
  • 6. As you can see, I made sure that the 4 L brackets were lined up perfectly with the 2 top and 2 bottom screw holes on the rad. Since my front 2 fans are mounted in the 120mm Antec fan enclosures, all I had to do was shoot the 4 screws through the L brackets and into the radiator. Be very careful not to go to far, as the screws can damage the radiator fins if the are to long! Measure the screws carefully, I used a pair of wire strippers/bolt cutters to cut them down to size!
  • 7. Initially I mounted the reservoir to the back of my case, later I moved it to the inside. Most cases have holes on the back for water tubes, so mounting the radiator or the reservoir this way is made easier! Once you have everything mounted, route the tubes and connect everything.
  • 8. I mounted my Liang D5 pump at the bottom of my case using double sided velcro tape. It is very strong and works quite well, also it helps with vibration from the pump! Now that everything is installed, all you have to do is fill the reservoir with distilled water ( I use a silver kill coil instead of a biocide, silver kills anything harmful that could live in your water) and you are ready to go!