SlideShare a Scribd company logo
1 of 6
Step-by-
     Step-by-Step Eagle Owl’s House Assembly Instructions

Owl’s House parts include

Qty                                     Description

 2                    Owl’s House sides

 1                    Owl’s House floor

 1                    Owl’s House roof (slight overhang for perch)


 1                    Owl’s House back

 1                    Owl’s House front arch
 2                    Owl’s House front arch supports
 1                    Owl’s House front lintel
 2                    Owl’s House perch supports

 1                    Owl’s House perch

 24                   Small Screws
  2                   Medium Screws
 4                    Large Screws

You will need:

 Qty                             Description
  1     Wood glue
  1     Cordless/Electric Screw Driver
  1     Rag for cleaning glue mistakes
  1     Bottle of Linseed oil
  1     Paintbrush
  1     Bottle of Turpentine for cleaning paintbrush


                                                                     1
Step-by-
     Step-by-Step Eagle Owl’s House Assembly Instructions


                       •   Ensure all Owl’s House parts have been received. Refer
1.                         to the above list


                       •   Spread glue on either sides of the floor/base of the
                           Owl’s House following the pre-drilled screw holes.
                       •   Put floor/base aside.
                       •   Place the sides of the Owl’s House in front of you in an
2.                         upright position.
                       •   Place the floor/base on top. (you might need an extra
                           pair of hands)


                       Right Hand Side
                       • Using one hand, square up any corner of the floor/base
                           with a side of the Owl’s House to ensure it is flush.
                       • Place small screw in pre-drilled corner hole. Hold the
                           squared corner firm and using the opposite hand with
                           the Cordless/Electric Screw Driver, drive in the screw
                           until fixed.
3.                     • Go to the top pre-drilled screw hole. Square up the
                           floor/base with the side of the Owl’s House.
                       • Place small screw in pre-drilled corner hole. Hold the
                           squared corner firm and using the opposite hand with
                           the Cordless/Electric Screw Driver, drive in the screw
                           until fixed.
                       • Complete the row.

                       Left Hand Side
                       • Using one hand, square up any corner of the floor/base
                           with a side of the Owl’s House to ensure it is flush.
                       • Place small screw in pre-drilled corner hole. Hold the
                           squared corner firm and using the opposite hand with
                           the Cordless/Electric Screw Driver, drive in the screw
                           until fixed.
4.                     • Go to the top pre-drilled screw hole. Square up the
                           floor/base with the side of the Owl’s House.
                       • Place small screw in pre-drilled corner hole. Hold the
                           squared corner firm and using the opposite hand with
                           the Cordless/Electric Screw Driver, drive in the screw
                           until fixed.
                       • Complete the row.


                                                                                      2
Step-by-
     Step-by-Step Eagle Owl’s House Assembly Instructions


                       •   Turn the structure onto its floor/base.
5.                     •   Apply glue along both sides. (The glue seals and is an
                           extra measure of building a secure Owl’s House.)


6.                     •   Place the roof with overhang on top of the glued sides.


                       Right Hand Side
                       • Using one hand, square up any corner of the roof with a
                           side of the Owl’s House to ensure it is flush.
                       • Place small screw in pre-drilled corner hole. Hold the
                           squared corner firm and using the opposite hand with
                           the Cordless/Electric Screw Driver, drive in the screw
                           until fixed.
                       • Go to the top pre-drilled screw hole. Square up the roof
7.                         with the side of the Owl’s House. (Be aware that the
                           front of the Owl’s House roof has a slight overhang.)
                       • Place small screw in pre-drilled corner hole. Hold the
                           squared corner firm and using the opposite hand with
                           the Cordless/Electric Screw Driver, drive in the screw
                           until fixed.
                       • Complete the row.

                       Left Hand Side
                       • Using one hand, square up any corner of the roof with a
                           side of the Owl’s House to ensure it is flush.
                       • Place small screw in pre-drilled corner hole. Hold the
                           squared corner firm and using the opposite hand with
                           the Cordless/Electric Screw Driver, drive in the screw
                           until fixed.
8.                     • Go to the top pre-drilled screw hole. Square up the roof
                           with the side of the Owl’s House. (Be aware that the
                           front of the Owl’s House roof has a slight overhang.)
                       • Place small screw in pre-drilled corner hole. Hold the
                           squared corner firm and using the opposite hand with
                           the Cordless/Electric Screw Driver, drive in the screw
                           until fixed.
                       • Complete the row.


                                                                                     3
Step-by-
     Step-by-Step Eagle Owl’s House Assembly Instructions


                       •   Take the back part of the Owl’s House.
9.                     •   Apply glue along all the pre-drilled screw holes.


                       The back end pulls the entire Owl’s House square.

                       •   Using one hand, square up any corner of the back with a
                           side of the Owl’s House to ensure it is flush.
10.                    •   Place small screw in pre-drilled corner hole. Hold the
                           squared corner firm and using the opposite hand with
                           the Cordless/Electric Screw Driver, drive in the screw
                           until fixed.
                       •   Drive screws home and fix in place along all sides.


                       •   Turn the Owl’s House with the open front end facing
11.                        you.


                       •   Select the arch and apply glue along pre-drilled screw
                           holes.
12.                    •   Be aware not to apply glue at the bottom end of arch,
                           only on along the pre-drilled holes.


                       •   Position arch below the roof overhang.
                       •   Using one hand, square up any corner of the arch with a
                           side and roof of the Owl’s House to ensure it is flush.
                       •   Place small screw in pre-drilled corner hole. Hold the
13.                        squared corner firm and using the opposite hand with
                           the Cordless/Electric Screw Driver, drive in the screw
                           until fixed.
                       •   Drive screws home in all pre-drilled screw holes along all
                           sides.


                                                                                    4
Step-by-
  Step-by-Step Eagle Owl’s House Assembly Instructions


                    •   Select the front lintel and apply glue along the pre-
14.                     drilled screw holes.


                    •   Place the front lintel at the bottom, aligning with both
                        sides and bottom/base of the Owl’s House
                    •   Using one hand, square up any corner of the lintel with a
                        side and bottom/base of the Owl’s House to ensure it is
                        flush.
15.                 •   Place small screw in pre-drilled corner hole. Hold the
                        squared corner firm and using the opposite hand with
                        the Cordless/Electric Screw Driver, drive in the screw
                        until fixed.
                    •   Drive screws home in all pre-drilled screw holes.


                    •   Select the first arch support and apply glue along the
16.                     pre-drilled screw holes.


                    •   Place the arch support between the arch and bottom
                        lintel along the side of the Owl’s House.
                    • Using one hand, square up to ensure it is flush.
                    • Place small screw in pre-drilled corner hole. Hold the
17.                     squared corner firm and using the opposite hand with
                        the Cordless/Electric Screw Driver, drive in the screw
                        until fixed.
                    • Drive screws home in all pre-drilled screw holes.
                     Repeat steps 16 & 17 to the opposite side’s arch support.


                    USE 4X large screws for both perch supports
                    to fix on Owl’s House
18.
                    •   Select both perch supports.
                    •   Apply glue to the first perch support.


                                                                                 5
Step-by-
  Step-by-Step Eagle Owl’s House Assembly Instructions
                    •  Position the perch support on the bottom, outside of the
                       Owl’s House.
                    • Using one hand, square up to ensure it is flush.
                    • Place small screw in pre-drilled corner hole. Hold the
                       squared corner firm and using the opposite hand with
19.                    the Cordless/Electric Screw Driver, drive in the screw
                       until fixed.
                    • Drive screws home in all pre-drilled screw holes.
                     NOTE: Do not repeat on other side until perch pole is in
                                               place!

                    •   Select the perch pole.
                    •   With a twist motion, push the perch pole into the perch
20.                     support hole.
                    •   Ensure that it protrudes from the outside edge of the
                        perch support.

                    •   Select opposite arch support and apply glue along the
                        pre-drilled screw holes.
                    •   Position the perch support on the bottom, outside of the
                        Owl’s House.
                    •   Using one hand, square up to ensure it is flush.
21.
                    •   Place small screw in pre-drilled corner hole. Hold the
                        squared corner firm and using the opposite hand with
                        the Cordless/Electric Screw Driver, drive in the screw
                        until fixed.
                    •   Drive screws home in all pre-drilled screw holes.


                    •   Turn the Owl’s House onto its back end with the bottom
                        facing you.
22.                 •   There are small pre-drilled holes at the bottom end of
                        the perch support in line with the perch pole.


                    USE 2X medium screws for both perch supports
                    to fix on Owl’s House
23.                 •   Select your screw and drill it to ensure the perch will
                        not move.
                    •   Repeat on the opposite side.


                    CONGRATULATIONS on assembling your first Owl’s House!
                         We know you will have lots of pleasure from it!
24.
                        Before positioning, apply 2 or 3 coats of linseed oil.


                                                                                  6

More Related Content

Viewers also liked

Toughbox-Assembly-Instructions
Toughbox-Assembly-InstructionsToughbox-Assembly-Instructions
Toughbox-Assembly-InstructionsGlenda Hernandez
 
F-F-Fiddle Assembly Instructions
F-F-Fiddle Assembly InstructionsF-F-Fiddle Assembly Instructions
F-F-Fiddle Assembly Instructionsdsp39
 
LEE Filters SW150 MkII Filter Holder Installation & Advice
LEE Filters SW150 MkII Filter Holder Installation& AdviceLEE Filters SW150 MkII Filter Holder Installation& Advice
LEE Filters SW150 MkII Filter Holder Installation & AdviceBroadside Interactive
 
Retrofitting the SW150 Mark II to the Original SW150
Retrofitting the SW150 Mark II to the Original SW150Retrofitting the SW150 Mark II to the Original SW150
Retrofitting the SW150 Mark II to the Original SW150Broadside Interactive
 
LEE Filters SW150 MkII Lens Adaptor Assembly Instructions
LEE Filters SW150 MkII Lens Adaptor Assembly InstructionsLEE Filters SW150 MkII Lens Adaptor Assembly Instructions
LEE Filters SW150 MkII Lens Adaptor Assembly InstructionsBroadside Interactive
 
Oral Hygeine Instructions
Oral Hygeine InstructionsOral Hygeine Instructions
Oral Hygeine Instructionsguesta79a7f
 

Viewers also liked (7)

Toughbox-Assembly-Instructions
Toughbox-Assembly-InstructionsToughbox-Assembly-Instructions
Toughbox-Assembly-Instructions
 
Growhouse Coldframe Upright Assembly Instructions - for Winter Gardening
Growhouse Coldframe Upright Assembly Instructions - for Winter GardeningGrowhouse Coldframe Upright Assembly Instructions - for Winter Gardening
Growhouse Coldframe Upright Assembly Instructions - for Winter Gardening
 
F-F-Fiddle Assembly Instructions
F-F-Fiddle Assembly InstructionsF-F-Fiddle Assembly Instructions
F-F-Fiddle Assembly Instructions
 
LEE Filters SW150 MkII Filter Holder Installation & Advice
LEE Filters SW150 MkII Filter Holder Installation& AdviceLEE Filters SW150 MkII Filter Holder Installation& Advice
LEE Filters SW150 MkII Filter Holder Installation & Advice
 
Retrofitting the SW150 Mark II to the Original SW150
Retrofitting the SW150 Mark II to the Original SW150Retrofitting the SW150 Mark II to the Original SW150
Retrofitting the SW150 Mark II to the Original SW150
 
LEE Filters SW150 MkII Lens Adaptor Assembly Instructions
LEE Filters SW150 MkII Lens Adaptor Assembly InstructionsLEE Filters SW150 MkII Lens Adaptor Assembly Instructions
LEE Filters SW150 MkII Lens Adaptor Assembly Instructions
 
Oral Hygeine Instructions
Oral Hygeine InstructionsOral Hygeine Instructions
Oral Hygeine Instructions
 

Recently uploaded

integrity in personal relationship (1).pdf
integrity in personal relationship (1).pdfintegrity in personal relationship (1).pdf
integrity in personal relationship (1).pdfAmitRout25
 
Virtue ethics & Effective Altruism: What can EA learn from virtue ethics?
Virtue ethics & Effective Altruism: What can EA learn from virtue ethics?Virtue ethics & Effective Altruism: What can EA learn from virtue ethics?
Virtue ethics & Effective Altruism: What can EA learn from virtue ethics?Mikko Kangassalo
 
Module-2-Lesson-2-COMMUNICATION-AIDS-AND-STRATEGIES-USING-TOOLS-OF-TECHNOLOGY...
Module-2-Lesson-2-COMMUNICATION-AIDS-AND-STRATEGIES-USING-TOOLS-OF-TECHNOLOGY...Module-2-Lesson-2-COMMUNICATION-AIDS-AND-STRATEGIES-USING-TOOLS-OF-TECHNOLOGY...
Module-2-Lesson-2-COMMUNICATION-AIDS-AND-STRATEGIES-USING-TOOLS-OF-TECHNOLOGY...JeylaisaManabat1
 
ingrediendts needed in preparing dessert and sweet sauces
ingrediendts needed in preparing dessert and sweet saucesingrediendts needed in preparing dessert and sweet sauces
ingrediendts needed in preparing dessert and sweet saucesJessicaEscao
 
Spiritual Life Quote from Shiva Negi
Spiritual Life Quote from Shiva Negi Spiritual Life Quote from Shiva Negi
Spiritual Life Quote from Shiva Negi OneDay18
 
Benefits of Co working & Shared office space in India
Benefits of Co working & Shared office space in IndiaBenefits of Co working & Shared office space in India
Benefits of Co working & Shared office space in IndiaBrantfordIndia
 
Call Girls Dubai O525547819 Favor Dubai Call Girls Agency
Call Girls Dubai O525547819 Favor Dubai Call Girls AgencyCall Girls Dubai O525547819 Favor Dubai Call Girls Agency
Call Girls Dubai O525547819 Favor Dubai Call Girls Agencykojalkojal131
 
English basic for beginners Future tenses .pdf
English basic for beginners Future tenses .pdfEnglish basic for beginners Future tenses .pdf
English basic for beginners Future tenses .pdfbromerom1
 
The 5 sec rule - Mel Robins (Hindi Summary)
The 5 sec rule - Mel Robins (Hindi Summary)The 5 sec rule - Mel Robins (Hindi Summary)
The 5 sec rule - Mel Robins (Hindi Summary)Shakti Savarn
 

Recently uploaded (9)

integrity in personal relationship (1).pdf
integrity in personal relationship (1).pdfintegrity in personal relationship (1).pdf
integrity in personal relationship (1).pdf
 
Virtue ethics & Effective Altruism: What can EA learn from virtue ethics?
Virtue ethics & Effective Altruism: What can EA learn from virtue ethics?Virtue ethics & Effective Altruism: What can EA learn from virtue ethics?
Virtue ethics & Effective Altruism: What can EA learn from virtue ethics?
 
Module-2-Lesson-2-COMMUNICATION-AIDS-AND-STRATEGIES-USING-TOOLS-OF-TECHNOLOGY...
Module-2-Lesson-2-COMMUNICATION-AIDS-AND-STRATEGIES-USING-TOOLS-OF-TECHNOLOGY...Module-2-Lesson-2-COMMUNICATION-AIDS-AND-STRATEGIES-USING-TOOLS-OF-TECHNOLOGY...
Module-2-Lesson-2-COMMUNICATION-AIDS-AND-STRATEGIES-USING-TOOLS-OF-TECHNOLOGY...
 
ingrediendts needed in preparing dessert and sweet sauces
ingrediendts needed in preparing dessert and sweet saucesingrediendts needed in preparing dessert and sweet sauces
ingrediendts needed in preparing dessert and sweet sauces
 
Spiritual Life Quote from Shiva Negi
Spiritual Life Quote from Shiva Negi Spiritual Life Quote from Shiva Negi
Spiritual Life Quote from Shiva Negi
 
Benefits of Co working & Shared office space in India
Benefits of Co working & Shared office space in IndiaBenefits of Co working & Shared office space in India
Benefits of Co working & Shared office space in India
 
Call Girls Dubai O525547819 Favor Dubai Call Girls Agency
Call Girls Dubai O525547819 Favor Dubai Call Girls AgencyCall Girls Dubai O525547819 Favor Dubai Call Girls Agency
Call Girls Dubai O525547819 Favor Dubai Call Girls Agency
 
English basic for beginners Future tenses .pdf
English basic for beginners Future tenses .pdfEnglish basic for beginners Future tenses .pdf
English basic for beginners Future tenses .pdf
 
The 5 sec rule - Mel Robins (Hindi Summary)
The 5 sec rule - Mel Robins (Hindi Summary)The 5 sec rule - Mel Robins (Hindi Summary)
The 5 sec rule - Mel Robins (Hindi Summary)
 

Spotted Eagle Owl's House step by-step assembly

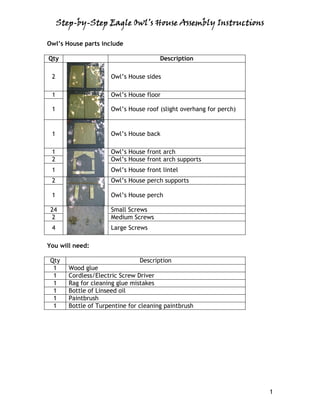
  • 1. Step-by- Step-by-Step Eagle Owl’s House Assembly Instructions Owl’s House parts include Qty Description 2 Owl’s House sides 1 Owl’s House floor 1 Owl’s House roof (slight overhang for perch) 1 Owl’s House back 1 Owl’s House front arch 2 Owl’s House front arch supports 1 Owl’s House front lintel 2 Owl’s House perch supports 1 Owl’s House perch 24 Small Screws 2 Medium Screws 4 Large Screws You will need: Qty Description 1 Wood glue 1 Cordless/Electric Screw Driver 1 Rag for cleaning glue mistakes 1 Bottle of Linseed oil 1 Paintbrush 1 Bottle of Turpentine for cleaning paintbrush 1
  • 2. Step-by- Step-by-Step Eagle Owl’s House Assembly Instructions • Ensure all Owl’s House parts have been received. Refer 1. to the above list • Spread glue on either sides of the floor/base of the Owl’s House following the pre-drilled screw holes. • Put floor/base aside. • Place the sides of the Owl’s House in front of you in an 2. upright position. • Place the floor/base on top. (you might need an extra pair of hands) Right Hand Side • Using one hand, square up any corner of the floor/base with a side of the Owl’s House to ensure it is flush. • Place small screw in pre-drilled corner hole. Hold the squared corner firm and using the opposite hand with the Cordless/Electric Screw Driver, drive in the screw until fixed. 3. • Go to the top pre-drilled screw hole. Square up the floor/base with the side of the Owl’s House. • Place small screw in pre-drilled corner hole. Hold the squared corner firm and using the opposite hand with the Cordless/Electric Screw Driver, drive in the screw until fixed. • Complete the row. Left Hand Side • Using one hand, square up any corner of the floor/base with a side of the Owl’s House to ensure it is flush. • Place small screw in pre-drilled corner hole. Hold the squared corner firm and using the opposite hand with the Cordless/Electric Screw Driver, drive in the screw until fixed. 4. • Go to the top pre-drilled screw hole. Square up the floor/base with the side of the Owl’s House. • Place small screw in pre-drilled corner hole. Hold the squared corner firm and using the opposite hand with the Cordless/Electric Screw Driver, drive in the screw until fixed. • Complete the row. 2
  • 3. Step-by- Step-by-Step Eagle Owl’s House Assembly Instructions • Turn the structure onto its floor/base. 5. • Apply glue along both sides. (The glue seals and is an extra measure of building a secure Owl’s House.) 6. • Place the roof with overhang on top of the glued sides. Right Hand Side • Using one hand, square up any corner of the roof with a side of the Owl’s House to ensure it is flush. • Place small screw in pre-drilled corner hole. Hold the squared corner firm and using the opposite hand with the Cordless/Electric Screw Driver, drive in the screw until fixed. • Go to the top pre-drilled screw hole. Square up the roof 7. with the side of the Owl’s House. (Be aware that the front of the Owl’s House roof has a slight overhang.) • Place small screw in pre-drilled corner hole. Hold the squared corner firm and using the opposite hand with the Cordless/Electric Screw Driver, drive in the screw until fixed. • Complete the row. Left Hand Side • Using one hand, square up any corner of the roof with a side of the Owl’s House to ensure it is flush. • Place small screw in pre-drilled corner hole. Hold the squared corner firm and using the opposite hand with the Cordless/Electric Screw Driver, drive in the screw until fixed. 8. • Go to the top pre-drilled screw hole. Square up the roof with the side of the Owl’s House. (Be aware that the front of the Owl’s House roof has a slight overhang.) • Place small screw in pre-drilled corner hole. Hold the squared corner firm and using the opposite hand with the Cordless/Electric Screw Driver, drive in the screw until fixed. • Complete the row. 3
  • 4. Step-by- Step-by-Step Eagle Owl’s House Assembly Instructions • Take the back part of the Owl’s House. 9. • Apply glue along all the pre-drilled screw holes. The back end pulls the entire Owl’s House square. • Using one hand, square up any corner of the back with a side of the Owl’s House to ensure it is flush. 10. • Place small screw in pre-drilled corner hole. Hold the squared corner firm and using the opposite hand with the Cordless/Electric Screw Driver, drive in the screw until fixed. • Drive screws home and fix in place along all sides. • Turn the Owl’s House with the open front end facing 11. you. • Select the arch and apply glue along pre-drilled screw holes. 12. • Be aware not to apply glue at the bottom end of arch, only on along the pre-drilled holes. • Position arch below the roof overhang. • Using one hand, square up any corner of the arch with a side and roof of the Owl’s House to ensure it is flush. • Place small screw in pre-drilled corner hole. Hold the 13. squared corner firm and using the opposite hand with the Cordless/Electric Screw Driver, drive in the screw until fixed. • Drive screws home in all pre-drilled screw holes along all sides. 4
  • 5. Step-by- Step-by-Step Eagle Owl’s House Assembly Instructions • Select the front lintel and apply glue along the pre- 14. drilled screw holes. • Place the front lintel at the bottom, aligning with both sides and bottom/base of the Owl’s House • Using one hand, square up any corner of the lintel with a side and bottom/base of the Owl’s House to ensure it is flush. 15. • Place small screw in pre-drilled corner hole. Hold the squared corner firm and using the opposite hand with the Cordless/Electric Screw Driver, drive in the screw until fixed. • Drive screws home in all pre-drilled screw holes. • Select the first arch support and apply glue along the 16. pre-drilled screw holes. • Place the arch support between the arch and bottom lintel along the side of the Owl’s House. • Using one hand, square up to ensure it is flush. • Place small screw in pre-drilled corner hole. Hold the 17. squared corner firm and using the opposite hand with the Cordless/Electric Screw Driver, drive in the screw until fixed. • Drive screws home in all pre-drilled screw holes. Repeat steps 16 & 17 to the opposite side’s arch support. USE 4X large screws for both perch supports to fix on Owl’s House 18. • Select both perch supports. • Apply glue to the first perch support. 5
  • 6. Step-by- Step-by-Step Eagle Owl’s House Assembly Instructions • Position the perch support on the bottom, outside of the Owl’s House. • Using one hand, square up to ensure it is flush. • Place small screw in pre-drilled corner hole. Hold the squared corner firm and using the opposite hand with 19. the Cordless/Electric Screw Driver, drive in the screw until fixed. • Drive screws home in all pre-drilled screw holes. NOTE: Do not repeat on other side until perch pole is in place! • Select the perch pole. • With a twist motion, push the perch pole into the perch 20. support hole. • Ensure that it protrudes from the outside edge of the perch support. • Select opposite arch support and apply glue along the pre-drilled screw holes. • Position the perch support on the bottom, outside of the Owl’s House. • Using one hand, square up to ensure it is flush. 21. • Place small screw in pre-drilled corner hole. Hold the squared corner firm and using the opposite hand with the Cordless/Electric Screw Driver, drive in the screw until fixed. • Drive screws home in all pre-drilled screw holes. • Turn the Owl’s House onto its back end with the bottom facing you. 22. • There are small pre-drilled holes at the bottom end of the perch support in line with the perch pole. USE 2X medium screws for both perch supports to fix on Owl’s House 23. • Select your screw and drill it to ensure the perch will not move. • Repeat on the opposite side. CONGRATULATIONS on assembling your first Owl’s House! We know you will have lots of pleasure from it! 24. Before positioning, apply 2 or 3 coats of linseed oil. 6