2. CX-PB001
Program Box for CopterX Gyro
MENU
Table of content 1
1. Introduction 2
2. Specifications 2
3. Buttons and Connections 2
4. Voltmeter and Servo Tester Function 4
5. Program CX-3X1000 Gyro 5
6. Program CX-1X1000 Gyro 9
01
3. CX-PB001
Program Box for CopterX Gyro
1. Introduction
Thank you for purchasing the CopterX CX-PB001 Program Box for CopterX Gyro. CX-PB001 is a
multifunctional programmer. It can fine tune your CopterX CX-1X1000 and CX-3X1000 gyro. It also
can be used as a voltmeter and servo tester.
2. Specification
• Operating voltage: Data port: DC 4.8V-12.6V
Servo port: DC 4.8V-12.6V
Servo power: DC 4.8V-12.6V
Battery measure port: 4.8V-33.6V(2-8S Li-Po, Li-Ion, Li-FePO4, Li-Mn)
• Operating current drain: 150mA
• Operating temperature: -20 -70
• Servo compatibility: 1.52ms analog servo, 1.52ms digital servo, 760us digital servo
• Supporting firmware upgrade
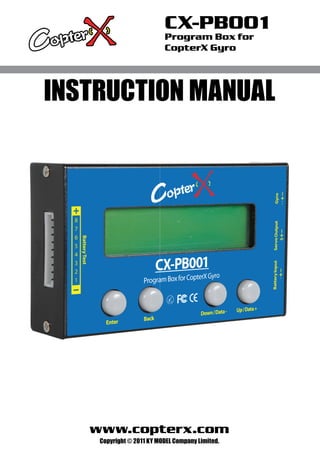
3. Buttons and Connections
Enter Back Down/Data- Up/Data+
ENTER: Enter the menu or item
BACK: Leave the current item and back to the father menu or item
UP/DATA+: Scroll up the item or increase the value
DOWN/DATA-: Scroll down the item or decrease the value
When you want to adjust a parameter, press the “ENTER” button, it shows a flashing “<<<”, then
press the “UP/DATA+”or “DOWN/DATA-” button to change the value.
02
4. CX-PB001
Program Box for CopterX Gyro
Battery Test
When measure a battery with balance connector, plug the connector to the “BATTERY TEST” port.
It shows the total voltage and the voltage of each cell.
When measure a battery with JR or Futaba servo connector, plug the connector to the “BATTERY
INPUT” port.
Disconnect the gyro and servo, otherwise they may be damaged.
Servo Output
Gyro
Battery Input
When test a servo, plug the servo connector to the “SERVO OUTPUT” port, plug the connector of
servo compatible power supply to the “BATTERY INPUT” port.
When program a gyro, plug the connector of data cable to the “GYRO”. Keep the metal reed
upwards.
03
5. CX-PB001
Program Box for CopterX Gyro
4. Voltmeter and Servo Tester Function
Plug a battery to The “BATTERY TEST” port or “BATTERY INPUT” port, CX-PB001 will power on
and enter the voltmeter and servo tester mode. To test servo, please use battery which match the
operating voltage of your servo or damage to servo may occur.
Item Description
Total voltage Display the total voltage and the voltage of each cell.
They are displayed alternately.
Servo type Select the servo type for the servo tester:
“1520us”: 1520us analog servo and digital servo
“760us”: 760us digital servo
Manual operate Operate the servo manually.
3 point test Test the servo as three point:
“1100us”(Low point), ”1520us”(Neutral point), “1940us”(High point)
Automatic run The servo does a reciprocating motion automatically.
Press the “UP/DATA+” or “DOWN/DATA-” to change the motion speed.
Servo speed The servo move from position 1 to position 2, and the time will be
displayed.
Position 1 and position 2 can be changed.
Servo deadband Press the “UP/DATA+” or “DOWN/DATA-” to change the value of dead-
band until the servo wiggles.
04
6. CX-PB001
Program Box for CopterX Gyro
5. Program CX-3X1000 Gyro
5.1 Basic menu
Connect CX-PB001 to CX-3X1000 gyro with data cable, CX-PB001 displays: “Hello! Loading data!”,
and then “Load succeed!”.If it always displays: “Hello! Loading data!”, please check the data cable
and make sure the gyro is in working mode.
Now, CX-PB001 enters the basic menu.
05
7. CX-PB001
Program Box for CopterX Gyro
5.2 Expert menu
Press the “BACK” button, Connect CX-PB001 to CX-3X1000 gyro with data cable, CX-PB001 displays:
“Hello! Loading data!”, and then “Load succeed!”.If it always displays: “Hello! Loading
data!”,please check the data cable and make sure the gyro is in working mode.
Now, CX-PB001 enters the expert menu. Release the “BACK” button.
5.3 Item description
Basic setup
Item Description
monitor In this item, you can check the transmitter configuration and the gyro
connections.
Page 1: “A” is Aileron channel, “E” is Elevator channel, “R” is Rudder channel,
“C” is Collective pitch channel.
Page 2: “G” is the tail gain given by transmitter. “A:” gyro is in AVCS mode.
“N:” gyro is in Normal mode. “Condition:” current parameters group in
gyro. There are two parameters groups in gyro.
Installation Direction Select the direction of the gyro mounting. There are three directions:
”Direction 1”, ”Direction 2”, ”Direction 3”
Load model Download the model data from CX-PB001 to gyro.
Model 1-5 are the parameters saved by the factory. Model 6-10 are the
parameters saved by user. We recommend to select a model among 1-5
models first. For beginners please select “Beginner”.
06
8. CX-PB001
Program Box for CopterX Gyro
Tail servo type Select the servo type.
:
“1520us 71Hz” All the tail and swashplate servos are 1520us analog.
:
“1520us 250Hz” Tail servo is 1520us digital,
swashplate servos are 1520us analog.
:
“1520us 333Hz” Tail servo is 1520us digital,
swashplate servos are 1520us digital.
:
“760us 250Hz” Tail servo is 760us digital,
swashplate servos are 1520us analog.
:
“760us 400Hz” Tail servo is 760us digital,
swashplate servos are 1520us digital.
:
“960us 333Hz” Tail servo is 960us digital,
swashplate servos are 1520us digital.
Model type Select the swashplate type. There are five types:
“Heli Normal”, “Heli 120”, “Heli 135”, “Heli 140”, “Heli 90”.
Servo trim Neutral point trim function of the four servos
Servo reverse Reverse function of the four servos
Servo limit Limit function of tail servo and swashplate servos
Collective range It is the collective pitch ratio, it can change the maximum and the
minimum collective pitch, and the direction of motion.
Gyro direction Gyro compensation direction of each axis
Gyro total gain Gyro total gain of each axis.
Pirouette optimization Adjust the sign of pirouette optimization
Tail tuning
Item Description
Yaw P gain It is equivalent to the rate gain
Yaw I gain It is equivalent to the heading hold gain
Yaw D gain It is equivalent to the stop gain
Acceleration L Acceleration of the left pirouette
Acceleration R Acceleration of the right pirouette
Deceleration L Deceleration of the left pirouette
Deceleration R Deceleration of the right pirouette
Tail deadband RC The deadband of the tail stick
Tail deadband gyro The deadband of the yaw gyro
Pirouette speed L The maximum left pirouette speed
07
9. CX-PB001
Program Box for CopterX Gyro
Pirouette speed R The maximum right pirouette speed
Tail compensate The ratio of collective pitch mixing to tail pitch
Col>tail
Tail compensate The ratio of cyclic pitch mixing to tail pitch
Cyc>tail
Swash tuning
Item Description
Roll P gain It is equivalent to the roll rate gain
Roll I gain It is equivalent to the attitude hold gain of roll axis
Roll D gain It is equivalent to the stop gain of roll axis
Pitch P gain It is equivalent to the pitch rate gain
Pitch I gain It is equivalent to the attitude hold gain of pitch axis
Pitch D gain It is equivalent to the stop gain of pitch axis
Acceleration Acceleration of the roll and pitch motion
Deceleration Deceleration of the roll and pitch motion
Swash deadband RC The deadband of the aileron and elevator sticks
Swash deadband gyro The deadband of the roll and pitch gyros
Roll agility It is equivalent to the maximum roll rate
Pitch agility It is equivalent to the maximum pitch rate
Advanced menu
Item Description
Data reset Reset all the parameters to defaults
Model save Save the parameters in CX-PB001 as a model
Model rename Rename a model that you save in CX-PB001
Condition Select a condition to use.
There are two conditions in a gyro: Condition 1 and Condition 2. Each
condition can save a parameters group.
08
10. CX-PB001
Program Box for CopterX Gyro
6. Program CX-1X1000 Gyro
Connect CX-PB001 to CX-1X1000 gyro with data cable, CX-PB001 displays: “Hello! Loading data!”,
and then “Load succeed!”.If it always displays: “Hello! Loading data!”, please check the data cable
and make sure the gyro is in working mode.
09