Contenu connexe
Similaire à How to-make-2-toys
Similaire à How to-make-2-toys (20)
How to-make-2-toys
- 1. How to make
2 FUN TOYS
for under $10!…
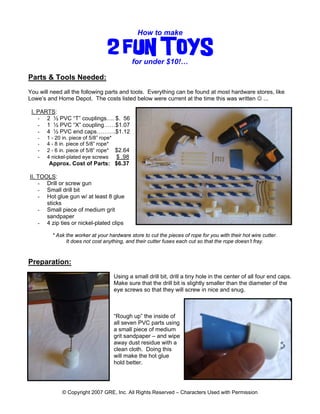
Parts & Tools Needed:
You will need all the following parts and tools. Everything can be found at most hardware stores, like Lowe’s and Home Depot. The costs listed below were current at the time this was written ☺ ... I. PARTS:
- 2 ½ PVC “T” couplings…. $. 56
- 1 ½ PVC “X” coupling……$1.07
- 4 ½ PVC end caps……….$1.12
- 1 - 20 in. piece of 5/8” rope*
- 4 - 8 in. piece of 5/8” rope*
- 2 - 6 in. piece of 5/8” rope* $2.64
- 4 nickel-plated eye screws $ .98
Approx. Cost of Parts: $6.37 II. TOOLS:
- Drill or screw gun
- Small drill bit
- Hot glue gun w/ at least 8 glue sticks
- Small piece of medium grit sandpaper
- 4 zip ties or nickel-plated clips
* Ask the worker at your hardware store to cut the pieces of rope for you with their hot wire cutter.
It does not cost anything, and their cutter fuses each cut so that the rope doesn’t fray.
Preparation:
Using a small drill bit, drill a tiny hole in the center of all four end caps. Make sure that the drill bit is slightly smaller than the diameter of the eye screws so that they will screw in nice and snug.
“Rough up” the inside of all seven PVC parts using a small piece of medium grit sandpaper – and wipe away dust residue with a clean cloth. Doing this will make the hot glue hold better.
© Copyright 2007 GRE, Inc. All Rights Reserved – Characters Used with Permission
- 2. Screw one eye screw into each cap...
Making Toy #1: (the “Tight-Rope”)
Using the hot glue gun, squirt a generous amount of glue into ONE PVC cap. Taking the 20- inch piece of rope, jam one end firmly into the cap, and hold in place for about 30 seconds.
Tug lightly to make sure the glue is set, and then fill in any gaps around the sides with more hot glue. Let dry for approximately one minute before moving on.
When dry, glue another PVC cap to the other end of the 20 inch rope – and this toy is complete! We will show you how to attach this toy to your cage on the last page of this report.
Repeat this SAME procedure every time you attach a PVC part on the next toy as well ☺.
© Copyright 2007 GRE, Inc. All Rights Reserved – Characters Used with Permission
- 3. Making Toy #2: (the “Figure-8”)
Taking the “X” shaped PVC coupling – and the four 8-inch pieces of rope - , place them in the center of the table as shown.. Glue in each end – one at a time - following the same procedure used in the previous toy.
Once this is dry, place the two “T” shaped PVC parts on the table. Glue in place as shown…
Once this is dry, glue on the final two 6-inch pieces and the last two end caps as shown...
© Copyright 2007 GRE, Inc. All Rights Reserved – Characters Used with Permission
- 4. CONGRATULATIONS! Both toys are now complete!
All you have to do now is hang them in your Glider’s cage...
Using either zip ties - or any type of nickel-plated clasp or clip – simply attach each toy in the cage wherever you like it.
Your Glider(s) will LOVE these two simple toys – and now that you have the “hang of it”, you can use the SAME techniques to create almost ANY kind of fun toy. Your imagination is the only limit ☺
Remember, because these toys are made of rope, they will need to be cleaned regularly or they will start to stink.
These types of toys can be soaked and washed in soapy dishwater - and then hung outside until completely dry. They should also be completely disinfected at least once every 90 days with Squeak-E-Clean™ Sterilization Spray. ENJOY! ☺
© Copyright 2007 GRE, Inc. All Rights Reserved – Characters Used with Permission