SlideShare une entreprise Scribd logo
1  sur  21
Télécharger pour lire hors ligne
DELL POWEREDGE R720 WITH SAMSUNG SSDs AND WINDOWS SERVER
2012: SUPPORTING VIRTUAL DESKTOPS IN REMOTE OFFICES


                     For businesses with remote offices looking for a solution that allows for a wide base of
             employees to access virtual desktops hosted on a server, a virtual desktop infrastructure (VDI)
             can be a wise choice. Such a solution can simplify management, enhance security, and save on
             power costs, among other benefits. If your business is implementing such a solution, it’s
             essential to select a server that can comfortably host the virtual desktops you need today and
             have plenty of room to support your needs as your company grows. The Dell PowerEdge R720
             server with Samsung SM825 200GB solid-state drives (SSDs), in conjunction with the enhanced
             VDI hosting platform in Microsoft® Windows Server® 2012, provides a viable solution for your
             VDI needs.
                     In our labs, PT set out to determine the VDI-hosting capability of the Dell PowerEdge
             R720 with Samsung SSDs running Windows Server 2012. We found that this server could
             support 60 simultaneous virtual desktop users with great performance—and with hardware
             resources to spare. This makes the Dell PowerEdge R720 with Samsung SSDs and Windows
             Server 2012 an excellent choice for a 60-user virtual desktop infrastructure.


                                                                                                   OCTOBER 2012
                                        A PRINCIPLED TECHNOLOGIES TEST REPORT
                                                                                         Commissioned by Dell Inc.
HOW MANY VIRTUAL DESKTOPS?
                                              To find out how many typical remote office workers the Dell PowerEdge
                                          R720 with Samsung SM825 200GB SSDs could support, we used a workload that
                                          reflects typical office activities, including performing various tasks in Microsoft®
                                          Office applications, Web browsing, and multimedia viewing.
                                              We set up a single Dell PowerEdge R720 with Samsung SSDs running
                                          Microsoft Windows Server 2012. We used Microsoft Hyper-V™ and Remote
                                          Desktop Services (RDS) on this server to host the virtual machines.
                                              To measure the server’s ability to support 60 virtual desktops, we employed
                                          the widely used Login Consultants Virtual Session Indexer (Login VSI) 3.6
                                          benchmark. Login VSI consists of several workloads that perform a range of
                                          common desktop computing tasks.
                                              In our testing, the Dell PowerEdge R720 ran 60 virtual desktop sessions with
                                          a medium workload while meeting the Login VSI requirements for acceptable
                                          response time and user experience.
                                               We provide server configuration information in Appendix A, our detailed
                                          workload and test descriptions in Appendix B, and a detailed test methodology
                                          in Appendix C.

RESOURCES TO SPARE
                                              In addition to supporting 60 simultaneous sessions, the Dell PowerEdge
                                          R720 server with Samsung SSDs, in conjunction with the enhanced VDI hosting
                                          platform in Windows Server 2012, had room to grow with additional hardware
                                          resources.
                                              Figure 1 shows the average processor, memory, and disk utilization
                                          throughout the whole Login VSI test and the segment where all 60 sessions are
                                          running simultaneously once they have logged in. With 60 simultaneous users,
                                          all of which achieved an acceptable response time as determined by the Login
                                          VSI 3.6 benchmark, the Dell, Samsung, and Windows solution had ample
                                          resources to spare.

                                                   Average total run time                 Average 60 sessions run time
CPU % utilization                                                            23.76                                   30.89
Memory % utilization                                                         54.73                                   54.72
Disk % utilization                                                           13.12                                     5.99
Figure 1: CPU, memory, and disk average and peak utilization for the Dell PowerEdge R720 host server. Lower numbers are
better.


Dell PowerEdge R720 with Samsung SSDs and Windows Server                             A Principled Technologies test report 2
2012: Supporting virtual desktops in remote offices
Figure 2 shows resource utilization trend lines, averaged each minute,
                                                                            throughout the run. This additionally demonstrates that the resources were not
                                                                            a performance bottleneck at any point during the run.


                                                                                 Resource utilization
                            100


                            80
   Percentage utilization


                            60


                            40


                            20


                             0
                                  1           301             601             901            1,201         1,501           1,801         2,101          2,401          2,701
                                                                                                Time (seconds)

                                      CPU % utilization (avg. per minute)           Disk % utilization (avg. per minute)      Memory % utilization (avg. per minute)

Figure 2: Resource utilization throughout the test.


ABOUT OUR TESTING
Remote Desktop Services
                                                                                We used the Microsoft Remote Desktop Services (RDS) role in Windows
                                                                            Server 2012 to build our virtual desktop infrastructure. Microsoft RDS is a server
                                                                            role that allows the user to deploy and manage a virtual desktop infrastructure
                                                                            from one location. A standard VDI deployment allows for a managed pool of
                                                                            VMs and a Web access portal that allows users in remote offices to connect
                                                                            through a Web browser. Because Microsoft RDS manages incoming remote
                                                                            connections as well as the desktop pool, remote users can be paired with an
                                                                            optimal VM, allowing for server resources to be allocated without waste.
                                                                                For our testing, we used Microsoft RDS to create the virtual desktop pool,
                                                                            but bypassed the Web portal during testing for ease of use with Login VSI. This
                                                                            circumvents the RDS pairing management feature, but because our virtual
                                                                            desktops were identical, this had no impact on performance.


 Dell PowerEdge R720 with Samsung SSDs and Windows Server                                                                          A Principled Technologies test report 3
 2012: Supporting virtual desktops in remote offices
Login VSI 3.6
                                        After all desktops are idle, Login VSI incrementally logs users into virtual
                                    desktop sessions and begins workloads on each. Login VSI measures the total
                                    response times of seven typical office operations from each session and
                                    calculates the VSI Index by taking the average response times and dropping the
                                    highest and lowest 2 percent.
                                        To initiate our test, we used Hyper-V to start up all Windows 7 VMs and
                                    reach an idle state. We monitored our test bed during the startup and perceived
                                    no bottlenecks in server CPU, network, or storage I/O at the Hyper-V default
                                    startup rate of five VMs at a time. When the VMs were idle we started Login VSI
                                    testing.
ABOUT THE COMPONENTS OF OUR SOLUTION
Dell PowerEdge R720
                                        The new Intel® Xeon® processor E5-2680-powered Dell PowerEdge R720 2U
                                    rack server incorporates many enhancements and features designed to improve
                                    performance, lower power consumption, and ease maintenance. Some of these
                                    features include the following:
                                       Performance. Dell engineered the PowerEdge R720 to handle complex
                                        workloads, with I/O and internal data management technologies (i.e., NSC,
                                        NPAR, CacheCade) to allow faster access to information and GPU
                                        accelerators for faster than ever computational performance.
                                       Processors. The Dell PowerEdge R720 is powered by two Intel Xeon
                                        processors E5-2680, which incorporate the very latest in technology from
                                        Intel. The powerful processors provide exceptional performance and make
                                        the PowerEdge R720 a solid virtualization platform.
                                       Power efficiency. Dell PowerEdge R720 servers implement leading industry
                                        power efficiency standards, and are designed to optimize performance
                                        while maintaining low power consumption. Automated tracking and
                                        regulation of thermal activity, intelligent design of right-sized power
                                        options, and high efficiency fans and airflow management work to save
                                        power, saving you money in the process.
                                       Management. The Dell PowerEdge R720, like all late-model Dell servers,
                                        comes with the Dell Lifecycle Controller. This tool simplifies server
                                        management by providing a single interface for management functions and
                                        by storing critical system information in the system itself. There are no CDs
                                        or USB keys to keep track of for drivers or firmware.


Dell PowerEdge R720 with Samsung SSDs and Windows Server                       A Principled Technologies test report 4
2012: Supporting virtual desktops in remote offices
   Storage. With impressive storage capacity for small business servers, the
                                        Dell PowerEdge R720 is available in both an 8-bay and 16-bay chassis.
                                       Memory. The Dell PowerEdge R720 holds up to 768 GB of RAM, many times
                                        the memory capacity of older small business servers, allowing for powerful
                                        flexibility with virtualized database solutions.

Samsung SM825 200GB SATA SSDs
                                        According to the Dell Web site, the addition of Samsung SM825 200GB SSDs
                                    lets the Dell PowerEdge servers deliver outstanding sustained read, write and
                                    sequential speeds. Compared to 15K SAS hard disk drives, Samsung's E-MLC
                                    SSDs deliver 57 times more operations per second.
                                        The Samsung SSDs also deliver an increased level of performance and
                                    reliability with their power-loss protection. Samsung's E-MLC SSDs increase
                                    write endurance by more than 100 times than that of standard MLC SSDs. That
                                    translates into long-lasting, sustained performance for your servers.
                                        Dell PowerEdge servers with Samsung SSDs also provide the ability to scale
                                    for capacities from 100 GB to 400 GB and ensure that all sensitive data is secure.
                                    They help protect your data with AES 256-bit encryption, delivering the optimal
                                    level of security.
                                        For more information, visit www.dell.com/business/ssd/server.

Microsoft Windows Server 2012
                                        Windows Server 2012, the latest release of this server OS from Microsoft,
                                    includes many new features and enhancements. According to Microsoft,
                                    Windows Server 2012 focuses on four core areas:
                                       Beyond virtualization. Windows Server 2012 provides a robust and dynamic
                                        virtualization platform through Hyper-V, and includes new features that
                                        provide flexible options for delivering cloud services.
                                       The power of many servers, the simplicity of one. Windows Server 2012
                                        offers improvements in its features that allow for better-than-ever high
                                        availability and ease of management for multiple-server infrastructures.
                                       Every app, any cloud. Windows Server 2012 delivers a scalable and flexible
                                        Web and application platform by providing a consistent and open set of
                                        tools and frameworks that apply to applications on-premises, in the cloud,
                                        or in a hybrid environment.
                                       Modern work style, enabled. Microsoft Windows Server 2012 empowers
                                        users and IT staff with remote access to data, applications, and simpler
                                        management tools while strengthening security and compliance.

Dell PowerEdge R720 with Samsung SSDs and Windows Server                       A Principled Technologies test report 5
2012: Supporting virtual desktops in remote offices
WHAT THIS MEANS FOR YOU
                                        As your business implements a virtual desktop solution, selecting the
                                    appropriate server is critical. In our hands-on tests, the Dell PowerEdge R720
                                    with Samsung SM825 200GB SSDs supported 60 virtual desktops with resources
                                    to spare. This makes it an excellent choice for supporting your remote office
                                    workers now and in the future.


Dell PowerEdge R720 with Samsung SSDs and Windows Server                     A Principled Technologies test report 6
2012: Supporting virtual desktops in remote offices
APPENDIX A – SERVER CONFIGURATION INFORMATION
         Figure 3 provides detailed configuration information for the servers in our configuration.

System                                                                            Dell PowerEdge R720
General
Number of processor packages                                    2
Number of cores per processor                                   8
Number of hardware threads per core                             2
CPU
Vendor                                                          Intel
Name                                                            Xeon
Model number                                                    E5-2680
Stepping                                                        C1
Socket type                                                     LGA2011
Core frequency (GHz)                                            2.70
Bus frequency                                                   8.0 GT/s
L1 cache                                                        32 KB + 32 KB (per core)
L2 cache                                                        256 KB (per core)
L3 cache (MB)                                                   20
Platform
Vendor and model number                                         Dell PowerEdge R720
Motherboard model number                                        0VWT90
BIOS name and version                                           Dell 1.2.6
BIOS settings                                                   Default
Memory module(s)
Total RAM in system (GB)                                        128
Vendor and model number                                         Samsung M393B1K70DH0-YH9
Type                                                            PC3L-10600R
Speed (MHz)                                                     1,333
Speed running in the system (MHz)                               1,333
Timing/Latency (tCL-tRCD-tRP-tRASmin)                           9-9-9-36
Size (GB)                                                       8
Number of RAM module(s)                                         16
Chip organization                                               Double-sided
Operating system
Name                                                            Windows Server 2012 Datacenter 64-bit
Build number                                                    9200
File system                                                     NTFS
Service Pack                                                    N/A
Language                                                        English
RAID controller
Vendor and model number                                         Dell PERC H710P Mini
Firmware version                                                21.0.2-0001
Driver version                                                  5.2.112.0


Dell PowerEdge R720 with Samsung SSDs and Windows Server                           A Principled Technologies test report 7
2012: Supporting virtual desktops in remote offices
System                                                                               Dell PowerEdge R720

Cache size                                                        1 GB
Hard drive 1
Vendor and model number                                           Dell ST9300653SS
Number of drives                                                  4
Size (GB)                                                         300
RPM                                                               15K
Type                                                              SAS
Hard drive 2
Vendor and model number                                           Dell MZ5EA200HMDR-000D3
Number of drives                                                  6
Size (GB)                                                         200
RPM                                                               N/A
Type                                                              SATA SSD
Network adapter 1
Vendor and model number                                           Intel I350 Quad Port Gigabit Network Daughter Card
Type                                                              Integrated
Network adapter 2
Vendor and model number                                           Intel X520-DA2 Dual Port 10 Gb Network Adapter
Type                                                              PCI-E
Power supplies
Total number                                                      2
Vendor and model number                                           Dell F750E-S0
Wattage of each (W)                                               750
Cooling fans
Total number                                                      6
Vendor and model number                                           Delta PFR0612UHE
Dimensions (h x w) of each                                        2-1/2” x 2-1/2”
Volts                                                             12
Amps                                                              1.50
Optical drive
Vendor and model number                                           PLDS DS-8D3SH
Figure 3: System configuration information for the test server.


Dell PowerEdge R720 with Samsung SSDs and Windows Server                             A Principled Technologies test report 8
2012: Supporting virtual desktops in remote offices
APPENDIX B – DETAILED WORKLOAD AND TEST DESCRIPTIONS
About Microsoft RDS
        To create the virtual desktop pool, we deployed the Microsoft RDS virtual desktop infrastructure. This requires a
server farm consisting of three servers: a Connection Broker server, a Web Access server and a Virtual Desktop Host
server. The virtual desktop infrastructure deployment and virtual desktop pool creation can be done from the
Connection Broker. To do this, we installed the Microsoft RDS role on the Connection Broker and used it to remotely
install and configure the appropriate roles and features on the rest of the server farm. We then created and configured a
VM using Hyper-V to be used as a template for our virtual desktop pool. We used Microsoft RDS to automate the
process of building our virtual desktop pool of 60 VMs based on our template VHD. Microsoft RDS allowed us to easily
build the required infrastructure and automate the process of creating a virtual desktop pool. Once the infrastructure
was in place and the pool was created, Microsoft RDS gave us one location from which to manage everything.

About Login VSI
        Login VSI benchmarks virtual desktop sessions to determine how scalable a particular virtualized system is.
Specifically, it benchmarks a virtual desktop solution by simulating Windows-based office user workloads. The Medium
workload of Login VSI, which we tested as indicative of a typical “knowledge worker,” opens and closes the following
applications and runs their respective tasks:
           Microsoft Outlook®: Browsing a message
           Microsoft Word® (TimerDoc): Initiating response timer to see how the program responds throughout the
            workload
           Microsoft Internet Explorer® instance one: Maximizing, scrolling, and minimizing
           Microsoft Internet Explorer instance two: Navigating a Web site, maximizing, and scrolling
           Adobe® Flash® KA movie trailer
           Microsoft Word (UserRead): Reading and typing text, and printing to PDF
           Bullzip: Generating a PDF
           Adobe® Reader®: Reading a PDF
           Microsoft PowerPoint®: Watching a presentation and adding a slide
           Microsoft Excel®: Reading and minimizing
           7-Zip: Saving a ZIP file

        The Login VSI 3.6 benchmark uses seven operations to determine the VSImax, the maximum number of users
the system can handle before suffering serious degradation in performance. By using seven operations instead of only
two, as earlier versions of Login VSI did, Login VSI 3.6 better reflects what a user actually experiences. The seven
operations are as follows:
           Copying a new document from the document pool in the home drive
           Starting Microsoft Word
           Starting the File Open dialogue
           Starting the Search and Replace dialogue
           Starting the Print dialogue
           Starting Notepad
           Compressing the document into a ZIP file with 7-zip command line


Dell PowerEdge R720 with Samsung SSDs and Windows Server                            A Principled Technologies test report 9
2012: Supporting virtual desktops in remote offices
Login VSI records response times, the time taken to execute a given task, in milliseconds. Login VSI then reports
minimum, average, and maximum response times, as well as the VSI Index average while performing the workload. The
Login VSI Index average is similar to the average response time, as it averages the maximum and minimum response
times, but it removes 2 percent from the maximum and minimum response time before calculating the average. VSI max
is then calculated in one of two ways, Classic and Dynamic. When the VSI Index average is higher than the default
threshold of 4000ms, Classic VSImax is achieved. Dynamic VSI max calculates a dynamic threshold based on the average
response times of the first 15 sessions and applies the formula Baseline x 125% +3000, when the VSI index is higher than
the dynamic baseline then dynamic VSI Max is achieved. In our testing, we were able to run 60 sessions without
surpassing the Dynamic VSI Max.
        For more information on Classic and Dynamic VSI max, see
        http://www.loginvsi.com/en/admin-guide/analyzing-results#h0-1-calculating-vsimax . For more information on
Login VSI 3.6, see http://www.loginvsi.com/product-overview.

About the servers we used
        In addition to the Dell PowerEdge R720 that hosted the VDI virtual machines we tested, we also used a Dell
PowerEdge R900, Dell PowerEdge R710 and Dell PowerEdge R720 to support the infrastructure required to run this
benchmark. The Dell PowerEdge R900 hosted two Login VSI launcher VMs, each of which launched 30 VDI sessions, the
Dell PowerEdge R710 hosted Active Directory and DHCP services, and the Dell PowerEdge R720 hosted the RDS
connection broker and web access roles used to create and clone the virtual machines.


Dell PowerEdge R720 with Samsung SSDs and Windows Server                         A Principled Technologies test report 10
2012: Supporting virtual desktops in remote offices
APPENDIX C – DETAILED TEST METHODOLOGY
Deploying the virtual desktop infrastructure
         Microsoft’s VDI solution requires four servers: an Active Directory® Domain controller, a virtual desktop host, a
connection broker and a Web access portal. Our Active Directory Domain controller was a Dell PowerEdge R710 named
domaincontroller; our virtual desktop host was a Dell PowerEdge R720 with Samsung solid-state drives named vdihost;
our connection broker and Web access portal were virtual machines hosted on a separate Dell PowerEdge R720, named
connbroker and webaccess respectively. All components used Windows Server 2012 Datacenter Edition.
Configuring the Active Directory server

Installing Microsoft Windows Server 2012 Datacenter on the Dell PowerEdge R710 Active Directory server
   1.  Insert the installation media into the CD/DVD drive, and restart the server.
   2.  When the option appears, press F11 to enter the Boot Manager.
   3.  Select SATA Optical Drive, and press Enter.
   4.  Press any key when prompted to boot from DVD.
   5.  When the installation screen appears, click My language is English.
   6.  Leave language, time/currency format, and input method as default and click Next.
   7.  Click Install now.
   8.  When the Windows Setup window appears, click No thanks when prompted to go online to install updates.
   9.  Select Windows Server 2012 Datacenter (Server with a GUI), and click Next.
   10. Check I accept the license terms, and click Next.
   11. Click Custom: Install Windows only (advanced).
   12. Press Alt+A to open advanced partition options. Delete any partitions until there is only Drive 0 Unallocated
       Space.
   13. Select Drive 0 Unallocated Space, and click Next, at which point Windows will begin installing, and will restart
       automatically after completing.
   14. When the Settings page appears, fill in the Password and Reenter Password fields with the same password.
   15. Log in with the previously set up password.

Configuring Windows Update
   1.    In the left pane of the Server Manager window, click Local Server.
   2.    In the main frame, next to Windows Update, click Never configured.
   3.    In the Windows Update window, in the main pane, click Let me choose my settings.
   4.    Under Important updates, select Never check for updates (not recommended), and then click OK.
   5.    In the left pane, click Check for updates, and install all available updates.
   6.    Restart the server.
   7.    Repeat steps 1 through 6 until all updates are installed.

Configuring Windows Firewall
   1.    In Server Manager, click ToolsWindows Firewall with Advanced Security.
   2.    In the Overview section, click Windows Firewall Properties.
   3.    In the Domain Profile tab, for Firewall state, click Off.
   4.    In the Private Profile tab, for Firewall state, click Off.
   5.    In the Public Profile tab, for Firewall state, click Off.
   6.    Click OK.

Dell PowerEdge R720 with Samsung SSDs and Windows Server                          A Principled Technologies test report 11
2012: Supporting virtual desktops in remote offices
7. Close the Windows Firewall Properties window.

Setting up Remote Desktop
    1. In the Local Server tab of the Server Manager window, next to Remote Desktop, click Disabled.
    2. In the System Properties window that appears, in the Remote Desktop section, select the Allow remote
       connections to this computer radio button, and click OK when the warning message appears.
    3. Uncheck Allow connections only from computers running Remote Desktop with Network Level Authentication
       (recommended), and click OK.

Disabling IE Enhanced Security Configuration
    1. In the Local Server tab of the Server Manager window, next to IE Enhanced Security Configuration, click On.
    2. In the Internet Explorer Enhanced Security Configuration window, select the Off radio buttons for both
       Administrators and Users, and click OK.

Setting a static IP address
    1. Open the Run prompt and type ncpa.cpl Click OK.
    2. Right-click the network adapter, and select Properties.
    3. Select Internet Protocol Version 4 (TCP/IPv4), and click Properties.
    4. Select the Use the following IP address radio button, and enter the appropriate addresses in the IP address,
       Subnet mask, Default gateway and Preferred DNS server fields.
    5. Click OK.

Choosing a hostname
    1.   Launch Server Manager, and click Local Server.
    2.   In the Properties section, click the current name shown next to Computer name.
    3.   At the System Properties screen, click Change.
    4.   At the Computer Name/Domain Changes, enter an appropriate hostname. Click OK.
    5.   Click OK at the restart confirmation dialog.
    6.   Click OK at the System Properties screen.
    7.   Click Restart Now.

Installing Active Directory and DNS services

    1. Launch Server Manager.
    2. Click ManageAdd Roles and Features.
    3. At the Before you begin screen, click Next.
    4. At the Select installation type screen, leave Role-based or feature-based installation selected, and click Next.
    5. At the Server Selection Screen, select the server from the pool, and click Next.
    6. At the Select Server Roles screen, select Active Directory Domain Services. Click Add Features when prompted,
       and click Next.
    7. At the Select Features screen, click Next.
    8. At the Active Directory Domain Services screen, click Next.
    9. At the Confirm installation selections screen, check Restart the destination server automatically if required, and
       click Install.


Dell PowerEdge R720 with Samsung SSDs and Windows Server                         A Principled Technologies test report 12
2012: Supporting virtual desktops in remote offices
Configuring Active Directory and DNS services

   1. After the installation completes, a screen should pop up with configuration options. If not, click the Tasks flag in
      the upper-right section of Server Manager.
   2. Click Promote this server to a Domain Controller.
   3. At the Deployment Configuration screen, select Add a new forest. In the Root domain name field, type
      test.local and click Next.
   4. At the Domain Controller Options screen, leave the default values, and enter a password twice.
   5. Click Next four times to accept default settings for DNS, NetBIOS, and directory paths.
   6. At the Review Options screen, click Next.
   7. At the Prerequisites Check dialog, allow the check to complete. If there are no relevant errors, check Restart the
      destination server automatically if required, and click Install.
   8. When the server restarts, log on using testAdministrator and the specified password.

Setting up DHCP services

   1.    Launch Server Manager.
   2.    Click ManageAdd Roles and Features.
   3.    At the Before you begin screen, click Next.
   4.    At the Select installation type screen, leave Role-based or feature-based installation selected, and click Next.
   5.    At the Server Selection Screen, select the server from the pool, and click Next.
   6.    At the Select Server Roles screen, select DHCP Server. Click Add Features when prompted, and click Next.
   7.    At the Select Features screen, click Next.
   8.    At the DHCP Server screen, click Next.
   9.    At the Confirm installation selections, check Restart the destination server automatically if required, and click
         Next.
   10.   Once the installation is finished, click Complete DHCP configuration.
   11.   At the DHCP Post-Install configuration wizard, click Next, and click Commit.
   12.   At the Summary dialog, click Close.
   13.   In the Add Roles and Features Wizard, click Close.
   14.   Click StartDHCP.
   15.   Expand domaincontroller.test.local, and click IPv4. Right-click IPv4New Scope.
   16.   At the New Scope Wizard Welcome screen, click Next.
   17.   In the Name field, type test and click Next.
   18.   Enter the lowest IP address in your test setup for Start IP address, and the highest IP address for End IP address.
         Leave the Length and Subnet mask as defaults, and click Next.
   19.   Click Next eight times to accept default scope settings, and click Finish.
   20.   Close the DHCP Manager console.

Creating the Login VSI users

   1. On the ADDS server, run VSI36.exe to extract the Login VSI setup files.
   2. Browse to the extraction location and run VSI361SetupsAD SetupAD Setup.exe.
   3. In the Amount of users field, enter 60 users. Choose a username root and password. We used Login_VSI and
      Password1. Click Start.
   4. After the installation completes, click Exit twice.


Dell PowerEdge R720 with Samsung SSDs and Windows Server                           A Principled Technologies test report 13
2012: Supporting virtual desktops in remote offices
Modifying the Login VSI group policy

    1. On the ADDS server, open a Run prompt, type gpmc.msc and click OK.
    2. Expand Forest: test.localDomainstest.localLogin_VSIComputers. Right-click the VSI System group policy
       object, and click Edit.
    3. Under Computer Configuration, expand PoliciesAdministrative Templates: Policy definitions (ADMX files)
       retrieved from the local computerWindows ComponentsRemote Desktop ServicesRemote Desktop
       Session Host, and click Security.
    4. In the Security GPO folder, right-click Require user authentication for remote connections using Network Level
       Authentication, and click Edit.
    5. Select the radio button next to Disabled, and click OK.
    6. Close the Group Policy Management Editor and the Group Policy Management Console.

Creating the Login VSI network share
    1.  Log onto connbroker with the testAdministrator credentials.
    2.  Launch Windows Explorer.
    3.  Click Computer, and then double-click Local Disk (C:).
    4.  Press Ctrl-Shift-N to create a New Folder. Type Share and press Enter.
    5.  Right-click the Share folder, and click Properties.
    6.  Click the Sharing tab, and click Advanced Sharing.
    7.  Check Share this folder.
    8.  Click Permissions. Select the Everyone group, and check the Allow box next to Full Control to grant read and
        write access to the Everyone group.
    9. Click OK twice to return to the Properties screen.
    10. Click the Security tab, and click Edit.
    11. Click Add.
    12. In the Enter the object names to select field, type Login_VSI_TS and click Find Now.
    13. Select LOGIN_VSI_TS, and check the Allow box next to Modify.
    14. Click Object Types, check the Computers box, and click OK.
    15. In the Enter the object names to select field, type vdihost.test.local and click Find Now.
    16. Select vdihost, and check the Allow box next to Modify.
    17. Click OK twice.
Setting up the remaining virtual desktop infrastructure machines
        Install Microsoft Windows Server 2012 Datacenter with all updates on vdihost and apply the firewall/remote
desktop/IEsec settings specified above. Assign an appropriate IP address and join the test.local domain. Repeat this for
the VMs connbroker and webaccess.

Adding the servers to the server pool
    1.   Log onto the connection broker server using the testAdministrator credentials.
    2.   Launch Server Manager.
    3.   In the Quick Start section, click Add other servers to manage.
    4.   In the Name (CN): box, type vdihost and click Find Now.
    5.   Click vdihost, and click the right arrow to add the server to the pool.
    6.   Repeat steps 4 and 5 for webaccess.


Dell PowerEdge R720 with Samsung SSDs and Windows Server                         A Principled Technologies test report 14
2012: Supporting virtual desktops in remote offices
Creating the VDI deployment
    1.  Log onto the connection broker server.
    2.  Launch Server Manager.
    3.  Click ManageAdd Roles and Features.
    4.  At the Before you begin screen, click Next.
    1.  At the Select installation type screen, select Remote Desktop Services scenario-based Installation, and click Next.
    2.  At the Select deployment type screen, select Standard deployment, and click Next.
    3.  At the Select deployment scenario screen, select Virtual Desktop Infrastructure, and click Next.
    4.  At the Review role services page, click Next.
    5.  At the Specify RD Connection Broker server page, click connbroker.test.local, click the right arrow, and click
        Next.
    6. At the Specify RD Web Access server page, click webaccess.test.local, click the right arrow, and click Next.
    7. At the Specify RD Virtualization Host server page, click vdihost.test.local, click the right arrow, and click Next.
    8. At the Confirm selections screen, check Restart the destination server automatically if required, and click
        Deploy.
    9. After the installation is complete, click Close.
Building the virtual desktop pool
        In this section, we show how to create 60 virtual desktops running Windows 7 Enterprise 32-bit OS on the
vdihost Dell PowerEdge R720 server.

Creating a user profile disk network share
    1.    Log onto connbroker with the testAdministrator credentials.
    2.    Launch Windows Explorer.
    3.    Click Computer, and then double-click Local Disk (C:).
    4.    Press Ctrl-Shift-N to create a New Folder. Type UPD and press Enter.
    5.    Right-click the UPD folder, and click Properties.
    6.    Click the Sharing tab, and click Advanced Sharing.
    7.    Check Share this folder.
    8.    Click Permissions. Select the Everyone group, and check the Allow box next to Full Control to grant read and
          write access to the Everyone group.
    9.    Click OK twice to return to the Properties screen.
    10.   Click the Security tab, and click Edit.
    11.   Click Add.
    12.   Click Object Types, check the Computers box, and click OK.
    13.   In the Enter the object names to select field, type vdihost.test.local and click Find Now.
    14.   Select vdihost, and check the Allow box next to Modify.
    15.   Click OK twice.

Creating a virtual desktop template
    1.    Log on to vdihost with the testAdministrator credentials.
    2.    Click StartHyper-V Manager.
    3.    Right-click vdihostNewVirtual Machine.
    4.    At the Before you begin screen, click Next.
    5.    At the Specify name and location screen, type Template in the name field, and click Next.
    6.    At the Assign memory screen, type 1024 in the Startup memory field, and then click Next.


Dell PowerEdge R720 with Samsung SSDs and Windows Server                          A Principled Technologies test report 15
2012: Supporting virtual desktops in remote offices
7. At the Configure networking page, open the drop-down Connection menu, select RDS Virtual, and click Next.
       This virtual switch was created during the VDI deployment.
    8. At the Connect Virtual Hard Disk screen, select the Create a virtual hard disk radio button, and enter 20 in the
       Size field.
    9. Click Finish.

Installing Windows 7 Enterprise 32-bit OS
    1. Right-click the Template virtual machine in Hyper-V Manager and click Settings.
    2. Under IDE Controller 1, click DVD Drive. Select the radio button for Image file, and enter the location of the
       Windows 7 Enterprise 32-bit DVD image. Click OK.
    3. Right-click the Template virtual machine, and click Start. Double-click the Template virtual machine to connect
       to it.
    4. Press any key when prompted to boot from DVD.
    5. Follow the on-screen instructions to install Windows 7 Enterprise 32-bit, taking care to select the same time
       zone as the server pool.
    6. Install all Windows Updates and apply the firewall/remote desktop/IEsec settings specified above.
    7. Assign an IP address, and join the test.local domain.

Installing Microsoft Office 2010 Standard
    1. Right-click the Template virtual machine in Hyper-V Manager and click Settings.
    2. Under IDE Controller 1, click DVD Drive. Select the radio button for Image file and enter the location of the
       Microsoft Office 2010 Standard DVD image. Click OK.
    3. In the Template virtual machine, run D:setup.exe.
    4. Follow the on-screen instructions to install Microsoft Office 2010 Standard with default settings.

Installing Microsoft .NET Framework 4.0
    1. In the Template virtual machine, open Internet Explorer, navigate to http://www.microsoft.com/en-
       us/download/details.aspx?id=24872, and download the Standalone Installer.
    2. Run dotNetFx40_Client_x86_x64.exe, and follow the on-screen instructions to install Microsoft .NET Framework
       4.0 with default settings.

Setting page file
    1.   In the Template virtual machine, click Start, and right-click ComputerProperties.
    2.   Click Advanced System Settings.
    3.   Under the Advanced tab, click Settings.
    4.   At the Performance Options screen, click the Advanced tab, and click Change.
    5.   Uncheck Automatically manage paging file size for all drives.
    6.   Select the Custom size radio button, and enter 2048 for Initial size and Maximum size.
    7.   Click OK three times to close all screens.

Enabling ClearType
    1.   In the Template virtual machine, click Start, and type cleartype in the search box.
    2.   Click Adjust ClearType text.
    3.   Check Turn on ClearType. Click Next.
    4.   Click Next four times to go through the adjustment process.
    5.   Click Finish.


Dell PowerEdge R720 with Samsung SSDs and Windows Server                         A Principled Technologies test report 16
2012: Supporting virtual desktops in remote offices
Deleting default printers
    1.    In the Template virtual machine, click StartDevices and printers.
    2.    Right-click Fax, and click Remove device.
    3.    Click Yes.
    4.    Repeat steps 2 and 3 for Microsoft XPS Document Writer and Send to OneNote 2010.

Installing Login VSI target software
    1.  In the Template virtual machine, run VSI36.exe to extract the installation files.
    2.  Browse to the location of the extraction files and run VSI361SetupsTarget SetupSetup.exe.
    3.  In the Please specify VSI Share: (UNC Path) field, type connbrokershare and click Start.
    4.  Allow the installation to complete, and click OK on the Warning dialog.
    5.  Log onto the ADDS server, and open Server ManagerToolsActive Directory Users and Computers.
    6.  Click ActionFind.
    7.  In the drop-down menu labeled Find, select Computers.
    8.  In the drop-down menu labeled In, select test.local.
    9.  In the Name field, type Template and click Find Now.
    10. Right-click Templat,e and click Move.
    11. Expand Login_VSI and select the Computers folder. Click OK and then close the Find Computers and Active
        Directory Users and Computers windows.
    12. Restart the Template virtual machine.

Prepping the Template for duplication
    1.    Log onto the Template virtual machine using testAdministrator credentials.
    2.    Press Windows+R to open the Run prompt.
    3.    Type sysprep and click OK.
    4.    Run sysprep.exe.
    5.    From the System Cleanup Action drop-down menu, select Enter System Out-of-Box Experience (OOBE).
    6.    Check the Generalize checkbox.
    7.    From the Shutdown Options drop-down menu, select Shutdown.
    8.    Click OK.
    9.    Allow the system to be sysprepped and let it shut down automatically. Do not restart the Template virtual
          machine until it has been cloned.

Cloning the virtual desktop template and creating a pooled virtual desktop collection
    1. Log onto connbroker using the testAdministrator credentials.
    2. Launch Server manager.
    3. Click Remote Desktop Services, and click Collections.
    4. Click TasksCreate Virtual Desktop Collection.
    5. At the Before you begin screen, click Next.
    6. At the Name the collection screen, type Test Pool in the Name field, and click Next.
    7. At the Specify the collection type screen, select the Pooled virtual desktop collection button, check the
        Automatically create and manage virtual desktops checkbox, and click Next.
    8. At the Specify the virtual desktop template screen, select Template, and click Next.
    9. At the Specify the virtual desktop settings screen, click Provide unattended settings, and click Next.
    10. At the Specify the unattended installation settings screen, select an appropriate time zone for the server pool.
        Select the Select the organizational unit: radio button and select test.local for the Active Directory domain name
        and Login_VSI for the Active Directory Domain Services organization unit (OU). Click Next.

Dell PowerEdge R720 with Samsung SSDs and Windows Server                         A Principled Technologies test report 17
2012: Supporting virtual desktops in remote offices
11. At the Specify users and user groups screen, click Add. Type Login_VSI_TS and press Enter. Verify that
       TESTLogin_VSI_TS appears in the User Groups box. In the Virtual desktops to be created in the collection field,
       type 60. In the Specify characters that should be added to the beginning or end of the name of each virtual
       desktop fields, select a prefix and starting index for your collection. We used Test- and 1, so our desktops were
       named Test-1, Test-2, Test-3, etc. Click Next.
   12. At the Specify virtual desktop allocation screen, leave the default settings, and click Next.
   13. At the Specify virtual desktop storage screen, select the Store on a network share radio button. Enter the
       location of a folder on the solid-state drives on vdihost. Check the Automatically roll back the virtual desktop
       when the user logs off checkbox. Click Next.
   14. At the Specify user profile disks screen, check Enable user profile disks. Enter connbrokerUPD for the
       Location of user profile disks field. Leave the Maximum size (in GB) as 20. Click Next.
   15. At the Confirm selections screen, click Create.
   16. Let the deployment complete, and click Finish.

Moving the pooled desktops to the Login_VSI organizational unit
  1. Log onto the ADDS server and open Server ManagerToolsActive Directory Users and Computers.
  2. Click ActionFind.
  3. In the drop-down menu labeled Find, select Computers.
  4. In the drop-down menu labeled In, select test.local.
  5. In the Name field, type Test and click Find Now.
  6. Select Test-1 through Test-60. Right-click the selection, and click Move.
  7. Expand Login_VSI, and select the Computers folder. Click OK, and then close the Find Computers and Active
       Directory Users and Computers windows.
  8. Reboot the pooled desktops to ensure delivery of the Login_VSI group policy.

Creating the Login VSI launchers
        In this section, we show how to create the two virtual machines used to launch the Login VSI benchmark. We
used a Dell PowerEdge R900 to host the launcher VMs.
Creating a virtual machine with Windows 7 Enterprise 64-bit OS
    1. Using Hyper-V, create two virtual machines named VSI-1 and VSI-2. We gave each launcher 8192 MB of static
         RAM, four vCPUs, and a 30 GB VHD. Install Microsoft Windows 7 Enterprise 64-bit OS with all updates and the
         firewall/remote desktop/ IEsec settings specified above on both machines. Assign appropriate IPs and join them
         to the test.local domain.
    2. Move VSI-1 and VSI-2 to the Login_VSI organizational unit as you did for the Template and Test VMs.
    3. Reboot VSI-1 and VSI-2 to ensure delivery of the Login VSI group policy.
Installing the Login VSI launcher and analyzer software
    1. Log into VSI-1 using the TESTAdministrator credentials.
    2. Run VSI36.exe.
    3. Browse to the extraction location, and run VSI361SetupsLauncherSetup.exe.
    4. At the Welcome screen, click Next.
    5. At the Select Destination Location, leave the default location, and click Next.
    6. At the Select VSI Share screen, enter connbrokerShare for the UNC path, and click Next.
    7. At the Select Components screen, click Next.
    8. At the Select Start Menu Folder, click Next.
    9. At the Ready to Install screen, click Install.
    10. Repeat steps 1 through 9 for VSI-2.
    11. On VSI-1, run VSI361SetupsAnalyzerSetup.exe.

Dell PowerEdge R720 with Samsung SSDs and Windows Server                        A Principled Technologies test report 18
2012: Supporting virtual desktops in remote offices
12.   At the Welcome screen, click Next.
   13.   At the Select Destination Location screen, click Next.
   14.   At the Select VSI Share screen, enter connbrokerShare for the UNC path, and click Next.
   15.   At the Select Components screen, click Next.
   16.   At the Select Start Menu Folder, click Next.
   17.   At the Ready to Install screen, click Install.

Setting up the Login VSI benchmark
         In this section we show how to make the configurations necessary to run the test.
Setting up the test configuration
    1. Log into VSI-1 using the TESTAdministrator credentials.
    2. Use a spreadsheet program to create a table as shown:

                input_servername      input_username        input_password         input_domain
                Test-1                Login_VSI1            Password1              test.local
                Test-2                Login_VSI2            Password1              test.local
                (rows 3-59 omitted) (rows 3-59 omitted) (rows 3-59 omitted) (rows 3-59 omitted)
                Test-60               Login_VSI60           Password1              test.local


   3. Save it as RDPCSV.csv in connbrokerShare to create a comma-separated values file.
   4. Click StartLogin ConsultantsVSILauncherVSI Management Console.
   5. Click Launchers on the left pane:
          a. Right-click in the middle pane and click Add Launcher.
          b. When the Add Launchers Wizard pops up, select the Single manual entry radio button, and click Next.
          c. In the Launcher name field, type VSI-2.test.local. Set the Launcher capacity to 30, and check the
               Launcher enabled checkbox. Click OK.
          d. Click Finish.
          e. Under Launchers, right-click VSI-1, and click Modify. Set the Launcher capacity to 30, and check the
               Launcher-enabled checkbox. Click OK.
   6. Click Workload Configuration:
          a. Make sure Global Settings is selected in the drop-down menu.
          b. Set Office Version to 14.
          c. Click Save workload settings, and save under an appropriate file name.
   7. Click Test Configuration in the left pane.
          a. In the Workload drop-down menu, select Medium.
          b. Check the Auto start launcher checkbox.
          c. In the Launch type drop-down menu, select Sequential Launching.
          d. Check the Auto logoff checkbox.
          e. Set the Auto logoff timeout to 900 seconds.
          f. If this is the very first run, check the Create profiles checkbox. This will pre-create the user profiles and
               suppress any results output. If the profiles have been created, uncheck this box.
          g. In the Connection type drop-down menu, select Custom Commandline with CSV.
          h. In the Specify Custom Commandline field, enter the following:


Dell PowerEdge R720 with Samsung SSDs and Windows Server                        A Principled Technologies test report 19
2012: Supporting virtual desktops in remote offices
“C:Program FilesLogin ConsultantsVSILauncherAgentLaunchRDP.exe”
                %CSV_input_servername% 3389 %CSV_input_username% test Password1 0 0 0

          i. In the Specify CSV File field, enter the following:

              ConnBrokerShareRDPCSV.csv

          j. Leave the Pre-Test script and Post-test script fields blank.
          k. In the Connect drop-down menu, select User.
          l. Leave the Connection Settings options as default. They are overridden by the custom command line.
          m. Set Sessions to 60.
          n. Set Start number to 1.
          o. Set Interval to 30.
          p. Click Save test settings and save under an appropriate file name.
   8. Click Start Test.
          a. Review the configuration, and click Start test.
          b. Enter a testname, and click Next.
          c. At the Pre//PostScripts screen, click Next.
          d. At the SessionMonitor screen, click Next.
          e. At the Check launchers screen, wait for both launchers to become ready and then click Start Test. If a
               launcher shows Not ready for more than 3 minutes, restart the VSI Agent on that machine, and then
               click Start Test after both launchers are ready.
   9. After the test has completed, reboot Test-1 through Test-60 as well as both launchers. This prepares the test
      bed for a new run.


Dell PowerEdge R720 with Samsung SSDs and Windows Server                      A Principled Technologies test report 20
2012: Supporting virtual desktops in remote offices
ABOUT PRINCIPLED TECHNOLOGIES
                                               We provide industry-leading technology assessment and fact-based
                                               marketing services. We bring to every assignment extensive experience
                                               with and expertise in all aspects of technology testing and analysis, from
                                               researching new technologies, to developing new methodologies, to
Principled Technologies, Inc.
                                               testing with existing and new tools.
1007 Slater Road, Suite 300
Durham, NC, 27703                              When the assessment is complete, we know how to present the results to
www.principledtechnologies.com
                                               a broad range of target audiences. We provide our clients with the
                                               materials they need, from market-focused data to use in their own
                                               collateral to custom sales aids, such as test reports, performance
                                               assessments, and white papers. Every document reflects the results of
                                               our trusted independent analysis.

                                               We provide customized services that focus on our clients’ individual
                                               requirements. Whether the technology involves hardware, software, Web
                                               sites, or services, we offer the experience, expertise, and tools to help our
                                               clients assess how it will fare against its competition, its performance, its
                                               market readiness, and its quality and reliability.

                                               Our founders, Mark L. Van Name and Bill Catchings, have worked
                                               together in technology assessment for over 20 years. As journalists, they
                                               published over a thousand articles on a wide array of technology subjects.
                                               They created and led the Ziff-Davis Benchmark Operation, which
                                               developed such industry-standard benchmarks as Ziff Davis Media’s
                                               Winstone and WebBench. They founded and led eTesting Labs, and after
                                               the acquisition of that company by Lionbridge Technologies were the
                                               head and CTO of VeriTest.


Principled Technologies is a registered trademark of Principled Technologies, Inc.
All other product names are the trademarks of their respective owners.

Disclaimer of Warranties; Limitation of Liability:
PRINCIPLED TECHNOLOGIES, INC. HAS MADE REASONABLE EFFORTS TO ENSURE THE ACCURACY AND VALIDITY OF ITS TESTING, HOWEVER,
PRINCIPLED TECHNOLOGIES, INC. SPECIFICALLY DISCLAIMS ANY WARRANTY, EXPRESSED OR IMPLIED, RELATING TO THE TEST RESULTS AND
ANALYSIS, THEIR ACCURACY, COMPLETENESS OR QUALITY, INCLUDING ANY IMPLIED WARRANTY OF FITNESS FOR ANY PARTICULAR PURPOSE.
ALL PERSONS OR ENTITIES RELYING ON THE RESULTS OF ANY TESTING DO SO AT THEIR OWN RISK, AND AGREE THAT PRINCIPLED
TECHNOLOGIES, INC., ITS EMPLOYEES AND ITS SUBCONTRACTORS SHALL HAVE NO LIABILITY WHATSOEVER FROM ANY CLAIM OF LOSS OR
DAMAGE ON ACCOUNT OF ANY ALLEGED ERROR OR DEFECT IN ANY TESTING PROCEDURE OR RESULT.

IN NO EVENT SHALL PRINCIPLED TECHNOLOGIES, INC. BE LIABLE FOR INDIRECT, SPECIAL, INCIDENTAL, OR CONSEQUENTIAL DAMAGES IN
CONNECTION WITH ITS TESTING, EVEN IF ADVISED OF THE POSSIBILITY OF SUCH DAMAGES. IN NO EVENT SHALL PRINCIPLED TECHNOLOGIES,
INC.’S LIABILITY, INCLUDING FOR DIRECT DAMAGES, EXCEED THE AMOUNTS PAID IN CONNECTION WITH PRINCIPLED TECHNOLOGIES, INC.’S
TESTING. CUSTOMER’S SOLE AND EXCLUSIVE REMEDIES ARE AS SET FORTH HEREIN.


Dell PowerEdge R720 with Samsung SSDs and Windows Server                              A Principled Technologies test report 21
2012: Supporting virtual desktops in remote offices

Contenu connexe

Tendances

Stephan pfister deep dive personal v disk
Stephan pfister deep dive personal v diskStephan pfister deep dive personal v disk
Stephan pfister deep dive personal v disk
Digicomp Academy AG
 
Dell VMware Virtual SAN Ready Nodes
Dell VMware Virtual SAN Ready NodesDell VMware Virtual SAN Ready Nodes
Dell VMware Virtual SAN Ready Nodes
Andrew McDaniel
 
Ms windows 2012 hp-badurini prezentacija
Ms windows 2012   hp-badurini prezentacijaMs windows 2012   hp-badurini prezentacija
Ms windows 2012 hp-badurini prezentacija
Tomislav Lulic
 
Citrix Xen Desktop Solution White Paper
Citrix Xen Desktop Solution White PaperCitrix Xen Desktop Solution White Paper
Citrix Xen Desktop Solution White Paper
ReadWriteEnterprise
 

Tendances (20)

Migrating to Microsoft Windows Server 2012 and Microsoft SQL Server 2012 on D...
Migrating to Microsoft Windows Server 2012 and Microsoft SQL Server 2012 on D...Migrating to Microsoft Windows Server 2012 and Microsoft SQL Server 2012 on D...
Migrating to Microsoft Windows Server 2012 and Microsoft SQL Server 2012 on D...
 
Dell 3-2-1 Reference Configurations: Configuration, management, and upgrade g...
Dell 3-2-1 Reference Configurations: Configuration, management, and upgrade g...Dell 3-2-1 Reference Configurations: Configuration, management, and upgrade g...
Dell 3-2-1 Reference Configurations: Configuration, management, and upgrade g...
 
IBM SmartCloud Desktop Infrastructure with Citrix XenDesktop
IBM SmartCloud Desktop Infrastructure with Citrix XenDesktopIBM SmartCloud Desktop Infrastructure with Citrix XenDesktop
IBM SmartCloud Desktop Infrastructure with Citrix XenDesktop
 
Windows 2008 R2 Virtualization
Windows 2008  R2  VirtualizationWindows 2008  R2  Virtualization
Windows 2008 R2 Virtualization
 
Stephan pfister deep dive personal v disk
Stephan pfister deep dive personal v diskStephan pfister deep dive personal v disk
Stephan pfister deep dive personal v disk
 
Exploring the HDXPRT 2014 Benchmark
Exploring the HDXPRT 2014 BenchmarkExploring the HDXPRT 2014 Benchmark
Exploring the HDXPRT 2014 Benchmark
 
Efficient and versatile hardware management with Dell PowerEdge VRTX
Efficient and versatile hardware management with Dell PowerEdge VRTXEfficient and versatile hardware management with Dell PowerEdge VRTX
Efficient and versatile hardware management with Dell PowerEdge VRTX
 
Ws 2012 white paper hyper v
Ws 2012 white paper hyper vWs 2012 white paper hyper v
Ws 2012 white paper hyper v
 
Dell PowerEdge Deployment Guide
Dell PowerEdge Deployment GuideDell PowerEdge Deployment Guide
Dell PowerEdge Deployment Guide
 
Dell PowerEdge M420: A Microsoft SQL Server 2012 AlwaysOn Failover Cluster Re...
Dell PowerEdge M420: A Microsoft SQL Server 2012 AlwaysOn Failover Cluster Re...Dell PowerEdge M420: A Microsoft SQL Server 2012 AlwaysOn Failover Cluster Re...
Dell PowerEdge M420: A Microsoft SQL Server 2012 AlwaysOn Failover Cluster Re...
 
Database performance with Dell PowerEdge PCIe Express Flash SSDs
Database performance with Dell PowerEdge PCIe Express Flash SSDsDatabase performance with Dell PowerEdge PCIe Express Flash SSDs
Database performance with Dell PowerEdge PCIe Express Flash SSDs
 
Fasg02 mr
Fasg02 mrFasg02 mr
Fasg02 mr
 
Configuring a highly available Microsoft Exchange Server 2013 environment on ...
Configuring a highly available Microsoft Exchange Server 2013 environment on ...Configuring a highly available Microsoft Exchange Server 2013 environment on ...
Configuring a highly available Microsoft Exchange Server 2013 environment on ...
 
Dell VMware Virtual SAN Ready Nodes
Dell VMware Virtual SAN Ready NodesDell VMware Virtual SAN Ready Nodes
Dell VMware Virtual SAN Ready Nodes
 
Virtualized database performance with Dell PowerEdge PCIe Express Flash SSDs
Virtualized database performance with Dell PowerEdge PCIe Express Flash SSDsVirtualized database performance with Dell PowerEdge PCIe Express Flash SSDs
Virtualized database performance with Dell PowerEdge PCIe Express Flash SSDs
 
Bb sql serverdell
Bb sql serverdellBb sql serverdell
Bb sql serverdell
 
Dell 3-2-1 Reference Configurations: Scalable performance and simplicity in s...
Dell 3-2-1 Reference Configurations: Scalable performance and simplicity in s...Dell 3-2-1 Reference Configurations: Scalable performance and simplicity in s...
Dell 3-2-1 Reference Configurations: Scalable performance and simplicity in s...
 
Ms windows 2012 hp-badurini prezentacija
Ms windows 2012   hp-badurini prezentacijaMs windows 2012   hp-badurini prezentacija
Ms windows 2012 hp-badurini prezentacija
 
Citrix Xen Desktop Solution White Paper
Citrix Xen Desktop Solution White PaperCitrix Xen Desktop Solution White Paper
Citrix Xen Desktop Solution White Paper
 
Reviewer’s Guide for XenDesktop 7
Reviewer’s Guide for XenDesktop 7Reviewer’s Guide for XenDesktop 7
Reviewer’s Guide for XenDesktop 7
 

En vedette

Volcano
Volcano Volcano
Volcano
evajtok
 
Egov afghanistan presentation omar ansari
Egov afghanistan presentation omar ansariEgov afghanistan presentation omar ansari
Egov afghanistan presentation omar ansari
E-Journal ICT4D
 

En vedette (8)

Volcano
Volcano Volcano
Volcano
 
Awcc serves as gold sponsor at kitex 2015
Awcc serves as gold sponsor at kitex 2015Awcc serves as gold sponsor at kitex 2015
Awcc serves as gold sponsor at kitex 2015
 
ICT as a platform for multilateral cooperation
ICT as a platform for multilateral cooperationICT as a platform for multilateral cooperation
ICT as a platform for multilateral cooperation
 
Electronic government: Challenges and Opportunities in Afghanistan
Electronic government: Challenges and Opportunities in AfghanistanElectronic government: Challenges and Opportunities in Afghanistan
Electronic government: Challenges and Opportunities in Afghanistan
 
ICT for Development
ICT for Development ICT for Development
ICT for Development
 
Egov afghanistan presentation omar ansari
Egov afghanistan presentation omar ansariEgov afghanistan presentation omar ansari
Egov afghanistan presentation omar ansari
 
Monash presentation
Monash presentationMonash presentation
Monash presentation
 
Operacion del servicio ti
Operacion del servicio  tiOperacion del servicio  ti
Operacion del servicio ti
 

Similaire à Dell PowerEdge R720 with Samsung SSDs and Windows Server 2012: Supporting virtual desktops in remote offices

What's new in Windows Server 2012 R2
What's new in Windows Server 2012 R2What's new in Windows Server 2012 R2
What's new in Windows Server 2012 R2
Christopher Keyaert
 
grid-vgpu-app-guide-esri-v01
grid-vgpu-app-guide-esri-v01grid-vgpu-app-guide-esri-v01
grid-vgpu-app-guide-esri-v01
Jason Kyungho Lee
 

Similaire à Dell PowerEdge R720 with Samsung SSDs and Windows Server 2012: Supporting virtual desktops in remote offices (20)

VDI performance comparison: Samsung solid-state drives vs. SAS drives in a De...
VDI performance comparison: Samsung solid-state drives vs. SAS drives in a De...VDI performance comparison: Samsung solid-state drives vs. SAS drives in a De...
VDI performance comparison: Samsung solid-state drives vs. SAS drives in a De...
 
Red Hat Enterprise Virtualization sizing guide
Red Hat Enterprise Virtualization sizing guideRed Hat Enterprise Virtualization sizing guide
Red Hat Enterprise Virtualization sizing guide
 
R720 samsung ss_ds_0213
R720 samsung ss_ds_0213R720 samsung ss_ds_0213
R720 samsung ss_ds_0213
 
Throughput comparison: Dell PowerEdge R720 drive options
Throughput comparison: Dell PowerEdge R720 drive optionsThroughput comparison: Dell PowerEdge R720 drive options
Throughput comparison: Dell PowerEdge R720 drive options
 
Dell PowerEdge R660xs: Maximize VDI density while delivering a strong user ex...
Dell PowerEdge R660xs: Maximize VDI density while delivering a strong user ex...Dell PowerEdge R660xs: Maximize VDI density while delivering a strong user ex...
Dell PowerEdge R660xs: Maximize VDI density while delivering a strong user ex...
 
Remote office server performance: Dell PowerEdge R720 server with Samsung SSD...
Remote office server performance: Dell PowerEdge R720 server with Samsung SSD...Remote office server performance: Dell PowerEdge R720 server with Samsung SSD...
Remote office server performance: Dell PowerEdge R720 server with Samsung SSD...
 
Server consolidation with the Dell PowerEdge M620
Server consolidation with the Dell PowerEdge M620Server consolidation with the Dell PowerEdge M620
Server consolidation with the Dell PowerEdge M620
 
VMmark 2.5.2 virtualization performance of the Dell Storage SC4020 array
VMmark 2.5.2 virtualization performance of the Dell Storage SC4020 arrayVMmark 2.5.2 virtualization performance of the Dell Storage SC4020 array
VMmark 2.5.2 virtualization performance of the Dell Storage SC4020 array
 
Dell PowerEdge R920 and Microsoft SQL Server 2014 Migration and Benefits Guide
Dell PowerEdge R920 and Microsoft SQL Server 2014 Migration and Benefits GuideDell PowerEdge R920 and Microsoft SQL Server 2014 Migration and Benefits Guide
Dell PowerEdge R920 and Microsoft SQL Server 2014 Migration and Benefits Guide
 
VMmark 2.5.2 virtualization performance of the Dell EqualLogic PS6210XS stora...
VMmark 2.5.2 virtualization performance of the Dell EqualLogic PS6210XS stora...VMmark 2.5.2 virtualization performance of the Dell EqualLogic PS6210XS stora...
VMmark 2.5.2 virtualization performance of the Dell EqualLogic PS6210XS stora...
 
Dell PowerEdge R720 server with VMware vSphere 5 - Exchange server consolidation
Dell PowerEdge R720 server with VMware vSphere 5 - Exchange server consolidationDell PowerEdge R720 server with VMware vSphere 5 - Exchange server consolidation
Dell PowerEdge R720 server with VMware vSphere 5 - Exchange server consolidation
 
Dell PowerEdge R720 rack server solutions for virtual desktop infrastructures
Dell PowerEdge R720 rack server solutions for virtual desktop infrastructures Dell PowerEdge R720 rack server solutions for virtual desktop infrastructures
Dell PowerEdge R720 rack server solutions for virtual desktop infrastructures
 
Support more workers using graphics-accelerated VDI desktops
Support more workers using graphics-accelerated VDI desktopsSupport more workers using graphics-accelerated VDI desktops
Support more workers using graphics-accelerated VDI desktops
 
Dell PowerEdge R820 and R910 servers: Performance and reliability
Dell PowerEdge R820 and R910 servers: Performance and reliabilityDell PowerEdge R820 and R910 servers: Performance and reliability
Dell PowerEdge R820 and R910 servers: Performance and reliability
 
Virtual desktop scalability and performance with VMware View 5.2 and Virident...
Virtual desktop scalability and performance with VMware View 5.2 and Virident...Virtual desktop scalability and performance with VMware View 5.2 and Virident...
Virtual desktop scalability and performance with VMware View 5.2 and Virident...
 
Windows Server 2012 on Dell - Great performance and value for the next genera...
Windows Server 2012 on Dell - Great performance and value for the next genera...Windows Server 2012 on Dell - Great performance and value for the next genera...
Windows Server 2012 on Dell - Great performance and value for the next genera...
 
Dell Acceleration Appliance for Databases 2.0 and Microsoft SQL Server 2014: ...
Dell Acceleration Appliance for Databases 2.0 and Microsoft SQL Server 2014: ...Dell Acceleration Appliance for Databases 2.0 and Microsoft SQL Server 2014: ...
Dell Acceleration Appliance for Databases 2.0 and Microsoft SQL Server 2014: ...
 
What's new in Windows Server 2012 R2
What's new in Windows Server 2012 R2What's new in Windows Server 2012 R2
What's new in Windows Server 2012 R2
 
TechInsight - Real World Implementation of VDI
TechInsight - Real World Implementation of VDITechInsight - Real World Implementation of VDI
TechInsight - Real World Implementation of VDI
 
grid-vgpu-app-guide-esri-v01
grid-vgpu-app-guide-esri-v01grid-vgpu-app-guide-esri-v01
grid-vgpu-app-guide-esri-v01
 

Plus de Principled Technologies

Improve performance and gain room to grow by easily migrating to a modern Ope...
Improve performance and gain room to grow by easily migrating to a modern Ope...Improve performance and gain room to grow by easily migrating to a modern Ope...
Improve performance and gain room to grow by easily migrating to a modern Ope...
Principled Technologies
 
Increase security, sustainability, and efficiency with robust Dell server man...
Increase security, sustainability, and efficiency with robust Dell server man...Increase security, sustainability, and efficiency with robust Dell server man...
Increase security, sustainability, and efficiency with robust Dell server man...
Principled Technologies
 

Plus de Principled Technologies (20)

Dell APEX Cloud Platform for Red Hat OpenShift: An easily deployable and powe...
Dell APEX Cloud Platform for Red Hat OpenShift: An easily deployable and powe...Dell APEX Cloud Platform for Red Hat OpenShift: An easily deployable and powe...
Dell APEX Cloud Platform for Red Hat OpenShift: An easily deployable and powe...
 
Upgrade your cloud infrastructure with Dell PowerEdge R760 servers and VMware...
Upgrade your cloud infrastructure with Dell PowerEdge R760 servers and VMware...Upgrade your cloud infrastructure with Dell PowerEdge R760 servers and VMware...
Upgrade your cloud infrastructure with Dell PowerEdge R760 servers and VMware...
 
Upgrade your cloud infrastructure with Dell PowerEdge R760 servers and VMware...
Upgrade your cloud infrastructure with Dell PowerEdge R760 servers and VMware...Upgrade your cloud infrastructure with Dell PowerEdge R760 servers and VMware...
Upgrade your cloud infrastructure with Dell PowerEdge R760 servers and VMware...
 
Realize 2.1X the performance with 20% less power with AMD EPYC processor-back...
Realize 2.1X the performance with 20% less power with AMD EPYC processor-back...Realize 2.1X the performance with 20% less power with AMD EPYC processor-back...
Realize 2.1X the performance with 20% less power with AMD EPYC processor-back...
 
Improve performance and gain room to grow by easily migrating to a modern Ope...
Improve performance and gain room to grow by easily migrating to a modern Ope...Improve performance and gain room to grow by easily migrating to a modern Ope...
Improve performance and gain room to grow by easily migrating to a modern Ope...
 
Boost PC performance: How more available memory can improve productivity
Boost PC performance: How more available memory can improve productivityBoost PC performance: How more available memory can improve productivity
Boost PC performance: How more available memory can improve productivity
 
Deploy with confidence: VMware Cloud Foundation 5.1 on next gen Dell PowerEdg...
Deploy with confidence: VMware Cloud Foundation 5.1 on next gen Dell PowerEdg...Deploy with confidence: VMware Cloud Foundation 5.1 on next gen Dell PowerEdg...
Deploy with confidence: VMware Cloud Foundation 5.1 on next gen Dell PowerEdg...
 
Upgrade your cloud infrastructure with Dell PowerEdge R760 servers and VMware...
Upgrade your cloud infrastructure with Dell PowerEdge R760 servers and VMware...Upgrade your cloud infrastructure with Dell PowerEdge R760 servers and VMware...
Upgrade your cloud infrastructure with Dell PowerEdge R760 servers and VMware...
 
A comparison of security features in Dell, HP, and Lenovo PC systems
A comparison of security features in Dell, HP, and Lenovo PC systemsA comparison of security features in Dell, HP, and Lenovo PC systems
A comparison of security features in Dell, HP, and Lenovo PC systems
 
Increase security, sustainability, and efficiency with robust Dell server man...
Increase security, sustainability, and efficiency with robust Dell server man...Increase security, sustainability, and efficiency with robust Dell server man...
Increase security, sustainability, and efficiency with robust Dell server man...
 
Increase security, sustainability, and efficiency with robust Dell server man...
Increase security, sustainability, and efficiency with robust Dell server man...Increase security, sustainability, and efficiency with robust Dell server man...
Increase security, sustainability, and efficiency with robust Dell server man...
 
Scale up your storage with higher-performing Dell APEX Block Storage for AWS ...
Scale up your storage with higher-performing Dell APEX Block Storage for AWS ...Scale up your storage with higher-performing Dell APEX Block Storage for AWS ...
Scale up your storage with higher-performing Dell APEX Block Storage for AWS ...
 
Scale up your storage with higher-performing Dell APEX Block Storage for AWS
Scale up your storage with higher-performing Dell APEX Block Storage for AWSScale up your storage with higher-performing Dell APEX Block Storage for AWS
Scale up your storage with higher-performing Dell APEX Block Storage for AWS
 
Get in and stay in the productivity zone with the HP Z2 G9 Tower Workstation
Get in and stay in the productivity zone with the HP Z2 G9 Tower WorkstationGet in and stay in the productivity zone with the HP Z2 G9 Tower Workstation
Get in and stay in the productivity zone with the HP Z2 G9 Tower Workstation
 
Open up new possibilities with higher transactional database performance from...
Open up new possibilities with higher transactional database performance from...Open up new possibilities with higher transactional database performance from...
Open up new possibilities with higher transactional database performance from...
 
Improving database performance and value with an easy migration to Azure Data...
Improving database performance and value with an easy migration to Azure Data...Improving database performance and value with an easy migration to Azure Data...
Improving database performance and value with an easy migration to Azure Data...
 
Realize better value and performance migrating from Azure Database for Postgr...
Realize better value and performance migrating from Azure Database for Postgr...Realize better value and performance migrating from Azure Database for Postgr...
Realize better value and performance migrating from Azure Database for Postgr...
 
Realize better value and performance migrating from Azure Database for Postgr...
Realize better value and performance migrating from Azure Database for Postgr...Realize better value and performance migrating from Azure Database for Postgr...
Realize better value and performance migrating from Azure Database for Postgr...
 
Set up students and teachers to excel now and in the future with Intel proces...
Set up students and teachers to excel now and in the future with Intel proces...Set up students and teachers to excel now and in the future with Intel proces...
Set up students and teachers to excel now and in the future with Intel proces...
 
Finding the path to AI success with the Dell AI portfolio - Summary
Finding the path to AI success with the Dell AI portfolio - SummaryFinding the path to AI success with the Dell AI portfolio - Summary
Finding the path to AI success with the Dell AI portfolio - Summary
 

Dernier

+971581248768>> SAFE AND ORIGINAL ABORTION PILLS FOR SALE IN DUBAI AND ABUDHA...
+971581248768>> SAFE AND ORIGINAL ABORTION PILLS FOR SALE IN DUBAI AND ABUDHA...+971581248768>> SAFE AND ORIGINAL ABORTION PILLS FOR SALE IN DUBAI AND ABUDHA...
+971581248768>> SAFE AND ORIGINAL ABORTION PILLS FOR SALE IN DUBAI AND ABUDHA...
?#DUbAI#??##{{(☎️+971_581248768%)**%*]'#abortion pills for sale in dubai@
 

Dernier (20)

A Domino Admins Adventures (Engage 2024)
A Domino Admins Adventures (Engage 2024)A Domino Admins Adventures (Engage 2024)
A Domino Admins Adventures (Engage 2024)
 
From Event to Action: Accelerate Your Decision Making with Real-Time Automation
From Event to Action: Accelerate Your Decision Making with Real-Time AutomationFrom Event to Action: Accelerate Your Decision Making with Real-Time Automation
From Event to Action: Accelerate Your Decision Making with Real-Time Automation
 
Boost Fertility New Invention Ups Success Rates.pdf
Boost Fertility New Invention Ups Success Rates.pdfBoost Fertility New Invention Ups Success Rates.pdf
Boost Fertility New Invention Ups Success Rates.pdf
 
Workshop - Best of Both Worlds_ Combine KG and Vector search for enhanced R...
Workshop - Best of Both Worlds_ Combine  KG and Vector search for  enhanced R...Workshop - Best of Both Worlds_ Combine  KG and Vector search for  enhanced R...
Workshop - Best of Both Worlds_ Combine KG and Vector search for enhanced R...
 
Powerful Google developer tools for immediate impact! (2023-24 C)
Powerful Google developer tools for immediate impact! (2023-24 C)Powerful Google developer tools for immediate impact! (2023-24 C)
Powerful Google developer tools for immediate impact! (2023-24 C)
 
presentation ICT roal in 21st century education
presentation ICT roal in 21st century educationpresentation ICT roal in 21st century education
presentation ICT roal in 21st century education
 
Axa Assurance Maroc - Insurer Innovation Award 2024
Axa Assurance Maroc - Insurer Innovation Award 2024Axa Assurance Maroc - Insurer Innovation Award 2024
Axa Assurance Maroc - Insurer Innovation Award 2024
 
2024: Domino Containers - The Next Step. News from the Domino Container commu...
2024: Domino Containers - The Next Step. News from the Domino Container commu...2024: Domino Containers - The Next Step. News from the Domino Container commu...
2024: Domino Containers - The Next Step. News from the Domino Container commu...
 
What Are The Drone Anti-jamming Systems Technology?
What Are The Drone Anti-jamming Systems Technology?What Are The Drone Anti-jamming Systems Technology?
What Are The Drone Anti-jamming Systems Technology?
 
Tata AIG General Insurance Company - Insurer Innovation Award 2024
Tata AIG General Insurance Company - Insurer Innovation Award 2024Tata AIG General Insurance Company - Insurer Innovation Award 2024
Tata AIG General Insurance Company - Insurer Innovation Award 2024
 
Automating Google Workspace (GWS) & more with Apps Script
Automating Google Workspace (GWS) & more with Apps ScriptAutomating Google Workspace (GWS) & more with Apps Script
Automating Google Workspace (GWS) & more with Apps Script
 
Data Cloud, More than a CDP by Matt Robison
Data Cloud, More than a CDP by Matt RobisonData Cloud, More than a CDP by Matt Robison
Data Cloud, More than a CDP by Matt Robison
 
Understanding Discord NSFW Servers A Guide for Responsible Users.pdf
Understanding Discord NSFW Servers A Guide for Responsible Users.pdfUnderstanding Discord NSFW Servers A Guide for Responsible Users.pdf
Understanding Discord NSFW Servers A Guide for Responsible Users.pdf
 
04-2024-HHUG-Sales-and-Marketing-Alignment.pptx
04-2024-HHUG-Sales-and-Marketing-Alignment.pptx04-2024-HHUG-Sales-and-Marketing-Alignment.pptx
04-2024-HHUG-Sales-and-Marketing-Alignment.pptx
 
Strategize a Smooth Tenant-to-tenant Migration and Copilot Takeoff
Strategize a Smooth Tenant-to-tenant Migration and Copilot TakeoffStrategize a Smooth Tenant-to-tenant Migration and Copilot Takeoff
Strategize a Smooth Tenant-to-tenant Migration and Copilot Takeoff
 
+971581248768>> SAFE AND ORIGINAL ABORTION PILLS FOR SALE IN DUBAI AND ABUDHA...
+971581248768>> SAFE AND ORIGINAL ABORTION PILLS FOR SALE IN DUBAI AND ABUDHA...+971581248768>> SAFE AND ORIGINAL ABORTION PILLS FOR SALE IN DUBAI AND ABUDHA...
+971581248768>> SAFE AND ORIGINAL ABORTION PILLS FOR SALE IN DUBAI AND ABUDHA...
 
Apidays Singapore 2024 - Building Digital Trust in a Digital Economy by Veron...
Apidays Singapore 2024 - Building Digital Trust in a Digital Economy by Veron...Apidays Singapore 2024 - Building Digital Trust in a Digital Economy by Veron...
Apidays Singapore 2024 - Building Digital Trust in a Digital Economy by Veron...
 
HTML Injection Attacks: Impact and Mitigation Strategies
HTML Injection Attacks: Impact and Mitigation StrategiesHTML Injection Attacks: Impact and Mitigation Strategies
HTML Injection Attacks: Impact and Mitigation Strategies
 
GenAI Risks & Security Meetup 01052024.pdf
GenAI Risks & Security Meetup 01052024.pdfGenAI Risks & Security Meetup 01052024.pdf
GenAI Risks & Security Meetup 01052024.pdf
 
AWS Community Day CPH - Three problems of Terraform
AWS Community Day CPH - Three problems of TerraformAWS Community Day CPH - Three problems of Terraform
AWS Community Day CPH - Three problems of Terraform
 

Dell PowerEdge R720 with Samsung SSDs and Windows Server 2012: Supporting virtual desktops in remote offices

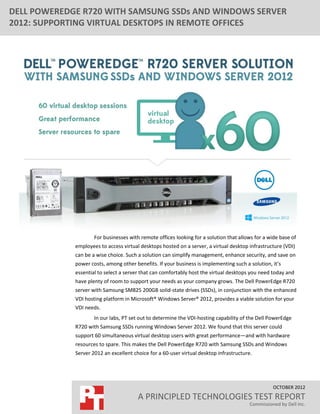
  • 1. DELL POWEREDGE R720 WITH SAMSUNG SSDs AND WINDOWS SERVER 2012: SUPPORTING VIRTUAL DESKTOPS IN REMOTE OFFICES For businesses with remote offices looking for a solution that allows for a wide base of employees to access virtual desktops hosted on a server, a virtual desktop infrastructure (VDI) can be a wise choice. Such a solution can simplify management, enhance security, and save on power costs, among other benefits. If your business is implementing such a solution, it’s essential to select a server that can comfortably host the virtual desktops you need today and have plenty of room to support your needs as your company grows. The Dell PowerEdge R720 server with Samsung SM825 200GB solid-state drives (SSDs), in conjunction with the enhanced VDI hosting platform in Microsoft® Windows Server® 2012, provides a viable solution for your VDI needs. In our labs, PT set out to determine the VDI-hosting capability of the Dell PowerEdge R720 with Samsung SSDs running Windows Server 2012. We found that this server could support 60 simultaneous virtual desktop users with great performance—and with hardware resources to spare. This makes the Dell PowerEdge R720 with Samsung SSDs and Windows Server 2012 an excellent choice for a 60-user virtual desktop infrastructure. OCTOBER 2012 A PRINCIPLED TECHNOLOGIES TEST REPORT Commissioned by Dell Inc.
  • 2. HOW MANY VIRTUAL DESKTOPS? To find out how many typical remote office workers the Dell PowerEdge R720 with Samsung SM825 200GB SSDs could support, we used a workload that reflects typical office activities, including performing various tasks in Microsoft® Office applications, Web browsing, and multimedia viewing. We set up a single Dell PowerEdge R720 with Samsung SSDs running Microsoft Windows Server 2012. We used Microsoft Hyper-V™ and Remote Desktop Services (RDS) on this server to host the virtual machines. To measure the server’s ability to support 60 virtual desktops, we employed the widely used Login Consultants Virtual Session Indexer (Login VSI) 3.6 benchmark. Login VSI consists of several workloads that perform a range of common desktop computing tasks. In our testing, the Dell PowerEdge R720 ran 60 virtual desktop sessions with a medium workload while meeting the Login VSI requirements for acceptable response time and user experience. We provide server configuration information in Appendix A, our detailed workload and test descriptions in Appendix B, and a detailed test methodology in Appendix C. RESOURCES TO SPARE In addition to supporting 60 simultaneous sessions, the Dell PowerEdge R720 server with Samsung SSDs, in conjunction with the enhanced VDI hosting platform in Windows Server 2012, had room to grow with additional hardware resources. Figure 1 shows the average processor, memory, and disk utilization throughout the whole Login VSI test and the segment where all 60 sessions are running simultaneously once they have logged in. With 60 simultaneous users, all of which achieved an acceptable response time as determined by the Login VSI 3.6 benchmark, the Dell, Samsung, and Windows solution had ample resources to spare. Average total run time Average 60 sessions run time CPU % utilization 23.76 30.89 Memory % utilization 54.73 54.72 Disk % utilization 13.12 5.99 Figure 1: CPU, memory, and disk average and peak utilization for the Dell PowerEdge R720 host server. Lower numbers are better. Dell PowerEdge R720 with Samsung SSDs and Windows Server A Principled Technologies test report 2 2012: Supporting virtual desktops in remote offices
  • 3. Figure 2 shows resource utilization trend lines, averaged each minute, throughout the run. This additionally demonstrates that the resources were not a performance bottleneck at any point during the run. Resource utilization 100 80 Percentage utilization 60 40 20 0 1 301 601 901 1,201 1,501 1,801 2,101 2,401 2,701 Time (seconds) CPU % utilization (avg. per minute) Disk % utilization (avg. per minute) Memory % utilization (avg. per minute) Figure 2: Resource utilization throughout the test. ABOUT OUR TESTING Remote Desktop Services We used the Microsoft Remote Desktop Services (RDS) role in Windows Server 2012 to build our virtual desktop infrastructure. Microsoft RDS is a server role that allows the user to deploy and manage a virtual desktop infrastructure from one location. A standard VDI deployment allows for a managed pool of VMs and a Web access portal that allows users in remote offices to connect through a Web browser. Because Microsoft RDS manages incoming remote connections as well as the desktop pool, remote users can be paired with an optimal VM, allowing for server resources to be allocated without waste. For our testing, we used Microsoft RDS to create the virtual desktop pool, but bypassed the Web portal during testing for ease of use with Login VSI. This circumvents the RDS pairing management feature, but because our virtual desktops were identical, this had no impact on performance. Dell PowerEdge R720 with Samsung SSDs and Windows Server A Principled Technologies test report 3 2012: Supporting virtual desktops in remote offices
  • 4. Login VSI 3.6 After all desktops are idle, Login VSI incrementally logs users into virtual desktop sessions and begins workloads on each. Login VSI measures the total response times of seven typical office operations from each session and calculates the VSI Index by taking the average response times and dropping the highest and lowest 2 percent. To initiate our test, we used Hyper-V to start up all Windows 7 VMs and reach an idle state. We monitored our test bed during the startup and perceived no bottlenecks in server CPU, network, or storage I/O at the Hyper-V default startup rate of five VMs at a time. When the VMs were idle we started Login VSI testing. ABOUT THE COMPONENTS OF OUR SOLUTION Dell PowerEdge R720 The new Intel® Xeon® processor E5-2680-powered Dell PowerEdge R720 2U rack server incorporates many enhancements and features designed to improve performance, lower power consumption, and ease maintenance. Some of these features include the following:  Performance. Dell engineered the PowerEdge R720 to handle complex workloads, with I/O and internal data management technologies (i.e., NSC, NPAR, CacheCade) to allow faster access to information and GPU accelerators for faster than ever computational performance.  Processors. The Dell PowerEdge R720 is powered by two Intel Xeon processors E5-2680, which incorporate the very latest in technology from Intel. The powerful processors provide exceptional performance and make the PowerEdge R720 a solid virtualization platform.  Power efficiency. Dell PowerEdge R720 servers implement leading industry power efficiency standards, and are designed to optimize performance while maintaining low power consumption. Automated tracking and regulation of thermal activity, intelligent design of right-sized power options, and high efficiency fans and airflow management work to save power, saving you money in the process.  Management. The Dell PowerEdge R720, like all late-model Dell servers, comes with the Dell Lifecycle Controller. This tool simplifies server management by providing a single interface for management functions and by storing critical system information in the system itself. There are no CDs or USB keys to keep track of for drivers or firmware. Dell PowerEdge R720 with Samsung SSDs and Windows Server A Principled Technologies test report 4 2012: Supporting virtual desktops in remote offices
  • 5. Storage. With impressive storage capacity for small business servers, the Dell PowerEdge R720 is available in both an 8-bay and 16-bay chassis.  Memory. The Dell PowerEdge R720 holds up to 768 GB of RAM, many times the memory capacity of older small business servers, allowing for powerful flexibility with virtualized database solutions. Samsung SM825 200GB SATA SSDs According to the Dell Web site, the addition of Samsung SM825 200GB SSDs lets the Dell PowerEdge servers deliver outstanding sustained read, write and sequential speeds. Compared to 15K SAS hard disk drives, Samsung's E-MLC SSDs deliver 57 times more operations per second. The Samsung SSDs also deliver an increased level of performance and reliability with their power-loss protection. Samsung's E-MLC SSDs increase write endurance by more than 100 times than that of standard MLC SSDs. That translates into long-lasting, sustained performance for your servers. Dell PowerEdge servers with Samsung SSDs also provide the ability to scale for capacities from 100 GB to 400 GB and ensure that all sensitive data is secure. They help protect your data with AES 256-bit encryption, delivering the optimal level of security. For more information, visit www.dell.com/business/ssd/server. Microsoft Windows Server 2012 Windows Server 2012, the latest release of this server OS from Microsoft, includes many new features and enhancements. According to Microsoft, Windows Server 2012 focuses on four core areas:  Beyond virtualization. Windows Server 2012 provides a robust and dynamic virtualization platform through Hyper-V, and includes new features that provide flexible options for delivering cloud services.  The power of many servers, the simplicity of one. Windows Server 2012 offers improvements in its features that allow for better-than-ever high availability and ease of management for multiple-server infrastructures.  Every app, any cloud. Windows Server 2012 delivers a scalable and flexible Web and application platform by providing a consistent and open set of tools and frameworks that apply to applications on-premises, in the cloud, or in a hybrid environment.  Modern work style, enabled. Microsoft Windows Server 2012 empowers users and IT staff with remote access to data, applications, and simpler management tools while strengthening security and compliance. Dell PowerEdge R720 with Samsung SSDs and Windows Server A Principled Technologies test report 5 2012: Supporting virtual desktops in remote offices
  • 6. WHAT THIS MEANS FOR YOU As your business implements a virtual desktop solution, selecting the appropriate server is critical. In our hands-on tests, the Dell PowerEdge R720 with Samsung SM825 200GB SSDs supported 60 virtual desktops with resources to spare. This makes it an excellent choice for supporting your remote office workers now and in the future. Dell PowerEdge R720 with Samsung SSDs and Windows Server A Principled Technologies test report 6 2012: Supporting virtual desktops in remote offices
  • 7. APPENDIX A – SERVER CONFIGURATION INFORMATION Figure 3 provides detailed configuration information for the servers in our configuration. System Dell PowerEdge R720 General Number of processor packages 2 Number of cores per processor 8 Number of hardware threads per core 2 CPU Vendor Intel Name Xeon Model number E5-2680 Stepping C1 Socket type LGA2011 Core frequency (GHz) 2.70 Bus frequency 8.0 GT/s L1 cache 32 KB + 32 KB (per core) L2 cache 256 KB (per core) L3 cache (MB) 20 Platform Vendor and model number Dell PowerEdge R720 Motherboard model number 0VWT90 BIOS name and version Dell 1.2.6 BIOS settings Default Memory module(s) Total RAM in system (GB) 128 Vendor and model number Samsung M393B1K70DH0-YH9 Type PC3L-10600R Speed (MHz) 1,333 Speed running in the system (MHz) 1,333 Timing/Latency (tCL-tRCD-tRP-tRASmin) 9-9-9-36 Size (GB) 8 Number of RAM module(s) 16 Chip organization Double-sided Operating system Name Windows Server 2012 Datacenter 64-bit Build number 9200 File system NTFS Service Pack N/A Language English RAID controller Vendor and model number Dell PERC H710P Mini Firmware version 21.0.2-0001 Driver version 5.2.112.0 Dell PowerEdge R720 with Samsung SSDs and Windows Server A Principled Technologies test report 7 2012: Supporting virtual desktops in remote offices
  • 8. System Dell PowerEdge R720 Cache size 1 GB Hard drive 1 Vendor and model number Dell ST9300653SS Number of drives 4 Size (GB) 300 RPM 15K Type SAS Hard drive 2 Vendor and model number Dell MZ5EA200HMDR-000D3 Number of drives 6 Size (GB) 200 RPM N/A Type SATA SSD Network adapter 1 Vendor and model number Intel I350 Quad Port Gigabit Network Daughter Card Type Integrated Network adapter 2 Vendor and model number Intel X520-DA2 Dual Port 10 Gb Network Adapter Type PCI-E Power supplies Total number 2 Vendor and model number Dell F750E-S0 Wattage of each (W) 750 Cooling fans Total number 6 Vendor and model number Delta PFR0612UHE Dimensions (h x w) of each 2-1/2” x 2-1/2” Volts 12 Amps 1.50 Optical drive Vendor and model number PLDS DS-8D3SH Figure 3: System configuration information for the test server. Dell PowerEdge R720 with Samsung SSDs and Windows Server A Principled Technologies test report 8 2012: Supporting virtual desktops in remote offices
  • 9. APPENDIX B – DETAILED WORKLOAD AND TEST DESCRIPTIONS About Microsoft RDS To create the virtual desktop pool, we deployed the Microsoft RDS virtual desktop infrastructure. This requires a server farm consisting of three servers: a Connection Broker server, a Web Access server and a Virtual Desktop Host server. The virtual desktop infrastructure deployment and virtual desktop pool creation can be done from the Connection Broker. To do this, we installed the Microsoft RDS role on the Connection Broker and used it to remotely install and configure the appropriate roles and features on the rest of the server farm. We then created and configured a VM using Hyper-V to be used as a template for our virtual desktop pool. We used Microsoft RDS to automate the process of building our virtual desktop pool of 60 VMs based on our template VHD. Microsoft RDS allowed us to easily build the required infrastructure and automate the process of creating a virtual desktop pool. Once the infrastructure was in place and the pool was created, Microsoft RDS gave us one location from which to manage everything. About Login VSI Login VSI benchmarks virtual desktop sessions to determine how scalable a particular virtualized system is. Specifically, it benchmarks a virtual desktop solution by simulating Windows-based office user workloads. The Medium workload of Login VSI, which we tested as indicative of a typical “knowledge worker,” opens and closes the following applications and runs their respective tasks:  Microsoft Outlook®: Browsing a message  Microsoft Word® (TimerDoc): Initiating response timer to see how the program responds throughout the workload  Microsoft Internet Explorer® instance one: Maximizing, scrolling, and minimizing  Microsoft Internet Explorer instance two: Navigating a Web site, maximizing, and scrolling  Adobe® Flash® KA movie trailer  Microsoft Word (UserRead): Reading and typing text, and printing to PDF  Bullzip: Generating a PDF  Adobe® Reader®: Reading a PDF  Microsoft PowerPoint®: Watching a presentation and adding a slide  Microsoft Excel®: Reading and minimizing  7-Zip: Saving a ZIP file The Login VSI 3.6 benchmark uses seven operations to determine the VSImax, the maximum number of users the system can handle before suffering serious degradation in performance. By using seven operations instead of only two, as earlier versions of Login VSI did, Login VSI 3.6 better reflects what a user actually experiences. The seven operations are as follows:  Copying a new document from the document pool in the home drive  Starting Microsoft Word  Starting the File Open dialogue  Starting the Search and Replace dialogue  Starting the Print dialogue  Starting Notepad  Compressing the document into a ZIP file with 7-zip command line Dell PowerEdge R720 with Samsung SSDs and Windows Server A Principled Technologies test report 9 2012: Supporting virtual desktops in remote offices
  • 10. Login VSI records response times, the time taken to execute a given task, in milliseconds. Login VSI then reports minimum, average, and maximum response times, as well as the VSI Index average while performing the workload. The Login VSI Index average is similar to the average response time, as it averages the maximum and minimum response times, but it removes 2 percent from the maximum and minimum response time before calculating the average. VSI max is then calculated in one of two ways, Classic and Dynamic. When the VSI Index average is higher than the default threshold of 4000ms, Classic VSImax is achieved. Dynamic VSI max calculates a dynamic threshold based on the average response times of the first 15 sessions and applies the formula Baseline x 125% +3000, when the VSI index is higher than the dynamic baseline then dynamic VSI Max is achieved. In our testing, we were able to run 60 sessions without surpassing the Dynamic VSI Max. For more information on Classic and Dynamic VSI max, see http://www.loginvsi.com/en/admin-guide/analyzing-results#h0-1-calculating-vsimax . For more information on Login VSI 3.6, see http://www.loginvsi.com/product-overview. About the servers we used In addition to the Dell PowerEdge R720 that hosted the VDI virtual machines we tested, we also used a Dell PowerEdge R900, Dell PowerEdge R710 and Dell PowerEdge R720 to support the infrastructure required to run this benchmark. The Dell PowerEdge R900 hosted two Login VSI launcher VMs, each of which launched 30 VDI sessions, the Dell PowerEdge R710 hosted Active Directory and DHCP services, and the Dell PowerEdge R720 hosted the RDS connection broker and web access roles used to create and clone the virtual machines. Dell PowerEdge R720 with Samsung SSDs and Windows Server A Principled Technologies test report 10 2012: Supporting virtual desktops in remote offices
  • 11. APPENDIX C – DETAILED TEST METHODOLOGY Deploying the virtual desktop infrastructure Microsoft’s VDI solution requires four servers: an Active Directory® Domain controller, a virtual desktop host, a connection broker and a Web access portal. Our Active Directory Domain controller was a Dell PowerEdge R710 named domaincontroller; our virtual desktop host was a Dell PowerEdge R720 with Samsung solid-state drives named vdihost; our connection broker and Web access portal were virtual machines hosted on a separate Dell PowerEdge R720, named connbroker and webaccess respectively. All components used Windows Server 2012 Datacenter Edition. Configuring the Active Directory server Installing Microsoft Windows Server 2012 Datacenter on the Dell PowerEdge R710 Active Directory server 1. Insert the installation media into the CD/DVD drive, and restart the server. 2. When the option appears, press F11 to enter the Boot Manager. 3. Select SATA Optical Drive, and press Enter. 4. Press any key when prompted to boot from DVD. 5. When the installation screen appears, click My language is English. 6. Leave language, time/currency format, and input method as default and click Next. 7. Click Install now. 8. When the Windows Setup window appears, click No thanks when prompted to go online to install updates. 9. Select Windows Server 2012 Datacenter (Server with a GUI), and click Next. 10. Check I accept the license terms, and click Next. 11. Click Custom: Install Windows only (advanced). 12. Press Alt+A to open advanced partition options. Delete any partitions until there is only Drive 0 Unallocated Space. 13. Select Drive 0 Unallocated Space, and click Next, at which point Windows will begin installing, and will restart automatically after completing. 14. When the Settings page appears, fill in the Password and Reenter Password fields with the same password. 15. Log in with the previously set up password. Configuring Windows Update 1. In the left pane of the Server Manager window, click Local Server. 2. In the main frame, next to Windows Update, click Never configured. 3. In the Windows Update window, in the main pane, click Let me choose my settings. 4. Under Important updates, select Never check for updates (not recommended), and then click OK. 5. In the left pane, click Check for updates, and install all available updates. 6. Restart the server. 7. Repeat steps 1 through 6 until all updates are installed. Configuring Windows Firewall 1. In Server Manager, click ToolsWindows Firewall with Advanced Security. 2. In the Overview section, click Windows Firewall Properties. 3. In the Domain Profile tab, for Firewall state, click Off. 4. In the Private Profile tab, for Firewall state, click Off. 5. In the Public Profile tab, for Firewall state, click Off. 6. Click OK. Dell PowerEdge R720 with Samsung SSDs and Windows Server A Principled Technologies test report 11 2012: Supporting virtual desktops in remote offices
  • 12. 7. Close the Windows Firewall Properties window. Setting up Remote Desktop 1. In the Local Server tab of the Server Manager window, next to Remote Desktop, click Disabled. 2. In the System Properties window that appears, in the Remote Desktop section, select the Allow remote connections to this computer radio button, and click OK when the warning message appears. 3. Uncheck Allow connections only from computers running Remote Desktop with Network Level Authentication (recommended), and click OK. Disabling IE Enhanced Security Configuration 1. In the Local Server tab of the Server Manager window, next to IE Enhanced Security Configuration, click On. 2. In the Internet Explorer Enhanced Security Configuration window, select the Off radio buttons for both Administrators and Users, and click OK. Setting a static IP address 1. Open the Run prompt and type ncpa.cpl Click OK. 2. Right-click the network adapter, and select Properties. 3. Select Internet Protocol Version 4 (TCP/IPv4), and click Properties. 4. Select the Use the following IP address radio button, and enter the appropriate addresses in the IP address, Subnet mask, Default gateway and Preferred DNS server fields. 5. Click OK. Choosing a hostname 1. Launch Server Manager, and click Local Server. 2. In the Properties section, click the current name shown next to Computer name. 3. At the System Properties screen, click Change. 4. At the Computer Name/Domain Changes, enter an appropriate hostname. Click OK. 5. Click OK at the restart confirmation dialog. 6. Click OK at the System Properties screen. 7. Click Restart Now. Installing Active Directory and DNS services 1. Launch Server Manager. 2. Click ManageAdd Roles and Features. 3. At the Before you begin screen, click Next. 4. At the Select installation type screen, leave Role-based or feature-based installation selected, and click Next. 5. At the Server Selection Screen, select the server from the pool, and click Next. 6. At the Select Server Roles screen, select Active Directory Domain Services. Click Add Features when prompted, and click Next. 7. At the Select Features screen, click Next. 8. At the Active Directory Domain Services screen, click Next. 9. At the Confirm installation selections screen, check Restart the destination server automatically if required, and click Install. Dell PowerEdge R720 with Samsung SSDs and Windows Server A Principled Technologies test report 12 2012: Supporting virtual desktops in remote offices
  • 13. Configuring Active Directory and DNS services 1. After the installation completes, a screen should pop up with configuration options. If not, click the Tasks flag in the upper-right section of Server Manager. 2. Click Promote this server to a Domain Controller. 3. At the Deployment Configuration screen, select Add a new forest. In the Root domain name field, type test.local and click Next. 4. At the Domain Controller Options screen, leave the default values, and enter a password twice. 5. Click Next four times to accept default settings for DNS, NetBIOS, and directory paths. 6. At the Review Options screen, click Next. 7. At the Prerequisites Check dialog, allow the check to complete. If there are no relevant errors, check Restart the destination server automatically if required, and click Install. 8. When the server restarts, log on using testAdministrator and the specified password. Setting up DHCP services 1. Launch Server Manager. 2. Click ManageAdd Roles and Features. 3. At the Before you begin screen, click Next. 4. At the Select installation type screen, leave Role-based or feature-based installation selected, and click Next. 5. At the Server Selection Screen, select the server from the pool, and click Next. 6. At the Select Server Roles screen, select DHCP Server. Click Add Features when prompted, and click Next. 7. At the Select Features screen, click Next. 8. At the DHCP Server screen, click Next. 9. At the Confirm installation selections, check Restart the destination server automatically if required, and click Next. 10. Once the installation is finished, click Complete DHCP configuration. 11. At the DHCP Post-Install configuration wizard, click Next, and click Commit. 12. At the Summary dialog, click Close. 13. In the Add Roles and Features Wizard, click Close. 14. Click StartDHCP. 15. Expand domaincontroller.test.local, and click IPv4. Right-click IPv4New Scope. 16. At the New Scope Wizard Welcome screen, click Next. 17. In the Name field, type test and click Next. 18. Enter the lowest IP address in your test setup for Start IP address, and the highest IP address for End IP address. Leave the Length and Subnet mask as defaults, and click Next. 19. Click Next eight times to accept default scope settings, and click Finish. 20. Close the DHCP Manager console. Creating the Login VSI users 1. On the ADDS server, run VSI36.exe to extract the Login VSI setup files. 2. Browse to the extraction location and run VSI361SetupsAD SetupAD Setup.exe. 3. In the Amount of users field, enter 60 users. Choose a username root and password. We used Login_VSI and Password1. Click Start. 4. After the installation completes, click Exit twice. Dell PowerEdge R720 with Samsung SSDs and Windows Server A Principled Technologies test report 13 2012: Supporting virtual desktops in remote offices
  • 14. Modifying the Login VSI group policy 1. On the ADDS server, open a Run prompt, type gpmc.msc and click OK. 2. Expand Forest: test.localDomainstest.localLogin_VSIComputers. Right-click the VSI System group policy object, and click Edit. 3. Under Computer Configuration, expand PoliciesAdministrative Templates: Policy definitions (ADMX files) retrieved from the local computerWindows ComponentsRemote Desktop ServicesRemote Desktop Session Host, and click Security. 4. In the Security GPO folder, right-click Require user authentication for remote connections using Network Level Authentication, and click Edit. 5. Select the radio button next to Disabled, and click OK. 6. Close the Group Policy Management Editor and the Group Policy Management Console. Creating the Login VSI network share 1. Log onto connbroker with the testAdministrator credentials. 2. Launch Windows Explorer. 3. Click Computer, and then double-click Local Disk (C:). 4. Press Ctrl-Shift-N to create a New Folder. Type Share and press Enter. 5. Right-click the Share folder, and click Properties. 6. Click the Sharing tab, and click Advanced Sharing. 7. Check Share this folder. 8. Click Permissions. Select the Everyone group, and check the Allow box next to Full Control to grant read and write access to the Everyone group. 9. Click OK twice to return to the Properties screen. 10. Click the Security tab, and click Edit. 11. Click Add. 12. In the Enter the object names to select field, type Login_VSI_TS and click Find Now. 13. Select LOGIN_VSI_TS, and check the Allow box next to Modify. 14. Click Object Types, check the Computers box, and click OK. 15. In the Enter the object names to select field, type vdihost.test.local and click Find Now. 16. Select vdihost, and check the Allow box next to Modify. 17. Click OK twice. Setting up the remaining virtual desktop infrastructure machines Install Microsoft Windows Server 2012 Datacenter with all updates on vdihost and apply the firewall/remote desktop/IEsec settings specified above. Assign an appropriate IP address and join the test.local domain. Repeat this for the VMs connbroker and webaccess. Adding the servers to the server pool 1. Log onto the connection broker server using the testAdministrator credentials. 2. Launch Server Manager. 3. In the Quick Start section, click Add other servers to manage. 4. In the Name (CN): box, type vdihost and click Find Now. 5. Click vdihost, and click the right arrow to add the server to the pool. 6. Repeat steps 4 and 5 for webaccess. Dell PowerEdge R720 with Samsung SSDs and Windows Server A Principled Technologies test report 14 2012: Supporting virtual desktops in remote offices
  • 15. Creating the VDI deployment 1. Log onto the connection broker server. 2. Launch Server Manager. 3. Click ManageAdd Roles and Features. 4. At the Before you begin screen, click Next. 1. At the Select installation type screen, select Remote Desktop Services scenario-based Installation, and click Next. 2. At the Select deployment type screen, select Standard deployment, and click Next. 3. At the Select deployment scenario screen, select Virtual Desktop Infrastructure, and click Next. 4. At the Review role services page, click Next. 5. At the Specify RD Connection Broker server page, click connbroker.test.local, click the right arrow, and click Next. 6. At the Specify RD Web Access server page, click webaccess.test.local, click the right arrow, and click Next. 7. At the Specify RD Virtualization Host server page, click vdihost.test.local, click the right arrow, and click Next. 8. At the Confirm selections screen, check Restart the destination server automatically if required, and click Deploy. 9. After the installation is complete, click Close. Building the virtual desktop pool In this section, we show how to create 60 virtual desktops running Windows 7 Enterprise 32-bit OS on the vdihost Dell PowerEdge R720 server. Creating a user profile disk network share 1. Log onto connbroker with the testAdministrator credentials. 2. Launch Windows Explorer. 3. Click Computer, and then double-click Local Disk (C:). 4. Press Ctrl-Shift-N to create a New Folder. Type UPD and press Enter. 5. Right-click the UPD folder, and click Properties. 6. Click the Sharing tab, and click Advanced Sharing. 7. Check Share this folder. 8. Click Permissions. Select the Everyone group, and check the Allow box next to Full Control to grant read and write access to the Everyone group. 9. Click OK twice to return to the Properties screen. 10. Click the Security tab, and click Edit. 11. Click Add. 12. Click Object Types, check the Computers box, and click OK. 13. In the Enter the object names to select field, type vdihost.test.local and click Find Now. 14. Select vdihost, and check the Allow box next to Modify. 15. Click OK twice. Creating a virtual desktop template 1. Log on to vdihost with the testAdministrator credentials. 2. Click StartHyper-V Manager. 3. Right-click vdihostNewVirtual Machine. 4. At the Before you begin screen, click Next. 5. At the Specify name and location screen, type Template in the name field, and click Next. 6. At the Assign memory screen, type 1024 in the Startup memory field, and then click Next. Dell PowerEdge R720 with Samsung SSDs and Windows Server A Principled Technologies test report 15 2012: Supporting virtual desktops in remote offices
  • 16. 7. At the Configure networking page, open the drop-down Connection menu, select RDS Virtual, and click Next. This virtual switch was created during the VDI deployment. 8. At the Connect Virtual Hard Disk screen, select the Create a virtual hard disk radio button, and enter 20 in the Size field. 9. Click Finish. Installing Windows 7 Enterprise 32-bit OS 1. Right-click the Template virtual machine in Hyper-V Manager and click Settings. 2. Under IDE Controller 1, click DVD Drive. Select the radio button for Image file, and enter the location of the Windows 7 Enterprise 32-bit DVD image. Click OK. 3. Right-click the Template virtual machine, and click Start. Double-click the Template virtual machine to connect to it. 4. Press any key when prompted to boot from DVD. 5. Follow the on-screen instructions to install Windows 7 Enterprise 32-bit, taking care to select the same time zone as the server pool. 6. Install all Windows Updates and apply the firewall/remote desktop/IEsec settings specified above. 7. Assign an IP address, and join the test.local domain. Installing Microsoft Office 2010 Standard 1. Right-click the Template virtual machine in Hyper-V Manager and click Settings. 2. Under IDE Controller 1, click DVD Drive. Select the radio button for Image file and enter the location of the Microsoft Office 2010 Standard DVD image. Click OK. 3. In the Template virtual machine, run D:setup.exe. 4. Follow the on-screen instructions to install Microsoft Office 2010 Standard with default settings. Installing Microsoft .NET Framework 4.0 1. In the Template virtual machine, open Internet Explorer, navigate to http://www.microsoft.com/en- us/download/details.aspx?id=24872, and download the Standalone Installer. 2. Run dotNetFx40_Client_x86_x64.exe, and follow the on-screen instructions to install Microsoft .NET Framework 4.0 with default settings. Setting page file 1. In the Template virtual machine, click Start, and right-click ComputerProperties. 2. Click Advanced System Settings. 3. Under the Advanced tab, click Settings. 4. At the Performance Options screen, click the Advanced tab, and click Change. 5. Uncheck Automatically manage paging file size for all drives. 6. Select the Custom size radio button, and enter 2048 for Initial size and Maximum size. 7. Click OK three times to close all screens. Enabling ClearType 1. In the Template virtual machine, click Start, and type cleartype in the search box. 2. Click Adjust ClearType text. 3. Check Turn on ClearType. Click Next. 4. Click Next four times to go through the adjustment process. 5. Click Finish. Dell PowerEdge R720 with Samsung SSDs and Windows Server A Principled Technologies test report 16 2012: Supporting virtual desktops in remote offices
  • 17. Deleting default printers 1. In the Template virtual machine, click StartDevices and printers. 2. Right-click Fax, and click Remove device. 3. Click Yes. 4. Repeat steps 2 and 3 for Microsoft XPS Document Writer and Send to OneNote 2010. Installing Login VSI target software 1. In the Template virtual machine, run VSI36.exe to extract the installation files. 2. Browse to the location of the extraction files and run VSI361SetupsTarget SetupSetup.exe. 3. In the Please specify VSI Share: (UNC Path) field, type connbrokershare and click Start. 4. Allow the installation to complete, and click OK on the Warning dialog. 5. Log onto the ADDS server, and open Server ManagerToolsActive Directory Users and Computers. 6. Click ActionFind. 7. In the drop-down menu labeled Find, select Computers. 8. In the drop-down menu labeled In, select test.local. 9. In the Name field, type Template and click Find Now. 10. Right-click Templat,e and click Move. 11. Expand Login_VSI and select the Computers folder. Click OK and then close the Find Computers and Active Directory Users and Computers windows. 12. Restart the Template virtual machine. Prepping the Template for duplication 1. Log onto the Template virtual machine using testAdministrator credentials. 2. Press Windows+R to open the Run prompt. 3. Type sysprep and click OK. 4. Run sysprep.exe. 5. From the System Cleanup Action drop-down menu, select Enter System Out-of-Box Experience (OOBE). 6. Check the Generalize checkbox. 7. From the Shutdown Options drop-down menu, select Shutdown. 8. Click OK. 9. Allow the system to be sysprepped and let it shut down automatically. Do not restart the Template virtual machine until it has been cloned. Cloning the virtual desktop template and creating a pooled virtual desktop collection 1. Log onto connbroker using the testAdministrator credentials. 2. Launch Server manager. 3. Click Remote Desktop Services, and click Collections. 4. Click TasksCreate Virtual Desktop Collection. 5. At the Before you begin screen, click Next. 6. At the Name the collection screen, type Test Pool in the Name field, and click Next. 7. At the Specify the collection type screen, select the Pooled virtual desktop collection button, check the Automatically create and manage virtual desktops checkbox, and click Next. 8. At the Specify the virtual desktop template screen, select Template, and click Next. 9. At the Specify the virtual desktop settings screen, click Provide unattended settings, and click Next. 10. At the Specify the unattended installation settings screen, select an appropriate time zone for the server pool. Select the Select the organizational unit: radio button and select test.local for the Active Directory domain name and Login_VSI for the Active Directory Domain Services organization unit (OU). Click Next. Dell PowerEdge R720 with Samsung SSDs and Windows Server A Principled Technologies test report 17 2012: Supporting virtual desktops in remote offices
  • 18. 11. At the Specify users and user groups screen, click Add. Type Login_VSI_TS and press Enter. Verify that TESTLogin_VSI_TS appears in the User Groups box. In the Virtual desktops to be created in the collection field, type 60. In the Specify characters that should be added to the beginning or end of the name of each virtual desktop fields, select a prefix and starting index for your collection. We used Test- and 1, so our desktops were named Test-1, Test-2, Test-3, etc. Click Next. 12. At the Specify virtual desktop allocation screen, leave the default settings, and click Next. 13. At the Specify virtual desktop storage screen, select the Store on a network share radio button. Enter the location of a folder on the solid-state drives on vdihost. Check the Automatically roll back the virtual desktop when the user logs off checkbox. Click Next. 14. At the Specify user profile disks screen, check Enable user profile disks. Enter connbrokerUPD for the Location of user profile disks field. Leave the Maximum size (in GB) as 20. Click Next. 15. At the Confirm selections screen, click Create. 16. Let the deployment complete, and click Finish. Moving the pooled desktops to the Login_VSI organizational unit 1. Log onto the ADDS server and open Server ManagerToolsActive Directory Users and Computers. 2. Click ActionFind. 3. In the drop-down menu labeled Find, select Computers. 4. In the drop-down menu labeled In, select test.local. 5. In the Name field, type Test and click Find Now. 6. Select Test-1 through Test-60. Right-click the selection, and click Move. 7. Expand Login_VSI, and select the Computers folder. Click OK, and then close the Find Computers and Active Directory Users and Computers windows. 8. Reboot the pooled desktops to ensure delivery of the Login_VSI group policy. Creating the Login VSI launchers In this section, we show how to create the two virtual machines used to launch the Login VSI benchmark. We used a Dell PowerEdge R900 to host the launcher VMs. Creating a virtual machine with Windows 7 Enterprise 64-bit OS 1. Using Hyper-V, create two virtual machines named VSI-1 and VSI-2. We gave each launcher 8192 MB of static RAM, four vCPUs, and a 30 GB VHD. Install Microsoft Windows 7 Enterprise 64-bit OS with all updates and the firewall/remote desktop/ IEsec settings specified above on both machines. Assign appropriate IPs and join them to the test.local domain. 2. Move VSI-1 and VSI-2 to the Login_VSI organizational unit as you did for the Template and Test VMs. 3. Reboot VSI-1 and VSI-2 to ensure delivery of the Login VSI group policy. Installing the Login VSI launcher and analyzer software 1. Log into VSI-1 using the TESTAdministrator credentials. 2. Run VSI36.exe. 3. Browse to the extraction location, and run VSI361SetupsLauncherSetup.exe. 4. At the Welcome screen, click Next. 5. At the Select Destination Location, leave the default location, and click Next. 6. At the Select VSI Share screen, enter connbrokerShare for the UNC path, and click Next. 7. At the Select Components screen, click Next. 8. At the Select Start Menu Folder, click Next. 9. At the Ready to Install screen, click Install. 10. Repeat steps 1 through 9 for VSI-2. 11. On VSI-1, run VSI361SetupsAnalyzerSetup.exe. Dell PowerEdge R720 with Samsung SSDs and Windows Server A Principled Technologies test report 18 2012: Supporting virtual desktops in remote offices
  • 19. 12. At the Welcome screen, click Next. 13. At the Select Destination Location screen, click Next. 14. At the Select VSI Share screen, enter connbrokerShare for the UNC path, and click Next. 15. At the Select Components screen, click Next. 16. At the Select Start Menu Folder, click Next. 17. At the Ready to Install screen, click Install. Setting up the Login VSI benchmark In this section we show how to make the configurations necessary to run the test. Setting up the test configuration 1. Log into VSI-1 using the TESTAdministrator credentials. 2. Use a spreadsheet program to create a table as shown: input_servername input_username input_password input_domain Test-1 Login_VSI1 Password1 test.local Test-2 Login_VSI2 Password1 test.local (rows 3-59 omitted) (rows 3-59 omitted) (rows 3-59 omitted) (rows 3-59 omitted) Test-60 Login_VSI60 Password1 test.local 3. Save it as RDPCSV.csv in connbrokerShare to create a comma-separated values file. 4. Click StartLogin ConsultantsVSILauncherVSI Management Console. 5. Click Launchers on the left pane: a. Right-click in the middle pane and click Add Launcher. b. When the Add Launchers Wizard pops up, select the Single manual entry radio button, and click Next. c. In the Launcher name field, type VSI-2.test.local. Set the Launcher capacity to 30, and check the Launcher enabled checkbox. Click OK. d. Click Finish. e. Under Launchers, right-click VSI-1, and click Modify. Set the Launcher capacity to 30, and check the Launcher-enabled checkbox. Click OK. 6. Click Workload Configuration: a. Make sure Global Settings is selected in the drop-down menu. b. Set Office Version to 14. c. Click Save workload settings, and save under an appropriate file name. 7. Click Test Configuration in the left pane. a. In the Workload drop-down menu, select Medium. b. Check the Auto start launcher checkbox. c. In the Launch type drop-down menu, select Sequential Launching. d. Check the Auto logoff checkbox. e. Set the Auto logoff timeout to 900 seconds. f. If this is the very first run, check the Create profiles checkbox. This will pre-create the user profiles and suppress any results output. If the profiles have been created, uncheck this box. g. In the Connection type drop-down menu, select Custom Commandline with CSV. h. In the Specify Custom Commandline field, enter the following: Dell PowerEdge R720 with Samsung SSDs and Windows Server A Principled Technologies test report 19 2012: Supporting virtual desktops in remote offices
  • 20. “C:Program FilesLogin ConsultantsVSILauncherAgentLaunchRDP.exe” %CSV_input_servername% 3389 %CSV_input_username% test Password1 0 0 0 i. In the Specify CSV File field, enter the following: ConnBrokerShareRDPCSV.csv j. Leave the Pre-Test script and Post-test script fields blank. k. In the Connect drop-down menu, select User. l. Leave the Connection Settings options as default. They are overridden by the custom command line. m. Set Sessions to 60. n. Set Start number to 1. o. Set Interval to 30. p. Click Save test settings and save under an appropriate file name. 8. Click Start Test. a. Review the configuration, and click Start test. b. Enter a testname, and click Next. c. At the Pre//PostScripts screen, click Next. d. At the SessionMonitor screen, click Next. e. At the Check launchers screen, wait for both launchers to become ready and then click Start Test. If a launcher shows Not ready for more than 3 minutes, restart the VSI Agent on that machine, and then click Start Test after both launchers are ready. 9. After the test has completed, reboot Test-1 through Test-60 as well as both launchers. This prepares the test bed for a new run. Dell PowerEdge R720 with Samsung SSDs and Windows Server A Principled Technologies test report 20 2012: Supporting virtual desktops in remote offices
  • 21. ABOUT PRINCIPLED TECHNOLOGIES We provide industry-leading technology assessment and fact-based marketing services. We bring to every assignment extensive experience with and expertise in all aspects of technology testing and analysis, from researching new technologies, to developing new methodologies, to Principled Technologies, Inc. testing with existing and new tools. 1007 Slater Road, Suite 300 Durham, NC, 27703 When the assessment is complete, we know how to present the results to www.principledtechnologies.com a broad range of target audiences. We provide our clients with the materials they need, from market-focused data to use in their own collateral to custom sales aids, such as test reports, performance assessments, and white papers. Every document reflects the results of our trusted independent analysis. We provide customized services that focus on our clients’ individual requirements. Whether the technology involves hardware, software, Web sites, or services, we offer the experience, expertise, and tools to help our clients assess how it will fare against its competition, its performance, its market readiness, and its quality and reliability. Our founders, Mark L. Van Name and Bill Catchings, have worked together in technology assessment for over 20 years. As journalists, they published over a thousand articles on a wide array of technology subjects. They created and led the Ziff-Davis Benchmark Operation, which developed such industry-standard benchmarks as Ziff Davis Media’s Winstone and WebBench. They founded and led eTesting Labs, and after the acquisition of that company by Lionbridge Technologies were the head and CTO of VeriTest. Principled Technologies is a registered trademark of Principled Technologies, Inc. All other product names are the trademarks of their respective owners. Disclaimer of Warranties; Limitation of Liability: PRINCIPLED TECHNOLOGIES, INC. HAS MADE REASONABLE EFFORTS TO ENSURE THE ACCURACY AND VALIDITY OF ITS TESTING, HOWEVER, PRINCIPLED TECHNOLOGIES, INC. SPECIFICALLY DISCLAIMS ANY WARRANTY, EXPRESSED OR IMPLIED, RELATING TO THE TEST RESULTS AND ANALYSIS, THEIR ACCURACY, COMPLETENESS OR QUALITY, INCLUDING ANY IMPLIED WARRANTY OF FITNESS FOR ANY PARTICULAR PURPOSE. ALL PERSONS OR ENTITIES RELYING ON THE RESULTS OF ANY TESTING DO SO AT THEIR OWN RISK, AND AGREE THAT PRINCIPLED TECHNOLOGIES, INC., ITS EMPLOYEES AND ITS SUBCONTRACTORS SHALL HAVE NO LIABILITY WHATSOEVER FROM ANY CLAIM OF LOSS OR DAMAGE ON ACCOUNT OF ANY ALLEGED ERROR OR DEFECT IN ANY TESTING PROCEDURE OR RESULT. IN NO EVENT SHALL PRINCIPLED TECHNOLOGIES, INC. BE LIABLE FOR INDIRECT, SPECIAL, INCIDENTAL, OR CONSEQUENTIAL DAMAGES IN CONNECTION WITH ITS TESTING, EVEN IF ADVISED OF THE POSSIBILITY OF SUCH DAMAGES. IN NO EVENT SHALL PRINCIPLED TECHNOLOGIES, INC.’S LIABILITY, INCLUDING FOR DIRECT DAMAGES, EXCEED THE AMOUNTS PAID IN CONNECTION WITH PRINCIPLED TECHNOLOGIES, INC.’S TESTING. CUSTOMER’S SOLE AND EXCLUSIVE REMEDIES ARE AS SET FORTH HEREIN. Dell PowerEdge R720 with Samsung SSDs and Windows Server A Principled Technologies test report 21 2012: Supporting virtual desktops in remote offices