SlideShare une entreprise Scribd logo
1  sur  39
Télécharger pour lire hors ligne
JUNE 2014
A PRINCIPLED TECHNOLOGIES TEST REPORT
Commissioned by Dell Inc.
REMOTE NOTEBOOK MANAGEMENT: DELL UNIQUE VPRO EXTENSIONS
AND DELL CLIENT INTEGRATION PACK 3.1
Notebooks offer convenience and mobility for your employees. For IT staff and
administration however, remotely managing employee notebooks can be a challenge.
Traditional software-based management solutions require the operating system of the
notebook to be up and running, and when the hard drive fails or the computer goes to
sleep, IT cannot service the device. Dell unique vPro extensions allow the Dell Client
Integration Pack 3.1 (DCIP) for Microsoft System Center Configuration Manager 2012
(SCCM) to manage Dell business client systems with Intel® Core™ vPro™ processors
quickly and efficiently, regardless of operating system status, hard drive failures, or
power state.
In our labs at Principled Technologies, we tested common remote management
scenarios to demonstrate the time you can save with DCIP and Intel vPro on a Dell
Latitude 7000 series. We found that, when compared to a mix of three-year-old Lenovo
ThinkPad notebooks managed only through SCCM, the Dell Latitude 7000 required 75
percent less time to change a single BIOS setting, 46 percent less time to change 10 BIOS
settings, 92 percent less time to remotely erase a hard drive, and 45 percent less time to
complete a Keyboard-Video-Mouse (KVM) Remote Control connection.
After performing the remote management tasks on a single Dell Latitude 7000
series notebook and a single Lenovo ThinkPad notebook, we then performed the tasks
on a pair of Dell Latitude 7240s and a pair of Lenovo ThinkPads, a T430 and a T420.
A Principled Technologies test report 2Remote notebook management: Dell unique vPro extensions and
Dell Client Integration Pack 3.1
While managing a second system required no additional steps and no increase in time
for the Dell systems, doing so on the Lenovo systems required additional steps and time.
This is because we had to complete each process separately for each ThinkPad. The Dell,
on the other hand, only requires the admin to select the changes and the target laptops,
and DCIP pushes those changes to the laptops selected.
DCIP and Intel vPro can improve scalability in your business: as administrators
connect more Dell Latitude 7000 notebooks through the DCIP plugin, it takes no longer
to change settings remotely on multiple Dell Latitude 7000 notebooks than it does for a
single notebook. With Intel Core vPro processors and Dell Business Client notebooks,
DCIP provides an invaluable addition to SCCM for remotely managing clients in any
state.
Figure 1 illustrates the IT admin time it took in our testing to change a single
BIOS setting. Note that in this chart and those similar to it that follow, the time for one
and two systems come from our hands-on testing and the time for 50 systems is an
extrapolation based on those times. For details on how we calculated admin time for 50
notebooks, see Appendix B. As Figure 1 shows, for the Dell system the time to change
the setting remained constant regardless of the number of systems on which we
performed the task. For the Lenovo systems, the amount of time increased as the
number of systems increased. Completing the task on 50 Dell notebooks would take
only 13 seconds whereas doing so on 50 Lenovo notebooks would take over 36 minutes.
This is a dramatic time savings that would increase with greater numbers of systems.
Figure 1: IT admin time to change
one BIOS setting on various
numbers of notebooks using the
two management systems. Lower
numbers are better.
In the following sections, we provide some background on out-of-band
management in general, Dell Client Integration Pack in particular, and how we
approached testing. To skip ahead to more of our findings, see the section Scalability
with DCIP and Intel vPro.
A Principled Technologies test report 3Remote notebook management: Dell unique vPro extensions and
Dell Client Integration Pack 3.1
OUT-OF-BAND: REMOTE MANAGEMENT REGARDLESS OF STATE
Remote management has traditionally required each managed device to fully
load its operating system and receive commands through a software-based
management agent, or in-band management. When the operating system is
unreachable however, IT administrators can use a special hardware-based channel to
connect with the device remotely, a process called out-of-band (OOB) management.
Intel considers notebooks OOB when the operating system has not loaded; when the
computer is plugged in or has battery power but is not actively running (either off, on
standby, sleep, or hibernation); or when the computer is booted into its operating
system, but the software-based management agent is not available.1
Intel Core vPro
processors offer a hardware-based option for OOB management with the Intel
Management Engine, an isolated and protected coprocessor that can communicate with
the network and draw power independently of the notebook’s main components.2
DELL CLIENT INTEGRATION PACK
SCCM includes built-in support for management of computers with Intel Core
vPro processors. The OOB Management Console of SCCM allows IT administrators to
execute simple management tasks for computers with Intel Core vPro processors,
including powering a device on or off, checking system information and status, booting
from a remote virtualized drive, and running commands. OOB management in SCCM can
be complicated and costly: without the resources to research and design workflows
customized to your remote management needs, using SCCM to manage even a small
number of computers can quickly become a time-consuming task.
As a visual interface that initiates management tasks, DCIP provides a no-cost
alternative to OOB management in SCCM that incorporates the Dell Client Configuration
Toolkit to provide BIOS configuration capability for Dell client systems. An IT admin can
easily add the DCIP plugin to an existing SCCM. With DCIP, an IT administrator can
quickly perform out-of-band management tasks and implement them broadly to
multiple clients within an enterprise network.
Our representative three-year-old notebooks, a Lenovo ThinkPad T430 and a
Lenovo ThinkPad T420, use Intel Core vPro processors, which means they have out-of-
1
en.community.dell.com/techcenter/extras/m/white_papers/20179305/download.aspx
2
https://www.kernel.org/doc/Documentation/misc-devices/mei/mei.txt
Out-of-band
management
allows for remote
client maintenance
regardless of the
managed system’s
power state or
operating system
status. As long as
the client has
battery or AC
power and is
authenticated on
the network, IT
administrators can
remotely manage
the device.
A Principled Technologies test report 4Remote notebook management: Dell unique vPro extensions and
Dell Client Integration Pack 3.1
band-management capabilities with SCCM. However, to achieve the ease of use that
DCIP offers as a free plugin would require a third-party product or a custom built
solution.
Another advantage of DCIP is that IT admins can perform management tasks
without interfering with users and their ability to do their work. DCIP can issue changes
to a remotely managed client while the user is loaded and working in their operating
system. This translates to a productivity advantage. For the purposes of our tests, we
started timings with each system fully shutdown and turned off.
OUR CONFIGURATIONS
Our tests looked at the differences between remote management on Dell
notebooks managed through the DCIP 3.1 plugin and previous-generation Lenovo
notebooks managed only through SCCM 2012. We considered four common
management tasks IT administrators often perform remotely: changing BIOS settings,
erasing a hard drive, completing a KVM connection, and changing AMT power settings.
In our first set of tests, we counted the steps needed to accomplish each task
and measured IT admin time, the amount of time an IT administrator would spend
actively navigating through either DCIP or SCCM to fully initiate a task on a single Dell
notebook and a single Lenovo notebook. For the Dell notebook, we began measuring IT
admin time from the first launch of DCIP and ended our timing when we clicked “Finish”
and the job was added to DCIP’s task queue. For the Lenovo notebook, IT admin time
began with launching SCCM 2012 and ended with the last action required to complete
the process.
We reran all tests on two of each notebook to highlight the scalable advantages
of managing multiple Dell notebooks with DCIP over managing multiple Lenovo
notebooks with SCCM. Using two Dell notebooks and two Lenovo notebooks, we
measured the time and counted the steps it took to deploy the same four management
scenarios. The results demonstrate how DCIP saves IT administrators’ time with tools
that streamline the process of managing multiple connected clients.
We present the results below. For detailed specifications of the test systems,
see Appendix A. For a systematic presentation of how we tested, including all of the
steps required to perform the tasks with the two management approaches, see
Appendix C. For complete results, see Appendix D.
A Principled Technologies test report 5Remote notebook management: Dell unique vPro extensions and
Dell Client Integration Pack 3.1
SCALABILITY WITH DCIP AND INTEL VPRO
We used each of the two management systems to perform a set of four tasks on
a pair of each notebook. We then extrapolated the data from managing two systems to
managing 50 systems. With DCIP, increasing the number of systems did not increase the
management time because DCIP allows the IT admin to apply changes to multiple
systems simultaneously. It takes no longer to perform the tasks in our scenarios on 50
systems than it does to perform them on a single system. In contrast, an admin must
perform the tasks on one Lenovo system at a time, which leads to much more hand-on
time for multiple systems.
Scenario: Remotely managing BIOS settings
A company decides to limit employee access to the BIOS, but then encounters a
situation where changes to the BIOS need to be made. For example, a new sales person
may request a specific Bluetooth headset. While official company policy may not permit
enabling Bluetooth, management has made an exception in this case. On the Lenovo
notebook, the IT admin needs to schedule a maintenance time with the employee,
create a KVM connection to the system, enter the BIOS password, and change the
setting manually. On the Dell notebook, the administrator can use DCIP to send the
command over the network. On a larger scale, a new company security policy may
require the use of legacy ROMs to distribute new software. Had IT previously disabled
this functionality, an IT admin using only SCCM to manage the Lenovo notebooks would
need to change each system’s BIOS individually. With DCIP, the admin could schedule
this change in a matter of seconds.
Changing one BIOS setting
Changing BIOS settings on a user’s notebook has traditionally been inconvenient
for IT administrators because the ability to manage BIOS settings remotely has been
limited. Updating settings can mean hands-on time with each device, either through
KVM or in person–waiting for reboots, pressing complicated key combinations, and
navigating menus.
Notebooks with Intel Core vPro processors can communicate with a
management server before the BIOS loads. DCIP integrates with the Dell Client
Configuration Toolkit to enable BIOS configuration features, providing a simple interface
for remote management. On the Lenovo ThinkPad, the only option for remotely
managing BIOS settings without scripting requires initiating a KVM session and manually
booting into the BIOS menu itself. To demonstrate the time an IT admin would save by
using DCIP, we chose a single BIOS setting shared between the Dell and Lenovo systems
and measured the time and steps it took to implement changing that setting.
Using DCIP, the IT admin changed a BIOS setting in nine steps. Changing this
setting took just 13 seconds for the IT admin in our scenario. Changing the BIOS setting
A Principled Technologies test report 6Remote notebook management: Dell unique vPro extensions and
Dell Client Integration Pack 3.1
on the Lenovo system took 11 steps. It took the IT admin over 50 seconds to complete
this change. As we showed in Figure 1, completing the task on 50 Dell notebooks would
take only 13 seconds whereas doing so on 50 Lenovo notebooks would take over 36
minutes.
Changing 10 BIOS settings
We chose 10 BIOS settings shared between the Dell and Lenovo notebooks and
measured the steps and time it took to implement changes to all of the settings at once.
The BIOS Settings menu in DCIP lists all available BIOS options in one sortable list. After
selecting a specific BIOS configuration, an IT admin can apply the settings to any number
of connected clients.
Figure 2 lists the BIOS settings we changed between the two notebooks.
Changed BIOS Settings
 Active Processor Cores: All
 Bluetooth®: Enabled
 Enable External USB Port: Enabled
 Enable Intel SpeedStep®: Enabled
 Enable Intel Virtualization Technology: Disabled
 Enable VT for Direct I/O: Disabled
 Hyper-Threading: Enabled
 Touchpad: Enabled
 Wake on LAN/WLAN (Notebook): LAN or WLAN
 WLAN: Enabled
Figure 2: The BIOS settings we changed on the two systems under test.
Our IT admin was able to change all 10 BIOS settings we selected in just 18 steps
using DCIP, requiring less than 41 seconds to initiate the changes on a single system.
Doing so on a single Lenovo system took 30 steps, requiring 74 seconds. That is almost
twice as long to complete the same tasks in DCIP.
Figure 3 shows how this time difference increased when we changed 10 BIOS
settings on multiple systems. Completing the task on 50 Dell notebooks with DCIP would
take only 40 seconds whereas doing so on 50 Lenovo notebooks would take over 55
minutes.
A Principled Technologies test report 7Remote notebook management: Dell unique vPro extensions and
Dell Client Integration Pack 3.1
Figure 3: IT admin time to
change 10 BIOS settings on
various numbers of notebooks
using the two management
systems. Lower numbers are
better.
Changing the BIOS password
Unauthorized changes to the BIOS by inexperienced users could render a
notebook unstable or vulnerable. By using the change BIOS Password feature,
administrators can ensure that employee systems remain secure.
In this scenario, it took 11 steps to change the BIOS password using the BIOS
Passwords task on the Dell notebook using DCIP. Our IT admin initiated the change in 19
seconds. For the Lenovo system, it took 13 steps to change the BIOS password, but that
change took our IT admin 47 seconds.
Figure 4 shows how this time difference increased when we changed the BIOS
password on multiple notebooks. We calculate the task on 50 Dell notebooks would
take only 19 seconds whereas doing so on 50 Lenovo notebooks would take over 34
minutes.
Figure 4: IT admin time to
change the BIOS password on
various numbers of notebooks
using the two management
systems. Lower numbers are
better.
A Principled Technologies test report 8Remote notebook management: Dell unique vPro extensions and
Dell Client Integration Pack 3.1
Changing boot order
Sometimes it is necessary to make changes to the boot order of a large number
of systems. OS installations and firmware updates can prompt an IT administrator to
change the boot order. Using the change boot order feature, Dell systems can be
simultaneously instructed to set a specific boot order, either permanently or just for the
next boot. This means less time is needed navigating boot selection menus.
For the Dell notebook, it only took 10 steps to change the boot order using the
Boot Order task, requiring 13 seconds of IT admin time to initiate the change. It took 11
steps to change the boot order on the Lenovo ThinkPad and 42 seconds for the IT admin
to complete this change.
Figure 5 shows how this time difference increased when we changed the boot
order on multiple systems. Completing the task on 50 Dell notebooks would take only
13 seconds whereas doing so on 50 Lenovo notebooks would take over 29 minutes.
Figure 5: IT admin time to
change the boot order on
various numbers of
notebooks using the two
management systems. Lower
numbers are better.
A Principled Technologies test report 9Remote notebook management: Dell unique vPro extensions and
Dell Client Integration Pack 3.1
Remotely erasing a hard drive
Erasing a hard drive on a system that’s out-of-band is difficult if not impossible:
all software-based solutions rely on the operating system’s network communication to
receive the erase-disk command. Furthermore, in-band solutions are not useful when
the operating system is not responding or the computer is off. Our tests compared the
steps and time it took to erase the data on a solid-state drive (SSD) managed through
DCIP on a Dell system securely versus an older Lenovo system with a hard-disk drive
(HDD) managed through only SCCM.
With DCIP, it took only eight steps to complete the Erase Disk task. It took the IT
admin only 10 seconds to initiate the task. For the Lenovo system, it took 14 steps to
erase the disk. In this scenario, it took our IT admin over two minutes, to complete this
change on the ThinkPad.
Figure 6 shows how this time difference increased when we used the two
management systems to erase the hard-disk drives remotely on multiple systems.
Completing the task on 50 Dell notebooks would take only 10 seconds whereas doing so
on 50 Lenovo notebooks would take over 1 hour and 45 minutes.
Figure 6: IT admin time to remotely
erase the hard drive on various
numbers of notebooks using the two
management systems. Lower
numbers are better.
Did you know?
DCIP leverages ATA
Secure Erase capability
for hard-disk drives and
solid-state drives. Dell
notebooks that feature
ATA compliant drives
support Secure Erase
functionality—and with
Intel Core vPro
processors and DCIP,
Dell notebooks can
have sensitive data
securely erased, in-
band or out.
A Principled Technologies test report 10Remote notebook management: Dell unique vPro extensions and
Dell Client Integration Pack 3.1
Performing general remote management tasks
Initiating a KVM Connection
Occasionally, an IT administrator will need to access a laptop remotely. While
tools like Window’s Remote Desktop Connection are useful for this, they are limited if
the system is not booted into an operating system. DCIP provides KVM tools for
accessing systems remotely regardless of the system’s power state. No password is
required to complete this connection, though security precautions can be taken to
require the user of the laptop to provide consent to establish the KVM connection. By
enabling user consent, an employee is required to communicate a randomly generated
confirmation code to the remote IT administrator. The code is displayed on the screen
via a sprite file that is not accessible from the network. This ensures the safety of
employees. These features are available in both Configuration Manager 2012 and DCIP.
While the uses of the technology are similar for both systems, we found that it is faster
to navigate through the Dell AMT Plugin menus to create the connection, than in SCCM.
For the Dell system, it took five steps to complete the KVM connection using the
KVM Connect task, taking the IT admin just under 15 seconds to complete this task. For
the Lenovo system, it also took five steps to complete the KVM connection. It took the
IT admin 20.3 seconds to complete this task.
Figure 7 shows how this time difference increased when we used the two
management systems to complete the KVM session on multiple systems. Completing
the task on 50 Dell notebooks would take only 2.1 minutes whereas doing so on 50
Lenovo notebooks would take 3.3 minutes.
Figure7: IT admin time to
complete a KVM connection on
various numbers of notebooks
using the two management
systems. Lower numbers are
better.
A Principled Technologies test report 11Remote notebook management: Dell unique vPro extensions and
Dell Client Integration Pack 3.1
Changing the power profile
The AMT power profile specifies the states in which a system responds to
commands depending on the power state of the laptop. Power states describe whether
the laptop is on or off, hibernating, or connected or disconnected from an AC power
source. DCIP allows you to configure this setting remotely for multiple laptops from the
console. For example, a technician may want to set all of his laptops to respond only to
AMT requests when connected to a power source. By using the Intel® vPro™ AMT
Plugin, the administrator could quickly change the power setting on multiple laptops so
that they will only wake when attached to an AC adapter. This was not possible on the
Lenovo. While we were able to manage the BIOS settings on the older Lenovo laptops
through the KVM, the system was not able to boot into the management engine during
a KVM session. A technician using the Lenovo would need to walk to the target laptop
and make the changes manually using BIOS menus.
For the Dell system, it took nine steps to change the Power Profile using the
Power Profile task. In our scenario, it took our IT admin 13 seconds to initiate this
change.
We were not able to replicate this action on the Lenovo system because the
KVM connection could not reach the Management Engine interface while using the KVM
function.
Reporting and collecting information
Using DCIP, an administrator can collect data on provisioned computers using
multiple reports. Those reports are called OOB Manageability, Provisioning, Battery
Health, and Hardware Inventory. The OOB Manageability collects information about the
state of AMT management on the target laptops. The provisioning report provides
information to show when the laptop was provisioned and what methods were used.
The Battery Health report provides data about the type of batteries in your Latitude
systems and the health status of the batteries. IT admins could use this information to
determine whether employees will need a new battery, and what type of battery will
need to be ordered. IT can run the hardware inventory report to collect model numbers
and current version numbers on laptops. This report includes information such as the
model number for the laptop, IP address, or specifics about processor, memory, or
drives.
For all of these reports, IT can get some of this information for the Lenovo
notebooks from SCCM and the Out of Band Management console, but this process
involves entering the Out of Band Management Console for each system, and finding
the desired information. DCIP collects the information and allows the quick creation of a
report on multiple systems. The report can then be printed or exported into an Excel
document for further use.
A Principled Technologies test report 12Remote notebook management: Dell unique vPro extensions and
Dell Client Integration Pack 3.1
IN CONCLUSION
IT admins can spend considerable time managing employee notebooks. The Dell
Client Integration Pack 3.1 for Microsoft System Center Configuration Manager 2012 can
greatly streamline the management process and allow admins to remotely perform
management tasks under a much broader range of conditions.
In our labs at Principled Technologies, we performed a series of remote
management tasks on Dell Latitude 7240 notebooks managed with DCIP and on Lenovo
ThinkPad notebooks managed only through SCCM. Executing these tasks on a single
system with DCIP was quicker and simpler than doing so with only SCCM. The time
savings was even more pronounced when we performed the scenarios on two systems
because DCIP lets you apply the same changes to multiple systems without taking any
additional time. For an organization with large numbers of notebook systems, the
economies of scale that DCIP provides would translate to the greatest savings.
A Principled Technologies test report 13Remote notebook management: Dell unique vPro extensions and
Dell Client Integration Pack 3.1
APPENDIX A – SYSTEM CONFIGURATION INFORMATION
Figure 8 describes our server configuration.
System Dell PowerEdge R510
Power supplies
Total number 2
Vendor and model number Dell L1100A-S0
Wattage of each (W) 1100
Cooling fans
Total number 5
Vendor and model number Delta Electronics Inc. PFC0612DE
Dimensions (h × w) of each 2.5″ × 2.4″
Volts 12
Amps 1.7
General
Number of processor packages 2
Number of cores per processor 4
Number of hardware threads per core 2
System power management policy Balanced
CPU
Vendor Intel
Name Xeon
Model number E5540
Stepping D0
Socket type LGA 1366
Core frequency (GHz) 2.53
Bus frequency 5.86 GT/s
L1 cache 4 × 32 KB
L2 cache 4 × 256 KB
L3 cache 8 MB
Platform
Vendor and model number Dell PowerEdge R510
Motherboard model number Intel 5500
BIOS name and version Dell Inc. 1.12.0 (07/26/2013)
BIOS settings Default
Memory module(s)
Total RAM in system (GB) 128 GB
Vendor and model number Hynix HMT42GR7MFR4C-PB
Type PC3-12800R
Speed (MHz) 1,600
Speed running in the system (MHz) 1,333
Timing/Latency (tCL-tRCD-tRP-tRASmin) 7-7-7-19
Size (GB) 8
Number of RAM module(s) 16
Chip organization Double-Sided
A Principled Technologies test report 14Remote notebook management: Dell unique vPro extensions and
Dell Client Integration Pack 3.1
System Dell PowerEdge R510
Rank Dual
Operating system
Name Microsoft Windows Server 2012 Datacenter
Build number 9200
File system NTFS
Kernel ACPI x64-based PC
Language English
Graphics
Vendor and model number Matrox G200eW
Graphics memory (MB) 256
Driver 3.8.0.33w2
RAID controller
Vendor and model number Dell PERC 6/I Integrated
Firmware version 6.3.3-0002 (06/11/2013)
Driver version 5.2.122.0 (04/03/2012)
Cache size (MB) 256 MB
Hard drives
Type 1
Vendor and model number Dell MBA3147RC
Number of drives 4
Size (GB) 146
RPM 15K
Type SAS
Type 2
Vendor and model number Dell ST3600057SS
Number of drives 4
Size (GB) 600
RPM 15K
Type SAS
Ethernet adapters
First network adapter
Vendor and model number Broadcom® BCM5716C NetXtreme® II GigE
Type Integrated
Driver 7.8.53 (06/12/2014)
Second network adapter
Vendor and model number Broadcom BCM5716C NetXtreme II GigE
Type Integrated
Driver 7.8.53 (06/12/2014)
Optical drive(s)
Vendor and model number PLDS DVD+RW DS-8A3S
Type DVD+RW
A Principled Technologies test report 15Remote notebook management: Dell unique vPro extensions and
Dell Client Integration Pack 3.1
System Dell PowerEdge R510
USB ports
Number 4
Type 2.0
Figure 8: Configuration details for the test server.
Figure 9 provides configuration details for the four laptops we tested.
System Dell Latitude E7240 Dell Latitude E7240
Lenovo ThinkPad
T430
Lenovo ThinkPad
T420
General
Number of processor
packages
1 1 1 1
Number of cores per
processor
2 2 2 2
Number of hardware
threads per core
2 2 2 2
Total number of
processor threads in
system
4 4 4 4
System power
management policy
Default Default Default Default
Processor power-saving
option
Intel SpeedStep™
Enabled
Intel SpeedStep
Enabled
Lenovo Lenovo
System dimensions
(length × width ×
height)
8.3″ × 12.2″ × 0.79″ 8.3″ × 12.2″ × 0.79″ 13.4″ × 9.1″ × 1.4″ 13.4″ × 9.1″ × 1.4″
System weight 2.99 lbs. 2.99 lbs. 5.19 lbs. 4.81 lbs.
CPU
Vendor Intel Intel Intel Intel
Name Core i5 Core i5 Core i5 Core i5
Model number 4300U 4300U 3320M 2520M
Stepping C0 C0 D2 E0
Socket type and
number of pins
SOCKET 1168 BGA SOCKET 1168 BGA Socket 988B rPGA Socket 988B rPGA
Core frequency (GHz) 1.90 1.90 2.60 2.50
Bus frequency 5 GT/s DMI 5 GT/s DMI
L1 cache
32 KB + 32 KB (per
core)
32 KB + 32 KB (per
core)
32 KB + 32 KB (per
core)
32 KB + 32 KB (per
core)
L2 cache
512 KB (256 KB per
core)
512 KB (256 KB per
core)
512 KB (256 KB per
core)
512 KB (256 KB per
core)
L3 cache 3 MB 3 MB 3 MB 3 MB
Platform
Vendor Dell Dell Lenovo Lenovo
Motherboard model
number
OV120R OV120R 234222U 4177CTO
Motherboard chipset Intel 5 series chipset Intel 5 series chipset Intel QM77 Intel QM67
A Principled Technologies test report 16Remote notebook management: Dell unique vPro extensions and
Dell Client Integration Pack 3.1
System Dell Latitude E7240 Dell Latitude E7240
Lenovo ThinkPad
T430
Lenovo ThinkPad
T420
BIOS name and version
Dell A08
(02/18/2014)
Dell A08
(02/18/2014)
Lenovo G1ETA5WW
2.65 (04/15/2014)
Lenovo 83ET76WW
1.46 (07/05/2013)
Memory module(s)
Vendor and model
number
Micron
8KTF51264HZ-1G6E1
Samsung
M471B5173QH0-
YK0
Samsung
471B5273DH0-CK0
Samsung
M471B5773CHS-CH9
Type PC3-12800 PC3-12800 PC3-12800 PC3-10600
Speed (MHz) 1,600 1,600 1,600 1,333
Speed running in the
system (MHz)
1,600 1,600 1,600 1,333
Timing/Latency (tCL-
tRCD-tRP-tRASmin)
11-11-11-28 11-11-11-28 11-11-11-28 9-9-9-24
Size (MB) 4,096 4,096 4,096 2,048
Number of memory
module(s)
2 1 1 1
Total amount of system
RAM (GB)
8 4 4 2
Chip organization
(single-sided/ double-
sided)
Double-sided Double-sided Double-sided Double-sided
Channel (single/dual) Dual Single Single Single
Hard disk
Vendor and model
number
Samsung SSD SM841
mSATA
Samsung SSD SM841
mSATA
Hitachi
HTS725050A7E630
Hitachi
HTS725032A9A364
Number of disks in
system
1 1 2
1
Size (GB) 120 120 500 320
Buffer size (MB) N/A N/A 32 16
RPM N/A N/A 7,200 7,200
Type SATA III 6.0 Gb/s SATA III 6.0 Gb/s SATA II 3.0 Gb/s SATA II 3.0 Gb/s
Controller
Intel Mobile Express
Chipset SATA RAID
Controller
Intel Mobile Express
Chipset SATA RAID
Controller
Intel 7 Series Chipset
Family SATA AHCI
Controller
Intel Mobile Express
Chipset SATA AHCI
Controller
Driver
12.9.0.1001
(10/28/2013)
12.9.0.1001
(10/28/2013)
Intel 12.8.10.1005
(02/07/2014)
Intel 12.8.10.1005
(02/07/2014)
Operating system
Name
Windows 8 Pro 64-
bit
Windows 8 Pro 64-
bit
Windows 8 Pro 64-
bit
Windows 8 Pro 64-
bit
Build number 9200 9200 9200 9200
Service Pack NA NA NA NA
File system NTFS NTFS NTFS NTFS
Kernel ACPI x64-based PC ACPI x64-based PC ACPI x64-based PC ACPI x64-based PC
Language English English English English
A Principled Technologies test report 17Remote notebook management: Dell unique vPro extensions and
Dell Client Integration Pack 3.1
System Dell Latitude E7240 Dell Latitude E7240
Lenovo ThinkPad
T430
Lenovo ThinkPad
T420
Graphics
Vendor and model
number
Intel HD Graphics
4400
Intel HD Graphics
4400
Intel HD Graphics
4000
Intel HD Graphics
3000
Type Integrated Integrated Integrated Integrated
Chipset
Intel HD Graphics
Family
Intel HD Graphics
Family
Intel HD Graphics
Family
Intel HD Graphics
Family
BIOS version 2177.14 2177.14 2161.0 2.089.0
Total available graphics
memory (MB)
1,744 1,792 1,664 741
Dedicated video
memory (MB)
0 0 32 32
System video memory
(MB)
0 0 0 0
Shared system memory
(MB)
1,744 1,792 1,632 709
Resolution 1,920 × 1,080 1,920 × 1,080 1,366 × 768 1,366 x 768
Driver
Intel 10.18.10.3621
(05/16/2014)
Intel 10.18.10.3621
(05/16/2014)
Intel 9.17.10.2875
(10/17/2012)
Intel 9.17.10.2843
(08/21/2012)
Microsoft DirectX®
Version
DirectX 11.0 DirectX 11.0 DirectX 11 DirectX 11
Sound card/subsystem
Vendor and model
number
Realtek ALC3226 HD
Audio Codec
Realtek ALC3226 HD
Audio Codec
Realtek High
Definition Audio
Driver
Conexant 20672
SmartAudio HD
Driver
6.0.1.5988
(08/27/2013)
6.0.1.5988
(08/27/2013)
6.0.1.7040
(11/11/2013)
8.32.43
(08/08/2013)
Ethernet
Vendor and model
number
Intel Ethernet
Connection I218-LM
Intel Ethernet
Connection I218-LM
Intel 82579LM
Gigabit Network
Connection
Intel 82579LM
Gigabit Network
Connection
Driver
Intel 12.11.77.1
(03/13/2014)
Intel 12.11.77.1
(03/13/2014)
12.10.28.0
(08/21/2013)
12.10.28.0
(08/21/2013)
Wireless
Vendor and model
number
Intel Dual Band-AC
7260
Intel Dual Band-AC
7260
Intel Centrino®
Advanced-N 6205
Intel Centrino
Advanced-N 6205
Driver
17.0.0.32
(02/18/2014)
17.0.0.32
(02/18/2014)
15.10.3.2
(8/22/2013)
15.10.3.2
(8/22/2013)
Optical drive(s)
Vendor and model
number
N/A N/A Optiarc AD-7740H Matshita UJ8A0A
Type N/A N/A DVD-RW DVD-RW
A Principled Technologies test report 18Remote notebook management: Dell unique vPro extensions and
Dell Client Integration Pack 3.1
System Dell Latitude E7240 Dell Latitude E7240
Lenovo ThinkPad
T430
Lenovo ThinkPad
T420
USB ports
Number 3 3 4 3
Type USB 3.0 USB 3.0
2 x USB 2.0, 2 x USB
3.0
USB 2.0
Other Mini DisplayPort Mini DisplayPort
Media card reader,
Mini DisplayPort
eSATA & Media card
reader
Monitor
LCD type LED LED HD LED WXGA HD LED WXGA
Screen size 12.5” 12.5” 14.0” 14.0”
Refresh rate 60 Hz 60 Hz 60 Hz 60 Hz
Battery
Type Dell GVD76 Dell WD52H Lenovo 45N1011
Lenovo 42T4795
Lithium-ion
Size (length × width ×
height)
10.9″ × 3.1″ × .4″ 10.9″ × 3.1″ × .4″ 8.5″ × 3″ × .75″ 8.13 ″ × 2″ × .75”
Rated capacity
2,679 mAh / 11.1V
(31Wh)
6,700 mAH / 7.4V
(45 Wh)
8,400 mAh / 11.1V
(94.Wh)
5,200 mAh / 10.8V
(57Wh)
Weight .506 lbs. .586 lbs. 1.1 lbs. .68 lbs.
Figure 9: Configuration details for the laptops we tested.
A Principled Technologies test report 19Remote notebook management: Dell unique vPro extensions and
Dell Client Integration Pack 3.1
APPENDIX B – EXTRAPOLATING TO 50 NOTEBOOKS
When managing the Lenovo ThinkPads with SCCM, the first few steps are the same whether you are managing
one or multiple notebooks. However, once in SCCM, each notebook is managed one at a time. While DCIP allows Dell
notebooks to be managed in parallel, each step or task must be repeated on each individual Lenovo notebook. To
calculate the amount of time required to manage multiple Lenovo notebooks more accurately, we separated the
management time into three parts:
 The time required to open SCCM and prepare it for remote management.
 The time required to manage the first Lenovo notebook.
 The time required to manage the second Lenovo notebook.
We ran each test 3 times and took the median of the three runs for each part of the process listed above. We
took an average of the time required to manage the first and second Lenovo notebook to determine the average time
required to manage one notebook. To present admin time required for 50 Lenovo notebooks, we multiplied the average
time required to manage one notebook by 50, and added the time required to perform the initial steps.
 Time it takes to perform the initial steps + (Average Lenovo management time * 50)
A Principled Technologies test report 20Remote notebook management: Dell unique vPro extensions and
Dell Client Integration Pack 3.1
APPENDIX B – HOW WE TESTED
We used the following steps to create our test environment. Figure 10 describes our isolated testing
environment, which comprised one PowerEdge R510 server running Hyper-V with four virtual machines. We tested four
laptops, which we describe below. We used two Dell Latitude E7240s: one Lenovo T430 and one Lenovo T420. All
systems installed all available Windows updates before being configured.
Description Computer name Operating system Assigned IP vCPU vRAM
Domain Controller dc.test.local Windows Server 2008 R2 Standard 192.168.1.10 1 8 GB
Certificate Authority ca.test.local Windows Server 2008 R2 Enterprise 192.168.1.15 1 8 GB
Database Server db.test.local Windows Server 2008 R2 Standard 192.168.1.20 1 16 GB
Management Server cm.test.local Windows Server 2008 R2 Standard 192.168.1.50 2 16 GB
Dell Latitude E7240 Dell1.test.local Windows 8 Pro 192.168.1.101
Dell Latitude E7240 Dell2.test.local Windows 8 Pro 192.168.1.102
Lenovo T430 T430.test.local Windows 8 Pro 192.168.1.103
Lenovo T420 T420.test.local Windows 8 Pro 192.168.1.104
Figure 10: The details of our isolated testing environment.
Required installation media
 Each of the Microsoft Windows operating systems listed in Figure 10
 SQL 2012 Enterprise (en_sql_server_2012_enterprise_edition_x86_x64_dvd_813294.iso)
 System Center 2012 Configuration Manager SP1
(mu_system_center_2012_configuration_manager_and_enpoint_protection_with_sp1_x86_x64_dvd_1565907.iso)
Infrastructure construction
System configuration
The following steps were completed on each virtual machine.
1. Log in to the virtual machine as administrator
2. Open Windows Firewall with Advanced Security.
3. Click Firewall properties.
4. On the Domain Profile, Private Profile, and Public Profile tabs, set the Firewall state to off. Click OK.
5. Set the host name and IP of each virtual machine as described above.
Installing the Active Directory and Domain Controller
1. On the Domain Controller, set a static IP, and set the DNS server to 127.0.0.1.
2. Click StartRun, and type DCPROMO in the Run field.
3. Leave defaults, and click Next on the Welcome window.
4. Click Next on the Operating System Compatibility window.
5. Choose Create a new domain in a new forest, and click Next.
6. Provide a name for the domain, and click Next. We used test.local
7. At the Domain NetBIOS name, enter a name and click Next. We used TEST
8. Set the Forest Functional Level to Windows Server 2008, and click Next.
9. Set the Domain Functional Level to Windows Server 2008, and click Next.
A Principled Technologies test report 21Remote notebook management: Dell unique vPro extensions and
Dell Client Integration Pack 3.1
10. Leave defaults on the Additional Domain Controller Options window, and click Next.
11. On the pop-up asking if you want to continue, click Yes.
12. Leave defaults on the Location for Database, Log Files and SYSVOL window, and click Next.
13. Enter a domain password, and click Next.
14. Click Next on the summary page.
15. Click Finish.
16. Click Restart Now.
Adding DHCP
1. On the Domain Controller, open the Add Roles Wizard.
2. Click Next.
3. Select DHCP Server and click Next.
4. Accept all defaults and click Next until you reach the Add Scope screen.
5. At the Add or Edit DHCP Scopes screen, click Add.
6. At the Add Scope screen, enter the Name DHCP Scope name.
7. In the next box, set the following values, and click OK.
 Starting IP Address. We used 192.168.1.100
 Ending IP Address. We used 192.168.1.150
 Subnet mask. We used 255.255.255.0
8. Check the Activate This Scope box.
9. Click Next.
10. Accept defaults and click Next until you reach the Confirmation Page.
11. Click Install.
Configuring administrative rights for the management server
1. On the Certificate Authority and Database servers, run lusrmgr.msc.
2. Select Groups.
3. Right-click Administrators and click Properties.
4. Click Add.
5. Select Object Types, check the box for Computers, and click OK.
6. Add the computer name for the management server. We entered CM
Configuring the enterprise certificate authority
1. Log in to the Windows 2008 R2 Enterprise server designated for Certificate Authority as domainadministrator.
2. Launch Server Manager.
3. Select the menu item for Roles. Click Add Roles. Click Next.
4. Choose the option Active Directory Certificate Services. Click Next.
5. Click Next. Choose the option Certification Authority, and click Next.
6. Select Enterprise for the setup type, and click Next.
7. Choose Root CA for the CA type, and click Next.
8. Select Create a New Private Key, and click Next.
A Principled Technologies test report 22Remote notebook management: Dell unique vPro extensions and
Dell Client Integration Pack 3.1
9. Accept all remaining defaults, and click Next through the remaining screens.
10. When prompted to begin installation, click Install.
11. To exit the wizard, click Close. Restart the server before continuing to the next steps.
Installing SQL 2012
1. Log in to the Database server as domainadministrator.
2. Attach the installation media for SQL 2012, and run the setup.exe file.
3. Select Installation from the menu on the left, and then select New SQL Server stand-alone installation or add
features to an existing installation.
4. Allow the prerequisite check to finish and click OK.
5. A window with the title SQL Server 2012 Setup will appear and check prerequisites. When this is process is
complete, click Next.
6. Enter a valid product key and click Next.
7. Accept the license terms and click Next.
8. Select SQL Server Feature Installation and click Next.
9. Under Instances Features, select Database Engine Services with Full-Text and Semantic Extractions for Search and
Data Quality Services, Reporting Services, Management Tools - Basic, Management Tools - Complete, and SQL Client
Connectivity SDK. Click Next.
10. Allow the prerequisite checker to run and click Next.
11. Select Default Instance and an Instance ID. Click Next.
12. On the Disk Space Requirements Screen, click Next.
13. On the Server configuration screen, choose NT AUTHORITYSYSTEM for SQL Server Database Engine, and NT
AUTHORITYLOCAL SERVER for SQL Server Analysis Services and SQL Server Reporting Services.
14. Set Startup Type for Server Agent, SQL Server Database Engine, and Server Browser as Automatic, and click Next.
15. On the Database Engine Configuration screen, select Mixed Mode.
16. Enter a password for the system administrator (sa) account.
17. Click Add Current user.
18. Click Next four times.
19. Verify that the Summary is correct and click install.
20. Click finish when prompted.
21. Install SQL Server 2012 SP1 and CU9 from the following Web site: technet.microsoft.com/en-
us/sqlserver/ff803383.aspx. When the installation is finished, restart the server.
22. Open Microsoft SQL Server Management Studio.
23. Sign in to your SQL database.
24. Right-click your SQL host and select Properties.
25. Select the memory page.
26. Change maximum server memory to 16384. Click OK.
27. In SQL Server Configuration Manager, expand the SQL Server Network Configuration tree and double-click Protocols
for MSQLSERVER.
A Principled Technologies test report 23Remote notebook management: Dell unique vPro extensions and
Dell Client Integration Pack 3.1
28. Right-click Named Pipes and click Enable.
29. Do the same for TCP/IP.
30. In the left panel, click SQL Server Services, right-click SQL Server, and choose restart.
Installing required Windows features and roles for System Center Configuration Manager
1. Log in to the management server with domainadministrator.
2. Launch the Server Manager from the taskbar.
3. Click Add Features or Roles.
4. Click Next, and then click Next again.
5. Select Web Server IIS.
6. Click Add Required Role Services.
7. Add Windows Software Update Services.
8. Run Windows Update, and install updates.
9. Register ASP.NET with IIS by running the following command:
C:WindowsMicrosoft.NETFramework64v4.0.30319>aspnet_regiis.exe –r
Installing the Windows Assessment and Deployment Kit for Windows 8 Release Preview
1. Download the Windows Assessment and Deployment Kit for Windows 8 Release Preview from the following Web
site: www.microsoft.com/en-us/download/details.aspx?id=29929
2. Run adksetup.exe.
3. Select Install the Assessment and Deployment Kit to this computer, and choose an installation path. Click Next.
4. Select No when prompted to join the Customer Experience Improvement Program (CEIP).
5. Accept the license agreement.
6. Select Deployment tools and Windows Preinstallation Environment features, and User State Migration. Click Install.
7. Click Close when the install finishes.
Extending the Active Directory schema
1. Log on to the Domain controller with an account that is a member of the Schema Admins security group.
2. Run SMSSETUPBINx64extadsch.exe from the installation source to extend the AD schema.
3. Review extadsch.log in the root of the system drive to confirm the operation was successful.
Creating Active Directory accounts for System Center Configuration Manager
1. Log in to the Domain Controller using the domainadministrator account.
2. Create a global security group called Kerberos Admins
3. Add Domain Admins group to the Kerberos Admins global security group.
4. Add the computer account of the SCCM server to the Kerberos Admins security group.
5. Create an Organizational Unit for AMT managed systems called AMT
6. Create a security group called AMT
7. Add the Kerberos Admins group to the AMT security group.
Creating system management container and permissions
1. On the Domain Controller server, run adsiedit.msc, and connect to the domain for the management server.
2. Expand the Domain Controller computer FQDN, right-click CN=System, click New, and click Object.
A Principled Technologies test report 24Remote notebook management: Dell unique vPro extensions and
Dell Client Integration Pack 3.1
3. Select Container, and click Next.
4. In the Value field, type System Management. Click Next.
5. Click Finish.
6. Expand the management server’s domain in the console pane.
7. Expand DC=Site Server and then expand CN=System.
8. Right-click CN=System Management, and then click Properties.
9. Click the Security tab, and click Add to the management server computer account.
10. Grant Full Control permissions.
11. Click Advanced, select the management server’s computer account, and click Edit.
12. In the Apply Onto list, choose this object and all descendant objects.
13. Click OK to close ADSI Edit.
Creating certificate templates for OOB management
1. Log in to the Windows 2008 R2 Enterprise server designated for Certificate Authority as domainadministrator.
2. Click StartAdministrative ToolsCertification Authority.
3. Right-click the Certification Authority, and click Properties.
4. On the General tab, click View Certificate.
5. On the Details tab, scroll to and select Thumbprint. Copy the 40-character code displayed in the details. You will add
this information to the AMT BIOS later.
6. Click Ok to close the Certificate Authority properties.
7. Expand the Certification Authority, and select Certificate Templates.
8. Right-click Certificate Templates, and select Manage.
9. Locate Web Server in the list of available certificate templates. Right-click the template, and select Duplicate
Template.
10. Select Windows 2003 Enterprise, and click OK.
11. Change the template name to AMT Provisioning.
12. On the Subject Name tab, select Build from this Active Directory Information. Select Common Name, and choose the
option UPN.
13. On the Security tab, add the security group you created for your SCCM site server. Add the Enroll permission for the
security group. Ensure Domain Admins and Enterprise Admins have Enroll permissions.
14. On the Extensions tab, select Application Policies, and click Edit.
15. Click Add. Click New. Type AMT Provisioning for the name, and 2.16.840.1.113741.1.2.3 as the
Object Identifier. Click OK.
16. Ensure AMT Provisioning and Server Authentication are listed, and click OK.
17. Click OK to close the template properties.
18. Right-click the web server template, and select Duplicate Template.
19. Select Windows 2003 Enterprise, and click OK.
20. Change the template name to AMT Web Server Certificate Template
21. On the General tab, choose the option Publish Certificate in Active Directory.
A Principled Technologies test report 25Remote notebook management: Dell unique vPro extensions and
Dell Client Integration Pack 3.1
22. On the Subject Name tab, select Supply in the request.
23. On the Security tab, ensure Domain Admins and Enterprise Admins have Enroll permissions.
24. Click OK to close the template properties.
25. Log in to the management server as domainadministrator.
26. Click StartRun. Type mmc and press Enter.
27. In the mmc console, click FileAdd/Remove Snap-in…
28. Select Certificates, and click Add. Select Computer account. Click Next.
29. Select Local computer, and click Finish.
30. Click OK.
31. Expand CertificatesPersonalCertificates.
32. In the right panel, click More ActionsAll TasksRequest a new certificate…
33. Click Next.
34. Accept the defaults, and click Next.
35. Select the new AMT Provisioning certificate. Click Enroll.
36. Click Close.
Installing System Center Configuration Manager 2012 SP1
1. Attach the SCCM 2012 SP1 Installation media to the management server.
2. Open splash.hta.
3. Click Install.
4. Read the Before You Begin section, click Next.
5. Choose Install a primary site. Do not choose the typical options.
6. Choose the Evaluation option, or enter your license key. Click Next.
7. Check the box to accept the EULA, and click Next.
8. Accept the license agreements, and click Next.
9. Enter a path for the prerequisite file downloads. We used C:Downloads
10. Select a language, and click Next for both server and client.
11. Enter a site code for the primary site. We used PTL.
12. Enter a description.
13. Choose an install path. We accepted the default install path.
14. Ensure that the console will be installed, and click Next.
15. Install as a primary stand-alone site.
16. Enter the SQL server name and instance, and click Next.
17. Accept the default SMS provider, and click Next.
18. Select the option to configure the communication method on each site system role.
19. Select HTTPS, and click Next.
20. Select HTTP for Management Point and Distribution point, and click Next.
21. Enable CEIP if you wish to participate, and click Next.
22. Run the prerequisites check, and resolve any issues displayed.
A Principled Technologies test report 26Remote notebook management: Dell unique vPro extensions and
Dell Client Integration Pack 3.1
23. Click Begin Install, and click Close when the installation is complete.
24. Download and install the Cumulative Update 4 from the following Web site: support.microsoft.com/kb/2922875/en-
us
Adding site system roles for OOB management
1. Open the Configuration Manager console.
2. Click Administration in the lower left panel of the console.
3. Expand Site Configuration. Select Sites.
4. Right-click the management server, and select Add Site System Roles.
5. Click Next.
6. Accept the default for Proxy, and click Next.
7. From the list of available roles, choose the options Enrollment point and Out of band service point. Click Next.
8. Accept the defaults for the AMT Service Point, and click Next.
9. Click Browse to select the AMT provisioning certificate you created in the previous steps.
10. Clear the checkbox for Enable CRL checking for the AMT provisioning certificate. Click Next.
11. Accept the defaults for the enrollment point, and click Next.
12. Review the summary, and click Next.
13. Click Close to exit the wizard.
Installing Intel vPro™ add-on for System Center Configuration Manager
1. Download the Intel Core™ vPro processor add-on for System Center Configuration Manager from the following Web
site: downloadcenter.intel.com/Detail_Desc.aspx?agr=Y&DwnldID=21835&lang=eng
2. Extract the downloaded zip file to a location on your SCCM server. We used C:IntelvProSCCMAddOn-v2
3. Browse to C:IntelvProSCCMAddOn-v2x64, and run setup.exe.
4. Select I Agree, and click Next.
5. Accept the default installation location. Select Everyone, and click Next.
6. Click Next to begin installation.
7. Click Close.
Installing Intel SCS 9.1
1. Download IntelSCS_9.1.zip from the following Web address:
https://downloadcenter.intel.com/Detail_Desc.aspx?DwnldID=20921
2. Extract the contents to C:IntelSCS_9.1
3. Browse to C:IntelSCS_9.1IntelSCSRCS
4. Run IntelSCSInstaller.exe.
5. Check the boxes for Database, Service, and Console. Click Next.
6. Select I accept the terms of the license agreement, and click Next.
7. Enter the credentials of the Domain account that will run the service. We used domainadministrator. Click Next.
8. Select the SQL server you want to use for the SCS database. This information may populate automatically. Click Next.
9. For Installer SQL Server Authentication, select Windows authentication (integrated security), and click Next.
10. For Service SQL Server Authentication, select Windows authentication (integrated security), and click Next.
A Principled Technologies test report 27Remote notebook management: Dell unique vPro extensions and
Dell Client Integration Pack 3.1
11. Review and confirm the setup information, and click Install.
12. Click Finish.
Installing and Configuring DCIP 3.1
1. On the management server, download DCIP-Build 99_ZPE.exe from the following Web address:
downloads.dell.com/FOLDER01459457M/2/DCIP-Build 99_ZPE.exe
2. Run DCIP-Build 99_ZPE.exe and unzip the files to C:Dell
3. Browse to C:Dell
4. Run Dell_Client_Integration_Pack.exe.
5. Click Next.
6. Agree to the License Agreement and click Next.
7. Select Complete and click Next.
8. Click Install.
9. Click Finish.
10. Open the Dell AMT Plugin.
11. On the Database and Password Configuration Page, click Retrieve SQL Servers. Select the site database server.
12. Select Integrated Security.
13. Click Retrieve SQL Databases, choose the SCCM site database.
14. For Windows Account, enter the credentials for the test.local administrator.
15. For AMT ME Account, for Username enter admin and for Password enter Password1!
16. Click Save.
17. Add Configuration Manager Console and Dell AMT Plugin to the task bar.
Getting the Intel vPro™ Use Case Remote Drive Erase image
1. Download the Intel vPro Use Case Reference Design - Remote Drive Erase from the following Web site:
downloadcenter.intel.com/confirm.aspx?httpDown=http://downloadmirror.intel.com/20971/eng/1083.zip&lang=en
g&Dwnldid=20971
2. Extract the downloaded file to C:1083
3. In the location C:1083rde_builder, find and open the file iso_builder.html.
4. In the Remote Drive Erase ISO Builder, select Take input from: KVM Session.
5. Click Build ISO.
6. Move the rde.iso file from C:1083rde_builder to C:usersadministrator.testDocuments
Setting up AMT provisioning with Intel SCS Remote Configuration Service
Creating the configuration profile
1. On the management server, launch the Intel Setup and Configuration Console.
2. Click the Profiles button.
3. Click the New button to construct a profile for deployment.
4. For Profile Name, enter the name of your target server. We used test-tp. Click Next.
5. Choose the options Active Directory Integration, Access Control List (ACL), and Transport Layer Security (TLS) and
click Next.
A Principled Technologies test report 28Remote notebook management: Dell unique vPro extensions and
Dell Client Integration Pack 3.1
6. Browse for the OU created for the AMT managed devices. We used OU=AMT, DC=test, DC=local.
7. Click Next.
8. Click Add.
9. Select Active Directory User/Group. Click Browse.
10. Add Kerberos Admin, Domain Admins, or other administrative users groups. Click OK.
11. Select Remote for Access Type.
12. Choose the option for PT Administration. Click OK.
13. Click Next.
14. Select your Enterprise Certificate Authority.
15. Select the Server Certificate Template you will use to generate certificates for your AMT devices. We selected
AMTWebServerCertificate. Click Next.
16. Choose the options Web UI, Serial Over LAN, IDE Redirection, KVM Redirection. Enter the RFB Password for KVM
sessions. We used Password1!
17. Enter the MEBios Extension password. We used Password1!
18. Select Use the following password for all systems. Enter the password for use after provisioning is complete. We
used Password1!
19. Choose the options Enable Intel AMT to respond to ping requests and Enable Fast Call for Help (within the enterprise
network).
20. Click Set… to Edit IP and FQDN settings.
21. Select Use the following as the FQDN, and choose Primary DNS FQDN from the pull-down menu.
22. Choose the option The device and the OS will have the same FQDN (Shared FQDN).
23. Select Get the IP from the DHCP server.
24. Select Update the DNS directly or via DHCP option 81. Click OK.
25. Click Next. Click Finish.
Laptop configuration
Repeat these steps for each laptop.
Reserving an IP address in DHCP
1. On the Domain Controller, run dhcpmgmt.msc.
2. Expand FQDNScope and double-click Reservations.
3. Click more actions then New Reservation.
4. For Reservation Name, enter the host name of the target laptop.
5. Enter an IP address to reserve.
6. Enter the MAC address of the target laptops Ethernet port.
7. Click Add.
Configuring policy on the target laptop
1. Log on to the target laptop using domainadministrator.
2. Download and apply all applicable driver packages from the manufacture’s website.
3. Open Windows Firewall with Advanced Security.
A Principled Technologies test report 29Remote notebook management: Dell unique vPro extensions and
Dell Client Integration Pack 3.1
4. Click Firewall Properties.
5. On the Domain Profile, Private Profile, and Public Profile tabs, set the Firewall state to off. Click OK.
6. Set the host name and IP of each virtual machine as described above.
7. Join the system to the test.local domain and restart.
8. Run lusrmgr.msc.
9. Select Groups.
10. Right-click Administrators and click Properties.
11. Click Add.
12. Select Object Types, check the box for Computers, and click OK.
13. Add the computer name for the management server. We entered CM
Adding the enterprise certificate authority to the AMT trusted root certification authorities
1. Power on the target laptop.
2. During POST, press CTRL-P to enter the Intel Management Engine BIOS settings.
3. When prompted for a password, type the default password admin
4. Provide and confirm a new password. We used Password1!
5. Select Intel AMT Configuration. Press Enter.
6. Select SOL/IDER/KVM.
7. All features should be Enabled. Press Esc to exit the menu.
8. Select User Consent.
9. Change User Opt-in to None.
10. Change Opt-in Configurable from Remote IT to Disabled. Press Esc to exit the menu.
11. Change Password Policy to During Setup And Configuration.
12. Select Network Setup.
13. Select Intel ME Network Name Settings.
14. For Host Name, use the same host name used for the operating system.
15. For Domain Name, enter the name of your domain. We used test.local
16. For Shared/Dedicated FQDN, select Shared.
17. For Dynamic DNS Update, select Enabled. Press Esc to exit the menu.
18. Select Remote Setup and Configuration. Press Enter.
19. On Provisioning Server IPv4/IPv6, enter the IP address of the system center server. We used 192.168.1.20
20. For Provisioning Server FQDN, enter the FQDN of the management server. We entered cm.test.local
21. Select TLS PKI.
22. Select PKI DNS Suffix, type the FQDN suffix. We used test.local Press Enter.
23. Select Manage Hashes.
24. Press Insert to add a new hash.
25. Enter a descriptive name for your Enterprise Certificate Authority. We used test.local CA.
26. Press Enter.
A Principled Technologies test report 30Remote notebook management: Dell unique vPro extensions and
Dell Client Integration Pack 3.1
27. Following the syntax example provided in the prompt, enter the 40-character thumbprint previously copied from
your Enterprise CA root certificate. Press Enter.
28. Press Y to set the hash certificate as active. test.local CA will appear in the list of trusted root authorities.
29. Press Esc to return to the AMT Configuration Menu.
30. Select Activate Network Access. Press Y to confirm.
31. To exit, press Esc until prompted. Press Y to confirm exit.
Executing the remote configuration script on the AMT managed laptop
1. Log in to the AMT managed target laptop as domainadministrator.
2. Copy the Configurator folder from the SCS_9.1 directory located on the management server to C: on the local host.
3. Open a command prompt as administrator.
4. Type cd C:Configurator and press Enter.
5. Execute the following command (where cm.domain is the fully qualified domain name of the management server):
ACUConfig.exe /lowsecurity /output console /verbose ConfigViaRCSOnly
cm.test.local Test-TP
The Configurator utility will contact the Remote Configuration Service and apply the settings configured in the Test-TP
profile.
Setting up AMT discovery in SCCM
1. On the management server, open the SCCM Management Console. Locate your target laptop in the Devices panel.
2. Right-click the headings bar in the Devices panel and check the entries for AMT Status and AMT Version.
3. Right-click the server, and select Manage Out of BandDiscover AMT Status. Click OK to begin discovery.
4. Click refresh in the Home menu at the top of the panel. When the AMT Status for the target server displays
Detected, the AMT controller has been discovered.
Configuring the Configuration Manager Client
1. On the management server, navigate to the Microsoft Configuration Manager folder in program files.
2. Copy the Client folder and to the target laptop.
3. On the target laptop, run ccmsetup.exe. This task will run in the background and will take a few minutes to
complete.
4. In Control Panel, open Configuration Manager.
5. On the Site tab, click Configure Settings.
6. For Currently assigned to site code:, enter PTL and click Apply.
7. In the Actions panel, run the User Policy Retrieval & Evaluation Cycle as well as the Machine Policy Retrieval &
Evaluation Cycle.
8. After a few minutes, the Actions panel will populate with more tasks. Run each one of the tasks.
9. On the management server, in Device Collections, right-click on the target laptop, navigate to Manage Out of Band,
and select Discover AMT Status. The Client, Site Code, and Client Activity fields will populate. The AMT Status will
change to Externally provisioned.
A Principled Technologies test report 31Remote notebook management: Dell unique vPro extensions and
Dell Client Integration Pack 3.1
APPENDIX C – WHAT WE TESTED
About our tests
Our testing took place in two phases. In the first phase, only one of the Latitude E7240s and the Lenovo T430
were provisioned and able to be managed Out of Band. We found the time required to administer the changes on each
of the laptops. We used Configuration Manager Console, the Out of Band Console, and the Intel vPro add-on to
complete the testing on the Lenovo system. The Dell system was managed through the Dell AMT Plugin. In the second
phase, we provisioned all four laptops in Configuration Manager and measured the amount of time required to make
changes on both systems.
For the Dell laptops, timing began prior to opening the Dell AMT Plugin. We then completed the steps required
to complete the task, as listed below. Timing ended when the Finish button was clicked and the tasks were added to the
queue for the system to administer.
For the Lenovo laptops, timing began prior to opening the Configuration Manager Console. We then completed
the steps required to complete the task, as listed below. Timing ended when the last step listed was completed.
All tasks started with the laptops powered off and plugged in to their AC adapter. We pinged each laptop to
verify that the management engine was available.
Out of Band Management tests in DCIP for Dell laptops
Change a single BIOS setting
1. On the management server, open the Dell Intel vPro AMT Plugin from the Windows task bar.
2. Select Client Configuration.
3. Select BIOS Settings.
4. On Active processor Cores, select All, and check Apply.
5. Click Next.
6. Click Add All.
7. Click Next.
8. Type a description in the Description field. We used test
9. Click Finish.
To change a single BIOS setting for the two laptop test, we provisioned the second Dell laptop in SCCM and
repeated the previous test.
Change 10 BIOS settings
1. On the management server, open the Dell Intel vPro AMT Plugin from the Windows task bar.
2. Select Client Configuration.
3. Select BIOS Settings.
4. On Active processor Cores, select All, and check Apply.
5. On Bluetooth, select Enabled, and check Apply.
6. On Enable External USB Port, select Enabled, and check Apply.
7. On Enable Intel SpeedStep, select Enabled, and check Apply.
8. On Enable Intel Virtualization Technology, select Disabled, and check Apply.
9. On Enable VT for Direct I/O, select Disabled, and check Apply.
A Principled Technologies test report 32Remote notebook management: Dell unique vPro extensions and
Dell Client Integration Pack 3.1
10. On Hyper-threading, select Enabled, and check Apply.
11. On Mouse/Touchpad, select Touchpad/PS-2 Mouse, and check Apply.
12. On Wake on LAN/WLAN (Notebook), select LAN or WLAN and check the Apply checkbox.
13. On WLAN, select Enabled, and check Apply.
14. Click Next.
15. Click Add All.
16. Click Next.
17. Type a description in the Description field. We used test
18. Click Finish.
To change 10 BIOS settings for the two laptop test, we provisioned the second Dell laptop in SCCM and repeated
the previous test.
Secure drive erase
1. On the management server, open the Dell Intel vPro AMT Plugin from the Windows task bar.
2. Select Operations.
3. Select Wipe Client Disk.
4. Select Schedule.
5. Click Add All.
6. Click Next.
7. Type a description in the Description field. We used test
8. Click Finish.
For secure drive erase for the two laptop test, we provisioned the second Dell laptop in SCCM and repeated the
previous test.
Change a BIOS password
1. On the management server, open the Dell Intel vPro AMT Plugin from the Windows task bar.
2. Select Client Configuration.
3. Select BIOS Passwords.
4. Select Admin.
5. For Admin Password, type Password1
6. For Confirm, type Password1
7. Click Next.
8. Click Add All.
9. Click Next.
10. Type a description in the Description field. We used test
11. Click Finish.
To change a BIOS password for the two laptop test, we provisioned the second Dell laptop in SCCM and repeated
the previous test.
A Principled Technologies test report 33Remote notebook management: Dell unique vPro extensions and
Dell Client Integration Pack 3.1
Change boot order
1. On the management server, open the Dell Intel vPro AMT Plugin from the Windows task bar.
2. Select Client Configuration.
3. Select Boot Order.
4. Select the CD/DVD/CD-RW Drive from the Device list and click the up Arrow button to move the drive up in the Boot
order once.
5. Select Permanent configuration.
6. Click Next.
7. Click Add All
8. Click Next.
9. Type a description in the Description field. We used test
10. Click Finish.
To change boot order for the two laptop test, we provisioned the second Dell laptop in SCCM and repeated the
previous test.
Open KVM session
Note: System is booted into BIOS before test.
1. On the management server, open the Dell Intel vPro AMT Plugin from the Windows task bar.
2. Select Operations.
3. Select KVM Connect.
4. Select Dell1 from the list and click Start.
To open a KVM session for the two laptop test, we provisioned the second Dell laptop and repeated the previous
test then repeated steps 4 for Dell2.
Change power profile
1. On the management server, open the Dell Intel vPro AMT Plugin from the Windows task bar.
2. Select Client Configuration.
3. Select Power Profile.
4. From the Mobile Power Package dropdown menu, in the dropdown menu, change the setting to On in S0; ME Wake
in S3/AC, S4-S5/AC.
5. Click Next.
6. Select the notebooks to add. We used Add All.
7. Click Next.
8. Type a description in the Description field. We used test
9. Click Finish.
To change the power profile for the two laptop test, we provisioned the second laptop and repeated the previous
test.
Note: We were not able to reproduce this process on the Lenovo.
A Principled Technologies test report 34Remote notebook management: Dell unique vPro extensions and
Dell Client Integration Pack 3.1
Schedule Data Collection
1. On the management server, open the Dell Intel vPro AMT Plugin from the Windows task bar.
2. Select Reports.
3. Select OOB Manageability.
4. Select Schedule.
5. Click Add All.
6. Click Next
7. Type a description in the Description field. We used test
8. Click Finish.
To schedule data collection for the two laptop test, we added Dell2 in SCCM and repeated the previous test.
Retrieve Report
The schedule data collection task must be completed before running the retrieve report task.
1. On the management server, open the Dell Intel vPro AMT Plugin from the Windows task bar.
2. Select Reports.
3. Select OOB Manageability.
4. Select Retrieve.
5. Click Add All.
6. Click Next.
To retrieve report for the two laptop test, we added Dell2 in SCCM and repeated the previous test.
Out of Band Management in SCCM tests for Lenovo laptops
Change a single BIOS setting
1. On the management server, open the Configuration Manager Console from the Windows task bar.
2. In Assets and Compliance, expand Overview, and select Devices Collections.
3. Select the All Desktop and Server Clients Collection.
4. Right-click the notebook and in the menu, navigate to Intel vPro, and select KVM.
5. Wait for the KVM prompt to report the connection complete and for the screen to appear black. In the task bar, click
Tools, and then click Power On.
6. During POST, press the F1 button to boot into the setup menu.
7. In the Security tab of the ThinkPad Setup menu, select I/O Port Access.
8. Select Bluetooth, and select Enabled.
9. Press Esc to close the current menu.
10. In the Restart Menu, select Exit Saving Changes.
11. Select Yes to save the configuration changes.
To change a single BIOS setting in the two laptop test, we repeated the previous test, and then repeated steps 4
through 11 for the Lenovo T420.
Change 10 BIOS settings
1. On the management server, open the Configuration Manager Console from the Windows task bar.
A Principled Technologies test report 35Remote notebook management: Dell unique vPro extensions and
Dell Client Integration Pack 3.1
2. In Assets and Compliance, expand Overview, and select Devices Collections.
3. Select the group containing the notebook.
4. Right-click the notebook and in the menu, navigate to Intel vPro, and select KVM.
5. Wait for the KVM prompt to report the connection complete and for the screen to appear black. In the task bar, click
Tools, and then click Power On.
6. During POST, press the F1 button to boot into the setup menu.
7. In the Config tab of the ThinkPad Setup menu, select Network.
8. Select Wake on LAN, and select AC Only.
9. To close the current menu, press Esc.
10. In the Config menu, select Keyboard/Mouse
11. Select Touchpad, and select Enabled
12. To close the current menu, press Esc.
13. In the Config menu, select Power.
14. Select Intel SpeedStep Technology, and select Enabled.
15. To close the current menu, press Esc.
16. In the Config menu, select CPU.
17. Select Core Multi-Processing, and select Enabled.
18. Select Intel Hyper-threading Technology, and select Enabled.
19. To close the current menu, press Esc.
20. In the Security tab, select Virtualization.
21. Select Intel Virtualization Technology, and select Disabled.
22. Select Intel VT-d Feature, and select Disabled.
23. To close the current menu, press Esc.
24. In the Security tab, select I/O Port Access.
25. Select Wireless LAN and select Enabled.
26. Select Bluetooth, and select Enabled.
27. Select USB Port, and select Enabled.
28. Press Esc to close the current menu.
29. In the Restart Menu, select Exit Saving Changes.
30. Select Yes to save the configuration changes.
To change 10 BIOS settings in the two laptop test, we repeated the previous test, and then repeated steps 4
through 30 for the Lenovo T420.
Secure drive erase
1. On the management server, open the Configuration Manager Console from the Windows task bar.
2. In Assets and Compliance, expand Overview, and select Devices Collections.
3. Select the group containing the notebook.
4. Right-click the notebook. In the menu, expand Manage Out of Band, and select Out of Band Management Console.
5. Select Power Control.
A Principled Technologies test report 36Remote notebook management: Dell unique vPro extensions and
Dell Client Integration Pack 3.1
6. When the options become available in the Boot Option list, select IDER.
7. Select Boot from file.
8. Select Browse.
9. Select the .iso file created by the Intel vPro Remote Drive Erase program. In our testing, the file was named rde.iso.
10. Click Power On.
11. In Configuration Manager, right-click the Lenovo T430. In the dropdown menu, navigate to Intel vPro, and select
Start KVM.
12. When prompted, press C.
13. Identify the number of the disk that will be erased. Enter the number, and press Enter.
14. Type low and press Enter.
To securely erase the drive in the two laptop test, we repeated the previous test, and then repeated steps 4
through 14 for the Lenovo T420.
Change boot order
1. On the management server, open the Configuration Manager Console from the Windows task bar.
2. In Assets and Compliance, expand Overview, and select Devices Collections.
3. Select the All Desktop and Server Clients Collection.
4. Right-click the notebook and in the menu, navigate to Intel vPro, and select KVM.
5. Wait for the KVM prompt to report the connection complete and for the screen to appear black. In the task bar, click
Tools, and then click Power On.
6. During POST, press the F1 button to boot into the setup menu.
7. In the Startup menu, Select Boot.
8. Select the CD drive from the list. Click the up arrow button.
9. Press Esc to close the current menu.
10. In the Restart Menu, select Exit Saving Changes.
11. Select Yes to save the configuration changes.
To change boot order in SCCM in the two laptop test, we repeated the previous test, and then repeated steps 4
through 11 for the Lenovo T420.
Change BIOS password
1. On the management server, open the Configuration Manager Console from the Windows task bar.
2. In Assets and Compliance, expand Overview, and select Devices Collections.
3. Select the All Desktop and Server Clients Collection.
4. Right-click the notebook and in the menu, navigate to Intel vPro, and select KVM.
5. Wait for the KVM prompt to report the connection complete and for the screen to appear black. In the task bar, click
Tools, and then click Power On.
6. During POST, press the F1 button to boot into the setup menu.
7. In the Security Menu, select Password.
8. Select Supervisor Password.
9. For the new password, type Password1
A Principled Technologies test report 37Remote notebook management: Dell unique vPro extensions and
Dell Client Integration Pack 3.1
10. Confirm the new password, and press Enter.
11. Press Esc to close the current menu.
12. In the Restart Menu, select Exit Saving Changes.
13. Select Yes to save the configuration changes.
To change the BIOS password in the two laptop test, we repeated the previous test, and then repeated steps 4
through 13 for the Lenovo T420.
Open KVM session
Note: System is booted into BIOS before test.
1. On the management server, open the Configuration Manager Console from the Windows task bar.
2. In Assets and Compliance, expand Overview, and select Devices Collections.
3. Select the group containing the notebook.
4. In Configuration Manager, right-click the notebook. In the dropdown menu, navigate to Intel vPro, and select Start
KVM.
To Initiate KVM Connection in the two laptop test, we repeated the previous test, and then repeated step 4 for the
Lenovo T420.
A Principled Technologies test report 38Remote notebook management: Dell unique vPro extensions and
Dell Client Integration Pack 3.1
APPENDIX D – WHAT WE FOUND
Figures 11 and 12 show the detailed results of our testing using seconds and minutes respectively.
Time to
complete a task
in seconds
One notebook Two notebooks 50 notebooks
Dell DCIM in
SCCM
Lenovo SCCM
only
Dell DCIM in
SCCM
Lenovo SCCM
only
Dell DCIM in
SCCM
Lenovo SCCM
only
Secure erase the
disk
10.2 134.7 10.1 263.1 10.2 6,352.4
BIOS management tasks
Change one BIOS
setting
12.8 50.6 12.4 95.9 12.6 2,174.4
Change 10 BIOS
settings
40.4 74.5 40.2 141.4 40.3 3,309.7
Change boot
order
12.6 41.7 12.8 79.5 12.7 1,748.4
Change BIOS
password
19.0 47.5 18.7 91.9 18.8 2,081.3
General management tasks
Initiate KVM
connection
7.2 13.1 9.7 16.6 127.1 196.3
Set the power
profile
12.77 12.90 12.84
Figure 11: Time in seconds to complete tasks. Lower numbers are better.
Time to
complete a task
in seconds
One notebook Two notebooks 50 notebooks
Dell DCIM in
SCCM
Lenovo SCCM
only
Dell DCIM in
SCCM
Lenovo SCCM
only
Dell DCIM in
SCCM
Lenovo SCCM
only
Secure erase the
disk
0.17 2.25 0.17 4.39 0.17 105.9
BIOS management tasks
Change one BIOS
setting
0.2 0.8 0.2 1.6 0.2 36.2
Change 10 BIOS
settings
0.7 1.2 0.7 2.4 0.7 55.2
Change boot
order
0.2 0.7 0.2 1.3 0.2 29.1
Change BIOS
password
0.3 0.8 0.3 1.5 0.3 34.7
General management tasks
Initiate KVM
connection
0.12 0.22 0.16 0.28 2.12 3.27
Set the power
profile
0.2 0.2 0.2
Figure 12: Time in minutes to complete tasks. Lower numbers are better.
A Principled Technologies test report 39Remote notebook management: Dell unique vPro extensions and
Dell Client Integration Pack 3.1
ABOUT PRINCIPLED TECHNOLOGIES
Principled Technologies, Inc.
1007 Slater Road, Suite 300
Durham, NC, 27703
www.principledtechnologies.com
We provide industry-leading technology assessment and fact-based
marketing services. We bring to every assignment extensive experience
with and expertise in all aspects of technology testing and analysis, from
researching new technologies, to developing new methodologies, to
testing with existing and new tools.
When the assessment is complete, we know how to present the results to
a broad range of target audiences. We provide our clients with the
materials they need, from market-focused data to use in their own
collateral to custom sales aids, such as test reports, performance
assessments, and white papers. Every document reflects the results of
our trusted independent analysis.
We provide customized services that focus on our clients’ individual
requirements. Whether the technology involves hardware, software, Web
sites, or services, we offer the experience, expertise, and tools to help our
clients assess how it will fare against its competition, its performance, its
market readiness, and its quality and reliability.
Our founders, Mark L. Van Name and Bill Catchings, have worked
together in technology assessment for over 20 years. As journalists, they
published over a thousand articles on a wide array of technology subjects.
They created and led the Ziff-Davis Benchmark Operation, which
developed such industry-standard benchmarks as Ziff Davis Media’s
Winstone and WebBench. They founded and led eTesting Labs, and after
the acquisition of that company by Lionbridge Technologies were the
head and CTO of VeriTest.
Principled Technologies is a registered trademark of Principled Technologies, Inc.
All other product names are the trademarks of their respective owners.
Disclaimer of Warranties; Limitation of Liability:
PRINCIPLED TECHNOLOGIES, INC. HAS MADE REASONABLE EFFORTS TO ENSURE THE ACCURACY AND VALIDITY OF ITS TESTING, HOWEVER,
PRINCIPLED TECHNOLOGIES, INC. SPECIFICALLY DISCLAIMS ANY WARRANTY, EXPRESSED OR IMPLIED, RELATING TO THE TEST RESULTS AND
ANALYSIS, THEIR ACCURACY, COMPLETENESS OR QUALITY, INCLUDING ANY IMPLIED WARRANTY OF FITNESS FOR ANY PARTICULAR PURPOSE.
ALL PERSONS OR ENTITIES RELYING ON THE RESULTS OF ANY TESTING DO SO AT THEIR OWN RISK, AND AGREE THAT PRINCIPLED
TECHNOLOGIES, INC., ITS EMPLOYEES AND ITS SUBCONTRACTORS SHALL HAVE NO LIABILITY WHATSOEVER FROM ANY CLAIM OF LOSS OR
DAMAGE ON ACCOUNT OF ANY ALLEGED ERROR OR DEFECT IN ANY TESTING PROCEDURE OR RESULT.
IN NO EVENT SHALL PRINCIPLED TECHNOLOGIES, INC. BE LIABLE FOR INDIRECT, SPECIAL, INCIDENTAL, OR CONSEQUENTIAL DAMAGES IN
CONNECTION WITH ITS TESTING, EVEN IF ADVISED OF THE POSSIBILITY OF SUCH DAMAGES. IN NO EVENT SHALL PRINCIPLED TECHNOLOGIES,
INC.’S LIABILITY, INCLUDING FOR DIRECT DAMAGES, EXCEED THE AMOUNTS PAID IN CONNECTION WITH PRINCIPLED TECHNOLOGIES, INC.’S
TESTING. CUSTOMER’S SOLE AND EXCLUSIVE REMEDIES ARE AS SET FORTH HEREIN.

Contenu connexe

Tendances

Media and entertainment workload comparison: HP Z8 vs. Apple Mac Pro
Media and entertainment workload comparison: HP Z8 vs. Apple Mac ProMedia and entertainment workload comparison: HP Z8 vs. Apple Mac Pro
Media and entertainment workload comparison: HP Z8 vs. Apple Mac ProPrincipled Technologies
 
A Dell Latitude 7420 laptop powered by a four-core Intel Core i7-1185G7 vPro ...
A Dell Latitude 7420 laptop powered by a four-core Intel Core i7-1185G7 vPro ...A Dell Latitude 7420 laptop powered by a four-core Intel Core i7-1185G7 vPro ...
A Dell Latitude 7420 laptop powered by a four-core Intel Core i7-1185G7 vPro ...Principled Technologies
 
Nimboxx HCI AU-110x: A scalable, easy-to-use solution for hyperconverged infr...
Nimboxx HCI AU-110x: A scalable, easy-to-use solution for hyperconverged infr...Nimboxx HCI AU-110x: A scalable, easy-to-use solution for hyperconverged infr...
Nimboxx HCI AU-110x: A scalable, easy-to-use solution for hyperconverged infr...Principled Technologies
 
VDI performance comparison: Dell PowerEdge FX2 and FC430 servers with VMware ...
VDI performance comparison: Dell PowerEdge FX2 and FC430 servers with VMware ...VDI performance comparison: Dell PowerEdge FX2 and FC430 servers with VMware ...
VDI performance comparison: Dell PowerEdge FX2 and FC430 servers with VMware ...Principled Technologies
 
Upgrading to Windows Server 2019 on Dell EMC PowerEdge servers: A simple proc...
Upgrading to Windows Server 2019 on Dell EMC PowerEdge servers: A simple proc...Upgrading to Windows Server 2019 on Dell EMC PowerEdge servers: A simple proc...
Upgrading to Windows Server 2019 on Dell EMC PowerEdge servers: A simple proc...Principled Technologies
 
A Dell Latitude 5420 laptop powered by a four-core Intel Core i5-1145G7 vPro ...
A Dell Latitude 5420 laptop powered by a four-core Intel Core i5-1145G7 vPro ...A Dell Latitude 5420 laptop powered by a four-core Intel Core i5-1145G7 vPro ...
A Dell Latitude 5420 laptop powered by a four-core Intel Core i5-1145G7 vPro ...Principled Technologies
 
Deduplication without performance hits: Intel Xeon processor E5-2697v2-powere...
Deduplication without performance hits: Intel Xeon processor E5-2697v2-powere...Deduplication without performance hits: Intel Xeon processor E5-2697v2-powere...
Deduplication without performance hits: Intel Xeon processor E5-2697v2-powere...Principled Technologies
 
Spend less time, effort, and money by choosing a Dell EMC server with pre-ins...
Spend less time, effort, and money by choosing a Dell EMC server with pre-ins...Spend less time, effort, and money by choosing a Dell EMC server with pre-ins...
Spend less time, effort, and money by choosing a Dell EMC server with pre-ins...Principled Technologies
 
VDI performance comparison: Dell PowerEdge FX2 and FC430 servers with VMware ...
VDI performance comparison: Dell PowerEdge FX2 and FC430 servers with VMware ...VDI performance comparison: Dell PowerEdge FX2 and FC430 servers with VMware ...
VDI performance comparison: Dell PowerEdge FX2 and FC430 servers with VMware ...Principled Technologies
 
Dell PowerEdge R720 rack server solutions for virtual desktop infrastructures
Dell PowerEdge R720 rack server solutions for virtual desktop infrastructures Dell PowerEdge R720 rack server solutions for virtual desktop infrastructures
Dell PowerEdge R720 rack server solutions for virtual desktop infrastructures Principled Technologies
 
Performance and battery life comparison: Samsung solid-state drive vs. hard d...
Performance and battery life comparison: Samsung solid-state drive vs. hard d...Performance and battery life comparison: Samsung solid-state drive vs. hard d...
Performance and battery life comparison: Samsung solid-state drive vs. hard d...Principled Technologies
 
Microsoft System Center virtual environment comparison: Dell PowerEdge server...
Microsoft System Center virtual environment comparison: Dell PowerEdge server...Microsoft System Center virtual environment comparison: Dell PowerEdge server...
Microsoft System Center virtual environment comparison: Dell PowerEdge server...Principled Technologies
 
Managing clients with Dell Client Integration Pack 3.0 and Microsoft System C...
Managing clients with Dell Client Integration Pack 3.0 and Microsoft System C...Managing clients with Dell Client Integration Pack 3.0 and Microsoft System C...
Managing clients with Dell Client Integration Pack 3.0 and Microsoft System C...Principled Technologies
 
Better email response time using Microsoft Exchange 2013 with the Dell PowerE...
Better email response time using Microsoft Exchange 2013 with the Dell PowerE...Better email response time using Microsoft Exchange 2013 with the Dell PowerE...
Better email response time using Microsoft Exchange 2013 with the Dell PowerE...Principled Technologies
 
A Dell Latitude 5420 laptop powered by a four-core Intel Core i5-1145G7 vPro ...
A Dell Latitude 5420 laptop powered by a four-core Intel Core i5-1145G7 vPro ...A Dell Latitude 5420 laptop powered by a four-core Intel Core i5-1145G7 vPro ...
A Dell Latitude 5420 laptop powered by a four-core Intel Core i5-1145G7 vPro ...Principled Technologies
 
Dell PowerEdge R920 and Microsoft SQL Server 2014 Migration and Benefits Guide
Dell PowerEdge R920 and Microsoft SQL Server 2014 Migration and Benefits GuideDell PowerEdge R920 and Microsoft SQL Server 2014 Migration and Benefits Guide
Dell PowerEdge R920 and Microsoft SQL Server 2014 Migration and Benefits GuidePrincipled Technologies
 
Make sense of important data faster with AWS EC2 M6i instances
Make sense of important data faster with AWS EC2 M6i instancesMake sense of important data faster with AWS EC2 M6i instances
Make sense of important data faster with AWS EC2 M6i instancesPrincipled Technologies
 
Accelerate performance on machine learning workloads with the Dell EMC PowerE...
Accelerate performance on machine learning workloads with the Dell EMC PowerE...Accelerate performance on machine learning workloads with the Dell EMC PowerE...
Accelerate performance on machine learning workloads with the Dell EMC PowerE...Principled Technologies
 
Upgrade to Dell EMC PowerEdge R940 servers with VMware vSphere 7.0 and gain g...
Upgrade to Dell EMC PowerEdge R940 servers with VMware vSphere 7.0 and gain g...Upgrade to Dell EMC PowerEdge R940 servers with VMware vSphere 7.0 and gain g...
Upgrade to Dell EMC PowerEdge R940 servers with VMware vSphere 7.0 and gain g...Principled Technologies
 
Performance and durability comparison: Dell Latitude 14 5000 Series vs. Lenov...
Performance and durability comparison: Dell Latitude 14 5000 Series vs. Lenov...Performance and durability comparison: Dell Latitude 14 5000 Series vs. Lenov...
Performance and durability comparison: Dell Latitude 14 5000 Series vs. Lenov...Principled Technologies
 

Tendances (20)

Media and entertainment workload comparison: HP Z8 vs. Apple Mac Pro
Media and entertainment workload comparison: HP Z8 vs. Apple Mac ProMedia and entertainment workload comparison: HP Z8 vs. Apple Mac Pro
Media and entertainment workload comparison: HP Z8 vs. Apple Mac Pro
 
A Dell Latitude 7420 laptop powered by a four-core Intel Core i7-1185G7 vPro ...
A Dell Latitude 7420 laptop powered by a four-core Intel Core i7-1185G7 vPro ...A Dell Latitude 7420 laptop powered by a four-core Intel Core i7-1185G7 vPro ...
A Dell Latitude 7420 laptop powered by a four-core Intel Core i7-1185G7 vPro ...
 
Nimboxx HCI AU-110x: A scalable, easy-to-use solution for hyperconverged infr...
Nimboxx HCI AU-110x: A scalable, easy-to-use solution for hyperconverged infr...Nimboxx HCI AU-110x: A scalable, easy-to-use solution for hyperconverged infr...
Nimboxx HCI AU-110x: A scalable, easy-to-use solution for hyperconverged infr...
 
VDI performance comparison: Dell PowerEdge FX2 and FC430 servers with VMware ...
VDI performance comparison: Dell PowerEdge FX2 and FC430 servers with VMware ...VDI performance comparison: Dell PowerEdge FX2 and FC430 servers with VMware ...
VDI performance comparison: Dell PowerEdge FX2 and FC430 servers with VMware ...
 
Upgrading to Windows Server 2019 on Dell EMC PowerEdge servers: A simple proc...
Upgrading to Windows Server 2019 on Dell EMC PowerEdge servers: A simple proc...Upgrading to Windows Server 2019 on Dell EMC PowerEdge servers: A simple proc...
Upgrading to Windows Server 2019 on Dell EMC PowerEdge servers: A simple proc...
 
A Dell Latitude 5420 laptop powered by a four-core Intel Core i5-1145G7 vPro ...
A Dell Latitude 5420 laptop powered by a four-core Intel Core i5-1145G7 vPro ...A Dell Latitude 5420 laptop powered by a four-core Intel Core i5-1145G7 vPro ...
A Dell Latitude 5420 laptop powered by a four-core Intel Core i5-1145G7 vPro ...
 
Deduplication without performance hits: Intel Xeon processor E5-2697v2-powere...
Deduplication without performance hits: Intel Xeon processor E5-2697v2-powere...Deduplication without performance hits: Intel Xeon processor E5-2697v2-powere...
Deduplication without performance hits: Intel Xeon processor E5-2697v2-powere...
 
Spend less time, effort, and money by choosing a Dell EMC server with pre-ins...
Spend less time, effort, and money by choosing a Dell EMC server with pre-ins...Spend less time, effort, and money by choosing a Dell EMC server with pre-ins...
Spend less time, effort, and money by choosing a Dell EMC server with pre-ins...
 
VDI performance comparison: Dell PowerEdge FX2 and FC430 servers with VMware ...
VDI performance comparison: Dell PowerEdge FX2 and FC430 servers with VMware ...VDI performance comparison: Dell PowerEdge FX2 and FC430 servers with VMware ...
VDI performance comparison: Dell PowerEdge FX2 and FC430 servers with VMware ...
 
Dell PowerEdge R720 rack server solutions for virtual desktop infrastructures
Dell PowerEdge R720 rack server solutions for virtual desktop infrastructures Dell PowerEdge R720 rack server solutions for virtual desktop infrastructures
Dell PowerEdge R720 rack server solutions for virtual desktop infrastructures
 
Performance and battery life comparison: Samsung solid-state drive vs. hard d...
Performance and battery life comparison: Samsung solid-state drive vs. hard d...Performance and battery life comparison: Samsung solid-state drive vs. hard d...
Performance and battery life comparison: Samsung solid-state drive vs. hard d...
 
Microsoft System Center virtual environment comparison: Dell PowerEdge server...
Microsoft System Center virtual environment comparison: Dell PowerEdge server...Microsoft System Center virtual environment comparison: Dell PowerEdge server...
Microsoft System Center virtual environment comparison: Dell PowerEdge server...
 
Managing clients with Dell Client Integration Pack 3.0 and Microsoft System C...
Managing clients with Dell Client Integration Pack 3.0 and Microsoft System C...Managing clients with Dell Client Integration Pack 3.0 and Microsoft System C...
Managing clients with Dell Client Integration Pack 3.0 and Microsoft System C...
 
Better email response time using Microsoft Exchange 2013 with the Dell PowerE...
Better email response time using Microsoft Exchange 2013 with the Dell PowerE...Better email response time using Microsoft Exchange 2013 with the Dell PowerE...
Better email response time using Microsoft Exchange 2013 with the Dell PowerE...
 
A Dell Latitude 5420 laptop powered by a four-core Intel Core i5-1145G7 vPro ...
A Dell Latitude 5420 laptop powered by a four-core Intel Core i5-1145G7 vPro ...A Dell Latitude 5420 laptop powered by a four-core Intel Core i5-1145G7 vPro ...
A Dell Latitude 5420 laptop powered by a four-core Intel Core i5-1145G7 vPro ...
 
Dell PowerEdge R920 and Microsoft SQL Server 2014 Migration and Benefits Guide
Dell PowerEdge R920 and Microsoft SQL Server 2014 Migration and Benefits GuideDell PowerEdge R920 and Microsoft SQL Server 2014 Migration and Benefits Guide
Dell PowerEdge R920 and Microsoft SQL Server 2014 Migration and Benefits Guide
 
Make sense of important data faster with AWS EC2 M6i instances
Make sense of important data faster with AWS EC2 M6i instancesMake sense of important data faster with AWS EC2 M6i instances
Make sense of important data faster with AWS EC2 M6i instances
 
Accelerate performance on machine learning workloads with the Dell EMC PowerE...
Accelerate performance on machine learning workloads with the Dell EMC PowerE...Accelerate performance on machine learning workloads with the Dell EMC PowerE...
Accelerate performance on machine learning workloads with the Dell EMC PowerE...
 
Upgrade to Dell EMC PowerEdge R940 servers with VMware vSphere 7.0 and gain g...
Upgrade to Dell EMC PowerEdge R940 servers with VMware vSphere 7.0 and gain g...Upgrade to Dell EMC PowerEdge R940 servers with VMware vSphere 7.0 and gain g...
Upgrade to Dell EMC PowerEdge R940 servers with VMware vSphere 7.0 and gain g...
 
Performance and durability comparison: Dell Latitude 14 5000 Series vs. Lenov...
Performance and durability comparison: Dell Latitude 14 5000 Series vs. Lenov...Performance and durability comparison: Dell Latitude 14 5000 Series vs. Lenov...
Performance and durability comparison: Dell Latitude 14 5000 Series vs. Lenov...
 

Similaire à Remote notebook management: Dell unique vPro extensions and Dell Client Integration Pack 3.1

Simplify administrator tasks and improve security and health monitoring with ...
Simplify administrator tasks and improve security and health monitoring with ...Simplify administrator tasks and improve security and health monitoring with ...
Simplify administrator tasks and improve security and health monitoring with ...Principled Technologies
 
Streamline administrator duties and gain more security and analytics features...
Streamline administrator duties and gain more security and analytics features...Streamline administrator duties and gain more security and analytics features...
Streamline administrator duties and gain more security and analytics features...Principled Technologies
 
Simplifying systems management with Dell OpenManage on 13G Dell PowerEdge ser...
Simplifying systems management with Dell OpenManage on 13G Dell PowerEdge ser...Simplifying systems management with Dell OpenManage on 13G Dell PowerEdge ser...
Simplifying systems management with Dell OpenManage on 13G Dell PowerEdge ser...Principled Technologies
 
A Dell PowerEdge MX environment using OpenManage Enterprise and OpenManage En...
A Dell PowerEdge MX environment using OpenManage Enterprise and OpenManage En...A Dell PowerEdge MX environment using OpenManage Enterprise and OpenManage En...
A Dell PowerEdge MX environment using OpenManage Enterprise and OpenManage En...Principled Technologies
 
The evolution of Dell EMC PowerEdge server systems management - Infographic
The evolution of Dell EMC PowerEdge server systems management - InfographicThe evolution of Dell EMC PowerEdge server systems management - Infographic
The evolution of Dell EMC PowerEdge server systems management - InfographicPrincipled Technologies
 
Speed up system deployment with Dell Connected Configuration services
Speed up system deployment with Dell Connected Configuration servicesSpeed up system deployment with Dell Connected Configuration services
Speed up system deployment with Dell Connected Configuration servicesPrincipled Technologies
 
Systems management savings with Dell OpenManage on 13G Dell PowerEdge servers
Systems management savings with Dell OpenManage on 13G Dell PowerEdge servers Systems management savings with Dell OpenManage on 13G Dell PowerEdge servers
Systems management savings with Dell OpenManage on 13G Dell PowerEdge servers Principled Technologies
 
Dell Open Server Manager built on OpenBMC for security, lifecycle management,...
Dell Open Server Manager built on OpenBMC for security, lifecycle management,...Dell Open Server Manager built on OpenBMC for security, lifecycle management,...
Dell Open Server Manager built on OpenBMC for security, lifecycle management,...Principled Technologies
 
Client management with SCCM 2012: Dell Latitude 6430u Ultrabook vs. older Del...
Client management with SCCM 2012: Dell Latitude 6430u Ultrabook vs. older Del...Client management with SCCM 2012: Dell Latitude 6430u Ultrabook vs. older Del...
Client management with SCCM 2012: Dell Latitude 6430u Ultrabook vs. older Del...Principled Technologies
 
Get more comprehensive remote IT support capabilities on a Dell OptiPlex 7070...
Get more comprehensive remote IT support capabilities on a Dell OptiPlex 7070...Get more comprehensive remote IT support capabilities on a Dell OptiPlex 7070...
Get more comprehensive remote IT support capabilities on a Dell OptiPlex 7070...Principled Technologies
 
Reducing deployment time with Dell Chassis Management Controller
Reducing deployment time with Dell Chassis Management ControllerReducing deployment time with Dell Chassis Management Controller
Reducing deployment time with Dell Chassis Management ControllerPrincipled Technologies
 
Using Dell ProDeploy Plus for Infrastructure can improve deployment times for...
Using Dell ProDeploy Plus for Infrastructure can improve deployment times for...Using Dell ProDeploy Plus for Infrastructure can improve deployment times for...
Using Dell ProDeploy Plus for Infrastructure can improve deployment times for...Principled Technologies
 
Reduce complexity and save money with Dell Engineered Solutions for VMware EV...
Reduce complexity and save money with Dell Engineered Solutions for VMware EV...Reduce complexity and save money with Dell Engineered Solutions for VMware EV...
Reduce complexity and save money with Dell Engineered Solutions for VMware EV...Principled Technologies
 
Dell EMC™ ProDeploy set up a production-ready environment in less time and fe...
Dell EMC™ ProDeploy set up a production-ready environment in less time and fe...Dell EMC™ ProDeploy set up a production-ready environment in less time and fe...
Dell EMC™ ProDeploy set up a production-ready environment in less time and fe...Principled Technologies
 
Performance advantages of Hadoop ETL offload with the Intel processor-powered...
Performance advantages of Hadoop ETL offload with the Intel processor-powered...Performance advantages of Hadoop ETL offload with the Intel processor-powered...
Performance advantages of Hadoop ETL offload with the Intel processor-powered...Principled Technologies
 
Dell Solutions Tour 2015 - Chromebook - Dell og Google viser vei, Ross Mahon ...
Dell Solutions Tour 2015 - Chromebook - Dell og Google viser vei, Ross Mahon ...Dell Solutions Tour 2015 - Chromebook - Dell og Google viser vei, Ross Mahon ...
Dell Solutions Tour 2015 - Chromebook - Dell og Google viser vei, Ross Mahon ...Kenneth de Brucq
 
Virtualization-management comparison: Dell Foglight for Virtualization vs. So...
Virtualization-management comparison: Dell Foglight for Virtualization vs. So...Virtualization-management comparison: Dell Foglight for Virtualization vs. So...
Virtualization-management comparison: Dell Foglight for Virtualization vs. So...Principled Technologies
 
Speed up (and simplify) employee device management
Speed up (and simplify) employee device managementSpeed up (and simplify) employee device management
Speed up (and simplify) employee device managementPrincipled Technologies
 
Dell PowerEdge VRTX and M-series compute nodes configuration study
Dell PowerEdge VRTX and M-series compute nodes configuration studyDell PowerEdge VRTX and M-series compute nodes configuration study
Dell PowerEdge VRTX and M-series compute nodes configuration studyPrincipled Technologies
 

Similaire à Remote notebook management: Dell unique vPro extensions and Dell Client Integration Pack 3.1 (20)

Simplify administrator tasks and improve security and health monitoring with ...
Simplify administrator tasks and improve security and health monitoring with ...Simplify administrator tasks and improve security and health monitoring with ...
Simplify administrator tasks and improve security and health monitoring with ...
 
Upgrading to new Dell OptiPlex desktops
Upgrading to new Dell OptiPlex desktopsUpgrading to new Dell OptiPlex desktops
Upgrading to new Dell OptiPlex desktops
 
Streamline administrator duties and gain more security and analytics features...
Streamline administrator duties and gain more security and analytics features...Streamline administrator duties and gain more security and analytics features...
Streamline administrator duties and gain more security and analytics features...
 
Simplifying systems management with Dell OpenManage on 13G Dell PowerEdge ser...
Simplifying systems management with Dell OpenManage on 13G Dell PowerEdge ser...Simplifying systems management with Dell OpenManage on 13G Dell PowerEdge ser...
Simplifying systems management with Dell OpenManage on 13G Dell PowerEdge ser...
 
A Dell PowerEdge MX environment using OpenManage Enterprise and OpenManage En...
A Dell PowerEdge MX environment using OpenManage Enterprise and OpenManage En...A Dell PowerEdge MX environment using OpenManage Enterprise and OpenManage En...
A Dell PowerEdge MX environment using OpenManage Enterprise and OpenManage En...
 
The evolution of Dell EMC PowerEdge server systems management - Infographic
The evolution of Dell EMC PowerEdge server systems management - InfographicThe evolution of Dell EMC PowerEdge server systems management - Infographic
The evolution of Dell EMC PowerEdge server systems management - Infographic
 
Speed up system deployment with Dell Connected Configuration services
Speed up system deployment with Dell Connected Configuration servicesSpeed up system deployment with Dell Connected Configuration services
Speed up system deployment with Dell Connected Configuration services
 
Systems management savings with Dell OpenManage on 13G Dell PowerEdge servers
Systems management savings with Dell OpenManage on 13G Dell PowerEdge servers Systems management savings with Dell OpenManage on 13G Dell PowerEdge servers
Systems management savings with Dell OpenManage on 13G Dell PowerEdge servers
 
Dell Open Server Manager built on OpenBMC for security, lifecycle management,...
Dell Open Server Manager built on OpenBMC for security, lifecycle management,...Dell Open Server Manager built on OpenBMC for security, lifecycle management,...
Dell Open Server Manager built on OpenBMC for security, lifecycle management,...
 
Client management with SCCM 2012: Dell Latitude 6430u Ultrabook vs. older Del...
Client management with SCCM 2012: Dell Latitude 6430u Ultrabook vs. older Del...Client management with SCCM 2012: Dell Latitude 6430u Ultrabook vs. older Del...
Client management with SCCM 2012: Dell Latitude 6430u Ultrabook vs. older Del...
 
Get more comprehensive remote IT support capabilities on a Dell OptiPlex 7070...
Get more comprehensive remote IT support capabilities on a Dell OptiPlex 7070...Get more comprehensive remote IT support capabilities on a Dell OptiPlex 7070...
Get more comprehensive remote IT support capabilities on a Dell OptiPlex 7070...
 
Reducing deployment time with Dell Chassis Management Controller
Reducing deployment time with Dell Chassis Management ControllerReducing deployment time with Dell Chassis Management Controller
Reducing deployment time with Dell Chassis Management Controller
 
Using Dell ProDeploy Plus for Infrastructure can improve deployment times for...
Using Dell ProDeploy Plus for Infrastructure can improve deployment times for...Using Dell ProDeploy Plus for Infrastructure can improve deployment times for...
Using Dell ProDeploy Plus for Infrastructure can improve deployment times for...
 
Reduce complexity and save money with Dell Engineered Solutions for VMware EV...
Reduce complexity and save money with Dell Engineered Solutions for VMware EV...Reduce complexity and save money with Dell Engineered Solutions for VMware EV...
Reduce complexity and save money with Dell Engineered Solutions for VMware EV...
 
Dell EMC™ ProDeploy set up a production-ready environment in less time and fe...
Dell EMC™ ProDeploy set up a production-ready environment in less time and fe...Dell EMC™ ProDeploy set up a production-ready environment in less time and fe...
Dell EMC™ ProDeploy set up a production-ready environment in less time and fe...
 
Performance advantages of Hadoop ETL offload with the Intel processor-powered...
Performance advantages of Hadoop ETL offload with the Intel processor-powered...Performance advantages of Hadoop ETL offload with the Intel processor-powered...
Performance advantages of Hadoop ETL offload with the Intel processor-powered...
 
Dell Solutions Tour 2015 - Chromebook - Dell og Google viser vei, Ross Mahon ...
Dell Solutions Tour 2015 - Chromebook - Dell og Google viser vei, Ross Mahon ...Dell Solutions Tour 2015 - Chromebook - Dell og Google viser vei, Ross Mahon ...
Dell Solutions Tour 2015 - Chromebook - Dell og Google viser vei, Ross Mahon ...
 
Virtualization-management comparison: Dell Foglight for Virtualization vs. So...
Virtualization-management comparison: Dell Foglight for Virtualization vs. So...Virtualization-management comparison: Dell Foglight for Virtualization vs. So...
Virtualization-management comparison: Dell Foglight for Virtualization vs. So...
 
Speed up (and simplify) employee device management
Speed up (and simplify) employee device managementSpeed up (and simplify) employee device management
Speed up (and simplify) employee device management
 
Dell PowerEdge VRTX and M-series compute nodes configuration study
Dell PowerEdge VRTX and M-series compute nodes configuration studyDell PowerEdge VRTX and M-series compute nodes configuration study
Dell PowerEdge VRTX and M-series compute nodes configuration study
 

Plus de Principled Technologies

Realize 2.1X the performance with 20% less power with AMD EPYC processor-back...
Realize 2.1X the performance with 20% less power with AMD EPYC processor-back...Realize 2.1X the performance with 20% less power with AMD EPYC processor-back...
Realize 2.1X the performance with 20% less power with AMD EPYC processor-back...Principled Technologies
 
Improve performance and gain room to grow by easily migrating to a modern Ope...
Improve performance and gain room to grow by easily migrating to a modern Ope...Improve performance and gain room to grow by easily migrating to a modern Ope...
Improve performance and gain room to grow by easily migrating to a modern Ope...Principled Technologies
 
Boost PC performance: How more available memory can improve productivity
Boost PC performance: How more available memory can improve productivityBoost PC performance: How more available memory can improve productivity
Boost PC performance: How more available memory can improve productivityPrincipled Technologies
 
Deploy with confidence: VMware Cloud Foundation 5.1 on next gen Dell PowerEdg...
Deploy with confidence: VMware Cloud Foundation 5.1 on next gen Dell PowerEdg...Deploy with confidence: VMware Cloud Foundation 5.1 on next gen Dell PowerEdg...
Deploy with confidence: VMware Cloud Foundation 5.1 on next gen Dell PowerEdg...Principled Technologies
 
Upgrade your cloud infrastructure with Dell PowerEdge R760 servers and VMware...
Upgrade your cloud infrastructure with Dell PowerEdge R760 servers and VMware...Upgrade your cloud infrastructure with Dell PowerEdge R760 servers and VMware...
Upgrade your cloud infrastructure with Dell PowerEdge R760 servers and VMware...Principled Technologies
 
A comparison of security features in Dell, HP, and Lenovo PC systems
A comparison of security features in Dell, HP, and Lenovo PC systemsA comparison of security features in Dell, HP, and Lenovo PC systems
A comparison of security features in Dell, HP, and Lenovo PC systemsPrincipled Technologies
 
Increase security, sustainability, and efficiency with robust Dell server man...
Increase security, sustainability, and efficiency with robust Dell server man...Increase security, sustainability, and efficiency with robust Dell server man...
Increase security, sustainability, and efficiency with robust Dell server man...Principled Technologies
 
Scale up your storage with higher-performing Dell APEX Block Storage for AWS ...
Scale up your storage with higher-performing Dell APEX Block Storage for AWS ...Scale up your storage with higher-performing Dell APEX Block Storage for AWS ...
Scale up your storage with higher-performing Dell APEX Block Storage for AWS ...Principled Technologies
 
Scale up your storage with higher-performing Dell APEX Block Storage for AWS
Scale up your storage with higher-performing Dell APEX Block Storage for AWSScale up your storage with higher-performing Dell APEX Block Storage for AWS
Scale up your storage with higher-performing Dell APEX Block Storage for AWSPrincipled Technologies
 
Get in and stay in the productivity zone with the HP Z2 G9 Tower Workstation
Get in and stay in the productivity zone with the HP Z2 G9 Tower WorkstationGet in and stay in the productivity zone with the HP Z2 G9 Tower Workstation
Get in and stay in the productivity zone with the HP Z2 G9 Tower WorkstationPrincipled Technologies
 
Open up new possibilities with higher transactional database performance from...
Open up new possibilities with higher transactional database performance from...Open up new possibilities with higher transactional database performance from...
Open up new possibilities with higher transactional database performance from...Principled Technologies
 
Improving database performance and value with an easy migration to Azure Data...
Improving database performance and value with an easy migration to Azure Data...Improving database performance and value with an easy migration to Azure Data...
Improving database performance and value with an easy migration to Azure Data...Principled Technologies
 
Realize better value and performance migrating from Azure Database for Postgr...
Realize better value and performance migrating from Azure Database for Postgr...Realize better value and performance migrating from Azure Database for Postgr...
Realize better value and performance migrating from Azure Database for Postgr...Principled Technologies
 
Set up students and teachers to excel now and in the future with Intel proces...
Set up students and teachers to excel now and in the future with Intel proces...Set up students and teachers to excel now and in the future with Intel proces...
Set up students and teachers to excel now and in the future with Intel proces...Principled Technologies
 
Finding the path to AI success with the Dell AI portfolio - Summary
Finding the path to AI success with the Dell AI portfolio - SummaryFinding the path to AI success with the Dell AI portfolio - Summary
Finding the path to AI success with the Dell AI portfolio - SummaryPrincipled Technologies
 
Finding the path to AI success with the Dell AI portfolio
Finding the path to AI success with the Dell AI portfolioFinding the path to AI success with the Dell AI portfolio
Finding the path to AI success with the Dell AI portfolioPrincipled Technologies
 
Achieve strong performance and value on Azure SQL Database Hyperscale
Achieve strong performance and value on Azure SQL Database HyperscaleAchieve strong performance and value on Azure SQL Database Hyperscale
Achieve strong performance and value on Azure SQL Database HyperscalePrincipled Technologies
 
Improve backup and recovery outcomes by combining Dell APEX Data Storage Serv...
Improve backup and recovery outcomes by combining Dell APEX Data Storage Serv...Improve backup and recovery outcomes by combining Dell APEX Data Storage Serv...
Improve backup and recovery outcomes by combining Dell APEX Data Storage Serv...Principled Technologies
 

Plus de Principled Technologies (20)

Realize 2.1X the performance with 20% less power with AMD EPYC processor-back...
Realize 2.1X the performance with 20% less power with AMD EPYC processor-back...Realize 2.1X the performance with 20% less power with AMD EPYC processor-back...
Realize 2.1X the performance with 20% less power with AMD EPYC processor-back...
 
Improve performance and gain room to grow by easily migrating to a modern Ope...
Improve performance and gain room to grow by easily migrating to a modern Ope...Improve performance and gain room to grow by easily migrating to a modern Ope...
Improve performance and gain room to grow by easily migrating to a modern Ope...
 
Boost PC performance: How more available memory can improve productivity
Boost PC performance: How more available memory can improve productivityBoost PC performance: How more available memory can improve productivity
Boost PC performance: How more available memory can improve productivity
 
Deploy with confidence: VMware Cloud Foundation 5.1 on next gen Dell PowerEdg...
Deploy with confidence: VMware Cloud Foundation 5.1 on next gen Dell PowerEdg...Deploy with confidence: VMware Cloud Foundation 5.1 on next gen Dell PowerEdg...
Deploy with confidence: VMware Cloud Foundation 5.1 on next gen Dell PowerEdg...
 
Upgrade your cloud infrastructure with Dell PowerEdge R760 servers and VMware...
Upgrade your cloud infrastructure with Dell PowerEdge R760 servers and VMware...Upgrade your cloud infrastructure with Dell PowerEdge R760 servers and VMware...
Upgrade your cloud infrastructure with Dell PowerEdge R760 servers and VMware...
 
A comparison of security features in Dell, HP, and Lenovo PC systems
A comparison of security features in Dell, HP, and Lenovo PC systemsA comparison of security features in Dell, HP, and Lenovo PC systems
A comparison of security features in Dell, HP, and Lenovo PC systems
 
Increase security, sustainability, and efficiency with robust Dell server man...
Increase security, sustainability, and efficiency with robust Dell server man...Increase security, sustainability, and efficiency with robust Dell server man...
Increase security, sustainability, and efficiency with robust Dell server man...
 
Increase security, sustainability, and efficiency with robust Dell server man...
Increase security, sustainability, and efficiency with robust Dell server man...Increase security, sustainability, and efficiency with robust Dell server man...
Increase security, sustainability, and efficiency with robust Dell server man...
 
Scale up your storage with higher-performing Dell APEX Block Storage for AWS ...
Scale up your storage with higher-performing Dell APEX Block Storage for AWS ...Scale up your storage with higher-performing Dell APEX Block Storage for AWS ...
Scale up your storage with higher-performing Dell APEX Block Storage for AWS ...
 
Scale up your storage with higher-performing Dell APEX Block Storage for AWS
Scale up your storage with higher-performing Dell APEX Block Storage for AWSScale up your storage with higher-performing Dell APEX Block Storage for AWS
Scale up your storage with higher-performing Dell APEX Block Storage for AWS
 
Get in and stay in the productivity zone with the HP Z2 G9 Tower Workstation
Get in and stay in the productivity zone with the HP Z2 G9 Tower WorkstationGet in and stay in the productivity zone with the HP Z2 G9 Tower Workstation
Get in and stay in the productivity zone with the HP Z2 G9 Tower Workstation
 
Open up new possibilities with higher transactional database performance from...
Open up new possibilities with higher transactional database performance from...Open up new possibilities with higher transactional database performance from...
Open up new possibilities with higher transactional database performance from...
 
Improving database performance and value with an easy migration to Azure Data...
Improving database performance and value with an easy migration to Azure Data...Improving database performance and value with an easy migration to Azure Data...
Improving database performance and value with an easy migration to Azure Data...
 
Realize better value and performance migrating from Azure Database for Postgr...
Realize better value and performance migrating from Azure Database for Postgr...Realize better value and performance migrating from Azure Database for Postgr...
Realize better value and performance migrating from Azure Database for Postgr...
 
Realize better value and performance migrating from Azure Database for Postgr...
Realize better value and performance migrating from Azure Database for Postgr...Realize better value and performance migrating from Azure Database for Postgr...
Realize better value and performance migrating from Azure Database for Postgr...
 
Set up students and teachers to excel now and in the future with Intel proces...
Set up students and teachers to excel now and in the future with Intel proces...Set up students and teachers to excel now and in the future with Intel proces...
Set up students and teachers to excel now and in the future with Intel proces...
 
Finding the path to AI success with the Dell AI portfolio - Summary
Finding the path to AI success with the Dell AI portfolio - SummaryFinding the path to AI success with the Dell AI portfolio - Summary
Finding the path to AI success with the Dell AI portfolio - Summary
 
Finding the path to AI success with the Dell AI portfolio
Finding the path to AI success with the Dell AI portfolioFinding the path to AI success with the Dell AI portfolio
Finding the path to AI success with the Dell AI portfolio
 
Achieve strong performance and value on Azure SQL Database Hyperscale
Achieve strong performance and value on Azure SQL Database HyperscaleAchieve strong performance and value on Azure SQL Database Hyperscale
Achieve strong performance and value on Azure SQL Database Hyperscale
 
Improve backup and recovery outcomes by combining Dell APEX Data Storage Serv...
Improve backup and recovery outcomes by combining Dell APEX Data Storage Serv...Improve backup and recovery outcomes by combining Dell APEX Data Storage Serv...
Improve backup and recovery outcomes by combining Dell APEX Data Storage Serv...
 

Dernier

The Role of Taxonomy and Ontology in Semantic Layers - Heather Hedden.pdf
The Role of Taxonomy and Ontology in Semantic Layers - Heather Hedden.pdfThe Role of Taxonomy and Ontology in Semantic Layers - Heather Hedden.pdf
The Role of Taxonomy and Ontology in Semantic Layers - Heather Hedden.pdfEnterprise Knowledge
 
The Codex of Business Writing Software for Real-World Solutions 2.pptx
The Codex of Business Writing Software for Real-World Solutions 2.pptxThe Codex of Business Writing Software for Real-World Solutions 2.pptx
The Codex of Business Writing Software for Real-World Solutions 2.pptxMalak Abu Hammad
 
A Domino Admins Adventures (Engage 2024)
A Domino Admins Adventures (Engage 2024)A Domino Admins Adventures (Engage 2024)
A Domino Admins Adventures (Engage 2024)Gabriella Davis
 
IAC 2024 - IA Fast Track to Search Focused AI Solutions
IAC 2024 - IA Fast Track to Search Focused AI SolutionsIAC 2024 - IA Fast Track to Search Focused AI Solutions
IAC 2024 - IA Fast Track to Search Focused AI SolutionsEnterprise Knowledge
 
Axa Assurance Maroc - Insurer Innovation Award 2024
Axa Assurance Maroc - Insurer Innovation Award 2024Axa Assurance Maroc - Insurer Innovation Award 2024
Axa Assurance Maroc - Insurer Innovation Award 2024The Digital Insurer
 
Mastering MySQL Database Architecture: Deep Dive into MySQL Shell and MySQL R...
Mastering MySQL Database Architecture: Deep Dive into MySQL Shell and MySQL R...Mastering MySQL Database Architecture: Deep Dive into MySQL Shell and MySQL R...
Mastering MySQL Database Architecture: Deep Dive into MySQL Shell and MySQL R...Miguel Araújo
 
Automating Google Workspace (GWS) & more with Apps Script
Automating Google Workspace (GWS) & more with Apps ScriptAutomating Google Workspace (GWS) & more with Apps Script
Automating Google Workspace (GWS) & more with Apps Scriptwesley chun
 
Advantages of Hiring UIUX Design Service Providers for Your Business
Advantages of Hiring UIUX Design Service Providers for Your BusinessAdvantages of Hiring UIUX Design Service Providers for Your Business
Advantages of Hiring UIUX Design Service Providers for Your BusinessPixlogix Infotech
 
04-2024-HHUG-Sales-and-Marketing-Alignment.pptx
04-2024-HHUG-Sales-and-Marketing-Alignment.pptx04-2024-HHUG-Sales-and-Marketing-Alignment.pptx
04-2024-HHUG-Sales-and-Marketing-Alignment.pptxHampshireHUG
 
Histor y of HAM Radio presentation slide
Histor y of HAM Radio presentation slideHistor y of HAM Radio presentation slide
Histor y of HAM Radio presentation slidevu2urc
 
08448380779 Call Girls In Diplomatic Enclave Women Seeking Men
08448380779 Call Girls In Diplomatic Enclave Women Seeking Men08448380779 Call Girls In Diplomatic Enclave Women Seeking Men
08448380779 Call Girls In Diplomatic Enclave Women Seeking MenDelhi Call girls
 
A Call to Action for Generative AI in 2024
A Call to Action for Generative AI in 2024A Call to Action for Generative AI in 2024
A Call to Action for Generative AI in 2024Results
 
Apidays Singapore 2024 - Building Digital Trust in a Digital Economy by Veron...
Apidays Singapore 2024 - Building Digital Trust in a Digital Economy by Veron...Apidays Singapore 2024 - Building Digital Trust in a Digital Economy by Veron...
Apidays Singapore 2024 - Building Digital Trust in a Digital Economy by Veron...apidays
 
Exploring the Future Potential of AI-Enabled Smartphone Processors
Exploring the Future Potential of AI-Enabled Smartphone ProcessorsExploring the Future Potential of AI-Enabled Smartphone Processors
Exploring the Future Potential of AI-Enabled Smartphone Processorsdebabhi2
 
2024: Domino Containers - The Next Step. News from the Domino Container commu...
2024: Domino Containers - The Next Step. News from the Domino Container commu...2024: Domino Containers - The Next Step. News from the Domino Container commu...
2024: Domino Containers - The Next Step. News from the Domino Container commu...Martijn de Jong
 
Scaling API-first – The story of a global engineering organization
Scaling API-first – The story of a global engineering organizationScaling API-first – The story of a global engineering organization
Scaling API-first – The story of a global engineering organizationRadu Cotescu
 
Understanding Discord NSFW Servers A Guide for Responsible Users.pdf
Understanding Discord NSFW Servers A Guide for Responsible Users.pdfUnderstanding Discord NSFW Servers A Guide for Responsible Users.pdf
Understanding Discord NSFW Servers A Guide for Responsible Users.pdfUK Journal
 
Factors to Consider When Choosing Accounts Payable Services Providers.pptx
Factors to Consider When Choosing Accounts Payable Services Providers.pptxFactors to Consider When Choosing Accounts Payable Services Providers.pptx
Factors to Consider When Choosing Accounts Payable Services Providers.pptxKatpro Technologies
 
08448380779 Call Girls In Friends Colony Women Seeking Men
08448380779 Call Girls In Friends Colony Women Seeking Men08448380779 Call Girls In Friends Colony Women Seeking Men
08448380779 Call Girls In Friends Colony Women Seeking MenDelhi Call girls
 
Raspberry Pi 5: Challenges and Solutions in Bringing up an OpenGL/Vulkan Driv...
Raspberry Pi 5: Challenges and Solutions in Bringing up an OpenGL/Vulkan Driv...Raspberry Pi 5: Challenges and Solutions in Bringing up an OpenGL/Vulkan Driv...
Raspberry Pi 5: Challenges and Solutions in Bringing up an OpenGL/Vulkan Driv...Igalia
 

Dernier (20)

The Role of Taxonomy and Ontology in Semantic Layers - Heather Hedden.pdf
The Role of Taxonomy and Ontology in Semantic Layers - Heather Hedden.pdfThe Role of Taxonomy and Ontology in Semantic Layers - Heather Hedden.pdf
The Role of Taxonomy and Ontology in Semantic Layers - Heather Hedden.pdf
 
The Codex of Business Writing Software for Real-World Solutions 2.pptx
The Codex of Business Writing Software for Real-World Solutions 2.pptxThe Codex of Business Writing Software for Real-World Solutions 2.pptx
The Codex of Business Writing Software for Real-World Solutions 2.pptx
 
A Domino Admins Adventures (Engage 2024)
A Domino Admins Adventures (Engage 2024)A Domino Admins Adventures (Engage 2024)
A Domino Admins Adventures (Engage 2024)
 
IAC 2024 - IA Fast Track to Search Focused AI Solutions
IAC 2024 - IA Fast Track to Search Focused AI SolutionsIAC 2024 - IA Fast Track to Search Focused AI Solutions
IAC 2024 - IA Fast Track to Search Focused AI Solutions
 
Axa Assurance Maroc - Insurer Innovation Award 2024
Axa Assurance Maroc - Insurer Innovation Award 2024Axa Assurance Maroc - Insurer Innovation Award 2024
Axa Assurance Maroc - Insurer Innovation Award 2024
 
Mastering MySQL Database Architecture: Deep Dive into MySQL Shell and MySQL R...
Mastering MySQL Database Architecture: Deep Dive into MySQL Shell and MySQL R...Mastering MySQL Database Architecture: Deep Dive into MySQL Shell and MySQL R...
Mastering MySQL Database Architecture: Deep Dive into MySQL Shell and MySQL R...
 
Automating Google Workspace (GWS) & more with Apps Script
Automating Google Workspace (GWS) & more with Apps ScriptAutomating Google Workspace (GWS) & more with Apps Script
Automating Google Workspace (GWS) & more with Apps Script
 
Advantages of Hiring UIUX Design Service Providers for Your Business
Advantages of Hiring UIUX Design Service Providers for Your BusinessAdvantages of Hiring UIUX Design Service Providers for Your Business
Advantages of Hiring UIUX Design Service Providers for Your Business
 
04-2024-HHUG-Sales-and-Marketing-Alignment.pptx
04-2024-HHUG-Sales-and-Marketing-Alignment.pptx04-2024-HHUG-Sales-and-Marketing-Alignment.pptx
04-2024-HHUG-Sales-and-Marketing-Alignment.pptx
 
Histor y of HAM Radio presentation slide
Histor y of HAM Radio presentation slideHistor y of HAM Radio presentation slide
Histor y of HAM Radio presentation slide
 
08448380779 Call Girls In Diplomatic Enclave Women Seeking Men
08448380779 Call Girls In Diplomatic Enclave Women Seeking Men08448380779 Call Girls In Diplomatic Enclave Women Seeking Men
08448380779 Call Girls In Diplomatic Enclave Women Seeking Men
 
A Call to Action for Generative AI in 2024
A Call to Action for Generative AI in 2024A Call to Action for Generative AI in 2024
A Call to Action for Generative AI in 2024
 
Apidays Singapore 2024 - Building Digital Trust in a Digital Economy by Veron...
Apidays Singapore 2024 - Building Digital Trust in a Digital Economy by Veron...Apidays Singapore 2024 - Building Digital Trust in a Digital Economy by Veron...
Apidays Singapore 2024 - Building Digital Trust in a Digital Economy by Veron...
 
Exploring the Future Potential of AI-Enabled Smartphone Processors
Exploring the Future Potential of AI-Enabled Smartphone ProcessorsExploring the Future Potential of AI-Enabled Smartphone Processors
Exploring the Future Potential of AI-Enabled Smartphone Processors
 
2024: Domino Containers - The Next Step. News from the Domino Container commu...
2024: Domino Containers - The Next Step. News from the Domino Container commu...2024: Domino Containers - The Next Step. News from the Domino Container commu...
2024: Domino Containers - The Next Step. News from the Domino Container commu...
 
Scaling API-first – The story of a global engineering organization
Scaling API-first – The story of a global engineering organizationScaling API-first – The story of a global engineering organization
Scaling API-first – The story of a global engineering organization
 
Understanding Discord NSFW Servers A Guide for Responsible Users.pdf
Understanding Discord NSFW Servers A Guide for Responsible Users.pdfUnderstanding Discord NSFW Servers A Guide for Responsible Users.pdf
Understanding Discord NSFW Servers A Guide for Responsible Users.pdf
 
Factors to Consider When Choosing Accounts Payable Services Providers.pptx
Factors to Consider When Choosing Accounts Payable Services Providers.pptxFactors to Consider When Choosing Accounts Payable Services Providers.pptx
Factors to Consider When Choosing Accounts Payable Services Providers.pptx
 
08448380779 Call Girls In Friends Colony Women Seeking Men
08448380779 Call Girls In Friends Colony Women Seeking Men08448380779 Call Girls In Friends Colony Women Seeking Men
08448380779 Call Girls In Friends Colony Women Seeking Men
 
Raspberry Pi 5: Challenges and Solutions in Bringing up an OpenGL/Vulkan Driv...
Raspberry Pi 5: Challenges and Solutions in Bringing up an OpenGL/Vulkan Driv...Raspberry Pi 5: Challenges and Solutions in Bringing up an OpenGL/Vulkan Driv...
Raspberry Pi 5: Challenges and Solutions in Bringing up an OpenGL/Vulkan Driv...
 

Remote notebook management: Dell unique vPro extensions and Dell Client Integration Pack 3.1

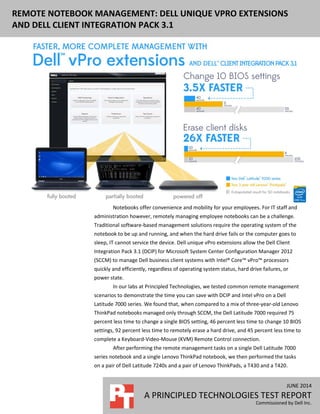
  • 1. JUNE 2014 A PRINCIPLED TECHNOLOGIES TEST REPORT Commissioned by Dell Inc. REMOTE NOTEBOOK MANAGEMENT: DELL UNIQUE VPRO EXTENSIONS AND DELL CLIENT INTEGRATION PACK 3.1 Notebooks offer convenience and mobility for your employees. For IT staff and administration however, remotely managing employee notebooks can be a challenge. Traditional software-based management solutions require the operating system of the notebook to be up and running, and when the hard drive fails or the computer goes to sleep, IT cannot service the device. Dell unique vPro extensions allow the Dell Client Integration Pack 3.1 (DCIP) for Microsoft System Center Configuration Manager 2012 (SCCM) to manage Dell business client systems with Intel® Core™ vPro™ processors quickly and efficiently, regardless of operating system status, hard drive failures, or power state. In our labs at Principled Technologies, we tested common remote management scenarios to demonstrate the time you can save with DCIP and Intel vPro on a Dell Latitude 7000 series. We found that, when compared to a mix of three-year-old Lenovo ThinkPad notebooks managed only through SCCM, the Dell Latitude 7000 required 75 percent less time to change a single BIOS setting, 46 percent less time to change 10 BIOS settings, 92 percent less time to remotely erase a hard drive, and 45 percent less time to complete a Keyboard-Video-Mouse (KVM) Remote Control connection. After performing the remote management tasks on a single Dell Latitude 7000 series notebook and a single Lenovo ThinkPad notebook, we then performed the tasks on a pair of Dell Latitude 7240s and a pair of Lenovo ThinkPads, a T430 and a T420.
  • 2. A Principled Technologies test report 2Remote notebook management: Dell unique vPro extensions and Dell Client Integration Pack 3.1 While managing a second system required no additional steps and no increase in time for the Dell systems, doing so on the Lenovo systems required additional steps and time. This is because we had to complete each process separately for each ThinkPad. The Dell, on the other hand, only requires the admin to select the changes and the target laptops, and DCIP pushes those changes to the laptops selected. DCIP and Intel vPro can improve scalability in your business: as administrators connect more Dell Latitude 7000 notebooks through the DCIP plugin, it takes no longer to change settings remotely on multiple Dell Latitude 7000 notebooks than it does for a single notebook. With Intel Core vPro processors and Dell Business Client notebooks, DCIP provides an invaluable addition to SCCM for remotely managing clients in any state. Figure 1 illustrates the IT admin time it took in our testing to change a single BIOS setting. Note that in this chart and those similar to it that follow, the time for one and two systems come from our hands-on testing and the time for 50 systems is an extrapolation based on those times. For details on how we calculated admin time for 50 notebooks, see Appendix B. As Figure 1 shows, for the Dell system the time to change the setting remained constant regardless of the number of systems on which we performed the task. For the Lenovo systems, the amount of time increased as the number of systems increased. Completing the task on 50 Dell notebooks would take only 13 seconds whereas doing so on 50 Lenovo notebooks would take over 36 minutes. This is a dramatic time savings that would increase with greater numbers of systems. Figure 1: IT admin time to change one BIOS setting on various numbers of notebooks using the two management systems. Lower numbers are better. In the following sections, we provide some background on out-of-band management in general, Dell Client Integration Pack in particular, and how we approached testing. To skip ahead to more of our findings, see the section Scalability with DCIP and Intel vPro.
  • 3. A Principled Technologies test report 3Remote notebook management: Dell unique vPro extensions and Dell Client Integration Pack 3.1 OUT-OF-BAND: REMOTE MANAGEMENT REGARDLESS OF STATE Remote management has traditionally required each managed device to fully load its operating system and receive commands through a software-based management agent, or in-band management. When the operating system is unreachable however, IT administrators can use a special hardware-based channel to connect with the device remotely, a process called out-of-band (OOB) management. Intel considers notebooks OOB when the operating system has not loaded; when the computer is plugged in or has battery power but is not actively running (either off, on standby, sleep, or hibernation); or when the computer is booted into its operating system, but the software-based management agent is not available.1 Intel Core vPro processors offer a hardware-based option for OOB management with the Intel Management Engine, an isolated and protected coprocessor that can communicate with the network and draw power independently of the notebook’s main components.2 DELL CLIENT INTEGRATION PACK SCCM includes built-in support for management of computers with Intel Core vPro processors. The OOB Management Console of SCCM allows IT administrators to execute simple management tasks for computers with Intel Core vPro processors, including powering a device on or off, checking system information and status, booting from a remote virtualized drive, and running commands. OOB management in SCCM can be complicated and costly: without the resources to research and design workflows customized to your remote management needs, using SCCM to manage even a small number of computers can quickly become a time-consuming task. As a visual interface that initiates management tasks, DCIP provides a no-cost alternative to OOB management in SCCM that incorporates the Dell Client Configuration Toolkit to provide BIOS configuration capability for Dell client systems. An IT admin can easily add the DCIP plugin to an existing SCCM. With DCIP, an IT administrator can quickly perform out-of-band management tasks and implement them broadly to multiple clients within an enterprise network. Our representative three-year-old notebooks, a Lenovo ThinkPad T430 and a Lenovo ThinkPad T420, use Intel Core vPro processors, which means they have out-of- 1 en.community.dell.com/techcenter/extras/m/white_papers/20179305/download.aspx 2 https://www.kernel.org/doc/Documentation/misc-devices/mei/mei.txt Out-of-band management allows for remote client maintenance regardless of the managed system’s power state or operating system status. As long as the client has battery or AC power and is authenticated on the network, IT administrators can remotely manage the device.
  • 4. A Principled Technologies test report 4Remote notebook management: Dell unique vPro extensions and Dell Client Integration Pack 3.1 band-management capabilities with SCCM. However, to achieve the ease of use that DCIP offers as a free plugin would require a third-party product or a custom built solution. Another advantage of DCIP is that IT admins can perform management tasks without interfering with users and their ability to do their work. DCIP can issue changes to a remotely managed client while the user is loaded and working in their operating system. This translates to a productivity advantage. For the purposes of our tests, we started timings with each system fully shutdown and turned off. OUR CONFIGURATIONS Our tests looked at the differences between remote management on Dell notebooks managed through the DCIP 3.1 plugin and previous-generation Lenovo notebooks managed only through SCCM 2012. We considered four common management tasks IT administrators often perform remotely: changing BIOS settings, erasing a hard drive, completing a KVM connection, and changing AMT power settings. In our first set of tests, we counted the steps needed to accomplish each task and measured IT admin time, the amount of time an IT administrator would spend actively navigating through either DCIP or SCCM to fully initiate a task on a single Dell notebook and a single Lenovo notebook. For the Dell notebook, we began measuring IT admin time from the first launch of DCIP and ended our timing when we clicked “Finish” and the job was added to DCIP’s task queue. For the Lenovo notebook, IT admin time began with launching SCCM 2012 and ended with the last action required to complete the process. We reran all tests on two of each notebook to highlight the scalable advantages of managing multiple Dell notebooks with DCIP over managing multiple Lenovo notebooks with SCCM. Using two Dell notebooks and two Lenovo notebooks, we measured the time and counted the steps it took to deploy the same four management scenarios. The results demonstrate how DCIP saves IT administrators’ time with tools that streamline the process of managing multiple connected clients. We present the results below. For detailed specifications of the test systems, see Appendix A. For a systematic presentation of how we tested, including all of the steps required to perform the tasks with the two management approaches, see Appendix C. For complete results, see Appendix D.
  • 5. A Principled Technologies test report 5Remote notebook management: Dell unique vPro extensions and Dell Client Integration Pack 3.1 SCALABILITY WITH DCIP AND INTEL VPRO We used each of the two management systems to perform a set of four tasks on a pair of each notebook. We then extrapolated the data from managing two systems to managing 50 systems. With DCIP, increasing the number of systems did not increase the management time because DCIP allows the IT admin to apply changes to multiple systems simultaneously. It takes no longer to perform the tasks in our scenarios on 50 systems than it does to perform them on a single system. In contrast, an admin must perform the tasks on one Lenovo system at a time, which leads to much more hand-on time for multiple systems. Scenario: Remotely managing BIOS settings A company decides to limit employee access to the BIOS, but then encounters a situation where changes to the BIOS need to be made. For example, a new sales person may request a specific Bluetooth headset. While official company policy may not permit enabling Bluetooth, management has made an exception in this case. On the Lenovo notebook, the IT admin needs to schedule a maintenance time with the employee, create a KVM connection to the system, enter the BIOS password, and change the setting manually. On the Dell notebook, the administrator can use DCIP to send the command over the network. On a larger scale, a new company security policy may require the use of legacy ROMs to distribute new software. Had IT previously disabled this functionality, an IT admin using only SCCM to manage the Lenovo notebooks would need to change each system’s BIOS individually. With DCIP, the admin could schedule this change in a matter of seconds. Changing one BIOS setting Changing BIOS settings on a user’s notebook has traditionally been inconvenient for IT administrators because the ability to manage BIOS settings remotely has been limited. Updating settings can mean hands-on time with each device, either through KVM or in person–waiting for reboots, pressing complicated key combinations, and navigating menus. Notebooks with Intel Core vPro processors can communicate with a management server before the BIOS loads. DCIP integrates with the Dell Client Configuration Toolkit to enable BIOS configuration features, providing a simple interface for remote management. On the Lenovo ThinkPad, the only option for remotely managing BIOS settings without scripting requires initiating a KVM session and manually booting into the BIOS menu itself. To demonstrate the time an IT admin would save by using DCIP, we chose a single BIOS setting shared between the Dell and Lenovo systems and measured the time and steps it took to implement changing that setting. Using DCIP, the IT admin changed a BIOS setting in nine steps. Changing this setting took just 13 seconds for the IT admin in our scenario. Changing the BIOS setting
  • 6. A Principled Technologies test report 6Remote notebook management: Dell unique vPro extensions and Dell Client Integration Pack 3.1 on the Lenovo system took 11 steps. It took the IT admin over 50 seconds to complete this change. As we showed in Figure 1, completing the task on 50 Dell notebooks would take only 13 seconds whereas doing so on 50 Lenovo notebooks would take over 36 minutes. Changing 10 BIOS settings We chose 10 BIOS settings shared between the Dell and Lenovo notebooks and measured the steps and time it took to implement changes to all of the settings at once. The BIOS Settings menu in DCIP lists all available BIOS options in one sortable list. After selecting a specific BIOS configuration, an IT admin can apply the settings to any number of connected clients. Figure 2 lists the BIOS settings we changed between the two notebooks. Changed BIOS Settings  Active Processor Cores: All  Bluetooth®: Enabled  Enable External USB Port: Enabled  Enable Intel SpeedStep®: Enabled  Enable Intel Virtualization Technology: Disabled  Enable VT for Direct I/O: Disabled  Hyper-Threading: Enabled  Touchpad: Enabled  Wake on LAN/WLAN (Notebook): LAN or WLAN  WLAN: Enabled Figure 2: The BIOS settings we changed on the two systems under test. Our IT admin was able to change all 10 BIOS settings we selected in just 18 steps using DCIP, requiring less than 41 seconds to initiate the changes on a single system. Doing so on a single Lenovo system took 30 steps, requiring 74 seconds. That is almost twice as long to complete the same tasks in DCIP. Figure 3 shows how this time difference increased when we changed 10 BIOS settings on multiple systems. Completing the task on 50 Dell notebooks with DCIP would take only 40 seconds whereas doing so on 50 Lenovo notebooks would take over 55 minutes.
  • 7. A Principled Technologies test report 7Remote notebook management: Dell unique vPro extensions and Dell Client Integration Pack 3.1 Figure 3: IT admin time to change 10 BIOS settings on various numbers of notebooks using the two management systems. Lower numbers are better. Changing the BIOS password Unauthorized changes to the BIOS by inexperienced users could render a notebook unstable or vulnerable. By using the change BIOS Password feature, administrators can ensure that employee systems remain secure. In this scenario, it took 11 steps to change the BIOS password using the BIOS Passwords task on the Dell notebook using DCIP. Our IT admin initiated the change in 19 seconds. For the Lenovo system, it took 13 steps to change the BIOS password, but that change took our IT admin 47 seconds. Figure 4 shows how this time difference increased when we changed the BIOS password on multiple notebooks. We calculate the task on 50 Dell notebooks would take only 19 seconds whereas doing so on 50 Lenovo notebooks would take over 34 minutes. Figure 4: IT admin time to change the BIOS password on various numbers of notebooks using the two management systems. Lower numbers are better.
  • 8. A Principled Technologies test report 8Remote notebook management: Dell unique vPro extensions and Dell Client Integration Pack 3.1 Changing boot order Sometimes it is necessary to make changes to the boot order of a large number of systems. OS installations and firmware updates can prompt an IT administrator to change the boot order. Using the change boot order feature, Dell systems can be simultaneously instructed to set a specific boot order, either permanently or just for the next boot. This means less time is needed navigating boot selection menus. For the Dell notebook, it only took 10 steps to change the boot order using the Boot Order task, requiring 13 seconds of IT admin time to initiate the change. It took 11 steps to change the boot order on the Lenovo ThinkPad and 42 seconds for the IT admin to complete this change. Figure 5 shows how this time difference increased when we changed the boot order on multiple systems. Completing the task on 50 Dell notebooks would take only 13 seconds whereas doing so on 50 Lenovo notebooks would take over 29 minutes. Figure 5: IT admin time to change the boot order on various numbers of notebooks using the two management systems. Lower numbers are better.
  • 9. A Principled Technologies test report 9Remote notebook management: Dell unique vPro extensions and Dell Client Integration Pack 3.1 Remotely erasing a hard drive Erasing a hard drive on a system that’s out-of-band is difficult if not impossible: all software-based solutions rely on the operating system’s network communication to receive the erase-disk command. Furthermore, in-band solutions are not useful when the operating system is not responding or the computer is off. Our tests compared the steps and time it took to erase the data on a solid-state drive (SSD) managed through DCIP on a Dell system securely versus an older Lenovo system with a hard-disk drive (HDD) managed through only SCCM. With DCIP, it took only eight steps to complete the Erase Disk task. It took the IT admin only 10 seconds to initiate the task. For the Lenovo system, it took 14 steps to erase the disk. In this scenario, it took our IT admin over two minutes, to complete this change on the ThinkPad. Figure 6 shows how this time difference increased when we used the two management systems to erase the hard-disk drives remotely on multiple systems. Completing the task on 50 Dell notebooks would take only 10 seconds whereas doing so on 50 Lenovo notebooks would take over 1 hour and 45 minutes. Figure 6: IT admin time to remotely erase the hard drive on various numbers of notebooks using the two management systems. Lower numbers are better. Did you know? DCIP leverages ATA Secure Erase capability for hard-disk drives and solid-state drives. Dell notebooks that feature ATA compliant drives support Secure Erase functionality—and with Intel Core vPro processors and DCIP, Dell notebooks can have sensitive data securely erased, in- band or out.
  • 10. A Principled Technologies test report 10Remote notebook management: Dell unique vPro extensions and Dell Client Integration Pack 3.1 Performing general remote management tasks Initiating a KVM Connection Occasionally, an IT administrator will need to access a laptop remotely. While tools like Window’s Remote Desktop Connection are useful for this, they are limited if the system is not booted into an operating system. DCIP provides KVM tools for accessing systems remotely regardless of the system’s power state. No password is required to complete this connection, though security precautions can be taken to require the user of the laptop to provide consent to establish the KVM connection. By enabling user consent, an employee is required to communicate a randomly generated confirmation code to the remote IT administrator. The code is displayed on the screen via a sprite file that is not accessible from the network. This ensures the safety of employees. These features are available in both Configuration Manager 2012 and DCIP. While the uses of the technology are similar for both systems, we found that it is faster to navigate through the Dell AMT Plugin menus to create the connection, than in SCCM. For the Dell system, it took five steps to complete the KVM connection using the KVM Connect task, taking the IT admin just under 15 seconds to complete this task. For the Lenovo system, it also took five steps to complete the KVM connection. It took the IT admin 20.3 seconds to complete this task. Figure 7 shows how this time difference increased when we used the two management systems to complete the KVM session on multiple systems. Completing the task on 50 Dell notebooks would take only 2.1 minutes whereas doing so on 50 Lenovo notebooks would take 3.3 minutes. Figure7: IT admin time to complete a KVM connection on various numbers of notebooks using the two management systems. Lower numbers are better.
  • 11. A Principled Technologies test report 11Remote notebook management: Dell unique vPro extensions and Dell Client Integration Pack 3.1 Changing the power profile The AMT power profile specifies the states in which a system responds to commands depending on the power state of the laptop. Power states describe whether the laptop is on or off, hibernating, or connected or disconnected from an AC power source. DCIP allows you to configure this setting remotely for multiple laptops from the console. For example, a technician may want to set all of his laptops to respond only to AMT requests when connected to a power source. By using the Intel® vPro™ AMT Plugin, the administrator could quickly change the power setting on multiple laptops so that they will only wake when attached to an AC adapter. This was not possible on the Lenovo. While we were able to manage the BIOS settings on the older Lenovo laptops through the KVM, the system was not able to boot into the management engine during a KVM session. A technician using the Lenovo would need to walk to the target laptop and make the changes manually using BIOS menus. For the Dell system, it took nine steps to change the Power Profile using the Power Profile task. In our scenario, it took our IT admin 13 seconds to initiate this change. We were not able to replicate this action on the Lenovo system because the KVM connection could not reach the Management Engine interface while using the KVM function. Reporting and collecting information Using DCIP, an administrator can collect data on provisioned computers using multiple reports. Those reports are called OOB Manageability, Provisioning, Battery Health, and Hardware Inventory. The OOB Manageability collects information about the state of AMT management on the target laptops. The provisioning report provides information to show when the laptop was provisioned and what methods were used. The Battery Health report provides data about the type of batteries in your Latitude systems and the health status of the batteries. IT admins could use this information to determine whether employees will need a new battery, and what type of battery will need to be ordered. IT can run the hardware inventory report to collect model numbers and current version numbers on laptops. This report includes information such as the model number for the laptop, IP address, or specifics about processor, memory, or drives. For all of these reports, IT can get some of this information for the Lenovo notebooks from SCCM and the Out of Band Management console, but this process involves entering the Out of Band Management Console for each system, and finding the desired information. DCIP collects the information and allows the quick creation of a report on multiple systems. The report can then be printed or exported into an Excel document for further use.
  • 12. A Principled Technologies test report 12Remote notebook management: Dell unique vPro extensions and Dell Client Integration Pack 3.1 IN CONCLUSION IT admins can spend considerable time managing employee notebooks. The Dell Client Integration Pack 3.1 for Microsoft System Center Configuration Manager 2012 can greatly streamline the management process and allow admins to remotely perform management tasks under a much broader range of conditions. In our labs at Principled Technologies, we performed a series of remote management tasks on Dell Latitude 7240 notebooks managed with DCIP and on Lenovo ThinkPad notebooks managed only through SCCM. Executing these tasks on a single system with DCIP was quicker and simpler than doing so with only SCCM. The time savings was even more pronounced when we performed the scenarios on two systems because DCIP lets you apply the same changes to multiple systems without taking any additional time. For an organization with large numbers of notebook systems, the economies of scale that DCIP provides would translate to the greatest savings.
  • 13. A Principled Technologies test report 13Remote notebook management: Dell unique vPro extensions and Dell Client Integration Pack 3.1 APPENDIX A – SYSTEM CONFIGURATION INFORMATION Figure 8 describes our server configuration. System Dell PowerEdge R510 Power supplies Total number 2 Vendor and model number Dell L1100A-S0 Wattage of each (W) 1100 Cooling fans Total number 5 Vendor and model number Delta Electronics Inc. PFC0612DE Dimensions (h × w) of each 2.5″ × 2.4″ Volts 12 Amps 1.7 General Number of processor packages 2 Number of cores per processor 4 Number of hardware threads per core 2 System power management policy Balanced CPU Vendor Intel Name Xeon Model number E5540 Stepping D0 Socket type LGA 1366 Core frequency (GHz) 2.53 Bus frequency 5.86 GT/s L1 cache 4 × 32 KB L2 cache 4 × 256 KB L3 cache 8 MB Platform Vendor and model number Dell PowerEdge R510 Motherboard model number Intel 5500 BIOS name and version Dell Inc. 1.12.0 (07/26/2013) BIOS settings Default Memory module(s) Total RAM in system (GB) 128 GB Vendor and model number Hynix HMT42GR7MFR4C-PB Type PC3-12800R Speed (MHz) 1,600 Speed running in the system (MHz) 1,333 Timing/Latency (tCL-tRCD-tRP-tRASmin) 7-7-7-19 Size (GB) 8 Number of RAM module(s) 16 Chip organization Double-Sided
  • 14. A Principled Technologies test report 14Remote notebook management: Dell unique vPro extensions and Dell Client Integration Pack 3.1 System Dell PowerEdge R510 Rank Dual Operating system Name Microsoft Windows Server 2012 Datacenter Build number 9200 File system NTFS Kernel ACPI x64-based PC Language English Graphics Vendor and model number Matrox G200eW Graphics memory (MB) 256 Driver 3.8.0.33w2 RAID controller Vendor and model number Dell PERC 6/I Integrated Firmware version 6.3.3-0002 (06/11/2013) Driver version 5.2.122.0 (04/03/2012) Cache size (MB) 256 MB Hard drives Type 1 Vendor and model number Dell MBA3147RC Number of drives 4 Size (GB) 146 RPM 15K Type SAS Type 2 Vendor and model number Dell ST3600057SS Number of drives 4 Size (GB) 600 RPM 15K Type SAS Ethernet adapters First network adapter Vendor and model number Broadcom® BCM5716C NetXtreme® II GigE Type Integrated Driver 7.8.53 (06/12/2014) Second network adapter Vendor and model number Broadcom BCM5716C NetXtreme II GigE Type Integrated Driver 7.8.53 (06/12/2014) Optical drive(s) Vendor and model number PLDS DVD+RW DS-8A3S Type DVD+RW
  • 15. A Principled Technologies test report 15Remote notebook management: Dell unique vPro extensions and Dell Client Integration Pack 3.1 System Dell PowerEdge R510 USB ports Number 4 Type 2.0 Figure 8: Configuration details for the test server. Figure 9 provides configuration details for the four laptops we tested. System Dell Latitude E7240 Dell Latitude E7240 Lenovo ThinkPad T430 Lenovo ThinkPad T420 General Number of processor packages 1 1 1 1 Number of cores per processor 2 2 2 2 Number of hardware threads per core 2 2 2 2 Total number of processor threads in system 4 4 4 4 System power management policy Default Default Default Default Processor power-saving option Intel SpeedStep™ Enabled Intel SpeedStep Enabled Lenovo Lenovo System dimensions (length × width × height) 8.3″ × 12.2″ × 0.79″ 8.3″ × 12.2″ × 0.79″ 13.4″ × 9.1″ × 1.4″ 13.4″ × 9.1″ × 1.4″ System weight 2.99 lbs. 2.99 lbs. 5.19 lbs. 4.81 lbs. CPU Vendor Intel Intel Intel Intel Name Core i5 Core i5 Core i5 Core i5 Model number 4300U 4300U 3320M 2520M Stepping C0 C0 D2 E0 Socket type and number of pins SOCKET 1168 BGA SOCKET 1168 BGA Socket 988B rPGA Socket 988B rPGA Core frequency (GHz) 1.90 1.90 2.60 2.50 Bus frequency 5 GT/s DMI 5 GT/s DMI L1 cache 32 KB + 32 KB (per core) 32 KB + 32 KB (per core) 32 KB + 32 KB (per core) 32 KB + 32 KB (per core) L2 cache 512 KB (256 KB per core) 512 KB (256 KB per core) 512 KB (256 KB per core) 512 KB (256 KB per core) L3 cache 3 MB 3 MB 3 MB 3 MB Platform Vendor Dell Dell Lenovo Lenovo Motherboard model number OV120R OV120R 234222U 4177CTO Motherboard chipset Intel 5 series chipset Intel 5 series chipset Intel QM77 Intel QM67
  • 16. A Principled Technologies test report 16Remote notebook management: Dell unique vPro extensions and Dell Client Integration Pack 3.1 System Dell Latitude E7240 Dell Latitude E7240 Lenovo ThinkPad T430 Lenovo ThinkPad T420 BIOS name and version Dell A08 (02/18/2014) Dell A08 (02/18/2014) Lenovo G1ETA5WW 2.65 (04/15/2014) Lenovo 83ET76WW 1.46 (07/05/2013) Memory module(s) Vendor and model number Micron 8KTF51264HZ-1G6E1 Samsung M471B5173QH0- YK0 Samsung 471B5273DH0-CK0 Samsung M471B5773CHS-CH9 Type PC3-12800 PC3-12800 PC3-12800 PC3-10600 Speed (MHz) 1,600 1,600 1,600 1,333 Speed running in the system (MHz) 1,600 1,600 1,600 1,333 Timing/Latency (tCL- tRCD-tRP-tRASmin) 11-11-11-28 11-11-11-28 11-11-11-28 9-9-9-24 Size (MB) 4,096 4,096 4,096 2,048 Number of memory module(s) 2 1 1 1 Total amount of system RAM (GB) 8 4 4 2 Chip organization (single-sided/ double- sided) Double-sided Double-sided Double-sided Double-sided Channel (single/dual) Dual Single Single Single Hard disk Vendor and model number Samsung SSD SM841 mSATA Samsung SSD SM841 mSATA Hitachi HTS725050A7E630 Hitachi HTS725032A9A364 Number of disks in system 1 1 2 1 Size (GB) 120 120 500 320 Buffer size (MB) N/A N/A 32 16 RPM N/A N/A 7,200 7,200 Type SATA III 6.0 Gb/s SATA III 6.0 Gb/s SATA II 3.0 Gb/s SATA II 3.0 Gb/s Controller Intel Mobile Express Chipset SATA RAID Controller Intel Mobile Express Chipset SATA RAID Controller Intel 7 Series Chipset Family SATA AHCI Controller Intel Mobile Express Chipset SATA AHCI Controller Driver 12.9.0.1001 (10/28/2013) 12.9.0.1001 (10/28/2013) Intel 12.8.10.1005 (02/07/2014) Intel 12.8.10.1005 (02/07/2014) Operating system Name Windows 8 Pro 64- bit Windows 8 Pro 64- bit Windows 8 Pro 64- bit Windows 8 Pro 64- bit Build number 9200 9200 9200 9200 Service Pack NA NA NA NA File system NTFS NTFS NTFS NTFS Kernel ACPI x64-based PC ACPI x64-based PC ACPI x64-based PC ACPI x64-based PC Language English English English English
  • 17. A Principled Technologies test report 17Remote notebook management: Dell unique vPro extensions and Dell Client Integration Pack 3.1 System Dell Latitude E7240 Dell Latitude E7240 Lenovo ThinkPad T430 Lenovo ThinkPad T420 Graphics Vendor and model number Intel HD Graphics 4400 Intel HD Graphics 4400 Intel HD Graphics 4000 Intel HD Graphics 3000 Type Integrated Integrated Integrated Integrated Chipset Intel HD Graphics Family Intel HD Graphics Family Intel HD Graphics Family Intel HD Graphics Family BIOS version 2177.14 2177.14 2161.0 2.089.0 Total available graphics memory (MB) 1,744 1,792 1,664 741 Dedicated video memory (MB) 0 0 32 32 System video memory (MB) 0 0 0 0 Shared system memory (MB) 1,744 1,792 1,632 709 Resolution 1,920 × 1,080 1,920 × 1,080 1,366 × 768 1,366 x 768 Driver Intel 10.18.10.3621 (05/16/2014) Intel 10.18.10.3621 (05/16/2014) Intel 9.17.10.2875 (10/17/2012) Intel 9.17.10.2843 (08/21/2012) Microsoft DirectX® Version DirectX 11.0 DirectX 11.0 DirectX 11 DirectX 11 Sound card/subsystem Vendor and model number Realtek ALC3226 HD Audio Codec Realtek ALC3226 HD Audio Codec Realtek High Definition Audio Driver Conexant 20672 SmartAudio HD Driver 6.0.1.5988 (08/27/2013) 6.0.1.5988 (08/27/2013) 6.0.1.7040 (11/11/2013) 8.32.43 (08/08/2013) Ethernet Vendor and model number Intel Ethernet Connection I218-LM Intel Ethernet Connection I218-LM Intel 82579LM Gigabit Network Connection Intel 82579LM Gigabit Network Connection Driver Intel 12.11.77.1 (03/13/2014) Intel 12.11.77.1 (03/13/2014) 12.10.28.0 (08/21/2013) 12.10.28.0 (08/21/2013) Wireless Vendor and model number Intel Dual Band-AC 7260 Intel Dual Band-AC 7260 Intel Centrino® Advanced-N 6205 Intel Centrino Advanced-N 6205 Driver 17.0.0.32 (02/18/2014) 17.0.0.32 (02/18/2014) 15.10.3.2 (8/22/2013) 15.10.3.2 (8/22/2013) Optical drive(s) Vendor and model number N/A N/A Optiarc AD-7740H Matshita UJ8A0A Type N/A N/A DVD-RW DVD-RW
  • 18. A Principled Technologies test report 18Remote notebook management: Dell unique vPro extensions and Dell Client Integration Pack 3.1 System Dell Latitude E7240 Dell Latitude E7240 Lenovo ThinkPad T430 Lenovo ThinkPad T420 USB ports Number 3 3 4 3 Type USB 3.0 USB 3.0 2 x USB 2.0, 2 x USB 3.0 USB 2.0 Other Mini DisplayPort Mini DisplayPort Media card reader, Mini DisplayPort eSATA & Media card reader Monitor LCD type LED LED HD LED WXGA HD LED WXGA Screen size 12.5” 12.5” 14.0” 14.0” Refresh rate 60 Hz 60 Hz 60 Hz 60 Hz Battery Type Dell GVD76 Dell WD52H Lenovo 45N1011 Lenovo 42T4795 Lithium-ion Size (length × width × height) 10.9″ × 3.1″ × .4″ 10.9″ × 3.1″ × .4″ 8.5″ × 3″ × .75″ 8.13 ″ × 2″ × .75” Rated capacity 2,679 mAh / 11.1V (31Wh) 6,700 mAH / 7.4V (45 Wh) 8,400 mAh / 11.1V (94.Wh) 5,200 mAh / 10.8V (57Wh) Weight .506 lbs. .586 lbs. 1.1 lbs. .68 lbs. Figure 9: Configuration details for the laptops we tested.
  • 19. A Principled Technologies test report 19Remote notebook management: Dell unique vPro extensions and Dell Client Integration Pack 3.1 APPENDIX B – EXTRAPOLATING TO 50 NOTEBOOKS When managing the Lenovo ThinkPads with SCCM, the first few steps are the same whether you are managing one or multiple notebooks. However, once in SCCM, each notebook is managed one at a time. While DCIP allows Dell notebooks to be managed in parallel, each step or task must be repeated on each individual Lenovo notebook. To calculate the amount of time required to manage multiple Lenovo notebooks more accurately, we separated the management time into three parts:  The time required to open SCCM and prepare it for remote management.  The time required to manage the first Lenovo notebook.  The time required to manage the second Lenovo notebook. We ran each test 3 times and took the median of the three runs for each part of the process listed above. We took an average of the time required to manage the first and second Lenovo notebook to determine the average time required to manage one notebook. To present admin time required for 50 Lenovo notebooks, we multiplied the average time required to manage one notebook by 50, and added the time required to perform the initial steps.  Time it takes to perform the initial steps + (Average Lenovo management time * 50)
  • 20. A Principled Technologies test report 20Remote notebook management: Dell unique vPro extensions and Dell Client Integration Pack 3.1 APPENDIX B – HOW WE TESTED We used the following steps to create our test environment. Figure 10 describes our isolated testing environment, which comprised one PowerEdge R510 server running Hyper-V with four virtual machines. We tested four laptops, which we describe below. We used two Dell Latitude E7240s: one Lenovo T430 and one Lenovo T420. All systems installed all available Windows updates before being configured. Description Computer name Operating system Assigned IP vCPU vRAM Domain Controller dc.test.local Windows Server 2008 R2 Standard 192.168.1.10 1 8 GB Certificate Authority ca.test.local Windows Server 2008 R2 Enterprise 192.168.1.15 1 8 GB Database Server db.test.local Windows Server 2008 R2 Standard 192.168.1.20 1 16 GB Management Server cm.test.local Windows Server 2008 R2 Standard 192.168.1.50 2 16 GB Dell Latitude E7240 Dell1.test.local Windows 8 Pro 192.168.1.101 Dell Latitude E7240 Dell2.test.local Windows 8 Pro 192.168.1.102 Lenovo T430 T430.test.local Windows 8 Pro 192.168.1.103 Lenovo T420 T420.test.local Windows 8 Pro 192.168.1.104 Figure 10: The details of our isolated testing environment. Required installation media  Each of the Microsoft Windows operating systems listed in Figure 10  SQL 2012 Enterprise (en_sql_server_2012_enterprise_edition_x86_x64_dvd_813294.iso)  System Center 2012 Configuration Manager SP1 (mu_system_center_2012_configuration_manager_and_enpoint_protection_with_sp1_x86_x64_dvd_1565907.iso) Infrastructure construction System configuration The following steps were completed on each virtual machine. 1. Log in to the virtual machine as administrator 2. Open Windows Firewall with Advanced Security. 3. Click Firewall properties. 4. On the Domain Profile, Private Profile, and Public Profile tabs, set the Firewall state to off. Click OK. 5. Set the host name and IP of each virtual machine as described above. Installing the Active Directory and Domain Controller 1. On the Domain Controller, set a static IP, and set the DNS server to 127.0.0.1. 2. Click StartRun, and type DCPROMO in the Run field. 3. Leave defaults, and click Next on the Welcome window. 4. Click Next on the Operating System Compatibility window. 5. Choose Create a new domain in a new forest, and click Next. 6. Provide a name for the domain, and click Next. We used test.local 7. At the Domain NetBIOS name, enter a name and click Next. We used TEST 8. Set the Forest Functional Level to Windows Server 2008, and click Next. 9. Set the Domain Functional Level to Windows Server 2008, and click Next.
  • 21. A Principled Technologies test report 21Remote notebook management: Dell unique vPro extensions and Dell Client Integration Pack 3.1 10. Leave defaults on the Additional Domain Controller Options window, and click Next. 11. On the pop-up asking if you want to continue, click Yes. 12. Leave defaults on the Location for Database, Log Files and SYSVOL window, and click Next. 13. Enter a domain password, and click Next. 14. Click Next on the summary page. 15. Click Finish. 16. Click Restart Now. Adding DHCP 1. On the Domain Controller, open the Add Roles Wizard. 2. Click Next. 3. Select DHCP Server and click Next. 4. Accept all defaults and click Next until you reach the Add Scope screen. 5. At the Add or Edit DHCP Scopes screen, click Add. 6. At the Add Scope screen, enter the Name DHCP Scope name. 7. In the next box, set the following values, and click OK.  Starting IP Address. We used 192.168.1.100  Ending IP Address. We used 192.168.1.150  Subnet mask. We used 255.255.255.0 8. Check the Activate This Scope box. 9. Click Next. 10. Accept defaults and click Next until you reach the Confirmation Page. 11. Click Install. Configuring administrative rights for the management server 1. On the Certificate Authority and Database servers, run lusrmgr.msc. 2. Select Groups. 3. Right-click Administrators and click Properties. 4. Click Add. 5. Select Object Types, check the box for Computers, and click OK. 6. Add the computer name for the management server. We entered CM Configuring the enterprise certificate authority 1. Log in to the Windows 2008 R2 Enterprise server designated for Certificate Authority as domainadministrator. 2. Launch Server Manager. 3. Select the menu item for Roles. Click Add Roles. Click Next. 4. Choose the option Active Directory Certificate Services. Click Next. 5. Click Next. Choose the option Certification Authority, and click Next. 6. Select Enterprise for the setup type, and click Next. 7. Choose Root CA for the CA type, and click Next. 8. Select Create a New Private Key, and click Next.
  • 22. A Principled Technologies test report 22Remote notebook management: Dell unique vPro extensions and Dell Client Integration Pack 3.1 9. Accept all remaining defaults, and click Next through the remaining screens. 10. When prompted to begin installation, click Install. 11. To exit the wizard, click Close. Restart the server before continuing to the next steps. Installing SQL 2012 1. Log in to the Database server as domainadministrator. 2. Attach the installation media for SQL 2012, and run the setup.exe file. 3. Select Installation from the menu on the left, and then select New SQL Server stand-alone installation or add features to an existing installation. 4. Allow the prerequisite check to finish and click OK. 5. A window with the title SQL Server 2012 Setup will appear and check prerequisites. When this is process is complete, click Next. 6. Enter a valid product key and click Next. 7. Accept the license terms and click Next. 8. Select SQL Server Feature Installation and click Next. 9. Under Instances Features, select Database Engine Services with Full-Text and Semantic Extractions for Search and Data Quality Services, Reporting Services, Management Tools - Basic, Management Tools - Complete, and SQL Client Connectivity SDK. Click Next. 10. Allow the prerequisite checker to run and click Next. 11. Select Default Instance and an Instance ID. Click Next. 12. On the Disk Space Requirements Screen, click Next. 13. On the Server configuration screen, choose NT AUTHORITYSYSTEM for SQL Server Database Engine, and NT AUTHORITYLOCAL SERVER for SQL Server Analysis Services and SQL Server Reporting Services. 14. Set Startup Type for Server Agent, SQL Server Database Engine, and Server Browser as Automatic, and click Next. 15. On the Database Engine Configuration screen, select Mixed Mode. 16. Enter a password for the system administrator (sa) account. 17. Click Add Current user. 18. Click Next four times. 19. Verify that the Summary is correct and click install. 20. Click finish when prompted. 21. Install SQL Server 2012 SP1 and CU9 from the following Web site: technet.microsoft.com/en- us/sqlserver/ff803383.aspx. When the installation is finished, restart the server. 22. Open Microsoft SQL Server Management Studio. 23. Sign in to your SQL database. 24. Right-click your SQL host and select Properties. 25. Select the memory page. 26. Change maximum server memory to 16384. Click OK. 27. In SQL Server Configuration Manager, expand the SQL Server Network Configuration tree and double-click Protocols for MSQLSERVER.
  • 23. A Principled Technologies test report 23Remote notebook management: Dell unique vPro extensions and Dell Client Integration Pack 3.1 28. Right-click Named Pipes and click Enable. 29. Do the same for TCP/IP. 30. In the left panel, click SQL Server Services, right-click SQL Server, and choose restart. Installing required Windows features and roles for System Center Configuration Manager 1. Log in to the management server with domainadministrator. 2. Launch the Server Manager from the taskbar. 3. Click Add Features or Roles. 4. Click Next, and then click Next again. 5. Select Web Server IIS. 6. Click Add Required Role Services. 7. Add Windows Software Update Services. 8. Run Windows Update, and install updates. 9. Register ASP.NET with IIS by running the following command: C:WindowsMicrosoft.NETFramework64v4.0.30319>aspnet_regiis.exe –r Installing the Windows Assessment and Deployment Kit for Windows 8 Release Preview 1. Download the Windows Assessment and Deployment Kit for Windows 8 Release Preview from the following Web site: www.microsoft.com/en-us/download/details.aspx?id=29929 2. Run adksetup.exe. 3. Select Install the Assessment and Deployment Kit to this computer, and choose an installation path. Click Next. 4. Select No when prompted to join the Customer Experience Improvement Program (CEIP). 5. Accept the license agreement. 6. Select Deployment tools and Windows Preinstallation Environment features, and User State Migration. Click Install. 7. Click Close when the install finishes. Extending the Active Directory schema 1. Log on to the Domain controller with an account that is a member of the Schema Admins security group. 2. Run SMSSETUPBINx64extadsch.exe from the installation source to extend the AD schema. 3. Review extadsch.log in the root of the system drive to confirm the operation was successful. Creating Active Directory accounts for System Center Configuration Manager 1. Log in to the Domain Controller using the domainadministrator account. 2. Create a global security group called Kerberos Admins 3. Add Domain Admins group to the Kerberos Admins global security group. 4. Add the computer account of the SCCM server to the Kerberos Admins security group. 5. Create an Organizational Unit for AMT managed systems called AMT 6. Create a security group called AMT 7. Add the Kerberos Admins group to the AMT security group. Creating system management container and permissions 1. On the Domain Controller server, run adsiedit.msc, and connect to the domain for the management server. 2. Expand the Domain Controller computer FQDN, right-click CN=System, click New, and click Object.
  • 24. A Principled Technologies test report 24Remote notebook management: Dell unique vPro extensions and Dell Client Integration Pack 3.1 3. Select Container, and click Next. 4. In the Value field, type System Management. Click Next. 5. Click Finish. 6. Expand the management server’s domain in the console pane. 7. Expand DC=Site Server and then expand CN=System. 8. Right-click CN=System Management, and then click Properties. 9. Click the Security tab, and click Add to the management server computer account. 10. Grant Full Control permissions. 11. Click Advanced, select the management server’s computer account, and click Edit. 12. In the Apply Onto list, choose this object and all descendant objects. 13. Click OK to close ADSI Edit. Creating certificate templates for OOB management 1. Log in to the Windows 2008 R2 Enterprise server designated for Certificate Authority as domainadministrator. 2. Click StartAdministrative ToolsCertification Authority. 3. Right-click the Certification Authority, and click Properties. 4. On the General tab, click View Certificate. 5. On the Details tab, scroll to and select Thumbprint. Copy the 40-character code displayed in the details. You will add this information to the AMT BIOS later. 6. Click Ok to close the Certificate Authority properties. 7. Expand the Certification Authority, and select Certificate Templates. 8. Right-click Certificate Templates, and select Manage. 9. Locate Web Server in the list of available certificate templates. Right-click the template, and select Duplicate Template. 10. Select Windows 2003 Enterprise, and click OK. 11. Change the template name to AMT Provisioning. 12. On the Subject Name tab, select Build from this Active Directory Information. Select Common Name, and choose the option UPN. 13. On the Security tab, add the security group you created for your SCCM site server. Add the Enroll permission for the security group. Ensure Domain Admins and Enterprise Admins have Enroll permissions. 14. On the Extensions tab, select Application Policies, and click Edit. 15. Click Add. Click New. Type AMT Provisioning for the name, and 2.16.840.1.113741.1.2.3 as the Object Identifier. Click OK. 16. Ensure AMT Provisioning and Server Authentication are listed, and click OK. 17. Click OK to close the template properties. 18. Right-click the web server template, and select Duplicate Template. 19. Select Windows 2003 Enterprise, and click OK. 20. Change the template name to AMT Web Server Certificate Template 21. On the General tab, choose the option Publish Certificate in Active Directory.
  • 25. A Principled Technologies test report 25Remote notebook management: Dell unique vPro extensions and Dell Client Integration Pack 3.1 22. On the Subject Name tab, select Supply in the request. 23. On the Security tab, ensure Domain Admins and Enterprise Admins have Enroll permissions. 24. Click OK to close the template properties. 25. Log in to the management server as domainadministrator. 26. Click StartRun. Type mmc and press Enter. 27. In the mmc console, click FileAdd/Remove Snap-in… 28. Select Certificates, and click Add. Select Computer account. Click Next. 29. Select Local computer, and click Finish. 30. Click OK. 31. Expand CertificatesPersonalCertificates. 32. In the right panel, click More ActionsAll TasksRequest a new certificate… 33. Click Next. 34. Accept the defaults, and click Next. 35. Select the new AMT Provisioning certificate. Click Enroll. 36. Click Close. Installing System Center Configuration Manager 2012 SP1 1. Attach the SCCM 2012 SP1 Installation media to the management server. 2. Open splash.hta. 3. Click Install. 4. Read the Before You Begin section, click Next. 5. Choose Install a primary site. Do not choose the typical options. 6. Choose the Evaluation option, or enter your license key. Click Next. 7. Check the box to accept the EULA, and click Next. 8. Accept the license agreements, and click Next. 9. Enter a path for the prerequisite file downloads. We used C:Downloads 10. Select a language, and click Next for both server and client. 11. Enter a site code for the primary site. We used PTL. 12. Enter a description. 13. Choose an install path. We accepted the default install path. 14. Ensure that the console will be installed, and click Next. 15. Install as a primary stand-alone site. 16. Enter the SQL server name and instance, and click Next. 17. Accept the default SMS provider, and click Next. 18. Select the option to configure the communication method on each site system role. 19. Select HTTPS, and click Next. 20. Select HTTP for Management Point and Distribution point, and click Next. 21. Enable CEIP if you wish to participate, and click Next. 22. Run the prerequisites check, and resolve any issues displayed.
  • 26. A Principled Technologies test report 26Remote notebook management: Dell unique vPro extensions and Dell Client Integration Pack 3.1 23. Click Begin Install, and click Close when the installation is complete. 24. Download and install the Cumulative Update 4 from the following Web site: support.microsoft.com/kb/2922875/en- us Adding site system roles for OOB management 1. Open the Configuration Manager console. 2. Click Administration in the lower left panel of the console. 3. Expand Site Configuration. Select Sites. 4. Right-click the management server, and select Add Site System Roles. 5. Click Next. 6. Accept the default for Proxy, and click Next. 7. From the list of available roles, choose the options Enrollment point and Out of band service point. Click Next. 8. Accept the defaults for the AMT Service Point, and click Next. 9. Click Browse to select the AMT provisioning certificate you created in the previous steps. 10. Clear the checkbox for Enable CRL checking for the AMT provisioning certificate. Click Next. 11. Accept the defaults for the enrollment point, and click Next. 12. Review the summary, and click Next. 13. Click Close to exit the wizard. Installing Intel vPro™ add-on for System Center Configuration Manager 1. Download the Intel Core™ vPro processor add-on for System Center Configuration Manager from the following Web site: downloadcenter.intel.com/Detail_Desc.aspx?agr=Y&DwnldID=21835&lang=eng 2. Extract the downloaded zip file to a location on your SCCM server. We used C:IntelvProSCCMAddOn-v2 3. Browse to C:IntelvProSCCMAddOn-v2x64, and run setup.exe. 4. Select I Agree, and click Next. 5. Accept the default installation location. Select Everyone, and click Next. 6. Click Next to begin installation. 7. Click Close. Installing Intel SCS 9.1 1. Download IntelSCS_9.1.zip from the following Web address: https://downloadcenter.intel.com/Detail_Desc.aspx?DwnldID=20921 2. Extract the contents to C:IntelSCS_9.1 3. Browse to C:IntelSCS_9.1IntelSCSRCS 4. Run IntelSCSInstaller.exe. 5. Check the boxes for Database, Service, and Console. Click Next. 6. Select I accept the terms of the license agreement, and click Next. 7. Enter the credentials of the Domain account that will run the service. We used domainadministrator. Click Next. 8. Select the SQL server you want to use for the SCS database. This information may populate automatically. Click Next. 9. For Installer SQL Server Authentication, select Windows authentication (integrated security), and click Next. 10. For Service SQL Server Authentication, select Windows authentication (integrated security), and click Next.
  • 27. A Principled Technologies test report 27Remote notebook management: Dell unique vPro extensions and Dell Client Integration Pack 3.1 11. Review and confirm the setup information, and click Install. 12. Click Finish. Installing and Configuring DCIP 3.1 1. On the management server, download DCIP-Build 99_ZPE.exe from the following Web address: downloads.dell.com/FOLDER01459457M/2/DCIP-Build 99_ZPE.exe 2. Run DCIP-Build 99_ZPE.exe and unzip the files to C:Dell 3. Browse to C:Dell 4. Run Dell_Client_Integration_Pack.exe. 5. Click Next. 6. Agree to the License Agreement and click Next. 7. Select Complete and click Next. 8. Click Install. 9. Click Finish. 10. Open the Dell AMT Plugin. 11. On the Database and Password Configuration Page, click Retrieve SQL Servers. Select the site database server. 12. Select Integrated Security. 13. Click Retrieve SQL Databases, choose the SCCM site database. 14. For Windows Account, enter the credentials for the test.local administrator. 15. For AMT ME Account, for Username enter admin and for Password enter Password1! 16. Click Save. 17. Add Configuration Manager Console and Dell AMT Plugin to the task bar. Getting the Intel vPro™ Use Case Remote Drive Erase image 1. Download the Intel vPro Use Case Reference Design - Remote Drive Erase from the following Web site: downloadcenter.intel.com/confirm.aspx?httpDown=http://downloadmirror.intel.com/20971/eng/1083.zip&lang=en g&Dwnldid=20971 2. Extract the downloaded file to C:1083 3. In the location C:1083rde_builder, find and open the file iso_builder.html. 4. In the Remote Drive Erase ISO Builder, select Take input from: KVM Session. 5. Click Build ISO. 6. Move the rde.iso file from C:1083rde_builder to C:usersadministrator.testDocuments Setting up AMT provisioning with Intel SCS Remote Configuration Service Creating the configuration profile 1. On the management server, launch the Intel Setup and Configuration Console. 2. Click the Profiles button. 3. Click the New button to construct a profile for deployment. 4. For Profile Name, enter the name of your target server. We used test-tp. Click Next. 5. Choose the options Active Directory Integration, Access Control List (ACL), and Transport Layer Security (TLS) and click Next.
  • 28. A Principled Technologies test report 28Remote notebook management: Dell unique vPro extensions and Dell Client Integration Pack 3.1 6. Browse for the OU created for the AMT managed devices. We used OU=AMT, DC=test, DC=local. 7. Click Next. 8. Click Add. 9. Select Active Directory User/Group. Click Browse. 10. Add Kerberos Admin, Domain Admins, or other administrative users groups. Click OK. 11. Select Remote for Access Type. 12. Choose the option for PT Administration. Click OK. 13. Click Next. 14. Select your Enterprise Certificate Authority. 15. Select the Server Certificate Template you will use to generate certificates for your AMT devices. We selected AMTWebServerCertificate. Click Next. 16. Choose the options Web UI, Serial Over LAN, IDE Redirection, KVM Redirection. Enter the RFB Password for KVM sessions. We used Password1! 17. Enter the MEBios Extension password. We used Password1! 18. Select Use the following password for all systems. Enter the password for use after provisioning is complete. We used Password1! 19. Choose the options Enable Intel AMT to respond to ping requests and Enable Fast Call for Help (within the enterprise network). 20. Click Set… to Edit IP and FQDN settings. 21. Select Use the following as the FQDN, and choose Primary DNS FQDN from the pull-down menu. 22. Choose the option The device and the OS will have the same FQDN (Shared FQDN). 23. Select Get the IP from the DHCP server. 24. Select Update the DNS directly or via DHCP option 81. Click OK. 25. Click Next. Click Finish. Laptop configuration Repeat these steps for each laptop. Reserving an IP address in DHCP 1. On the Domain Controller, run dhcpmgmt.msc. 2. Expand FQDNScope and double-click Reservations. 3. Click more actions then New Reservation. 4. For Reservation Name, enter the host name of the target laptop. 5. Enter an IP address to reserve. 6. Enter the MAC address of the target laptops Ethernet port. 7. Click Add. Configuring policy on the target laptop 1. Log on to the target laptop using domainadministrator. 2. Download and apply all applicable driver packages from the manufacture’s website. 3. Open Windows Firewall with Advanced Security.
  • 29. A Principled Technologies test report 29Remote notebook management: Dell unique vPro extensions and Dell Client Integration Pack 3.1 4. Click Firewall Properties. 5. On the Domain Profile, Private Profile, and Public Profile tabs, set the Firewall state to off. Click OK. 6. Set the host name and IP of each virtual machine as described above. 7. Join the system to the test.local domain and restart. 8. Run lusrmgr.msc. 9. Select Groups. 10. Right-click Administrators and click Properties. 11. Click Add. 12. Select Object Types, check the box for Computers, and click OK. 13. Add the computer name for the management server. We entered CM Adding the enterprise certificate authority to the AMT trusted root certification authorities 1. Power on the target laptop. 2. During POST, press CTRL-P to enter the Intel Management Engine BIOS settings. 3. When prompted for a password, type the default password admin 4. Provide and confirm a new password. We used Password1! 5. Select Intel AMT Configuration. Press Enter. 6. Select SOL/IDER/KVM. 7. All features should be Enabled. Press Esc to exit the menu. 8. Select User Consent. 9. Change User Opt-in to None. 10. Change Opt-in Configurable from Remote IT to Disabled. Press Esc to exit the menu. 11. Change Password Policy to During Setup And Configuration. 12. Select Network Setup. 13. Select Intel ME Network Name Settings. 14. For Host Name, use the same host name used for the operating system. 15. For Domain Name, enter the name of your domain. We used test.local 16. For Shared/Dedicated FQDN, select Shared. 17. For Dynamic DNS Update, select Enabled. Press Esc to exit the menu. 18. Select Remote Setup and Configuration. Press Enter. 19. On Provisioning Server IPv4/IPv6, enter the IP address of the system center server. We used 192.168.1.20 20. For Provisioning Server FQDN, enter the FQDN of the management server. We entered cm.test.local 21. Select TLS PKI. 22. Select PKI DNS Suffix, type the FQDN suffix. We used test.local Press Enter. 23. Select Manage Hashes. 24. Press Insert to add a new hash. 25. Enter a descriptive name for your Enterprise Certificate Authority. We used test.local CA. 26. Press Enter.
  • 30. A Principled Technologies test report 30Remote notebook management: Dell unique vPro extensions and Dell Client Integration Pack 3.1 27. Following the syntax example provided in the prompt, enter the 40-character thumbprint previously copied from your Enterprise CA root certificate. Press Enter. 28. Press Y to set the hash certificate as active. test.local CA will appear in the list of trusted root authorities. 29. Press Esc to return to the AMT Configuration Menu. 30. Select Activate Network Access. Press Y to confirm. 31. To exit, press Esc until prompted. Press Y to confirm exit. Executing the remote configuration script on the AMT managed laptop 1. Log in to the AMT managed target laptop as domainadministrator. 2. Copy the Configurator folder from the SCS_9.1 directory located on the management server to C: on the local host. 3. Open a command prompt as administrator. 4. Type cd C:Configurator and press Enter. 5. Execute the following command (where cm.domain is the fully qualified domain name of the management server): ACUConfig.exe /lowsecurity /output console /verbose ConfigViaRCSOnly cm.test.local Test-TP The Configurator utility will contact the Remote Configuration Service and apply the settings configured in the Test-TP profile. Setting up AMT discovery in SCCM 1. On the management server, open the SCCM Management Console. Locate your target laptop in the Devices panel. 2. Right-click the headings bar in the Devices panel and check the entries for AMT Status and AMT Version. 3. Right-click the server, and select Manage Out of BandDiscover AMT Status. Click OK to begin discovery. 4. Click refresh in the Home menu at the top of the panel. When the AMT Status for the target server displays Detected, the AMT controller has been discovered. Configuring the Configuration Manager Client 1. On the management server, navigate to the Microsoft Configuration Manager folder in program files. 2. Copy the Client folder and to the target laptop. 3. On the target laptop, run ccmsetup.exe. This task will run in the background and will take a few minutes to complete. 4. In Control Panel, open Configuration Manager. 5. On the Site tab, click Configure Settings. 6. For Currently assigned to site code:, enter PTL and click Apply. 7. In the Actions panel, run the User Policy Retrieval & Evaluation Cycle as well as the Machine Policy Retrieval & Evaluation Cycle. 8. After a few minutes, the Actions panel will populate with more tasks. Run each one of the tasks. 9. On the management server, in Device Collections, right-click on the target laptop, navigate to Manage Out of Band, and select Discover AMT Status. The Client, Site Code, and Client Activity fields will populate. The AMT Status will change to Externally provisioned.
  • 31. A Principled Technologies test report 31Remote notebook management: Dell unique vPro extensions and Dell Client Integration Pack 3.1 APPENDIX C – WHAT WE TESTED About our tests Our testing took place in two phases. In the first phase, only one of the Latitude E7240s and the Lenovo T430 were provisioned and able to be managed Out of Band. We found the time required to administer the changes on each of the laptops. We used Configuration Manager Console, the Out of Band Console, and the Intel vPro add-on to complete the testing on the Lenovo system. The Dell system was managed through the Dell AMT Plugin. In the second phase, we provisioned all four laptops in Configuration Manager and measured the amount of time required to make changes on both systems. For the Dell laptops, timing began prior to opening the Dell AMT Plugin. We then completed the steps required to complete the task, as listed below. Timing ended when the Finish button was clicked and the tasks were added to the queue for the system to administer. For the Lenovo laptops, timing began prior to opening the Configuration Manager Console. We then completed the steps required to complete the task, as listed below. Timing ended when the last step listed was completed. All tasks started with the laptops powered off and plugged in to their AC adapter. We pinged each laptop to verify that the management engine was available. Out of Band Management tests in DCIP for Dell laptops Change a single BIOS setting 1. On the management server, open the Dell Intel vPro AMT Plugin from the Windows task bar. 2. Select Client Configuration. 3. Select BIOS Settings. 4. On Active processor Cores, select All, and check Apply. 5. Click Next. 6. Click Add All. 7. Click Next. 8. Type a description in the Description field. We used test 9. Click Finish. To change a single BIOS setting for the two laptop test, we provisioned the second Dell laptop in SCCM and repeated the previous test. Change 10 BIOS settings 1. On the management server, open the Dell Intel vPro AMT Plugin from the Windows task bar. 2. Select Client Configuration. 3. Select BIOS Settings. 4. On Active processor Cores, select All, and check Apply. 5. On Bluetooth, select Enabled, and check Apply. 6. On Enable External USB Port, select Enabled, and check Apply. 7. On Enable Intel SpeedStep, select Enabled, and check Apply. 8. On Enable Intel Virtualization Technology, select Disabled, and check Apply. 9. On Enable VT for Direct I/O, select Disabled, and check Apply.
  • 32. A Principled Technologies test report 32Remote notebook management: Dell unique vPro extensions and Dell Client Integration Pack 3.1 10. On Hyper-threading, select Enabled, and check Apply. 11. On Mouse/Touchpad, select Touchpad/PS-2 Mouse, and check Apply. 12. On Wake on LAN/WLAN (Notebook), select LAN or WLAN and check the Apply checkbox. 13. On WLAN, select Enabled, and check Apply. 14. Click Next. 15. Click Add All. 16. Click Next. 17. Type a description in the Description field. We used test 18. Click Finish. To change 10 BIOS settings for the two laptop test, we provisioned the second Dell laptop in SCCM and repeated the previous test. Secure drive erase 1. On the management server, open the Dell Intel vPro AMT Plugin from the Windows task bar. 2. Select Operations. 3. Select Wipe Client Disk. 4. Select Schedule. 5. Click Add All. 6. Click Next. 7. Type a description in the Description field. We used test 8. Click Finish. For secure drive erase for the two laptop test, we provisioned the second Dell laptop in SCCM and repeated the previous test. Change a BIOS password 1. On the management server, open the Dell Intel vPro AMT Plugin from the Windows task bar. 2. Select Client Configuration. 3. Select BIOS Passwords. 4. Select Admin. 5. For Admin Password, type Password1 6. For Confirm, type Password1 7. Click Next. 8. Click Add All. 9. Click Next. 10. Type a description in the Description field. We used test 11. Click Finish. To change a BIOS password for the two laptop test, we provisioned the second Dell laptop in SCCM and repeated the previous test.
  • 33. A Principled Technologies test report 33Remote notebook management: Dell unique vPro extensions and Dell Client Integration Pack 3.1 Change boot order 1. On the management server, open the Dell Intel vPro AMT Plugin from the Windows task bar. 2. Select Client Configuration. 3. Select Boot Order. 4. Select the CD/DVD/CD-RW Drive from the Device list and click the up Arrow button to move the drive up in the Boot order once. 5. Select Permanent configuration. 6. Click Next. 7. Click Add All 8. Click Next. 9. Type a description in the Description field. We used test 10. Click Finish. To change boot order for the two laptop test, we provisioned the second Dell laptop in SCCM and repeated the previous test. Open KVM session Note: System is booted into BIOS before test. 1. On the management server, open the Dell Intel vPro AMT Plugin from the Windows task bar. 2. Select Operations. 3. Select KVM Connect. 4. Select Dell1 from the list and click Start. To open a KVM session for the two laptop test, we provisioned the second Dell laptop and repeated the previous test then repeated steps 4 for Dell2. Change power profile 1. On the management server, open the Dell Intel vPro AMT Plugin from the Windows task bar. 2. Select Client Configuration. 3. Select Power Profile. 4. From the Mobile Power Package dropdown menu, in the dropdown menu, change the setting to On in S0; ME Wake in S3/AC, S4-S5/AC. 5. Click Next. 6. Select the notebooks to add. We used Add All. 7. Click Next. 8. Type a description in the Description field. We used test 9. Click Finish. To change the power profile for the two laptop test, we provisioned the second laptop and repeated the previous test. Note: We were not able to reproduce this process on the Lenovo.
  • 34. A Principled Technologies test report 34Remote notebook management: Dell unique vPro extensions and Dell Client Integration Pack 3.1 Schedule Data Collection 1. On the management server, open the Dell Intel vPro AMT Plugin from the Windows task bar. 2. Select Reports. 3. Select OOB Manageability. 4. Select Schedule. 5. Click Add All. 6. Click Next 7. Type a description in the Description field. We used test 8. Click Finish. To schedule data collection for the two laptop test, we added Dell2 in SCCM and repeated the previous test. Retrieve Report The schedule data collection task must be completed before running the retrieve report task. 1. On the management server, open the Dell Intel vPro AMT Plugin from the Windows task bar. 2. Select Reports. 3. Select OOB Manageability. 4. Select Retrieve. 5. Click Add All. 6. Click Next. To retrieve report for the two laptop test, we added Dell2 in SCCM and repeated the previous test. Out of Band Management in SCCM tests for Lenovo laptops Change a single BIOS setting 1. On the management server, open the Configuration Manager Console from the Windows task bar. 2. In Assets and Compliance, expand Overview, and select Devices Collections. 3. Select the All Desktop and Server Clients Collection. 4. Right-click the notebook and in the menu, navigate to Intel vPro, and select KVM. 5. Wait for the KVM prompt to report the connection complete and for the screen to appear black. In the task bar, click Tools, and then click Power On. 6. During POST, press the F1 button to boot into the setup menu. 7. In the Security tab of the ThinkPad Setup menu, select I/O Port Access. 8. Select Bluetooth, and select Enabled. 9. Press Esc to close the current menu. 10. In the Restart Menu, select Exit Saving Changes. 11. Select Yes to save the configuration changes. To change a single BIOS setting in the two laptop test, we repeated the previous test, and then repeated steps 4 through 11 for the Lenovo T420. Change 10 BIOS settings 1. On the management server, open the Configuration Manager Console from the Windows task bar.
  • 35. A Principled Technologies test report 35Remote notebook management: Dell unique vPro extensions and Dell Client Integration Pack 3.1 2. In Assets and Compliance, expand Overview, and select Devices Collections. 3. Select the group containing the notebook. 4. Right-click the notebook and in the menu, navigate to Intel vPro, and select KVM. 5. Wait for the KVM prompt to report the connection complete and for the screen to appear black. In the task bar, click Tools, and then click Power On. 6. During POST, press the F1 button to boot into the setup menu. 7. In the Config tab of the ThinkPad Setup menu, select Network. 8. Select Wake on LAN, and select AC Only. 9. To close the current menu, press Esc. 10. In the Config menu, select Keyboard/Mouse 11. Select Touchpad, and select Enabled 12. To close the current menu, press Esc. 13. In the Config menu, select Power. 14. Select Intel SpeedStep Technology, and select Enabled. 15. To close the current menu, press Esc. 16. In the Config menu, select CPU. 17. Select Core Multi-Processing, and select Enabled. 18. Select Intel Hyper-threading Technology, and select Enabled. 19. To close the current menu, press Esc. 20. In the Security tab, select Virtualization. 21. Select Intel Virtualization Technology, and select Disabled. 22. Select Intel VT-d Feature, and select Disabled. 23. To close the current menu, press Esc. 24. In the Security tab, select I/O Port Access. 25. Select Wireless LAN and select Enabled. 26. Select Bluetooth, and select Enabled. 27. Select USB Port, and select Enabled. 28. Press Esc to close the current menu. 29. In the Restart Menu, select Exit Saving Changes. 30. Select Yes to save the configuration changes. To change 10 BIOS settings in the two laptop test, we repeated the previous test, and then repeated steps 4 through 30 for the Lenovo T420. Secure drive erase 1. On the management server, open the Configuration Manager Console from the Windows task bar. 2. In Assets and Compliance, expand Overview, and select Devices Collections. 3. Select the group containing the notebook. 4. Right-click the notebook. In the menu, expand Manage Out of Band, and select Out of Band Management Console. 5. Select Power Control.
  • 36. A Principled Technologies test report 36Remote notebook management: Dell unique vPro extensions and Dell Client Integration Pack 3.1 6. When the options become available in the Boot Option list, select IDER. 7. Select Boot from file. 8. Select Browse. 9. Select the .iso file created by the Intel vPro Remote Drive Erase program. In our testing, the file was named rde.iso. 10. Click Power On. 11. In Configuration Manager, right-click the Lenovo T430. In the dropdown menu, navigate to Intel vPro, and select Start KVM. 12. When prompted, press C. 13. Identify the number of the disk that will be erased. Enter the number, and press Enter. 14. Type low and press Enter. To securely erase the drive in the two laptop test, we repeated the previous test, and then repeated steps 4 through 14 for the Lenovo T420. Change boot order 1. On the management server, open the Configuration Manager Console from the Windows task bar. 2. In Assets and Compliance, expand Overview, and select Devices Collections. 3. Select the All Desktop and Server Clients Collection. 4. Right-click the notebook and in the menu, navigate to Intel vPro, and select KVM. 5. Wait for the KVM prompt to report the connection complete and for the screen to appear black. In the task bar, click Tools, and then click Power On. 6. During POST, press the F1 button to boot into the setup menu. 7. In the Startup menu, Select Boot. 8. Select the CD drive from the list. Click the up arrow button. 9. Press Esc to close the current menu. 10. In the Restart Menu, select Exit Saving Changes. 11. Select Yes to save the configuration changes. To change boot order in SCCM in the two laptop test, we repeated the previous test, and then repeated steps 4 through 11 for the Lenovo T420. Change BIOS password 1. On the management server, open the Configuration Manager Console from the Windows task bar. 2. In Assets and Compliance, expand Overview, and select Devices Collections. 3. Select the All Desktop and Server Clients Collection. 4. Right-click the notebook and in the menu, navigate to Intel vPro, and select KVM. 5. Wait for the KVM prompt to report the connection complete and for the screen to appear black. In the task bar, click Tools, and then click Power On. 6. During POST, press the F1 button to boot into the setup menu. 7. In the Security Menu, select Password. 8. Select Supervisor Password. 9. For the new password, type Password1
  • 37. A Principled Technologies test report 37Remote notebook management: Dell unique vPro extensions and Dell Client Integration Pack 3.1 10. Confirm the new password, and press Enter. 11. Press Esc to close the current menu. 12. In the Restart Menu, select Exit Saving Changes. 13. Select Yes to save the configuration changes. To change the BIOS password in the two laptop test, we repeated the previous test, and then repeated steps 4 through 13 for the Lenovo T420. Open KVM session Note: System is booted into BIOS before test. 1. On the management server, open the Configuration Manager Console from the Windows task bar. 2. In Assets and Compliance, expand Overview, and select Devices Collections. 3. Select the group containing the notebook. 4. In Configuration Manager, right-click the notebook. In the dropdown menu, navigate to Intel vPro, and select Start KVM. To Initiate KVM Connection in the two laptop test, we repeated the previous test, and then repeated step 4 for the Lenovo T420.
  • 38. A Principled Technologies test report 38Remote notebook management: Dell unique vPro extensions and Dell Client Integration Pack 3.1 APPENDIX D – WHAT WE FOUND Figures 11 and 12 show the detailed results of our testing using seconds and minutes respectively. Time to complete a task in seconds One notebook Two notebooks 50 notebooks Dell DCIM in SCCM Lenovo SCCM only Dell DCIM in SCCM Lenovo SCCM only Dell DCIM in SCCM Lenovo SCCM only Secure erase the disk 10.2 134.7 10.1 263.1 10.2 6,352.4 BIOS management tasks Change one BIOS setting 12.8 50.6 12.4 95.9 12.6 2,174.4 Change 10 BIOS settings 40.4 74.5 40.2 141.4 40.3 3,309.7 Change boot order 12.6 41.7 12.8 79.5 12.7 1,748.4 Change BIOS password 19.0 47.5 18.7 91.9 18.8 2,081.3 General management tasks Initiate KVM connection 7.2 13.1 9.7 16.6 127.1 196.3 Set the power profile 12.77 12.90 12.84 Figure 11: Time in seconds to complete tasks. Lower numbers are better. Time to complete a task in seconds One notebook Two notebooks 50 notebooks Dell DCIM in SCCM Lenovo SCCM only Dell DCIM in SCCM Lenovo SCCM only Dell DCIM in SCCM Lenovo SCCM only Secure erase the disk 0.17 2.25 0.17 4.39 0.17 105.9 BIOS management tasks Change one BIOS setting 0.2 0.8 0.2 1.6 0.2 36.2 Change 10 BIOS settings 0.7 1.2 0.7 2.4 0.7 55.2 Change boot order 0.2 0.7 0.2 1.3 0.2 29.1 Change BIOS password 0.3 0.8 0.3 1.5 0.3 34.7 General management tasks Initiate KVM connection 0.12 0.22 0.16 0.28 2.12 3.27 Set the power profile 0.2 0.2 0.2 Figure 12: Time in minutes to complete tasks. Lower numbers are better.
  • 39. A Principled Technologies test report 39Remote notebook management: Dell unique vPro extensions and Dell Client Integration Pack 3.1 ABOUT PRINCIPLED TECHNOLOGIES Principled Technologies, Inc. 1007 Slater Road, Suite 300 Durham, NC, 27703 www.principledtechnologies.com We provide industry-leading technology assessment and fact-based marketing services. We bring to every assignment extensive experience with and expertise in all aspects of technology testing and analysis, from researching new technologies, to developing new methodologies, to testing with existing and new tools. When the assessment is complete, we know how to present the results to a broad range of target audiences. We provide our clients with the materials they need, from market-focused data to use in their own collateral to custom sales aids, such as test reports, performance assessments, and white papers. Every document reflects the results of our trusted independent analysis. We provide customized services that focus on our clients’ individual requirements. Whether the technology involves hardware, software, Web sites, or services, we offer the experience, expertise, and tools to help our clients assess how it will fare against its competition, its performance, its market readiness, and its quality and reliability. Our founders, Mark L. Van Name and Bill Catchings, have worked together in technology assessment for over 20 years. As journalists, they published over a thousand articles on a wide array of technology subjects. They created and led the Ziff-Davis Benchmark Operation, which developed such industry-standard benchmarks as Ziff Davis Media’s Winstone and WebBench. They founded and led eTesting Labs, and after the acquisition of that company by Lionbridge Technologies were the head and CTO of VeriTest. Principled Technologies is a registered trademark of Principled Technologies, Inc. All other product names are the trademarks of their respective owners. Disclaimer of Warranties; Limitation of Liability: PRINCIPLED TECHNOLOGIES, INC. HAS MADE REASONABLE EFFORTS TO ENSURE THE ACCURACY AND VALIDITY OF ITS TESTING, HOWEVER, PRINCIPLED TECHNOLOGIES, INC. SPECIFICALLY DISCLAIMS ANY WARRANTY, EXPRESSED OR IMPLIED, RELATING TO THE TEST RESULTS AND ANALYSIS, THEIR ACCURACY, COMPLETENESS OR QUALITY, INCLUDING ANY IMPLIED WARRANTY OF FITNESS FOR ANY PARTICULAR PURPOSE. ALL PERSONS OR ENTITIES RELYING ON THE RESULTS OF ANY TESTING DO SO AT THEIR OWN RISK, AND AGREE THAT PRINCIPLED TECHNOLOGIES, INC., ITS EMPLOYEES AND ITS SUBCONTRACTORS SHALL HAVE NO LIABILITY WHATSOEVER FROM ANY CLAIM OF LOSS OR DAMAGE ON ACCOUNT OF ANY ALLEGED ERROR OR DEFECT IN ANY TESTING PROCEDURE OR RESULT. IN NO EVENT SHALL PRINCIPLED TECHNOLOGIES, INC. BE LIABLE FOR INDIRECT, SPECIAL, INCIDENTAL, OR CONSEQUENTIAL DAMAGES IN CONNECTION WITH ITS TESTING, EVEN IF ADVISED OF THE POSSIBILITY OF SUCH DAMAGES. IN NO EVENT SHALL PRINCIPLED TECHNOLOGIES, INC.’S LIABILITY, INCLUDING FOR DIRECT DAMAGES, EXCEED THE AMOUNTS PAID IN CONNECTION WITH PRINCIPLED TECHNOLOGIES, INC.’S TESTING. CUSTOMER’S SOLE AND EXCLUSIVE REMEDIES ARE AS SET FORTH HEREIN.