1. Tips and Tricks
The Settings Cog
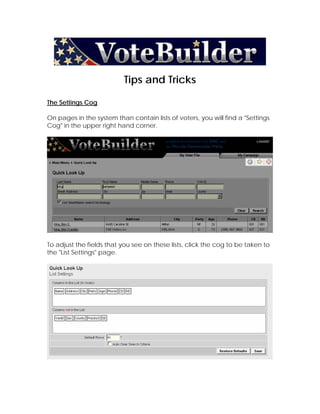
On pages in the system than contain lists of voters, you will find a quot;Settings
Cogquot; in the upper right hand corner.
To adjust the fields that you see on these lists, click the cog to be taken to
the quot;List Settingsquot; page.
2. You can simply quot;drag and dropquot; the fields from the box quot;Columns in the
Listquot; to quot;Columns not in the Listquot; and vice versa.
After adjusting the fields, press save. Your settings will be retained until you
next change them.
Save Page Layout
The default layout in VoteBuilder is for all information boxes to be closed.
This leads to page that look like this:
3. Take heart, though. You do not have to expand these sections out each
time you perform a search. Instead, expand out the sections once by
pressing the quot;plus signquot; next to the title of the section you want to expand
After you've done this for all of the sections, press quot;Save Page Layoutquot; in
the Actions section of the page.
This will retain your layout until you change it again.
Sharing a List
Unlike in VAN 3, individual lists are not shared in VoteBuilder. Instead, these
lists are shared at the folder level.
First, press quot;Savequot;
4. Once you're brought to the Save My List dialog, choose the folder in
which you want to save the list from the drop down menu. You can also
create a new folder from this screen. To do so, check the quot;New Folderquot;
box
Then title your folder
And title your list. Then, press save.
5. After you've done this, return to the Main Menu and select quot;View My
Folders
Select the folder you want to share
Press Edit Folder
6. From here you can define which users have access to the folder and
which do not.
Then, press save. This folder is now shared with those users that you
selected.
7. Restore My Previous List
Having an undo tool is very handy when working with computers. In VAN 3
there was a link at the bottom of the quot;My Listquot; page you could click to
restore your previous list. Don't worry -- this has not disappeared!
The Restore My List function has moved from the bottom of the My List
page to the top. To use it, press the quot;Morequot; button
Click the radio button next to quot;Restore Previous Listquot; and press next.
Your previous list is now restored to the My List page.
Multiple Selection
If words on the quot;Create a New Listquot; page are underlined, you can make
multiple selections in that field. For instance, after you've selected your
county from the county drop-down menu, the quot;Precinctquot; drop-down
menu automatically fills in with the precincts in that county.
8. After selecting the county, click the link for precinct.
This will bring you to a page where you can select multiple precincts.
After selecting the precincts in question, press save at the bottom of the
page. This will then take you back to the quot;Create A Listquot; page where you
can continue to define your universe.
Remember, you can do this for any field that is underlined. Once you
select one specific precinct (this will not work if you select multiple
precincts), you can choose a specific street or several streets by clicking
on the quot;Street Namequot; link.
9. If you want to find all voters on a specific street, this is the best approach
to take. If you try to enter the street name into the Street Name Box, and
you don't enter it exactly as it is on the file, your search will yield no results.
So, would not yield quot;E Park Avequot; as shown
in the street picker above.
Multiple Selections can also be made for activist codes or survey
questions.
After clicking the link, you can check all codes or questions in which you
are interested.