Easy Book Manual Overview
•
6 j'aime•6,446 vues

The document is a manual for the SIMATIC S7-1200 PLC system. It provides an introduction to the S7-1200 programmable logic controller, including its modular design, expansion capabilities, and basic HMI panels. It also describes the key features of STEP 7 programming software, such as its easy-to-use programming languages and instructions, device configuration tools, and communication functions. The manual aims to explain PLC concepts and S7-1200 operation in simple terms to help users get started with the system easily.

Recommandé
Contenu connexe
Tendances
Tendances (20)
Similaire à Easy Book Manual Overview
Similaire à Easy Book Manual Overview (20)
Dernier
Dernier (20)
Easy Book Manual Overview
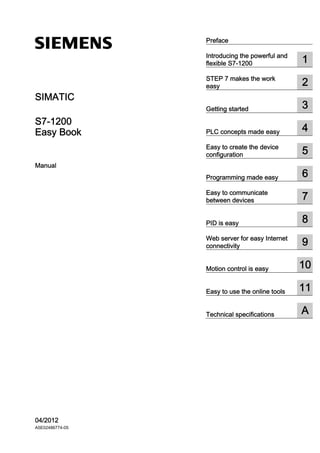
- 1. Easy Book ___________________ ___________________ ___________________ ___________________ ___________________ ___________________ ___________________ ___________________ ___________________ ___________________ ___________________ ___________________ ___________________ SIMATIC S7-1200 Easy Book Manual 04/2012 A5E02486774-05 Preface Introducing the powerful and flexible S7-1200 1 STEP 7 makes the work easy 2 Getting started 3 PLC concepts made easy 4 Easy to create the device configuration 5 Programming made easy 6 Easy to communicate between devices 7 PID is easy 8 Web server for easy Internet connectivity 9 Motion control is easy 10 Easy to use the online tools 11 Technical specifications A
- 2. Legal information Legal information Warning notice system This manual contains notices you have to observe in order to ensure your personal safety, as well as to prevent damage to property. The notices referring to your personal safety are highlighted in the manual by a safety alert symbol, notices referring only to property damage have no safety alert symbol. These notices shown below are graded according to the degree of danger. DANGER indicates that death or severe personal injury will result if proper precautions are not taken. WARNING indicates that death or severe personal injury may result if proper precautions are not taken. CAUTION with a safety alert symbol, indicates that minor personal injury can result if proper precautions are not taken. CAUTION without a safety alert symbol, indicates that property damage can result if proper precautions are not taken. NOTICE indicates that an unintended result or situation can occur if the relevant information is not taken into account. If more than one degree of danger is present, the warning notice representing the highest degree of danger will be used. A notice warning of injury to persons with a safety alert symbol may also include a warning relating to property damage. Qualified Personnel The product/system described in this documentation may be operated only by personnel qualified for the specific task in accordance with the relevant documentation, in particular its warning notices and safety instructions. Qualified personnel are those who, based on their training and experience, are capable of identifying risks and avoiding potential hazards when working with these products/systems. Proper use of Siemens products Note the following: WARNING Siemens products may only be used for the applications described in the catalog and in the relevant technical documentation. If products and components from other manufacturers are used, these must be recommended or approved by Siemens. Proper transport, storage, installation, assembly, commissioning, operation and maintenance are required to ensure that the products operate safely and without any problems. The permissible ambient conditions must be complied with. The information in the relevant documentation must be observed. Trademarks All names identified by ® are registered trademarks of Siemens AG. The remaining trademarks in this publication may be trademarks whose use by third parties for their own purposes could violate the rights of the owner. Disclaimer of Liability We have reviewed the contents of this publication to ensure consistency with the hardware and software described. Since variance cannot be precluded entirely, we cannot guarantee full consistency. However, the information in this publication is reviewed regularly and any necessary corrections are included in subsequent editions. Siemens AG Industry Sector Postfach 48 48 90026 NÜRNBERG GERMANY Order number: 6ES7298-8FA30-8BQ0 Ⓟ 05/2012 Technical data subject to change Copyright © Siemens AG 2012. All rights reserved
- 3. Easy Book Manual, 04/2012, A5E02486774-05 3 Preface Welcome to the world of S7-1200, the latest in a line of the Siemens SIMATIC controllers. The SIMATIC S7-1200 compact controller is the modular, space-saving controller for small automation systems that require either simple or advanced functionality for logic, HMI and networking. The compact design, low cost, and powerful features make the S7-1200 a perfect solution for controlling small applications. As part of the SIMATIC commitment to totally integrated automation (TIA), the S7-1200 product family and the STEP 7 programming tool give you the flexibility you need to solve your automation needs. The S7-1200 helps to make the most challenging tasks easy! The SIMATIC S7-1200 controller solution, designed for the compact controller class, is comprised of the SIMATIC S7-1200 controller and SIMATIC HMI Basic panels that can both be programmed with SIMATIC STEP 7 engineering software. The ability to program both devices using the same engineering software significantly reduces development costs. The S7-1200 compact controller includes: Built-in PROFINET High-speed I/O capable of motion control, onboard analog inputs to minimize space requirements and the need for additional I/O, 2 pulse generators for pulse-train and pulse-width applications (Page 66) , and up to 6 high-speed counters (Page 113) On-board I/O points built into the CPU modules provide from 6 to 14 input points and from 4 to 10 output points. Signal modules for DC, relay, or analog I/O expand the number of I/O points, and innovative signal boards snap onto the front of the CPU to provide additional I/O (Page 16). The SIMATIC HMI Basic panels (Page 19) were designed specifically for the S7-1200. This Easy Book provides an introduction to the S7-1200 PLC. The following pages offer an overview of the many features and capabilities of the devices. For additional information, refer to the S7-1200 programmable controller system manual. For information about UL and FM certification, CE labeling, C-Tick and other standards, refer to the Technical specifications (Page 239).
- 4. Preface Easy Book 4 Manual, 04/2012, A5E02486774-05 This manual describes the following products: ● STEP 7 V11 Basic and Professional ● S7-1200 CPU firmware release V3.0 Documentation and information S7-1200 and STEP 7 provide a variety of documentation and other resources for finding the technical information that you require. ● The S7-1200 system manual provides specific information about the operation, programming and the specifications for the complete S7-1200 product family. In addition to the system manual, the S7-1200 Easy Book provides a more general overview to the capabilities of the S7-1200 family. Both the system manual and the Easy Book are available as electronic (PDF) and printed manuals. The electronic manuals can be downloaded from the customer support web site and can also be found on the companion disk that ships with every S7-1200 CPU. ● The online information system of STEP 7 provides immediate access to the conceptual information and specific instructions that describe the operation and functionality of the programming package and basic operation of SIMATIC CPUs. ● My Documentation Manager accesses the electronic (PDF) versions of the SIMATIC documentation set, including the system manual, the Easy Book and the information system of STEP 7. With My Documentation Manager, you can drag and drop topics from various documents to create your own custom manual. The customer support entry portal (http://support.automation.siemens.com) provides a link to My Documentation Manager under mySupport. ● The customer support web site also provides podcasts, FAQs, and other helpful documents for S7-1200 and STEP 7. The podcasts utilize short educational video presentations that focus on specific features or scenarios in order to demonstrate the interactions, convenience and efficiency provided by STEP 7. Visit the following web sites to access the collection of podcasts: – STEP 7 Basic web page (http://www.automation.siemens.com/mcms/simatic- controller-software/en/step7/step7-basic/Pages/Default.aspx) – STEP 7 Professional web page (http://www.automation.siemens.com/mcms/simatic- controller-software/en/step7/step7-professional/Pages/Default.aspx) ● You can also follow or join product discussions on the Service Support technical forum (https://www.automation.siemens.com/WW/forum/guests/Conferences.aspx?Language=e nsiteid=csiustreeLang=engroupid=4000002extranet=standardviewreg=WWnodei d0=34612486). These forums allow you to interact with various product experts. – Forum for S7-1200 (https://www.automation.siemens.com/WW/forum/guests/Conference.aspx?SortField= LastPostDateSortOrder=DescendingForumID=258Language=enonlyInternet=Fa lse) – Forum for STEP 7 Basic (https://www.automation.siemens.com/WW/forum/guests/Conference.aspx?SortField= LastPostDateSortOrder=DescendingForumID=265Language=enonlyInternet=Fa lse)
- 5. Preface Easy Book Manual, 04/2012, A5E02486774-05 5 Service and support In addition to our documentation, we offer our technical expertise on the Internet on the customer support web site (http://www.siemens.com/automation/). Contact your Siemens distributor or sales office for assistance in answering any technical questions, for training, or for ordering S7 products. Because your sales representatives are technically trained and have the most specific knowledge about your operations, process and industry, as well as about the individual Siemens products that you are using, they can provide the fastest and most efficient answers to any problems you might encounter.
- 6. Preface Easy Book 6 Manual, 04/2012, A5E02486774-05
- 7. Easy Book Manual, 04/2012, A5E02486774-05 7 Table of contents Preface ...................................................................................................................................................... 3 1 Introducing the powerful and flexible S7-1200 ......................................................................................... 13 1.1 Introducing the S7-1200 PLC.......................................................................................................13 1.2 Expansion capability of the CPU..................................................................................................16 1.3 S7-1200 modules.........................................................................................................................18 1.4 Basic HMI panels .........................................................................................................................19 1.5 Mounting dimensions and clearance requirements .....................................................................21 1.6 New features................................................................................................................................24 2 STEP 7 makes the work easy.................................................................................................................. 25 2.1 Easy to insert instructions into your user program.......................................................................26 2.2 Easy access to your favorite instructions from a toolbar .............................................................26 2.3 Easy to add inputs or outputs to LAD and FBD instructions........................................................27 2.4 Expandable instructions...............................................................................................................27 2.5 Easy to change the operating mode of the CPU .........................................................................28 2.6 Easy to modify the appearance and configuration of STEP 7.....................................................29 2.7 Project and global libraries for easy access ................................................................................29 2.8 Easy to select a version of an instruction ....................................................................................30 2.9 Easy to drag and drop between editors.......................................................................................30 2.10 Changing the call type for a DB ...................................................................................................31 2.11 Temporarily disconnecting devices from a network.....................................................................32 2.12 Easy to virtually unplug modules without losing the configuration............................................33 3 Getting started ......................................................................................................................................... 35 3.1 Create a project............................................................................................................................35 3.2 Create tags for the I/O of the CPU...............................................................................................36 3.3 Create a simple network in your user program............................................................................37 3.4 Use the PLC tags in the tag table for addressing the instructions...............................................39 3.5 Add a box instruction.................................................................................................................40 3.6 Use the CALCULATE instruction for a complex mathematical equation.....................................41 3.7 Add an HMI device to the project.................................................................................................43 3.8 Create a network connection between the CPU and HMI device................................................44 3.9 Create an HMI connection to share tags .....................................................................................44
- 8. Table of contents Easy Book 8 Manual, 04/2012, A5E02486774-05 3.10 Create an HMI screen................................................................................................................. 45 3.11 Select a PLC tag for the HMI element ........................................................................................ 46 4 PLC concepts made easy........................................................................................................................ 47 4.1 Tasks performed every scan cycle ............................................................................................. 47 4.2 Operating modes of the CPU...................................................................................................... 48 4.3 Execution of the user program.................................................................................................... 50 4.3.1 Processing the scan cycle in RUN mode.................................................................................... 50 4.3.2 OBs help you structure your user program................................................................................. 51 4.3.3 Event execution priorities and queuing....................................................................................... 52 4.4 Memory areas, addressing and data types................................................................................. 57 4.4.1 Data types supported by the S7-1200 ........................................................................................ 58 4.4.2 Addressing memory areas .......................................................................................................... 60 4.4.3 Accessing a slice of a tagged data type................................................................................... 62 4.4.4 Accessing a tag with an AT overlay............................................................................................ 63 4.5 Pulse outputs .............................................................................................................................. 66 5 Easy to create the device configuration ................................................................................................... 69 5.1 Detecting the configuration for an unspecified CPU................................................................... 70 5.2 Adding a CPU to the configuration.............................................................................................. 71 5.3 Adding modules to the configuration........................................................................................... 72 5.4 Configuring the operation of the CPU and modules ................................................................... 73 5.4.1 System memory and clock memory provide standard functionality............................................ 75 5.5 Configuring the IP address of the CPU....................................................................................... 77 5.6 Protecting access to the CPU or code block is easy .................................................................. 79 5.6.1 Know-how protection................................................................................................................... 80 5.6.2 Copy protection........................................................................................................................... 81 6 Programming made easy......................................................................................................................... 83 6.1 Easy to design your user program.............................................................................................. 83 6.1.1 Use OBs for organizing your user program ................................................................................ 85 6.1.2 FBs and FCs make programming the modular tasks easy......................................................... 86 6.1.3 Data blocks provide easy storage for program data................................................................... 87 6.1.4 Creating a new code block.......................................................................................................... 88 6.1.5 Calling a code block from another code block ............................................................................ 88 6.2 Easy-to-use programming languages......................................................................................... 89 6.2.1 Ladder logic (LAD) ...................................................................................................................... 89 6.2.2 Function Block Diagram (FBD) ................................................................................................... 90 6.2.3 SCL overview .............................................................................................................................. 90 6.2.4 SCL program editor..................................................................................................................... 91 6.3 Powerful instructions make programming easy .......................................................................... 93 6.3.1 Providing the basic instructions you expect................................................................................ 93 6.3.2 Compare and Move instructions ................................................................................................. 95 6.3.3 Conversion instructions............................................................................................................... 96 6.3.4 Math made easy with the Calculate instruction........................................................................... 98 6.3.5 Timers ......................................................................................................................................... 99
- 9. Table of contents Easy Book Manual, 04/2012, A5E02486774-05 9 6.3.6 Counters.....................................................................................................................................103 6.3.7 Pulse-width modulation (PWM)..................................................................................................105 6.4 Easy to create data logs ............................................................................................................106 6.5 Easy to monitor and test your user program..............................................................................108 6.5.1 Watch tables and force tables....................................................................................................108 6.5.2 Cross reference to show usage .................................................................................................109 6.5.3 Call structure to examine the calling hierarchy..........................................................................109 6.5.4 Diagnostic instructions to monitor the hardware........................................................................110 6.5.4.1 Reading the states of the LEDs on the CPU .............................................................................110 6.5.4.2 Instructions for reading the diagnostic status of the devices.....................................................111 6.6 High-speed counter (HSC).........................................................................................................111 6.6.1 Operation of the HSC.................................................................................................................113 6.6.2 Configuration of the HSC...........................................................................................................116 7 Easy to communicate between devices................................................................................................. 119 7.1 Creating a network connection ..................................................................................................120 7.2 Communication options .............................................................................................................121 7.3 Number of asynchronous communication connections .............................................................122 7.4 PROFINET and PROFIBUS instructions...................................................................................123 7.5 PROFINET.................................................................................................................................124 7.5.1 Open user communication.........................................................................................................124 7.5.1.1 Ad hoc mode..............................................................................................................................125 7.5.1.2 Connection IDs for the PROFINET instructions.........................................................................126 7.5.1.3 Parameters for the PROFINET connection ...............................................................................128 7.5.2 Configuring the Local/Partner connection path..........................................................................131 7.6 PROFIBUS.................................................................................................................................133 7.6.1 Configuration examples for PROFIBUS ....................................................................................135 7.6.2 Adding the CM 1243-5 (DP master) module and a DP slave....................................................138 7.6.3 Assigning PROFIBUS addresses to the CM 1243-5 module and DP slave..............................139 7.7 AS-i ............................................................................................................................................141 7.7.1 Adding the AS-i master CM 1243-2 and AS-i slave...................................................................141 7.7.2 Assigning an AS-i address to an AS-i slave ..............................................................................142 7.8 S7 communication .....................................................................................................................143 7.8.1 GET and PUT instructions .........................................................................................................143 7.8.2 Creating an S7 connection.........................................................................................................144 7.8.3 GET/PUT connection parameter assignment............................................................................144 7.9 GPRS.........................................................................................................................................145 7.9.1 Connection to a GSM network...................................................................................................145 7.10 PtP, USS, and Modbus communication protocols.....................................................................153 7.10.1 Using the serial communication interfaces ................................................................................153 7.10.2 PtP instructions ..........................................................................................................................154 7.10.3 USS instructions ........................................................................................................................155 7.10.4 Modbus instructions...................................................................................................................156
- 10. Table of contents Easy Book 10 Manual, 04/2012, A5E02486774-05 8 PID is easy ............................................................................................................................................ 159 8.1 Inserting the PID instruction and technological object.............................................................. 161 8.2 PID_Compact instruction........................................................................................................... 163 8.3 PID_Compact instruction ErrorBit parameters.......................................................................... 168 8.4 PID_3STEP instruction.............................................................................................................. 169 8.5 PID_3STEP instruction ErrorBit parameters............................................................................. 175 8.6 Configuring the PID controller................................................................................................... 177 8.7 Commissioning the PID controller............................................................................................. 179 9 Web server for easy Internet connectivity .............................................................................................. 181 9.1 Easy to use the standard Web pages....................................................................................... 181 9.2 Constraints that can affect the use of the Web server.............................................................. 183 9.2.1 Constraints when JavaScript is disabled .................................................................................. 184 9.2.2 Features restricted when cookies are not allowed.................................................................... 185 9.3 Easy to create user-defined web pages.................................................................................... 185 9.3.1 Easy to create custom user-defined web pages .................................................................... 185 9.3.2 Constraints specific to user-defined Web pages ...................................................................... 187 9.3.3 Configuration of a user-defined Web page ............................................................................... 188 9.3.4 Using the WWW instruction ...................................................................................................... 189 10 Motion control is easy............................................................................................................................ 191 10.1 Configuring the axis .................................................................................................................. 194 10.2 Configuring the TO_CommandTable_PTO............................................................................... 197 10.3 MC_Power instruction ............................................................................................................... 200 10.4 MC_Reset instruction................................................................................................................ 203 10.5 MC_Home instruction................................................................................................................ 204 10.6 MC_Halt instruction................................................................................................................... 208 10.7 MC_MoveAbsolute instruction .................................................................................................. 210 10.8 MC_MoveRelative instruction.................................................................................................... 212 10.9 MC_MoveVelocity instruction.................................................................................................... 214 10.10 MC_MoveJog instruction........................................................................................................... 216 10.11 MC_CommandTable instruction................................................................................................ 218 10.12 MC_ChangeDynamic ................................................................................................................ 221 11 Easy to use the online tools................................................................................................................... 223 11.1 Going online and connecting to a CPU..................................................................................... 223 11.2 Interacting with the online CPU................................................................................................. 224 11.3 Going online to monitor the values in the CPU......................................................................... 225 11.4 Displaying status of the user program is easy .......................................................................... 226 11.5 Using a watch table for monitoring the CPU............................................................................. 226
- 11. Table of contents Easy Book Manual, 04/2012, A5E02486774-05 11 11.6 Using the force table..................................................................................................................227 11.7 Capturing the online values of a DB to reset the start values....................................................230 11.8 Copying elements of the project ................................................................................................231 11.9 Comparing offline and online CPUs...........................................................................................232 11.10 Displaying the diagnostic events................................................................................................233 11.11 Setting the IP address and time of day......................................................................................233 11.12 Resetting to factory settings.......................................................................................................234 11.13 Downloading an IP address to an online CPU...........................................................................235 11.14 Using the unspecified CPU to upload the hardware configuration..........................................236 11.15 Downloading in RUN mode........................................................................................................237 11.15.1 Changing your program in RUN mode ......................................................................................238 A Technical specifications......................................................................................................................... 239 A.1 General Technical Specifications ..............................................................................................239 A.2 CPU modules.............................................................................................................................245 A.3 Digital I/O modules.....................................................................................................................249 A.3.1 SB 1221, SB 1222, and SB 1223 digital input/output (DI, DQ, and DI/DQ) ..............................249 A.3.2 SM 1221 digital input (DI) ..........................................................................................................251 A.3.3 SM 1222 digital output (DQ) ......................................................................................................252 A.3.4 SM 1223 VDC digital input/output (DI / DQ) ..............................................................................254 A.3.5 SM 1223 120/230 VAC input / Relay output..............................................................................255 A.4 Specifications for the digital inputs and outputs.........................................................................256 A.4.1 24 VDC digital inputs (DI) ..........................................................................................................256 A.4.2 120/230 VAC digital AC inputs...................................................................................................257 A.4.3 Digital outputs (DQ) ...................................................................................................................258 A.5 Analog I/O modules ...................................................................................................................260 A.5.1 SB 1231 and SB 1232 analog input (AI) and output (AQ).........................................................260 A.5.2 SM 1231 analog input (AI) .........................................................................................................261 A.5.3 SM 1232 analog output (AQ) .....................................................................................................261 A.5.4 SM 1234 analog input/output (AI/AQ)........................................................................................262 A.5.5 Wiring diagrams for SM 1231 (AI), SM 1232 (AQ), and SM 1234 (AI/AQ)................................263 A.6 BB 1297 Battery Board ..............................................................................................................263 A.7 Specifications for the analog I/O................................................................................................264 A.7.1 Specifications for the analog inputs (CPU, SM, and SB)...........................................................264 A.7.2 Input (AI) measurement ranges for voltage and current............................................................266 A.7.3 Step response for the analog inputs (AI) ...................................................................................267 A.7.4 Sample time and update times for the analog inputs ................................................................267 A.7.5 Specifications for the analog outputs (SB and SM) ...................................................................268 A.7.6 Output (AQ) measurement ranges for voltage and current .......................................................269 A.8 RTD and Thermocouple modules..............................................................................................270 A.8.1 SB 1231 RTD and SB 1231 TC specifications ..........................................................................270 A.8.2 SM 1231 RTD specifications......................................................................................................272 A.8.3 SM 1231 TC specifications ........................................................................................................273 A.8.4 Analog input specifications for RTD and TC (SM and SB) ........................................................274
- 12. Table of contents Easy Book 12 Manual, 04/2012, A5E02486774-05 A.8.5 Thermocouple type ................................................................................................................... 275 A.8.6 Thermocouple filter selection and update times ....................................................................... 276 A.8.7 RTD sensor type selection table ............................................................................................... 276 A.8.8 RTD filter selection and update times....................................................................................... 278 A.9 Communication interfaces......................................................................................................... 278 A.9.1 PROFIBUS master/slave .......................................................................................................... 278 A.9.1.1 CM 1242-5 PROFIBUS slave.................................................................................................... 278 A.9.1.2 CM 1243-5 PROFIBUS master................................................................................................. 280 A.9.2 GPRS CP .................................................................................................................................. 281 A.9.2.1 Technical specifications of the CP 1242-7................................................................................ 282 A.9.3 Teleservice (TS)........................................................................................................................ 284 A.9.4 RS485, RS232 and RS422 communication.............................................................................. 285 A.9.4.1 CB 1241 RS485 Specifications................................................................................................. 285 A.9.4.2 CM 1241 RS232........................................................................................................................ 287 A.9.4.3 CM 1241 RS422/485 Specifications ......................................................................................... 288 A.10 Companion products................................................................................................................. 289 A.10.1 PM 1207 power module ............................................................................................................ 289 A.10.2 CSM 1277 compact switch module........................................................................................... 290 Index...................................................................................................................................................... 291
- 13. Easy Book Manual, 04/2012, A5E02486774-05 13 Introducing the powerful and flexible S7-1200 1 1.1 Introducing the S7-1200 PLC The S7-1200 controller provides the flexibility and power to control a wide variety of devices in support of your automation needs. The compact design, flexible configuration, and powerful instruction set combine to make the S7-1200 a perfect solution for controlling a wide variety of applications. The CPU combines a microprocessor, an integrated power supply, input and output circuits, built-in PROFINET, high-speed motion control I/O, and on-board analog inputs in a compact housing to create a powerful controller. After you download your program, the CPU contains the logic required to monitor and control the devices in your application. The CPU monitors the inputs and changes the outputs according to the logic of your user program, which can include Boolean logic, counting, timing, complex math operations, and communications with other intelligent devices. The CPU provides a PROFINET port for communication over a PROFINET network. Additional modules are available for communicating over PROFIBUS, GPRS, RS485 or RS232 networks. ① Power connector ② Memory card slot under top door ③ Removable user wiring connectors (behind the doors) ④ Status LEDs for the on-board I/O ⑤ PROFINET connector (on the bottom of the CPU) Several security features help protect access to both the CPU and the control program: ● Every CPU provides password protection (Page 79) that allows you to configure access to the CPU functions. ● You can use know-how protection (Page 80) to hide the code within a specific block. ● You can use copy protection (Page 81) to bind your program to a specific memory card or CPU.
- 14. Introducing the powerful and flexible S7-1200 1.1 Introducing the S7-1200 PLC Easy Book 14 Manual, 04/2012, A5E02486774-05 Table 1- 1 Comparing the CPU models Feature CPU 1211C CPU 1212C CPU 1214C CPU 1215C Physical size (mm) 90 x 100 x 75 90 x 100 x 75 110 x 100 x 75 130 x 100 x 75 Work 30 Kbytes 50 Kbytes 75 Kbytes 100 Kbytes Load 1 Mbyte 1 Mbyte 4 Mbytes 4 Mbytes User memory Retentive 10 Kbytes 10 Kbytes 10 Kbytes 10 Kbytes Digital 6 inputs/4 outputs 8 inputs/6 outputs 14 inputs/10 outputs 14 inputs/10 outputsLocal on-board I/O Analog 2 inputs 2 inputs 2 inputs 2 inputs / 2 outputs Inputs (I) 1024 bytes 1024 bytes 1024 bytes 1024 bytesProcess image size Outputs (Q) 1024 bytes 1024 bytes 1024 bytes 1024 bytes Bit memory (M) 4096 bytes 4096 bytes 8192 bytes 8192 bytes Signal module (SM) expansion None 2 8 8 Signal board (SB), Battery board (BB), or communication board (CB) 1 1 1 1 Communication module (CM) (left-side expansion) 3 3 3 3 Total 3 built-in I/O, 5 with SB 4 built-in I/O, 6 with SB 6 6 Single phase 3 at 100 kHz SB: 2 at 30 kHz 3 at 100 kHz 1 at 30 kHz SB: 2 at 30 kHz 3 at 100 kHz 3 at 30 kHz 3 at 100 kHz 3 at 30 kHz High-speed counters Quadrature phase 3 at 80 kHz SB: 2 at 20 kHz 3 at 80 kHz 1 at 20 kHz SB: 2 at 20 kHz 3 at 80 kHz 3 at 20 kHz 3 at 80 kHz 3 at 20 kHz Pulse outputs1 4 4 4 4 Memory card SIMATIC Memory card (optional) Real time clock retention time 20 days, typ. / 12 day min. at 40 degrees C (maintenance-free Super Capicator) PROFINET 1 Ethernet communication port 2 Ethernet communication ports Real math execution speed 2.3 μs/instruction Boolean execution speed 0.08 μs/instruction 1 For CPU models with relay outputs, you must install a digital signal board (SB) to use the pulse outputs. Each CPU provides dedicated HMI connections to support up to 3 HMI devices. The total number of HMI is affected by the types of HMI panels in your configuration. For example, you could have up to three SIMATIC Basic panels connected to your CPU, or you could have up to two SIMATIC Comfort panels with one additional Basic panel. The different CPU models provide a diversity of features and capabilities that help you create effective solutions for your varied applications. For detailed information about a specific CPU, see the technical specifications (Page 239).
- 15. Introducing the powerful and flexible S7-1200 1.1 Introducing the S7-1200 PLC Easy Book Manual, 04/2012, A5E02486774-05 15 Table 1- 2 Blocks, timers and counters supported by S7-1200 Element Description Type OB, FB, FC, DB Size 30 Kbytes (CPU 1211C) 50 Kbytes (CPU 1212C) 64 Kbytes (CPU 1214C and CPU 1215C) Quantity Up to 1024 blocks total (OBs + FBs + FCs + DBs) Address range for FBs, FCs, and DBs 1 to 65535 (such as FB 1 to FB 65535) Nesting depth 16 from the program cycle or start up OB; 4 from the time delay interrupt, time-of-day interrupt, cyclic interrupt, hardware interrupt, time error interrupt, or diagnostic error interrupt OB Blocks Monitoring Status of 2 code blocks can be monitored simultaneously Program cycle Multiple: OB 1, OB 200 to OB 65535 Startup Multiple: OB 100, OB 200 to OB 65535 Time-delay interrupts and cyclic interrupts 41 (1 per event): OB 200 to OB 65535 Hardware interrupts (edges and HSC) 50 (1 per event): OB 200 to OB 65535 Time error interrupts 1: OB 80 OBs Diagnostic error interrupts 1: OB 82 Type IEC Quantity Limited only by memory size Timers Storage Structure in DB, 16 bytes per timer Type IEC Quantity Limited only by memory size Counters Storage Structure in DB, size dependent upon count type SInt, USInt: 3 bytes Int, UInt: 6 bytes DInt, UDInt: 12 bytes 1 Time-delay and cyclic interrupts use the same resources in the CPU. You can have only a total of 4 of these interrupts (time-delay plus cyclic interrupts). You cannot have 4 time-delay interrupts and 4 cyclic interrupts.
- 16. Introducing the powerful and flexible S7-1200 1.2 Expansion capability of the CPU Easy Book 16 Manual, 04/2012, A5E02486774-05 1.2 Expansion capability of the CPU The S7-1200 family provides a variety of modules and plug-in boards for expanding the capabilities of the CPU with additional I/O or other communication protocols. For detailed information about a specific module, see the technical specifications (Page 239). ① Communication module (CM), communcation processor (CP), or TS Adapter ② CPU ③ Signal board (SB), communication board (CB), or Battery Board (BB) ④ Signal module (SM) Table 1- 3 Digital signal modules and signal boards Type Input only Output only Combination In/Out ③ digital SB 4 x 24VDC In, 200 kHz 4 x 5VDC In, 200 kHz 4 x 24VDC Out, 200 kHz 4 x 5VDC Out, 200 kHz 2 x 24VDC In / 2 x 24VDC Out 2 x 24VDC In / 2 x 24VDC Out, 200 kHz 2 x 5VDC In / 2 x 5VDC Out, 200 kHz 8 x 24VDC In 8 x 24VDC Out 8 x Relay Out 8 x Relay Out (Changeover) 8 x 24VDC In / 8 x 24VDC Out 8 x 24VDC In / 8 x Relay Out 8 x 120/230VAC In / 8 x Relay Out ④ digital SM 16 x 24VDC In 16 x 24VDC Out 16 x Relay Out 16 x 24VDC In / 16 x 24VDC Out 16 x 24VDC In / 16 x Relay Out
- 17. Introducing the powerful and flexible S7-1200 1.2 Expansion capability of the CPU Easy Book Manual, 04/2012, A5E02486774-05 17 Table 1- 4 Analog signal modules and signal boards Type Input only Output only Combination In/Out ③ analog SB 1 x 12 bit Analog In 1 x 16 bit RTD 1 x 16 bit Thermocouple 1 x Analog Out - ④ analog SM 4 x Analog In 4 x Analog In x 16 bit 8 x Analog In Thermocouple: – 4 x 16 bit TC – 8 x 16 bit TC RTD: – 4 x 16 bit RTD – 8 x 16 bit RTD 2 x Analog Out 4 x Analog Out 4 x Analog In / 2 x Analog Out Table 1- 5 Communication interfaces Module Type Description RS232 Full-duplex RS422/485 Full-duplex (RS422) Half-duplex (RS485) PROFIBUS Master DPV1 PROFIBUS Slave DPV1 ① Communication module (CM) AS-i Master (CM 1243-2) AS-Interface ① Communication processor (CP) Modem connectivity GPRS ① Communication board (CB) RS485 Half-duplex TS Adapter IE Basic1 Connection to CPU TS Adapter GSM GSM/GPRS TS Adapter Modem Modem TS Adapter ISDN ISDN ① TeleService TS Adapter RS232 RS232 1 The TS Adapter allows you to connect various communication interfaces to the PROFINET port of the CPU. You install the TS Adapter on the left side of the CPU and connect the TS Adapter modular (up to 3) onto the TS Adapter. Table 1- 6 Other boards Module Description ③ Battery board Plugs into expansion board interface on front of CPU. Provides long term backup of realtime clock
- 18. Introducing the powerful and flexible S7-1200 1.3 S7-1200 modules Easy Book 18 Manual, 04/2012, A5E02486774-05 1.3 S7-1200 modules Table 1- 7 S7-1200 expansion modules Type of module Description ① Status LEDs on the SB The CPU supports one plug-in expansion board: A signal board (SB) provides additional I/O for your CPU. The SB connects on the front of the CPU. A communication board (CB) allows you to add another communication port to your CPU. A battery board (BB) allows you to provide long term backup of the realtime clock. ② Removable user wiring connector ① Status LEDs ② Bus connector Signal modules (SMs) add additional functionality to the CPU. SMs connect to the right side of the CPU. Digital I/O Analog I/O RTD and thermocouple ③ Removable user wiring connector ① Status LEDsCommunication modules (CMs) and communications processors (CPs) add communication options to the CPU, such as for PROFIBUS or RS232 / RS485 connectivity (for PtP, Modbus or USS), or the AS-i master. A CP provides capabilities for other types of communication, such as to connect the CPU over a GPRS network. The CPU supports up to 3 CMs or CPs Each CM or CP connects to the left side of the CPU (or to the left side of another CM or CP) ② Communication connector
- 19. Introducing the powerful and flexible S7-1200 1.4 Basic HMI panels Easy Book Manual, 04/2012, A5E02486774-05 19 1.4 Basic HMI panels Because visualization is becoming a standard component for most machine designs, the SIMATIC HMI Basic Panels provide touch-screen devices for basic operator control and monitoring tasks. All panels have a protection rating for IP65 and have CE, UL, cULus, and NEMA 4x certification. Basic HMI Panel Description Technical data KP 300 Basic PN 3.6 membrane keyboard with 10 freely configurable tactile keys Mono (STN, black/white) 87 mm x 31 mm (3.6) Backlight color programmed (white, green, yellow or red) Resolution: 240 x 80 250 tags 50 process screens 200 alarms 25 curves 40 KB recipe memory 5 recipes, 20 data records, 20 entries KTP 400 Basic PN 4 touch screen with 4 tactile keys Mono (STN, gray scale) 76.79 mm x 57.59 mm (3.8) Portrait or landscape Resolution: 320 x 240 250 tags 50 process screens 200 alarms 25 curves 40 KB recipe memory 5 recipes, 20 data records, 20 entries KTP 600 Basic PN 6 touch screen with 6 tactile keys Color (TFT, 256 colors) or Mono (STN, gray scales) 115.2 mm x 86.4 mm (5.7) Portrait or landscape Resolution: 320 x 240 500 tags 50 process screens 200 alarms 25 curves 40 KB recipe memory 5 recipes, 20 data records, 20 entries
- 20. Introducing the powerful and flexible S7-1200 1.4 Basic HMI panels Easy Book 20 Manual, 04/2012, A5E02486774-05 Basic HMI Panel Description Technical data KTP 1000 Basic PN 10 touch screen with 8 tactile keys Color (TFT, 256 colors) 211.2 mm x 158.4 mm (10.4) Resolution: 640 x 480 500 tags 50 process screens 200 alarms 25 curves 40 KB recipe memory 5 recipes, 20 data records, 20 entries TP 1500 Basic PN 15 touch screen Color (TFT, 256 colors) 304.1 mm x 228.1 mm (15.1) Resolution: 1024 x 768 500 tags 50 process screens 200 alarms 25 curves 40 KB recipe memory (integrated flash) 5 recipes, 20 data records, 20 entries
- 21. Introducing the powerful and flexible S7-1200 1.5 Mounting dimensions and clearance requirements Easy Book Manual, 04/2012, A5E02486774-05 21 1.5 Mounting dimensions and clearance requirements The S7-1200 PLC is designed to be easy to install. Whether mounted on a panel or on a standard DIN rail, the compact size makes efficient use of space. Each CPU, SM, CM, and CP supports mounting on either a DIN rail or on a panel. Use the DIN rail clips on the module to secure the device on the rail. These clips also snap into an extended position to provide screw mounting positions to mount the unit directly on a panel. The interior dimension of the hole for the DIN clips on the device is 4.3 mm.
- 22. Introducing the powerful and flexible S7-1200 1.5 Mounting dimensions and clearance requirements Easy Book 22 Manual, 04/2012, A5E02486774-05 Table 1- 8 Mounting dimensions (mm) S7-1200 Devices Width A (mm) Width B (mm) Width C (mm) CPU 1211C and CPU 1212C 90 45 -- CPU 1214C 110 55 -- CPU CPU 1215C 130 65 (top) Bottom: C1: 32.5 C2: 65 C3: 32.5 Digital 8 and 16 point Analog 2, 4, and 8 point Thermocouple 4 and 8 point RTD 4 point 45 22.5 -- Digital DQ 8 x Relay (Changeover) 70 22.5 -- Signal modules Analog 16 point RTD 8 point 70 35 -- CM 1241 RS232, CM 1241 RS485 and CM 1241 RS422/485 CM 1243-5 PROFIBUS master and CM 1242-5 PROFIBUS slave CM 1242-2 AS-i Master CP 1242-7 GPRS 30 15 --Communication interfaces TS AdapterIE Basic 60 1 15 -- 1 Because you must install a TS Adapter modular with the TS Adapter, the total width (width A) is 60 mm. Each CPU, SM, CM, and CP supports mounting on either a DIN rail or on a panel. Use the DIN rail clips on the module to secure the device on the rail. These clips also snap into an extended position to provide screw mounting positions to mount the unit directly on a panel. The interior dimension of the hole for the DIN clips on the device is 4.3 mm. A 25 mm thermal zone must be provided above and below the unit for free air circulation. Always consider the following guidelines when planning your installation: ● Separate the devices from heat, high voltage, and electrical noise. ● Provide adequate clearance for cooling and wiring. A 25 mm thermal zone must be provided above and below the unit for free air circulation. Refer to the S7-1200 System Manual for specific requirements and guidelines for installation.
- 23. Introducing the powerful and flexible S7-1200 1.5 Mounting dimensions and clearance requirements Easy Book Manual, 04/2012, A5E02486774-05 23 ① Side view ③ Vertical installation ② Horizontal installation ④ Clearance area A 25 mm thermal zone must be provided above and below the unit for free air circulation. WARNING Installation or removal of S7-1200 or related equipment with the power applied could cause electric shock or unexpected operation of equipment. Failure to disable all power to the S7-1200 and related equipment during installation or removal procedures could result in death, severe personal injury and/or property damage due to electric shock or unexpected equipment operation. Always follow appropriate safety precautions and ensure that power to the S7-1200 is disabled before attempting to install or remove S7-1200 CPUs or related equipment. Always ensure that whenever you replace or install an S7-1200 device you use the correct module or equivalent device. WARNING Incorrect installation of an S7-1200 module may cause the program in the S7-1200 to function unpredictably. Failure to replace an S7-1200 device with the same model, orientation, or order could result in death, severe personal injury and/or property damage due to unexpected equipment operation. Replace an S7-1200 device with the same model, and be sure to orient and position it correctly.
- 24. Introducing the powerful and flexible S7-1200 1.6 New features Easy Book 24 Manual, 04/2012, A5E02486774-05 1.6 New features The following features are new in this release: ● A standard Web server page for performing a CPU firmware update ● The ability to use three PROFIBUS DP CM 1243-5 master modules or three AS-i CM 1243-2 master modules Note To use three AS-i modules as masters, you must update the firmware of the AS-i modules. New modules for the S7-1200 A variety of new modules expand the power of the S7-1200 CPU and provide the flexibility to meet your automation needs: ● New and improved CPUs: – New CPU 1215C DC/DC/DC, CPU 1215C DC/DC/Relay, and CPU 1215C AC/DC/Relay offer 100 Kbytes of work memory, dual Ethernet, and analog outputs. – New and improved CPU 1211Cs, CPU 1212Cs, and CPU 1214Cs have faster processing time, the possibility of 4 PTOs (the CPU 1211C requires a signal board), increased retentive memory (10 Kbytes), and increased time-of-day hold up time (20 days). ● New I/O signal module: SM 1231 AI 4 x 16 bit provides higher sample rate and increased number of bits. ● New battery board (BB 1297) offers long term backup of the realtime clock. The BB 1297 is pluggable in the signal board slot of the S7-1200 CPU (firmware 3.0 and later versions). To use the new modules you must use STEP 7 V11 SP2 Update 3 or later (Basic or Professional) and you must download the hardware support package (HSP) for new modules from the STEP 7 Options Support Packages menu command. Follow the instructions for adding modules to the hardware catalog for STEP 7 (TIA Portal) from the Siemens Service and Support Site. See also Customer_support_entry_portal (http://support.automation.siemens.com)
- 25. Easy Book Manual, 04/2012, A5E02486774-05 25 STEP 7 makes the work easy 2 STEP 7 provides a user-friendly environment to develop controller logic, configure HMI visualization, and setup network communication. To help increase your productivity, STEP 7 provides two different views of the project: a task-oriented set of portals that are organized on the functionality of the tools (Portal view), or a project-oriented view of the elements within the project (Project view). Choose which view helps you work most efficiently. With a single click, you can toggle between the Portal view and the Project view. Portal view ① Portals for the different tasks ② Tasks for the selected portal ③ Selection panel for the selected action ④ Changes to the Project view Project view ① Menus and toolbar ② Project navigator ③ Work area ④ Task cards ⑤ Inspector window ⑥ Changes to the Portal view ⑦ Editor bar With all of these components in one place, you have easy access to every aspect of your project. For example, the inspector window shows the properties and information for the object that you have selected in the work area. As you select different objects, the inspector window displays the properties that you can configure. The inspector window includes tabs that allow you to see diagnostic information and other messages. By showing all of the editors that are open, the editor bar helps you work more quickly and efficiently. To toggle between the open editors, simply click the different editor. You can also arrange two editors to appear together, arranged either vertically or horizontally. This feature allows you to drag and drop between editors.
- 26. STEP 7 makes the work easy 2.1 Easy to insert instructions into your user program Easy Book 26 Manual, 04/2012, A5E02486774-05 2.1 Easy to insert instructions into your user program STEP 7 provides task cards that contain the instructions for your program. The instructions are grouped according to function. To create your program, you drag instructions from the task card onto a network. 2.2 Easy access to your favorite instructions from a toolbar STEP 7 provides a Favorites toolbar to give you quick access to the instructions that you frequently use. Simply click the icon for the instruction to insert it into your network! (For the Favorites in the instruction tree, double- click the icon.) You can easily customize the Favorites by adding new instructions. Simply drag and drop an instruction to the Favorites. The instruction is now just a click away!
- 27. STEP 7 makes the work easy 2.3 Easy to add inputs or outputs to LAD and FBD instructions Easy Book Manual, 04/2012, A5E02486774-05 27 2.3 Easy to add inputs or outputs to LAD and FBD instructions Some of the instructions allow you to create additional inputs or outputs. ● To add an input or output, click the Create icon or right-click on an input stub for one of the existing IN or OUT parameters and select the Insert input command. ● To remove an input or output, right-click on the stub for one of the existing IN or OUT parameters (when there are more than the original two inputs) and select the Delete command. 2.4 Expandable instructions Some of the more complex instructions are expandable, displaying only the key inputs and outputs. To display the inputs and outputs, click the arrow at the bottom of the instruction.
- 28. STEP 7 makes the work easy 2.5 Easy to change the operating mode of the CPU Easy Book 28 Manual, 04/2012, A5E02486774-05 2.5 Easy to change the operating mode of the CPU Refer to The CPU does not have a physical switch for changing the operating mode (STOP or RUN). Use the Start CPU and Stop CPU toolbar buttons to change the operating mode of the CPU. When you configure the CPU in the device configuration, you configure the start-up behavior in the properties of the CPU (Page 73). The Online and diagnostics portal also provides an operator panel for changing the operating mode of the online CPU. To use the CPU operator panel, you must be connected online to the CPU. The Online tools task card displays an operator panel that shows the operating mode of the online CPU. The operator panel also allows you to change the operating mode of the online CPU. Use the button on the operator panel to change the operating mode (STOP or RUN). The operator panel also provides an MRES button for resetting the memory. The color of the RUN/STOP indicator shows the current operating mode of the CPU. Yellow indicates STOP mode, and green indicates RUN mode. Refer to Operating Modes of the CPU in the S7-1200 System Manual for configuring the default operating mode on power up.
- 29. STEP 7 makes the work easy 2.6 Easy to modify the appearance and configuration of STEP 7 Easy Book Manual, 04/2012, A5E02486774-05 29 2.6 Easy to modify the appearance and configuration of STEP 7 You can select a variety of settings, such as the appearance of the interface, language, or the folder for saving your work. Select the Settings command from the Options menu to change these settings. 2.7 Project and global libraries for easy access The global and project libraries allow you to reuse the stored objects throughout a project or across projects. For example, you can create block templates for use in different projects and adapt them to the particular requirements of your automation task. You can store a variety of objects in the libraries, such as FCs, FBs, DBs, device configuration, data types, watch tables, process screens, and faceplates. You can also save the components of the HMI devices in your project. Each project has a project library for storing the objects to be used more than once within the project. This project library is part of the project. Opening or closing the project opens or closes the project library, and saving the project saves any changes in the project library. You can create your own global library to store the objects you want to make available for other projects to use. When you create a new global library, you save this library to a location on your computer or network.
- 30. STEP 7 makes the work easy 2.8 Easy to select a version of an instruction Easy Book 30 Manual, 04/2012, A5E02486774-05 2.8 Easy to select a version of an instruction The development and release cycles for certain sets of instructions (such as Modbus, PID and motion) have created multiple released versions for these instructions. To help ensure compatibility and migration with older projects, STEP 7 allows you to choose which version of instruction to insert into your user program. Click the icon on the instruction tree task card to enable the headers and columns of the instruction tree. To change the version of the instruction, select the appropriate version from the drop-down list. 2.9 Easy to drag and drop between editors To help you perform tasks quickly and easily, STEP 7 allows you to drag and drop elements from one editor to another. For example, you can drag an input from the CPU to the address of an instruction in your user program. You must zoom in at least 200% to select the inputs or outputs of the CPU. Notice that the tag names are displayed not only in the PLC tag table, but also are displayed on the CPU. To display two editors at one time, use the Split editor menu commands or buttons in the toolbar.
- 31. STEP 7 makes the work easy 2.10 Changing the call type for a DB Easy Book Manual, 04/2012, A5E02486774-05 31 To toggle between the editors that have been opened, click the icons in the editor bar. 2.10 Changing the call type for a DB STEP 7 allows you to easily create or change the association of a DB for an instruction or an FB that is in an FB. You can switch the association between different DBs. You can switch the association between a single- instance DB and a multi-instance DB. You can create an instance DB (if an instance DB is missing or not available). You can access the Change call type command either by right-clicking the instruction or FB in the program editor or by selecting the Block call command from the Options menu. The Call options dialog allows you to select a single-instance or multi-instance DB. You can also select specific DBs from a drop-down list of available DBs.
- 32. STEP 7 makes the work easy 2.11 Temporarily disconnecting devices from a network Easy Book 32 Manual, 04/2012, A5E02486774-05 2.11 Temporarily disconnecting devices from a network You can disconnect individual network devices from the subnet. Because the configuration of the device is not removed from the project, you can easily restore the connection to the device. Right-click the interface port of the network device and select the Disconnect from subnet command from the context menu. STEP 7 reconfigures the network connections, but does not remove the disconnected device from the project. While the network connection is deleted, the interface addresses are not changed. When you download the new network connections, the CPU must be set to STOP mode. To reconnect the device, simply create a new network connection to the port of the device.
- 33. STEP 7 makes the work easy 2.12 Easy to virtually unplug modules without losing the configuration Easy Book Manual, 04/2012, A5E02486774-05 33 2.12 Easy to virtually unplug modules without losing the configuration STEP 7 provides a storage area for unplugged modules. You can drag a module from the rack to save the configuration of that module. These unplugged modules are saved with your project, allowing you to reinsert the module in the future without having to reconfigure the parameters. One use of this feature is for temporary maintenance. Consider a scenario where you might be waiting for a replacement module and plan to temporarily use a different module as a short-term replacement. You could drag the configured module from the rack to the Unplugged modules and then insert the temporary module.
- 34. STEP 7 makes the work easy 2.12 Easy to virtually unplug modules without losing the configuration Easy Book 34 Manual, 04/2012, A5E02486774-05
- 35. Easy Book Manual, 04/2012, A5E02486774-05 35 Getting started 3 3.1 Create a project Working with STEP 7 is easy! See how quickly you can get started with creating a project. In the Start portal, click the Create new project task. Enter a project name and click the Create button. After creating the project, select the Devices Networks portal. Click the Add new device task. Select the CPU to add to the project: 1. In the Add new device dialog, click the SIMATIC PLC button. 2. Select a CPU from the list. 3. To add the selected CPU to the project, click the Add button. Note that the Open device view option is selected. Clicking Add with this option selected opens the Device configuration of the Project view. The Device view displays the CPU that you added.
- 36. Getting started 3.2 Create tags for the I/O of the CPU Easy Book 36 Manual, 04/2012, A5E02486774-05 3.2 Create tags for the I/O of the CPU PLC tags are the symbolic names for I/O and addresses. After you create a PLC tag, STEP 7 stores the tag in a tag table. All of the editors in your project (such as the program editor, the device editor, the visualization editor, and the watch table editor) can access the tag table. With the device editor open, open a tag table. You can see the open editors displayed in the editor bar. In the tool bar, click the Split editor space horizontally button. STEP 7 displays both the tag table and the device editor together. Zoom the device configuration to over 200% so that the I/O points of the CPU are legible and selectable. Drag the inputs and outputs from the CPU to the tag table: 1. Select I0.0 and drag it to the first row of the tag table. 2. Change the tag name from I0.0 to Start. 3. Drag I0.1 to the tag table and change the name to Stop. 4. Drag Q0.0 (on the bottom of the CPU) to the tag table and change the name to Running.
- 37. Getting started 3.3 Create a simple network in your user program Easy Book Manual, 04/2012, A5E02486774-05 37 With the tags entered into the PLC tag table, the tags are available to your user program. 3.3 Create a simple network in your user program Your program code consists of instructions that the CPU executes in sequence. For this example, use ladder logic (LAD) to create the program code. The LAD program is a sequence of networks that resemble the rungs of a ladder. To open the program editor, follow these steps: 1. Expand the Program blocks folder in the Project tree to display the Main [OB1] block. 2. Double-click the Main [OB1] block. The program editor opens the program block (OB1).
- 38. Getting started 3.3 Create a simple network in your user program Easy Book 38 Manual, 04/2012, A5E02486774-05 Use the buttons on the Favorites to insert contacts and coils onto the network. 1. Click the Normally open contact button on the Favorites to add a contact to the network. 2. For this example, add second contact. 3. Click the Output coil button to insert a coil. The Favorites also provides a button for creating a branch 1. Select the left rail to select the rail for the branch. 2. Click the Open branch icon to add a branch to the rail of the network. 3. Insert another normally open contact to the open branch. 4. Drag the double-headed arrow to a connection point (the green square on the rung) between the two contacts on the first rung. To save the project, click the Save project button in the toolbar. Notice that you do not have to finish editing the rung before saving. You can now associate the tag names with these instructions.
- 39. Getting started 3.4 Use the PLC tags in the tag table for addressing the instructions Easy Book Manual, 04/2012, A5E02486774-05 39 3.4 Use the PLC tags in the tag table for addressing the instructions Using the tag table, you can quickly enter the PLC tags for the addresses of the contacts and coils. 1. Double-click the default address ??.? above the first normally open contact. 2. Click the selector icon to the right of the address to open the tags in the tag table. 3. From the drop-down list, select Start for the first contact. 4. For the second contact, repeat the preceding steps and select the tag Stop. 5. For the coil and the latching contact, select the tag Running. You can also drag the I/O addresses directly from the CPU. Simply split the work area of the Project view (Page 30). You must zoom the CPU to over 200% in order to select the I/O points. You can drag the I/O on the CPU in the Device configuration to the LAD instruction in the program editor to create not only the address for the instruction, but also to create an entry in the PLC tag table.
- 40. Getting started 3.5 Add a box instruction Easy Book 40 Manual, 04/2012, A5E02486774-05 3.5 Add a box instruction The program editor features a generic box instruction. After inserting this box instruction, you then select the type of instruction, such as an ADD instruction, from a drop-down list. Click the generic box instruction in the Favorites tool bar. The generic box instruction supports a variety of instructions. For this example, create an ADD instruction: 1. Click the yellow corner of the box instruction to display the drop- down list of instructions. 2. Scroll down the list and select the ADD instruction. 3. Click the yellow corner by the ? to select the data type for the inputs and output. You can now enter the tags (or memory addresses) for the values to use with the ADD instruction. You can also create additional inputs for certain instructions: 1. Click one of the inputs inside the box. 2. Right-click to display the context menu and select the Insert input command. The ADD instruction now uses three inputs.
- 41. Getting started 3.6 Use the CALCULATE instruction for a complex mathematical equation Easy Book Manual, 04/2012, A5E02486774-05 41 3.6 Use the CALCULATE instruction for a complex mathematical equation The Calculate instruction lets you create a math function that operates on multiple input parameters to produce the result, according to the equation that you define. In the Basic instruction tree, expand the Math functions folder. Double-click the Calculate instruction to insert the instruction into your user program. The unconfigured Calculate instruction provides two input parameters and an output parameter. Click the ??? and select the data types for the input and output parameters. (The input and output parameters must all be the same data type.) For this example, select the Real data type. Click the Edit equation icon to enter the equation.
- 42. Getting started 3.6 Use the CALCULATE instruction for a complex mathematical equation Easy Book 42 Manual, 04/2012, A5E02486774-05 For this example, enter the following equation for scaling a raw analog value. (The In and Out designations correspond to the parameters of the Calculate instruction.) Out value = ((Out high - Out low) / (In high - In low)) * (In value - In low) + Out low Out = ((in4 - in5) / (in2 - in3)) * (in1 - in3) + in5 Where: Out value (Out) Scaled output value In value (in1) Analog input value In high (in2) Upper limit for the scaled input value In low (in3) Lower limit for the scaled input value Out high (in4) Upper limit for the scaled output value Out low (in5) Lower limit for the scaled ouput value In the Edit Calculate box, enter the equation with the parameter names: OUT = ((in4 - in5) / (in2 - in3)) * (in1 - in3) + in5 When you click OK, the Calculate instruction creates the inputs required for the instruction. Enter the tag names for the values that correspond to the parameters.
- 43. Getting started 3.7 Add an HMI device to the project Easy Book Manual, 04/2012, A5E02486774-05 43 3.7 Add an HMI device to the project Adding an HMI device to your project is easy! 1. Double-click the Add new device icon. 2. Click the SIMATIC HMI button in the Add new device dialog. 3. Select the specific HMI device from the list. You can choose to run the HMI wizard to help you configure the screens for the HMI device. 4. Click OK to add the HMI device to your project. The HMI device is added to the project. STEP 7 provides an HMI wizard that helps you configure all of the screens and structure for your HMI device. If you do not run the HMI wizard, STEP 7 creates a simple default HMI screen.
- 44. Getting started 3.8 Create a network connection between the CPU and HMI device Easy Book 44 Manual, 04/2012, A5E02486774-05 3.8 Create a network connection between the CPU and HMI device Creating a network is easy! Go to Devices and Networks and select the Network view to display the CPU and HMI device. To create a PROFINET network, drag a line from the green box (Ethernet port) on one device to the green box on the other device. A network connection is created for the two devices. 3.9 Create an HMI connection to share tags By creating an HMI connection between the two devices, you can easily share the tags between the two devices. With the network connection selected, click the Connections button and select HMI connection from the drop-down list. The HMI connection turns the two devices blue. Select the CPU device and drag the line to the HMI device. The HMI connection allows you to configure the HMI tags by selecting a list of PLC tags.
- 45. Getting started 3.10 Create an HMI screen Easy Book Manual, 04/2012, A5E02486774-05 45 You can use other options for creating an HMI connection: ● Dragging a PLC tag from the PLC tag table, the program editor or the device configuration editor to the HMI screen editor automatically creates an HMI connection. ● Using the HMI wizard to browse for the PLC automatically creates the HMI connection. 3.10 Create an HMI screen Even if you do not utilize the HMI wizard, configuring an HMI screen is easy. STEP 7 provides a standard set of libraries for inserting basic shapes, interactive elements, and even standard graphics. To add an element, simply drag and drop one of the elements onto the screen. Use the properties for the element (in the Inspector window) to configure the appearance and behavior of the element. You can also create elements on your screen by dragging and dropping PLC tags either from the Project tree or the program editor to the HMI screen. The PLC tag becomes an element on the screen. You can then use the properties to change the parameters for this element.
- 46. Getting started 3.11 Select a PLC tag for the HMI element Easy Book 46 Manual, 04/2012, A5E02486774-05 3.11 Select a PLC tag for the HMI element After you create the element on your screen, use the properties of the element to assign a PLC tag to the element. Click the selector button by the tag field to display the PLC tags of the CPU. You can also drag and drop PLC tags from the Project tree to the HMI screen. Display the PLC tags in the Details view of the project tree and then drag the tag to the HMI screen.
- 47. Easy Book Manual, 04/2012, A5E02486774-05 47 PLC concepts made easy 4 4.1 Tasks performed every scan cycle Each scan cycle includes writing the outputs, reading the inputs, executing the user program instructions, and performing system maintenance or background processing. The cycle is referred to as a scan cycle or scan. Under default conditions, all digital and analog I/O points are updated synchronously with the scan cycle using an internal memory area called the process image. The process image contains a snapshot of the physical inputs and outputs on the CPU, signal board, and signal modules. ● The CPU reads the physical inputs just prior to the execution of the user program and stores the input values in the process image input area. This ensures that these values remain consistent throughout the execution of the user instructions. ● The CPU executes the logic of the user instructions and updates the output values in the process image output area instead of writing to the actual physical outputs. ● After executing the user program, the CPU writes the resulting outputs from the process image output area to the physical outputs. This process provides consistent logic through the execution of the user instructions for a given cycle and prevents the flickering of physical output points that might change state multiple times in the process image output area.
- 48. PLC concepts made easy 4.2 Operating modes of the CPU Easy Book 48 Manual, 04/2012, A5E02486774-05 STARTUP RUN A Clears the input (or I) memory ① Writes Q memory to the physical outputs B Initializes the outputs with either the last value or the substitute value ② Copies the state of the physical inputs to I memory C Executes the startup OBs ③ Executes the program cycle OBs D Copies the state of the physical inputs to I memory ④ Performs self-test diagnostics E Stores any interrupt events into the queue to be processed in RUN mode ⑤ F Enables the writing of the output (or Q) memory to the physical outputs Processes interrupts and communications during any part of the scan cycle You can change the default behavior for a module by removing it from this automatic update of I/O. You can also immediately read and write digital and analog I/O values to the modules when an instruction executes. Immediate reads of physical inputs do not update the process image input area. Immediate writes to physical outputs update both the process image output area and the physical output point. 4.2 Operating modes of the CPU The CPU has three modes of operation: STOP mode, STARTUP mode, and RUN mode. Status LEDs on the front of the CPU indicate the current mode of operation. ● In STOP mode, the CPU is not executing the program, and you can download a project. ● In STARTUP mode, the CPU executes any startup logic (if present). Interrupt events are not processed during the startup mode. ● In RUN mode, the scan cycle is executed repeatedly. Interrupt events can occur and be processed at any point within the program cycle phase. Some parts of a project can be downloaded in RUN mode. The CPU supports the warm restart method for entering the RUN mode. Warm restart does not include a memory reset, but a memory reset can be commanded from the programming software. A memory reset clears all work memory, clears retentive and non-retentive memory areas, and copies load memory to work memory. A memory reset does not clear the diagnostics buffer or the permanently saved IP address. All non-retentive system and user data are initialized at warm restart.
- 49. PLC concepts made easy 4.2 Operating modes of the CPU Easy Book Manual, 04/2012, A5E02486774-05 49 You can configure the startup after POWER ON setting of the CPU complete with restart method using the programming software. This configuration item appears under the Device Configuration for the CPU under Startup. When power is applied, the CPU performs a sequence of power-up diagnostic checks and system initialization. During system initialization, the CPU deletes all non-retentive bit memory and resets all non-retentive DB contents to initial values. The CPU then enters the appropriate power-up mode. Certain detected errors will prevent the CPU from entering the RUN mode. The CPU supports the following power-up modes: STOP mode, Go to RUN mode after warm restart, and Go to previous mode after warm restart. CAUTION The CPU can enter STOP mode due to repairable faults, such as failure of a replaceable signal module, or temporary faults, such as power line disturbance or erratic power up event. If the CPU has been configured to Warm restart mode prior to POWER OFF, it will not return to RUN mode when the fault is repaired or removed until it receives a new command from STEP 7 to go to RUN. Without a new command, the STOP mode is retained as the mode prior to POWER OFF. CPUs that are intended to operate independently of a STEP 7 connection should typically be configured to Warm restart - RUN so that the CPU can be returned to RUN mode by a power cycle following the removal of fault conditions. The CPU does not provide a physical switch for changing the operating mode. To change the operating mode of the CPU, STEP 7 provides the following tools: Stop and Run buttons on the STEP 7 toolbar CPU operator panel in the online tools You can also include a STP instruction in your program to change the CPU to STOP mode. This allows you to stop the execution of your program based on the program logic.
- 50. PLC concepts made easy 4.3 Execution of the user program Easy Book 50 Manual, 04/2012, A5E02486774-05 4.3 Execution of the user program The CPU supports the following types of code blocks that allow you to create an efficient structure for your user program: ● Organization blocks (OBs) define the structure of the program. Some OBs have predefined behavior and start events, but you can also create OBs with custom start events (Page 52). ● Functions (FCs) and function blocks (FBs) contain the program code that corresponds to specific tasks or combinations of parameters. Each FC or FB provides a set of input and output parameters for sharing data with the calling block. An FB also uses an associated data block (called an instance DB) to maintain state of values between execution that can be used by other blocks in the program. Valid FC and FB numbers range from 1 to 65535. ● Data blocks (DBs) store data that can be used by the program blocks. Valid DB numbers range from 1 to 65535. The size of the user program, data, and configuration is limited by the available load memory and work memory in the CPU (Page 13). There is no specific limit to the number of each individual OB, FC, FB and DB block. However, the total number of blocks is limited to 1024. 4.3.1 Processing the scan cycle in RUN mode For each scan cycle, the CPU writes the outputs, reads the inputs, executes the user program, updates communication modules, and responds to user interrupt events and communication requests. Communication requests are handled periodically throughout the scan. These actions (except for user interrupt events) are serviced regularly and in sequential order. User interrupt events which are enabled are serviced according to priority in the order in which they occur. The system guarantees that the scan cycle will be completed in a time period called the maximum cycle time; otherwise a time error event is generated. ● Each scan cycle begins by retrieving the current values of the digital and analog outputs from the process image and then writing them to the physical outputs of the CPU, SB, and SM modules configured for automatic I/O update (default configuration). When a physical output is accessed by an instruction, both the output process image and the physical output itself are updated. ● The scan cycle continues by reading the current values of the digital and analog inputs from the CPU, SB, and SMs configured for automatic I/O update (default configuration), and then writing these values to the process image. When a physical input is accessed by an instruction, the value of the physical input is accessed by the instruction, but the input process image is not updated. ● After reading the inputs, the user program is executed from the first instruction through the end instruction. This includes all the program cycle OBs plus all their associated FCs and FBs. The program cycle OBs are executed in order according to the OB number with the lowest OB number executing first.
- 51. PLC concepts made easy 4.3 Execution of the user program Easy Book Manual, 04/2012, A5E02486774-05 51 Communications processing occurs periodically throughout the scan, possibly interrupting user program execution. Self-diagnostic checks include periodic checks of the system and the I/O module status checks. Interrupts can occur during any part of the scan cycle, and are event-driven. When an event occurs, the CPU interrupts the scan cycle and calls the OB that was configured to process that event. After the OB finishes processing the event, the CPU resumes execution of the user program at the point of interruption. 4.3.2 OBs help you structure your user program OBs control the execution of the user program. Each OB must have a unique OB number. The default OB numbers are reserved below 200. Other OBs must be numbered 200 or greater. Specific events in the CPU trigger the execution of an organization block. OBs cannot call each other or be called from an FC or FB. Only a start event, such as a diagnostic interrupt or a time interval, can start the execution of an OB. The CPU handles OBs according to their respective priority classes, with higher priority OBs executed before lower priority OBs. The lowest priority class is 1 (for the main program cycle), and the highest priority class is 26 (for the time-error interrupts). OBs control the following operations: ● Program cycle OBs execute cyclically while the CPU is in RUN mode. The main block of the program is a program cycle OB. This is where you place the instructions that control your program and where you call additional user blocks. Multiple program cycle OBs are allowed and are executed in numerical order. OB 1 is the default. Other program cycle OBs must be identified as OB 200 or greater. ● Startup OBs execute one time when the operating mode of the CPU changes from STOP to RUN, including powering up in the RUN mode and in commanded STOP-to-RUN transitions. After completion, the main Program cycle OB will begin executing. Multiple startup OBs are allowed. OB 100 is the default. Others must be OB 200 or greater. ● Cyclic interrupt OBs execute at a specified interval. A cyclic interrupt OB will interrupt cyclic program execution at user defined intervals, such as every 2 seconds. You can configure up to a total of 4 for both the time-delay and cyclic events at any given time, with one OB allowed for each configured time-delay and cyclic event. The OB must be OB 200 or greater. ● Hardware interrupt OBs execute when the relevant hardware event occurs, including rising and falling edges on built-in digital inputs and HSC events. A hardware interrupt OB will interrupt normal cyclic program execution in reaction to a signal from a hardware event. You define the events in the properties of the hardware configuration. One OB is allowed for each configured hardware event. The OB must be OB 200 or greater.
- 52. PLC concepts made easy 4.3 Execution of the user program Easy Book 52 Manual, 04/2012, A5E02486774-05 ● A time error interrupt OB executes when either the maximum cycle time is exceeded or a time error event occurs. The OB for processing the time error interrupt is OB 80. If triggered, it executes, interrupting normal cyclic program execution or any other event OB. The events that trigger the time error interrupt and the reaction of the CPU to those events are described below: – Exceeding the maximum cycle time: You configure the maximum cycle time in the properties of the CPU. If OB 80 does not exist, the reaction of the CPU for exceeding the maximum time is to change to STOP. – Time errors: If OB 80 does not exist, the reaction of the CPU is to stay in RUN. Time errors occur if the time of day event is missed or repeated, the queue overflows, or an event OB (time delay event, time of day event, or cyclic interrupt) starts before the CPU finishes the execution of the first. The occurrence of either of these events generates a diagnostic buffer entry describing the event. The diagnostic buffer entry is generated regardless of the existence of OB 80. ● Diagnostic error interrupt OBs execute when a diagnostic error is detected and reported. A diagnostic OB interrupts the normal cyclic program execution if a diagnostics-capable module recognizes an error (if the diagnostic error interrupt has been enabled for the module). OB 82 is the only OB number supported for the diagnostic error event. You can include an STP instruction (put CPU in STOP mode) inside your OB 82 if you desire your CPU to enter STOP mode upon receiving this type of error. If there is no diagnostic OB in the program, the CPU ignores the error (stays in RUN). 4.3.3 Event execution priorities and queuing The CPU processing is controlled by events. An event triggers an interrupt OB to be executed. You can specify the interrupt OB for an event during the creation of the block, during the device configuration, or with an ATTACH or DETACH instruction. Some events happen on a regular basis like the program cycle or cyclic events. Other events happen only a single time, like the startup event and time delay events. Some events happen when there is a change triggered by the hardware, such as an edge event on an input point or a high speed counter event. There are also events like the diagnostic error and time error event which only happen when there is an error. The event priorities and queues are used to determine the processing order for the event interrupt OBs. The program cycle event happens once during each program cycle (or scan). During the program cycle, the CPU writes the outputs, reads the inputs and executes program cycle OBs. The program cycle event is required and is always enabled. You may have no program cycle OBs, or you may have multiple OBs selected for the program cycle event. After the program cycle event is triggered, the lowest numbered program cycle OB (usually OB 1) is executed. The other program cycle OBs are executed sequentially (in numerical order) within the program cycle. The cyclic interrupt events allow you to configure the execution of an interrupt OB at a configured scan time. The initial scan time is configured when the OB is created and selected to be a cyclic interrupt OB. A cyclic event will interrupt the program cycle and execute the cyclic interrupt OB (the cyclic event is at a higher priority class than the program cycle event). Only one cyclic interrupt OB can be attached to a cyclic event.
- 53. PLC concepts made easy 4.3 Execution of the user program Easy Book Manual, 04/2012, A5E02486774-05 53 Each cyclic event can be assigned a phase shift so that the execution of cyclic interrupts with the same scan time can be offset from one another by the phase shift amount. The default phase shift is 0. To change the initial phase shift, or to change the initial scan time for a cyclic event, right click on the cyclic interrupt OB in the project tree, click Properties, then click Cyclic interrupt, and enter the new initial values. You can also query and change the scan time and the phase shift from your program using the Query cyclic interrupt (QRY_CINT) and Set cyclic interrupt (SET_CINT) instructions. Scan time and phase shift values set by the SET_CINT instruction do not persist through a power cycle or a transition to STOP mode; scan time and phase shift values will return to the initial values following a power cycle or a transition to STOP. The CPU supports a total of four cyclic and time-delay interrupt events. The startup event happens one time on a STOP to RUN transition and causes the startup OBs to be executed. Multiple OBs can be selected for the startup event. The startup OBs are executed in numerical order. The time delay interrupt events allow you to configure the execution of an interrupt OB after a specified delay time has expired. The delay time is specified with the SRT_DINT instruction. The time delay events will interrupt the program cycle to execute the time delay interrupt OB. Only one time delay interrupt OB can be attached to a time delay event. The CPU supports four time delay events. The hardware interrupt events are triggered by a change in the hardware, such as a rising or falling edge on an input point, or a HSC (High Speed Counter) event. There can be one interrupt OB selected for each hardware interrupt event. The hardware events are enabled in Device configuration. The OBs are specified for the event in the Device configuration or with an ATTACH instruction in the user program. The CPU supports several hardware interrupt events. The exact events are based on the CPU model and the number of input points. The time and diagnostic error interrupt events are triggered when the CPU detects an error. These events are at a higher priority class that the other interrupt events and can interrupt the execution of the time delay, cyclic and hardware interrupt events. One interrupt OB can be specified for each of the time error and diagnostic error interrupt events. Understanding event execution priorities and queuing The number of pending (queued) events from a single source is limited, using a different queue for each event type. Upon reaching the limit of pending events for a given event type, the next event is lost. Refer to the following section on Understanding time error events for more information regarding queue overflows. Each CPU event has an associated priority. You cannot change the priority of an OB. In general, events are serviced in order of priority (highest priority first). Events of the same priority are serviced on a first-come, first-served basis.
- 54. PLC concepts made easy 4.3 Execution of the user program Easy Book 54 Manual, 04/2012, A5E02486774-05 Table 4- 1 OB events Event OB number Quantity allowed Start event OB priority Program cycle OB 1, OB 200 to OB 65535 1 program cycle event Multiple OBs allowed Startup OB ends Last program cycle OB ends 1 Startup OB 100, OB 200 to OB 65535 1 startup event 1, 2 Multiple OBs allowed STOP-to-RUN transition 1 Time-delay OB event is scheduled 3Time OB 200 to OB 65535 Up to 4 time events3 1 OB per event Cyclic OB event is scheduled 7 Edges: Rising edge events: 16 max. Falling edge events: 16 max. 5Process OB 200 to OB 65535 Up to 50 process events4 1 OB per event For HSC: CV=PV: 6 max. Direction changed: 6 max. External reset: 6 max. 6 Diagnostic error OB 82 1 event (only if OB 82 was loaded) Module transmits an error 9 Time error OB 80 1 event (only if OB 80 was loaded)5 Maximum cycle time was exceeded A second time interrupt (cyclic or time-delay) started before the CPU had finished execution of the first interrupt 26 1 The startup event and the program cycle event will never occur at the same time because the startup event will run to completion before the program cycle event will be started (controlled by the operating system). 2 Only the diagnostic error event (OB 82) interrupts the startup event. All other events are queued to be processed after the startup event has finished. 3 The CPU provides a total of 4 time events that are shared by the time-delay OBs and the cyclic OBs. The number of time-delay and cyclic OBs in your user program cannot exceed 4. 4 You can have more than 50 process events if you use the DETACH and ATTACH instructions. 5 You can configure the CPU to stay in RUN if the maximum scan cycle time was exceeded or you can use the RE_TRIGR instruction to reset the cycle time. However, the CPU goes to STOP mode the second time that the maximum scan cycle time was exceeded in one scan cycle. After the execution of an OB with a priority of 2 to 25 has started, processing of that OB cannot be interrupted by the occurrence of another event, except for by OB 80 (time-error event, which has a priority of 26). All other events are queued for later processing, allowing the current OB to finish. Interrupt latency The interrupt event latency (the time from notification of the CPU that an event has occurred until the CPU begins execution of the first instruction in the OB that services the event) is approximately 175 µsec, provided that a program cycle OB is the only event service routine active at the time of the interrupt event.