
Recommended
Recommended
More Related Content
What's hot
What's hot (19)
Similar to Build backyard rain garden improve water quality
Similar to Build backyard rain garden improve water quality (20)
More from Sotirakou964
More from Sotirakou964 (20)
Recently uploaded
Recently uploaded (20)
Build backyard rain garden improve water quality
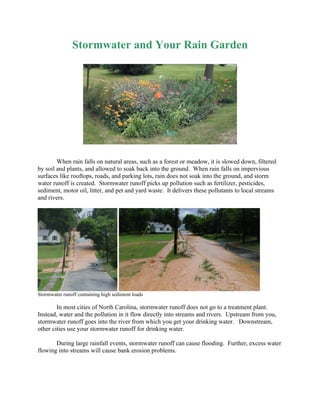
- 1. Stormwater and Your Rain Garden When rain falls on natural areas, such as a forest or meadow, it is slowed down, filtered by soil and plants, and allowed to soak back into the ground. When rain falls on impervious surfaces like rooftops, roads, and parking lots, rain does not soak into the ground, and storm water runoff is created. Stormwater runoff picks up pollution such as fertilizer, pesticides, sediment, motor oil, litter, and pet and yard waste. It delivers these pollutants to local streams and rivers. Stormwater runoff containing high sediment loads In most cities of North Carolina, stormwater runoff does not go to a treatment plant. Instead, water and the pollution in it flow directly into streams and rivers. Upstream from you, stormwater runoff goes into the river from which you get your drinking water. Downstream, other cities use your stormwater runoff for drinking water. During large rainfall events, stormwater runoff can cause flooding. Further, excess water flowing into streams will cause bank erosion problems.
- 2. Backyard rain gardens are a fun and inexpensive way to improve water quality and enhance the beauty of your yard or business. Rain gardens are placed between stormwater runoff sources (roofs, driveways, parking lots) and runoff destinations (storm drains, streets, streams). Streambank erosion can be caused by excessive stormwater flow A rain garden is a shallow depression in the ground that captures runoff from your driveway or roof and allows it to soak into the ground, rather than running across roads, capturing pollutants, and delivering them to a stream. Plants and soil work together to absorb and filter pollutants and return cleaner water through the ground to nearby streams. Rain gardens also reduce flooding by sending the water back underground, rather than into the street. Besides helping water quality and reducing flooding, rain garden plants provide habitat for beneficial insects and wildlife! The rain garden fills with a few inches of water after a storm, and the water slowly filters into the ground. Because water is only in the rain garden for a day or two, it doesn’t become a breeding ground for mosquitoes.
- 3. How to Build Your Own Backyard Rain Garden Building a rain garden in your own backyard is easy! By following these few simple guidelines, rain gardens can easily be installed on your residential lot. Selecting Garden Location To select a location for the rain garden, begin by observing your yard during a rainfall event. Notice where water is flowing from, and where it is going. Rain gardens should ideally be located between the source of runoff (roofs and driveways) and the runoff destination (drains, streams, low spots, etc.). Be sure to consider the following: • The garden should not be within 10 feet of the house foundation • Gardens should be located at least 25 feet from a septic system drainfield • Gardens should not be placed within 25 feet of a well head • Make sure to avoid underground utility lines • The best location for the garden will be in partial to full sun • Rain gardens should be constructed where the water table is at least 2’ below the surface of the soil. If you hit the water table when constructing your rain garden, consider turning it into a wetland garden. Once a location is selected, you may decide to send additional water to this site. Flexible plastic pipe can be used to direct water from downspouts and collecting areas to the rain garden. Corrugated plastic pipe can be used to direct water from a distant downspout to the garden drainage area. Be sure to factor this additional water flow into your garden sizing calculations. Soils and Drainage
- 4. Rain gardens work best when constructed in well-drained or sandy soils, but they can also be installed on sites with less permeable soils such as clays. By digging a hole at the rain garden site, the soil can be examined. There are three signs of an impermeable soil. • The site ponds water or remains saturated for several days after a storm event. • The soil shows signs of being a wetland soil within 1 foot of the surface. A wetland soil is often gray with ribbons or areas of brown color. • Water poured in the dug hole is still there after two days, provided it hasn’t rained. If you see any of these signs, then your garden will need to be designed as a backyard wetland garden. An example of a wetland soil Perform a water (perc) test for impermeable soils. If water does not drain in 2 days time, consider installing a backyard wetland. Sizing Your Rain Garden Rain gardens can be large or small – the size depends primarily on the site drainage area. The volume of water to be collected will be roughly equivalent to the amount of rain falling on impervious areas draining to the garden location, such as driveways and rooftops. In North Carolina, we typically try to capture runoff from 1 inch of rainfall. To estimate the drainage area, first figure out the roof area draining to the site. The volume of water draining to the garden from the roof will be equal to the square footage of the house multiplied by the percentage of roof feeding the downspouts to the
- 5. garden. For example, if the back half of your house will drain to the rain garden site, the size of the house’s drainage area would be one half the square footage of the house. Add to this number the surface area of your paved driveway. The driveway area can be estimated through actual measurement, using a tape measure. The other option would be to pace the driveway, noting that each step is normally 2.5 to 3 feet in length. The combined roof drainage area and driveway drainage area make up the total impermeable drainage area for your garden. By dividing the total impermeable drainage area by 20, you will get a rough estimate of the garden’s area requirements for a water depth of 6 inches. When sizing your rain garden, estimate the drainage area of all impermeable surfaces draining to your selected location. Primarily, your rain garden will be sized to capture runoff coming from rooftops and driveways. EXAMPLE: A house is 60 feet by 60 feet and the owner estimates that 25% of the roof area is draining to the downspout. Further, she estimates that the driveway area draining to the location for the rain garden is 500 square feet. For a desired 6 inch ponding depth, what size should the rain garden be? Roof area: 60 X 60 = 3600 sq. ft. ¼ of the flow to downspouts: (3600 sq. ft) X 25% = 900 ft Roof area plus driveway: 900 + 500 = 1400 sq. ft Divide square footage by 20: 1400/20 = 70 sq. ft. ANSWER: The water garden should be at least 70 square feet. A 5X14 or 7X10 foot garden design would be sufficient.
- 6. Shallower water depths are possible, but will result in a larger required surface area for the rain garden. The table on the next page relates impermeable drainage area to rain garden size. Rain Garden Size Once you have determined the total impermeable drainage area for your rain garden, use this table to determine possible rain garden dimensions. Dimensions are given for ponding depths of 6 inches and 3 inches. Impermeable Required Potential Rain Required Potential Rain Garden Surface Area Size of Rain Garden Size of Rain Dimensions Garden Dimensions Garden (ftXft) (6” deep) (ftXft) (3” deep) 800 ft2 40 ft2 4X10, 5X8, 6X7 80 ft2 7X12, 8X10, 9X9 1000 ft2 50 ft2 5X10, 6X8 100 ft2 7x15, 10X10 1200 ft2 60 ft2 4X15, 5X12, 120 ft2 10X12, 8X15 6X10, 8X8 1400 ft2 70 ft2 5X14, 7X10 140 ft2 10X14, 7X20 1600 ft2 80 ft2 7X12, 8X10, 9X9 160 ft2 8X20, 10X16 1800 ft2 90 ft2 6X15, 7X13, 180 ft2 9X20,10X18,12X15 8X12, 9X10 2000 ft2 100 ft2 7x15, 10X10 200 ft2 10X20, 14X15 2500 ft2 125 ft2 8X16,10X13 250 ft2 10X25, 13X20, 15X17 3000 ft2 150 ft2 10X15, 12X13 300 ft2 10X30, 15X20 3500 ft2 175 ft2 9X20, 12X15 350 ft2 14X25, 18X20 4000 ft2 200 ft2 10X20, 14X15 400 ft2 16X25, 20X20 5000 ft2 250 ft2 10X25, 13X20, 500 ft2 20X25 15X17 Rain Garden Construction Once the location and size of the rain garden have been determined, it is time to start digging the rain garden. Prior to digging, it may help to outline the area using string or spray paint. The garden should be dug 4 to 6 inches deep with a slight depression in the center. The dug out soil will be used to create a berm along one side of the rain garden which will allow water to be retained during a storm. If the garden is located on a slight slope, the berm should be located on the downhill sloping side of the rain garden. To prevent erosion, the berm should be covered with mulch or grass.
- 7. For very well drained soils, adding compost to the top layer of the garden will allow plants to establish themselves better and also allow the garden to retain more water. If you have compacted soils, you may add gravel or mulch to improve infiltration, or preferably a backyard wetland may be installed. Once the rain garden has been dug, planting can begin. It is important to note that plants in a rain garden will have to tolerate fluctuating levels of soil wetness. To help plants survive extended wet periods, it may help to plant the plants “high” on the edge of the rain garden or on mounds within the rain garden to elevate the roots above the ponded water level. Associated plant lists are available for guidance in plant selection. Finally, the area should be mulched with 2-3 inches of hardwood mulch. Lighter mulches will tend to float, so avoid pine bark and pine straw mulches. Mulch is important in pollution removal, maintaining soil moisture, and in preventing erosion. Mulch with 2-3 inches of hardwood mulch A newly completed rain garden
- 8. Planting Your Rain Garden What kind of plants should I use? Use container-grown plants with a well-established root system. It’s fun to sow native wildflower seed, but experience shows that this doesn’t work too well in a rain garden. Flooding, weeds, and garden pests will be hard on your seeds, and the garden will be mostly weeds for the first few years. You can start plants from seeds indoors, grow them for a few months, and then move the plants outdoors. You might also be able to get transplants from a gardening friend. Or, you could participate in a plant rescue, where groups dig up plants from construction sites before the heavy equipment moves in. What are the best plants for where I live? Plants that are native to your area should need the least maintenance – they have lived for a long time in this climate and with the insects that live in your area. Using little or no fertilizer or pesticides helps our goal of improving water quality. There are lots of spectacularly beautiful North Carolina native plants to choose. Where you live in North Carolina and where you place your garden will determine what type of plants are best for you. Planting several species in your rain garden can create a long flowering season, and give your garden depth and dimension. How should I put the plants in the ground?
- 9. Lay out the plants in the garden before putting them into the ground to see how they will look. If you have them in pots in your yard for more than a day before planting them, make sure and water them, and keep them out of direct sunlight. Dig the hole for each plant twice as wide as the plant container and deep enough to keep the crown of the young plant right at the soil line, as it was in the container. After you put the plant in the ground, firmly tamp the soil around the roots so you don’t have air pockets, which will dry out the roots and can kill the plant. Make sure to dig a wide enough hole for the plant to thrive well. After planting, lightly tamp down the soil around the plant to eliminate air pockets. Your rain garden will have a couple of different wetness zones in it. In the deepest part of the garden, you can put plants that withstand a couple of days of flooding at a time. In the shallower parts and on the edges, you can put more typical landscape plants. Water immediately after planting, and then water twice weekly (unless rain does the job for you) until the plants are well established. After the first growing season, you shouldn’t need to water the plants unless there is a lengthy drought. Add mulch two inches thick, but avoid burying your new plants with the mulch. You want mulch that won’t float away…hardwood mulch is best. Consider enhancing your rain garden by using stone or ornamental fences. Especially while your rain garden is young, this can give it a neat and attractive appearance you and your neighbors will appreciate!
- 11. Rain Garden Maintenance Just like any other garden, your rain garden will need some basic maintenance to keep it healthy and functioning. Mulch annually. Mulching is an important part of rain garden maintenance. Mulch keeps the soil moist, allowing for easy infiltration of rain water. Un-mulched surfaces may develop into a hardpan, a condition in which the soil surface becomes cemented together, forming a hard, impervious layer. Mulching also protects plants and reduces weed growth. Each spring, rain gardens should be re-mulched with 2-3 inches of hardwood mulch. Minimize sediment flow into the garden. Sediment in a rain garden can decrease runoff infiltration, and also kill plants. Do not construct your garden until development is established and the land surrounding your home is stable. If a construction project is being planned near your home, it will be best to wait and install your rain garden after the project has been completed. Weed, prune, and water your garden, especially during plant establishment. Depending on the selected garden design, there will be varying degrees of weeding and pruning involved. It is important to weed regularly during plant establishment, as newly planted species may have a tough time competing with weeds. Once plants become established, less weeding will be required. Rain gardens should be pruned to keep them looking nice, unless the “wild-look” is desired. The plants in your rain garden will need to be watered regularly during establishment to ensure healthy growth. Once established, plants should be watered in long periods of drought. Keep your garden healthy and clean. Rain gardens should be periodically cleared of dead vegetation and any debris that may collect. Replanting may be necessary over time. If a plant is not doing so well in one location of the garden, it may have to be moved to a wetter or dryer area. For more information on plants and maintenance, see the following North Carolina Cooperative Extension resources: Urban Horticulture Website, www.ncstate-plants.net, where you will find: • Plant Fact Sheets – complete growing information and images of thousands of plants. • Consumer Leaflets – short factsheets on everything from mulching to propagation. • Extension Bulletins – more indepth factsheets on a variety of topics including pruning trees and shrubs and gardening to protect water quality. • Plus much, much more!
- 12. References: Citizen’s Guide to Protecting Wilmington’s Waterways. City of Wilmington, NC Stormwater Services http://www.wilmingtonnc.gov/Portals/_default/stormwater/cguide.pdf Hunt, Bill. “How to Build Your Own Backyard Rain Garden.” N.C. Cooperative Extension. Rain Gardens: A how-to manual for homeowners. University of Wisconsin-Extension. http://clean-water.uwex.edu/pubs/raingarden/rgmanual.pdf Ruth, Cliff. Plants for Constructed Wetlands and Rain Gardens. http://www.ces.ncsu.edu/copubs/env/water/018/RaingardenPlantsBrochure.pdf