Surf link media_manual
•
1 j'aime•717 vues

This document provides instructions for connecting and using the SurfLink Media device to stream audio from various media sources to hearing aids. It includes details on the connection options using included cables like RCA, S/PDIF, and TOSLINK, as well as controls on the device for volume adjustment and streaming activation range. Setup requires selecting the appropriate cable, powering on the device, and choosing mono or binaural audio based on the number of hearing aids used.

Recommandé
Contenu connexe
Tendances
Tendances (20)
Similaire à Surf link media_manual
Similaire à Surf link media_manual (20)
Plus de Starkey Hearing Technologies
Plus de Starkey Hearing Technologies (18)
Surf link media_manual
- 1. MEDIA
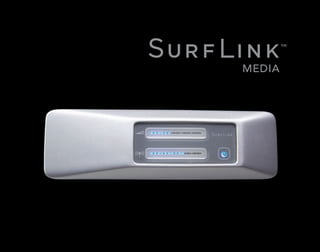
- 2. Streaming Activation Power Control Volume Control SurfLink Media Controls Overview Back View Microphone RCA Jacks Optical S/PDIF Monaural/Binaural Power TOSLINK Selection Read This First SurfLink Media can be connected to most media sources, including televisions, radios, and MP3 players. This guide provides easy step-by-step instructions for connecting and using SurfLink Media. SurfLink Media must be powered on and connected to the desired media input before your hearing instruments can receive a signal. Only ONE of the following connection setups needs to be followed to begin the use of SurfLink Media. A variety of cables are included in this package to allow streaming from virtually any media source. Select the appropriate cable for your connection and store any unused cables. Package Contents • SurfLink Media • Power Adaptor • RCA Cable Microphone (1) RCA Jacks (2) An RCA audio cable is supplied. Optical TOSLINK Jack (3) A TOSLINK cable is not supplied. TOSLINK cables are available at most consumer electronic stores. S/PDIF Jack (4) An S/PDIF digital audio cable is not supplied. S/PDIF digital audio cables are available at most consumer electronic stores. Power (5) A micro-USB power cable is supplied. Insert the micro-USB connector into the Power port on SurfLink Media and connect the opposite end to the power outlet. 2 3
- 3. Connecting SurfLink Media and Media Source Streaming Activation Power Control Volume Control RCA Cable Installation (most common connection option) 1. Connect the red and white RCA cable plugs into the corresponding red and white RCA jacks (labeled 2) on SurfLink Media. 2. Select the signal type as Monaural or Binaural audio stream based on your hearing system confi guration. M onaural if you are wearing one hearing instrument. B inaural if you are wearing two hearing instruments. Microphone RCA Jacks Optical S/PDIF Monaural/Binaural Power 3. Connect the opposite end of the red and white RCA cable jacks into the corresponding red and white RCA “AUDIO OUT” jacks on the media source. 4. Place SurfLink Media in a desired location that is in close proximity to the media source. TOSLINK Selection SLINK Once SurfLink Media has been turned on it will begin to stream the audio signal. Connecting SurfLink Media and Media Source S/PDIF Installation Streaming Activation Power Control Volume Control 1. Connect the orange S/PDIF cable into the orange S/PDIF “AUDIO OUT” port (labeled 4) on the media source. 2. Select the signal type as Monaural or Binaural audio stream based on your hearing system confi guration. M onaural if you are wearing one hearing instrument. B inaural if you are wearing two hearing instruments. Microphone RCA Jacks Optical S/PDIF Monaural/Binaural Power 3. Connect the opposite end of the orange S/PDIF cable into the orange S/PDIF port on the back of SurfLink Media. 4. Place SurfLink Media in a desired location that is in close proximity to the media source. TOSLINK Selection SLINK Once SurfLink Media has been turned on it will begin to stream the audio signal. 4 5
- 4. Connecting SurfLink Media and Media Source Optical/TOSLINK Installation Streaming Activation Power Control Volume Control 1. Connect the optical/TOSLINK cable into the optical/TOSLINK “AUDIO OUT” port (labeled 3) on the media source. 2. Select the signal type as Monaural or Binaural audio stream based on your hearing system confi guration. M onaural if you are wearing one hearing instrument. B inaural if you are wearing two hearing instruments. Microphone RCA Jacks Optical S/PDIF Monaural/Binaural Power 3. Connect the opposite end of the optical/ TOSLINK cable into the optical/TOSLINK port on the back of SurfLink Media. 4. Place SurfLink Media in a desired location that is in close proximity to the media source. Once SurfLink Media has been turned on it will begin to stream the audio signal. Connecting SurfLink Media and Media Source External Microphone Installation In the instance your television does not support the cable installation options listed on the previous pages, an external microphone can be used. 1. Connect the microphone cable into the microphone port (labeled 1) on the back of SurfLink Media. 2. Select the signal type as Monaural or Binaural audio Streaming Activation Power Control Volume Control stream based on your hearing system confi guration. M onaural if you are wearing one hearing instrument. B inaural if you are wearing two hearing instruments. 3. Place the microphone as close as possible to the speaker(s) of the desired media source. Television with External Microphone Confi guration Microphone RCA Jacks Optical S/PDIF Monaural/Binaural Power Once SurfLink Media has been turned on on it will begin to stream the audio signal. TOSLINK Selection SLINK TOSLINK Selection SLINK 6 7
- 5. Turning On SurfLink Media 1. Plug the power adaptor into the wall socket or other power source. 2. Connect the power cord using the Power port (labeled 5) on the back of SurfLink Media. 3. Press the power button on the front of SurfLink Media. The power button glows blue Streaming Activation Power Control when the device is on. 8 9 Control Microphone RCA Jacks Optical S/PDIF Monaural/Binaural Power TOSLINK Selection SLINK Streaming Activation Power Control Volume Control Microphone RCA Jacks Optical S/PDIF Monaural/Binaural Power TOSLINK Selection SurfLink Media Controls Overview Streaming Activation Power Control Volume Control Front View
- 6. SurfLink Media Controls Overview Volume Control The volume of the media source streaming to your hearing instruments can be adjusted by using the Volume Control. Slide your finger to the right to increase the volume and to the left to decrease the volume. The blue light indicates the volume control position of SurfLink Media. A longer bar means increased volume. Streaming Activation Control The streaming activation range of the SurfLink Media can be increased or decreased to adjust the distance where a streaming session begins. Slide your finger to the right to increase the distance between the location of the SurfLink Media and where you want to be able to start streaming. The blue light indicates the range position of SurfLink Media. A longer bar means increased distance. Regulatory Notices FCC ID: EOA-TV IC: 6903A-TV FCC Notice This device complies with part 15 of the FCC rules and with RSS-210. Operation is subject to the following two conditions: (1) This device may not cause harmful interference, and (2) this device must accept any interference received, including interference that may cause undesired operation of the device. Note: The manufacturer is not responsible for any radio or TV interference caused by unauthorized modifications to this equipment. Such modifications could void the user’s authority to operate the equipment. Hereby, Paradigm declares that SurfLink Media is in compliance with the essential requirements and other relevant provisions of Directive 1999/5/EC. A copy of the Declaration of Conformity can be obtained from the following addresses. This Class B digital apparatus complies with Canadian ICES-003. Cet appareil numérique de la classe B est conforme à la norme NMB-003 du Canada. Note: This equipment has been tested and found to comply with the limits for a Class B digital device, pursuant to part 15 of the FCC Rules. These limits are designed to provide reasonable protection against harmful interference in a residential installation. This equipment generates, uses and can radiate radio frequency energy and, if not installed and used in accordance with the instructions, may cause harmful interference to radio communications. However, there is no guarantee that interference will not occur in a particular installation. If this equipment does cause harmful interference to radio or television reception, which can be determined by turning the equipment off and on, the user is encouraged to try to correct the interference by one or more of the following measures: • Reorient or relocate the receiving antenna. • Increase the separation between the equipment and receiver. • Connect the equipment into an outlet on a circuit different from that to which the receiver is connected. • Consult the dealer or an experienced radio/TV technician for help. Paradigm, Inc. 6600 Washington Ave. South Eden Prairie, MN USA Paradigm, Inc. European Headquarters Wm. F. Austin House, Bramhall Technology Park Pepper Road, Hazel Grove, Stockport SK7 5BX United Kingdom 10 11
- 7. © 2010 Paradigm, Inc. All Rights Reserved. 84720-007 11/10 BKLT0230-01-EE-XX Rev. B