SlideShare une entreprise Scribd logo
1  sur  29
Steps to Install PostgreSQL Server/client
The following steps to install PostgreSql Server on Windows :

When the installer appears you can accept all of the default values by clicking the Next
button. You will need to enter a password that you will need to access the PostgreSQL server
later on. Make sure you remember the password you enter.
Here we need to give Password of the Super User. Here Super User is “postgres “.This
password is used for while connecting the server we need to give this password.
By default Port number the server is 5432
After a successful installation you will be prompted to launch Stack Builder. You can uncheck
this checkbox and click Finish.


Server Configuration from client (Win) to server (Win)

--In client side we have to add new server config
In the "New Server Registration" dialog that appears, enter appropriate values for your
server name and PostgreSQL account credentials. Be sure to specify "localhost" for the "Host"
field, as you'll be connecting via your SSH tunnel. Click "OK" to connect to your server.


You will be presented with a full view of the databases that your user account has access to.

--Now we need to set client IP address in server config file onpg_hba.config (in Server
Machine Win)

Location :   C:Program FilesPostgreSQL9.2datapg_hba.config file

Then,come down end of the file we need to add client ip address on following way.

                                                                            Add IP
                                                                            Address of win
                                                                            client box
--From client side we are getting server details.


In Config file set the particular DB,particular user on server side :
(Win(client) to Win(server)) :

Here we connect only particular database,particular user from client side(Win Box).
First we need to config file (from server side(win box)) ,open C:/Program
files/Postgresql/8.4/data/pg_hda.config file ,in that we add particulat DB,Particular user,IP
address (client box(Win)) and save it.After that restart the server.
                                                                                  From server
                                                                                  side(win) add
                                                                                  particular DB
                                                                                  and user
--- From client side connecting Particular DB,particular user .(In Win Box)
C:Program FilesPostgreSQL9.2bin>psql -h 10.65.2.49 -d sample -U u2


In Config file set the particular DB,particular user from server side :
(Win(server) to Win(client)) :

 Here we connect only particular database,particular user from client side(Win Box).
First we need to config file (from server side(win box)) ,open C:/Program
files/Postgresql/8.4/data/pg_hda.config file ,in that we add particulat DB,Particular user,IP
address (client box(Win)) and save it.After that restart the server
                                                                                  From server
                                                                                  side(win) add
                                                                                  particular DB
                                                                                  and user
----From client side connecting Particular DB,particular user .(In Win Box)
C:Program FilesPostgreSQL9.2bin>psql -h 10.65.0.141 -d test1 –U test_user


--Connecting the postgresfromcmd prompt on Windows.
The following Screen are Creating Database in command prompt by using Postgres (Super
User).Enter the postgres bin path then give “psql –U postgres “,Here we need to give passwd
of superuser Postgres.After login create one sample database called “sample”,after creating a
database check wether database is created or not by using l command,it shows all list of
databases.


Here create one sample user called sam_user1 and passwd is same as username.Next we
connect the particular database by using user (sam_user1) login .Here ” sample” is the
database ;username is sam_user1 .Create a table and insert the values ;and select the table.
--Insert the values in to particular table :

Go to Start -->All Programs -- >PostgreSQL9.2 -- >PgAdminIII
In Menu barTools ScriptsINSERT Script
The Quary window will be coming ,in that we select database and username like below
mentiond in red mark.


----- The following screen displays how to take database or schemas backup and
restore on cmd prompt(Windows).

Here pg_dump is used for taking the backup utility.Login as a SuperUser and give Database
at the end of the line.And mention the backup up location where we have to copy the backup
file.Here DB is :sample(from Bkup) ;To Restore DB is :TestDB.


OR
In this screen simple give Restore and backup commands

Here DB name :INFO(From Bkup);To Restore DB is : vv2.


OR

Here also give simple Backup asd Restore commands with out “Qautations”
-Creating DB and User priveleges on cmd : (Windows)
--- Create a database

 C:program filesPostgresqlversionbin>psql -U postgres
 Enter passwd for postgre :postgres
 postgres-# create database postgressvtdb;
 database created
(OR)
[prompt]$ created dbname –U user-name -W drop user username;
Postgres=# create database dbname;

--To check database is created or not

postgres-# l     (it displays the list of databases)

--- Delete a database

[prompt]$ destroy db dbname;
[prompt]$ drop db dbname ;
[prompt]$ drop database dbname;

---Create user : Adding New Users

A superuser or the database owner can create users in PostgreSQL. Use the CREATE
USER SQL command or the createuser shell script to create users.

Syntax:

CREATE USER username[ WITHSYSID uid| CREATEDB | NOCREATEDB
| CREATEUSER | NOCREATEUSER| IN GROUP groupname[, ...]| [ ENCRYPTED |
UNENCRYPTED ] PASSWORD 'password'| VALID UNTIL 'abstime' ]

[prompt] $ create user username with password „password‟;
(OR)
Postgres=#CREATE USER username WITH PASSWORD 'password' CREATEDB VALID
UNTIL 'yyyy-mm-dd';

--Manipulating Users :( Altering a User)

In PostgreSQL, each user is identified as an object. It is possible to modify the properties of
any user. This process is known as altering a user. Use the ALTER USER command to alter a
user. Only superusers can execute this command.

Syntax :

ALTER USER username[ WITHCREATEDB | NOCREATEDB | CREATEUSER |NOCREATEUSER| [
ENCRYPTED | UNENCRYPTED ] PASSWORD 'password'| VALID UNTIL 'abstime';

Postgres=#ALTER USER username NOCREATEDB;
Sometimes you may need to change the user's name, in which case the alternate syntax is
provided:

ALTER USER oldname RENAME TO newname;

The ALTER USER command is used to reset the password and expiry time, if specified, as
shown in the following code:

mydatabase=# ALTER USER username WITH PASSWORD „password‟ VALID UNTIL „yyyy-
mm-dd‟;

-- Delete a user

Only a superuser can remove a user, provided the specified user is not the owner of any
database. If the user is the owner of a database, drop the database first and then the user.
The alternative is to change the owner of the database in the pg_database table.

[prompt]$ drop user username;

---Group Management :

PostgreSQL enables you to manage multiple users as groups. Groups are a single identity for
multiple users with a similar set of rights and privileges. They also exist as database objects
and are stored in the system catalog.

To grant a similar set of rights to several individuals, create a group consisting of many
individuals. Rights granted to a group apply to all the users with in that group. If you are not
sure of the users, first create an empty group and then add or remove users using the ALTER
GROUP SQL command. You can specify one or more users while creating a group.

In PostgreSQL, the super user creates and removes groups using the CREATE GROUP and
DROP GROUP SQL commands.

--- Creating a Group

You can use the CREATE GROUP SQL command to create a group, using this syntax:

CREATE GROUP groupname [WITH] [SYSID groupid] [USER username [,........]]]

Note : Here, groupname is the name of the group and it must begin with an alphabet and
not exceed more than 31 characters.

mydatabase=# CREATE GROUP groupname WITH USER username, anewuser;

---Removing a Group:

To remove a group, use the DROP GROUP SQL command. The syntax for the DROP GROUP
SQL command is:

mydatabase=#DROP GROUP groupname;
Here, the groupname identifies the group to be dropped. When you drop a group, the rights
and permissions associated with it are retained. If you drop a group by mistake, recreate it
with the same name specifying the same SYSID. Since group membership information no
longer exists, user names need to be added to the group.

--- Altering a Group

Groups are created to manage multiple users with a similar set of permissions. To make
changes.

Syntax :

ALTER GROUP groupname{ ADD | DROP } USER username[,.....]

---Adding User to a Group

Use the following code to add a user to an existing group.

mydatabase=# ALTER GROUP groupname ADD USER username, username2;

The above code adds username1 and username2 to the “groupname” group and assigns
them the rights and privileges of the group.

--Removing Users from a Group

Use the ALTER command to drop a user, as shown in the following code:

mydatabase=# ALTER GROUP groupname DROP USER username;

The code above drops the user “username” from the “groupname” group.

--Grant priveliges from database to user:

Postgres=# grant all on database postgresvtdb to testuser;
postgres=# grant connect on database postgresvtdb to testuser;
postgres=# grant priveliges on database postgresvtdb to testuser;

--- Grant privileges: Syntax

Privileges are the rights you grant to a user or group for specific table views or sequence
within a database. Each privilege is associated with a special character symbol

GRANT privilege[, ...] ON object [, ...] TO{PUBLIC | GROUP groupname | username }[ WITH
GRANT OPTION ];

Postgres=#   GRANT   UPDATE ON table-name to username;
Postgres=#   GRANT   SELECT ON table-name to username;
Postgres=#   GRANT   INSERT ON table-name to username;
Postgres=#   GRANT   DELETE ON table-name to username;
Postgres=#   GRANT   RULE ON table-name to username;
Postgres=# GRANT TRIGGER ON table-name to username;
Postgres=# GRANT REFERENCE ON table-name to username;
Postgres=# GRANT UPDATE ON table-name to username;
Postgres=# GRANT ALL PRIVILEGES ON table-name to public;
Postgres=# GRANT SELECT,INSERT ON tablename1, tablename2 TO username1, username2
WITH GRANT OPTION;

The following code shows how to grant all the privileges to a specific user, manager:

mydatabase=# GRANT ALL ON customers, books, publishers TO manager;
CHANGE

The code above grants the ALL privileges to the user manager on the tables, customers,
books, and publishers in mydatabase.

You can view the privileges granted by specifying the z command with the name of the
table, view, or sequence, as shown in the following code.

mydatabase=# z publishers

Privileges granted to a group apply to all users within it. The following code shows how to
grant privileges to a group

mydatabase=# GRANT SELECT ON customers TO GROUP SALES;
CHANGE

The code above grants the SELECT privilege on the database, mydatabase to the group
Sales.To view the privileges granted, use the following code.

mydatabase=# z customers

--Revoke privileges from database to user : Syntax

In PostgreSQL, only the administrator and database owners can define the rights to others
for using the database. You can define privileges to other users and groups using the GRANT
command. To revoke the privileges granted, use the REVOKE command.

REVOKE privilege [, ...] ON object [, ...] FROM{PUBLIC | GROUP groupname | username };

   (i)      Revoke insert privilege for the public on table tname :
            Revoke insert on tname from public;
   (II)     Revoke all privileges from user username on view viewname :
            Revoke all Privileges on viewname from username;
   (III)    Revoke membership in role admins from username :
            Revoke admins from username;
   (IV)     Revoke all on tablenames FROM usernames;

The following code shows the REVOKE command given on the GROUP sales to revoke the
SELECT privilege ON the table customers.
mydatabase=# REVOKE SELECT ON customers FROM GROUP sales;
CHANGE
Using Views for Access Control :

You can create and use views for access control. Views display restricted data to the users.
A SELECT privilege allows a user to access or view all the information in a table. A view is a
restricted version of a table and consists of information that the database owner wants to
make available.When creating a view, specify the columns that will be part of it.

Listing: Creation of a View :

mydatabase=# CREATE VIEW stock_view AS SELECT isbn, retail, stock FROM stock;
CREATE

mydatabase=# GRANT SELECT ON stock_view TO GROUP sales;
CHANGE

mydatabase=# z stock
Access permissions for database "mydatabase"
Relation           | Access Permission
-----------------------------------
stock          |
stock_backup |
stock_view|{"=", "manager=arwR", "group sales=r"}

The listing above creates a view called the stock_view, which contains data from the stock
table. Privileges are granted to the users in this view and not in the table.
Users can access information but view only the information available in the stock_view.

--- Create Tablespace

Create tablespace “Tablespacename” ownername location „c:/program
files/postgresql/8.3/data/dbs or pg_tblspc‟;

Create tablespace tablespacename location „mnt/sda1/postgresql/data‟;

Create table tablename(I int) tablespace tablespacename;

--- Select default tablespaces

select * from pg_tablespace;

---- Alternatively, use the default_tablespace parameter
SET default_tablespace=tablespacename;
CREATE TABLE tablename(I int);

---- Renames a current tablespace to a new name

ALTER TABLESPACE tablespacename RENAME TO newtablespacename;

----- To changes the owner of a tablespace to a new owner

ALTER TABLESPACE tablespacename OWNER TO newowner;
------ To remove an empty tablespace

DROP TABLESPACE tablespacename;

------ Connect to a particular database

postgres=# c sample
psql (8.4.2)
You are now connected to database "sample".
sample=#

---- List all users and their permission levels

Postgres=# du

--- Shows summary information about all tables in the current database

Postgres=# dt

--- Exit/quit the psql shell

Postgres=# q or CTRL+d


  Installtion PostgreSQL Server/Client on Linux
Note: PostgreSql Server installation should be done through User Postgres

         --Login as root user:-

Step 1: Creating the “postgres” User

   (1)      Create a group called dba

[root@INVIRH54DB2 etc]# # groupadd –g 1020 dba

   (2)      Create a user called “postgres”

[root@INVIRH54DB2 etc]# useradd -g dba -u 888 -d /data1/postgres -m postgres

   (3)      Change the password of user postgres.

         Before installing we need to check the following versions.
         $ gmake –version
         $ gcc –version
         $ gzip –version
         $ tar –version
         $ df –k(8 to 15 MB need)

Step 2: Installing the PostgreSQL Source Package (Login as a Postgres User)
--------------> Unpacking the PostgreSQL source package

[postgres@INVIRH54DB2 ~]# cd /data1/postgres/
[postgres@INVIRH54DB2 ~]$ gunzip postgresql-8.4.2.tar.gz
[postgres@INVIRH54DB2 ~]$ tar -xvf postgresql-8.4.2.tar

Step 3: Configuring the Source Tree (Login as a Postgres user)

--------------> $ use ./configure –help
[postgres@INVIRH54DB2 ~]$ cd postgresql-8.4.2
[postgres@INVIRH54DB2 postgresql-8.4.2]$ ./configure
checking build system type... x86_64-unknown-linux-gnu
checking whether to build with 64-bit integer date/time support... yes
checking whether NLS is wanted... no
“
[“]


Step 4: Compiling the Source : Compiling the source with GNU make

[postgres@INVIRH54DB2 postgresql-8.4.2]$ gmake
gmake -C doc all
gmake[1]: Entering directory /usr/local/src/postgresql-8.4.1/doc'
gmake[1]: Nothing to be done for all'.
gmake[3]: Entering directory /usr/local/src/postgresql-8.4.1/src/backend/utils'
“
All of PostgreSQL successfully made. Ready to install.

Step 5: Installing Compiled Programs and Libraries (Login as a root)

[root@INVIRH54DB2 postgresql-8.4.2]# gmake install
gmake -C doc install
gmake[1]: Entering directory `/data1/postgres/postgresql-8.4.2/doc'
mkdir -p -- /usr/local/pgsql/share/doc//html
mkdir -p -- /usr/local/pgsql/share/man/man1 /usr/local/pgsql/share/man/man7
gzip -d -c ./postgres.tar.gz | ( cd /usr/local/pgsql/share/doc//html && /bin/tar
xf -)/bin/tar: Read 9728 bytes from –
“
make[1]: Leaving directory `/data1/postgres/postgresql-8.4.2/config'
PostgreSQL installation complete.

Create and initialize the database and invoke the postmaster application. The directory used
by the postmaster must be created and access restricted to postgres only. The command
used is:

[root@INVIRH54DB2 postgresql-8.4.2]# mkdir /usr/local/pgsql/data
[root@INVIRH54DB2 postgresql-8.4.2]# chown postgres /usr/local/pgsql/data

Step 6 : Initializing and Starting PostgreSQL (Login as a postgres user)
Now it's time to execute the initdb command, which will create the cluster. However, you
should do so as the postgres user, so change over to that user before proceeding.

The database is initialized when postgres logs on to it. The command initdb initializes the
database, which consists of server process, applications, and data files. The command for
creating an empty database for postgresis :

--------Initializing the database

[postgres@INVIRH54DB2 ~]$ /usr/local/pgsql/bin/initdb -D /usr/local/pgsql/data

The files belonging to this database system will be owned by user "postgres".
This user must also own the server process.
The database cluster will be initialized with locale en_US.UTF-8.
The default text search configuration will be set to "english".
“
Success. You can now start the database server using:
/usr/local/pgsql/bin/postgres -D /usr/local/pgsql/data       (I)
Or
/usr/local/pgsql/bin/pg_ctl -D /usr/local/pgsql/data -l logfile start (II)
here -D is the Data


/* Running postmaster in the foreground (Login as a postgres) */

[postgres@INVIRH54DB2 ~]$ /usr/local/pgsql/bin/postgres -D /usr/local/pgsql/data
LOG: database system was shut down at 2012-12-17 11:19:56 IST
LOG: autovacuum launcher started
LOG: database system is ready to accept connections
“
(OR)

The server process is started after the database is created. The command used is:

[postgres@INVIRH54DB2 ~]$ /usr/local/pgsql/bin/postmaster -D /usr/local/pgsql/data
>logfile 2>&1 &

/* Running postmaster in the background     (we mention /tmp/pgsql.log. in the following
command) */

$ /usr/local/pgsql/bin/pg_ctl -D /usr/local/pgsql/data -l /tmp/pgsql.log start

postmaster successfully started

Step 7: Configuring the PostgreSQL SysV Script :

First, change to the directory where you unpacked the PostgreSQL source. In our case, the
path to that directory is /usr/local/src/postgresql-8.4.1/. Then, issue a cp command to copy
the script from contrib/start-scripts into the init.d directory.
Copying the linux script.Installing as service ( service files can be found from source code
directory)

   (I)        go to /installation/startup-scripts (go to installation path like
              /u01/app/postgres/postgres-8.4.1/contrib/start-scripts/linux..…)
   (II)       Copy the startup script to the proper location.

/ * Be sure to execute these as the root user */

[root@INVIRH54DB2 postgresql-8.4.2]# cp /data1/postgres/postgresql-8.4.2/contrib/start-
scripts/linux /etc/init.d/postgresql
Making the linux script executable
[root@INVIRH54DB2 postgresql-8.4.2]# chmod 755 /etc/init.d/postgresql && cd /etc/init.d/
[root@INVIRH54DB2 init.d]# chkconfig --add postgresql
[root@INVIRH54DB2 init.d]# chkconfig postgresql on

---Starting PostgreSQL with the SysV script :
[root@INVIRH54DB2 init.d]# service postgresql start
Starting PostgreSQL: ok

--- Stopping PostgreSQL with the SysV script :
[root@INVIRH54DB2 init.d]# service postgresql stop
Stopping PostgreSQL: server stopped
ok

-- How to start, stop and restart PostgreSQL database? (in Linux)

[root@INVIRH54DB2 data]# servicepostgresql stop
Stopping PostgreSQL: server stopped
ok
[root@INVIRH54DB2 data]# servicepostgresql start
Starting PostgreSQL: ok
[root@INVIRH54DB2 data]# servicepostgresql restart
Restarting PostgreSQL: server stopped
Ok

Step 8: Setting Environment Variables : (Login as a root)

The environment variables that should be set are for the man pages and the bin directory
----Set /usr/local/pgsql/bin in system PATH

[root@INVIRH54DB2 init.d]# #PATH=$PATH:/usr/local/pgsql/bin;export PATH
Note: You must login to the system after the /etc/profile file has had environment variables
added to it in order for your shell to utilize them.
(OR)
[root@INVIRH54DB2 init.d]# PATH=/usr/local/pgsql/bin:$PATH
[root@INVIRH54DB2 init.d]# export PATH

In a default installation, shared libraries will be located in /usr/local/pgsql/lib
/*-----Setting LD_LIBRARY_PATH in a bash shell
$ LD_LIBRARY_PATH=/usr/local/pgsql/lib (in root)
$ export LD_LIBRARY_PATH (in root)
----Setting LD_LIBRARY_PATH in csh and tcsh
$ setenv LD_LIBRARY_PATH /usr/local/pgsql/lib (in root)*/

Step 9 : Creating a Sample Database (Login as a Postgres user)

[postgres@INVIRH54DB2 ~]$ /usr/local/pgsql/bin/createdb sample
[postgres@INVIRH54DB2 ~]$ /usr/local/pgsql/bin/psql -U postgres
psql (8.4.2)Type "help" for help.

postgres=# l
                         List of databases
   Name | Owner | Encoding | Collation | Ctype | Access privileges
-----------+----------+----------+-------------+-------------+-----------------------
 postgres | postgres | UTF8       | en_US.UTF-8 | en_US.UTF-8 |
 sample | postgres | UTF8         | en_US.UTF-8 | en_US.UTF-8 |
 template0 | postgres | UTF8       | en_US.UTF-8 | en_US.UTF-8 | =c/postgres
                                             : postgres=CTc/postgres
 template1 | postgres | UTF8       | en_US.UTF-8 | en_US.UTF-8 | =c/postgres
                                             : postgres=CTc/postgres
 test     | postgres | UTF8     | en_US.UTF-8 | en_US.UTF-8 |
(5 rows)
postgres=#
-Accessing a database with psql

[postgres@INVIRH54DB2 ~]$ /usr/local/pgsql/bin/psql sample
psql (8.4.2)Type "help" for help.
sample=#

---Querying a system table

sample=# SELECT * FROM pg_language;
 lanname | lanowner | lanispl | lanpltrusted | lanplcallfoid | lanvalidator | lanacl
----------+----------+---------+--------------+---------------+--------------+--------
 internal |     10 | f    |f          |         0|        2246 |
 c      |     10 | f    |f         |          0|        2247 |
 sql     |    10 | f     |t         |          0|       2248 |
(3 rows)[postgres@host postgresql-8.4.1]#psql -l
(Listing Databases)
/*Now you many now administrate the postgres from the user console*/

---Create,insert,select commands on Linux

[postgres@INVIRH54DB2 ~]$ /usr/local/pgsql/bin/psql -d sample
psql (8.4.2)
Type "help" for help.
sample=# create table emp(int integer,name character(20));
CREATE TABLE
sample=# insert into emp(int,name) values(1,'s1');
INSERT 0 1
sample=# insert into emp(int,name) values(2,'s2');
INSERT 0 1
sample=# insert into emp(int,name) values(3,'s3');
INSERT 0 1
sample=# select * from emp;
 int |      name
-----+----------------------
   1 | s1
   2 | s2
   3 | s3
(3 rows)
sample=#

---Backup and restore on linux (Login as a user postgres)

-----Backup :

[postgres@INVIRH54DB2 ~]$ /usr/local/pgsql/bin/pg_dump -U postgres sample -f
/data1/postgres/table.backup


--- Retore :

[postgres@INVIRH54DB2 ~]$ /usr/local/pgsql/bin/psql -U postgres -d testdb -f
/data1/postgres/table.backup
SET
SET
SET
SET
SET
SET
SET
SET
SET
CREATE TABLE
ALTER TABLE
REVOKE
REVOKE
GRANT

Connecting client(Linux) to server(Win) on linux Box

   (I)      First we need to config client ip address on server side (pg_hda.conf (Win))
   (II)     Once finishing the configration we need restart the server.
(III)     Once restarts the server, we connect from client to server.
   (IV)      In linux box login as a Postgres user,then give the following command :

[postgres@INVIRH54DB2 ~]$ psql -h windows_server_ip_address -l

[postgres@INVIRH54DB2 ~]$ /usr/local/pgsql/bin/psql -h 10.65.2.49 –l

Here –l is : list of databases (should return all available databases on the windows server)


-To connect a given DB and given user onclient (Linux) to server (Win) :

Here we connect only particular database,particular user from client side(Linux Box).
First we need to config file (from server side) ,open C:/Program
files/Postgresql/8.4/data/pg_hda.config file ,in that we add particulat DB,Particular user,IP
address (client box) and save it.After that restart the server.

In server side config (Win) :


Here we connect particular DB,particular user from client side on linux.
(I)      Login as a postgres user

[postgres@INVIRH54DB2 ~]$ psql -h windows_server_ip_address -d name_of_database -U
database_user

Here –h ------Windows_Server_IP_Address
-d ---------- Name of the Database
-U --------- Name of the Database user
[postgres@INVIRH54DB2 ~]$ /usr/local/pgsql/bin/psql -h 10.65.2.49 -d sample -U
test_sample


[postgres@INVIRH54DB2 ~]$ /usr/local/pgsql/bin/psql -h 10.65.2.49 -d sample -U
test_sample
--Connecting client (Win) to server (Linux) :

   (I)       First we need to config client ip address on server side (pg_hda.config file)
   (II)      Once finishing the configration we need restart the server.
   (III)     Once restarts the server, we connect the client from server
   (IV)      Hereafter insert the following line in the host-based authentication
             file /usr/local/pgsql/data/pg_hba.conf. This file controls which hosts are allowed
             to connect. And edit the pg_hba.conf file.
   (V)       And we need to add client IP address like the following screen.

[postgres@INVIRH54DB2 data]$ vi pg_hba.conf


In client side we are getting server Details.
Displaying all server side databases in client side :
In client side we need to give the following command :Here only particulat DB and particular
   User connecting.


   ---Connecting Server (Win) to client (Linux) :

      (I)      First we need to config client ip address on server side (pg_hda.config file)
      (II)     Once finishing the configration we need restart the server.
      (III)    Once restarts the server we connect the client from server.


In client side we need to give the following command :

[postgres@INVIRH54DB2 ~]$ /usr/local/pgsql/bin/psql -h 10.65.2.49 -U postgres
Password for user postgres:
-To connect a given DB and given user onServer (Win) to Client (Linux) :

In client side we need to give the following command :

[postgres@INVIRH54DB2 ~]$ /usr/local/pgsql/bin/psql -h 10.65.2.49 -d sample -U
user_sample


   --How to check whether PostgreSQL server is up and running? (In Linux)

   [root@INVIRH54DB2 data]# /etc/init.d/postgresql status
   pg_ctl: server is running (PID: 669)
   /usr/local/pgsql/bin/postgres "-D" "/usr/local/pgsql/data"
--- Starting the database server : As root

(from most to least favorite method.Servicepostgresql start (if the database has not already
been initialized with initdb,this will be performed by the command)
OR
/etc/rc.d/init.d/postgresql start
(if the database has not already been initialized with initdb,this will be performed by the
script)
OR
/usr/bin/pg_ctl –D /var/lib/pgsql/data –p /usr/bin/postmaster –l logfile start &
OR

/usr/bin/postmaster –D /var/lib/pgsql/data &

---Postgresql database default location on Linux :

In file system terms, a database cluster will be a single directory which all data will be stored.
We call this the data directory or data area.It is completely up to you where you choose to
store your data.There is no default,although locations such as /usr/local/pgsql/data or
/var/lib/pgsql/data are popular.

[root@INVIRH54DB2 ~]# ps -ef | greppostgres

postgres 9010 1 0 Dec21 ? 00:00:02 /usr/local/pgsql/bin/postmaster -D
/usr/local/pgsql/data

Contenu connexe

Tendances

ConFoo MySQL Replication Evolution : From Simple to Group Replication
ConFoo  MySQL Replication Evolution : From Simple to Group ReplicationConFoo  MySQL Replication Evolution : From Simple to Group Replication
ConFoo MySQL Replication Evolution : From Simple to Group ReplicationDave Stokes
 
MySQL Document Store
MySQL Document StoreMySQL Document Store
MySQL Document StoreI Goo Lee
 
Memcached Functions For My Sql Seemless Caching In My Sql
Memcached Functions For My Sql Seemless Caching In My SqlMemcached Functions For My Sql Seemless Caching In My Sql
Memcached Functions For My Sql Seemless Caching In My SqlMySQLConference
 
Introduction to MySQL InnoDB Cluster
Introduction to MySQL InnoDB ClusterIntroduction to MySQL InnoDB Cluster
Introduction to MySQL InnoDB ClusterI Goo Lee
 
A brief introduction to PostgreSQL
A brief introduction to PostgreSQLA brief introduction to PostgreSQL
A brief introduction to PostgreSQLVu Hung Nguyen
 
Logical volume manager xfs
Logical volume manager xfsLogical volume manager xfs
Logical volume manager xfsSarwar Javaid
 
The Ring programming language version 1.2 book - Part 17 of 84
The Ring programming language version 1.2 book - Part 17 of 84The Ring programming language version 1.2 book - Part 17 of 84
The Ring programming language version 1.2 book - Part 17 of 84Mahmoud Samir Fayed
 
MySQL as a Document Store
MySQL as a Document StoreMySQL as a Document Store
MySQL as a Document StoreDave Stokes
 
Introduction To Lamp P2
Introduction To Lamp P2Introduction To Lamp P2
Introduction To Lamp P2Amzad Hossain
 
Learn PHP Lacture2
Learn PHP Lacture2Learn PHP Lacture2
Learn PHP Lacture2ADARSH BHATT
 
MySQL Replication Update -- Zendcon 2016
MySQL Replication Update -- Zendcon 2016MySQL Replication Update -- Zendcon 2016
MySQL Replication Update -- Zendcon 2016Dave Stokes
 
MySQL Replication Basics -Ohio Linux Fest 2016
MySQL Replication Basics -Ohio Linux Fest 2016MySQL Replication Basics -Ohio Linux Fest 2016
MySQL Replication Basics -Ohio Linux Fest 2016Dave Stokes
 
Working with Databases and MySQL
Working with Databases and MySQLWorking with Databases and MySQL
Working with Databases and MySQLNicole Ryan
 
Highload Perf Tuning
Highload Perf TuningHighload Perf Tuning
Highload Perf TuningHighLoad2009
 
Mysql wp cluster_quickstart_windows
Mysql wp cluster_quickstart_windowsMysql wp cluster_quickstart_windows
Mysql wp cluster_quickstart_windowsRogério Rocha
 
Dbvisit replicate: logical replication made easy
Dbvisit replicate: logical replication made easyDbvisit replicate: logical replication made easy
Dbvisit replicate: logical replication made easyFranck Pachot
 

Tendances (20)

ConFoo MySQL Replication Evolution : From Simple to Group Replication
ConFoo  MySQL Replication Evolution : From Simple to Group ReplicationConFoo  MySQL Replication Evolution : From Simple to Group Replication
ConFoo MySQL Replication Evolution : From Simple to Group Replication
 
MySQL Document Store
MySQL Document StoreMySQL Document Store
MySQL Document Store
 
Memcached Functions For My Sql Seemless Caching In My Sql
Memcached Functions For My Sql Seemless Caching In My SqlMemcached Functions For My Sql Seemless Caching In My Sql
Memcached Functions For My Sql Seemless Caching In My Sql
 
Linux class 10 15 oct 2021-6
Linux class 10   15 oct 2021-6Linux class 10   15 oct 2021-6
Linux class 10 15 oct 2021-6
 
Introduction to MySQL InnoDB Cluster
Introduction to MySQL InnoDB ClusterIntroduction to MySQL InnoDB Cluster
Introduction to MySQL InnoDB Cluster
 
Beginbackup
BeginbackupBeginbackup
Beginbackup
 
A brief introduction to PostgreSQL
A brief introduction to PostgreSQLA brief introduction to PostgreSQL
A brief introduction to PostgreSQL
 
Linux class 9 15 oct 2021-5
Linux class 9   15 oct 2021-5Linux class 9   15 oct 2021-5
Linux class 9 15 oct 2021-5
 
Logical volume manager xfs
Logical volume manager xfsLogical volume manager xfs
Logical volume manager xfs
 
The Ring programming language version 1.2 book - Part 17 of 84
The Ring programming language version 1.2 book - Part 17 of 84The Ring programming language version 1.2 book - Part 17 of 84
The Ring programming language version 1.2 book - Part 17 of 84
 
Terraform Cosmos DB
Terraform Cosmos DBTerraform Cosmos DB
Terraform Cosmos DB
 
MySQL as a Document Store
MySQL as a Document StoreMySQL as a Document Store
MySQL as a Document Store
 
Introduction To Lamp P2
Introduction To Lamp P2Introduction To Lamp P2
Introduction To Lamp P2
 
Learn PHP Lacture2
Learn PHP Lacture2Learn PHP Lacture2
Learn PHP Lacture2
 
MySQL Replication Update -- Zendcon 2016
MySQL Replication Update -- Zendcon 2016MySQL Replication Update -- Zendcon 2016
MySQL Replication Update -- Zendcon 2016
 
MySQL Replication Basics -Ohio Linux Fest 2016
MySQL Replication Basics -Ohio Linux Fest 2016MySQL Replication Basics -Ohio Linux Fest 2016
MySQL Replication Basics -Ohio Linux Fest 2016
 
Working with Databases and MySQL
Working with Databases and MySQLWorking with Databases and MySQL
Working with Databases and MySQL
 
Highload Perf Tuning
Highload Perf TuningHighload Perf Tuning
Highload Perf Tuning
 
Mysql wp cluster_quickstart_windows
Mysql wp cluster_quickstart_windowsMysql wp cluster_quickstart_windows
Mysql wp cluster_quickstart_windows
 
Dbvisit replicate: logical replication made easy
Dbvisit replicate: logical replication made easyDbvisit replicate: logical replication made easy
Dbvisit replicate: logical replication made easy
 

En vedette

9 steps to install and configure postgre sql from source on linux
9 steps to install and configure postgre sql from source on linux9 steps to install and configure postgre sql from source on linux
9 steps to install and configure postgre sql from source on linuxchinkshady
 
Convert language latin1 to utf8 on mysql
Convert language latin1 to utf8 on mysqlConvert language latin1 to utf8 on mysql
Convert language latin1 to utf8 on mysqlVasudeva Rao
 
My sql storage engines
My sql storage enginesMy sql storage engines
My sql storage enginesVasudeva Rao
 
Inno db datafiles backup and retore
Inno db datafiles backup and retoreInno db datafiles backup and retore
Inno db datafiles backup and retoreVasudeva Rao
 
MySQL Crash Course, Chapter 1
MySQL Crash Course, Chapter 1MySQL Crash Course, Chapter 1
MySQL Crash Course, Chapter 1Gene Babon
 
Mater,slave on mysql
Mater,slave on mysqlMater,slave on mysql
Mater,slave on mysqlVasudeva Rao
 
Upgrading mysql version 5.5.30 to 5.6.10
Upgrading mysql version 5.5.30 to 5.6.10Upgrading mysql version 5.5.30 to 5.6.10
Upgrading mysql version 5.5.30 to 5.6.10Vasudeva Rao
 
Teaching PostgreSQL to new people
Teaching PostgreSQL to new peopleTeaching PostgreSQL to new people
Teaching PostgreSQL to new peopleTomek Borek
 

En vedette (8)

9 steps to install and configure postgre sql from source on linux
9 steps to install and configure postgre sql from source on linux9 steps to install and configure postgre sql from source on linux
9 steps to install and configure postgre sql from source on linux
 
Convert language latin1 to utf8 on mysql
Convert language latin1 to utf8 on mysqlConvert language latin1 to utf8 on mysql
Convert language latin1 to utf8 on mysql
 
My sql storage engines
My sql storage enginesMy sql storage engines
My sql storage engines
 
Inno db datafiles backup and retore
Inno db datafiles backup and retoreInno db datafiles backup and retore
Inno db datafiles backup and retore
 
MySQL Crash Course, Chapter 1
MySQL Crash Course, Chapter 1MySQL Crash Course, Chapter 1
MySQL Crash Course, Chapter 1
 
Mater,slave on mysql
Mater,slave on mysqlMater,slave on mysql
Mater,slave on mysql
 
Upgrading mysql version 5.5.30 to 5.6.10
Upgrading mysql version 5.5.30 to 5.6.10Upgrading mysql version 5.5.30 to 5.6.10
Upgrading mysql version 5.5.30 to 5.6.10
 
Teaching PostgreSQL to new people
Teaching PostgreSQL to new peopleTeaching PostgreSQL to new people
Teaching PostgreSQL to new people
 

Similaire à Postgre sql run book

TrinityCore server install guide
TrinityCore server install guideTrinityCore server install guide
TrinityCore server install guideSeungmin Shin
 
Geoserver GIS Mapping Solution
Geoserver GIS Mapping SolutionGeoserver GIS Mapping Solution
Geoserver GIS Mapping SolutionKeshavSharma274
 
Basics of Logical Replication,Streaming replication vs Logical Replication ,U...
Basics of Logical Replication,Streaming replication vs Logical Replication ,U...Basics of Logical Replication,Streaming replication vs Logical Replication ,U...
Basics of Logical Replication,Streaming replication vs Logical Replication ,U...Rajni Baliyan
 
Postgresql quick guide
Postgresql quick guidePostgresql quick guide
Postgresql quick guideAshoka Vanjare
 
User and groups administrator
User  and  groups administratorUser  and  groups administrator
User and groups administratorAisha Talat
 
Database Connection With Mysql
Database Connection With MysqlDatabase Connection With Mysql
Database Connection With MysqlHarit Kothari
 
Viktor Tsykunov "Microsoft AI platform for every Developer"
Viktor Tsykunov "Microsoft AI platform for every Developer"Viktor Tsykunov "Microsoft AI platform for every Developer"
Viktor Tsykunov "Microsoft AI platform for every Developer"Lviv Startup Club
 
Open-E DSS V7 Asynchronous Data Replication within a System
Open-E DSS V7 Asynchronous Data Replication within a SystemOpen-E DSS V7 Asynchronous Data Replication within a System
Open-E DSS V7 Asynchronous Data Replication within a Systemopen-e
 
Nko workshop - node js & nosql
Nko workshop - node js & nosqlNko workshop - node js & nosql
Nko workshop - node js & nosqlSimon Su
 
MySQL DBA OCP 1Z0-883
MySQL DBA OCP 1Z0-883MySQL DBA OCP 1Z0-883
MySQL DBA OCP 1Z0-883Kwaye Kant
 
Enable Database Service over HTTP or IBM WebSphere MQ in 15_minutes with IAS
Enable Database Service over HTTP or IBM WebSphere MQ in 15_minutes with IASEnable Database Service over HTTP or IBM WebSphere MQ in 15_minutes with IAS
Enable Database Service over HTTP or IBM WebSphere MQ in 15_minutes with IASInvenire Aude
 
Docker Java App with MariaDB – Deployment in Less than a Minute
Docker Java App with MariaDB – Deployment in Less than a MinuteDocker Java App with MariaDB – Deployment in Less than a Minute
Docker Java App with MariaDB – Deployment in Less than a Minutedchq
 
GR8Conf 2011: GORM Optimization
GR8Conf 2011: GORM OptimizationGR8Conf 2011: GORM Optimization
GR8Conf 2011: GORM OptimizationGR8Conf
 

Similaire à Postgre sql run book (20)

TrinityCore server install guide
TrinityCore server install guideTrinityCore server install guide
TrinityCore server install guide
 
Firebird
FirebirdFirebird
Firebird
 
Mysql
MysqlMysql
Mysql
 
Geoserver GIS Mapping Solution
Geoserver GIS Mapping SolutionGeoserver GIS Mapping Solution
Geoserver GIS Mapping Solution
 
linux installation.pdf
linux installation.pdflinux installation.pdf
linux installation.pdf
 
2) security
2) security2) security
2) security
 
Intalacion de owncloud
Intalacion de owncloudIntalacion de owncloud
Intalacion de owncloud
 
Basics of Logical Replication,Streaming replication vs Logical Replication ,U...
Basics of Logical Replication,Streaming replication vs Logical Replication ,U...Basics of Logical Replication,Streaming replication vs Logical Replication ,U...
Basics of Logical Replication,Streaming replication vs Logical Replication ,U...
 
Postgresql quick guide
Postgresql quick guidePostgresql quick guide
Postgresql quick guide
 
User and groups administrator
User  and  groups administratorUser  and  groups administrator
User and groups administrator
 
Database Connection With Mysql
Database Connection With MysqlDatabase Connection With Mysql
Database Connection With Mysql
 
Viktor Tsykunov "Microsoft AI platform for every Developer"
Viktor Tsykunov "Microsoft AI platform for every Developer"Viktor Tsykunov "Microsoft AI platform for every Developer"
Viktor Tsykunov "Microsoft AI platform for every Developer"
 
Open-E DSS V7 Asynchronous Data Replication within a System
Open-E DSS V7 Asynchronous Data Replication within a SystemOpen-E DSS V7 Asynchronous Data Replication within a System
Open-E DSS V7 Asynchronous Data Replication within a System
 
Nko workshop - node js & nosql
Nko workshop - node js & nosqlNko workshop - node js & nosql
Nko workshop - node js & nosql
 
MySQL DBA OCP 1Z0-883
MySQL DBA OCP 1Z0-883MySQL DBA OCP 1Z0-883
MySQL DBA OCP 1Z0-883
 
Enable Database Service over HTTP or IBM WebSphere MQ in 15_minutes with IAS
Enable Database Service over HTTP or IBM WebSphere MQ in 15_minutes with IASEnable Database Service over HTTP or IBM WebSphere MQ in 15_minutes with IAS
Enable Database Service over HTTP or IBM WebSphere MQ in 15_minutes with IAS
 
Docker Java App with MariaDB – Deployment in Less than a Minute
Docker Java App with MariaDB – Deployment in Less than a MinuteDocker Java App with MariaDB – Deployment in Less than a Minute
Docker Java App with MariaDB – Deployment in Less than a Minute
 
Postgre sql unleashed
Postgre sql unleashedPostgre sql unleashed
Postgre sql unleashed
 
GR8Conf 2011: GORM Optimization
GR8Conf 2011: GORM OptimizationGR8Conf 2011: GORM Optimization
GR8Conf 2011: GORM Optimization
 
Msql
Msql Msql
Msql
 

Plus de Vasudeva Rao

Database migration
Database migrationDatabase migration
Database migrationVasudeva Rao
 
Performence tuning
Performence tuningPerformence tuning
Performence tuningVasudeva Rao
 
All types of backups and restore
All types of backups and restoreAll types of backups and restore
All types of backups and restoreVasudeva Rao
 
Multiple instances second method
Multiple instances second methodMultiple instances second method
Multiple instances second methodVasudeva Rao
 
Multiple instance on windows
Multiple instance on windowsMultiple instance on windows
Multiple instance on windowsVasudeva Rao
 
Multiple instances on linux
Multiple instances on linuxMultiple instances on linux
Multiple instances on linuxVasudeva Rao
 

Plus de Vasudeva Rao (7)

Ddl commands
Ddl commandsDdl commands
Ddl commands
 
Database migration
Database migrationDatabase migration
Database migration
 
Performence tuning
Performence tuningPerformence tuning
Performence tuning
 
All types of backups and restore
All types of backups and restoreAll types of backups and restore
All types of backups and restore
 
Multiple instances second method
Multiple instances second methodMultiple instances second method
Multiple instances second method
 
Multiple instance on windows
Multiple instance on windowsMultiple instance on windows
Multiple instance on windows
 
Multiple instances on linux
Multiple instances on linuxMultiple instances on linux
Multiple instances on linux
 

Dernier

Developer Data Modeling Mistakes: From Postgres to NoSQL
Developer Data Modeling Mistakes: From Postgres to NoSQLDeveloper Data Modeling Mistakes: From Postgres to NoSQL
Developer Data Modeling Mistakes: From Postgres to NoSQLScyllaDB
 
Merck Moving Beyond Passwords: FIDO Paris Seminar.pptx
Merck Moving Beyond Passwords: FIDO Paris Seminar.pptxMerck Moving Beyond Passwords: FIDO Paris Seminar.pptx
Merck Moving Beyond Passwords: FIDO Paris Seminar.pptxLoriGlavin3
 
Commit 2024 - Secret Management made easy
Commit 2024 - Secret Management made easyCommit 2024 - Secret Management made easy
Commit 2024 - Secret Management made easyAlfredo García Lavilla
 
Human Factors of XR: Using Human Factors to Design XR Systems
Human Factors of XR: Using Human Factors to Design XR SystemsHuman Factors of XR: Using Human Factors to Design XR Systems
Human Factors of XR: Using Human Factors to Design XR SystemsMark Billinghurst
 
Story boards and shot lists for my a level piece
Story boards and shot lists for my a level pieceStory boards and shot lists for my a level piece
Story boards and shot lists for my a level piececharlottematthew16
 
WordPress Websites for Engineers: Elevate Your Brand
WordPress Websites for Engineers: Elevate Your BrandWordPress Websites for Engineers: Elevate Your Brand
WordPress Websites for Engineers: Elevate Your Brandgvaughan
 
Tampa BSides - Chef's Tour of Microsoft Security Adoption Framework (SAF)
Tampa BSides - Chef's Tour of Microsoft Security Adoption Framework (SAF)Tampa BSides - Chef's Tour of Microsoft Security Adoption Framework (SAF)
Tampa BSides - Chef's Tour of Microsoft Security Adoption Framework (SAF)Mark Simos
 
Are Multi-Cloud and Serverless Good or Bad?
Are Multi-Cloud and Serverless Good or Bad?Are Multi-Cloud and Serverless Good or Bad?
Are Multi-Cloud and Serverless Good or Bad?Mattias Andersson
 
Take control of your SAP testing with UiPath Test Suite
Take control of your SAP testing with UiPath Test SuiteTake control of your SAP testing with UiPath Test Suite
Take control of your SAP testing with UiPath Test SuiteDianaGray10
 
Artificial intelligence in cctv survelliance.pptx
Artificial intelligence in cctv survelliance.pptxArtificial intelligence in cctv survelliance.pptx
Artificial intelligence in cctv survelliance.pptxhariprasad279825
 
The Ultimate Guide to Choosing WordPress Pros and Cons
The Ultimate Guide to Choosing WordPress Pros and ConsThe Ultimate Guide to Choosing WordPress Pros and Cons
The Ultimate Guide to Choosing WordPress Pros and ConsPixlogix Infotech
 
DSPy a system for AI to Write Prompts and Do Fine Tuning
DSPy a system for AI to Write Prompts and Do Fine TuningDSPy a system for AI to Write Prompts and Do Fine Tuning
DSPy a system for AI to Write Prompts and Do Fine TuningLars Bell
 
From Family Reminiscence to Scholarly Archive .
From Family Reminiscence to Scholarly Archive .From Family Reminiscence to Scholarly Archive .
From Family Reminiscence to Scholarly Archive .Alan Dix
 
Powerpoint exploring the locations used in television show Time Clash
Powerpoint exploring the locations used in television show Time ClashPowerpoint exploring the locations used in television show Time Clash
Powerpoint exploring the locations used in television show Time Clashcharlottematthew16
 
H2O.ai CEO/Founder: Sri Ambati Keynote at Wells Fargo Day
H2O.ai CEO/Founder: Sri Ambati Keynote at Wells Fargo DayH2O.ai CEO/Founder: Sri Ambati Keynote at Wells Fargo Day
H2O.ai CEO/Founder: Sri Ambati Keynote at Wells Fargo DaySri Ambati
 
How AI, OpenAI, and ChatGPT impact business and software.
How AI, OpenAI, and ChatGPT impact business and software.How AI, OpenAI, and ChatGPT impact business and software.
How AI, OpenAI, and ChatGPT impact business and software.Curtis Poe
 
SAP Build Work Zone - Overview L2-L3.pptx
SAP Build Work Zone - Overview L2-L3.pptxSAP Build Work Zone - Overview L2-L3.pptx
SAP Build Work Zone - Overview L2-L3.pptxNavinnSomaal
 
"LLMs for Python Engineers: Advanced Data Analysis and Semantic Kernel",Oleks...
"LLMs for Python Engineers: Advanced Data Analysis and Semantic Kernel",Oleks..."LLMs for Python Engineers: Advanced Data Analysis and Semantic Kernel",Oleks...
"LLMs for Python Engineers: Advanced Data Analysis and Semantic Kernel",Oleks...Fwdays
 
Streamlining Python Development: A Guide to a Modern Project Setup
Streamlining Python Development: A Guide to a Modern Project SetupStreamlining Python Development: A Guide to a Modern Project Setup
Streamlining Python Development: A Guide to a Modern Project SetupFlorian Wilhelm
 

Dernier (20)

Developer Data Modeling Mistakes: From Postgres to NoSQL
Developer Data Modeling Mistakes: From Postgres to NoSQLDeveloper Data Modeling Mistakes: From Postgres to NoSQL
Developer Data Modeling Mistakes: From Postgres to NoSQL
 
Merck Moving Beyond Passwords: FIDO Paris Seminar.pptx
Merck Moving Beyond Passwords: FIDO Paris Seminar.pptxMerck Moving Beyond Passwords: FIDO Paris Seminar.pptx
Merck Moving Beyond Passwords: FIDO Paris Seminar.pptx
 
Commit 2024 - Secret Management made easy
Commit 2024 - Secret Management made easyCommit 2024 - Secret Management made easy
Commit 2024 - Secret Management made easy
 
Human Factors of XR: Using Human Factors to Design XR Systems
Human Factors of XR: Using Human Factors to Design XR SystemsHuman Factors of XR: Using Human Factors to Design XR Systems
Human Factors of XR: Using Human Factors to Design XR Systems
 
DMCC Future of Trade Web3 - Special Edition
DMCC Future of Trade Web3 - Special EditionDMCC Future of Trade Web3 - Special Edition
DMCC Future of Trade Web3 - Special Edition
 
Story boards and shot lists for my a level piece
Story boards and shot lists for my a level pieceStory boards and shot lists for my a level piece
Story boards and shot lists for my a level piece
 
WordPress Websites for Engineers: Elevate Your Brand
WordPress Websites for Engineers: Elevate Your BrandWordPress Websites for Engineers: Elevate Your Brand
WordPress Websites for Engineers: Elevate Your Brand
 
Tampa BSides - Chef's Tour of Microsoft Security Adoption Framework (SAF)
Tampa BSides - Chef's Tour of Microsoft Security Adoption Framework (SAF)Tampa BSides - Chef's Tour of Microsoft Security Adoption Framework (SAF)
Tampa BSides - Chef's Tour of Microsoft Security Adoption Framework (SAF)
 
Are Multi-Cloud and Serverless Good or Bad?
Are Multi-Cloud and Serverless Good or Bad?Are Multi-Cloud and Serverless Good or Bad?
Are Multi-Cloud and Serverless Good or Bad?
 
Take control of your SAP testing with UiPath Test Suite
Take control of your SAP testing with UiPath Test SuiteTake control of your SAP testing with UiPath Test Suite
Take control of your SAP testing with UiPath Test Suite
 
Artificial intelligence in cctv survelliance.pptx
Artificial intelligence in cctv survelliance.pptxArtificial intelligence in cctv survelliance.pptx
Artificial intelligence in cctv survelliance.pptx
 
The Ultimate Guide to Choosing WordPress Pros and Cons
The Ultimate Guide to Choosing WordPress Pros and ConsThe Ultimate Guide to Choosing WordPress Pros and Cons
The Ultimate Guide to Choosing WordPress Pros and Cons
 
DSPy a system for AI to Write Prompts and Do Fine Tuning
DSPy a system for AI to Write Prompts and Do Fine TuningDSPy a system for AI to Write Prompts and Do Fine Tuning
DSPy a system for AI to Write Prompts and Do Fine Tuning
 
From Family Reminiscence to Scholarly Archive .
From Family Reminiscence to Scholarly Archive .From Family Reminiscence to Scholarly Archive .
From Family Reminiscence to Scholarly Archive .
 
Powerpoint exploring the locations used in television show Time Clash
Powerpoint exploring the locations used in television show Time ClashPowerpoint exploring the locations used in television show Time Clash
Powerpoint exploring the locations used in television show Time Clash
 
H2O.ai CEO/Founder: Sri Ambati Keynote at Wells Fargo Day
H2O.ai CEO/Founder: Sri Ambati Keynote at Wells Fargo DayH2O.ai CEO/Founder: Sri Ambati Keynote at Wells Fargo Day
H2O.ai CEO/Founder: Sri Ambati Keynote at Wells Fargo Day
 
How AI, OpenAI, and ChatGPT impact business and software.
How AI, OpenAI, and ChatGPT impact business and software.How AI, OpenAI, and ChatGPT impact business and software.
How AI, OpenAI, and ChatGPT impact business and software.
 
SAP Build Work Zone - Overview L2-L3.pptx
SAP Build Work Zone - Overview L2-L3.pptxSAP Build Work Zone - Overview L2-L3.pptx
SAP Build Work Zone - Overview L2-L3.pptx
 
"LLMs for Python Engineers: Advanced Data Analysis and Semantic Kernel",Oleks...
"LLMs for Python Engineers: Advanced Data Analysis and Semantic Kernel",Oleks..."LLMs for Python Engineers: Advanced Data Analysis and Semantic Kernel",Oleks...
"LLMs for Python Engineers: Advanced Data Analysis and Semantic Kernel",Oleks...
 
Streamlining Python Development: A Guide to a Modern Project Setup
Streamlining Python Development: A Guide to a Modern Project SetupStreamlining Python Development: A Guide to a Modern Project Setup
Streamlining Python Development: A Guide to a Modern Project Setup
 

Postgre sql run book

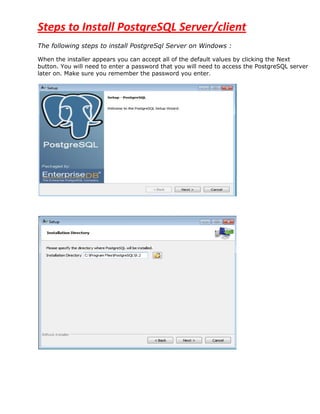
  • 1. Steps to Install PostgreSQL Server/client The following steps to install PostgreSql Server on Windows : When the installer appears you can accept all of the default values by clicking the Next button. You will need to enter a password that you will need to access the PostgreSQL server later on. Make sure you remember the password you enter.
  • 2. Here we need to give Password of the Super User. Here Super User is “postgres “.This password is used for while connecting the server we need to give this password.
  • 3. By default Port number the server is 5432
  • 4. After a successful installation you will be prompted to launch Stack Builder. You can uncheck this checkbox and click Finish. Server Configuration from client (Win) to server (Win) --In client side we have to add new server config
  • 5. In the "New Server Registration" dialog that appears, enter appropriate values for your server name and PostgreSQL account credentials. Be sure to specify "localhost" for the "Host" field, as you'll be connecting via your SSH tunnel. Click "OK" to connect to your server. You will be presented with a full view of the databases that your user account has access to. --Now we need to set client IP address in server config file onpg_hba.config (in Server Machine Win) Location : C:Program FilesPostgreSQL9.2datapg_hba.config file Then,come down end of the file we need to add client ip address on following way. Add IP Address of win client box
  • 6. --From client side we are getting server details. In Config file set the particular DB,particular user on server side : (Win(client) to Win(server)) : Here we connect only particular database,particular user from client side(Win Box). First we need to config file (from server side(win box)) ,open C:/Program files/Postgresql/8.4/data/pg_hda.config file ,in that we add particulat DB,Particular user,IP address (client box(Win)) and save it.After that restart the server. From server side(win) add particular DB and user
  • 7. --- From client side connecting Particular DB,particular user .(In Win Box) C:Program FilesPostgreSQL9.2bin>psql -h 10.65.2.49 -d sample -U u2 In Config file set the particular DB,particular user from server side : (Win(server) to Win(client)) : Here we connect only particular database,particular user from client side(Win Box). First we need to config file (from server side(win box)) ,open C:/Program files/Postgresql/8.4/data/pg_hda.config file ,in that we add particulat DB,Particular user,IP address (client box(Win)) and save it.After that restart the server From server side(win) add particular DB and user
  • 8. ----From client side connecting Particular DB,particular user .(In Win Box) C:Program FilesPostgreSQL9.2bin>psql -h 10.65.0.141 -d test1 –U test_user --Connecting the postgresfromcmd prompt on Windows.
  • 9. The following Screen are Creating Database in command prompt by using Postgres (Super User).Enter the postgres bin path then give “psql –U postgres “,Here we need to give passwd of superuser Postgres.After login create one sample database called “sample”,after creating a database check wether database is created or not by using l command,it shows all list of databases. Here create one sample user called sam_user1 and passwd is same as username.Next we connect the particular database by using user (sam_user1) login .Here ” sample” is the database ;username is sam_user1 .Create a table and insert the values ;and select the table.
  • 10. --Insert the values in to particular table : Go to Start -->All Programs -- >PostgreSQL9.2 -- >PgAdminIII In Menu barTools ScriptsINSERT Script The Quary window will be coming ,in that we select database and username like below mentiond in red mark. ----- The following screen displays how to take database or schemas backup and restore on cmd prompt(Windows). Here pg_dump is used for taking the backup utility.Login as a SuperUser and give Database at the end of the line.And mention the backup up location where we have to copy the backup file.Here DB is :sample(from Bkup) ;To Restore DB is :TestDB. OR
  • 11. In this screen simple give Restore and backup commands Here DB name :INFO(From Bkup);To Restore DB is : vv2. OR Here also give simple Backup asd Restore commands with out “Qautations”
  • 12. -Creating DB and User priveleges on cmd : (Windows) --- Create a database C:program filesPostgresqlversionbin>psql -U postgres Enter passwd for postgre :postgres postgres-# create database postgressvtdb; database created (OR) [prompt]$ created dbname –U user-name -W drop user username; Postgres=# create database dbname; --To check database is created or not postgres-# l (it displays the list of databases) --- Delete a database [prompt]$ destroy db dbname; [prompt]$ drop db dbname ; [prompt]$ drop database dbname; ---Create user : Adding New Users A superuser or the database owner can create users in PostgreSQL. Use the CREATE USER SQL command or the createuser shell script to create users. Syntax: CREATE USER username[ WITHSYSID uid| CREATEDB | NOCREATEDB | CREATEUSER | NOCREATEUSER| IN GROUP groupname[, ...]| [ ENCRYPTED | UNENCRYPTED ] PASSWORD 'password'| VALID UNTIL 'abstime' ] [prompt] $ create user username with password „password‟; (OR) Postgres=#CREATE USER username WITH PASSWORD 'password' CREATEDB VALID UNTIL 'yyyy-mm-dd'; --Manipulating Users :( Altering a User) In PostgreSQL, each user is identified as an object. It is possible to modify the properties of any user. This process is known as altering a user. Use the ALTER USER command to alter a user. Only superusers can execute this command. Syntax : ALTER USER username[ WITHCREATEDB | NOCREATEDB | CREATEUSER |NOCREATEUSER| [ ENCRYPTED | UNENCRYPTED ] PASSWORD 'password'| VALID UNTIL 'abstime'; Postgres=#ALTER USER username NOCREATEDB;
  • 13. Sometimes you may need to change the user's name, in which case the alternate syntax is provided: ALTER USER oldname RENAME TO newname; The ALTER USER command is used to reset the password and expiry time, if specified, as shown in the following code: mydatabase=# ALTER USER username WITH PASSWORD „password‟ VALID UNTIL „yyyy- mm-dd‟; -- Delete a user Only a superuser can remove a user, provided the specified user is not the owner of any database. If the user is the owner of a database, drop the database first and then the user. The alternative is to change the owner of the database in the pg_database table. [prompt]$ drop user username; ---Group Management : PostgreSQL enables you to manage multiple users as groups. Groups are a single identity for multiple users with a similar set of rights and privileges. They also exist as database objects and are stored in the system catalog. To grant a similar set of rights to several individuals, create a group consisting of many individuals. Rights granted to a group apply to all the users with in that group. If you are not sure of the users, first create an empty group and then add or remove users using the ALTER GROUP SQL command. You can specify one or more users while creating a group. In PostgreSQL, the super user creates and removes groups using the CREATE GROUP and DROP GROUP SQL commands. --- Creating a Group You can use the CREATE GROUP SQL command to create a group, using this syntax: CREATE GROUP groupname [WITH] [SYSID groupid] [USER username [,........]]] Note : Here, groupname is the name of the group and it must begin with an alphabet and not exceed more than 31 characters. mydatabase=# CREATE GROUP groupname WITH USER username, anewuser; ---Removing a Group: To remove a group, use the DROP GROUP SQL command. The syntax for the DROP GROUP SQL command is: mydatabase=#DROP GROUP groupname;
  • 14. Here, the groupname identifies the group to be dropped. When you drop a group, the rights and permissions associated with it are retained. If you drop a group by mistake, recreate it with the same name specifying the same SYSID. Since group membership information no longer exists, user names need to be added to the group. --- Altering a Group Groups are created to manage multiple users with a similar set of permissions. To make changes. Syntax : ALTER GROUP groupname{ ADD | DROP } USER username[,.....] ---Adding User to a Group Use the following code to add a user to an existing group. mydatabase=# ALTER GROUP groupname ADD USER username, username2; The above code adds username1 and username2 to the “groupname” group and assigns them the rights and privileges of the group. --Removing Users from a Group Use the ALTER command to drop a user, as shown in the following code: mydatabase=# ALTER GROUP groupname DROP USER username; The code above drops the user “username” from the “groupname” group. --Grant priveliges from database to user: Postgres=# grant all on database postgresvtdb to testuser; postgres=# grant connect on database postgresvtdb to testuser; postgres=# grant priveliges on database postgresvtdb to testuser; --- Grant privileges: Syntax Privileges are the rights you grant to a user or group for specific table views or sequence within a database. Each privilege is associated with a special character symbol GRANT privilege[, ...] ON object [, ...] TO{PUBLIC | GROUP groupname | username }[ WITH GRANT OPTION ]; Postgres=# GRANT UPDATE ON table-name to username; Postgres=# GRANT SELECT ON table-name to username; Postgres=# GRANT INSERT ON table-name to username; Postgres=# GRANT DELETE ON table-name to username; Postgres=# GRANT RULE ON table-name to username;
  • 15. Postgres=# GRANT TRIGGER ON table-name to username; Postgres=# GRANT REFERENCE ON table-name to username; Postgres=# GRANT UPDATE ON table-name to username; Postgres=# GRANT ALL PRIVILEGES ON table-name to public; Postgres=# GRANT SELECT,INSERT ON tablename1, tablename2 TO username1, username2 WITH GRANT OPTION; The following code shows how to grant all the privileges to a specific user, manager: mydatabase=# GRANT ALL ON customers, books, publishers TO manager; CHANGE The code above grants the ALL privileges to the user manager on the tables, customers, books, and publishers in mydatabase. You can view the privileges granted by specifying the z command with the name of the table, view, or sequence, as shown in the following code. mydatabase=# z publishers Privileges granted to a group apply to all users within it. The following code shows how to grant privileges to a group mydatabase=# GRANT SELECT ON customers TO GROUP SALES; CHANGE The code above grants the SELECT privilege on the database, mydatabase to the group Sales.To view the privileges granted, use the following code. mydatabase=# z customers --Revoke privileges from database to user : Syntax In PostgreSQL, only the administrator and database owners can define the rights to others for using the database. You can define privileges to other users and groups using the GRANT command. To revoke the privileges granted, use the REVOKE command. REVOKE privilege [, ...] ON object [, ...] FROM{PUBLIC | GROUP groupname | username }; (i) Revoke insert privilege for the public on table tname : Revoke insert on tname from public; (II) Revoke all privileges from user username on view viewname : Revoke all Privileges on viewname from username; (III) Revoke membership in role admins from username : Revoke admins from username; (IV) Revoke all on tablenames FROM usernames; The following code shows the REVOKE command given on the GROUP sales to revoke the SELECT privilege ON the table customers. mydatabase=# REVOKE SELECT ON customers FROM GROUP sales; CHANGE
  • 16. Using Views for Access Control : You can create and use views for access control. Views display restricted data to the users. A SELECT privilege allows a user to access or view all the information in a table. A view is a restricted version of a table and consists of information that the database owner wants to make available.When creating a view, specify the columns that will be part of it. Listing: Creation of a View : mydatabase=# CREATE VIEW stock_view AS SELECT isbn, retail, stock FROM stock; CREATE mydatabase=# GRANT SELECT ON stock_view TO GROUP sales; CHANGE mydatabase=# z stock Access permissions for database "mydatabase" Relation | Access Permission ----------------------------------- stock | stock_backup | stock_view|{"=", "manager=arwR", "group sales=r"} The listing above creates a view called the stock_view, which contains data from the stock table. Privileges are granted to the users in this view and not in the table. Users can access information but view only the information available in the stock_view. --- Create Tablespace Create tablespace “Tablespacename” ownername location „c:/program files/postgresql/8.3/data/dbs or pg_tblspc‟; Create tablespace tablespacename location „mnt/sda1/postgresql/data‟; Create table tablename(I int) tablespace tablespacename; --- Select default tablespaces select * from pg_tablespace; ---- Alternatively, use the default_tablespace parameter SET default_tablespace=tablespacename; CREATE TABLE tablename(I int); ---- Renames a current tablespace to a new name ALTER TABLESPACE tablespacename RENAME TO newtablespacename; ----- To changes the owner of a tablespace to a new owner ALTER TABLESPACE tablespacename OWNER TO newowner;
  • 17. ------ To remove an empty tablespace DROP TABLESPACE tablespacename; ------ Connect to a particular database postgres=# c sample psql (8.4.2) You are now connected to database "sample". sample=# ---- List all users and their permission levels Postgres=# du --- Shows summary information about all tables in the current database Postgres=# dt --- Exit/quit the psql shell Postgres=# q or CTRL+d Installtion PostgreSQL Server/Client on Linux Note: PostgreSql Server installation should be done through User Postgres --Login as root user:- Step 1: Creating the “postgres” User (1) Create a group called dba [root@INVIRH54DB2 etc]# # groupadd –g 1020 dba (2) Create a user called “postgres” [root@INVIRH54DB2 etc]# useradd -g dba -u 888 -d /data1/postgres -m postgres (3) Change the password of user postgres. Before installing we need to check the following versions. $ gmake –version $ gcc –version $ gzip –version $ tar –version $ df –k(8 to 15 MB need) Step 2: Installing the PostgreSQL Source Package (Login as a Postgres User)
  • 18. --------------> Unpacking the PostgreSQL source package [postgres@INVIRH54DB2 ~]# cd /data1/postgres/ [postgres@INVIRH54DB2 ~]$ gunzip postgresql-8.4.2.tar.gz [postgres@INVIRH54DB2 ~]$ tar -xvf postgresql-8.4.2.tar Step 3: Configuring the Source Tree (Login as a Postgres user) --------------> $ use ./configure –help [postgres@INVIRH54DB2 ~]$ cd postgresql-8.4.2 [postgres@INVIRH54DB2 postgresql-8.4.2]$ ./configure checking build system type... x86_64-unknown-linux-gnu checking whether to build with 64-bit integer date/time support... yes checking whether NLS is wanted... no “ [“] Step 4: Compiling the Source : Compiling the source with GNU make [postgres@INVIRH54DB2 postgresql-8.4.2]$ gmake gmake -C doc all gmake[1]: Entering directory /usr/local/src/postgresql-8.4.1/doc' gmake[1]: Nothing to be done for all'. gmake[3]: Entering directory /usr/local/src/postgresql-8.4.1/src/backend/utils' “ All of PostgreSQL successfully made. Ready to install. Step 5: Installing Compiled Programs and Libraries (Login as a root) [root@INVIRH54DB2 postgresql-8.4.2]# gmake install gmake -C doc install gmake[1]: Entering directory `/data1/postgres/postgresql-8.4.2/doc' mkdir -p -- /usr/local/pgsql/share/doc//html mkdir -p -- /usr/local/pgsql/share/man/man1 /usr/local/pgsql/share/man/man7 gzip -d -c ./postgres.tar.gz | ( cd /usr/local/pgsql/share/doc//html && /bin/tar xf -)/bin/tar: Read 9728 bytes from – “ make[1]: Leaving directory `/data1/postgres/postgresql-8.4.2/config' PostgreSQL installation complete. Create and initialize the database and invoke the postmaster application. The directory used by the postmaster must be created and access restricted to postgres only. The command used is: [root@INVIRH54DB2 postgresql-8.4.2]# mkdir /usr/local/pgsql/data [root@INVIRH54DB2 postgresql-8.4.2]# chown postgres /usr/local/pgsql/data Step 6 : Initializing and Starting PostgreSQL (Login as a postgres user)
  • 19. Now it's time to execute the initdb command, which will create the cluster. However, you should do so as the postgres user, so change over to that user before proceeding. The database is initialized when postgres logs on to it. The command initdb initializes the database, which consists of server process, applications, and data files. The command for creating an empty database for postgresis : --------Initializing the database [postgres@INVIRH54DB2 ~]$ /usr/local/pgsql/bin/initdb -D /usr/local/pgsql/data The files belonging to this database system will be owned by user "postgres". This user must also own the server process. The database cluster will be initialized with locale en_US.UTF-8. The default text search configuration will be set to "english". “ Success. You can now start the database server using: /usr/local/pgsql/bin/postgres -D /usr/local/pgsql/data (I) Or /usr/local/pgsql/bin/pg_ctl -D /usr/local/pgsql/data -l logfile start (II) here -D is the Data /* Running postmaster in the foreground (Login as a postgres) */ [postgres@INVIRH54DB2 ~]$ /usr/local/pgsql/bin/postgres -D /usr/local/pgsql/data LOG: database system was shut down at 2012-12-17 11:19:56 IST LOG: autovacuum launcher started LOG: database system is ready to accept connections “ (OR) The server process is started after the database is created. The command used is: [postgres@INVIRH54DB2 ~]$ /usr/local/pgsql/bin/postmaster -D /usr/local/pgsql/data >logfile 2>&1 & /* Running postmaster in the background (we mention /tmp/pgsql.log. in the following command) */ $ /usr/local/pgsql/bin/pg_ctl -D /usr/local/pgsql/data -l /tmp/pgsql.log start postmaster successfully started Step 7: Configuring the PostgreSQL SysV Script : First, change to the directory where you unpacked the PostgreSQL source. In our case, the path to that directory is /usr/local/src/postgresql-8.4.1/. Then, issue a cp command to copy the script from contrib/start-scripts into the init.d directory.
  • 20. Copying the linux script.Installing as service ( service files can be found from source code directory) (I) go to /installation/startup-scripts (go to installation path like /u01/app/postgres/postgres-8.4.1/contrib/start-scripts/linux..…) (II) Copy the startup script to the proper location. / * Be sure to execute these as the root user */ [root@INVIRH54DB2 postgresql-8.4.2]# cp /data1/postgres/postgresql-8.4.2/contrib/start- scripts/linux /etc/init.d/postgresql Making the linux script executable [root@INVIRH54DB2 postgresql-8.4.2]# chmod 755 /etc/init.d/postgresql && cd /etc/init.d/ [root@INVIRH54DB2 init.d]# chkconfig --add postgresql [root@INVIRH54DB2 init.d]# chkconfig postgresql on ---Starting PostgreSQL with the SysV script : [root@INVIRH54DB2 init.d]# service postgresql start Starting PostgreSQL: ok --- Stopping PostgreSQL with the SysV script : [root@INVIRH54DB2 init.d]# service postgresql stop Stopping PostgreSQL: server stopped ok -- How to start, stop and restart PostgreSQL database? (in Linux) [root@INVIRH54DB2 data]# servicepostgresql stop Stopping PostgreSQL: server stopped ok [root@INVIRH54DB2 data]# servicepostgresql start Starting PostgreSQL: ok [root@INVIRH54DB2 data]# servicepostgresql restart Restarting PostgreSQL: server stopped Ok Step 8: Setting Environment Variables : (Login as a root) The environment variables that should be set are for the man pages and the bin directory ----Set /usr/local/pgsql/bin in system PATH [root@INVIRH54DB2 init.d]# #PATH=$PATH:/usr/local/pgsql/bin;export PATH Note: You must login to the system after the /etc/profile file has had environment variables added to it in order for your shell to utilize them. (OR) [root@INVIRH54DB2 init.d]# PATH=/usr/local/pgsql/bin:$PATH [root@INVIRH54DB2 init.d]# export PATH In a default installation, shared libraries will be located in /usr/local/pgsql/lib
  • 21. /*-----Setting LD_LIBRARY_PATH in a bash shell $ LD_LIBRARY_PATH=/usr/local/pgsql/lib (in root) $ export LD_LIBRARY_PATH (in root) ----Setting LD_LIBRARY_PATH in csh and tcsh $ setenv LD_LIBRARY_PATH /usr/local/pgsql/lib (in root)*/ Step 9 : Creating a Sample Database (Login as a Postgres user) [postgres@INVIRH54DB2 ~]$ /usr/local/pgsql/bin/createdb sample [postgres@INVIRH54DB2 ~]$ /usr/local/pgsql/bin/psql -U postgres psql (8.4.2)Type "help" for help. postgres=# l List of databases Name | Owner | Encoding | Collation | Ctype | Access privileges -----------+----------+----------+-------------+-------------+----------------------- postgres | postgres | UTF8 | en_US.UTF-8 | en_US.UTF-8 | sample | postgres | UTF8 | en_US.UTF-8 | en_US.UTF-8 | template0 | postgres | UTF8 | en_US.UTF-8 | en_US.UTF-8 | =c/postgres : postgres=CTc/postgres template1 | postgres | UTF8 | en_US.UTF-8 | en_US.UTF-8 | =c/postgres : postgres=CTc/postgres test | postgres | UTF8 | en_US.UTF-8 | en_US.UTF-8 | (5 rows) postgres=# -Accessing a database with psql [postgres@INVIRH54DB2 ~]$ /usr/local/pgsql/bin/psql sample psql (8.4.2)Type "help" for help. sample=# ---Querying a system table sample=# SELECT * FROM pg_language; lanname | lanowner | lanispl | lanpltrusted | lanplcallfoid | lanvalidator | lanacl ----------+----------+---------+--------------+---------------+--------------+-------- internal | 10 | f |f | 0| 2246 | c | 10 | f |f | 0| 2247 | sql | 10 | f |t | 0| 2248 | (3 rows)[postgres@host postgresql-8.4.1]#psql -l (Listing Databases) /*Now you many now administrate the postgres from the user console*/ ---Create,insert,select commands on Linux [postgres@INVIRH54DB2 ~]$ /usr/local/pgsql/bin/psql -d sample psql (8.4.2) Type "help" for help. sample=# create table emp(int integer,name character(20)); CREATE TABLE
  • 22. sample=# insert into emp(int,name) values(1,'s1'); INSERT 0 1 sample=# insert into emp(int,name) values(2,'s2'); INSERT 0 1 sample=# insert into emp(int,name) values(3,'s3'); INSERT 0 1 sample=# select * from emp; int | name -----+---------------------- 1 | s1 2 | s2 3 | s3 (3 rows) sample=# ---Backup and restore on linux (Login as a user postgres) -----Backup : [postgres@INVIRH54DB2 ~]$ /usr/local/pgsql/bin/pg_dump -U postgres sample -f /data1/postgres/table.backup --- Retore : [postgres@INVIRH54DB2 ~]$ /usr/local/pgsql/bin/psql -U postgres -d testdb -f /data1/postgres/table.backup SET SET SET SET SET SET SET SET SET CREATE TABLE ALTER TABLE REVOKE REVOKE GRANT Connecting client(Linux) to server(Win) on linux Box (I) First we need to config client ip address on server side (pg_hda.conf (Win)) (II) Once finishing the configration we need restart the server.
  • 23. (III) Once restarts the server, we connect from client to server. (IV) In linux box login as a Postgres user,then give the following command : [postgres@INVIRH54DB2 ~]$ psql -h windows_server_ip_address -l [postgres@INVIRH54DB2 ~]$ /usr/local/pgsql/bin/psql -h 10.65.2.49 –l Here –l is : list of databases (should return all available databases on the windows server) -To connect a given DB and given user onclient (Linux) to server (Win) : Here we connect only particular database,particular user from client side(Linux Box). First we need to config file (from server side) ,open C:/Program files/Postgresql/8.4/data/pg_hda.config file ,in that we add particulat DB,Particular user,IP address (client box) and save it.After that restart the server. In server side config (Win) : Here we connect particular DB,particular user from client side on linux.
  • 24. (I) Login as a postgres user [postgres@INVIRH54DB2 ~]$ psql -h windows_server_ip_address -d name_of_database -U database_user Here –h ------Windows_Server_IP_Address -d ---------- Name of the Database -U --------- Name of the Database user [postgres@INVIRH54DB2 ~]$ /usr/local/pgsql/bin/psql -h 10.65.2.49 -d sample -U test_sample [postgres@INVIRH54DB2 ~]$ /usr/local/pgsql/bin/psql -h 10.65.2.49 -d sample -U test_sample
  • 25. --Connecting client (Win) to server (Linux) : (I) First we need to config client ip address on server side (pg_hda.config file) (II) Once finishing the configration we need restart the server. (III) Once restarts the server, we connect the client from server (IV) Hereafter insert the following line in the host-based authentication file /usr/local/pgsql/data/pg_hba.conf. This file controls which hosts are allowed to connect. And edit the pg_hba.conf file. (V) And we need to add client IP address like the following screen. [postgres@INVIRH54DB2 data]$ vi pg_hba.conf In client side we are getting server Details.
  • 26. Displaying all server side databases in client side :
  • 27. In client side we need to give the following command :Here only particulat DB and particular User connecting. ---Connecting Server (Win) to client (Linux) : (I) First we need to config client ip address on server side (pg_hda.config file) (II) Once finishing the configration we need restart the server. (III) Once restarts the server we connect the client from server. In client side we need to give the following command : [postgres@INVIRH54DB2 ~]$ /usr/local/pgsql/bin/psql -h 10.65.2.49 -U postgres Password for user postgres:
  • 28. -To connect a given DB and given user onServer (Win) to Client (Linux) : In client side we need to give the following command : [postgres@INVIRH54DB2 ~]$ /usr/local/pgsql/bin/psql -h 10.65.2.49 -d sample -U user_sample --How to check whether PostgreSQL server is up and running? (In Linux) [root@INVIRH54DB2 data]# /etc/init.d/postgresql status pg_ctl: server is running (PID: 669) /usr/local/pgsql/bin/postgres "-D" "/usr/local/pgsql/data"
  • 29. --- Starting the database server : As root (from most to least favorite method.Servicepostgresql start (if the database has not already been initialized with initdb,this will be performed by the command) OR /etc/rc.d/init.d/postgresql start (if the database has not already been initialized with initdb,this will be performed by the script) OR /usr/bin/pg_ctl –D /var/lib/pgsql/data –p /usr/bin/postmaster –l logfile start & OR /usr/bin/postmaster –D /var/lib/pgsql/data & ---Postgresql database default location on Linux : In file system terms, a database cluster will be a single directory which all data will be stored. We call this the data directory or data area.It is completely up to you where you choose to store your data.There is no default,although locations such as /usr/local/pgsql/data or /var/lib/pgsql/data are popular. [root@INVIRH54DB2 ~]# ps -ef | greppostgres postgres 9010 1 0 Dec21 ? 00:00:02 /usr/local/pgsql/bin/postmaster -D /usr/local/pgsql/data