SlideShare une entreprise Scribd logo
1  sur  9
Télécharger pour lire hors ligne
www.video-tutorials.net - SolidWorks Q&A
SolidWorks Questions & Answers - Beginner Surface Design - www.video-tutorials.net
SolidWorks Tutorials for Beginners - Questions & Answers - Surface Design
March 2014 - www.video-tutorials.net
Hi everyone. I recently received a question from one of my YouTube viewers regarding a basic
surface design questions. Here is the question:
"I've used the 3D sketch tool to create 2 joined triangles. One is on the top plane, and the
other is on the front plane. The two triangles share a line. I want to convert them into two
triangle surfaces. How can I do this?"
Let's figure this out! While for intermediate users of SolidWorks this is an easy-breezy task, for
newcomers this question provides an opportunity to explain and demonstrate some of the structural
thinking that needs to underpin your geometry when you're working with surfaces, and hence a
great question for my SolidWorks tutorials for beginners questions & answers.
Let's begin with a New Part Document and then go to the Sketch tab.
Fig 01 - Choose "new".
Fig 02 - Choose the new part document.
Create a 3D sketch. Activate the Line Tool; we'll use it to sketch a triangle on the top plane. First, let's
make the plane visible in the graphic area. I'll do this by double-clicking on it in the tree. This makes it
visible even while we're sketching, and seeing the top plane makes it easier to sketch out this simple
geometry.
Sketch three lines for the triangle:
www.video-tutorials.net - SolidWorks Q&A
SolidWorks Questions & Answers - Beginner Surface Design - www.video-tutorials.net
Fig 03 - Our first triangle sketch on the top plane.
Then go to the confirmation corner and click on the green checkmark to save your changes and exit
the sketch.
Fig 04 - The confirmation corner in the top right of your window. Click the arrow to save & exit.
Now, I'll select a line of the triangle, press down the CTRL key on my keyboard, and select the Front
Plane. We'll apply an On Plane relation to the third line of my triangle.
Fig 05- The "on plane" relation in the line property manager.
Let's proceed with the second triangle now. We'll sketch this geometry on the front plane. When we
double-click on the front plane in the tree, we make it visible in the graphic area. Activate the Line
www.video-tutorials.net - SolidWorks Q&A
SolidWorks Questions & Answers - Beginner Surface Design - www.video-tutorials.net
Tool. To place this triangle, we'll snap to some of the points on our first triangle. Instead of snapping
the final point of the second triangle to the first triangle, let's snap somewhere on the line.
Exit the line tool with a right-click > Select.
Let's review what we have created. We have two triangles. One belongs to the front plane. The other
belongs to the top plane.
Fig 06- Our second triangle sketch.
Let's exit our sketch and go to the Surfaces tabs. If we try to create a surface from this geometry at
this point, it just won't work. Let's try the Filled Surface tool - basically, nothing will happen; Solidworks
can't execute the command. We're going to need to make some modifications to our geometry in
order to work in the Surface Design environment successfullly.
www.video-tutorials.net - SolidWorks Q&A
SolidWorks Questions & Answers - Beginner Surface Design - www.video-tutorials.net
Fig 6a - The Filled Surface tool doesn't work on our sketches at such.
Like all design and engineering work, there are many ways to navigate this conundrum and solve this
problem. What I'm going to do is create two more sketches, and copy the geometry into my first two
sketches. I'll start by inserting a sketch on the top plane. Right-click on the top plane and then select
the Sketch icon.
Fig 07 - Create a new sketch on the front plane.
Now we're going to convert some entities from our previous sketches into active geometry for this
sketch. We do this with the Convert Entities tool. Activate the Convert Entities tool with a left-click and
select the three lines of our first sketch, then click Accept in the tool property manager.
www.video-tutorials.net - SolidWorks Q&A
SolidWorks Questions & Answers - Beginner Surface Design - www.video-tutorials.net
Fig 08- The convert entities tool.
Now we'll be able to create a planar surface easily! But first, let's try an experiment. In order to create
the second triangle, I can also use the Split Entity tool. It's located under Tools > Sketch Tools > Split
Entities.
Fig 09- The split entities tool is located under Tools > Sketch Tools > Split Entities.
I'll split this line as follows. Then I'll grab this point you see below and snap it to where you see, below.
www.video-tutorials.net - SolidWorks Q&A
SolidWorks Questions & Answers - Beginner Surface Design - www.video-tutorials.net
Fig 10- The split line property manager.
I'm actually going to undo these last two actions (using the keyboard shortcut CTRL-Z); I just wanted
to show you how you could use the split line tool here instead. But let's exit the sketch and get on with
our second sketch.
Fig 10- Exit the sketch.
So, let's continue, and insert a second sketch, on the front plane:
Fig 11- Our second sketch, on the front plane.
Then activate the Line Tool. Let's sketch a triangle with a series of three lines that are coincident to
the one beneath--so in effect, I've just replicated the triangle.
www.video-tutorials.net - SolidWorks Q&A
SolidWorks Questions & Answers - Beginner Surface Design - www.video-tutorials.net
Fig 12- The second triangle.
Let's exit the sketch by clicking in the confirmation corner (to save our work and exit):
Fig 13- Save & exit!
We're back to the Surfaces tab. I'll hide the 3D sketch by right-clicking and clicking on the Show/Hide
icon (it's the glasses).
Fig 14 - Click the glasses button to hide the 3D sketch.
Now, activate the Filled Surface tool. Select Sketch 1, click Accept. Activate the tool again. This time,
select Sketch 2, and click accept.
Fig 15- The FIlled Surface property manager. Creating our second Fill-Surface feature.
www.video-tutorials.net - SolidWorks Q&A
SolidWorks Questions & Answers - Beginner Surface Design - www.video-tutorials.net
Take a look at the feature manager design tree--we've now got two surface bodies.
Fig 16- Both the surface-fill features appear in the tree now.
They are Surface Fill 1 and Surface Fill 2. We're going to knit these together. Activate the Knit Tool.
Fig 17- The knit tool - select both our surface-fill features to create a single surface body.
Select our surface bodies.
Click accept. Now we have a single surface.
www.video-tutorials.net - SolidWorks Q&A
SolidWorks Questions & Answers - Beginner Surface Design - www.video-tutorials.net
Fig 18- Now we have a single surface body in the tree--the knit feature.
Thanks for taking the time to learn via these SolidWorks tutorials for beginners. I hope this was helpful
and I look forward to answering more of your questions.
Thanks, Rosanna

Contenu connexe

Tendances

Tendances (20)

AUTOCAD Report
AUTOCAD ReportAUTOCAD Report
AUTOCAD Report
 
CATIA LESSON 1
CATIA LESSON 1CATIA LESSON 1
CATIA LESSON 1
 
Auto cad 2007-tutorial
Auto cad 2007-tutorialAuto cad 2007-tutorial
Auto cad 2007-tutorial
 
Autocade 2D complete course
Autocade 2D complete course Autocade 2D complete course
Autocade 2D complete course
 
Inventor notes[1]
Inventor notes[1]Inventor notes[1]
Inventor notes[1]
 
AutoDesk Inventor Professional-2018
AutoDesk Inventor Professional-2018AutoDesk Inventor Professional-2018
AutoDesk Inventor Professional-2018
 
Solidworks software
Solidworks softwareSolidworks software
Solidworks software
 
Vice Grip Soldiworks Project
Vice Grip Soldiworks ProjectVice Grip Soldiworks Project
Vice Grip Soldiworks Project
 
ViceGripFem
ViceGripFemViceGripFem
ViceGripFem
 
Solidworks
SolidworksSolidworks
Solidworks
 
SolidWorks Advanced Customization Techniques
SolidWorks Advanced Customization TechniquesSolidWorks Advanced Customization Techniques
SolidWorks Advanced Customization Techniques
 
TUTORIAL AUTO CAD 3D
TUTORIAL AUTO CAD 3DTUTORIAL AUTO CAD 3D
TUTORIAL AUTO CAD 3D
 
3 d autocad_2009
3 d autocad_20093 d autocad_2009
3 d autocad_2009
 
Autocad 1st Lecture
Autocad 1st LectureAutocad 1st Lecture
Autocad 1st Lecture
 
Autocad ppt
Autocad pptAutocad ppt
Autocad ppt
 
AutoCAD Training Syllabus
AutoCAD Training SyllabusAutoCAD Training Syllabus
AutoCAD Training Syllabus
 
Introduction to CAD
Introduction to CADIntroduction to CAD
Introduction to CAD
 
Autocad Training Delhi
Autocad Training DelhiAutocad Training Delhi
Autocad Training Delhi
 
Catia Part06
Catia Part06Catia Part06
Catia Part06
 
Autocad training
Autocad trainingAutocad training
Autocad training
 

Similaire à Solid works tutorials beginner surface design

Solid works tutorial08_bearingpuller_english_08_lr
Solid works tutorial08_bearingpuller_english_08_lrSolid works tutorial08_bearingpuller_english_08_lr
Solid works tutorial08_bearingpuller_english_08_lrAkira Tamashiro
 
Solidworks tips - First edition.pdf
Solidworks tips - First edition.pdfSolidworks tips - First edition.pdf
Solidworks tips - First edition.pdfZaheerAhmed905221
 
Solidworks 2012-basic-tutorials compress
Solidworks 2012-basic-tutorials compressSolidworks 2012-basic-tutorials compress
Solidworks 2012-basic-tutorials compressMahdi Zatout
 
Nx basics 2014 unfnished
Nx basics 2014 unfnishedNx basics 2014 unfnished
Nx basics 2014 unfnishedMiguele Davila
 
Solidworks apple mouse Design
Solidworks apple mouse DesignSolidworks apple mouse Design
Solidworks apple mouse DesignRa'uf Tailony
 
Intro to Inventor with MugTree
Intro to Inventor with MugTreeIntro to Inventor with MugTree
Intro to Inventor with MugTreekrysia
 
Assembling the MugTree (Using Inventor10)
Assembling the MugTree (Using Inventor10)Assembling the MugTree (Using Inventor10)
Assembling the MugTree (Using Inventor10)krysia
 
Tutorial 1 - Computer Aided Design (Final Release)
Tutorial 1 - Computer Aided Design (Final Release)Tutorial 1 - Computer Aided Design (Final Release)
Tutorial 1 - Computer Aided Design (Final Release)Charling Li
 
AUTO CAD final prestation.pptx
AUTO CAD final prestation.pptxAUTO CAD final prestation.pptx
AUTO CAD final prestation.pptxMRehanKhalil
 
Silicone Mold Primer
Silicone Mold PrimerSilicone Mold Primer
Silicone Mold PrimerNYCCTfab
 
Solid Modeling Assignment EGR 201-100 Spring 2018 .docx
Solid Modeling Assignment EGR 201-100 Spring 2018 .docxSolid Modeling Assignment EGR 201-100 Spring 2018 .docx
Solid Modeling Assignment EGR 201-100 Spring 2018 .docxwhitneyleman54422
 
Beginners guide to solid works 2006
Beginners guide to solid works 2006Beginners guide to solid works 2006
Beginners guide to solid works 2006Adrián Suárez
 
Ma105 1 l mather
Ma105 1 l matherMa105 1 l mather
Ma105 1 l matherBejn Penik
 
SolidWorks report.pptx
SolidWorks report.pptxSolidWorks report.pptx
SolidWorks report.pptxMohakRanjan
 

Similaire à Solid works tutorials beginner surface design (20)

Solid works tutorial08_bearingpuller_english_08_lr
Solid works tutorial08_bearingpuller_english_08_lrSolid works tutorial08_bearingpuller_english_08_lr
Solid works tutorial08_bearingpuller_english_08_lr
 
Solidworks tips - First edition.pdf
Solidworks tips - First edition.pdfSolidworks tips - First edition.pdf
Solidworks tips - First edition.pdf
 
Solidworks 2012-basic-tutorials compress
Solidworks 2012-basic-tutorials compressSolidworks 2012-basic-tutorials compress
Solidworks 2012-basic-tutorials compress
 
Nx basics 2014 unfnished
Nx basics 2014 unfnishedNx basics 2014 unfnished
Nx basics 2014 unfnished
 
Nx basics 2014
Nx basics 2014 Nx basics 2014
Nx basics 2014
 
Solidworks apple mouse Design
Solidworks apple mouse DesignSolidworks apple mouse Design
Solidworks apple mouse Design
 
Intro to Inventor with MugTree
Intro to Inventor with MugTreeIntro to Inventor with MugTree
Intro to Inventor with MugTree
 
PRO ENGINEER BASIC
PRO ENGINEER BASICPRO ENGINEER BASIC
PRO ENGINEER BASIC
 
autocad demo.pptx
autocad demo.pptxautocad demo.pptx
autocad demo.pptx
 
Assembling the MugTree (Using Inventor10)
Assembling the MugTree (Using Inventor10)Assembling the MugTree (Using Inventor10)
Assembling the MugTree (Using Inventor10)
 
Tutorial 1 - Computer Aided Design (Final Release)
Tutorial 1 - Computer Aided Design (Final Release)Tutorial 1 - Computer Aided Design (Final Release)
Tutorial 1 - Computer Aided Design (Final Release)
 
AUTO CAD final prestation.pptx
AUTO CAD final prestation.pptxAUTO CAD final prestation.pptx
AUTO CAD final prestation.pptx
 
Silicone Mold Primer
Silicone Mold PrimerSilicone Mold Primer
Silicone Mold Primer
 
01 propeller tutorial
01 propeller tutorial01 propeller tutorial
01 propeller tutorial
 
Solid Modeling Assignment EGR 201-100 Spring 2018 .docx
Solid Modeling Assignment EGR 201-100 Spring 2018 .docxSolid Modeling Assignment EGR 201-100 Spring 2018 .docx
Solid Modeling Assignment EGR 201-100 Spring 2018 .docx
 
Beginners guide to solid works 2006
Beginners guide to solid works 2006Beginners guide to solid works 2006
Beginners guide to solid works 2006
 
Autocad project ppt
Autocad project pptAutocad project ppt
Autocad project ppt
 
AutoCad 1.pptx
AutoCad 1.pptxAutoCad 1.pptx
AutoCad 1.pptx
 
Ma105 1 l mather
Ma105 1 l matherMa105 1 l mather
Ma105 1 l mather
 
SolidWorks report.pptx
SolidWorks report.pptxSolidWorks report.pptx
SolidWorks report.pptx
 

Dernier

Paris 2024 Olympic Geographies - an activity
Paris 2024 Olympic Geographies - an activityParis 2024 Olympic Geographies - an activity
Paris 2024 Olympic Geographies - an activityGeoBlogs
 
Presentation by Andreas Schleicher Tackling the School Absenteeism Crisis 30 ...
Presentation by Andreas Schleicher Tackling the School Absenteeism Crisis 30 ...Presentation by Andreas Schleicher Tackling the School Absenteeism Crisis 30 ...
Presentation by Andreas Schleicher Tackling the School Absenteeism Crisis 30 ...EduSkills OECD
 
mini mental status format.docx
mini    mental       status     format.docxmini    mental       status     format.docx
mini mental status format.docxPoojaSen20
 
POINT- BIOCHEMISTRY SEM 2 ENZYMES UNIT 5.pptx
POINT- BIOCHEMISTRY SEM 2 ENZYMES UNIT 5.pptxPOINT- BIOCHEMISTRY SEM 2 ENZYMES UNIT 5.pptx
POINT- BIOCHEMISTRY SEM 2 ENZYMES UNIT 5.pptxSayali Powar
 
BASLIQ CURRENT LOOKBOOK LOOKBOOK(1) (1).pdf
BASLIQ CURRENT LOOKBOOK  LOOKBOOK(1) (1).pdfBASLIQ CURRENT LOOKBOOK  LOOKBOOK(1) (1).pdf
BASLIQ CURRENT LOOKBOOK LOOKBOOK(1) (1).pdfSoniaTolstoy
 
Introduction to ArtificiaI Intelligence in Higher Education
Introduction to ArtificiaI Intelligence in Higher EducationIntroduction to ArtificiaI Intelligence in Higher Education
Introduction to ArtificiaI Intelligence in Higher Educationpboyjonauth
 
Introduction to AI in Higher Education_draft.pptx
Introduction to AI in Higher Education_draft.pptxIntroduction to AI in Higher Education_draft.pptx
Introduction to AI in Higher Education_draft.pptxpboyjonauth
 
1029 - Danh muc Sach Giao Khoa 10 . pdf
1029 -  Danh muc Sach Giao Khoa 10 . pdf1029 -  Danh muc Sach Giao Khoa 10 . pdf
1029 - Danh muc Sach Giao Khoa 10 . pdfQucHHunhnh
 
Interactive Powerpoint_How to Master effective communication
Interactive Powerpoint_How to Master effective communicationInteractive Powerpoint_How to Master effective communication
Interactive Powerpoint_How to Master effective communicationnomboosow
 
Mastering the Unannounced Regulatory Inspection
Mastering the Unannounced Regulatory InspectionMastering the Unannounced Regulatory Inspection
Mastering the Unannounced Regulatory InspectionSafetyChain Software
 
Contemporary philippine arts from the regions_PPT_Module_12 [Autosaved] (1).pptx
Contemporary philippine arts from the regions_PPT_Module_12 [Autosaved] (1).pptxContemporary philippine arts from the regions_PPT_Module_12 [Autosaved] (1).pptx
Contemporary philippine arts from the regions_PPT_Module_12 [Autosaved] (1).pptxRoyAbrique
 
Software Engineering Methodologies (overview)
Software Engineering Methodologies (overview)Software Engineering Methodologies (overview)
Software Engineering Methodologies (overview)eniolaolutunde
 
How to Make a Pirate ship Primary Education.pptx
How to Make a Pirate ship Primary Education.pptxHow to Make a Pirate ship Primary Education.pptx
How to Make a Pirate ship Primary Education.pptxmanuelaromero2013
 
Z Score,T Score, Percential Rank and Box Plot Graph
Z Score,T Score, Percential Rank and Box Plot GraphZ Score,T Score, Percential Rank and Box Plot Graph
Z Score,T Score, Percential Rank and Box Plot GraphThiyagu K
 
microwave assisted reaction. General introduction
microwave assisted reaction. General introductionmicrowave assisted reaction. General introduction
microwave assisted reaction. General introductionMaksud Ahmed
 
SOCIAL AND HISTORICAL CONTEXT - LFTVD.pptx
SOCIAL AND HISTORICAL CONTEXT - LFTVD.pptxSOCIAL AND HISTORICAL CONTEXT - LFTVD.pptx
SOCIAL AND HISTORICAL CONTEXT - LFTVD.pptxiammrhaywood
 
Organic Name Reactions for the students and aspirants of Chemistry12th.pptx
Organic Name Reactions  for the students and aspirants of Chemistry12th.pptxOrganic Name Reactions  for the students and aspirants of Chemistry12th.pptx
Organic Name Reactions for the students and aspirants of Chemistry12th.pptxVS Mahajan Coaching Centre
 

Dernier (20)

TataKelola dan KamSiber Kecerdasan Buatan v022.pdf
TataKelola dan KamSiber Kecerdasan Buatan v022.pdfTataKelola dan KamSiber Kecerdasan Buatan v022.pdf
TataKelola dan KamSiber Kecerdasan Buatan v022.pdf
 
Paris 2024 Olympic Geographies - an activity
Paris 2024 Olympic Geographies - an activityParis 2024 Olympic Geographies - an activity
Paris 2024 Olympic Geographies - an activity
 
Presentation by Andreas Schleicher Tackling the School Absenteeism Crisis 30 ...
Presentation by Andreas Schleicher Tackling the School Absenteeism Crisis 30 ...Presentation by Andreas Schleicher Tackling the School Absenteeism Crisis 30 ...
Presentation by Andreas Schleicher Tackling the School Absenteeism Crisis 30 ...
 
mini mental status format.docx
mini    mental       status     format.docxmini    mental       status     format.docx
mini mental status format.docx
 
POINT- BIOCHEMISTRY SEM 2 ENZYMES UNIT 5.pptx
POINT- BIOCHEMISTRY SEM 2 ENZYMES UNIT 5.pptxPOINT- BIOCHEMISTRY SEM 2 ENZYMES UNIT 5.pptx
POINT- BIOCHEMISTRY SEM 2 ENZYMES UNIT 5.pptx
 
BASLIQ CURRENT LOOKBOOK LOOKBOOK(1) (1).pdf
BASLIQ CURRENT LOOKBOOK  LOOKBOOK(1) (1).pdfBASLIQ CURRENT LOOKBOOK  LOOKBOOK(1) (1).pdf
BASLIQ CURRENT LOOKBOOK LOOKBOOK(1) (1).pdf
 
Introduction to ArtificiaI Intelligence in Higher Education
Introduction to ArtificiaI Intelligence in Higher EducationIntroduction to ArtificiaI Intelligence in Higher Education
Introduction to ArtificiaI Intelligence in Higher Education
 
Mattingly "AI & Prompt Design: The Basics of Prompt Design"
Mattingly "AI & Prompt Design: The Basics of Prompt Design"Mattingly "AI & Prompt Design: The Basics of Prompt Design"
Mattingly "AI & Prompt Design: The Basics of Prompt Design"
 
Introduction to AI in Higher Education_draft.pptx
Introduction to AI in Higher Education_draft.pptxIntroduction to AI in Higher Education_draft.pptx
Introduction to AI in Higher Education_draft.pptx
 
1029 - Danh muc Sach Giao Khoa 10 . pdf
1029 -  Danh muc Sach Giao Khoa 10 . pdf1029 -  Danh muc Sach Giao Khoa 10 . pdf
1029 - Danh muc Sach Giao Khoa 10 . pdf
 
Interactive Powerpoint_How to Master effective communication
Interactive Powerpoint_How to Master effective communicationInteractive Powerpoint_How to Master effective communication
Interactive Powerpoint_How to Master effective communication
 
Mastering the Unannounced Regulatory Inspection
Mastering the Unannounced Regulatory InspectionMastering the Unannounced Regulatory Inspection
Mastering the Unannounced Regulatory Inspection
 
Contemporary philippine arts from the regions_PPT_Module_12 [Autosaved] (1).pptx
Contemporary philippine arts from the regions_PPT_Module_12 [Autosaved] (1).pptxContemporary philippine arts from the regions_PPT_Module_12 [Autosaved] (1).pptx
Contemporary philippine arts from the regions_PPT_Module_12 [Autosaved] (1).pptx
 
Staff of Color (SOC) Retention Efforts DDSD
Staff of Color (SOC) Retention Efforts DDSDStaff of Color (SOC) Retention Efforts DDSD
Staff of Color (SOC) Retention Efforts DDSD
 
Software Engineering Methodologies (overview)
Software Engineering Methodologies (overview)Software Engineering Methodologies (overview)
Software Engineering Methodologies (overview)
 
How to Make a Pirate ship Primary Education.pptx
How to Make a Pirate ship Primary Education.pptxHow to Make a Pirate ship Primary Education.pptx
How to Make a Pirate ship Primary Education.pptx
 
Z Score,T Score, Percential Rank and Box Plot Graph
Z Score,T Score, Percential Rank and Box Plot GraphZ Score,T Score, Percential Rank and Box Plot Graph
Z Score,T Score, Percential Rank and Box Plot Graph
 
microwave assisted reaction. General introduction
microwave assisted reaction. General introductionmicrowave assisted reaction. General introduction
microwave assisted reaction. General introduction
 
SOCIAL AND HISTORICAL CONTEXT - LFTVD.pptx
SOCIAL AND HISTORICAL CONTEXT - LFTVD.pptxSOCIAL AND HISTORICAL CONTEXT - LFTVD.pptx
SOCIAL AND HISTORICAL CONTEXT - LFTVD.pptx
 
Organic Name Reactions for the students and aspirants of Chemistry12th.pptx
Organic Name Reactions  for the students and aspirants of Chemistry12th.pptxOrganic Name Reactions  for the students and aspirants of Chemistry12th.pptx
Organic Name Reactions for the students and aspirants of Chemistry12th.pptx
 

Solid works tutorials beginner surface design

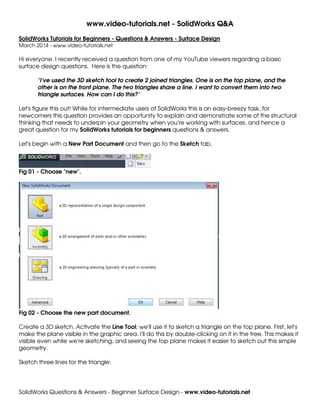
  • 1. www.video-tutorials.net - SolidWorks Q&A SolidWorks Questions & Answers - Beginner Surface Design - www.video-tutorials.net SolidWorks Tutorials for Beginners - Questions & Answers - Surface Design March 2014 - www.video-tutorials.net Hi everyone. I recently received a question from one of my YouTube viewers regarding a basic surface design questions. Here is the question: "I've used the 3D sketch tool to create 2 joined triangles. One is on the top plane, and the other is on the front plane. The two triangles share a line. I want to convert them into two triangle surfaces. How can I do this?" Let's figure this out! While for intermediate users of SolidWorks this is an easy-breezy task, for newcomers this question provides an opportunity to explain and demonstrate some of the structural thinking that needs to underpin your geometry when you're working with surfaces, and hence a great question for my SolidWorks tutorials for beginners questions & answers. Let's begin with a New Part Document and then go to the Sketch tab. Fig 01 - Choose "new". Fig 02 - Choose the new part document. Create a 3D sketch. Activate the Line Tool; we'll use it to sketch a triangle on the top plane. First, let's make the plane visible in the graphic area. I'll do this by double-clicking on it in the tree. This makes it visible even while we're sketching, and seeing the top plane makes it easier to sketch out this simple geometry. Sketch three lines for the triangle:
  • 2. www.video-tutorials.net - SolidWorks Q&A SolidWorks Questions & Answers - Beginner Surface Design - www.video-tutorials.net Fig 03 - Our first triangle sketch on the top plane. Then go to the confirmation corner and click on the green checkmark to save your changes and exit the sketch. Fig 04 - The confirmation corner in the top right of your window. Click the arrow to save & exit. Now, I'll select a line of the triangle, press down the CTRL key on my keyboard, and select the Front Plane. We'll apply an On Plane relation to the third line of my triangle. Fig 05- The "on plane" relation in the line property manager. Let's proceed with the second triangle now. We'll sketch this geometry on the front plane. When we double-click on the front plane in the tree, we make it visible in the graphic area. Activate the Line
  • 3. www.video-tutorials.net - SolidWorks Q&A SolidWorks Questions & Answers - Beginner Surface Design - www.video-tutorials.net Tool. To place this triangle, we'll snap to some of the points on our first triangle. Instead of snapping the final point of the second triangle to the first triangle, let's snap somewhere on the line. Exit the line tool with a right-click > Select. Let's review what we have created. We have two triangles. One belongs to the front plane. The other belongs to the top plane. Fig 06- Our second triangle sketch. Let's exit our sketch and go to the Surfaces tabs. If we try to create a surface from this geometry at this point, it just won't work. Let's try the Filled Surface tool - basically, nothing will happen; Solidworks can't execute the command. We're going to need to make some modifications to our geometry in order to work in the Surface Design environment successfullly.
  • 4. www.video-tutorials.net - SolidWorks Q&A SolidWorks Questions & Answers - Beginner Surface Design - www.video-tutorials.net Fig 6a - The Filled Surface tool doesn't work on our sketches at such. Like all design and engineering work, there are many ways to navigate this conundrum and solve this problem. What I'm going to do is create two more sketches, and copy the geometry into my first two sketches. I'll start by inserting a sketch on the top plane. Right-click on the top plane and then select the Sketch icon. Fig 07 - Create a new sketch on the front plane. Now we're going to convert some entities from our previous sketches into active geometry for this sketch. We do this with the Convert Entities tool. Activate the Convert Entities tool with a left-click and select the three lines of our first sketch, then click Accept in the tool property manager.
  • 5. www.video-tutorials.net - SolidWorks Q&A SolidWorks Questions & Answers - Beginner Surface Design - www.video-tutorials.net Fig 08- The convert entities tool. Now we'll be able to create a planar surface easily! But first, let's try an experiment. In order to create the second triangle, I can also use the Split Entity tool. It's located under Tools > Sketch Tools > Split Entities. Fig 09- The split entities tool is located under Tools > Sketch Tools > Split Entities. I'll split this line as follows. Then I'll grab this point you see below and snap it to where you see, below.
  • 6. www.video-tutorials.net - SolidWorks Q&A SolidWorks Questions & Answers - Beginner Surface Design - www.video-tutorials.net Fig 10- The split line property manager. I'm actually going to undo these last two actions (using the keyboard shortcut CTRL-Z); I just wanted to show you how you could use the split line tool here instead. But let's exit the sketch and get on with our second sketch. Fig 10- Exit the sketch. So, let's continue, and insert a second sketch, on the front plane: Fig 11- Our second sketch, on the front plane. Then activate the Line Tool. Let's sketch a triangle with a series of three lines that are coincident to the one beneath--so in effect, I've just replicated the triangle.
  • 7. www.video-tutorials.net - SolidWorks Q&A SolidWorks Questions & Answers - Beginner Surface Design - www.video-tutorials.net Fig 12- The second triangle. Let's exit the sketch by clicking in the confirmation corner (to save our work and exit): Fig 13- Save & exit! We're back to the Surfaces tab. I'll hide the 3D sketch by right-clicking and clicking on the Show/Hide icon (it's the glasses). Fig 14 - Click the glasses button to hide the 3D sketch. Now, activate the Filled Surface tool. Select Sketch 1, click Accept. Activate the tool again. This time, select Sketch 2, and click accept. Fig 15- The FIlled Surface property manager. Creating our second Fill-Surface feature.
  • 8. www.video-tutorials.net - SolidWorks Q&A SolidWorks Questions & Answers - Beginner Surface Design - www.video-tutorials.net Take a look at the feature manager design tree--we've now got two surface bodies. Fig 16- Both the surface-fill features appear in the tree now. They are Surface Fill 1 and Surface Fill 2. We're going to knit these together. Activate the Knit Tool. Fig 17- The knit tool - select both our surface-fill features to create a single surface body. Select our surface bodies. Click accept. Now we have a single surface.
  • 9. www.video-tutorials.net - SolidWorks Q&A SolidWorks Questions & Answers - Beginner Surface Design - www.video-tutorials.net Fig 18- Now we have a single surface body in the tree--the knit feature. Thanks for taking the time to learn via these SolidWorks tutorials for beginners. I hope this was helpful and I look forward to answering more of your questions. Thanks, Rosanna