SlideShare une entreprise Scribd logo
1  sur  13
Télécharger pour lire hors ligne
Canon iP 1600
Category : Print Quality Issues
Description : No ink ejection or streaks
How to install or remove ink cartridges
To ensure normal printer operation, follow these step by step instructions to install or remove an ink cartridge.
<How to set ink cartridges>
1. After confirming that the printer is powered on, open the front cover.
The ink cartridge holder moves to the replacement position.
2. Take out a cartridge from its casing and gently remove the orange protective tape in the direction of the arrow.
Note:
Do not attempt to reattach the protective tape once you have removed it.
- Do not touch the gold electrical contacts or the print head nozzles after removing the protective tape.
3. Insert the ink cartridge into the ink cartridge holder.
- Black: the left slot
- Color: the right slot
4. Confirm that the ink cartridges are installed properly.
<1> The ink cartridge is not installed properly.
<2> The ink cartridge is installed properly.
5. Close the front cover.
Wait until the preparatory operation is complete; it takes about one to two minutes.
<How to remove ink cartridges
1. After confirming that the printer is powered on, open the front cover.
The ink cartridge holder moves to the replacement position.
2. Remove the ink cartridges.
Note:
Handle the ink cartridges carefully to avoid staining clothes and surrounding work area.
Category : Print Quality Issues
Description : No ink ejection or streaks
How to prevent smudge or paper abrasion
To adjust the gap between the print head and the paper, set the paper thickness lever properly according to the media being used.
When the paper other than an envelope/T-Shirt Transfers is scratched, setting the paper thickness lever to the right position may
improve this problem.
( The images below show the iP2200 model. )
Note:
When paper other than an envelope/T-Shirt Transfers is abraded, setting the paper thickness lever to the right position may
improve this problem.
However, continuous printing in this setting will likely smear the inside of the printer.
Therefore, return the paper thickness lever to the left position after printing.
- Paper other than envelopes/T-Shirt Transfers -> Left side
- Envelopes/T-Shirt Transfers -> Right side
Category : Print Quality Issues
Description : No ink ejection or streaks
How to curl paper
When using 4" x 6" or 5" x 7" sized paper, to prevent paper abrasion, curl the paper in advance.
1. Put a sheet of paper not used for printing on the paper's print side < 1 >.
2. Without touching the paper's print side, roll the paper and hold it in place for approximately 10 seconds.
Note:
If you touch the paper's print side, print quality may deteriorate.
3. Remove the paper not used for printing and confirm that the paper's print side < 1 > is curled within 2 to 5 mm (0.2 in).
Memo:
Set the curled paper sheet by sheet in the printer.
Category : Print Quality Issues
Description : No ink ejection or streaks
Streaks or uneven printing on the trailing edge of the paper
When printing a picture, streaks or uneven printing may appear on its trailing edge (inside the red frame).
This problem is caused by printing outside the recommended print area, and may improve by using the combination below.
- Media Type: Photo Paper Pro PR-101
- Print Quality: High or Fine (after clicking Custom)
Ex. Streaks or uneven printing appears. (The printer in the illustration below shows the iP2200 model.)
Category : Print Quality Issues
Description : No ink ejection or streaks
How to unclog print head nozzles (Windows)
If print results are faint or streaks are printed, the print head nozzles may be clogged.
Those phenomena can be improved by performing print head cleaning (Cleaning) or print head deep cleaning (Deep Cleaning).
Also, you can check the cleaning results by printing the Nozzle Check Pattern after the cleaning of the print head nozzles.
<Procedures>
To check and improve the condition in which the print head nozzles are clogged, follow the instructions below.
(Memo)
If missing lines still appear on the Nozzle Check Pattern printing even after Deep Cleaning, ink cartridges may be defective.
Cleaning, Deep Cleaning, and Nozzle Check are performed through the Maintenance window.
Do the following to open Maintenance.
1. First, open the Properties window.
- For Windows XP Home Edition
Click/Select "Start," "Control Panel," "Printers and Other Hardware," and "Printers and Faxes."
- For Windows XP Professional Edition
Click "Start" and "Printers and Faxes."
- For Windows 2000/Me/98
Click/Select "Start," and "Settings," then "Printers."
2. Select the Maintenance tab.
*Display varies according to the printer model.
<How to print the Nozzle Check Pattern>
1. In the Maintenance window, click Nozzle Check.
2. When the Nozzle Check window is displayed, move the paper thickness lever to the left, and load a sheet of A4 or letter size
paper in the auto sheet feeder.
Then, click Print Check Pattern, and printing will start.
(Memo)
When clicking Initial Check Items, the confirming items before performing the nozzle check pattern printing will be displayed.
3. When the confirming message is displayed, click OK.
Do not perform any other operations until printing is completed.
4. Check the printed nozzle check pattern.
*Display varies according to the printer model.
(Memo)
When printing from the printer which can print without an optional black ink cartridge, the BK pattern in the above will not be
printed.
The BK pattern will not be displayed in the window either.
[When the output is normal]
Black ink: The grid pattern is regular without missing lines.
Color ink: White streaks are not visible in the pattern.
[When the output is not normal]
If the following cases can be seen, perform the cleaning of the print head nozzles.
<Case A>
No color is printed. (Nothing appears on the output.)
<Case B>
There is any color which is not printed at all. (In the diagram below, black ink is not printed at all.)
<Case C>
There are missing lines partially in the pattern for the black ink.
<Case D>
There are white streaks in one of the color ink patterns.
<How to perform Cleaning>
1. In the Maintenance window, click Cleaning.
2. The cleaning of the print head nozzles starts.
3. When the confirming message is displayed, check the contents, and click OK.
Although the Nozzle Check window is displayed, do not perform any other operations until Cleaning is completed.
(Memo)
- During Cleaning, the Power lamp blinks green.
- Cleaning consumes a certain amount of ink. Note that if performing Cleaning often, ink will be consumed quickly.
4. When Cleaning is completed, the Power lamp will stay green.
5. To print the nozzle check pattern, do the following.
Move the paper thickness lever to the left, and load a sheet of A4 or letter size paper in the auto sheet feeder.
6. In the Nozzle Check window, click Initial Check Items.
(Memo)
When clicking Initial Check Items, the confirming items before performing the nozzle check pattern printing will be displayed.
7. When the confirming message is displayed, click OK. Printing starts.
Do not perform any other operations until printing is completed.
8. When the nozzle check pattern is printed, refer to procedure 4 <How to print the Nozzle Check Pattern> to check whether
print head nozzles are clogged.
<How to perform Deep Cleaning>
1. In the Maintenance window, click Deep Cleaning.
2. When the Deep Cleaning window is displayed, check the contents, and click Execute.
(Note)
Cleaning consumes a certain amount of ink. Note that if performing Cleaning often, ink will be consumed quickly. Furthermore,
Deep Cleaning consumes much more ink than Cleaning; execute Deep Cleaning only if the nozzle condition does not improve
even after Cleaning.
(Memo)
When printing a Nozzle Check pattern from a printer which does not use a black ink cartridge, the Black pattern will not print on
the paper and the BK pattern will not appear in the Pattern Check window.
3. When the confirmation window is displayed, click OK.
4. When the confirming message is displayed, check the contents, and click OK.
Do not perform any other operations until cleaning is completed.
(Memo)
During Deep Cleaning, the Power lamp blinks green.
5. When Deep Cleaning is completed, the Power lamp will stay green.

Contenu connexe

Tendances

Manual Canon pixma mg3500 how to change ink
Manual Canon pixma mg3500 how to change inkManual Canon pixma mg3500 how to change ink
Manual Canon pixma mg3500 how to change inkCompartirEsMejor
 
Presentation of defects
Presentation of defectsPresentation of defects
Presentation of defectsAbdul Hannan
 
Cutting and sewing quality scenario of ready made garments
Cutting and sewing quality scenario of ready made garmentsCutting and sewing quality scenario of ready made garments
Cutting and sewing quality scenario of ready made garmentsHindustan University
 
Overview of garment manufacturing
Overview of garment manufacturingOverview of garment manufacturing
Overview of garment manufacturingROHIT SINGH
 

Tendances (10)

Presentation on cutting section
Presentation on cutting sectionPresentation on cutting section
Presentation on cutting section
 
DIY Printable Post-Its
DIY Printable Post-ItsDIY Printable Post-Its
DIY Printable Post-Its
 
Manual Canon pixma mg3500 how to change ink
Manual Canon pixma mg3500 how to change inkManual Canon pixma mg3500 how to change ink
Manual Canon pixma mg3500 how to change ink
 
Garments manufacturing
Garments manufacturingGarments manufacturing
Garments manufacturing
 
Wallpaper a ceiling
Wallpaper a ceilingWallpaper a ceiling
Wallpaper a ceiling
 
Presentation of defects
Presentation of defectsPresentation of defects
Presentation of defects
 
Garment defects
Garment defectsGarment defects
Garment defects
 
Cutting and sewing quality scenario of ready made garments
Cutting and sewing quality scenario of ready made garmentsCutting and sewing quality scenario of ready made garments
Cutting and sewing quality scenario of ready made garments
 
Overview of garment manufacturing
Overview of garment manufacturingOverview of garment manufacturing
Overview of garment manufacturing
 
Garment Defects
Garment DefectsGarment Defects
Garment Defects
 

En vedette

Para visualizar em tela cheia, clique em menu e depois em View Fullscreen.
Para visualizar em tela cheia, clique em menu e depois em View Fullscreen.Para visualizar em tela cheia, clique em menu e depois em View Fullscreen.
Para visualizar em tela cheia, clique em menu e depois em View Fullscreen.Cauan Felipe
 
Hp software prompts_03-10
Hp software prompts_03-10Hp software prompts_03-10
Hp software prompts_03-10Michael Davis
 
Hp software prompts_03-10
Hp software prompts_03-10Hp software prompts_03-10
Hp software prompts_03-10Michael Davis
 
Lex dell ink_prompt_turnoff
Lex dell ink_prompt_turnoffLex dell ink_prompt_turnoff
Lex dell ink_prompt_turnoffMichael Davis
 
Social Endorsement and News curating via Xydo
Social Endorsement and News curating via XydoSocial Endorsement and News curating via Xydo
Social Endorsement and News curating via XydoSrinivas Kulkarni
 
How brands can effectively use Google+
How brands can effectively use Google+How brands can effectively use Google+
How brands can effectively use Google+Srinivas Kulkarni
 
Dell printer instructions
Dell printer instructionsDell printer instructions
Dell printer instructionsMichael Davis
 
Laser trouble shooting guide
Laser trouble shooting guideLaser trouble shooting guide
Laser trouble shooting guideMichael Davis
 

En vedette (8)

Para visualizar em tela cheia, clique em menu e depois em View Fullscreen.
Para visualizar em tela cheia, clique em menu e depois em View Fullscreen.Para visualizar em tela cheia, clique em menu e depois em View Fullscreen.
Para visualizar em tela cheia, clique em menu e depois em View Fullscreen.
 
Hp software prompts_03-10
Hp software prompts_03-10Hp software prompts_03-10
Hp software prompts_03-10
 
Hp software prompts_03-10
Hp software prompts_03-10Hp software prompts_03-10
Hp software prompts_03-10
 
Lex dell ink_prompt_turnoff
Lex dell ink_prompt_turnoffLex dell ink_prompt_turnoff
Lex dell ink_prompt_turnoff
 
Social Endorsement and News curating via Xydo
Social Endorsement and News curating via XydoSocial Endorsement and News curating via Xydo
Social Endorsement and News curating via Xydo
 
How brands can effectively use Google+
How brands can effectively use Google+How brands can effectively use Google+
How brands can effectively use Google+
 
Dell printer instructions
Dell printer instructionsDell printer instructions
Dell printer instructions
 
Laser trouble shooting guide
Laser trouble shooting guideLaser trouble shooting guide
Laser trouble shooting guide
 

Similaire à The tech tip canon i p-1600

Tsa Co2 Solidworks To Mcamx2 Rev 6
Tsa Co2 Solidworks To Mcamx2  Rev 6Tsa Co2 Solidworks To Mcamx2  Rev 6
Tsa Co2 Solidworks To Mcamx2 Rev 6mike
 
38 epson pc_printhead_cleaning1
38 epson pc_printhead_cleaning138 epson pc_printhead_cleaning1
38 epson pc_printhead_cleaning1Michael Davis
 
Xmastcamcribboard
XmastcamcribboardXmastcamcribboard
Xmastcamcribboarddoglupo
 
Frequently Asked Questions3-24
Frequently Asked Questions3-24Frequently Asked Questions3-24
Frequently Asked Questions3-24Jessica Calderwood
 
Epson cartridge troubleshooting guide 9 17-06
Epson cartridge troubleshooting guide 9 17-06Epson cartridge troubleshooting guide 9 17-06
Epson cartridge troubleshooting guide 9 17-06Michael Davis
 
Brother printer drum error slide green tab
Brother printer drum error slide green tabBrother printer drum error slide green tab
Brother printer drum error slide green tabkate_207
 
Intro to Inventor with MugTree
Intro to Inventor with MugTreeIntro to Inventor with MugTree
Intro to Inventor with MugTreekrysia
 
Zmorph Dual Head User Manual for Printing
Zmorph Dual Head User Manual for PrintingZmorph Dual Head User Manual for Printing
Zmorph Dual Head User Manual for PrintingRyan Dunn
 
A8-M Operation instruction-1.0.pdf
A8-M Operation instruction-1.0.pdfA8-M Operation instruction-1.0.pdf
A8-M Operation instruction-1.0.pdfCristian A. Tissera
 
1-855-233-7309 HP Printer not Working Customer Service & Technical Support Ph...
1-855-233-7309 HP Printer not Working Customer Service & Technical Support Ph...1-855-233-7309 HP Printer not Working Customer Service & Technical Support Ph...
1-855-233-7309 HP Printer not Working Customer Service & Technical Support Ph...jackmarteen465
 
The 5 Steps of the Color Management Process
The 5 Steps of the Color Management ProcessThe 5 Steps of the Color Management Process
The 5 Steps of the Color Management ProcessHeidelberg India
 
Peopoly Phenom 3D printer setup guide
Peopoly Phenom 3D printer setup guidePeopoly Phenom 3D printer setup guide
Peopoly Phenom 3D printer setup guideDaveRFlorizone
 
Hp envy 5544 - How to copy and Scan
Hp envy 5544 - How to copy and Scan Hp envy 5544 - How to copy and Scan
Hp envy 5544 - How to copy and Scan 123hp.co
 

Similaire à The tech tip canon i p-1600 (20)

DTF Printhead Cleaning Solution 5 Most Common Situations.pptx
DTF Printhead Cleaning Solution  5 Most Common Situations.pptxDTF Printhead Cleaning Solution  5 Most Common Situations.pptx
DTF Printhead Cleaning Solution 5 Most Common Situations.pptx
 
Tsa Co2 Solidworks To Mcamx2 Rev 6
Tsa Co2 Solidworks To Mcamx2  Rev 6Tsa Co2 Solidworks To Mcamx2  Rev 6
Tsa Co2 Solidworks To Mcamx2 Rev 6
 
38 epson pc_printhead_cleaning1
38 epson pc_printhead_cleaning138 epson pc_printhead_cleaning1
38 epson pc_printhead_cleaning1
 
Z510 3D PRINTER
Z510 3D PRINTERZ510 3D PRINTER
Z510 3D PRINTER
 
Xmastcamcribboard
XmastcamcribboardXmastcamcribboard
Xmastcamcribboard
 
Frequently Asked Questions3-24
Frequently Asked Questions3-24Frequently Asked Questions3-24
Frequently Asked Questions3-24
 
Manual
ManualManual
Manual
 
Final Printer Manual
Final Printer ManualFinal Printer Manual
Final Printer Manual
 
Epson cartridge troubleshooting guide 9 17-06
Epson cartridge troubleshooting guide 9 17-06Epson cartridge troubleshooting guide 9 17-06
Epson cartridge troubleshooting guide 9 17-06
 
Brother printer drum error slide green tab
Brother printer drum error slide green tabBrother printer drum error slide green tab
Brother printer drum error slide green tab
 
Intro to Inventor with MugTree
Intro to Inventor with MugTreeIntro to Inventor with MugTree
Intro to Inventor with MugTree
 
Zmorph Dual Head User Manual for Printing
Zmorph Dual Head User Manual for PrintingZmorph Dual Head User Manual for Printing
Zmorph Dual Head User Manual for Printing
 
A8-M Operation instruction-1.0.pdf
A8-M Operation instruction-1.0.pdfA8-M Operation instruction-1.0.pdf
A8-M Operation instruction-1.0.pdf
 
Surface machining
Surface machiningSurface machining
Surface machining
 
muna yuyu
muna yuyumuna yuyu
muna yuyu
 
1-855-233-7309 HP Printer not Working Customer Service & Technical Support Ph...
1-855-233-7309 HP Printer not Working Customer Service & Technical Support Ph...1-855-233-7309 HP Printer not Working Customer Service & Technical Support Ph...
1-855-233-7309 HP Printer not Working Customer Service & Technical Support Ph...
 
The 5 Steps of the Color Management Process
The 5 Steps of the Color Management ProcessThe 5 Steps of the Color Management Process
The 5 Steps of the Color Management Process
 
Color management
Color managementColor management
Color management
 
Peopoly Phenom 3D printer setup guide
Peopoly Phenom 3D printer setup guidePeopoly Phenom 3D printer setup guide
Peopoly Phenom 3D printer setup guide
 
Hp envy 5544 - How to copy and Scan
Hp envy 5544 - How to copy and Scan Hp envy 5544 - How to copy and Scan
Hp envy 5544 - How to copy and Scan
 

Plus de Michael Davis

09 canon pg cl ink counter reset flyer
09 canon pg cl ink counter reset flyer09 canon pg cl ink counter reset flyer
09 canon pg cl ink counter reset flyerMichael Davis
 
Pc magazine article truth_about_page_yields
 Pc magazine article truth_about_page_yields Pc magazine article truth_about_page_yields
Pc magazine article truth_about_page_yieldsMichael Davis
 
Carbon footprint release final
 Carbon footprint release final Carbon footprint release final
Carbon footprint release finalMichael Davis
 
Handling instructions for laser cartridges
 Handling instructions for laser cartridges Handling instructions for laser cartridges
Handling instructions for laser cartridgesMichael Davis
 
Lex dell ink_prompt_turnoff
Lex dell ink_prompt_turnoffLex dell ink_prompt_turnoff
Lex dell ink_prompt_turnoffMichael Davis
 
Common+cartridge+faults+july+2010[1]
Common+cartridge+faults+july+2010[1]Common+cartridge+faults+july+2010[1]
Common+cartridge+faults+july+2010[1]Michael Davis
 
Cartridge machjine reset_guide_ver.2016
Cartridge machjine reset_guide_ver.2016Cartridge machjine reset_guide_ver.2016
Cartridge machjine reset_guide_ver.2016Michael Davis
 
Canon printer reset instructions
Canon printer reset instructionsCanon printer reset instructions
Canon printer reset instructionsMichael Davis
 
Basic laser cartridge
Basic laser cartridgeBasic laser cartridge
Basic laser cartridgeMichael Davis
 
09 canon pg cl ink counter reset flyer
09 canon pg cl ink counter reset flyer09 canon pg cl ink counter reset flyer
09 canon pg cl ink counter reset flyerMichael Davis
 
Separating hp myths from reality
 Separating hp myths from reality Separating hp myths from reality
Separating hp myths from realityMichael Davis
 
Remanufacturing the_best_solution_for_the_environment
 Remanufacturing the_best_solution_for_the_environment Remanufacturing the_best_solution_for_the_environment
Remanufacturing the_best_solution_for_the_environmentMichael Davis
 
Exposing the fraud recycling_programs_gone_wrong
 Exposing the fraud recycling_programs_gone_wrong Exposing the fraud recycling_programs_gone_wrong
Exposing the fraud recycling_programs_gone_wrongMichael Davis
 
Remanufacturing is_a_superior_choce.pdf
 Remanufacturing is_a_superior_choce.pdf Remanufacturing is_a_superior_choce.pdf
Remanufacturing is_a_superior_choce.pdfMichael Davis
 
Oem warranty_document.pdf
 Oem warranty_document.pdf Oem warranty_document.pdf
Oem warranty_document.pdfMichael Davis
 
Cut your office supply costs dramatically get-the_facts
 Cut your office supply costs dramatically   get-the_facts Cut your office supply costs dramatically   get-the_facts
Cut your office supply costs dramatically get-the_factsMichael Davis
 
09 canon pg-cl_ink_counter_reset_flyer
09 canon pg-cl_ink_counter_reset_flyer09 canon pg-cl_ink_counter_reset_flyer
09 canon pg-cl_ink_counter_reset_flyerMichael Davis
 

Plus de Michael Davis (18)

09 canon pg cl ink counter reset flyer
09 canon pg cl ink counter reset flyer09 canon pg cl ink counter reset flyer
09 canon pg cl ink counter reset flyer
 
Pc magazine article truth_about_page_yields
 Pc magazine article truth_about_page_yields Pc magazine article truth_about_page_yields
Pc magazine article truth_about_page_yields
 
Carbon footprint release final
 Carbon footprint release final Carbon footprint release final
Carbon footprint release final
 
Handling instructions for laser cartridges
 Handling instructions for laser cartridges Handling instructions for laser cartridges
Handling instructions for laser cartridges
 
Lex dell ink_prompt_turnoff
Lex dell ink_prompt_turnoffLex dell ink_prompt_turnoff
Lex dell ink_prompt_turnoff
 
Common+cartridge+faults+july+2010[1]
Common+cartridge+faults+july+2010[1]Common+cartridge+faults+july+2010[1]
Common+cartridge+faults+july+2010[1]
 
Cartridge machjine reset_guide_ver.2016
Cartridge machjine reset_guide_ver.2016Cartridge machjine reset_guide_ver.2016
Cartridge machjine reset_guide_ver.2016
 
Canon printer reset instructions
Canon printer reset instructionsCanon printer reset instructions
Canon printer reset instructions
 
Basic laser cartridge
Basic laser cartridgeBasic laser cartridge
Basic laser cartridge
 
09 canon pg cl ink counter reset flyer
09 canon pg cl ink counter reset flyer09 canon pg cl ink counter reset flyer
09 canon pg cl ink counter reset flyer
 
Separating hp myths from reality
 Separating hp myths from reality Separating hp myths from reality
Separating hp myths from reality
 
Remanufacturing the_best_solution_for_the_environment
 Remanufacturing the_best_solution_for_the_environment Remanufacturing the_best_solution_for_the_environment
Remanufacturing the_best_solution_for_the_environment
 
Exposing the fraud recycling_programs_gone_wrong
 Exposing the fraud recycling_programs_gone_wrong Exposing the fraud recycling_programs_gone_wrong
Exposing the fraud recycling_programs_gone_wrong
 
Remanufacturing is_a_superior_choce.pdf
 Remanufacturing is_a_superior_choce.pdf Remanufacturing is_a_superior_choce.pdf
Remanufacturing is_a_superior_choce.pdf
 
Oem warranty_document.pdf
 Oem warranty_document.pdf Oem warranty_document.pdf
Oem warranty_document.pdf
 
Cut your office supply costs dramatically get-the_facts
 Cut your office supply costs dramatically   get-the_facts Cut your office supply costs dramatically   get-the_facts
Cut your office supply costs dramatically get-the_facts
 
09 canon pg-cl_ink_counter_reset_flyer
09 canon pg-cl_ink_counter_reset_flyer09 canon pg-cl_ink_counter_reset_flyer
09 canon pg-cl_ink_counter_reset_flyer
 
2010 01 print-test
2010 01 print-test2010 01 print-test
2010 01 print-test
 

The tech tip canon i p-1600

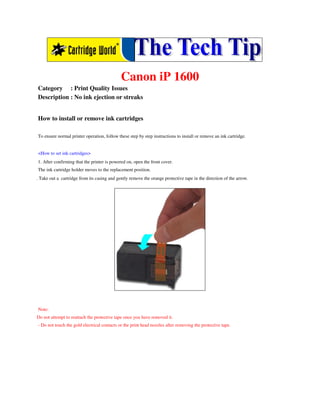
  • 1. Canon iP 1600 Category : Print Quality Issues Description : No ink ejection or streaks How to install or remove ink cartridges To ensure normal printer operation, follow these step by step instructions to install or remove an ink cartridge. <How to set ink cartridges> 1. After confirming that the printer is powered on, open the front cover. The ink cartridge holder moves to the replacement position. 2. Take out a cartridge from its casing and gently remove the orange protective tape in the direction of the arrow. Note: Do not attempt to reattach the protective tape once you have removed it. - Do not touch the gold electrical contacts or the print head nozzles after removing the protective tape.
  • 2. 3. Insert the ink cartridge into the ink cartridge holder. - Black: the left slot - Color: the right slot 4. Confirm that the ink cartridges are installed properly. <1> The ink cartridge is not installed properly. <2> The ink cartridge is installed properly.
  • 3. 5. Close the front cover. Wait until the preparatory operation is complete; it takes about one to two minutes. <How to remove ink cartridges 1. After confirming that the printer is powered on, open the front cover. The ink cartridge holder moves to the replacement position. 2. Remove the ink cartridges. Note: Handle the ink cartridges carefully to avoid staining clothes and surrounding work area. Category : Print Quality Issues Description : No ink ejection or streaks How to prevent smudge or paper abrasion To adjust the gap between the print head and the paper, set the paper thickness lever properly according to the media being used. When the paper other than an envelope/T-Shirt Transfers is scratched, setting the paper thickness lever to the right position may improve this problem. ( The images below show the iP2200 model. ) Note: When paper other than an envelope/T-Shirt Transfers is abraded, setting the paper thickness lever to the right position may improve this problem. However, continuous printing in this setting will likely smear the inside of the printer. Therefore, return the paper thickness lever to the left position after printing. - Paper other than envelopes/T-Shirt Transfers -> Left side
  • 4. - Envelopes/T-Shirt Transfers -> Right side Category : Print Quality Issues Description : No ink ejection or streaks How to curl paper When using 4" x 6" or 5" x 7" sized paper, to prevent paper abrasion, curl the paper in advance.
  • 5. 1. Put a sheet of paper not used for printing on the paper's print side < 1 >. 2. Without touching the paper's print side, roll the paper and hold it in place for approximately 10 seconds. Note: If you touch the paper's print side, print quality may deteriorate. 3. Remove the paper not used for printing and confirm that the paper's print side < 1 > is curled within 2 to 5 mm (0.2 in). Memo: Set the curled paper sheet by sheet in the printer.
  • 6. Category : Print Quality Issues Description : No ink ejection or streaks Streaks or uneven printing on the trailing edge of the paper When printing a picture, streaks or uneven printing may appear on its trailing edge (inside the red frame). This problem is caused by printing outside the recommended print area, and may improve by using the combination below. - Media Type: Photo Paper Pro PR-101 - Print Quality: High or Fine (after clicking Custom) Ex. Streaks or uneven printing appears. (The printer in the illustration below shows the iP2200 model.)
  • 7. Category : Print Quality Issues Description : No ink ejection or streaks How to unclog print head nozzles (Windows) If print results are faint or streaks are printed, the print head nozzles may be clogged. Those phenomena can be improved by performing print head cleaning (Cleaning) or print head deep cleaning (Deep Cleaning). Also, you can check the cleaning results by printing the Nozzle Check Pattern after the cleaning of the print head nozzles. <Procedures> To check and improve the condition in which the print head nozzles are clogged, follow the instructions below.
  • 8. (Memo) If missing lines still appear on the Nozzle Check Pattern printing even after Deep Cleaning, ink cartridges may be defective. Cleaning, Deep Cleaning, and Nozzle Check are performed through the Maintenance window. Do the following to open Maintenance. 1. First, open the Properties window. - For Windows XP Home Edition Click/Select "Start," "Control Panel," "Printers and Other Hardware," and "Printers and Faxes." - For Windows XP Professional Edition Click "Start" and "Printers and Faxes." - For Windows 2000/Me/98 Click/Select "Start," and "Settings," then "Printers." 2. Select the Maintenance tab.
  • 9. *Display varies according to the printer model. <How to print the Nozzle Check Pattern> 1. In the Maintenance window, click Nozzle Check. 2. When the Nozzle Check window is displayed, move the paper thickness lever to the left, and load a sheet of A4 or letter size paper in the auto sheet feeder. Then, click Print Check Pattern, and printing will start. (Memo) When clicking Initial Check Items, the confirming items before performing the nozzle check pattern printing will be displayed. 3. When the confirming message is displayed, click OK.
  • 10. Do not perform any other operations until printing is completed. 4. Check the printed nozzle check pattern. *Display varies according to the printer model. (Memo) When printing from the printer which can print without an optional black ink cartridge, the BK pattern in the above will not be printed. The BK pattern will not be displayed in the window either. [When the output is normal] Black ink: The grid pattern is regular without missing lines. Color ink: White streaks are not visible in the pattern. [When the output is not normal] If the following cases can be seen, perform the cleaning of the print head nozzles.
  • 11. <Case A> No color is printed. (Nothing appears on the output.) <Case B> There is any color which is not printed at all. (In the diagram below, black ink is not printed at all.) <Case C> There are missing lines partially in the pattern for the black ink. <Case D> There are white streaks in one of the color ink patterns. <How to perform Cleaning> 1. In the Maintenance window, click Cleaning. 2. The cleaning of the print head nozzles starts. 3. When the confirming message is displayed, check the contents, and click OK. Although the Nozzle Check window is displayed, do not perform any other operations until Cleaning is completed.
  • 12. (Memo) - During Cleaning, the Power lamp blinks green. - Cleaning consumes a certain amount of ink. Note that if performing Cleaning often, ink will be consumed quickly. 4. When Cleaning is completed, the Power lamp will stay green. 5. To print the nozzle check pattern, do the following. Move the paper thickness lever to the left, and load a sheet of A4 or letter size paper in the auto sheet feeder. 6. In the Nozzle Check window, click Initial Check Items. (Memo) When clicking Initial Check Items, the confirming items before performing the nozzle check pattern printing will be displayed. 7. When the confirming message is displayed, click OK. Printing starts. Do not perform any other operations until printing is completed. 8. When the nozzle check pattern is printed, refer to procedure 4 <How to print the Nozzle Check Pattern> to check whether print head nozzles are clogged. <How to perform Deep Cleaning> 1. In the Maintenance window, click Deep Cleaning. 2. When the Deep Cleaning window is displayed, check the contents, and click Execute. (Note) Cleaning consumes a certain amount of ink. Note that if performing Cleaning often, ink will be consumed quickly. Furthermore, Deep Cleaning consumes much more ink than Cleaning; execute Deep Cleaning only if the nozzle condition does not improve even after Cleaning.
  • 13. (Memo) When printing a Nozzle Check pattern from a printer which does not use a black ink cartridge, the Black pattern will not print on the paper and the BK pattern will not appear in the Pattern Check window. 3. When the confirmation window is displayed, click OK. 4. When the confirming message is displayed, check the contents, and click OK. Do not perform any other operations until cleaning is completed. (Memo) During Deep Cleaning, the Power lamp blinks green. 5. When Deep Cleaning is completed, the Power lamp will stay green.