SlideShare une entreprise Scribd logo
1  sur  20
Télécharger pour lire hors ligne
RNS-510 Installation for Jetta/Golf MKV and 2010's VW Coding update.

Tools Required:


     Precision straight screwdriver. 1.4MM worked for me.
     Small straight screwdriver.
     T15 driver.
     18 inch flat ruler or other straight, flat object. (For fishing the satellite antenna wire..)
     Microfiber cloth.

Items required:

     RNS-510 head unit for the proper region (US unit, EU unit, etc..)
     Antenna Adaptor - Part no 7L6 051 551 - Currently $31.13 from Impex (Interesting Fact: 7L6 parts
     are for the Touraeg..)
     GPS Antenna. (Not shown in this picture.)

Head Unit Removal:

Note that in this procedure I will show a few pictures of a screwdriver being used directly on the plastic.
Depending on how anal you are, how careful you are, and your level of concern for your interior trim
you might want to wrap the end of the screwdriver in the microfiber towel to avoid damaging the trim. I
did, I removed it in most cases for picture clarity. Sometimes it's easier to not use the towel, however
you do run the risk of scratching your trim.

IMPORTANT STEP: Turn your Climatic air output to the defrost setting. This will close off the
vent that goes down into the AC system. This will lessen the likelyhood of tools and parts
dropping into the abyss.
You will find out why later on in this How-To

You may want to disconnect your battery before performing any of the following steps for an added level of
safety.

Legaleese: The author of this How-To nor TDIClub assumes any responsibility for the content of this post,
the accuracy of the information provided herein, or any damage that may result as of the application of this
information. Have fun


1. Remove the above peice. In cars without Climatronic, this is a dummy peice. In cars WITH climatronic,
this is an infrared sensor - be mindful of the connector when removing.
2. Remove the torx screw here.


3. CAREFULLY pry up the screen here all around the edge. The trim peice surrounding the indirect venting
selector wheel will come off and makes this a little easier.
4. Pry up the vent assembely. Again, patience is the key here. It will come, and it will sound like plastic is
snapping. It's fine though.

5. Be sure the Climatic selector knob is on defrost.
6. Remove the two torx screws circled in red and use the screwdriver to carefully pry the trim away from
the three green marked points in the rear.
Pictures get a little few after here because the process is pretty easy to figure out from this point on.

I was panicing after a precision screwdriver managed to fly into the open vent, never to be seen again.
This is why I place emphasis on closing the vent.

7. Pull the top vent trim toward you a little until it raises about 1/4 inch from the top of the radio. Then
gently pull STRAIGHT UP from the radio until the two tabs separate from the lower portion of the dash.

8. At this point you can either simply move the vent piece to the side and set it on the top of the dash, or
you can remove the electrical connectors and completely remove it from the dash area. I just moved it to
the side and it was fine.

9. Remove the two torx screws made visible after the removal of the top vent piece.

10. Carefully use your screwdriver to remove the trim surrounding the lower portion of the radio and the
climate control knobs. Mine didn’t require much force at all and I was able to remove by hand without using
the screwdriver. YMMV.

11. Remove the four Torx screws from the corners of the radio.
Your old radio should pull right out now. Pull it out until you are limited by the length of the antenna wires
or the radio electrical harness.

12. Remove the antenna connectors from the radio.

13. Remove the electrical harness from the radio. The bottom of the connector has a lever - flip it 90
degrees and the connector will come right off.

Set your old radio aside. If your RNS came with a plastic protector over the face, this should fit your
Premium VII radio perfectly.

15. Install the antenna adaptor. Match the colors to each single antenna lead. You will be left with the
double antenna lead to plug into your RNS.
16. Install your GPS antenna. This is where I’m really sorry I have no better pictures. The antenna included
in my kit had a magnetic base and was about 1 inch square. Stick it to the support bar that goes across
the dash. It sides right in and fits perfectly. The location is circled in the above picture. Neatly coil the slack
to be placed behind the RNS. You can alternately mount the antenna wherever you wish, however make
sure it’s on something metallic for best operation.

GPS receiver circuts are very sensitive these days, and the antenna can be mounted below the dash
without having a significant effect on satellite reception. I get a fix on 9 satellites in this location.

17. If your car was equipped with the Aux In connector in the center console, you must do some pin
swapping on the BLUE connector in the electrical harness. These steps are covered here.
SKIP THIS STEP IF YOU OWN 2010 or newer VW with White Multifunction Display!!!!
The large black connector actually houses three smaller connectors. You will be removing the blue
connector from the black connector. Use a small screwdriver to push the clip down on the blue connector
and pull it from the black connector. One side of the blue connector is open so you can see the black
housing inside of it. On the side of the blue connector you can see a little spot to pry and the blue housing
will slide off of the black connector.
SKIP THIS STEP IF YOU OWN 2010 or newer VW with White Multifunction Display!!!!
In the above picture, you can see that the Aux wiring is a separate wire bundle from the rest of the car. It
contains a lime green wire, a gray wire, and a yellow wire. We will be moving the yellow and gray wires.

Using the smallest straight screwdriver you have (I used a 1.4mm driver), push down on the barb of the
gray wire and push it toward the rear of the connector. After you reach a ceratin point, you can then gently
pull the wire out from the connector.

If you look at the top of the black connector, you can see that each wire position is numbered, 1-6 on the
top and this continues on to the bottom from 7-12.

You will swap the gray wire to pin 7 and the yellow wire to pin 1.

Re-assemble the black connector into the blue connector and then re-assemble the blue connector into the
larger connector housing that connects to the radio.

18. Plug in your Sirius extension cable to the green connector on the back of the radio.

19. Plug in your GPS antenna connection to the blue connector on the back of the radio.

20. Carefully slide your RNS-510 into the dash opening, being mindful of the GPS and Satellite radio
antenna wires. Make sure they are neatly bundled behind the radio and do not bind on anything.

21. At this point, you can turn your car on and test the functionality of your RNS unit. Note that it takes up
a little bit

22. Replace the 4 torx screws that hold the head unit in, and re-assemble the dash. Just reverse the steps
above. Note that all the screws used in this procedure are the same size and interchangeable.

The RNS unit is now installed, and will probably work, however you will need to perform the following steps
to ensure that no trouble codes are stored and the RNS is configured properly.
Disconnect the Satellite Receiver and Position Sensing (Compass) Module in the trunk


Above picture courtesy: TurbineSuburban.

1. Disconnect the two cables from the Sirius receiver in the trunk. This Sirius receiver is now unused in your
car. I tucked the cables neatly into the gray liner so they don’t rattle.
This picture shows where the compass module resides. It's mounted on the metal that is under the cloth hat
shelf in a Jetta. In the JSW and Golf/Rabbit/GTI it's mounted above the headliner.

2. Press the clip, push up on the module and spin the module 90 degrees so you can access the connector.
Unclip it and secure the connector so it does not rattle. Rotate the position sensing module back to its original
position so the tab locks and the module is secure.

The RNS -510 will provide compass information to the instrument cluster using information received via the
satellite. Having the legacy position sensor and the RNS plugged in has been found to cause a lot of excess
traffic on the CAN bus.

VCDS Programming

Hopefully if you plan on going 100% on this project, you either have or have access to a VCDS with the
proper interface for CAN bus based cars. If not, consult the VAG-Tool locator. The link is available on TDIClub
and is also available via a Google search.
Recode the CAN gateway for installed options
1. Select module 19 – CAN Gateway


2. Select “Coding -07”

3. Write down / copy your existing long coding.


4. Go through the long coding. You will uncheck the boxes next to “Digital Radio” and “Position Sensing.”
Place a check mark in the box next to “Navigation” Exit long coding.
5. Click “Do It” to save your new long coding.
Code your Navi Unit

The RNS-510 now will answer to either address word “ 37 – Navigation” or “56 – Radio.” Both are the same
module and coding only needs to be performed on one of these. It does not matter which module you
select here.

1. Select module 37 - Navigation


2. Select Coding - 07

3. Code your unit similar to the following screenshots:
The coding options are pretty self explanitory. Any reference to "Sound System" indicates that you have an
amplifier under the drivers seat. Some '09 TDI loyal edition owners are reporting they have this as do some
earlier model MKVs, so you should code your unit accordingly. Most cars can code just like this and be
good. Bit # 7 Needs to be checked if you have 2010+ Volkswagen with White Mulitfunction Display such as
2010 Jetta Sportswagen or 2011 GTI MKVI. For all Red Multifunction Displays keep this bit unchecked.
Note that on the last page of coding options, there's a Display Variant. This allows you to select one of
three different "skins" that the RNS has programmed in. The premium I believe is what comes on stock '09
Jetta TDIs with RNS-510. I perfer the highline. The sportline has some bright colors if you're into that kind
of thing. Try them all.


4. Before you click "Do It!" you need to enter in a workshop, importer, and equipment code here or your
unit will store a fault code that it is not coded correctly. I made up numbers, however you may do as you
wish. Just don't leave everything at all zeroes. Once these are coded ,it appears they are not changable for
some reason.
Whenever you change coding on the RNS, you need to perform a reset of the unit for those changes to
take effect. Hold the day/night, left, and right buttons that are adjacent to the DVD slot. The RNS will
power off and then on again.
Bluetooth Module Coding

If your car came equipped with the 9W3 factory Bluetooth module, you can enable the advanced
functionality of this module with your RNS. On supported phones, it will download the phone book, missed
calls, recent calls, and dialed calls list and display this information on the RNS. You will also receive caller
ID information on the RNS.

This coding procedure is known to work on BT modules 1Z0 035 729 A and 1Z0 035 729 D. Modules with
the same part number ending in B and C may also work with this coding. If you have the Volk-L, you
cannot get this to give you the advanced functionality on the RNS-510. It is simply not supported,
however you MAY be able to enable Bluetooth audio to the
RNS-510 if you have the Volk-L module.

Some older production North American RNS-510 modules do not have a “Phone” button, but have a “Mute”
button instead. It is my understanding that this will work as the phone button, so don’t panic if your RNS
says “Mute” as the fourth button down on the left side.
1. Select 77 - Telephone


2. Code your module as shown above

My car came coded as: 0000377
I had the Premium VII head unit and MFSW.
The new coding to enable the menus on the RNS is : 0010477


3. Click "Do It!"

You will need to reset the RNS-510 for this change to be recognized by the nav unit.

At this point, you're pretty much done. You can run an auto-scan / clear all DTCs with VCDS and should
come up with no faults regarding navi, radio, digital radio, or position sensing. You may have a fault for
"Tuner not enabled / activated" if you haven't activated your Sirius tuner inside the RNS. Keep in mind that
you will need to contact Sirius and give them your new Sirius ID for your RNS-510. The RNS-510 has two
Sirius IDs, one for Audio and one for Traffic. The traffic info is about $3 a month I belive. It's well worth it.
It's been fairly accurate around Chicago and the RNS will figure traffic delays into navigatoin time to
destination. You can get your IDs by turning to channel 0 on Sirius, or it's in the Setup menu.

Be sure to press Setup on the unit and go through the menus and set your preferences, especially enabling
HD radio. You also need to enable Aux-In in the setup menu as well if you have it.

Contenu connexe

Similaire à RNS-510 Installation for Jetta/Golf MKV and 2010's VW Coding update

2009 2010 2011 vw passat b6 radio removal guide
2009 2010 2011 vw passat b6 radio removal guide2009 2010 2011 vw passat b6 radio removal guide
2009 2010 2011 vw passat b6 radio removal guidekellyseicane
 
How to remove a volkswagen golf radio
How to remove a volkswagen golf radioHow to remove a volkswagen golf radio
How to remove a volkswagen golf radiokellyseicane
 
Dynaudio passa 3c build
Dynaudio passa 3c buildDynaudio passa 3c build
Dynaudio passa 3c buildbrunofpguerra
 
How To Install A Car Amplifier
How To Install A Car AmplifierHow To Install A Car Amplifier
How To Install A Car AmplifierTim Miller
 
Rns 510 vw t iguan installation guide
Rns 510 vw t iguan installation guideRns 510 vw t iguan installation guide
Rns 510 vw t iguan installation guidebrunofpguerra
 
Digital Watchdog DWC-V4363DB User Manual
Digital Watchdog DWC-V4363DB User ManualDigital Watchdog DWC-V4363DB User Manual
Digital Watchdog DWC-V4363DB User ManualJMAC Supply
 
Digital Watchdog DWC-V4363TIRB User Manual
Digital Watchdog DWC-V4363TIRB User ManualDigital Watchdog DWC-V4363TIRB User Manual
Digital Watchdog DWC-V4363TIRB User ManualJMAC Supply
 
Instruction Manual | C-More Tactical Railway Red Dot Sights | Optics Trade
Instruction Manual | C-More Tactical Railway Red Dot Sights | Optics TradeInstruction Manual | C-More Tactical Railway Red Dot Sights | Optics Trade
Instruction Manual | C-More Tactical Railway Red Dot Sights | Optics TradeOptics-Trade
 
Connecting a switch battery disconnect
Connecting a switch battery disconnect Connecting a switch battery disconnect
Connecting a switch battery disconnect extreme shark facts
 
Connecting a switch battery disconnect
Connecting a switch battery disconnect Connecting a switch battery disconnect
Connecting a switch battery disconnect extreme shark facts
 
Vnx.su бронко 2-ф-серия_часть2
Vnx.su бронко 2-ф-серия_часть2Vnx.su бронко 2-ф-серия_часть2
Vnx.su бронко 2-ф-серия_часть27gsxr
 
Sensative Door Window Sensor Strip Z-Wave Plus User Manual
Sensative Door Window Sensor Strip Z-Wave Plus User ManualSensative Door Window Sensor Strip Z-Wave Plus User Manual
Sensative Door Window Sensor Strip Z-Wave Plus User ManualDomotica daVinci
 
Insructables fm listening bug
Insructables   fm listening bugInsructables   fm listening bug
Insructables fm listening bugzubeditufail
 

Similaire à RNS-510 Installation for Jetta/Golf MKV and 2010's VW Coding update (20)

2009 2010 2011 vw passat b6 radio removal guide
2009 2010 2011 vw passat b6 radio removal guide2009 2010 2011 vw passat b6 radio removal guide
2009 2010 2011 vw passat b6 radio removal guide
 
How to remove a volkswagen golf radio
How to remove a volkswagen golf radioHow to remove a volkswagen golf radio
How to remove a volkswagen golf radio
 
1
11
1
 
Dynaudio passa 3c build
Dynaudio passa 3c buildDynaudio passa 3c build
Dynaudio passa 3c build
 
How To Install A Car Amplifier
How To Install A Car AmplifierHow To Install A Car Amplifier
How To Install A Car Amplifier
 
Tesla Model X Rear Lighted T Installation Guide
Tesla Model X Rear Lighted T Installation GuideTesla Model X Rear Lighted T Installation Guide
Tesla Model X Rear Lighted T Installation Guide
 
Doc 1010
Doc 1010Doc 1010
Doc 1010
 
BlackVue Dash Cam Installation
BlackVue Dash Cam InstallationBlackVue Dash Cam Installation
BlackVue Dash Cam Installation
 
Rns 510 vw t iguan installation guide
Rns 510 vw t iguan installation guideRns 510 vw t iguan installation guide
Rns 510 vw t iguan installation guide
 
Tk116 user mannual min gsp vehicle tracker
Tk116 user mannual min gsp vehicle trackerTk116 user mannual min gsp vehicle tracker
Tk116 user mannual min gsp vehicle tracker
 
Digital Watchdog DWC-V4363DB User Manual
Digital Watchdog DWC-V4363DB User ManualDigital Watchdog DWC-V4363DB User Manual
Digital Watchdog DWC-V4363DB User Manual
 
Digital Watchdog DWC-V4363TIRB User Manual
Digital Watchdog DWC-V4363TIRB User ManualDigital Watchdog DWC-V4363TIRB User Manual
Digital Watchdog DWC-V4363TIRB User Manual
 
Instruction Manual | C-More Tactical Railway Red Dot Sights | Optics Trade
Instruction Manual | C-More Tactical Railway Red Dot Sights | Optics TradeInstruction Manual | C-More Tactical Railway Red Dot Sights | Optics Trade
Instruction Manual | C-More Tactical Railway Red Dot Sights | Optics Trade
 
TK119 Waterproof GPS Vehicle Tracker
TK119 Waterproof GPS Vehicle TrackerTK119 Waterproof GPS Vehicle Tracker
TK119 Waterproof GPS Vehicle Tracker
 
Connecting a switch battery disconnect
Connecting a switch battery disconnect Connecting a switch battery disconnect
Connecting a switch battery disconnect
 
Connecting a switch battery disconnect
Connecting a switch battery disconnect Connecting a switch battery disconnect
Connecting a switch battery disconnect
 
Dtmf robot
Dtmf robotDtmf robot
Dtmf robot
 
Vnx.su бронко 2-ф-серия_часть2
Vnx.su бронко 2-ф-серия_часть2Vnx.su бронко 2-ф-серия_часть2
Vnx.su бронко 2-ф-серия_часть2
 
Sensative Door Window Sensor Strip Z-Wave Plus User Manual
Sensative Door Window Sensor Strip Z-Wave Plus User ManualSensative Door Window Sensor Strip Z-Wave Plus User Manual
Sensative Door Window Sensor Strip Z-Wave Plus User Manual
 
Insructables fm listening bug
Insructables   fm listening bugInsructables   fm listening bug
Insructables fm listening bug
 

Dernier

Youth Involvement in an Innovative Coconut Value Chain by Mwalimu Menza
Youth Involvement in an Innovative Coconut Value Chain by Mwalimu MenzaYouth Involvement in an Innovative Coconut Value Chain by Mwalimu Menza
Youth Involvement in an Innovative Coconut Value Chain by Mwalimu Menzaictsugar
 
Pitch Deck Teardown: Geodesic.Life's $500k Pre-seed deck
Pitch Deck Teardown: Geodesic.Life's $500k Pre-seed deckPitch Deck Teardown: Geodesic.Life's $500k Pre-seed deck
Pitch Deck Teardown: Geodesic.Life's $500k Pre-seed deckHajeJanKamps
 
8447779800, Low rate Call girls in Shivaji Enclave Delhi NCR
8447779800, Low rate Call girls in Shivaji Enclave Delhi NCR8447779800, Low rate Call girls in Shivaji Enclave Delhi NCR
8447779800, Low rate Call girls in Shivaji Enclave Delhi NCRashishs7044
 
Islamabad Escorts | Call 03070433345 | Escort Service in Islamabad
Islamabad Escorts | Call 03070433345 | Escort Service in IslamabadIslamabad Escorts | Call 03070433345 | Escort Service in Islamabad
Islamabad Escorts | Call 03070433345 | Escort Service in IslamabadAyesha Khan
 
8447779800, Low rate Call girls in Saket Delhi NCR
8447779800, Low rate Call girls in Saket Delhi NCR8447779800, Low rate Call girls in Saket Delhi NCR
8447779800, Low rate Call girls in Saket Delhi NCRashishs7044
 
Call Girls in DELHI Cantt, ( Call Me )-8377877756-Female Escort- In Delhi / Ncr
Call Girls in DELHI Cantt, ( Call Me )-8377877756-Female Escort- In Delhi / NcrCall Girls in DELHI Cantt, ( Call Me )-8377877756-Female Escort- In Delhi / Ncr
Call Girls in DELHI Cantt, ( Call Me )-8377877756-Female Escort- In Delhi / Ncrdollysharma2066
 
IoT Insurance Observatory: summary 2024
IoT Insurance Observatory:  summary 2024IoT Insurance Observatory:  summary 2024
IoT Insurance Observatory: summary 2024Matteo Carbone
 
Cybersecurity Awareness Training Presentation v2024.03
Cybersecurity Awareness Training Presentation v2024.03Cybersecurity Awareness Training Presentation v2024.03
Cybersecurity Awareness Training Presentation v2024.03DallasHaselhorst
 
Annual General Meeting Presentation Slides
Annual General Meeting Presentation SlidesAnnual General Meeting Presentation Slides
Annual General Meeting Presentation SlidesKeppelCorporation
 
Independent Call Girls Andheri Nightlaila 9967584737
Independent Call Girls Andheri Nightlaila 9967584737Independent Call Girls Andheri Nightlaila 9967584737
Independent Call Girls Andheri Nightlaila 9967584737Riya Pathan
 
Marketplace and Quality Assurance Presentation - Vincent Chirchir
Marketplace and Quality Assurance Presentation - Vincent ChirchirMarketplace and Quality Assurance Presentation - Vincent Chirchir
Marketplace and Quality Assurance Presentation - Vincent Chirchirictsugar
 
Kenya Coconut Production Presentation by Dr. Lalith Perera
Kenya Coconut Production Presentation by Dr. Lalith PereraKenya Coconut Production Presentation by Dr. Lalith Perera
Kenya Coconut Production Presentation by Dr. Lalith Pereraictsugar
 
8447779800, Low rate Call girls in Kotla Mubarakpur Delhi NCR
8447779800, Low rate Call girls in Kotla Mubarakpur Delhi NCR8447779800, Low rate Call girls in Kotla Mubarakpur Delhi NCR
8447779800, Low rate Call girls in Kotla Mubarakpur Delhi NCRashishs7044
 
PSCC - Capability Statement Presentation
PSCC - Capability Statement PresentationPSCC - Capability Statement Presentation
PSCC - Capability Statement PresentationAnamaria Contreras
 
APRIL2024_UKRAINE_xml_0000000000000 .pdf
APRIL2024_UKRAINE_xml_0000000000000 .pdfAPRIL2024_UKRAINE_xml_0000000000000 .pdf
APRIL2024_UKRAINE_xml_0000000000000 .pdfRbc Rbcua
 
Organizational Structure Running A Successful Business
Organizational Structure Running A Successful BusinessOrganizational Structure Running A Successful Business
Organizational Structure Running A Successful BusinessSeta Wicaksana
 
8447779800, Low rate Call girls in Uttam Nagar Delhi NCR
8447779800, Low rate Call girls in Uttam Nagar Delhi NCR8447779800, Low rate Call girls in Uttam Nagar Delhi NCR
8447779800, Low rate Call girls in Uttam Nagar Delhi NCRashishs7044
 
Innovation Conference 5th March 2024.pdf
Innovation Conference 5th March 2024.pdfInnovation Conference 5th March 2024.pdf
Innovation Conference 5th March 2024.pdfrichard876048
 

Dernier (20)

Youth Involvement in an Innovative Coconut Value Chain by Mwalimu Menza
Youth Involvement in an Innovative Coconut Value Chain by Mwalimu MenzaYouth Involvement in an Innovative Coconut Value Chain by Mwalimu Menza
Youth Involvement in an Innovative Coconut Value Chain by Mwalimu Menza
 
Pitch Deck Teardown: Geodesic.Life's $500k Pre-seed deck
Pitch Deck Teardown: Geodesic.Life's $500k Pre-seed deckPitch Deck Teardown: Geodesic.Life's $500k Pre-seed deck
Pitch Deck Teardown: Geodesic.Life's $500k Pre-seed deck
 
8447779800, Low rate Call girls in Shivaji Enclave Delhi NCR
8447779800, Low rate Call girls in Shivaji Enclave Delhi NCR8447779800, Low rate Call girls in Shivaji Enclave Delhi NCR
8447779800, Low rate Call girls in Shivaji Enclave Delhi NCR
 
Islamabad Escorts | Call 03070433345 | Escort Service in Islamabad
Islamabad Escorts | Call 03070433345 | Escort Service in IslamabadIslamabad Escorts | Call 03070433345 | Escort Service in Islamabad
Islamabad Escorts | Call 03070433345 | Escort Service in Islamabad
 
8447779800, Low rate Call girls in Saket Delhi NCR
8447779800, Low rate Call girls in Saket Delhi NCR8447779800, Low rate Call girls in Saket Delhi NCR
8447779800, Low rate Call girls in Saket Delhi NCR
 
Call Girls in DELHI Cantt, ( Call Me )-8377877756-Female Escort- In Delhi / Ncr
Call Girls in DELHI Cantt, ( Call Me )-8377877756-Female Escort- In Delhi / NcrCall Girls in DELHI Cantt, ( Call Me )-8377877756-Female Escort- In Delhi / Ncr
Call Girls in DELHI Cantt, ( Call Me )-8377877756-Female Escort- In Delhi / Ncr
 
IoT Insurance Observatory: summary 2024
IoT Insurance Observatory:  summary 2024IoT Insurance Observatory:  summary 2024
IoT Insurance Observatory: summary 2024
 
Cybersecurity Awareness Training Presentation v2024.03
Cybersecurity Awareness Training Presentation v2024.03Cybersecurity Awareness Training Presentation v2024.03
Cybersecurity Awareness Training Presentation v2024.03
 
Annual General Meeting Presentation Slides
Annual General Meeting Presentation SlidesAnnual General Meeting Presentation Slides
Annual General Meeting Presentation Slides
 
Call Us ➥9319373153▻Call Girls In North Goa
Call Us ➥9319373153▻Call Girls In North GoaCall Us ➥9319373153▻Call Girls In North Goa
Call Us ➥9319373153▻Call Girls In North Goa
 
Independent Call Girls Andheri Nightlaila 9967584737
Independent Call Girls Andheri Nightlaila 9967584737Independent Call Girls Andheri Nightlaila 9967584737
Independent Call Girls Andheri Nightlaila 9967584737
 
Marketplace and Quality Assurance Presentation - Vincent Chirchir
Marketplace and Quality Assurance Presentation - Vincent ChirchirMarketplace and Quality Assurance Presentation - Vincent Chirchir
Marketplace and Quality Assurance Presentation - Vincent Chirchir
 
Kenya Coconut Production Presentation by Dr. Lalith Perera
Kenya Coconut Production Presentation by Dr. Lalith PereraKenya Coconut Production Presentation by Dr. Lalith Perera
Kenya Coconut Production Presentation by Dr. Lalith Perera
 
8447779800, Low rate Call girls in Kotla Mubarakpur Delhi NCR
8447779800, Low rate Call girls in Kotla Mubarakpur Delhi NCR8447779800, Low rate Call girls in Kotla Mubarakpur Delhi NCR
8447779800, Low rate Call girls in Kotla Mubarakpur Delhi NCR
 
PSCC - Capability Statement Presentation
PSCC - Capability Statement PresentationPSCC - Capability Statement Presentation
PSCC - Capability Statement Presentation
 
APRIL2024_UKRAINE_xml_0000000000000 .pdf
APRIL2024_UKRAINE_xml_0000000000000 .pdfAPRIL2024_UKRAINE_xml_0000000000000 .pdf
APRIL2024_UKRAINE_xml_0000000000000 .pdf
 
Corporate Profile 47Billion Information Technology
Corporate Profile 47Billion Information TechnologyCorporate Profile 47Billion Information Technology
Corporate Profile 47Billion Information Technology
 
Organizational Structure Running A Successful Business
Organizational Structure Running A Successful BusinessOrganizational Structure Running A Successful Business
Organizational Structure Running A Successful Business
 
8447779800, Low rate Call girls in Uttam Nagar Delhi NCR
8447779800, Low rate Call girls in Uttam Nagar Delhi NCR8447779800, Low rate Call girls in Uttam Nagar Delhi NCR
8447779800, Low rate Call girls in Uttam Nagar Delhi NCR
 
Innovation Conference 5th March 2024.pdf
Innovation Conference 5th March 2024.pdfInnovation Conference 5th March 2024.pdf
Innovation Conference 5th March 2024.pdf
 

RNS-510 Installation for Jetta/Golf MKV and 2010's VW Coding update

  • 1. RNS-510 Installation for Jetta/Golf MKV and 2010's VW Coding update.
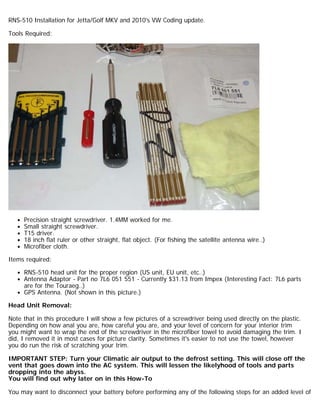
 Tools Required: Precision straight screwdriver. 1.4MM worked for me. Small straight screwdriver. T15 driver. 18 inch flat ruler or other straight, flat object. (For fishing the satellite antenna wire..) Microfiber cloth. Items required: RNS-510 head unit for the proper region (US unit, EU unit, etc..) Antenna Adaptor - Part no 7L6 051 551 - Currently $31.13 from Impex (Interesting Fact: 7L6 parts are for the Touraeg..) GPS Antenna. (Not shown in this picture.) Head Unit Removal: Note that in this procedure I will show a few pictures of a screwdriver being used directly on the plastic. Depending on how anal you are, how careful you are, and your level of concern for your interior trim you might want to wrap the end of the screwdriver in the microfiber towel to avoid damaging the trim. I did, I removed it in most cases for picture clarity. Sometimes it's easier to not use the towel, however you do run the risk of scratching your trim. IMPORTANT STEP: Turn your Climatic air output to the defrost setting. This will close off the vent that goes down into the AC system. This will lessen the likelyhood of tools and parts dropping into the abyss. You will find out why later on in this How-To You may want to disconnect your battery before performing any of the following steps for an added level of
  • 2. safety. Legaleese: The author of this How-To nor TDIClub assumes any responsibility for the content of this post, the accuracy of the information provided herein, or any damage that may result as of the application of this information. Have fun 1. Remove the above peice. In cars without Climatronic, this is a dummy peice. In cars WITH climatronic, this is an infrared sensor - be mindful of the connector when removing.
  • 3. 2. Remove the torx screw here. 3. CAREFULLY pry up the screen here all around the edge. The trim peice surrounding the indirect venting selector wheel will come off and makes this a little easier.
  • 4. 4. Pry up the vent assembely. Again, patience is the key here. It will come, and it will sound like plastic is snapping. It's fine though. 5. Be sure the Climatic selector knob is on defrost.
  • 5. 6. Remove the two torx screws circled in red and use the screwdriver to carefully pry the trim away from the three green marked points in the rear. Pictures get a little few after here because the process is pretty easy to figure out from this point on. I was panicing after a precision screwdriver managed to fly into the open vent, never to be seen again. This is why I place emphasis on closing the vent. 7. Pull the top vent trim toward you a little until it raises about 1/4 inch from the top of the radio. Then gently pull STRAIGHT UP from the radio until the two tabs separate from the lower portion of the dash. 8. At this point you can either simply move the vent piece to the side and set it on the top of the dash, or you can remove the electrical connectors and completely remove it from the dash area. I just moved it to the side and it was fine. 9. Remove the two torx screws made visible after the removal of the top vent piece. 10. Carefully use your screwdriver to remove the trim surrounding the lower portion of the radio and the climate control knobs. Mine didn’t require much force at all and I was able to remove by hand without using the screwdriver. YMMV. 11. Remove the four Torx screws from the corners of the radio. Your old radio should pull right out now. Pull it out until you are limited by the length of the antenna wires or the radio electrical harness. 12. Remove the antenna connectors from the radio. 13. Remove the electrical harness from the radio. The bottom of the connector has a lever - flip it 90 degrees and the connector will come right off. Set your old radio aside. If your RNS came with a plastic protector over the face, this should fit your Premium VII radio perfectly. 15. Install the antenna adaptor. Match the colors to each single antenna lead. You will be left with the double antenna lead to plug into your RNS.
  • 6. 16. Install your GPS antenna. This is where I’m really sorry I have no better pictures. The antenna included in my kit had a magnetic base and was about 1 inch square. Stick it to the support bar that goes across the dash. It sides right in and fits perfectly. The location is circled in the above picture. Neatly coil the slack to be placed behind the RNS. You can alternately mount the antenna wherever you wish, however make sure it’s on something metallic for best operation. GPS receiver circuts are very sensitive these days, and the antenna can be mounted below the dash without having a significant effect on satellite reception. I get a fix on 9 satellites in this location. 17. If your car was equipped with the Aux In connector in the center console, you must do some pin swapping on the BLUE connector in the electrical harness. These steps are covered here.
  • 7. SKIP THIS STEP IF YOU OWN 2010 or newer VW with White Multifunction Display!!!! SKIP THIS STEP IF YOU OWN 2010 or newer VW with White Multifunction Display!!!! The large black connector actually houses three smaller connectors. You will be removing the blue connector from the black connector. Use a small screwdriver to push the clip down on the blue connector and pull it from the black connector. One side of the blue connector is open so you can see the black housing inside of it. On the side of the blue connector you can see a little spot to pry and the blue housing will slide off of the black connector. SKIP THIS STEP IF YOU OWN 2010 or newer VW with White Multifunction Display!!!! In the above picture, you can see that the Aux wiring is a separate wire bundle from the rest of the car. It contains a lime green wire, a gray wire, and a yellow wire. We will be moving the yellow and gray wires. Using the smallest straight screwdriver you have (I used a 1.4mm driver), push down on the barb of the gray wire and push it toward the rear of the connector. After you reach a ceratin point, you can then gently pull the wire out from the connector. If you look at the top of the black connector, you can see that each wire position is numbered, 1-6 on the top and this continues on to the bottom from 7-12. You will swap the gray wire to pin 7 and the yellow wire to pin 1. Re-assemble the black connector into the blue connector and then re-assemble the blue connector into the larger connector housing that connects to the radio. 18. Plug in your Sirius extension cable to the green connector on the back of the radio. 19. Plug in your GPS antenna connection to the blue connector on the back of the radio. 20. Carefully slide your RNS-510 into the dash opening, being mindful of the GPS and Satellite radio antenna wires. Make sure they are neatly bundled behind the radio and do not bind on anything. 21. At this point, you can turn your car on and test the functionality of your RNS unit. Note that it takes up
  • 8. a little bit 22. Replace the 4 torx screws that hold the head unit in, and re-assemble the dash. Just reverse the steps above. Note that all the screws used in this procedure are the same size and interchangeable. The RNS unit is now installed, and will probably work, however you will need to perform the following steps to ensure that no trouble codes are stored and the RNS is configured properly.
  • 9. Disconnect the Satellite Receiver and Position Sensing (Compass) Module in the trunk Above picture courtesy: TurbineSuburban. 1. Disconnect the two cables from the Sirius receiver in the trunk. This Sirius receiver is now unused in your car. I tucked the cables neatly into the gray liner so they don’t rattle.
  • 10. This picture shows where the compass module resides. It's mounted on the metal that is under the cloth hat shelf in a Jetta. In the JSW and Golf/Rabbit/GTI it's mounted above the headliner. 2. Press the clip, push up on the module and spin the module 90 degrees so you can access the connector. Unclip it and secure the connector so it does not rattle. Rotate the position sensing module back to its original position so the tab locks and the module is secure. The RNS -510 will provide compass information to the instrument cluster using information received via the satellite. Having the legacy position sensor and the RNS plugged in has been found to cause a lot of excess traffic on the CAN bus. VCDS Programming Hopefully if you plan on going 100% on this project, you either have or have access to a VCDS with the proper interface for CAN bus based cars. If not, consult the VAG-Tool locator. The link is available on TDIClub and is also available via a Google search. Recode the CAN gateway for installed options
  • 11. 1. Select module 19 – CAN Gateway 2. Select “Coding -07” 3. Write down / copy your existing long coding. 4. Go through the long coding. You will uncheck the boxes next to “Digital Radio” and “Position Sensing.” Place a check mark in the box next to “Navigation” Exit long coding.
  • 12. 5. Click “Do It” to save your new long coding.
  • 13. Code your Navi Unit The RNS-510 now will answer to either address word “ 37 – Navigation” or “56 – Radio.” Both are the same module and coding only needs to be performed on one of these. It does not matter which module you select here. 1. Select module 37 - Navigation 2. Select Coding - 07 3. Code your unit similar to the following screenshots:
  • 14.
  • 15.
  • 16. The coding options are pretty self explanitory. Any reference to "Sound System" indicates that you have an amplifier under the drivers seat. Some '09 TDI loyal edition owners are reporting they have this as do some earlier model MKVs, so you should code your unit accordingly. Most cars can code just like this and be good. Bit # 7 Needs to be checked if you have 2010+ Volkswagen with White Mulitfunction Display such as 2010 Jetta Sportswagen or 2011 GTI MKVI. For all Red Multifunction Displays keep this bit unchecked. Note that on the last page of coding options, there's a Display Variant. This allows you to select one of three different "skins" that the RNS has programmed in. The premium I believe is what comes on stock '09 Jetta TDIs with RNS-510. I perfer the highline. The sportline has some bright colors if you're into that kind of thing. Try them all. 4. Before you click "Do It!" you need to enter in a workshop, importer, and equipment code here or your unit will store a fault code that it is not coded correctly. I made up numbers, however you may do as you wish. Just don't leave everything at all zeroes. Once these are coded ,it appears they are not changable for some reason.
  • 17. Whenever you change coding on the RNS, you need to perform a reset of the unit for those changes to take effect. Hold the day/night, left, and right buttons that are adjacent to the DVD slot. The RNS will power off and then on again.
  • 18. Bluetooth Module Coding If your car came equipped with the 9W3 factory Bluetooth module, you can enable the advanced functionality of this module with your RNS. On supported phones, it will download the phone book, missed calls, recent calls, and dialed calls list and display this information on the RNS. You will also receive caller ID information on the RNS. This coding procedure is known to work on BT modules 1Z0 035 729 A and 1Z0 035 729 D. Modules with the same part number ending in B and C may also work with this coding. If you have the Volk-L, you cannot get this to give you the advanced functionality on the RNS-510. It is simply not supported, however you MAY be able to enable Bluetooth audio to the RNS-510 if you have the Volk-L module. Some older production North American RNS-510 modules do not have a “Phone” button, but have a “Mute” button instead. It is my understanding that this will work as the phone button, so don’t panic if your RNS says “Mute” as the fourth button down on the left side.
  • 19. 1. Select 77 - Telephone 2. Code your module as shown above My car came coded as: 0000377 I had the Premium VII head unit and MFSW.
  • 20. The new coding to enable the menus on the RNS is : 0010477 3. Click "Do It!" You will need to reset the RNS-510 for this change to be recognized by the nav unit. At this point, you're pretty much done. You can run an auto-scan / clear all DTCs with VCDS and should come up with no faults regarding navi, radio, digital radio, or position sensing. You may have a fault for "Tuner not enabled / activated" if you haven't activated your Sirius tuner inside the RNS. Keep in mind that you will need to contact Sirius and give them your new Sirius ID for your RNS-510. The RNS-510 has two Sirius IDs, one for Audio and one for Traffic. The traffic info is about $3 a month I belive. It's well worth it. It's been fairly accurate around Chicago and the RNS will figure traffic delays into navigatoin time to destination. You can get your IDs by turning to channel 0 on Sirius, or it's in the Setup menu. Be sure to press Setup on the unit and go through the menus and set your preferences, especially enabling HD radio. You also need to enable Aux-In in the setup menu as well if you have it.