
Recommended
Recommended
More Related Content
What's hot
What's hot (12)
Viewers also liked
Similar to Preparing to play the clarinet
Similar to Preparing to play the clarinet (17)
Recently uploaded
Recently uploaded (20)
Preparing to play the clarinet
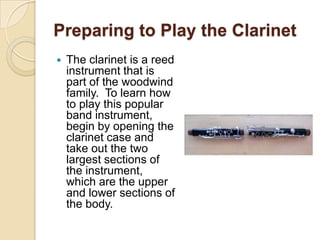
- 1. Preparing to Play the Clarinet The clarinet is a reed instrument that is part of the woodwind family. To learn how to play this popular band instrument, begin by opening the clarinet case and take out the two largest sections of the instrument, which are the upper and lower sections of the body.
- 2. Upper and lower sections of clarinet With the upper section of the body in your left hand and the lower section in your right hand, gently press the tone hole keys of the upper section. If the tone hole keys are not pressed while assembling this part of the instrument, the keys may become bent. The tone keys are the keys that are the circular open hole keys. Use a back and forth twisting motion to put these two sections of the body together. If the cork on any of the pieces of the instrument seems dry, you will need to apply some cork grease by massaging the grease into the cork.
- 3. Assembling the upper and lower sections of clarinet In order to align the two sections that you have just assembled, ensure that the bridge keys of the upper section fit into the small groove of the lower section.
- 4. Assembling bridge keys Next you will need to assemble the bell. With the body of the clarinet in your left hand and the bell in your right hand, gently twist on the bell, again using a back and forth motion.
- 5. Assembling the bell on to the body of the clarinet You are now ready to attach the barrel to the mouthpiece. Again, use a twisting motion to assemble these two sections.
- 6. Assembling the mouthpiece and barrel Attach the barrel and mouthpiece to the top of the instrument. Be sure that the hole in the mouthpiece is lined up with the register key on the back of the clarinet.
- 7. Attaching the mouthpiece and barrel to the body of the clarinet The last step in assembling the clarinet is attaching the reed to the mouthpiece.
- 8. A clarinet reed Before attempting this step, you will need to wet the reed by carefully placing the thin end of the reed in your mouth. Keep the reed in your mouth for a couple of minutes. Since reeds are extremely thin and fragile, be careful not to chip the end of the reed with your teeth.
- 9. Wetting the reed Loosen the screws of the metal ligature. Slide the ligature over the mouthpiece. . Ensure that the two screws of the ligature are to the right side of the clarinet, and are facing the back of the instrument.
- 10. Placing the ligature on the mouthpiece To secure the reed to the mouthpiece, carefu lly slide the reed under the ligature.
- 11. Positioning the reed under the ligature Place the flat side of the reed against the mouthpiece, centering the reed on the hole of the mouthpiece. Without touching the tip of the reed, move the reed down very slightly so that a hairline of the tip of the mouthpiece is not covered up by the reed. Be sure that the ligature is approximately half way down the reed, just past the “U” shaped part of the reed. Tighten the screws of the ligature to hold the reed in place however do not over tighten the ligature.
- 12. Reed placement on the clarinet mouthpiece After assembling the entire instrument, remove the mouthpiece and barrel in order to practice your embouchure (the position of your mouth). Stretch your bottom lip like you would if you were putting on Chap- stick. Part of the bottom lip should be covering your teeth.
- 13. Stretching the lip over the bottom teeth Keeping the chin flat put about half a centimeter of the reed and mouthpiece in your mouth, and set it on the flat part of your bottom lip. Place the teeth on top of the plastic part of the mouthpiece. Close your mouth around the mouthpiece so that it makes a seal and so that no air escapes. Be sure to maintain this same embouchure each time you take a breath.
- 14. Clarinet embouchure Place the mouthpiece and barrel back on the body of the instrument and you are ready to learn hand position and your first note on the clarinet.