
Recommandé
Contenu connexe
Tendances
Tendances (20)
En vedette
Similaire à Development Diary for Ancestors Trailer
Similaire à Development Diary for Ancestors Trailer (20)
Plus de charlottepage94
Plus de charlottepage94 (20)
Development Diary for Ancestors Trailer
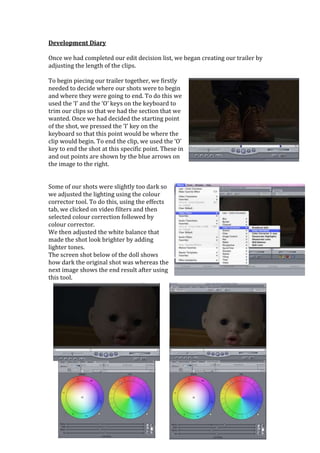
- 1. Development Diary Once we had completed our edit decision list, we began creating our trailer by adjusting the length of the clips. To begin piecing our trailer together, we firstly needed to decide where our shots were to begin and where they were going to end. To do this we used the ‘I’ and the ‘O’ keys on the keyboard to trim our clips so that we had the section that we wanted. Once we had decided the starting point of the shot, we pressed the ‘I’ key on the keyboard so that this point would be where the clip would begin. To end the clip, we used the ‘O’ key to end the shot at this specific point. These in and out points are shown by the blue arrows on the image to the right. Some of our shots were slightly too dark so we adjusted the lighting using the colour corrector tool. To do this, using the effects tab, we clicked on video filters and then selected colour correction followed by colour corrector. We then adjusted the white balance that made the shot look brighter by adding lighter tones. The screen shot below of the doll shows how dark the original shot was whereas the next image shows the end result after using this tool.
- 2. We also used this same technique to make the lighting brighter on other shots such as when the camera tracks across the photographs on the fireplace. When editing, we have tried to use different editing techniques, one of these being a match on action. For instance, the screen shots below shows how we have edited the character entering the house from the outside before the camera switches to the inside to show her entering.
- 3. Before we began to piece together our footage, we had downloaded some sounds using the Internet and Soundtrack Pro. We have used one of these sound effects for when the front door to put emphasis on the tense atmosphere. To do this we imported the sound using the file tab, and selecting the import icon to find our sound effect saved within our folders. To ensure that the sound effect was in time with the door shutting, we turned off the snap tool so that we could add the sound to the exact moment when the door closes. If the snap tool were on, the sound would begin at the end of the previous shot and so be out of time. To add text, we used the text icon that opened a box that could be added to the film timeline. Once we had typed what we wanted the text box to say, we edited the settings. Beginning with the font style, we have used the same styles throughout, not only in our trailer but the same as our ancillary tasks so that our house style is continuous across all platforms. We change the font style by selecting the control tab and choosing Buttons the Bear font which we downloaded online as this has a childlike feel which is relevant to our film. To add a horror feel to this text, we added a drop shadow using the motion tab which we then adjusted the offset, angle, colour and softness of the shadow.
- 4. To create the fast and tense atmosphere that is typically found in a horror trailer, we have cut some of our shots so that they appear quick. We did this by taking a clip and cutting it in various places using the razor blade tool. This sliced the clip so that it is played in sections. With the black space with have placed in between the clips we have cut with the razor blade tool, it appears to be flashing quickly when played which creates a tense and horror atmosphere. The music in our trailer has been found using Soundtrack Pro and the Internet, particularly YouTube. On Soundtrack Pro, we searched through the sound library to find sounds that we thought were ideal. When we had found something suitable, we saved this as a Wave file in our student folder so that it could be imported onto Final Cut Pro. With music found on YouTube, we have chosen songs that the owners have given permission for us to use in their description. Using an online video to MP3 converter, we then change the video to just sound and saved it with the same process that we did for the sounds from Soundtrack Pro.
- 5. We have used various techniques with the sounds including fading in and out. We did this using the pen tool on Final Cut Pro and drew points on the sound timeline to indicate where we wanted the music to fade in and where we needed the sound to fade out. To make the sound fade out, we dragged these points downwards to select the point when we wanted the music to fade and how long for. From the screen shot below, our fades are quite quick as the line has a sharp drop. For the title of our trailer, to keep the consistent house style across all three of our products, we have taken an image of the title from our final poster to use on our trailer. This will allow for consistency, and allow the title to become a brand identity for the products, as audiences will be able to recognize the brand easier. On Photoshop, we used the crop tool and saved the title as a separate image. We then used the importing process that we used to import sounds onto Final Cut Pro. We then added a dissolve to the title however this time we used a dissolve that was pre-set on Final Cut Pro. Previously, our clips were not long enough to use these video transitions and so this is why we used the pen tool to manually create a fade effect. To add this dissolve, we selected the effects tab, then video transitions and selected the fade in and fade out dissolve to do this.
- 6. On the final shot, we have added the final release date for the film that is in the same font style as the slogan previously featured so that our style is consistent. We have also added the production block and Production Company details which we have inserted as an image from our poster so that all details and style is the same. We have also included our website address and a hash tag which can be used on twitter as this is most likely to be popular amongst our target audience so not only advertises our film but raises awareness of our film’s release through social networking. Once our trailer was completed, we decided to change the look of the opening sequence, as we wanted this to appear old, as if from the past like a memory. To do this we selected the effects tab then chose the video filters option. Within this we were able to desaturate the colour using the image control option. This took away any colour to create a black and white look that we were pleased with as it reflects our plot of passing through generations before switching to the present day. The purpose of a trailer is to create mystery according to Barthe’s Enigma Code. This can be applied to our trailer, as there is an element of mystery surrounding whom the main protagonist is because her face is not seen until the tense ending of the trailer. There is an element of mystery surrounding the doll, as the consumers are not told it’s history and that this is the antagonist in the film. We have tried to also create an enigma with the text by having the slogan ‘Every family has their secrets’ which aims to get audiences thinking about what the secret is.