SlideShare une entreprise Scribd logo
1  sur  17
Tutorial: Photoshop Paths Explained
Learn the basics of vector paths in Photoshop, including line segments, anchor points, and
path components.

In this introductory tutorial, you'll learn about Photoshop's Paths feature. Paths are a
powerful tool and a big topic to cover. They're also quite tricky to get the hang of, but once
you do, you'll never look back!
Enjoy...
What are paths?
Paths are vector-based (line) drawings. This means that you can stretch and re-shape a path
and it will not lose detail. Compare this with a standard raster image such as a photograph,
which will become blocky when it's stretched, and will lose detail when it's reduced in size.
Paths are really useful. Once you've got the hang of using the Pen tool and the other path
tools, you can create really complex freehand shapes such as symbols, drawings and icons.
You can then turn these shapes into raster images at any resolution!
Paths are also great for selecting irregular objects. Because you can easily edit the shape of a
path after it's created, you can fine-tune it to exactly match an irregular border. Much better
than messing about with the lasso tools!
Photoshop comes with a range of cool shapes that you can create, using the Shape tool. These
shapes are also paths. However, once you learn how to use the path tools, you'll be able to
play with and modify these built-in shapes, as well as create your own shapes from scratch.
An example path
Here's a typical path in Photoshop. Don't be scared! :)


You'll see that the path is composed of a number of line segments and anchor points. Line
segments are the lines and curves that actually make up the path. Anchor points are movable
points at the ends of the line segments that let you adjust the position and shape of the lines.
Types of line segments
There are two types of line segments:
   1. Straight line segments. These are the easiest to draw and understand. You'll see that straight
       line segments do not have direction lines or direction points.
   2. Curved line segments. These are the tricky ones! The shape of each curve is controlled by the
       direction lines and direction points that you can see on the diagram above. More on these
       shortly.
Types of anchor points
Also, there are two types of anchor points:
   1. Smooth anchor points. When the curves on each side of an anchor point enter and leave the
       point at the same angle, you have a smooth anchor point. In other words, there is a smooth
       transition through the point from one curve to the next. You can see from the diagram that
       this type of point has two direction lines opposite each other (180 degrees apart).
   2. Corner anchor points. This type of point marks a sharp change of direction between one curve
       and the next. It is also used when connected to one or two straight lines. On the diagram,
       notice that the direction lines on the corner anchor points are not 180 degrees apart (or in the
       case of the straight line segments, that there are no direction lines at all).
About path components
Let's also take a quick look at path components. A path can consist of one or more path
components. Each component is a series of segments and anchor points. Furthermore, each
component is distinct and separate from all other components - that is, they don't join up.
Here's an example of a path with 3 distinct path components:


Note that path components don't have to be closed paths; they can have endpoints, like the
wavy line above. Note also that although the wavy line and triangle overlap each other, they
are not joined, so they are still separate path components.
Tutorial: Drawing with Photoshop's Pen Tool

Learn how to draw straight and curved vector paths using Photoshop's Pen and Freeform
Pen tools.

Now that you know the theory of Photoshop paths, it's time to explore Photoshop's Pen tool
and other related tools.
Most of the drawing and editing of paths can be done via the tools under the Pen tool icon in
the Tools palette. Click and hold the mouse button on this icon to bring up all the other tools:


Let's briefly go over these tools now, and what you can use them for.
   •   The Pen tool is probably the tool you'll use most. With this tool you can create the
       straight lines and curves that make up your paths.
   •   The Freeform Pen tool is designed to let you create paths quickly by just drawing
       freehand with the mouse. It's not very good for creating precise paths though.
   •   The Add Anchor Point tool allows you to insert additional anchor points into your
       path, effectively splitting a line segment into two. This is useful if, say, you've created
       a curve already but you want to turn the curve into a more complex shape. You can
       also add anchor points using the Pen Tool, provided you have the Auto Add/Delete
       option set - just move the mouse over the line segment you'd like to add a point to,
       and click!
   •   The Delete Anchor Point tool removes anchor points from your path. As it removes a
       point, it joins up the two line segments either side of the removed point into one long
       line segment. This is good if you've accidentally created too many segments (it's best
       to create as few as possible!) or if the Freeform Pen tool has created too many for
       you! You can also delete anchor points using the Pen tool if Auto Add/Delete is set -
       move the mouse over the point you'd like to delete, and click.
   •   The Convert Point tool allows you to convert a smooth anchor point to a corner
       anchor point, and vice-versa. More on this tool later!
Drawing straight lines
Let's start with the easiest technique. First create a new document of, say, 500 x 500 pixels
to give yourself plenty of space to work in. Then select the Pen tool in the Tools palette.
Now click with the mouse in your document. You'll see that you've placed your first anchor
point. Move the mouse and click again. You've now created your first line segment, with two
anchor points at each end. Congratulations! :)
Click in a few more places in your document. You'll see that each click adds a new anchor
point, and a new straight line segment.
So far, your path is an open path. This means it has a start point and an end point, and
doesn't join up. To make a closed path, move the mouse over the first point you created -
you'll see the Pen tool cursor changes, with a little 'o' appearing beside it:


Now click with the mouse, and you'll see that you have now created a complete shape - a
closed path. Well done!


Deleting your path
The path you just created is stored in a temporary path called the Work Path. Let's delete
this path so we can start again with a clean slate.
Click on the "Paths" tab in the Layers palette to bring up the list of available paths:


Now drag the "Work Path" to the trash can icon:


You're now ready to have a go at tackling curves!
Drawing curved lines
Learning to draw curves will take a bit longer, but they're not too hard once you get the hang
of them!
To start a curve, select the Pen tool, click in your document and drag the mouse in the rough
direction you want the curve to head - in this example, try dragging vertically up the page:


You'll see that as you drag, two direction lines and direction points are created. These control
the shape of the curve you're about to produce:
   •   The direction of the lines determines the direction in which the new curve will head.
   •   The length of the lines determines how much influence this anchor point will have over the
       curve. The longer the line, the more the curve will be "pulled" towards this line.
The best way to understand the direction lines is to just play around with them. We'll come
back to them in a moment!
Now try creating a new anchor point by clicking the mouse to the right of your original anchor
point, and dragging downwards:


You've now placed a second anchor point, and created a curve between the two points!
Notice that you dragged upwards from the first anchor point, and downwards from the
second. This follows the path of the curve - it goes up from the first point, and down as it
reaches the second.
What would happen if you dragged upwards from the second anchor point too? Try it! (You
may want to delete the Work Path and start again from scratch.)
This time, you can see that the curve moves upwards towards the second point, flipping
direction as it does so. So the curve will always try to head in the direction you drag!
Practice drawing a few curves like these, dragging in different directions, until you're
confident with the technique.


Note that when we're creating these curves we're always making smooth anchor points. In the
Editing paths in Photoshop tutorial, we show you how to create corner anchor points too (take
a look at the example path at the top of the Photoshop paths explained tutorial to see a
corner point).
Switching between curves and lines
Often you'll want to create a path that contains both straight lines and curved lines. It's easy
to switch between the two.
Start off drawing some straight lines by just clicking with the mouse:


To switch to drawing a curve, click and drag with the mouse where you want the curve to
end:


To switch back to drawing a straight line, create the anchor point of your last curve by
clicking rather than clicking and dragging (in other words, make a corner point). Then click
with the mouse where you would like the straight line to end:
Continuing paths
If you've previously left an incomplete path and you come back to it later, you can continue
adding to the path by moving the Pen tool over either end of the path until it turns into the
"Pick Up Path" cursor:


Note that you can't pick up a closed path in this way; however you can add and delete points
on the closed path, and drag points around to achieve the new shape you need. You can also
reopen a closed path - see the "Reopening and Joining Path Components" section below.
The Freeform Pen tool
You can use the Freeform Pen tool to quickly sketch out your path. It's not very accurate and
often doesn't place anchor points where you'd ideally like them, but it is easy to use, which is
a plus for beginners!
To use this tool, first select it from the Pen Tool icon in the Tools palette:


Then just click with the mouse and drag to draw your path:


When you release the mouse button, the path is created:


You can adjust the frequency of the anchor points created by the Freeform Pen tool by
altering the value in the Curve Fit box in the options bar. The higher the value, the less
anchor points and segments will be created (but the less accurate the finished path will be,
too!).
You can also make the Freeform Pen tool behave like the Magnetic Lasso tool by clicking the
Magnetic checkbox in the options bar. The tool will then snap to the shape you're drawing
around. See the Selecting with the marquee and lasso tools tutorial for more info on the
Magnetic Lasso.
Tutorial: Editing Paths in Photoshop

Now you know how to create paths, we'll take a look at how you can change your path after
you've made it. This way you can alter the shape of your path and "fine-tune" those lines and
curves until they're just right!
Selecting paths
In this section we'll take a look at ways to select your paths, or parts of your paths, for
editing.
The Path Component Selection tool
This tool is designed for quickly selecting an entire path component. This is great when you
want to move or resize a path component, for example.
The tool can be found under the black mouse pointer icon in the Tools palette:


To select a component, just click anywhere in or on the component:


You can also Shift+click on more than one component, or click and drag a marquee, to select
multiple components at the same time.
To deselect all components, click in an empty area of your document with the Path
Component Selection tool, or press the Esc key.
The Direct Selection tool
You'll find the Direct Selection tool under the Path Component Selection tool popup in the
Tools palette (see above).
This tool lets you select individual path segments and anchor points for editing. To select a
segment, click on the segment:


To select an anchor point, click on the point:
You can also Shift+click on more than one segment or point, or click and drag a marquee, to
select many things at the same time.
To deselect all segments and points, click in an empty area of your document with the Direct
Selection tool, or press the Esc key.
Some handy shortcuts
   •   You can temporarily activate the Path Component Selection tool when you're using the Direct
       Selection tool by holding down the Control key (Windows) or Command key (Mac) while clicking
       with the mouse.
   •   You can also use the Direct Selection tool from all other tools by holding down the Control key
       (Windows) or Command key (Mac) while clicking with the mouse. This is very useful for selecting
       and editing existing path components while you're creating new components with the Pen tool.
   •   You can switch between the Path Component and Direct Selection tools by pressing Shift+A.
Now that you know how to select path components and segments, let's look at how to alter
them.
Altering path segments
Being able to accurately move and reshape path segments is the key to becoming a Pen tool
expert! By knowing and understanding how the shape of path segments can be altered, you'll
be able to create any shaped path with a high level of precision. So pay careful attention! :)
To alter a path segment, you need to use the Direct Selection tool (described above). The
easiest way to activate this tool while you're drawing with the Pen tool is to hold down the
Control key (Windows) or Command key (Mac).
Moving straight segments
Straight segments are easy to move. Just click on the segment you want to move with the
Direct Selection tool, and drag with the mouse:


Moving curved segments
To move a curved segment, first click on the segment with the Direct Selection tool. You then
need to Shift+click on both the segment's anchor points to select them:
Once you have both anchor points selected, click on the curve and drag it to move it around:


Notice how you're just changing the position of the curved segment here; you're not altering
its shape (although the shape of the neighbouring curve changes to keep up with the new
curve's position).
Reshaping curved segments
There are two ways to reshape a curved segment. The first technique just shrinks or stretches
the curve, without reshaping the segments either side of it. The second technique involves
altering the direction lines at an anchor point to change the shape of the segments on either
side of the point.
Technique 1. Shrinking and stretching
To shrink or stretch a segment, first click on the segment with the Direct Selection tool, then
make sure that neither of its anchor points are selected, or that only one anchor point is
selected (if both are selected then you will simply move the segment, as described above).
You can deselect the anchor point(s) as necessary by Shift+clicking on them:


Then click on the curve and drag it to shrink or stretch it as required:


Technique 2. Altering the direction lines
By dragging the direction lines at an anchor point, you can change the shape of the curves on
either side of the point. The best way to get the hang of this is just to practice!
To alter a direction line, click on the direction point at the end of the line with the Direct
Selection tool, then drag it around:


Editing anchor points
As well as changing the curves and direction lines as shown above, you can also change the
type of each anchor point in your path. This allows you to create any shape of path that you
like!
Most of the changes you'll make to anchor points will be done with the Convert Point tool,
available under the Pen Tool in the Tools Palette:


Converting from a corner point to a smooth point
To turn a corner anchor point into a smooth anchor point, click on the point with the Convert
Point tool, and drag away from the point to make the direction lines appear:


Converting from a smooth point to a corner point
There are 3 types of corner point you can create, allowing you to form different shapes of
curves and lines.
Making a corner point without direction lines
To convert a smooth point to a corner point with no direction lines, simply click once with the
Convert Point tool on the anchor point you wish to convert:
The direction lines will disappear, and you'll be left with a corner point with two straight line
segments on either side.
Making a corner point with direction lines
To turn a smooth point into a corner point with direction lines (in other words, to create a
corner with curves rather than a corner with straight lines), click on either one of the
direction points with the Convert Point tool, and drag the point around until you get the
desired shape:


Notice that you have now "broken" the direction lines so that they work independently of
each other, and the result is two curves that enter and leave the points at very different
angles (a corner). Compare this to the original smooth point, where the direction lines moved
together and were at 180 degrees to each other, and the curves moved smoothly through the
point.
Making a corner point with only one direction line
It's also possible to make a corner point with only one direction line. This will mean that the
segment on the side of the point with the direction line will be a curve as it leaves the point,
while the segment without the direction line will be a straight line as it leaves the point
(though it may curve at the other end if it's heading towards a smooth anchor point).
Understanding this technique means you can easily switch from curves to straight lines and
vice-versa at any anchor point. Very useful!
To make a corner point with one direction line, all you have to do is use the Convert Point
tool to drag the unwanted direction point into the anchor point until it disappears. Click on
the direction point you want to remove, and drag it until it's on top of the anchor point:


Notice how the segment on one side of the point is now a straight line, while the other
segment remains curved. Cool eh!
You can quickly retract the direction line "in front" of the anchor point (in other words, on the
side with the most recently placed curve) by Alt+clicking (Windows) or Option+clicking (Mac) on
the anchor point itself:
Dragging anchor points
You can of course drag anchor points around to reshape your paths. Use the Direct Selection
tool to make sure that the point you want to move is selected (you can Shift+click to select
multiple points, or to deselect points as required). Then just click on a point and drag!


Practice working with all these tools for editing path segments and anchor points, as these
skills are the key to producing great paths.
Reopening and joining path components
If you've closed a path component (by clicking on the first anchor point with the Pen tool to
complete the loop), you can later re-open the path by using the Direct Selection tool to select
one of the path segments (by clicking on it), then pressing the Delete key:


You can also join two separate path components together, provided they are both open. First,
click on the end point of the first path, where you would like the join to start, with the Pen
tool:
Then click on the end point of the second path, where you want the join to end. Your path
components will then be joined into one continuous component:


Transforming and manipulating paths
You can use a lot of the same tools that you use for raster graphics on paths too, including:
   •   Cutting, copying and pasting
   •   Scaling
   •   Skewing, distortion and perspective
Just select the points, segments or components you want to manipulate, then apply the
appropriate command. You'll find all these manipulation commands under the Edit menu:
   •   Edit > Cut
   •   Edit > Copy
   •   Edit > Paste
   •   Edit > Free Transform
   •   Edit > Transform > Scale
   •   etc...
Remember, use the Direct Selection tool if you want to manipulate individual points or
segments, and the Path Component Selection tool to select and manipulate entire path
components.
For example, here we've selected just the bottom two points of the triangle with the Direct
Selection tool, and rotated them with Edit > Transform Points > Rotate:
On the other hand, in this example we've selected the entire component with the Path
Component Selection tool and rotated with Edit > Transform Path > Rotate:
Tutorial: Things You Can Do with Photoshop Paths
Turning a path into a selection
You can create a selection from your path. This means that you can select your complex,
irregular objects precisely by outlining them with the Pen tool, then converting your path to a
selection.
To do this, bring up the Paths palette by clicking on the Paths tab in the Layers palette (or
select Window > Show Paths), then select the path you'd like to create a selection from
(here we've chosen "Path 1"), then click on the Load Path as a Selection icon:


The selection marquee will then appear, in the shape of your path! You can now go ahead and
work on your selected area, as if you'd selected it with the selection tools.


Turning a selection into a path
You can also do the opposite! If you have an active selection, you can turn it into a path. Just
click on the Make Work Path button:


You can also Alt+click (Windows) or Option+click (Mac) on the button to bring up the "Make
Work Path" dialog. Set the desired Tolerance value (smaller numbers result in a more
accurate tracing of the selection) and press OK.
Note that using the Make Work Path feature will overwrite your current work path, so be
careful!
Filling and stroking a path
You can create a bitmap shape from your path by clicking on the Fill Path icon or the Stroke
Path icon:
The Fill Path icon will fill the inside of the currently selected path with the current
foreground colour, while the Stroke Path icon will stroke the outline of the path using the
currently (or last) selected brush and foreground colour:


Using a path as a vector mask for a layer
In Photoshop, you can mask off the contents of a layer using a bitmap layer mask or a vector
mask. These masks are a great way to shape a layer's contents. Layer masks are good for
complex bitmap shapes, while vector masks suit simpler shapes. The great thing about vector
masks is that, like paths, you can resize them without loss of detail.
A shape layer, which you can create with the Shape and Pen tools, is essentially a layer with a
vector mask applied to it.
To use an existing path as a vector mask, first create or load your path. Next, select the layer
you want to apply the mask to. Then choose Layer > Vector Mask > Current Path. Photoshop
creates a new vector mask for the layer using the current path, and the layer's contents are
revealed by the shape of the mask:


A photo layer and a path... The path applied as a vector mask to the photo layer

Contenu connexe

Tendances

Photoshop Introduction
Photoshop IntroductionPhotoshop Introduction
Photoshop IntroductionZ Hoeben
 
Adobe Photoshop for Beginners
Adobe Photoshop for BeginnersAdobe Photoshop for Beginners
Adobe Photoshop for BeginnersMahmoud Salah
 
Intro to Adobe Illustrator
Intro to Adobe IllustratorIntro to Adobe Illustrator
Intro to Adobe IllustratorDUSPviz
 
Introduction to CorelDRAW
Introduction to CorelDRAWIntroduction to CorelDRAW
Introduction to CorelDRAWSanthiNivas
 
Creating an Magazine ad with Adobe InDesign
Creating an Magazine ad with Adobe InDesignCreating an Magazine ad with Adobe InDesign
Creating an Magazine ad with Adobe InDesignAlease Michelle Jones
 
Pencil animation tutorials
Pencil animation tutorialsPencil animation tutorials
Pencil animation tutorialsnataliasmile
 
Photoshop Beginners Course
Photoshop Beginners CoursePhotoshop Beginners Course
Photoshop Beginners CourseMiracleOdion
 
Adobe illustrator 1
Adobe illustrator 1Adobe illustrator 1
Adobe illustrator 1ilaazmil2
 
Openoffice writer
Openoffice writerOpenoffice writer
Openoffice writerSisapardo
 
Photoshop intro to basics
Photoshop intro to basicsPhotoshop intro to basics
Photoshop intro to basicsNatalie Hurd
 
Adobe illustrator cs6
Adobe illustrator cs6Adobe illustrator cs6
Adobe illustrator cs6ilaazmil2
 
Manual visual basic 6.0
Manual visual basic 6.0Manual visual basic 6.0
Manual visual basic 6.0Dunkherz
 
Basics Of Photoshop
Basics Of PhotoshopBasics Of Photoshop
Basics Of Photoshopkarimnadir
 
Adobe Photoshop Basics - Session 1
Adobe Photoshop Basics - Session 1Adobe Photoshop Basics - Session 1
Adobe Photoshop Basics - Session 1xneptune
 
Macromedia flash presentation2
Macromedia flash presentation2Macromedia flash presentation2
Macromedia flash presentation2Zeeshan Ahmed
 
Presentation on adobe photoshop® tools
Presentation on adobe photoshop® toolsPresentation on adobe photoshop® tools
Presentation on adobe photoshop® toolsHarshit Dave
 

Tendances (20)

Photoshop Introduction
Photoshop IntroductionPhotoshop Introduction
Photoshop Introduction
 
Adobe Photoshop for Beginners
Adobe Photoshop for BeginnersAdobe Photoshop for Beginners
Adobe Photoshop for Beginners
 
Intro to Adobe Illustrator
Intro to Adobe IllustratorIntro to Adobe Illustrator
Intro to Adobe Illustrator
 
Introduction to CorelDRAW
Introduction to CorelDRAWIntroduction to CorelDRAW
Introduction to CorelDRAW
 
Creating an Magazine ad with Adobe InDesign
Creating an Magazine ad with Adobe InDesignCreating an Magazine ad with Adobe InDesign
Creating an Magazine ad with Adobe InDesign
 
Adobe Photoshop Tools
Adobe Photoshop ToolsAdobe Photoshop Tools
Adobe Photoshop Tools
 
Adobe Photoshop: Retouching Tools
Adobe Photoshop: Retouching ToolsAdobe Photoshop: Retouching Tools
Adobe Photoshop: Retouching Tools
 
Pencil animation tutorials
Pencil animation tutorialsPencil animation tutorials
Pencil animation tutorials
 
Adobe Photoshop
Adobe PhotoshopAdobe Photoshop
Adobe Photoshop
 
Photoshop Beginners Course
Photoshop Beginners CoursePhotoshop Beginners Course
Photoshop Beginners Course
 
Adobe illustrator 1
Adobe illustrator 1Adobe illustrator 1
Adobe illustrator 1
 
Openoffice writer
Openoffice writerOpenoffice writer
Openoffice writer
 
Photoshop intro to basics
Photoshop intro to basicsPhotoshop intro to basics
Photoshop intro to basics
 
Adobe illustrator cs6
Adobe illustrator cs6Adobe illustrator cs6
Adobe illustrator cs6
 
Manual visual basic 6.0
Manual visual basic 6.0Manual visual basic 6.0
Manual visual basic 6.0
 
Basics Of Photoshop
Basics Of PhotoshopBasics Of Photoshop
Basics Of Photoshop
 
Adobe Photoshop Basics - Session 1
Adobe Photoshop Basics - Session 1Adobe Photoshop Basics - Session 1
Adobe Photoshop Basics - Session 1
 
Macromedia flash presentation2
Macromedia flash presentation2Macromedia flash presentation2
Macromedia flash presentation2
 
Presentation on adobe photoshop® tools
Presentation on adobe photoshop® toolsPresentation on adobe photoshop® tools
Presentation on adobe photoshop® tools
 
Introduction to Adobe InDesign CC
Introduction to Adobe InDesign CCIntroduction to Adobe InDesign CC
Introduction to Adobe InDesign CC
 

En vedette

Working with text2
Working with text2Working with text2
Working with text2balermm
 
How to apply different Textures on a Type object.
How to apply different Textures on a Type object.How to apply different Textures on a Type object.
How to apply different Textures on a Type object.Animatrick blog
 
Working with text1
Working with text1Working with text1
Working with text1balermm
 
Adobe Illustrator: 6 Essential Tips and Tools
Adobe Illustrator: 6 Essential Tips and ToolsAdobe Illustrator: 6 Essential Tips and Tools
Adobe Illustrator: 6 Essential Tips and ToolsNguyet Minh
 
Adobe illustrator Beginner Tutorial #2 - Telkom University
Adobe illustrator Beginner Tutorial #2 - Telkom UniversityAdobe illustrator Beginner Tutorial #2 - Telkom University
Adobe illustrator Beginner Tutorial #2 - Telkom UniversityFarid Naufal Aslam
 
Pp3 - Pixel Perfect Precision V3
Pp3 - Pixel Perfect Precision V3Pp3 - Pixel Perfect Precision V3
Pp3 - Pixel Perfect Precision V3Olybop .fr
 
Adobe Photoshop CS6 tutorial 2013
Adobe Photoshop CS6 tutorial 2013Adobe Photoshop CS6 tutorial 2013
Adobe Photoshop CS6 tutorial 2013Jessie Doan
 
Photoshop step by step powerpoint presentation - hayley ip 10 f
Photoshop step by step   powerpoint presentation - hayley ip 10 fPhotoshop step by step   powerpoint presentation - hayley ip 10 f
Photoshop step by step powerpoint presentation - hayley ip 10 fHayley Ip
 
Presentation on Adobe Photoshop
Presentation on Adobe PhotoshopPresentation on Adobe Photoshop
Presentation on Adobe PhotoshopMohak Jain
 
Working with text
Working with textWorking with text
Working with textcuevadiana
 
Photoshop tools and their functions
Photoshop tools and their functionsPhotoshop tools and their functions
Photoshop tools and their functionsGener Evangelista
 
Geometric Shapes-PowerPoint Slide Show
Geometric Shapes-PowerPoint Slide ShowGeometric Shapes-PowerPoint Slide Show
Geometric Shapes-PowerPoint Slide ShowAlexandra Diana
 

En vedette (16)

Working with text2
Working with text2Working with text2
Working with text2
 
How to apply different Textures on a Type object.
How to apply different Textures on a Type object.How to apply different Textures on a Type object.
How to apply different Textures on a Type object.
 
Working with text1
Working with text1Working with text1
Working with text1
 
Texture
TextureTexture
Texture
 
Adobe Illustrator: 6 Essential Tips and Tools
Adobe Illustrator: 6 Essential Tips and ToolsAdobe Illustrator: 6 Essential Tips and Tools
Adobe Illustrator: 6 Essential Tips and Tools
 
Adobe illustrator Beginner Tutorial #2 - Telkom University
Adobe illustrator Beginner Tutorial #2 - Telkom UniversityAdobe illustrator Beginner Tutorial #2 - Telkom University
Adobe illustrator Beginner Tutorial #2 - Telkom University
 
The Adobe Photoshop Window
The Adobe Photoshop WindowThe Adobe Photoshop Window
The Adobe Photoshop Window
 
Pp3 - Pixel Perfect Precision V3
Pp3 - Pixel Perfect Precision V3Pp3 - Pixel Perfect Precision V3
Pp3 - Pixel Perfect Precision V3
 
Shapes.ppt
Shapes.pptShapes.ppt
Shapes.ppt
 
Adobe Photoshop CS6 tutorial 2013
Adobe Photoshop CS6 tutorial 2013Adobe Photoshop CS6 tutorial 2013
Adobe Photoshop CS6 tutorial 2013
 
Photoshop step by step powerpoint presentation - hayley ip 10 f
Photoshop step by step   powerpoint presentation - hayley ip 10 fPhotoshop step by step   powerpoint presentation - hayley ip 10 f
Photoshop step by step powerpoint presentation - hayley ip 10 f
 
Presentation on Adobe Photoshop
Presentation on Adobe PhotoshopPresentation on Adobe Photoshop
Presentation on Adobe Photoshop
 
Working with text
Working with textWorking with text
Working with text
 
Photoshop tools and their functions
Photoshop tools and their functionsPhotoshop tools and their functions
Photoshop tools and their functions
 
Geometric Shapes-PowerPoint Slide Show
Geometric Shapes-PowerPoint Slide ShowGeometric Shapes-PowerPoint Slide Show
Geometric Shapes-PowerPoint Slide Show
 
Pixel Perfect Guide
Pixel Perfect GuidePixel Perfect Guide
Pixel Perfect Guide
 

Similaire à Tutorial: Photoshop Paths Explained

How to Use the Photoshop Pen Tool – Photoshop Beginner Tutorial
How to Use the Photoshop Pen Tool – Photoshop Beginner TutorialHow to Use the Photoshop Pen Tool – Photoshop Beginner Tutorial
How to Use the Photoshop Pen Tool – Photoshop Beginner TutorialTowab Muhammad Yusuf
 
Lesson revolve
Lesson revolveLesson revolve
Lesson revolveMr_Burns
 
DID Unit 5 - Illustrator Basics
DID Unit 5 - Illustrator BasicsDID Unit 5 - Illustrator Basics
DID Unit 5 - Illustrator BasicsMrLawler
 
An%20Intermediate%20Google%20SketchUp%20Tutorial%20-%20Part%203
An%20Intermediate%20Google%20SketchUp%20Tutorial%20-%20Part%203An%20Intermediate%20Google%20SketchUp%20Tutorial%20-%20Part%203
An%20Intermediate%20Google%20SketchUp%20Tutorial%20-%20Part%203tutorialsruby
 
An%20Intermediate%20Google%20SketchUp%20Tutorial%20-%20Part%203
An%20Intermediate%20Google%20SketchUp%20Tutorial%20-%20Part%203An%20Intermediate%20Google%20SketchUp%20Tutorial%20-%20Part%203
An%20Intermediate%20Google%20SketchUp%20Tutorial%20-%20Part%203tutorialsruby
 
AiM Spinner Design Tutorial in Solidworks
AiM Spinner Design Tutorial in SolidworksAiM Spinner Design Tutorial in Solidworks
AiM Spinner Design Tutorial in Solidworksdsp39
 
Adobe illustrator 2
Adobe illustrator 2Adobe illustrator 2
Adobe illustrator 2ilaazmil2
 
Dig imag unit 9 module 1 working with the pen tool
Dig imag unit 9 module 1 working with the pen toolDig imag unit 9 module 1 working with the pen tool
Dig imag unit 9 module 1 working with the pen toolkateridrex
 
Wd133 unit 9 module 1 working with the pen tool
Wd133 unit 9 module 1 working with the pen toolWd133 unit 9 module 1 working with the pen tool
Wd133 unit 9 module 1 working with the pen toolkateridrex
 
How to use the photoshop pen tool to edit e commerce images
How to use the photoshop pen tool to edit e commerce imagesHow to use the photoshop pen tool to edit e commerce images
How to use the photoshop pen tool to edit e commerce imagesClipping Path Arts
 
Educ 215 final- how to guide
Educ 215 final- how to guideEduc 215 final- how to guide
Educ 215 final- how to guidesmemontech
 
Working with google sketch up
Working with google sketch upWorking with google sketch up
Working with google sketch upBaptec
 
Google sketchup8
Google sketchup8Google sketchup8
Google sketchup8Trianz King
 
Google sketchup8
Google sketchup8Google sketchup8
Google sketchup8Trianz King
 

Similaire à Tutorial: Photoshop Paths Explained (20)

How to Use the Photoshop Pen Tool – Photoshop Beginner Tutorial
How to Use the Photoshop Pen Tool – Photoshop Beginner TutorialHow to Use the Photoshop Pen Tool – Photoshop Beginner Tutorial
How to Use the Photoshop Pen Tool – Photoshop Beginner Tutorial
 
Flash 5 toolbar
Flash 5 toolbarFlash 5 toolbar
Flash 5 toolbar
 
Image manipulation - Photoshop
Image manipulation - PhotoshopImage manipulation - Photoshop
Image manipulation - Photoshop
 
Lesson revolve
Lesson revolveLesson revolve
Lesson revolve
 
DID Unit 5 - Illustrator Basics
DID Unit 5 - Illustrator BasicsDID Unit 5 - Illustrator Basics
DID Unit 5 - Illustrator Basics
 
Chap20
Chap20Chap20
Chap20
 
An%20Intermediate%20Google%20SketchUp%20Tutorial%20-%20Part%203
An%20Intermediate%20Google%20SketchUp%20Tutorial%20-%20Part%203An%20Intermediate%20Google%20SketchUp%20Tutorial%20-%20Part%203
An%20Intermediate%20Google%20SketchUp%20Tutorial%20-%20Part%203
 
An%20Intermediate%20Google%20SketchUp%20Tutorial%20-%20Part%203
An%20Intermediate%20Google%20SketchUp%20Tutorial%20-%20Part%203An%20Intermediate%20Google%20SketchUp%20Tutorial%20-%20Part%203
An%20Intermediate%20Google%20SketchUp%20Tutorial%20-%20Part%203
 
AiM Spinner Design Tutorial in Solidworks
AiM Spinner Design Tutorial in SolidworksAiM Spinner Design Tutorial in Solidworks
AiM Spinner Design Tutorial in Solidworks
 
Adobe illustrator 2
Adobe illustrator 2Adobe illustrator 2
Adobe illustrator 2
 
Chap39
Chap39Chap39
Chap39
 
Dig imag unit 9 module 1 working with the pen tool
Dig imag unit 9 module 1 working with the pen toolDig imag unit 9 module 1 working with the pen tool
Dig imag unit 9 module 1 working with the pen tool
 
Wd133 unit 9 module 1 working with the pen tool
Wd133 unit 9 module 1 working with the pen toolWd133 unit 9 module 1 working with the pen tool
Wd133 unit 9 module 1 working with the pen tool
 
Photoshop clipping path service.
Photoshop clipping path service.Photoshop clipping path service.
Photoshop clipping path service.
 
How to use the photoshop pen tool to edit e commerce images
How to use the photoshop pen tool to edit e commerce imagesHow to use the photoshop pen tool to edit e commerce images
How to use the photoshop pen tool to edit e commerce images
 
Educ 215 final- how to guide
Educ 215 final- how to guideEduc 215 final- how to guide
Educ 215 final- how to guide
 
Dwg 106 module 2 part 1
Dwg 106 module 2 part 1Dwg 106 module 2 part 1
Dwg 106 module 2 part 1
 
Working with google sketch up
Working with google sketch upWorking with google sketch up
Working with google sketch up
 
Google sketchup8
Google sketchup8Google sketchup8
Google sketchup8
 
Google sketchup8
Google sketchup8Google sketchup8
Google sketchup8
 

Dernier

Map of St. Louis Parks
Map of St. Louis Parks                              Map of St. Louis Parks
Map of St. Louis Parks CharlottePulte
 
Pharmaceutical Packaging for the elderly.pdf
Pharmaceutical Packaging for the elderly.pdfPharmaceutical Packaging for the elderly.pdf
Pharmaceutical Packaging for the elderly.pdfAayushChavan5
 
Color Theory Explained for Noobs- Think360 Studio
Color Theory Explained for Noobs- Think360 StudioColor Theory Explained for Noobs- Think360 Studio
Color Theory Explained for Noobs- Think360 StudioThink360 Studio
 
guest bathroom white and bluesssssssssss
guest bathroom white and bluesssssssssssguest bathroom white and bluesssssssssss
guest bathroom white and bluesssssssssssNadaMohammed714321
 
Making and Unmaking of Chandigarh - A City of Two Plans2-4-24.ppt
Making and Unmaking of Chandigarh - A City of Two Plans2-4-24.pptMaking and Unmaking of Chandigarh - A City of Two Plans2-4-24.ppt
Making and Unmaking of Chandigarh - A City of Two Plans2-4-24.pptJIT KUMAR GUPTA
 
cda.pptx critical discourse analysis ppt
cda.pptx critical discourse analysis pptcda.pptx critical discourse analysis ppt
cda.pptx critical discourse analysis pptMaryamAfzal41
 
Interior Design for Office a cura di RMG Project Studio
Interior Design for Office a cura di RMG Project StudioInterior Design for Office a cura di RMG Project Studio
Interior Design for Office a cura di RMG Project StudioRMG Project Studio
 
DAKSHIN BIHAR GRAMIN BANK: REDEFINING THE DIGITAL BANKING EXPERIENCE WITH A U...
DAKSHIN BIHAR GRAMIN BANK: REDEFINING THE DIGITAL BANKING EXPERIENCE WITH A U...DAKSHIN BIHAR GRAMIN BANK: REDEFINING THE DIGITAL BANKING EXPERIENCE WITH A U...
DAKSHIN BIHAR GRAMIN BANK: REDEFINING THE DIGITAL BANKING EXPERIENCE WITH A U...Rishabh Aryan
 
group_15_empirya_p1projectIndustrial.pdf
group_15_empirya_p1projectIndustrial.pdfgroup_15_empirya_p1projectIndustrial.pdf
group_15_empirya_p1projectIndustrial.pdfneelspinoy
 
办理卡尔顿大学毕业证成绩单|购买加拿大文凭证书
办理卡尔顿大学毕业证成绩单|购买加拿大文凭证书办理卡尔顿大学毕业证成绩单|购买加拿大文凭证书
办理卡尔顿大学毕业证成绩单|购买加拿大文凭证书zdzoqco
 
Karim apartment ideas 02 ppppppppppppppp
Karim apartment ideas 02 pppppppppppppppKarim apartment ideas 02 ppppppppppppppp
Karim apartment ideas 02 pppppppppppppppNadaMohammed714321
 
The spirit of digital place - game worlds and architectural phenomenology
The spirit of digital place - game worlds and architectural phenomenologyThe spirit of digital place - game worlds and architectural phenomenology
The spirit of digital place - game worlds and architectural phenomenologyChristopher Totten
 
怎么办理英国Newcastle毕业证纽卡斯尔大学学位证书一手渠道
怎么办理英国Newcastle毕业证纽卡斯尔大学学位证书一手渠道怎么办理英国Newcastle毕业证纽卡斯尔大学学位证书一手渠道
怎么办理英国Newcastle毕业证纽卡斯尔大学学位证书一手渠道yrolcks
 
Niintendo Wii Presentation Template.pptx
Niintendo Wii Presentation Template.pptxNiintendo Wii Presentation Template.pptx
Niintendo Wii Presentation Template.pptxKevinYaelJimnezSanti
 
guest bathroom white and blue ssssssssss
guest bathroom white and blue ssssssssssguest bathroom white and blue ssssssssss
guest bathroom white and blue ssssssssssNadaMohammed714321
 
Giulio Michelon, Founder di @Belka – “Oltre le Stime: Sviluppare una Mentalit...
Giulio Michelon, Founder di @Belka – “Oltre le Stime: Sviluppare una Mentalit...Giulio Michelon, Founder di @Belka – “Oltre le Stime: Sviluppare una Mentalit...
Giulio Michelon, Founder di @Belka – “Oltre le Stime: Sviluppare una Mentalit...Associazione Digital Days
 
Iconic Global Solution - web design, Digital Marketing services
Iconic Global Solution - web design, Digital Marketing servicesIconic Global Solution - web design, Digital Marketing services
Iconic Global Solution - web design, Digital Marketing servicesIconic global solution
 
10 must-have Chrome extensions for designers
10 must-have Chrome extensions for designers10 must-have Chrome extensions for designers
10 must-have Chrome extensions for designersPixeldarts
 
General Knowledge Quiz Game C++ CODE.pptx
General Knowledge Quiz Game C++ CODE.pptxGeneral Knowledge Quiz Game C++ CODE.pptx
General Knowledge Quiz Game C++ CODE.pptxmarckustrevion
 
10 Best WordPress Plugins to make the website effective in 2024
10 Best WordPress Plugins to make the website effective in 202410 Best WordPress Plugins to make the website effective in 2024
10 Best WordPress Plugins to make the website effective in 2024digital learning point
 

Dernier (20)

Map of St. Louis Parks
Map of St. Louis Parks                              Map of St. Louis Parks
Map of St. Louis Parks
 
Pharmaceutical Packaging for the elderly.pdf
Pharmaceutical Packaging for the elderly.pdfPharmaceutical Packaging for the elderly.pdf
Pharmaceutical Packaging for the elderly.pdf
 
Color Theory Explained for Noobs- Think360 Studio
Color Theory Explained for Noobs- Think360 StudioColor Theory Explained for Noobs- Think360 Studio
Color Theory Explained for Noobs- Think360 Studio
 
guest bathroom white and bluesssssssssss
guest bathroom white and bluesssssssssssguest bathroom white and bluesssssssssss
guest bathroom white and bluesssssssssss
 
Making and Unmaking of Chandigarh - A City of Two Plans2-4-24.ppt
Making and Unmaking of Chandigarh - A City of Two Plans2-4-24.pptMaking and Unmaking of Chandigarh - A City of Two Plans2-4-24.ppt
Making and Unmaking of Chandigarh - A City of Two Plans2-4-24.ppt
 
cda.pptx critical discourse analysis ppt
cda.pptx critical discourse analysis pptcda.pptx critical discourse analysis ppt
cda.pptx critical discourse analysis ppt
 
Interior Design for Office a cura di RMG Project Studio
Interior Design for Office a cura di RMG Project StudioInterior Design for Office a cura di RMG Project Studio
Interior Design for Office a cura di RMG Project Studio
 
DAKSHIN BIHAR GRAMIN BANK: REDEFINING THE DIGITAL BANKING EXPERIENCE WITH A U...
DAKSHIN BIHAR GRAMIN BANK: REDEFINING THE DIGITAL BANKING EXPERIENCE WITH A U...DAKSHIN BIHAR GRAMIN BANK: REDEFINING THE DIGITAL BANKING EXPERIENCE WITH A U...
DAKSHIN BIHAR GRAMIN BANK: REDEFINING THE DIGITAL BANKING EXPERIENCE WITH A U...
 
group_15_empirya_p1projectIndustrial.pdf
group_15_empirya_p1projectIndustrial.pdfgroup_15_empirya_p1projectIndustrial.pdf
group_15_empirya_p1projectIndustrial.pdf
 
办理卡尔顿大学毕业证成绩单|购买加拿大文凭证书
办理卡尔顿大学毕业证成绩单|购买加拿大文凭证书办理卡尔顿大学毕业证成绩单|购买加拿大文凭证书
办理卡尔顿大学毕业证成绩单|购买加拿大文凭证书
 
Karim apartment ideas 02 ppppppppppppppp
Karim apartment ideas 02 pppppppppppppppKarim apartment ideas 02 ppppppppppppppp
Karim apartment ideas 02 ppppppppppppppp
 
The spirit of digital place - game worlds and architectural phenomenology
The spirit of digital place - game worlds and architectural phenomenologyThe spirit of digital place - game worlds and architectural phenomenology
The spirit of digital place - game worlds and architectural phenomenology
 
怎么办理英国Newcastle毕业证纽卡斯尔大学学位证书一手渠道
怎么办理英国Newcastle毕业证纽卡斯尔大学学位证书一手渠道怎么办理英国Newcastle毕业证纽卡斯尔大学学位证书一手渠道
怎么办理英国Newcastle毕业证纽卡斯尔大学学位证书一手渠道
 
Niintendo Wii Presentation Template.pptx
Niintendo Wii Presentation Template.pptxNiintendo Wii Presentation Template.pptx
Niintendo Wii Presentation Template.pptx
 
guest bathroom white and blue ssssssssss
guest bathroom white and blue ssssssssssguest bathroom white and blue ssssssssss
guest bathroom white and blue ssssssssss
 
Giulio Michelon, Founder di @Belka – “Oltre le Stime: Sviluppare una Mentalit...
Giulio Michelon, Founder di @Belka – “Oltre le Stime: Sviluppare una Mentalit...Giulio Michelon, Founder di @Belka – “Oltre le Stime: Sviluppare una Mentalit...
Giulio Michelon, Founder di @Belka – “Oltre le Stime: Sviluppare una Mentalit...
 
Iconic Global Solution - web design, Digital Marketing services
Iconic Global Solution - web design, Digital Marketing servicesIconic Global Solution - web design, Digital Marketing services
Iconic Global Solution - web design, Digital Marketing services
 
10 must-have Chrome extensions for designers
10 must-have Chrome extensions for designers10 must-have Chrome extensions for designers
10 must-have Chrome extensions for designers
 
General Knowledge Quiz Game C++ CODE.pptx
General Knowledge Quiz Game C++ CODE.pptxGeneral Knowledge Quiz Game C++ CODE.pptx
General Knowledge Quiz Game C++ CODE.pptx
 
10 Best WordPress Plugins to make the website effective in 2024
10 Best WordPress Plugins to make the website effective in 202410 Best WordPress Plugins to make the website effective in 2024
10 Best WordPress Plugins to make the website effective in 2024
 

Tutorial: Photoshop Paths Explained

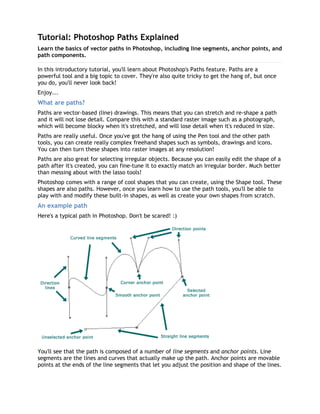
  • 1. Tutorial: Photoshop Paths Explained Learn the basics of vector paths in Photoshop, including line segments, anchor points, and path components. In this introductory tutorial, you'll learn about Photoshop's Paths feature. Paths are a powerful tool and a big topic to cover. They're also quite tricky to get the hang of, but once you do, you'll never look back! Enjoy... What are paths? Paths are vector-based (line) drawings. This means that you can stretch and re-shape a path and it will not lose detail. Compare this with a standard raster image such as a photograph, which will become blocky when it's stretched, and will lose detail when it's reduced in size. Paths are really useful. Once you've got the hang of using the Pen tool and the other path tools, you can create really complex freehand shapes such as symbols, drawings and icons. You can then turn these shapes into raster images at any resolution! Paths are also great for selecting irregular objects. Because you can easily edit the shape of a path after it's created, you can fine-tune it to exactly match an irregular border. Much better than messing about with the lasso tools! Photoshop comes with a range of cool shapes that you can create, using the Shape tool. These shapes are also paths. However, once you learn how to use the path tools, you'll be able to play with and modify these built-in shapes, as well as create your own shapes from scratch. An example path Here's a typical path in Photoshop. Don't be scared! :) You'll see that the path is composed of a number of line segments and anchor points. Line segments are the lines and curves that actually make up the path. Anchor points are movable points at the ends of the line segments that let you adjust the position and shape of the lines.
  • 2. Types of line segments There are two types of line segments: 1. Straight line segments. These are the easiest to draw and understand. You'll see that straight line segments do not have direction lines or direction points. 2. Curved line segments. These are the tricky ones! The shape of each curve is controlled by the direction lines and direction points that you can see on the diagram above. More on these shortly. Types of anchor points Also, there are two types of anchor points: 1. Smooth anchor points. When the curves on each side of an anchor point enter and leave the point at the same angle, you have a smooth anchor point. In other words, there is a smooth transition through the point from one curve to the next. You can see from the diagram that this type of point has two direction lines opposite each other (180 degrees apart). 2. Corner anchor points. This type of point marks a sharp change of direction between one curve and the next. It is also used when connected to one or two straight lines. On the diagram, notice that the direction lines on the corner anchor points are not 180 degrees apart (or in the case of the straight line segments, that there are no direction lines at all). About path components Let's also take a quick look at path components. A path can consist of one or more path components. Each component is a series of segments and anchor points. Furthermore, each component is distinct and separate from all other components - that is, they don't join up. Here's an example of a path with 3 distinct path components: Note that path components don't have to be closed paths; they can have endpoints, like the wavy line above. Note also that although the wavy line and triangle overlap each other, they are not joined, so they are still separate path components.
  • 3. Tutorial: Drawing with Photoshop's Pen Tool Learn how to draw straight and curved vector paths using Photoshop's Pen and Freeform Pen tools. Now that you know the theory of Photoshop paths, it's time to explore Photoshop's Pen tool and other related tools. Most of the drawing and editing of paths can be done via the tools under the Pen tool icon in the Tools palette. Click and hold the mouse button on this icon to bring up all the other tools: Let's briefly go over these tools now, and what you can use them for. • The Pen tool is probably the tool you'll use most. With this tool you can create the straight lines and curves that make up your paths. • The Freeform Pen tool is designed to let you create paths quickly by just drawing freehand with the mouse. It's not very good for creating precise paths though. • The Add Anchor Point tool allows you to insert additional anchor points into your path, effectively splitting a line segment into two. This is useful if, say, you've created a curve already but you want to turn the curve into a more complex shape. You can also add anchor points using the Pen Tool, provided you have the Auto Add/Delete option set - just move the mouse over the line segment you'd like to add a point to, and click! • The Delete Anchor Point tool removes anchor points from your path. As it removes a point, it joins up the two line segments either side of the removed point into one long line segment. This is good if you've accidentally created too many segments (it's best to create as few as possible!) or if the Freeform Pen tool has created too many for you! You can also delete anchor points using the Pen tool if Auto Add/Delete is set - move the mouse over the point you'd like to delete, and click. • The Convert Point tool allows you to convert a smooth anchor point to a corner anchor point, and vice-versa. More on this tool later! Drawing straight lines Let's start with the easiest technique. First create a new document of, say, 500 x 500 pixels to give yourself plenty of space to work in. Then select the Pen tool in the Tools palette. Now click with the mouse in your document. You'll see that you've placed your first anchor point. Move the mouse and click again. You've now created your first line segment, with two anchor points at each end. Congratulations! :)
  • 4. Click in a few more places in your document. You'll see that each click adds a new anchor point, and a new straight line segment. So far, your path is an open path. This means it has a start point and an end point, and doesn't join up. To make a closed path, move the mouse over the first point you created - you'll see the Pen tool cursor changes, with a little 'o' appearing beside it: Now click with the mouse, and you'll see that you have now created a complete shape - a closed path. Well done! Deleting your path The path you just created is stored in a temporary path called the Work Path. Let's delete this path so we can start again with a clean slate. Click on the "Paths" tab in the Layers palette to bring up the list of available paths: Now drag the "Work Path" to the trash can icon: You're now ready to have a go at tackling curves!
  • 5. Drawing curved lines Learning to draw curves will take a bit longer, but they're not too hard once you get the hang of them! To start a curve, select the Pen tool, click in your document and drag the mouse in the rough direction you want the curve to head - in this example, try dragging vertically up the page: You'll see that as you drag, two direction lines and direction points are created. These control the shape of the curve you're about to produce: • The direction of the lines determines the direction in which the new curve will head. • The length of the lines determines how much influence this anchor point will have over the curve. The longer the line, the more the curve will be "pulled" towards this line. The best way to understand the direction lines is to just play around with them. We'll come back to them in a moment! Now try creating a new anchor point by clicking the mouse to the right of your original anchor point, and dragging downwards: You've now placed a second anchor point, and created a curve between the two points! Notice that you dragged upwards from the first anchor point, and downwards from the second. This follows the path of the curve - it goes up from the first point, and down as it reaches the second. What would happen if you dragged upwards from the second anchor point too? Try it! (You may want to delete the Work Path and start again from scratch.)
  • 6. This time, you can see that the curve moves upwards towards the second point, flipping direction as it does so. So the curve will always try to head in the direction you drag! Practice drawing a few curves like these, dragging in different directions, until you're confident with the technique. Note that when we're creating these curves we're always making smooth anchor points. In the Editing paths in Photoshop tutorial, we show you how to create corner anchor points too (take a look at the example path at the top of the Photoshop paths explained tutorial to see a corner point). Switching between curves and lines Often you'll want to create a path that contains both straight lines and curved lines. It's easy to switch between the two. Start off drawing some straight lines by just clicking with the mouse: To switch to drawing a curve, click and drag with the mouse where you want the curve to end: To switch back to drawing a straight line, create the anchor point of your last curve by clicking rather than clicking and dragging (in other words, make a corner point). Then click with the mouse where you would like the straight line to end:
  • 7. Continuing paths If you've previously left an incomplete path and you come back to it later, you can continue adding to the path by moving the Pen tool over either end of the path until it turns into the "Pick Up Path" cursor: Note that you can't pick up a closed path in this way; however you can add and delete points on the closed path, and drag points around to achieve the new shape you need. You can also reopen a closed path - see the "Reopening and Joining Path Components" section below. The Freeform Pen tool You can use the Freeform Pen tool to quickly sketch out your path. It's not very accurate and often doesn't place anchor points where you'd ideally like them, but it is easy to use, which is a plus for beginners! To use this tool, first select it from the Pen Tool icon in the Tools palette: Then just click with the mouse and drag to draw your path: When you release the mouse button, the path is created: You can adjust the frequency of the anchor points created by the Freeform Pen tool by altering the value in the Curve Fit box in the options bar. The higher the value, the less anchor points and segments will be created (but the less accurate the finished path will be, too!). You can also make the Freeform Pen tool behave like the Magnetic Lasso tool by clicking the Magnetic checkbox in the options bar. The tool will then snap to the shape you're drawing around. See the Selecting with the marquee and lasso tools tutorial for more info on the Magnetic Lasso.
  • 8. Tutorial: Editing Paths in Photoshop Now you know how to create paths, we'll take a look at how you can change your path after you've made it. This way you can alter the shape of your path and "fine-tune" those lines and curves until they're just right! Selecting paths In this section we'll take a look at ways to select your paths, or parts of your paths, for editing. The Path Component Selection tool This tool is designed for quickly selecting an entire path component. This is great when you want to move or resize a path component, for example. The tool can be found under the black mouse pointer icon in the Tools palette: To select a component, just click anywhere in or on the component: You can also Shift+click on more than one component, or click and drag a marquee, to select multiple components at the same time. To deselect all components, click in an empty area of your document with the Path Component Selection tool, or press the Esc key. The Direct Selection tool You'll find the Direct Selection tool under the Path Component Selection tool popup in the Tools palette (see above). This tool lets you select individual path segments and anchor points for editing. To select a segment, click on the segment: To select an anchor point, click on the point:
  • 9. You can also Shift+click on more than one segment or point, or click and drag a marquee, to select many things at the same time. To deselect all segments and points, click in an empty area of your document with the Direct Selection tool, or press the Esc key. Some handy shortcuts • You can temporarily activate the Path Component Selection tool when you're using the Direct Selection tool by holding down the Control key (Windows) or Command key (Mac) while clicking with the mouse. • You can also use the Direct Selection tool from all other tools by holding down the Control key (Windows) or Command key (Mac) while clicking with the mouse. This is very useful for selecting and editing existing path components while you're creating new components with the Pen tool. • You can switch between the Path Component and Direct Selection tools by pressing Shift+A. Now that you know how to select path components and segments, let's look at how to alter them. Altering path segments Being able to accurately move and reshape path segments is the key to becoming a Pen tool expert! By knowing and understanding how the shape of path segments can be altered, you'll be able to create any shaped path with a high level of precision. So pay careful attention! :) To alter a path segment, you need to use the Direct Selection tool (described above). The easiest way to activate this tool while you're drawing with the Pen tool is to hold down the Control key (Windows) or Command key (Mac). Moving straight segments Straight segments are easy to move. Just click on the segment you want to move with the Direct Selection tool, and drag with the mouse: Moving curved segments To move a curved segment, first click on the segment with the Direct Selection tool. You then need to Shift+click on both the segment's anchor points to select them:
  • 10. Once you have both anchor points selected, click on the curve and drag it to move it around: Notice how you're just changing the position of the curved segment here; you're not altering its shape (although the shape of the neighbouring curve changes to keep up with the new curve's position). Reshaping curved segments There are two ways to reshape a curved segment. The first technique just shrinks or stretches the curve, without reshaping the segments either side of it. The second technique involves altering the direction lines at an anchor point to change the shape of the segments on either side of the point. Technique 1. Shrinking and stretching To shrink or stretch a segment, first click on the segment with the Direct Selection tool, then make sure that neither of its anchor points are selected, or that only one anchor point is selected (if both are selected then you will simply move the segment, as described above). You can deselect the anchor point(s) as necessary by Shift+clicking on them: Then click on the curve and drag it to shrink or stretch it as required: Technique 2. Altering the direction lines By dragging the direction lines at an anchor point, you can change the shape of the curves on either side of the point. The best way to get the hang of this is just to practice!
  • 11. To alter a direction line, click on the direction point at the end of the line with the Direct Selection tool, then drag it around: Editing anchor points As well as changing the curves and direction lines as shown above, you can also change the type of each anchor point in your path. This allows you to create any shape of path that you like! Most of the changes you'll make to anchor points will be done with the Convert Point tool, available under the Pen Tool in the Tools Palette: Converting from a corner point to a smooth point To turn a corner anchor point into a smooth anchor point, click on the point with the Convert Point tool, and drag away from the point to make the direction lines appear: Converting from a smooth point to a corner point There are 3 types of corner point you can create, allowing you to form different shapes of curves and lines. Making a corner point without direction lines To convert a smooth point to a corner point with no direction lines, simply click once with the Convert Point tool on the anchor point you wish to convert:
  • 12. The direction lines will disappear, and you'll be left with a corner point with two straight line segments on either side. Making a corner point with direction lines To turn a smooth point into a corner point with direction lines (in other words, to create a corner with curves rather than a corner with straight lines), click on either one of the direction points with the Convert Point tool, and drag the point around until you get the desired shape: Notice that you have now "broken" the direction lines so that they work independently of each other, and the result is two curves that enter and leave the points at very different angles (a corner). Compare this to the original smooth point, where the direction lines moved together and were at 180 degrees to each other, and the curves moved smoothly through the point. Making a corner point with only one direction line It's also possible to make a corner point with only one direction line. This will mean that the segment on the side of the point with the direction line will be a curve as it leaves the point, while the segment without the direction line will be a straight line as it leaves the point (though it may curve at the other end if it's heading towards a smooth anchor point). Understanding this technique means you can easily switch from curves to straight lines and vice-versa at any anchor point. Very useful! To make a corner point with one direction line, all you have to do is use the Convert Point tool to drag the unwanted direction point into the anchor point until it disappears. Click on the direction point you want to remove, and drag it until it's on top of the anchor point: Notice how the segment on one side of the point is now a straight line, while the other segment remains curved. Cool eh! You can quickly retract the direction line "in front" of the anchor point (in other words, on the side with the most recently placed curve) by Alt+clicking (Windows) or Option+clicking (Mac) on the anchor point itself:
  • 13. Dragging anchor points You can of course drag anchor points around to reshape your paths. Use the Direct Selection tool to make sure that the point you want to move is selected (you can Shift+click to select multiple points, or to deselect points as required). Then just click on a point and drag! Practice working with all these tools for editing path segments and anchor points, as these skills are the key to producing great paths. Reopening and joining path components If you've closed a path component (by clicking on the first anchor point with the Pen tool to complete the loop), you can later re-open the path by using the Direct Selection tool to select one of the path segments (by clicking on it), then pressing the Delete key: You can also join two separate path components together, provided they are both open. First, click on the end point of the first path, where you would like the join to start, with the Pen tool:
  • 14. Then click on the end point of the second path, where you want the join to end. Your path components will then be joined into one continuous component: Transforming and manipulating paths You can use a lot of the same tools that you use for raster graphics on paths too, including: • Cutting, copying and pasting • Scaling • Skewing, distortion and perspective Just select the points, segments or components you want to manipulate, then apply the appropriate command. You'll find all these manipulation commands under the Edit menu: • Edit > Cut • Edit > Copy • Edit > Paste • Edit > Free Transform • Edit > Transform > Scale • etc... Remember, use the Direct Selection tool if you want to manipulate individual points or segments, and the Path Component Selection tool to select and manipulate entire path components. For example, here we've selected just the bottom two points of the triangle with the Direct Selection tool, and rotated them with Edit > Transform Points > Rotate:
  • 15. On the other hand, in this example we've selected the entire component with the Path Component Selection tool and rotated with Edit > Transform Path > Rotate:
  • 16. Tutorial: Things You Can Do with Photoshop Paths Turning a path into a selection You can create a selection from your path. This means that you can select your complex, irregular objects precisely by outlining them with the Pen tool, then converting your path to a selection. To do this, bring up the Paths palette by clicking on the Paths tab in the Layers palette (or select Window > Show Paths), then select the path you'd like to create a selection from (here we've chosen "Path 1"), then click on the Load Path as a Selection icon: The selection marquee will then appear, in the shape of your path! You can now go ahead and work on your selected area, as if you'd selected it with the selection tools. Turning a selection into a path You can also do the opposite! If you have an active selection, you can turn it into a path. Just click on the Make Work Path button: You can also Alt+click (Windows) or Option+click (Mac) on the button to bring up the "Make Work Path" dialog. Set the desired Tolerance value (smaller numbers result in a more accurate tracing of the selection) and press OK. Note that using the Make Work Path feature will overwrite your current work path, so be careful! Filling and stroking a path You can create a bitmap shape from your path by clicking on the Fill Path icon or the Stroke Path icon:
  • 17. The Fill Path icon will fill the inside of the currently selected path with the current foreground colour, while the Stroke Path icon will stroke the outline of the path using the currently (or last) selected brush and foreground colour: Using a path as a vector mask for a layer In Photoshop, you can mask off the contents of a layer using a bitmap layer mask or a vector mask. These masks are a great way to shape a layer's contents. Layer masks are good for complex bitmap shapes, while vector masks suit simpler shapes. The great thing about vector masks is that, like paths, you can resize them without loss of detail. A shape layer, which you can create with the Shape and Pen tools, is essentially a layer with a vector mask applied to it. To use an existing path as a vector mask, first create or load your path. Next, select the layer you want to apply the mask to. Then choose Layer > Vector Mask > Current Path. Photoshop creates a new vector mask for the layer using the current path, and the layer's contents are revealed by the shape of the mask: A photo layer and a path... The path applied as a vector mask to the photo layer