Contenu connexe
Plus de Content Rules, Inc.
Plus de Content Rules, Inc. (20)
Tropos 6310/6320 Mesh Router Quick Start Card
- 1. s
Tropos 6310/6320 Mesh Router
Quick Start Card
Use this guide to quickly mount and connect power to the Tropos 6310 and 6320 routers.
For complete installation instructions, see the Tropos Networks Mesh Router Outdoor
Installation Guide Models 6310 and 6320.
1. Slide the flat portion of the clamp
under the inner slot of the pole
bracket.
Pole
bracket
Clamp
2. Use the clamp to attach the pole
bracket to the pole (metal pole is
shown).
Band goes
behind
inner tabs
Note: See the Tropos Networks
Mesh Router Outdoor Installation
Guide Models 6310 and 6320 for
instructions on mounting to a wood
pole, wood brace, tower, or
streetlight.
3. Attach the mounting bracket to the
pole bracket with two supplied
10-32 x 1/2-inch machine screws,
making sure that the plane of the
bracket is leveled to the vertical.
• Insert one screw through the to
of the mounting bracket to the
top of the pole bracket, as
shown.
• Insert the other screw through
the curved slot track in the
mounting bracket to the middle
of the pole bracket, above the
clamp slot.
5. Place the upright router on the top
of the mounting bracket, as shown
in the bottom figure. Secure the
mounting bracket to the router by
attaching supplied 10-32 x 1/2inch machine screws through the
holes in the mounting bracket tabs
to corresponding holes on the
bottom of the router.
PN 200334-01, Rev B0
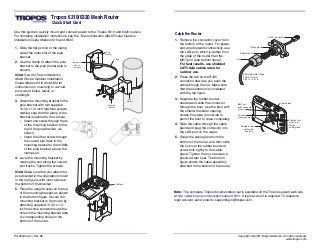
1. Remove the connector cover from
the bottom of the router. For power
and wired network connectivity, use
the LAN port, which is farther from
the edge of the router than the
MGT port (see bottom figure).
For best results, use shielded
CAT5 data cables rated for
outdoor use.
2. Press the tab on the RJ45
connector down as you push the
cable through the nut. Make sure
that the orientation is consistent
with the top figure.
Pole
bracket
Mounting
bracket
3. Separate the rubber boot as
needed and slide the connector
through the boot. Use the boot with
the smaller diameter opening,
unless the cable is too wide to
permit the boot to close completely.
4. Slide the cable through the cable
gland and plug the connector into
the LAN port on the router.
RJ45 connector
Cable gland
Rubber boot
Nut
Cable diameter range
5.5mm-9.3mm
0.22 in - 0.37 in
MGT port
(with connector
cover)
Cable gland
LAN port
(shows cable)
Shielded outdoor
cat5 cable
drip loop
Tighten four
screws to
fasten
cable gland
5. Screw the cable gland onto the
bottom of the router, and then slide
the nut over the rubber boot and
screw both tightly to the cable
gland. Tighten the nut to ensure a
positive water seal. The bottom
figure shows the cable assembly
attached to the bottom of the router.
4. Level the mounting bracket by
rotating the unit along the curved
slot tracks. Tighten the screws.
Note: Make sure that you attach the
pole bracket in the orientation shown
in the top figure, with inner tab near
the bottom of the bracket.
Cable the Router
LAN port
Note: The complete Tropos documentation set is available on the Tropos support web site
at http://www.tropos.com/support/support.html. A login account is required. To request a
login account, send email to supportlogin@tropos.com.
Copyright © 2009 Tropos Networks. All rights reserved.
www.tropos.com