SlideShare une entreprise Scribd logo
1  sur  10
Télécharger pour lire hors ligne
To add a picture or image to your blog posts just follow
                    these step-by-step directions.

   STEP 1: First you have to find the picture you want to use.You might have it on
  your camera or you may search for one on the internet. There are lots of places
    you can find pictures, but I will just give directions for finding one on Google.
                  From www.google.com, click on the word "images"


Saturday, October 31, 2009                                                       1
STEP 2: After you choose Images, then enter what you are
 looking for. You may have to do more than one search and
  change up the words to find what you have in mind. Then
                    click "Search Images"


                                     Text


*Be sure to observe copyright laws and give credit to the source of your images.


Saturday, October 31, 2009                                                     2
STEP 3: Keep moving on through the pages of the search
 until you find a picture that fits your need. Double click on
   the picture that you want to use. The picture will open.


Saturday, October 31, 2009                                     3
STEP 4: Click on the words "See full size image" The picture
 will open on a plain white page. Right click directly on the
  picture and choose Save Pic As...name the picture....and
  save to your Desktop.You now have your image and are
              ready to add to your Blog Post.


Saturday, October 31, 2009                                  4
STEP 5: Go to your Blog dashboard. If you are wanting to
      add a picture to a blog post that you have already
 published, then choose Edit. If you are starting a new post,
   then choose Add New. We will add a picture to a post
                      already published.


Saturday, October 31, 2009                                  5
STEP 6: Located just above the text box where you type
are the words "Upload/Insert". The icon just to the right is
 a small frame. If you put your cursor right over it. It says
                       Add an Image.


Saturday, October 31, 2009                                  6
STEP 7: There are two tabs to the right side. One says
   "Visual" the other says "HTML" Make sure you are on
 Visual Tab. Whichever one appears in black font is the one
  you are on. Place your cursor in the location where you
 want to insert your picture. I have the cursor right in front
     of the word "This". Now click on "Add an Image"


Saturday, October 31, 2009                                       7
STEP 8: You will see a popup box like this one. Choose
                           "Select Files"


Saturday, October 31, 2009                                     8
STEP 9: A popup will come up for you to find the location of your saved
picture. Remember this is why you saved it to the desktop. This makes it
  easier to find. Choose the location "Desktop". Sometimes the items
show in a list rather than the pictures themselves.You can change this by
clicking on View Thumbnails. Then the actual pictures show up making it
easy to find the one you are looking for. When you see the one you want
     to insert, click on it Once just to highlight it and choose "Select"


Saturday, October 31, 2009                                              9
STEP 10: The blog will Upload the picture. Scroll to the bottom of
    the popup after the picture uploads and you can select the
    position of the picture. Either None, Left, Center, or Right.
 You can also choose the size of the picture. Then select "insert
  into post". Once your picture appears in the post be sure to
                "Update Post" to save your changes.

               Now you will be ready to tackle something new!


Saturday, October 31, 2009                                       10

Contenu connexe

Tendances

Learning the basics of gmail and google drive
Learning the basics of gmail and google driveLearning the basics of gmail and google drive
Learning the basics of gmail and google drive
Lindsay Silver
 
Adding A Blog Entry
Adding A Blog EntryAdding A Blog Entry
Adding A Blog Entry
MALCLab
 
12 17 08 Creating A Blog
12 17 08 Creating A Blog12 17 08 Creating A Blog
12 17 08 Creating A Blog
Judy Kammerer
 
Photosharing
PhotosharingPhotosharing
Photosharing
cloecloe
 

Tendances (17)

Learning the basics of gmail and google drive
Learning the basics of gmail and google driveLearning the basics of gmail and google drive
Learning the basics of gmail and google drive
 
my diary
my diarymy diary
my diary
 
Blogging Your Way Through Grief
Blogging Your Way Through GriefBlogging Your Way Through Grief
Blogging Your Way Through Grief
 
How to start a blog
How to start a blogHow to start a blog
How to start a blog
 
Tutorial Tumblr
Tutorial TumblrTutorial Tumblr
Tutorial Tumblr
 
Photoclass
PhotoclassPhotoclass
Photoclass
 
Flickr Organize
Flickr OrganizeFlickr Organize
Flickr Organize
 
Adding A Blog Entry
Adding A Blog EntryAdding A Blog Entry
Adding A Blog Entry
 
12 17 08 Creating A Blog
12 17 08 Creating A Blog12 17 08 Creating A Blog
12 17 08 Creating A Blog
 
Dmc format ja
Dmc format jaDmc format ja
Dmc format ja
 
Adding a Blog Entry
Adding a Blog EntryAdding a Blog Entry
Adding a Blog Entry
 
Blogging with word press
Blogging with word pressBlogging with word press
Blogging with word press
 
How to Find Flickr Photos with a Creative Commons License
How to Find Flickr Photos with a Creative Commons LicenseHow to Find Flickr Photos with a Creative Commons License
How to Find Flickr Photos with a Creative Commons License
 
Posting instructions
Posting instructionsPosting instructions
Posting instructions
 
Wordpress e-portfolio tutorial
Wordpress   e-portfolio tutorialWordpress   e-portfolio tutorial
Wordpress e-portfolio tutorial
 
Sales Funnel Leadpages Part 2
Sales Funnel Leadpages Part 2Sales Funnel Leadpages Part 2
Sales Funnel Leadpages Part 2
 
Photosharing
PhotosharingPhotosharing
Photosharing
 

En vedette

Beginners guide eplan_electric_p8_version_2.1_us
Beginners guide eplan_electric_p8_version_2.1_usBeginners guide eplan_electric_p8_version_2.1_us
Beginners guide eplan_electric_p8_version_2.1_us
ionut grozav
 
Primefaces users guide_3_3
Primefaces users guide_3_3Primefaces users guide_3_3
Primefaces users guide_3_3
nesrine attia
 
Ateliers primefaces
Ateliers primefacesAteliers primefaces
Ateliers primefaces
Aymen Drira
 
10 Tips for Java EE 7 with PrimeFaces - JavaOne 2013
10 Tips for Java EE 7 with PrimeFaces - JavaOne 201310 Tips for Java EE 7 with PrimeFaces - JavaOne 2013
10 Tips for Java EE 7 with PrimeFaces - JavaOne 2013
Martin Fousek
 
Indexed primefaces users_guide_3_5
Indexed primefaces users_guide_3_5Indexed primefaces users_guide_3_5
Indexed primefaces users_guide_3_5
Daniel Ibrahim
 

En vedette (14)

Tech Forum
Tech ForumTech Forum
Tech Forum
 
Beginners guide eplan_electric_p8_version_2.1_us
Beginners guide eplan_electric_p8_version_2.1_usBeginners guide eplan_electric_p8_version_2.1_us
Beginners guide eplan_electric_p8_version_2.1_us
 
Primeface
PrimefacePrimeface
Primeface
 
Custom PrimeFaces components
Custom PrimeFaces componentsCustom PrimeFaces components
Custom PrimeFaces components
 
Primefaces Confess 2012
Primefaces Confess 2012Primefaces Confess 2012
Primefaces Confess 2012
 
Présentation de data.table
Présentation de data.tablePrésentation de data.table
Présentation de data.table
 
Gwt 2,3 Deep dive
Gwt 2,3 Deep diveGwt 2,3 Deep dive
Gwt 2,3 Deep dive
 
Ad.yieldmanager.com popp – remove ad.yieldmanager.com popup completely
Ad.yieldmanager.com popp – remove ad.yieldmanager.com popup completelyAd.yieldmanager.com popp – remove ad.yieldmanager.com popup completely
Ad.yieldmanager.com popp – remove ad.yieldmanager.com popup completely
 
Primefaces users guide_3_3
Primefaces users guide_3_3Primefaces users guide_3_3
Primefaces users guide_3_3
 
Ateliers primefaces
Ateliers primefacesAteliers primefaces
Ateliers primefaces
 
10 Tips for Java EE 7 with PrimeFaces - JavaOne 2013
10 Tips for Java EE 7 with PrimeFaces - JavaOne 201310 Tips for Java EE 7 with PrimeFaces - JavaOne 2013
10 Tips for Java EE 7 with PrimeFaces - JavaOne 2013
 
Primefaces
PrimefacesPrimefaces
Primefaces
 
PrimeFaces User Guide 5.0
PrimeFaces User Guide 5.0PrimeFaces User Guide 5.0
PrimeFaces User Guide 5.0
 
Indexed primefaces users_guide_3_5
Indexed primefaces users_guide_3_5Indexed primefaces users_guide_3_5
Indexed primefaces users_guide_3_5
 

Similaire à Ten Steps to adding blog image

Power point tutorial
Power point tutorialPower point tutorial
Power point tutorial
dmakk767
 
Using inspiration 8 lesson
Using inspiration 8 lessonUsing inspiration 8 lesson
Using inspiration 8 lesson
Emily Mross
 
Photo Sharing – The Basics For 23 Things Ks
Photo Sharing – The Basics For 23 Things KsPhoto Sharing – The Basics For 23 Things Ks
Photo Sharing – The Basics For 23 Things Ks
Patti Poe
 

Similaire à Ten Steps to adding blog image (20)

Microsoft Powerpoint part 1
Microsoft Powerpoint part 1Microsoft Powerpoint part 1
Microsoft Powerpoint part 1
 
Creating powerpointslide
Creating powerpointslideCreating powerpointslide
Creating powerpointslide
 
Power point2007
Power point2007Power point2007
Power point2007
 
Digital Storytelling
Digital StorytellingDigital Storytelling
Digital Storytelling
 
Power point tutorial
Power point tutorialPower point tutorial
Power point tutorial
 
How to use imove
How to use imoveHow to use imove
How to use imove
 
Google Picnik
Google PicnikGoogle Picnik
Google Picnik
 
Introduce a tool
Introduce a toolIntroduce a tool
Introduce a tool
 
Photo story
Photo storyPhoto story
Photo story
 
Learning to Create a Power Point basics
Learning to Create a Power Point basicsLearning to Create a Power Point basics
Learning to Create a Power Point basics
 
Embedding Smilebox in a Blog
Embedding Smilebox in a BlogEmbedding Smilebox in a Blog
Embedding Smilebox in a Blog
 
How To Use PowerPoint and SlideShare To Upload Your Sims 2 Stories
How To Use PowerPoint and SlideShare To Upload Your Sims 2 StoriesHow To Use PowerPoint and SlideShare To Upload Your Sims 2 Stories
How To Use PowerPoint and SlideShare To Upload Your Sims 2 Stories
 
Introduce A Tool
Introduce A ToolIntroduce A Tool
Introduce A Tool
 
How To Use PowerPoint and SlideShare To Upload Your Sims 2 Stories Ver2
How To Use PowerPoint and SlideShare To Upload Your Sims 2 Stories Ver2How To Use PowerPoint and SlideShare To Upload Your Sims 2 Stories Ver2
How To Use PowerPoint and SlideShare To Upload Your Sims 2 Stories Ver2
 
Critical Thinking Presentation
Critical Thinking  PresentationCritical Thinking  Presentation
Critical Thinking Presentation
 
How to post a blog with graphics
How to post a blog with graphicsHow to post a blog with graphics
How to post a blog with graphics
 
How to post a blog with graphics
How to post a blog with graphicsHow to post a blog with graphics
How to post a blog with graphics
 
Using inspiration 8 lesson
Using inspiration 8 lessonUsing inspiration 8 lesson
Using inspiration 8 lesson
 
Tool5
Tool5Tool5
Tool5
 
Photo Sharing – The Basics For 23 Things Ks
Photo Sharing – The Basics For 23 Things KsPhoto Sharing – The Basics For 23 Things Ks
Photo Sharing – The Basics For 23 Things Ks
 

Plus de Pam Cranford

Plus de Pam Cranford (20)

ESC7 - Symbaloo: My Appy Place
ESC7 - Symbaloo: My Appy PlaceESC7 - Symbaloo: My Appy Place
ESC7 - Symbaloo: My Appy Place
 
Follow the Bounce N Ball
Follow the Bounce N BallFollow the Bounce N Ball
Follow the Bounce N Ball
 
2013 STAAR Training Slides
2013  STAAR Training Slides2013  STAAR Training Slides
2013 STAAR Training Slides
 
Yes, I PMS! And You Will Too!
Yes, I PMS! And You Will Too!Yes, I PMS! And You Will Too!
Yes, I PMS! And You Will Too!
 
DMAC Region 7 RtI
DMAC Region 7 RtIDMAC Region 7 RtI
DMAC Region 7 RtI
 
Yes, I PMS! And You Will Too!
Yes, I PMS! And You Will Too!Yes, I PMS! And You Will Too!
Yes, I PMS! And You Will Too!
 
STAAR Parent Information
STAAR Parent InformationSTAAR Parent Information
STAAR Parent Information
 
Having a Blog Moment
Having a Blog MomentHaving a Blog Moment
Having a Blog Moment
 
STAAR 2012 Campus Training
STAAR 2012 Campus TrainingSTAAR 2012 Campus Training
STAAR 2012 Campus Training
 
TCEA Web 2.0
TCEA Web 2.0TCEA Web 2.0
TCEA Web 2.0
 
Having a Blog Moment
Having a Blog MomentHaving a Blog Moment
Having a Blog Moment
 
Link Sites to Images in a Widget
Link Sites to Images in a WidgetLink Sites to Images in a Widget
Link Sites to Images in a Widget
 
Love At First Byte
Love At First ByteLove At First Byte
Love At First Byte
 
M.E.A.T.T. 2
M.E.A.T.T. 2M.E.A.T.T. 2
M.E.A.T.T. 2
 
Meatt 2
Meatt 2Meatt 2
Meatt 2
 
M.E.A.T.T. 2
M.E.A.T.T. 2M.E.A.T.T. 2
M.E.A.T.T. 2
 
Small World
Small WorldSmall World
Small World
 
Region ESC 7 iPad in Education
Region ESC 7 iPad in EducationRegion ESC 7 iPad in Education
Region ESC 7 iPad in Education
 
2011TAKS Specific Training
2011TAKS Specific Training2011TAKS Specific Training
2011TAKS Specific Training
 
2011TAKS Writing Specific Training
2011TAKS Writing Specific Training2011TAKS Writing Specific Training
2011TAKS Writing Specific Training
 

Dernier

BASLIQ CURRENT LOOKBOOK LOOKBOOK(1) (1).pdf
BASLIQ CURRENT LOOKBOOK  LOOKBOOK(1) (1).pdfBASLIQ CURRENT LOOKBOOK  LOOKBOOK(1) (1).pdf
BASLIQ CURRENT LOOKBOOK LOOKBOOK(1) (1).pdf
SoniaTolstoy
 
Ecosystem Interactions Class Discussion Presentation in Blue Green Lined Styl...
Ecosystem Interactions Class Discussion Presentation in Blue Green Lined Styl...Ecosystem Interactions Class Discussion Presentation in Blue Green Lined Styl...
Ecosystem Interactions Class Discussion Presentation in Blue Green Lined Styl...
fonyou31
 
1029 - Danh muc Sach Giao Khoa 10 . pdf
1029 -  Danh muc Sach Giao Khoa 10 . pdf1029 -  Danh muc Sach Giao Khoa 10 . pdf
1029 - Danh muc Sach Giao Khoa 10 . pdf
QucHHunhnh
 

Dernier (20)

fourth grading exam for kindergarten in writing
fourth grading exam for kindergarten in writingfourth grading exam for kindergarten in writing
fourth grading exam for kindergarten in writing
 
BASLIQ CURRENT LOOKBOOK LOOKBOOK(1) (1).pdf
BASLIQ CURRENT LOOKBOOK  LOOKBOOK(1) (1).pdfBASLIQ CURRENT LOOKBOOK  LOOKBOOK(1) (1).pdf
BASLIQ CURRENT LOOKBOOK LOOKBOOK(1) (1).pdf
 
Interactive Powerpoint_How to Master effective communication
Interactive Powerpoint_How to Master effective communicationInteractive Powerpoint_How to Master effective communication
Interactive Powerpoint_How to Master effective communication
 
INDIA QUIZ 2024 RLAC DELHI UNIVERSITY.pptx
INDIA QUIZ 2024 RLAC DELHI UNIVERSITY.pptxINDIA QUIZ 2024 RLAC DELHI UNIVERSITY.pptx
INDIA QUIZ 2024 RLAC DELHI UNIVERSITY.pptx
 
General AI for Medical Educators April 2024
General AI for Medical Educators April 2024General AI for Medical Educators April 2024
General AI for Medical Educators April 2024
 
social pharmacy d-pharm 1st year by Pragati K. Mahajan
social pharmacy d-pharm 1st year by Pragati K. Mahajansocial pharmacy d-pharm 1st year by Pragati K. Mahajan
social pharmacy d-pharm 1st year by Pragati K. Mahajan
 
Measures of Central Tendency: Mean, Median and Mode
Measures of Central Tendency: Mean, Median and ModeMeasures of Central Tendency: Mean, Median and Mode
Measures of Central Tendency: Mean, Median and Mode
 
Key note speaker Neum_Admir Softic_ENG.pdf
Key note speaker Neum_Admir Softic_ENG.pdfKey note speaker Neum_Admir Softic_ENG.pdf
Key note speaker Neum_Admir Softic_ENG.pdf
 
Arihant handbook biology for class 11 .pdf
Arihant handbook biology for class 11 .pdfArihant handbook biology for class 11 .pdf
Arihant handbook biology for class 11 .pdf
 
Accessible design: Minimum effort, maximum impact
Accessible design: Minimum effort, maximum impactAccessible design: Minimum effort, maximum impact
Accessible design: Minimum effort, maximum impact
 
microwave assisted reaction. General introduction
microwave assisted reaction. General introductionmicrowave assisted reaction. General introduction
microwave assisted reaction. General introduction
 
Call Girls in Dwarka Mor Delhi Contact Us 9654467111
Call Girls in Dwarka Mor Delhi Contact Us 9654467111Call Girls in Dwarka Mor Delhi Contact Us 9654467111
Call Girls in Dwarka Mor Delhi Contact Us 9654467111
 
Holdier Curriculum Vitae (April 2024).pdf
Holdier Curriculum Vitae (April 2024).pdfHoldier Curriculum Vitae (April 2024).pdf
Holdier Curriculum Vitae (April 2024).pdf
 
Explore beautiful and ugly buildings. Mathematics helps us create beautiful d...
Explore beautiful and ugly buildings. Mathematics helps us create beautiful d...Explore beautiful and ugly buildings. Mathematics helps us create beautiful d...
Explore beautiful and ugly buildings. Mathematics helps us create beautiful d...
 
IGNOU MSCCFT and PGDCFT Exam Question Pattern: MCFT003 Counselling and Family...
IGNOU MSCCFT and PGDCFT Exam Question Pattern: MCFT003 Counselling and Family...IGNOU MSCCFT and PGDCFT Exam Question Pattern: MCFT003 Counselling and Family...
IGNOU MSCCFT and PGDCFT Exam Question Pattern: MCFT003 Counselling and Family...
 
Ecosystem Interactions Class Discussion Presentation in Blue Green Lined Styl...
Ecosystem Interactions Class Discussion Presentation in Blue Green Lined Styl...Ecosystem Interactions Class Discussion Presentation in Blue Green Lined Styl...
Ecosystem Interactions Class Discussion Presentation in Blue Green Lined Styl...
 
1029 - Danh muc Sach Giao Khoa 10 . pdf
1029 -  Danh muc Sach Giao Khoa 10 . pdf1029 -  Danh muc Sach Giao Khoa 10 . pdf
1029 - Danh muc Sach Giao Khoa 10 . pdf
 
A Critique of the Proposed National Education Policy Reform
A Critique of the Proposed National Education Policy ReformA Critique of the Proposed National Education Policy Reform
A Critique of the Proposed National Education Policy Reform
 
Z Score,T Score, Percential Rank and Box Plot Graph
Z Score,T Score, Percential Rank and Box Plot GraphZ Score,T Score, Percential Rank and Box Plot Graph
Z Score,T Score, Percential Rank and Box Plot Graph
 
Class 11th Physics NEET formula sheet pdf
Class 11th Physics NEET formula sheet pdfClass 11th Physics NEET formula sheet pdf
Class 11th Physics NEET formula sheet pdf
 

Ten Steps to adding blog image

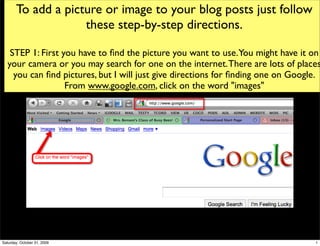
  • 1. To add a picture or image to your blog posts just follow these step-by-step directions. STEP 1: First you have to find the picture you want to use.You might have it on your camera or you may search for one on the internet. There are lots of places you can find pictures, but I will just give directions for finding one on Google. From www.google.com, click on the word "images" Saturday, October 31, 2009 1
  • 2. STEP 2: After you choose Images, then enter what you are looking for. You may have to do more than one search and change up the words to find what you have in mind. Then click "Search Images" Text *Be sure to observe copyright laws and give credit to the source of your images. Saturday, October 31, 2009 2
  • 3. STEP 3: Keep moving on through the pages of the search until you find a picture that fits your need. Double click on the picture that you want to use. The picture will open. Saturday, October 31, 2009 3
  • 4. STEP 4: Click on the words "See full size image" The picture will open on a plain white page. Right click directly on the picture and choose Save Pic As...name the picture....and save to your Desktop.You now have your image and are ready to add to your Blog Post. Saturday, October 31, 2009 4
  • 5. STEP 5: Go to your Blog dashboard. If you are wanting to add a picture to a blog post that you have already published, then choose Edit. If you are starting a new post, then choose Add New. We will add a picture to a post already published. Saturday, October 31, 2009 5
  • 6. STEP 6: Located just above the text box where you type are the words "Upload/Insert". The icon just to the right is a small frame. If you put your cursor right over it. It says Add an Image. Saturday, October 31, 2009 6
  • 7. STEP 7: There are two tabs to the right side. One says "Visual" the other says "HTML" Make sure you are on Visual Tab. Whichever one appears in black font is the one you are on. Place your cursor in the location where you want to insert your picture. I have the cursor right in front of the word "This". Now click on "Add an Image" Saturday, October 31, 2009 7
  • 8. STEP 8: You will see a popup box like this one. Choose "Select Files" Saturday, October 31, 2009 8
  • 9. STEP 9: A popup will come up for you to find the location of your saved picture. Remember this is why you saved it to the desktop. This makes it easier to find. Choose the location "Desktop". Sometimes the items show in a list rather than the pictures themselves.You can change this by clicking on View Thumbnails. Then the actual pictures show up making it easy to find the one you are looking for. When you see the one you want to insert, click on it Once just to highlight it and choose "Select" Saturday, October 31, 2009 9
  • 10. STEP 10: The blog will Upload the picture. Scroll to the bottom of the popup after the picture uploads and you can select the position of the picture. Either None, Left, Center, or Right. You can also choose the size of the picture. Then select "insert into post". Once your picture appears in the post be sure to "Update Post" to save your changes. Now you will be ready to tackle something new! Saturday, October 31, 2009 10