Limestone and Travertine Natural Stone Repair Instructions
•
0 j'aime•246 vues

For most natural stone tile repair projects, you will want to hire a professional to ensure the quality of the final outcome. However, when it comes to repairing subterranean voids that occasionally appear in limestone or travertine floor tile, most homeowners can fix the issue in a few simple steps. For more on how to maintain the beauty of your marble, limestone or travertine flooring, visit our website at www.durangostone.com.

Recommandé
Contenu connexe
En vedette
En vedette (12)
Dernier
Dernier (20)
Limestone and Travertine Natural Stone Repair Instructions
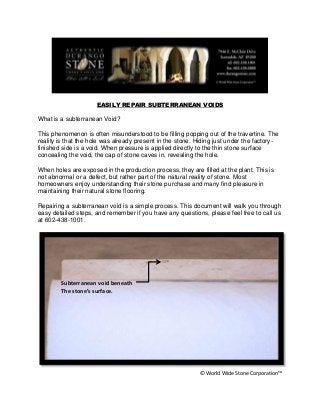
- 1. EASILY REPAIR SUBTERRANEAN VOIDS What is a subterranean Void? This phenomenon is often misunderstood to be filling popping out of the travertine. The reality is that the hole was already present in the stone. Hiding just under the factory- finished side is a void. When pressure is applied directly to the thin stone surface concealing the void, the cap of stone caves in, revealing the hole. When holes are exposed in the production process, they are filled at the plant. This is not abnormal or a defect, but rather part of the natural reality of stone. Most homeowners enjoy understanding their stone purchase and many find pleasure in maintaining their natural stone flooring. Repairing a subterranean void is a simple process. This document will walk you through easy detailed steps, and remember if you have any questions, please feel free to call us at 602-438-1001. © World Wide Stone Corporation™ Subterranean void beneath The stone’s surface.
- 2. Tools and Supplies 1. A cup of color matching un-sanded grout (any good quality brand). World Wide Stone Corporation™ is always happy to offer small quantities to any party that may need us to supply grout. 2. Pointed Tool. This may be a nail or small screwdriver needed to loosen natural debris or dirt, which may be present in the void. 3. Paper towel or clean dry cloth. 4. A small square of Styrofoam. A small block of wood or cardboard works well; the only requirement is that working surface is smooth and level. © World Wide Stone Corporation™
- 3. Step 1: Clean all debris from void using a small tool to loosen and remove all particles. Step 2: Blow into void to ensure it is clean. © World Wide Stone Corporation™
- 4. Step 3: Fill hole with tap water. Pour enough water into the hole until water will remain in the hole for a second or two. Step 4: Using a paper towel dry the finished surface surrounding the hole. This is important to make clean up and finished result a snap. © World Wide Stone Corporation™
- 5. Step 5: Using a flat tool such as a screwdriver or a knife put a mound of grout over the void, sufficient to completely fill the void. © World Wide Stone Corporation™
- 6. Step 6: Using your square of Styrofoam, or other flat surface tool, come down directly over the mound of grout. Step 7: Using small circular motions pack the grout into the wet hole. The water that is already in the hole and surround stone will set the grout. © World Wide Stone Corporation™
- 7. When finished you should have the results shown in the photo. If not enough grout was mounded over the hole, the result will not be correct. No problem, simply apply a little more grout over the void and repeat the above noted steps. If too much grout is used, you simply have a little more mess to clean up. You will easily realize the same result as above. The void in this example is just off the knifepoint. The grout will need 8 hours to harden prior to use. Tip: If the void is large, sometimes the amount of water held in the void is not sufficient to moisten the grout. When this occurs simply dip the tip of your finger into tap water. The surface tension of water will cause a half-drop to be attached to your fingertip. Carefully place this small amount of water onto the center of the grout until moist. Too much water and you will need to start over. Coaching is available from your account representative or call World Wide Stone Corporation™ at 602-438-1001. © World Wide Stone Corporation™