StoryKit: Rearranging Pages, Creating Book Cover/Title Pages
•Download as PPTX, PDF•
0 likes•1,123 views


Recommended
Recommended
More Related Content
Recently uploaded
Recently uploaded (9)
Featured
Featured (20)
StoryKit: Rearranging Pages, Creating Book Cover/Title Pages
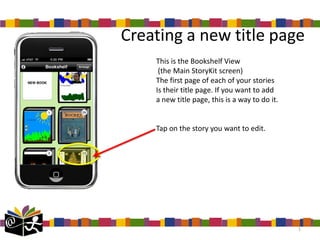
- 1. Creating a new title page This is the Bookshelf View (the Main StoryKit screen) The first page of each of your stories Is their title page. If you want to add a new title page, this is a way to do it. Tap on the story you want to edit. 1
- 2. Main Page View This is the Main Page of your story, Where you can choose to read, edit, or share it. I don’t want the current first page to be the “title” page. I want a better cover for the story. So, I tap “Edit.” 2
- 3. Edit Pages View I want a new “title” page, so I scroll down my pages to the row that says, “Create New Page.” (Note that you can also select an existing page to be your title page. If you just want to re-arrange existing pages, skip this step and go to slide #5 in this presentation.) If you want to add a new page, though, Tap “Create New Page.” 3
- 4. Edit (single) Page View Create your new page, with photos, title text, etc. Once done, Tap “Edit Pages” (top left). 4
- 5. Edit Pages View Now you’re back to the “Edit Pages” view, where you can see the list of pages in your book. Here is where you can move pages around. You want to move the new “title” page That you created to the top (i.e., first page). Tap on “Arrange.” 5
- 6. Rearrange Pages View The list of pages doesn’t change, But the icons for each page do. There are little red “delete” buttons On the left of each page, and Little “multi-row” re-arrange icons On the right. Re-arrange icon DELETE icon 6
- 7. Rearrange Pages View To Move your new “Title” page To the top, or first page of your book, Tap and hold the “re-arrange” icon, And move your desired title page up. (sorry about the dis-embodied finger. It’s the easiest way to demonstrate.) 7
- 8. Rearrange Pages View Once you’ve rearranged the pages the way that you like, with the new title page at the top, Tap “Done.” (top right) 8
- 9. Edit Pages View You will be back at your “Edit Pages” view. If you are satisfied with the order of your pages, Tap “Details.” (top left) This will bring you back to your main book view. (next slide) 9
- 10. Main Storybook View Now you see that the first page, and new “Title Page” for your book has been changed. When you go back to your “Bookshelf” view, you should see your book with this new “Cover” page. Again, the “Cover” of a book is just its first page. So if you want a distinctive “cover” – one that has a photo, author name, title test, or similar, You just create it as your first page. 10
- 11. Bookshelf View Now when you look at your StoryKit bookshelf, you should see the story with its new “Cover” page. Questions? Email us at: storykit@childrenslibrary.org 11