Seh62.1 instructions d_installation_xx
•
0 j'aime•3,069 vues

Seh62.1 instructions d_installation_xx

Recommandé
Contenu connexe
Tendances
Tendances (20)
En vedette
En vedette (20)
Similaire à Seh62.1 instructions d_installation_xx
Similaire à Seh62.1 instructions d_installation_xx (20)
Plus de e-genieclimatique
Plus de e-genieclimatique (20)
Dernier
Dernier (19)
Seh62.1 instructions d_installation_xx
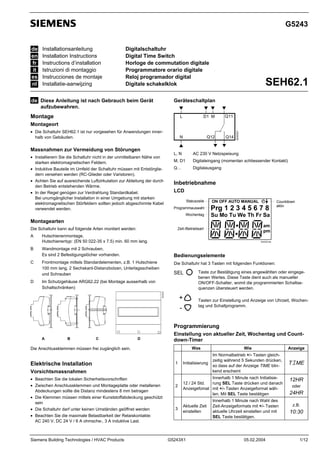
- 1. G5243 de en fr it es nl Installationsanleitung Installation Instructions Instructions d’installation Istruzioni di montaggio Instrucciones de montaje Installatie-aanwijzing Digitalschaltuhr Digital Time Switch Horloge de commutation digitale Programmatore orario digitale Reloj programador digital Digitale schakelklok de Diese Anleitung ist nach Gebrauch beim Gerät SEH62.1 Geräteschaltplan aufzubewahren. Montage L D1 M Q11 N Q12 Q14 • Die Schaltuhr SEH62.1 ist nur vorgesehen für Anwendungen innerhalb von Gebäuden. Massnahmen zur Vermeidung von Störungen • Installierern Sie die Schaltuhr nicht in der unmittelbaren Nähe von starken elektromagnetischen Feldern. • Induktive Bauteile im Umfeld der Schaltuhr müssen mit Entstörgliedern versehen werden (RC-Glieder oder Varistoren). • Achten Sie auf ausreichende Luftzirkulation zur Ableitung der durch den Betrieb entstehenden Wärme. • In der Regel genügen zur Verdrahtung Standardkabel. Bei unumgänglicher Installation in einer Umgebung mit starken elektromagnetischen Störfeldern sollten jedoch abgeschirmte Kabel verwendet werden. 5243G01 Montageort L, N AC 230 V Netzspeisung M, D1 Digitaleingang (momentan schliessender Kontakt) Q… Digitalausgang Inbetriebnahme LCD Statuszeile ON OFF AUTO MANUAL Programmauswahl Prg 1 2 3 4 5 6 7 8 Wochentag Su Mo Tu We Th Fr Sa Zeit-/Betriebsart am pm Montagearten Die Schaltuhr kann auf folgende Arten montiert werden: A Hutschienenmontage, Hutschienentyp: (EN 50 022-35 x 7.5) min. 60 mm lang. B 5243Z01de Wandmontage mit 2 Schrauben, Es sind 2 Befestigungslöcher vorhanden. C Frontmontage mittels Standardelementen, z.B. 1 Hutschiene 100 mm lang, 2 Sechskant-Distanzbolzen, Unterlagsscheiben und Schrauben Bedienungselemente Die Schaltuhr hat 3 Tasten mit folgenden Funktionen: SEL Im Schutzgehäuse ARG62.22 (bei Montage ausserhalb von Schaltschränken) 5243Z02 D Countdown aktiv + - Taste zur Bestätigung eines angewählten oder eingegebenen Wertes. Diese Taste dient auch als manueller ON/OFF-Schalter, womit die programmierten Schaltsequenzen übersteuert werden. Tasten zur Einstellung und Anzeige von Uhrzeit, Wochentag und Schaltprogramm. Programmierung A B C D Einstellung von aktueller Zeit, Wochentag und Countdown-Timer Was Wie Anzeige 1 Initialisierung Im Normalbetrieb +/- Tasten gleichzeitig während 5 Sekunden drücken, so dass auf der Anzeige TIME blinkend erscheint TIME 2 Innerhalb 1 Minute nach Initialisie12 / 24 Std. rung SEL Taste drücken und danach Anzeigefomat mit +/- Tasten Anzeigeformat wählen. Mit SEL Taste bestätigen Die Anschlussklemmen müssen frei zugänglich sein. Elektrische Installation Vorsichtsmassnahmen • Beachten Sie die lokalen Sicherheitsvorschriften • Zwischen Anschlussklemmen und Montageplatte oder metallenen Abdeckungen sollte die Distanz mindestens 8 mm betragen • Die Klemmen müssen mittels einer Kunststoffabdeckung geschützt sein • Die Schaltuhr darf unter keinen Umständen geöffnet werden • Beachten Sie die maximale Belastbarkeit der Relaiskontakte: AC 240 V, DC 24 V / 6 A ohmsche-, 3 A induktive Last. Siemens Building Technologies / HVAC Products 3 Aktuelle Zeit einstellen G5243X1 Innerhalb 1 Minute nach Wahl des Zeit-Anzeigeformats mit +/- Tasten aktuelle Uhrzeit einstellen und mit SEL Taste bestätigen. 05.02.2004 12HR oder 24HR z.B. 10:30 1/12
- 2. Was Innerhalb 1 Minute nach Einstellung des Wochentages mit +/- Tasten CTDN anwählen und mit SEL Taste bestätigen. Danach mit +/- Tasten die gewünschte EIN-Zeit des Timers einstellen, SEL Taste wieder drücken, so dass auf der Anzeige wieder CTDN erscheint. Zeit- oder Timereinstellung beenden Schritt Handlung 1 2 SEL-Taste drücken 3 Mit +/- Tasten Zeitverschiebung von + oder -1Std. wählen. 4 CTDN Im Normalbetrieb - Taste drücken, so dass auf der Anzeige DS erscheint. Mit SEL-Taste die Einstellung bestätigen, womit die Schaltuhr wieder auf Normalbetrieb schaltet. Wenn nach Einstellung des Wochentages (4. Schritt) oder des Timers auf der Anzeige wieder TIME oder CTDN blinkt, mit +/- Tasten EXIT anwählen und mit SEL Taste abschliessen. Tu We Pgr 1 ON Th Pgr 1 OFF Fr Pgr 2 ON Su...Sa SEL + SEL ON -- : -- Mo...Fr _ Sa, Su 00:00 SEL + SEL OFF -- : -- OUT _ 23:59 23:59 Mo...Sa _ _ DS OUT / IN Mo..We..Fr Tu..Th..Sa Pgr 8 ON Der Countdown-Timer wird gestartet durch einen momentan geschlossenen Kontakt zwischen M und D1. Bis zum Ablauf der gesetzten Zeit ist der Arbeitskontakt zwischen Q11 und Q14 geschlossen. +1 SEL DS -- SEL OUT -1 5243F02 Umschaltung der Betriebsart Initialisierung TIME 00:00 Sa Wenn der Countdown-Timer nicht benötigt wird, Schritt 5 auslassen. + DS---DS+I DS-I Mo IN / OUT EXIT DS Su + + Hinweise: Wenn im Programmiermodus während 1 Minute keine Taste betätigt wird, schaltet das Gerät automatisch wieder auf Normalbetrieb. + Anzeige _ 5 sec SEL 12HR _ + 24HR MO 00:01 SEL SEL + + 00:00 Im Normalbetrieb SEL-Taste drücken. Je nach momentanem Status schaltet das Gerät dann auf ON MANUAL, OFF MANUAL oder AUTO. Durch wiederholtes Betätigen der SEL-Taste ändert die Schaltuhr die Betriebsart in folgender Sequenz: + SEL Su _ _ 23:59 SA OFF AUTO 00:00 CT DN _ SEL ON MANUAL SEL OFF MANUAL + SEL 99:59 SEL _ SEL 99:58 ON MANUAL → Ausgang dauernd aktiv OFF MANUAL → Ausgang dauernd inaktiv AUTO → Ausgang gemäss Programmierung EXIT SEL Normalbetrieb 5243F03 6 Sommer-/ Winterzeit-Umschaltung Su…Sa Einstellen des Countdown-Timers 5 Anzeige Aktuellen Wochentag einstellen 4 Wie Innerhalb 1 Minute nach Einstellung der aktuellen Zeit mit +/- Tasten aktuellen Wochentag einstellen und mit SEL Taste bestätigen. 5243F01de In der Betriebsart MANUAL werden die programmierten Schaltsequenzen übersteuert. Programmierung der Schaltuhr Die Schaltuhr SEH62.1 erlaubt die Programmierung von bis zu 8 Ein/ Ausschaltzyklen. Jede dieser Schaltzyklen kann einem einzelnen Tag oder einem Block von Tagen zugeordnet werden. Mit den +/- Tasten gelangt man vom Normalbetrieb in den Programmier-Mode. Dabei startet man mit der + Taste bei Programm (Prg) 1 und mit der - Taste bei Prg 8. Der Programmier-Mode wird angezeigt durch Blinken der momentan angewählten Parameter. 1 Im Normalbetrieb + Taste drücken und anschliessend SEL-Taste drücken. 2 Mit +/- Tasten den gewünschten Wochentag oder Block von Wochentagen auswählen und SEL-Taste drücken. 3 Mit +/- Tasten gewünschte Einschaltzeit einstellen und SEL-Taste drücken. 4 Mit +/- Tasten die gewünschte Ausschaltzeit einstellen und wiederum SEL-Taste drücken, womit das Gerät wieder auf Normalbetrieb schaltet. Damit ist der 1. Schaltzyklus programmiert und der Speicherplatz Prg 1 belegt. 48 30 Anzeige Prg 1 So...Sa 89 Handlung 56 78.8 60 106 Schritt Massbild z.B. 06:00 z.B. 19:00 5243M01 Für die Programmierung von weiteren Schaltzyklen auf den Speicherplätzen Prg 2…8 die + Taste sooft betätigen, bis der gewünschte Speicherplatz blinkt und danach die Schritte 1…4 wiederholen. 2/12 05.02.2004 G5243X1 Siemens Building Technologies / HVAC Products
- 3. Commissioning en These instructions should be kept with the unit. LCD Mounting Status line Mounting location ON OFF AUTO MANUAL Program selection Prg 1 2 3 4 5 6 7 8 Weekday Su Mo Tu We Th Fr Sa Time/setup title line am pm • The SEH62.1 time switch is designed for indoor use Measures to be taken to avoid radio interference • Do not install the time switch near strong electromagnetic fields • Inductive components near the time switch must be fitted with interference suppressors (RC units or varistors) • Ensure adequate air circulation to dissipate the heat generated during operation • In general, standard cable can be used. If the time switch must be installed in environments with strong electromagnetic fields, shielded cable should be used 5243Z01en Operating elements The time switch has 3 buttons with the following functions: SEL Mounting choices + - The time switch can be mounted as follows: A On top hat rails. Type of rail: EN 50 022-35 x 7.5, min. 60 mm long. B Wall-mounting with 2 screws. 2 fixing holes are provided. C Flush panel-mounting with standard elements, e.g. 1 top hat rail 100 mm long, 2 hexagonal spacers, washers and screws. D In protective housing ARG62.22 (when used outside control panels). Countdown enable Button for confirming a selected or entered value. This button also serves as a manual ON/OFF switch for overriding the programmed switching sequences Buttons for setting and displaying the time of day, weekday and switching program Programming Setting the current time of day, weekday and countdown timer 5243Z02 What How Display TIME B C D Initialization 2 A 1 Press the + and - buttons simultaneously for 5 seconds in normal operation so that TIME appears flashing 12 / 24-hour format Press the SEL button within 1 minute after initialization, then press the +/- buttons to select the display format. Confirm with the SEL button Set the current time of day After selection of the time format, press the +/- buttons within 1 minute to set the current time of day. Confirm with the SEL button 3 The connection terminals must be freely accessible. 4 Electrical installation Precautionary measures • Ensure that local safety regulations are complied with • Between the connection terminals and the mounting plate or metal covers, there should be a minimum clearance 8 mm • The connection terminals must be protected by a plastic cover 5 • Never open the time switch • Note the maximum switching capacity of the relay contacts: AC 240 V, DC 24 V / 6 A resistive, 3 A inductive 6 Internal diagram D1 M Q12 Q14 Note: Q11 N Exit the time or timer seting 5243G01 L After setting the current time of day, Set the curpress the +/- buttons within 1 minute rent weekday to set the current weekday. Confirm with the SEL button After setting the weekday, press the +/- buttons to select CTDN and confirm with the SEL button. Then, set Setting the the timer’s required ON time by countdown pressing the +/- buttons. Press the timer SEL button again so that CTDN appears again L, N 24HR E.g. 10:30 Su…Sa CTDN EXIT When, in programming mode, no button is pressed for 1 minute, the timer will automatically return to normal operation. The countdown timer is started by a momentarily closing contact connected to M - D1. The N.O. contact across Q11 - Q14 remains closed until the set time has elapsed. Digital input (momentary contact closure) Q… or If the countdown timer is not required, skip step no. 5. AC 230 V mains supply M, D1 When, after setting the weekday (step no.4) or the timer, TIME or CTDN appears flashing again, press the +/buttons to select EXIT and close with the SEL button 12HR Digital output Siemens Building Technologies / HVAC Products G5243X1 05.02.2004 3/12
- 4. Initialization + + TIME _ 5 sec SEL 12HR _ + 24HR MO 00:01 SEL SEL + 00:00 Su 23:59 _ Tu We Pgr 1 ON SA Th Pgr 1 OFF 00:00 CT DN Mo IN / OUT + _ _ + Fr Pgr 2 ON 99:59 Su...Sa SEL _ SEL 00:00 Sa + SEL Su + + SEL Mo...Fr 99:58 SEL + ON -- : -- Sa, Su _ 00:00 SEL + SEL OFF -- : -_ 23:59 OUT 23:59 Mo...Sa EXIT _ SEL Tu..Th..Sa Pgr 8 ON 5243F01en _ DS OUT / IN +1 SEL DS -- 5243F02 With the SEH62.1 time switch, up to 8 ON / OFF switching cycles can be programmed. Each of them can be assigned to an individual day or block of days. Press the +/- buttons to switch from normal operation to programming mode. With the + button, a start is made with program (Prg) 1; with the – button, a start is made with program (Prg) 8. The currently selected parameters flash to indicate the programming mode. Action 1 Press the + button in normal operation, then press the SEL button 2 Press the +/- buttons to select the required weekday or block of weekday or block of weekdays, then press the SEL button 3 Set the required switch-on time with the +/- buttons, then press the SEL button 4 Set the required switch-off time with the +/- buttons and press the SEL button again so that the time switch will return to normal operation. The first switching cycle is thus programmed and memory location Prg 1 is assigned OUT -1 Programming the time switch Step SEL Changeover of operating mode Press the SEL button in normal operation. Depending on the current state, the time switch will switch to ON MANUAL, OFF MANUAL or AUTO. By repeatedly pressing the SEL button, the time switch will change the operating mode in the following sequence: OFF AUTO Display SEL Prg 1 Su...Sa E.g. 06:00 E.g. 19:00 ON MANUAL SEL OFF MANUAL 5243F03 Normal operation Mo..We..Fr SEL ON MANUAL → Output continuously active OFF MANUAL → Output continuously inactive AUTO → Output according to programming In MANUAL mode, the programmed switching sequences will be overridden. Dimensions 56 78.8 60 For programming additional switching cycles on the memory locations Prg 2…8, press the + button several times until the required memory location flashes. Then, repeat steps no. 1 through 4. 48 30 Summer- / wintertime changeover Display 1 DS 2 Press the SEL button 3 Press the +/- buttons to set the time shift of + or –1 hour 4 89 Action Press the - button in normal operation so that DS appears on the display 106 Step DS---DS+I DS-I Press the SEL button to confirm the setting after which the time switch returns to normal operation 5243M01 4/12 05.02.2004 G5243X1 Siemens Building Technologies / HVAC Products
- 5. Mise en service fr Ces instructions sont à conserver à proximité de l'appareil. LCD Montage Ligne d'état Sélection programme Lieu de montage Jour de semaine • L'horloge de commutation SEH62.1 est ne peut être installée qu'à l'intérieur du bâtiment. ON OFF AUTO MANUAL Prg 1 2 3 4 5 6 7 8 Di Lu Ma Me Je Ve Sa mat a-m. Heure/régime Mesures visant à éviter des dérangements • L'horloge ne doit pas être installée à proximité de champs électromagnétriques forts. • Des éléments inductifs dans l'environnement de l'horloge doivent être dotés de circuits RC ou de varistors. • Une circulation d'air suffisante doit assurer l'évacuation de la chaleur produite par le fonctionnement de l'appareil. • En règle générale, des câbles standard sont suffisants pour le raccordement. Si l'installation dans un environnement perturbé par des champs électromagnétiques est inévitable, utiliser des câbles blindés. 5243Z01fr Eléments d'exploitation L'horloge de commutation possède 3 touches ayant les fonctions suivantes : SEL + - Types de montage L'horloge peut être montée de différentes manières: A Montage sur rail oméga, Type de rail: (EN 50 022-35 x 7.5) longueur min. 60 mm . B Montage mural, par le moyen de deux vis, deux trous de fixation sont prévus à cet effet. C Comptage actif Touche pour la confirmation d'une valeur sélectionnée ou entrée. Elle sert également de commutateur manuel MARCHE/ARRET pour forcer les séquences programmées. Touches pour le réglage et l'affichage de l'heure, du jour de semaie et du programme de commutation . Programmation Réglage de l'heure, du jour de semaine et du compteur Montage dans la façade d'une armoire à l'aide d'éléments standard, par ex. 1 rail oméga de 100 mm, 2 boulons d'écartement sixpans, disques et vis. OBJET OPERATION Affichage TIME Format d'affichage 12 / 24 heures Dans la minute qui suit l'initialisation, appyuer sur SEL et choisir ensuite avec les touches +/- le format d'affichage de l'heure, valider avec la touche SEL. Régler l'heure actuelle Dans la minute qui suit la sélection du format de l'heure, régler avec les touches +/- l'heure actuelle, valider avec la touche SEL . 4 Dans la minute qui suit le réglage de Régler le jour l'heure, afficher avec les touches +/de semaine le jour de semaine, valider avec la actuel touche SEL. 5243Z02 Initialisation 3 Dans un boîtier de protection ARG62.22 (si le montage se fait à l'extérieur d'armoires électriques). 1 2 D En mode normal, appyuer pendant cinq secondes simultanément sur les deux touches +/-, jusqu'à ce que TIME clignote. A B C D Les bornes de raccordement doivent rester accessibles . Installation électrique Mesures de sécurité • Respecter les prescriptions de sécurité locales • Une distance de 8 mm min. doit séparer les bornes et la plaque de montage ou d'éventuels capots métalliques. 5 • Les bornes sont à protéger par un couvre-bornes plastique. Réglage du compteur (CountdownTimer) • L'ouverture de l'horloge est formellement proscrite. • Veuillez tenir compte de la charge maximale des contacts de relais 240 V ~, 24 V / 6 A charge ohmique , 3 A charge inductive 6 Schéma des connexions D1 M N Q12 Q14 Notas: Q11 5243G01 L Terminer les réglages L, N Sortie numérique Siemens Building Technologies / HVAC Products Par ex. 10:30 Di…Sa CTDN EXIT Si en mode programmation aucune touche n'est actionnée pendant une minute, l'horloge revient en régime normal. Le compteur "Countdown" est activé par un contact momentanément fermé entre M et D1. Jusqu'à l'écoulement du temps programmé, le contact de travail entre Q11 et Q14 reste fermé. Entrée numérique (contact à fermeture temporaire) Q… Si après le réglage du jour de semaine e (4 opération) ou du compteur, TIME ou CTDN clignotent à nouveau, sélectionner EXIT avec les touches +/- et quitter avec une pression sur SEL. ou 24HR Si le compteur n'est pas utilisé, l'opération 5 peut être omise. 230 V ~ Alimentation tension secteur M, D1 Dans la minute qui suit le réglage du jour de semaine, sélectionner avec les touches +/- CTDN, valider avec la touche SEL. Ensuite régler avec les touches +/l'heure d'enclenchement du compteur, presser à nouveau SEL, et l'affichage revient sur CTDN. 12HR G5243X1 05.02.2004 5/12
- 6. Initialisation + + TIME _ 5 sec SEL 12HR _ + 24HR MO 00:01 SEL SEL + + 00:00 SEL _ 23:59 CT DN Mo IN / OUT + Su _ Tu We Pgr 1 ON SA Th Pgr 1 OFF 00:00 Fr Pgr 2 ON 99:59 Su...Sa SEL SEL SEL Mo...Fr _ _ 00:00 Sa + SEL Su + + + ON -- : -_ Sa, Su 99:58 00:00 SEL + SEL OFF -- : -_ 23:59 OUT 23:59 Mo...Sa EXIT Mo..We..Fr _ SEL Tu..Th..Sa Pgr 8 ON _ DS OUT / IN +1 SEL DS -- SEL OUT -1 Programmation de l'horloge 5243F02 L'horloge de commutation SEH62.1 permet la programmation de 8 cycles d'enclenchement/déclenchement max. Chacun de ces cyles de commutation peut être affecté à un jour individuel ou à un bloc de jours. Avec les touches +/- , on accède depuis le mode normal dans le mode de programmation. On démarre avec la touche + pour le programme (Prg) 1 et avec la touche - pour le programme (Prg) 8. Le mode de programation est signalé par le clignotement des paramètres sélectionnés. Chronologie Opération En mode normal, appuyer sur la touche + et ensuite sur la touche SEL. Prg 1 2 Sélectionner avec les touches +/- le jour de semaine ou le groupe de jours et valider avec la touche SEL. 3 Sélectionner avec les touches +/- l'heure d'enclenchement souhaitée et valider avec la touche SEL. 4 Régler avec les touches +/- l'heure de déclenchement souhaitée, valider par pression de la touche SEL. L'appareil revient en mode normal. Le premier cycle de commutation est ainsi programmé et la place mémoire Prg 1 occupée. OFF AUTO SEL Affichage 1 Commutation du régime de fonctionnement En mode normal, appuyer sur la touche SEL. Selon le régime en cours, l'appareil commute sur ON MANUAL, OFF MANUAL ou AUTO. Par des pressions répétées de la touche SEL, l'horloge modifie le régime selon la séquence suivante: Di...Sa ON MANUAL SEL OFF MANUAL 5243F03 Régime normal 5243F01fr SEL ON MANUAL → sortie active en permanence OFF MANUAL → sortie désactivée en permanence AUTO → sortie fonctionne selon programmation En mode MANUAL, les séquences de commutation sont forcées. Par ex. 06:00 Encombrement 56 78.8 60 Par ex. 48 30 89 Pour la programmation d'autres cycles de commutation, sur les places de mémoire Prg 2…8, actionner la touche + tant de fois jusqu'à ce que le programme souhaité clignote, ensuite répéter les opérations 1…4. 106 19:00 Commutation de l'heure d'été/heure d'hiver Chronologie Opération Affichage 1 En mode normal, appuyer sur la touche −, DS s'affiche. DS 2 Actionner la touche SEL. 3 Sélectionner avec les touches +/- le décalage horaire (+ ou –1 heure). 4 Valider en pressant la touche SEL. L'horloge retourne en mode normal. 6/12 05.02.2004 DS---DS+I DS-I G5243X1 5243M01 Siemens Building Technologies / HVAC Products
- 7. Parametrizzazione it Queste istruzioni devono essere mantenute con l’apparecchiatura LCD Montaggio Linea di stato Selezione programma Disposizione di montaggio Giorno • Il programmatore orario SEH62.1 è progettato per installazione interna ON OFF AUTO MANUAL Prg 1 2 3 4 5 6 7 8 Su Mo Tu We Th Fr Sa am pm Ora/linea setup Occorre prevedere misure contro interferenze radio • Non installare il programmatore orario nelle vicinanze di forti campi magnetici • Componenti induttivi, nelle vicinanze del programmatore, devono essere adattati con soppressori d’interferenze (unità RC o varistori) • Garantire una circolazione d’aria idonea, per dissipare il calore generato durante il funzionamento • Utilizzare cavi standard di collegamento. Se il programmatore orario deve essere installato in prossimità di forte campi magnetici, utilizzare cavi schermati Abilitazione temporizz. 5243Z01it Elementi funzionali Il programmatore orario ha 3 pulsanti con le seguenti funzioni: SEL + - Istruzioni di montaggio Pulsante per confermare una selezione o un valore d’ingresso. Questo pulsante serve anche per forzare in sequenza il programma auto e manuale ON/OFF Pulsanti per impostare e visualizzare l’ora, il giorno settimanale e il programma orario Il programmatore orario può essere installato come segue: A Su guide DIN. Tipo: EN 50 022-35 x 7.5, min. lunghezza 60 mm. B Montaggio a parete con 2 viti. Sono previsti 2 fori di fissaggio. C Montaggio a fronte quadro con elementi standard, es. 1 guida lunga 100 mm, 2 distanziali esagonali, viti e rondelle. D Per montaggi esterni utilizzare la custodia protettiva ARG62.22. Programmazione Impostazione ora, giorno, settimana e temporizzatore Cosa Display Inizializzazione TIME Formato 12 / 24-ore Premere il pulsante SEL, entro 1 minuto dall’inizializzazione, e con i pulsanti +/– selezionare il formato del display. Confermare col pulsante SEL 5243Z02 1 Come Premere i pulsanti + e – simultaneamente per 5 secondi (impiego normale) così appare TIME lampeggiante 2 A B C D 3 I morsetti di collegamento devono essere facilmente accessibili. Installazione elettrica 4 Misure precauzionali • Accertarsi di garantire tutte le normative di sicurezza vigenti • Tra i morsetti e la piastra di montaggio o coperchio metallico ci deve essere una distanza minima di 8 mm • I terminali di collegamento devono essere protetti da una copertura di plastica 5 • Mai aprire il programmatore orario • Nota Bene: massima portata contati relè: 240 V AC, 24 V DC / 6 A (res.), 3 A (ind.) 6 Schema interno D1 M Q11 N Q12 Q14 Dopo l’impostazione dell’ora, premere i pulsanti +/– , entro 1 minuto, Impostazione per impostare il giorno della settidel giorno mana. Confermare con il pulsante SEL Dopo l’impostazione del giorno, premere i pulsanti +/– per impostare CTDN e confermare con il pulsante Impostazione SEL. Premere i pulsanti +/– per imtemporizzapostare il tempo richiesto del tempotore rizzatore ON. Premere di nuovo il pulsante SEL così che riappaia CTDN Dopo l’impostazione del giorno (punto n.4) o dell’ora, TIME o CTDN lamUscita propeggiano, premere i pulsanti +/– per grammazione selezionare EXIT e confermare con il pulsante SEL Nota: 5243G01 L Dopo la selezione del formato dell’ora, premere i pulsanti +/– , enImpostazione tro 1 minuto, per l’impostazione dell’ora dell’ora corrente. Confermare con il pulsante SEL L, N Es. 10:30 Su…Sa CTDN EXIT Quando, in modalità di programmazione, nessun pulsante viene premuto per 1 minuto, il programmatore orario ritorna automaticamente in funzionamento normale. Il temporizzatore inizia il funzionamento quando il contatto è momentaneamente chiuso tra i morsetti M - D1. Il contatto N.A. tra i morsetti Q11 - Q14 rimane chiuso per il tempo impostato (del temporizzatore). Ingresso digitale (contatto chiuso ad impulso) Q… o 24HR Se il temporizzatore non è richiesto, saltare il punto n. 5. 230 V AC, tensione d’alimentazione M, D1 12HR Uscita contatto Siemens Building Technologies / HVAC Products G5243X1 05.02.2004 7/12
- 8. Inizializzazione + TIME _ 5 sec SEL 12HR _ + 24HR MO 00:01 SEL SEL + 00:00 SEL _ 23:59 + CT DN _ Mo IN / OUT + Su _ Tu We Pgr 1 ON SA Th Pgr 1 OFF 00:00 Fr Pgr 2 ON 99:59 Su...Sa SEL SEL Mo...Fr _ SEL 00:00 Sa + SEL Su + + + ON -- : -_ Sa, Su 99:58 00:00 SEL + SEL OFF -- : -_ 23:59 OUT 23:59 Mo...Sa EXIT _ SEL Tu..Th..Sa Pgr 8 ON Funzionamento normale 5243F01it _ DS OUT / IN Mo..We..Fr +1 SEL DS -- SEL OUT -1 Programmi orari 5243F02 Con il programmatore orario SEH62.1 si possono impostare fino ad 8 cicli di programmi ON / OFF. Ciascun ciclo può essere assegnato ad un giorno o gruppo di giorni. Premere i pulsanti +/– per passare dal funzionamento normale alla modalità di programmazione. Con il pulsante + inizia con il programma (Prg) 1; con il pulsante –, inizia dal programma (Prg) 8. La selezione corrente dei parametri lampeggia per indicare la modalità di programmazione. Punto Azione 1 Premere i pulsanti +/– per selezionare il giorno o blocco di giorni richiesto, poi premere il pulsante SEL Su...Sa 3 Impostare la richiesta del tempo orario on con i pulsanti +/–, poi premere il pulsante SEL 4 Impostare la richiesta del tempo orario off con i pulsanti +/–, poi premere il pulsante SEL così da ritornare al funzionamento normale. Il primo ciclo di programmazione è assegnato alla locazione di memoria Prg 1 SEL Prg 1 2 OFF AUTO Display Nel funzionamento normale, premere il pulsante + e premere il pulsante SEL Commutazione modalità funzionamento Nel funzionamento normale, premendo il pulsante SEL e in funzione dello stato attuale, il programmatore commuta da ON MANUAL, OFF MANUAL o AUTO. Premere di nuovo il pulsante SEL , il programmatore orario commuterà la sequenza di funzionamento nel seguente modo: Es. 06:00 ON MANUAL SEL OFF MANUAL 5243F03 + SEL ON MANUAL → Uscita attiva permanentemente OFF MANUAL → Uscita inattiva permanentemente AUTO → Uscita in funzione del programma impostato In modalità MANUAL le sequenze dei programmi a tempo rimangono escluse. Es. 19:00 Dimensioni 56 78.8 60 Per programmare i restanti cicli di programmazione Prg 2…8, premere il pulsante + diverse volte fino alla locazione di memoria lampeggiante. Poi ripetere i punti dal n. 1 al 4. 48 30 Commutazione ora Solare / Legale Display 1 DS 2 Premere il pulsante SEL 3 Premere i pulsanti +/– per impostare lo scostamento orario di + o – 1 ora 4 DS---DS+I DS-I 89 Azione Nel funzionamento normale, premere il pulsante – ed appare sul display DS 106 Punto Premere il pulsante SEL per confermare l’impostazione dopo di che il programmatore ritorna al funzionamento normale 5243M01 8/12 05.02.2004 G5243X1 Siemens Building Technologies / HVAC Products
- 9. Puesta en servicio es Estas instrucciones deben guardarse con el reloj programador digital Pantalla LCD Montaje Línea de estado Selección programa Ubicación Día de la semana • El reloj programador SEH62.1 está diseñado para su uso en interiores ON OFF AUTO MANUAL Prg 1 2 3 4 5 6 7 8 Su Mo Tu We Th Fr Sa (Do) (Lu) (Ma) (Mi) (Ju) (Vi) (Sa) am pm Hora en curso Medidas que deben tomarse para evitar radiointerferencias • No instalar el reloj programador cerca de campos electromagnéticos • Los componentes inductivos cercanos al reloj programador deben ajustarse con supresores de interferencias (unidades RC o varistores) • Asegurar la sufiente circulación de aire para disipar el calor generado durante el funcionamiento • En general, puede usarse cable estándar. Si el reloj programadordebe instarlarse en ambientes con fuertes campos electromagnéticos, debe usarse cable protegido. Programa en curso 5243Z01es Elementos de funcionamiento El reloj programador tiene 3 botones con las siguientes funciones: SEL + - Opciones de montaje El reloj programador puede montarse de las siguientes maneras: Botón de confirmación de un valor seleccionado o introducido. Este botón sirve además como conmutador manual TODO/NADA invalidante de las secuencias de conmutación programadas Botones de ajuste y visualización de la hora, día de la semana y programa de conmutación A Sobre la brida de conexión a los raíles. Tipo de carril: EN 50 022-35 x 7.5, min. 60 mm longitud. Programación B Montaje en la pared mediante 2 tornillos. Se facilitan 2 agujeros de sujeción. Ajuste de la hora actual, día de la semana y temporizador cuenta atrás C Panel de montaje embutido con elementos estándar, p.ej. una brida de conexión en raíl superior, 2 espaciadores hexagonales, arandelas y tornillos. En la carcasa de protección ARG62.22 (cuando se utiliza en el exterior de los paneles de control). 1 2 3 A B C D Las bornas de conexión deben estar fácilmente accesibles. 4 Instalación eléctrica Medidas de precaución • Asegurarse del cumplimiento de las normas de seguridad locales • Entre las bornas de conexión y la placa de montaje o cubiertas metálicas, deberá existir una distancia mínima de 8 mm • Las bornas de conexión deben protegerse con una cubierta de plástico 5 • No abrir nunca el interruptor horario • Tomar nota de la máxima capacidad de conmutación de los contactos de relés: 240 V CA, 24 V CC / 6 A (res.), 3 A (ind.) Esquema interno L D1 M 6 Inicialización Formato 12 / 24-horas Pulsar el botón SEL durante 1 minuto después de la inicialización, después presionar los botones +/- para seleccionar el formato. Confirmar con el botón SEL Después de la selección del formato horario, presionar los botones +/Ajuste del día durante 1 minuto para ajustar la hora y hora actual actual del día. Confirmar con el botón SEL Después de ajustar la hora actual del día, pulsar los botones +/- duranAjuste del día te 1 minuto para ajustar el día de la de la semana semana. Confirmar con el botón SEL Después de ajustar el día de la semana, presionar los botones +/- para seleccionar CTDN y confirmar con el Ajuste del botón SEL. Después, ajustar el temtemporizador porizador por el tiempo necesario cuenta atrás pulsando los botones +/-. Presionar el botón SEL de nuevo para que CTDN aparezca otra vez Salir del tiempo o del ajuste del temporizador Q11 Q12 Q14 5243G01 Nota: N Cómo Pulsar los botones + y – simultáneamente durante 5 segundos en funcionamiento normal de manera que parpadee TIME 5243Z02 D Qué Cuando, después de ajustar el día de la semana (paso no.4) o el temporizador, TIME o CTDN aparezcan parpadeando de nuevo, pulsar los botones +/- para seleccionar EXIT y terminar con el botón SEL Pantalla TIME 12HR ó 24HR P.ej. 10:30 Do…Sa CTDN EXIT Cuando, en modo programación, no se pulsa ningún botón durante 1 minuto, el temporizador vuelve automáticamente al funcionamiento normal. Si el temporizador cuenta atrás no es necesario, saltar el paso no. 5. L, N Alimentación 230 V CA M, D1 Entrada digital (contacto momentáneamente cerrado) Q… Salida digital Siemens Building Technologies / HVAC Products El temporizador cuenta atrás es iniciado por un cierre momentáneo del contacto conectado a M - D1. El contacto N.A. que cruza Q11 - Q14 permanece cerrado hasta que la hora fijada ha transcurrido. G5243X1 05.02.2004 9/12
- 10. Inicialización + + TIME _ 5 sec SEL 12HR _ + 24HR MO 00:01 SEL + 00:00 SEL SEL _ 23:59 + Su + + Mo IN / OUT + Su _ Tu We Pgr 1 ON Th SA Pgr 1 OFF Fr 00:00 CT DN Pgr 2 ON + SEL Su...Sa SEL 99:59 99:58 SEL Mo...Fr 00:00 + SEL ON -- : -- + SEL OFF -- : -- OUT Mo...Sa _ _ 00:00 Sa SEL Sa, Su _ EXIT 5243F01es _ DS OUT / IN _ 23:59 23:59 Mo..We..Fr Tu..Th..Sa Pgr 8 ON SEL Operación Normal _ +1 SEL DS -- SEL OUT -1 5243F02 Programación del programador digital Paso Acción 1 Pulsar el botón + en funcionamiento normal, después pulsar el botón SEL 2 Pulsar los botones +/- para seleccionar el día de la semana necesario o bloque de días o bloque de semanas, después pulsar el botón SEL 3 Fijar el tiempo de encendido necesario con los botones +/-, después pulsar el botón SEL 4 Ajustar el tiempo de apagado con los botones +/y pulsar el botón SEL de nuevo para que el reloj programadorvuelva a funcionamiento normal. El primer ciclo de conmutación se programa así y se memoriza en Prg 1 Cambio de modo de funcionamiento Pulsar el botón SEL en funcionamiento normal. Dependiendo del estado actual, el reloj programador cambiará a ON MANUAL, OFF MANUAL o AUTO. Pulsando repetidamente el botón SEL, el reloj programador cambiará al modo de funcionamiento de la secuencia siguiente: OFF AUTO Pantalla SEL Prg 1 Do...Sa P.ej. 06:00 ON MANUAL SEL OFF MANUAL 5243F03 Con el reloj programador SEH62.1, pueden programarse hasta 8 ciclos de conmutación TODO/NADA. Cada uno de ellos puede asignarse a un día individual o bloque de días. Pulsar los botones +/- para cambiar del funcionamiento normal a modo programación. Con el botón +, arranca el programa (Prg) 1; con el botón –, se inicia el programa (Prg) 8. Los parámetros actualmente seleccionados parpadean para indicar el modo de programación. SEL ON MANUAL → Salida activa continuamente OFF MANUAL → Salida inactiva continuamente AUTO → Salida acorde con la programación En modo MANUAL, las secuencias de conmutación programadas se anularán. P.ej. 19:00 Dimensiones 56 78.8 60 Para una programación adicional de los ciclos de conmutación en las ubicaciones de la memoria de los Prg 2…8, pulsar el botón + varias veces hasta que la memoria requerida parpadee. Después, repetir los pasos 1 a 4. 48 30 Cambio verano / invierno Paso Acción Pulsar el botón SEL 3 Pulsar los botones +/- para fijar el cambio de hora en + o –1 hora 4 Pulsar el botón SEL para confirmar el ajuste después del cual el reloj programador vuelva a funcionamiento normal DS 89 2 Pantalla 106 1 Pulsar el botón – en funcionamiento normal de tal forma que DS aparezca en la pantalla DS---DS+I DS-I 5243M01 10/12 05.02.2004 G5243X1 Siemens Building Technologies / HVAC Products
- 11. Inbedrijfstelling nl Deze handleiding moet na gebruik bij het ap paraat worden bewaard LCD Montage Statusregel Montageplaats am pm Tijd/bedrijfswijze Maatregelen ter voorkoming van storingen • Installeer de schakelklok niet in de directe omgeving van sterke elektromagnetische velden • Inductieve componenten in de omgeving van de schakelklok moeten voorzien worden van ontstoringsdelen (RC-kringen of varistoren) • Let op voldoende luchtcirculatie voor afvoer van de door het bedrijf ontstane warmte • In de regel zijn voor de bedrading standaardkabels voldoende. Bij onvermijdelijke installatie in de buurt van sterke elektromagnetische storingsvelden moeten echter afgeschermde kabels worden gebruikt 5243Z01d Bedieningselementen De schakelklok heeft 3 toetsen met de volgende functies: SEL + - Montagetypes De schakelklok kan op de volgende manieren worden gemonteerd: A Wandmontage met 2 schroeven, er zijn 2 bevestigingsgaten aanwezig C Toets voor de bevestiging van een gekozen of ingevoerde waarde. Deze toets dient ook voor handmatige ON/OFFschakelaar, waarmee de geprogrammeerde schakelingen kunnen worden overbrugd. Toets voor de instelling en weergave van tijd, dag van de week en schakelprogramma. Programmering Railmontage, Railtype: (EN 50 022-35 x 7.5) min. 60 mm lang. B Countdown actief Su Mo Tu We Th Fr Sa Weekdag • De schakelkok SEH62.1 is slechts bedoeld voor toepassingen binnen gebouwen ON OFF AUTO MANUAL Prg 1 2 3 4 5 6 7 8 Programmakeuze Frontmontage d.m.v. standaardelementen, b.v. 1 rail 100 mm lang, 2 zeskant-afstandsbouten, sluitringen en schroeven Instelling van de actuele tijd, dag van de week en countdown-timer Wat Hoe Weergave TIME Initialisering Tijdens normaal bedrijf met de +/toetsen gelijktijdig gedurende 5 s indrukken, zodat op de display TIME knipperend verschijnt 2 12 / 24 uur. Weergaveformaat binnen 1 minuut na initialisering SEL-toets indrukken en daarna met de +/- toetsen een weergaveformaat kiezen. Met SEL-toets bevestigen 3 Actuele tijd instellen Binnen 1 minuut na keuze van het tijd-weergaveformaat met de +/toetsen de actuele tijd instellen en met SEL-toets bevestigen 4 Actuele dag van de week instellen Binnen 1 minuut na instelling van de actuele tijd met de +/- toetsen de actuele dag van de week instellen en met de SEL-toets bevestigen Su…Sa 5 Instellen van de countdown-timer Binnen 1 minuut na instelling van de dag van de week met de +/toetsen CTDN kiezen en met de SEL-toets bevestigen. Daarna met de +/- toetsen de INtijd van de timer instellen, de SEL toets weer indrukken, zodat op de weergave weer CTDN verschijnt CTDN 6 Tijd of timerinstelling beëindigen Als na instelling van de dag van de week (4e stap) of de timer op de weergave weer TIME of CTDN knippert, met de +/- toetsen EXIT kiezen en met de SEL- toets afsluiten EXIT In beschermhuis ARG62.22 (bij montage buiten de schakelkast) 5243Z02 D 1 A B C D De aansluitklemmen moeten vrij toegankelijk zijn. Elektrische installatie Beschermende maatregelen • Neem de plaatselijke veiligheidsvoorschriften in acht • Tussen aansluitklemmen en montageplaat of metalen afdekkingen moet een minimumafstand van 8 mm zijn • De klemmen moeten d.m.v. een kunststofafdekking worden beveiligd • De schakelklok mag onder geen voorwaarde worden geopend • Neem de maximale belastbaarheid van de relaiscontacten in acht: AC 240 V, DC 24 V / 6 A ohm., 3 A ind. Apparatenschema D1 M Q11 N Q12 Q14 5243G01 L L, N b.v. 10:30 De countdown-timer wordt gestart door een gesloten contact tussen M en D1. Tot aan de afloop van de ingestelde tijd is het contact tussen Q11 en Q14 gesloten. Digitale uitgang Siemens Building Technologies / HVAC Products 24HR Als de countdown-timer niet nodig is, stap 5 overslaan. Digitale ingang (maakcontact) Q… of Aanwijzingen: Als gedurende de programmeermodus gedurende 1 minuut geen toets wordt bediend, schakelt het apparaat automatisch weer om naar normaal bedrijf. AC 230 V netvoeding M, D1 12HR G5243X1 05.02.2004 11/12
- 12. Initialisering + + TIME 12HR _ 5 sec SEL _ + 24HR MO 00:01 SEL SEL + 00:00 SEL _ 23:59 + Su + + Mo IN / OUT + Su _ Tu We Pgr 1 ON Th SA Pgr 1 OFF Fr 00:00 CT DN _ Pgr 2 ON + SEL Su...Sa SEL 99:59 99:58 SEL Mo...Fr + ON -- : -- 00:00 SEL + SEL OFF -- : -- OUT Mo...Sa _ SEL 00:00 Sa Sa, Su _ EXIT 5243F01nl _ DS OUT / IN _ 23:59 23:59 Mo..We..Fr Tu..Th..Sa Pgr 8 ON SEL Normaal bedrijf _ +1 SEL DS -- SEL OUT -1 5243F02 Programmering van de schakelklok Stap Handeling 1 Prg 1 2 Met de +/- toetsen de gewenste dag van de week of blok van dagen van de week kiezen en de SEL-toets indrukken. So…Sa 3 Met de +/- toetsen de gewenste inschakeltijd instellen en de SEL-toets indrukken. 4 Met de +/- toetsen de gewenste uitschakeltijd instellen en opnieuw de SEL-toets indrukken, waarna het apparaat weer naar normaal bedrijf schakelt. Daarmee is de 1e schakelcyclus geprogrammeerd en de opslagpaats Prg 1 bezet. OFF AUTO SEL Weergave Tijdens normaal bedrijf de + toets indrukken en aansluitend de SEL-toets indrukken. Omschakeling van de bedrijfswijze Tijdens normaal bedrijf de SEL-toets indrukken. Na de status van dat moment schakelt het apparaat dan naar ON MANUAL, OFF MANUAL of AUTO. b.v. ON MANUAL SEL OFF MANUAL 5243F03 Met schakelklok SEH62.1 kan men max. 8 in-/uitschakelcycli programmeren. Aan ieder van deze schakelcycli kan een enkele dag of een blok van dagen worden toegewezen. Met de +/- toetsen komt men van normaal bedrijf in de programmeermodus. Men start daarbij met de + toets bij programma (Prg) 1 en met de - toets bij Prg 8. De programmeermodus wordt aangegeven door knipperen van de op dat moment gekozen parameter. SEL ON MANUAL → Uitgang voortdurend actief OFF MANUAL → Uitgang voortdurend inactief AUTO → Uitgang volgens programmering In de bedrijfswijze MANUAL worden de geprogrammeerde schakelingen overbrugd. 06:00 Maatschets b.v. 56 19:00 78.8 60 48 30 Voor de programmering van de volgende opslagplaatsen Prg 2…8 moet de + toets zo vaak worden bediend tot de opslagplaats knippert en dan de stappen 1...4 herhalen. Handeling 1 Tijdens normaal bedrijf de – toets indrukken, zodat op de weergave DS verschijn 2 SEL-toets indrukken 3 Met de +/- toetsen de tijdverschuiving van + of – 1 uur kiezen 4 Weerave Met de SEL-toets de instelling bevestigen, waardoor de schakelklok weer overgaat naar normaal bedrijf 89 Stap 106 Omschakeling zomer-wintertijd DS DS---DS+I DS-I 5243M01 Alle maten in mm. 2002 Siemens Building Technologies Ltd. 12/12 05.02.2004 G5243X1 Siemens Building Technologies / HVAC Products