08448380779 Call Girls In Friends Colony Women Seeking Men
Class 1 handout (2) html exercises
1. Intro to HTML/CSS
Class 1 Handout: HTML Exercises
1. <html>
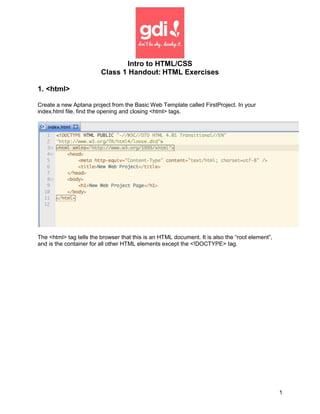
Create a new Aptana project from the Basic Web Template called FirstProject. In your
index.html file, find the opening and closing <html> tags.
The <html> tag tells the browser that this is an HTML document. It is also the “root element”,
and is the container for all other HTML elements except the <!DOCTYPE> tag.
1
2. 2. <head> and <body>
Find the <head> and <body> opening and closing tags nested inside the <html> tags.
<head> is a container tag for all of the head elements. It must include a title element, but can
also include other information like scripts, styles, and meta information.
The <body> opening and closing tags contain all of the contents of your HTML page, such as
text, hyperlinks, images, tables, lists, etc.
Minimum required tags
These are the minimum required tags for any HTML page:
● html
● head
● title
● body
3. <title>
The title defines the title displayed in the browser’s toolbar. It also provides a title for the page
when it is added to favorites, and is displayed in search engine results. You can only have one
2
3. <title> tag in an HTML document, and it is required. If you skip the <title> tag, your HTML will
not be valid.
Find the <title> tag in our project and change the title to:
<title>My First Project</title>
4. <h1> through <h6>
H1 through H6 are the heading tags. H1 is the “most important” heading and H6 is the least
important.
Aptana creates an <h1> tag for you with the Basic Web Template. Change the text inside the
opening and closing <h1> tags and add an <h2> tag below it.
<h1>Learning New Skills</h1>
<h2>With GDI Cincinnati!</h2>
Save the changes you just made to index.html and click on the Preview button in Aptana.
3
4. Headings are important because Search Engines use them to index and structure the content of
your website. It’s important that you use the <h1> through <h6> tags for headings, and not to
make text larger or bolder.
5. <p>
The <p> tag defines a paragraph. Browsers will automatically add some space before and after
each <p> element. We will learn in Class 2 how to use CSS to modify that space.
Under our <h1> and <h2> tags, add a couple <p> tags with some text.
<p>Want to learn how to build your own website? Already have your own Tumblr/Wordpress/etc
site, but want to have more control over it? Interested in learning to program but want to start
small? This class is for you!</p>
<p>We will guide you through the basics of HTML and CSS, give you some readily-applicable
skills, and answer any questions you may have along the way.</p>
Save your changes to the index.html file, and look at the preview page again:
4
5. 6. <br>
This is the line break tag. It inserts a single line break. This is a self closing tag, which means it
has no end tag because you already have all the information you need inside the first tag. You
may see the <br> tag a couple ways:
● <br>
○ Used in HTML with no end tag
● <br />
○ Used in XHTML, it must be properly closed with the forward slash. This is still a
self closing tag, there is no additional end tag
Let’s add some line breaks in the text we used for our paragraphs:
<p>Want to learn how to build your own website?<br> Already have your own
Tumblr/Wordpress/etc site, but want to have more control over it?<br> Interested in learning to
program but want to start small? This class is for you!</p>
Now our paragraph looks like this:
5
6. 7.
This is the non-breaking space character entity. Browsers always remove spaces in HTML
pages. If you write 15 spaces in your text, the browser remove 14 of them before displaying the
page. To add spaces to your text that the browser won’t get rid of, use the character
entity. Additionally, a browser will not wrap a line of text at the point where a occupies.
To see the non-breaking space in action, we are going to indent the second paragraph of our
page with four spaces:
<p> We will guide you through the basics of HTML and CSS, give you
some readily-applicable skills, and answer any questions you may have along the way.</p>
Now you can see the indent in the preview page:
6
9. This is what our links look like in the Aptana preview pane:
10. <img>
Another important tag that uses attributes is the image tag. Like the line break, this is another
self-closing tag. You will see this tag a couple ways:
● <img src="http://i.istockimg.com/file_thumbview_approve/17315556/2/stock-photo-
17315556-tabby-small-kitten-on-white-background.jpg" alt="Kitten" >
● Used in HTML, no forward slash required
9
10. ● <img src="http://i.istockimg.com/file_thumbview_approve/17315556/2/stock-photo-
17315556-tabby-small-kitten-on-white-background.jpg" alt="Kitten" />
○ Used in XHTML, forward slash is required
The src attribute is pretty important. Without that, we won’t have an image display. The alt
attribute specifies alternative text for the image in the event that it cannot be displayed for some
reason, like a slow internet connection or an error in the src attribute. It is also used by screen
readers for the vision impaired, and by search eng
Let’s add an adorable kitten to our page:
<img src="http://i.istockimg.com/file_thumbview_approve/17315556/2/stock-photo-17315556-
tabby-small-kitten-on-white-background.jpg" alt="Kitten" />
10
11. 11. <ol> and <li>
The ordered list tag <ol> is used for numeric or alphabetical lists. We will learn later in the
course how to use CSS to define the type of list.
The list item tag <li> is nested inside an <ol> to add items to our list. The <li> tag is used for
both ordered lists and unordered lists.
Let’s add an ordered list to our page:
<h3>Things to Do</h3>
<ol>
<li>Do my laundry</li>
<li>Pay my bills</li>
<li>Go to the bank</li>
</ol>
In our Aptana preview pane, our list should look like this:
11
12. 12. <ul> and <li>
The unordered list tag <ul> is used for unordered (bulleted) lists. As with ordered lists, we will
learn now to style unordered lists later with CSS.
The <li> tag is also used to denote list items in unordered lists. Let’s add one to our page.
<h3>More Things to Do</h3>
<ul>
<li>Do my laundry</li>
<li>Pay my bills</li>
<li>Go to the bank</li>
</ul>
12
13. We should now see a bulleted list below our ordered list in the Aptana preview pane:
13. <table>
Because HTML tables are nested elements inside a <table> tag, there are a few tags we need
to know:
● <table>
○ A table consists of a <table> element with one or more <tr>, <th>, and <th> tags
nested inside of it.
● <tr>
○ This defines a table row. A <tr> contains one or more <th> or <td> elements
● <th>
○ This defines a table header cell. Table header elements are bold and centered by
default.
● <td>
○ This defines a table data cell. The <td> element contains data and are regular
and left-aligned by default.
Let’s add a table to our page:
<table>
<tr>
<th>Month</th>
<th>Days</th>
</tr>
13
17. 14. <form>
For this exercise, we are going to use Google Forms to add a form to our page.
1. Go to Google Forms: Create -> Forms
2. Enter Question Title, Help Text, Select Type, Done
3. More Actions -> Embed -> copy and paste code into Aptana
Copy into Aptana:
<iframe
src="https://docs.google.com/spreadsheet/embeddedform?formkey=dHB4QTNxTmNRNHJoSF
VaOENnd3VIenc6MQ" width="760" height="837" frameborder="0" marginheight="0"
marginwidth="0">Loading...</iframe>
17