Contenu connexe
En vedette
Instalacion del labview 2013, package manager, arduino, practica 1, 2, 3Instalacion del labview 2013, package manager, arduino, practica 1, 2, 3Marco Merino Treviño
Similaire à Arduino LabVIEW Interface
Similaire à Arduino LabVIEW Interface (20)
Arduino LabVIEW Interface
- 1. © Copyright by Razin Rozilan 2012_All Right Reserved
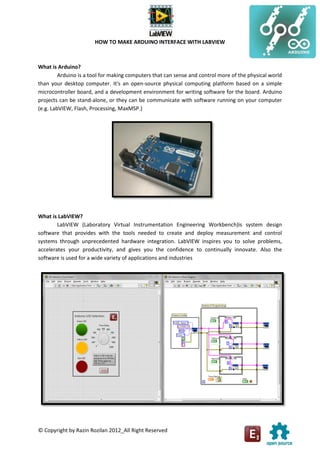
HOW TO MAKE ARDUINO INTERFACE WITH LABVIEW
What is Arduino?
Arduino is a tool for making computers that can sense and control more of the physical world
than your desktop computer. It's an open-source physical computing platform based on a simple
microcontroller board, and a development environment for writing software for the board. Arduino
projects can be stand-alone, or they can be communicate with software running on your computer
(e.g. LabVIEW, Flash, Processing, MaxMSP.)
What is LabVIEW?
LabVIEW (Laboratory Virtual Instrumentation Engineering Workbench)is system design
software that provides with the tools needed to create and deploy measurement and control
systems through unprecedented hardware integration. LabVIEW inspires you to solve problems,
accelerates your productivity, and gives you the confidence to continually innovate. Also the
software is used for a wide variety of applications and industries
- 2. © Copyright by Razin Rozilan 2012_All Right Reserved
Step To Interface Arduino + LabVIEW!
1. Purchase an Arduino board. You can find them at Myduino.com (For Malaysia) , Sparkfun (Over
Sea) or other suppliers. Make sure to order a USB cable if you don’t already have one. There are
two main boards. The Uno and the Mega. I purchased mine on Amazon.com.
2. Make sure you have LabVIEW 2010 or newer installed. The VIs that are included in the LIFA are
saved in LV 2010, so this is the version of LV that you must have to be able to use the LIFA. If you
do not have this version of LabVIEW, you can download a 30 day evaluation of it
from ni.com/trylabview
3. Install NI-VISA Drivers. To LabVIEW, the arduino appears as a serial instrument device. To
communicate with serial instruments in LabVIEW, you need to have the latest version of the NI-
VISA driver. You can get the latest NI-VISA drivers here. Make sure to select the
latest Windows or Mac versions.
4. Install the Arduino IDE and drivers for Windows. You can download them from the Arduino
website here.
Step-by-step instructions for setting up the Arduino software on Windows can be
found here.
For Mac look here. Mac does not need drivers but you still need the IDE environment.
5. Install the LIFA. The LIFA is available as a VI package through the LabVIEW Tools Network. You
must first install VIPM. Once VIPM is installed, click on this link to get and install the LIFA under
LabVIEW 2010+.
6. Upload the sketch ‘LIFA_Base.pde’ to the Arduino. The LIFA comes with a sketch program that
must be uploaded to the Arduino before you can use the VIs to communicate with it. You must
use the Arduino IDE software (which you installed in step 4) to do this. I show how to do this in
the video tutorial – above. The sketch is located at:
C:Program FilesNational InstrumentsLabVIEW 2010vi.libLabVIEW Interface for
ArduinoFirmwareLVIFA_BaseLVIFA_Base.pde
7. Start Playing. For support, join the Arduino LabVIEW community at ni.com/arduino
Example Figure :
- 3. © Copyright by Razin Rozilan 2012_All Right Reserved
Example Coding and Program :
Arduino + LabVIEW with LED Selector - http://www.mediafire.com/?14j158dywd886z3
Video Tutorial :
1. Arduino + LabVIEW - LCD Write
http://www.youtube.com/watch?v=ObxiGK8wWaA&feature=g-upl
2. Arduino + labVIEW -LED Selection
http://www.youtube.com/watch?v=xz4LCIJyd2A
3. Arduino + labVIEW -Solar Monitoring
http://www.youtube.com/watch?v=i81jWQpoa3M&feature=channel&list=UL
4. Arduino + LabVIEW -Humidity & Light Monitoring
http://www.youtube.com/watch?v=Wj5n2x9iygY
5. Arduino + LabVIEW –Way Communication
http://www.youtube.com/watch?v=IYG3YulsYUQ&feature=related
Other -
For more understanding, try to learn on how to use the basic component that is inside the
labview enviroment so that make more easyer to combine with arduino component to program the
style G-programming. So we can learn how the arduino hardware is wired and how the LabVIEW
Interface for Arduino (LIFA) works. The Labview interface for Arduino is a vi based API that was
written and distributed by national instruments. The code also includes and Arduino embedded
program which must be downloaded to the device. The program which runs on the Arduino,
responds to commands sent on the USB bus from the LabVIEW program. It then sends back data to
the the computer via the USB. The LabVIEW VIs provided, allow you to read back the analog inputs,
control the digital IO lines and use several other features of the Arduino hardware.
- 4. © Copyright by Razin Rozilan 2012_All Right Reserved
Software –
* Arduino IDE http://arduino.cc/en/Main/Software
*LabVIEW http://www.ni.com/trylabview/
*VIPM http://jki.net/vipm/download
*VISA http://joule.ni.com/nidu/cds/view/p/id/2914/lang/en
*NI License Activator http://www.mediafire.com/?zzbqi7bh17hb44a
*LIFA C:Program FilesNational InstrumentsLabVIEW 2011vi.libLabVIEW Interface for
ArduinoFirmwareLIFA_Base
Hardware –
Arduino board with some sensor that is same or other than the library provided.
Reference
1. http://www.facebook.com/inraz
2. http://www.facebook.com/mohd.afiq.186?fref=ts
3. http://www.facebook.com/idzuddin.ariff?fref=ts
4. http://www.facebook.com/Style.IR.Ahmad?fref=ts
5. https://decibel.ni.com/content/groups/labview-interface-for-arduino
6. http://vishots.com/getting-started-with-the-labview-interface-for-arduino/