SlideShare une entreprise Scribd logo
1  sur  71
Télécharger pour lire hors ligne
®
   AVerMedia
    AVerDiGi
EB1304NET SATA
               +
EB1304NET SATA
    User Manual


                      Oct.2008
FCC NOTICE (Class A)
             This device complies with Part 15 of the FCC Rules. Operation is subject to the following two conditions: (1)
           this device may not cause harmful interference, and (2) this device must accept any interference received,
           including interference that may cause undesired operation.
.Federal Communications Commission Statement
NOTE- This equipment has been tested and found to comply with the limits for a Class A digital device, pursuant to Part
15 of the FCC Rules. These limits are designed to provide reasonable protection against harmful interference in a
residential installation. This equipment generates uses and can radiate radio frequency energy and, if not installed and
used in accordance with the instructions, may cause harmful interference to radio communications. However, there is no
guarantee that interference will not occur in a particular installation. If this equipment does cause harmful interference to
radio or television reception, which can be determined by tuning the equipment off and on, the user is encouraged to try to
correct the interference by one or more of the following measures:
    Reorient or relocate the receiving antenna.
    Increase the separation between the equipment and receiver.
    Connect the equipment into an outlet on a circuit different from that to which the receiver is connected.
    Consult the dealer or an experienced radio/television technician for help.
Class A ITE
Class A ITE is a category of all other ITE which satisfies the class A ITE limits but not the class B ITE limits. Such
equipment should not be restricted in its sale but the following warning shall be included in the instructions for use:
Warning --This is a class A product. In a domestic environment this product may cause radio interference in which case
the user may be required to take adequate measures.
European Community Compliance Statement (Class A)
           This product is herewith confirmed to comply with the requirements set out in the Council Directives on the
           Approximation of the laws of the Member States relating to Electromagnetic Compatibility Directive
           2004/108/EEC.
Warning - This is a Class A product. In a domestic environment this product may cause radio interference in which case
          the user may be required to take adequate measures to correct this interference.
DISCLAIMER
No warranty or representation, either expressed or implied, is made with respect to the contents of this documentation, its
quality, performance, merchantability, or fitness for a particular purpose. Information presented in this documentation has
been carefully checked for reliability; however, no responsibility is assumed for inaccuracies. The information contained in
this documentation is subject to change without notice.
In no event will AVerMedia be liable for direct, indirect, special, incidental, or consequential damages arising out of the use
or inability to use this product or documentation, even if advised of the possibility of such damages.
TRADEMARKS
AVerMedia, being authorized AVerMedia Information, Inc. to use, is registered trademarks of AVerMedia
TECHNOLOGIES, Inc. IBM PC is a registered trademark of International Business Machines Corporation. Macintosh is a
registered trademark of Apple Computer, Inc. Microsoft is a registered trademark and Windows is a trademark of Microsoft
Corporation. All other products or corporate names mentioned in this documentation are for identification and explanation
purposes only, and may be trademarks or registered trademarks of their respective owners.
COPYRIGHT
© 2008 by AVerMedia INFORMATION, Inc. All rights reserved. No part of this publication may be reproduced,
transmitted, transcribed, stored in a retrieval system, or translated into any language in any form by any means without
the written permission of AVerMedia TECHNOLOGIES, Inc.

            The mark of Crossed-out wheeled bin indicates that this product must not be disposed of with your other
            household waste. Instead, you need to dispose of the waste equipment by handing it over to a designated
            collection point for the recycling of waste electrical and electronic equipment. For more information about
            where to drop off your waste equipment for recycling, please contact your household waste disposal
            service or the shop where you purchased the product.

Battery Safety Information
-   Store the batteries in a cool dry place.
-   Do not dispose of used batteries in domestic waste. Dispose of batteries at special collection points or return to
    point of sale if applies.
-   Remove the batteries during long periods of non-use. Always remove exhausted batteries from the remote
    control. Battery leakage and corrosion can damage this remote control, dispose of batteries safely.
-   Do not mix old and new batteries.
-   Do not mix different types of batteries: alkaline, standard (carbon-zinc) or rechargeable (nickel-cadmium).
-   Do not dispose of batteries in a fire. The batteries may explode or leak.
-   Never short circuit the battery terminals.
WARNING
TO REDUCE RISK OF FIRE OR ELECTRIC SHOCK, DO NOT EXPOSE THIS
APPLIANCE TO RAIN OR MOISTURE

CAUTION
IF THERE IS ANY DAMAGE, SHORTAGE OR INAPPROPRIATE ITEM IN THE
PACKAGE, PLEASE CONTACT WITH YOUR LOCAL DEALER. WARRANTY
VOID FOR ANY UNAUTHORIZED PRODUCT MODIFICATION

NOTICE
- INFORMATION IN THIS DOCUMENT IS SUBJECT TO CHANGE WITHOUT
  NOTICE.
- THE INFORMATION CONTAINED HEREIN IS TO BE CONSIDERED FOR
  REFERENCT ONLY.

LIGHTNING WARNING
− TO AVOID THE LIGHTNING STRIKE, STRONGLY SUGGEST INSTALLING

  THE LIGHTNING ROD AT LIGHTNING FREQUENTLY AREA.
− FOR ADDED PROTECTION, UNPLUG THE DVR UNIT DURING THE

  LIGHTNING STORM. THIS MAY PREVENT TO DAMAGE THE DVR UNIT
  DUE TO THE LIGHTNING.
Table of Contents

Chapter 1 Introduction................................................................................ 1
  1.1    Package Content.................................................................................................. 1
  1.2    Features and Specifications ................................................................................. 1
  1.3    Front Panel........................................................................................................... 3
    1.3.1 EB1304NET SATA ........................................................................................... 3
    1.3.2 EB1304NET SATA+ .......................................................................................... 3
  1.4    Back Panel ........................................................................................................... 5
  1.5    Setting Up the DVR Unit....................................................................................... 6
    1.5.1 Installing the Hard Disk .................................................................................... 6
    1.5.2 Adjust Fan Speed............................................................................................. 7
    1.5.3 Connecting Devices ......................................................................................... 8
    1.5.4 Connecting the Sensor device/Relay device /PTZ Camera ............................. 9
Chapter 2 Operating the DVR unit ........................................................... 10
  2.1      Familiarizing the Remote Control Buttons .......................................................... 10
    2.1.1 Using AB Repeat Function ..............................................................................11
    2.1.2 Using USB Backup Button ............................................................................. 12
    2.1.3 Controlling PTZ Camera ................................................................................ 12
      2.1.3.1 To Enter the PTZ Mode .............................................................................. 12
      2.1.3.2 To Set Preset Position ................................................................................ 12
      2.1.3.3 To Control PTZ Camera ............................................................................. 13
  2.2    Using the DVR for the First Time........................................................................ 13
    2.2.1 Set up the System Date and Time ................................................................. 14
  2.3    Surveillance Screen ........................................................................................... 14
  2.4    Playback the Video............................................................................................. 15
Chapter 3 OSD Navigation Tree ............................................................... 16
  3.1      Menu Function.................................................................................................... 17
Chapter 4 Using the USB Playback Console .......................................... 28
  4.1      Recommended system requirements ................................................................. 28
  4.2    Installing the USB Playback Console ................................................................. 28
  4.3    Running the USB Playback Console .................................................................. 29
    4.3.1 To Cut and Save the Portion of the Recorded Video...................................... 31
    4.3.2 Playback DVR Recorded File from Hard Disk................................................ 31
    4.3.3 Playback Backup File(*.dvr) ........................................................................... 32
    4.3.4 Playback Backup File (*.avf) .......................................................................... 32
Chapter 5 Backup Recorded Video File .................................................. 33
  5.1      Familiarizing with HDD Backup Application ........................................................ 33
  5.2      To Backup Recorded Video File ......................................................................... 34
Chapter 6 ImageVerification..................................................................... 35
6.1      To Run the ImageVerification.............................................................................. 35
Chapter 7 iEnhance................................................................................... 36
  7.1      To Use iStable .................................................................................................... 37
Chapter 8 Using the Remote Programs .................................................. 38
  8.1    Familiarizing the Web Viewer Buttons ................................................................ 39
    8.1.1 To Setup Remote System Setting .................................................................. 41
      8.1.1.1 System Setup ............................................................................................. 41
      8.1.1.2 Camera Setup ............................................................................................ 42
      8.1.1.3 Record Setup ............................................................................................. 43
      8.1.1.4 Alarm/Sensor Setup ................................................................................... 45
      8.1.1.5 Network Setup............................................................................................ 47
      8.1.1.6 Password Change ...................................................................................... 49
  8.2    Familiarizing the Remote Console Buttons......................................................... 50
    To Setup Remote Console Setting ............................................................................. 51
  8.3    Using the Remote Playback ............................................................................... 52
    8.3.1 Familiarizing the Local Playback Buttons....................................................... 53
    8.3.2 Familiarizing the Download and Playback Buttons ........................................ 55
      8.3.2.1 To Cut and Save the Wanted Portion of the Recorded Video ..................... 56
      8.3.2.2 To Search Using the Visual Search ............................................................ 56
      8.3.2.3 To Search Using the Intelligent Search ...................................................... 57
Chapter 9 Using HandyViewer to Access DVR server........................... 58
  9.1    Using PDA Viewer to Access DVR Server.......................................................... 58
    9.1.1 To install PDAViewer thru ActiveSync ............................................................ 58
    9.1.2 To install PDAViewer from the Internet........................................................... 59
    9.1.3 To Use the PDAViewer................................................................................... 60
    9.1.4 To Playback in PDA Viewer............................................................................ 61
  9.2    Using JavaViewer to Access DVR Server .......................................................... 62
    9.2.1 To Use the JAVAViewer.................................................................................. 63
  Appendix A Registering Domain Name ...................................................................... 64
  Appendix B Network Service Port .............................................................................. 65
Chapter 1              Introduction
1.1       Package Content

                                                                               AVe
                                                                                 rDiG AVerM
                                                                                      i EB        ed ®
                                                                                Quic        130 ia
                                                                                    k In          4NE
                                                                                         stalla       TS
                                                                                                         ATA
                                                                                                tion
                                                                                                     Guid
                                                                                                          e


               A                          B

                           (1)
                                                             (2)                     (3)


              (4)                                  (5)
                                                                                     (6)


              (7)

          (1) DVR Unit
                 A: AVerDiGi EB1304NET SATA unit
                 B: AVerDiGi EB1304NET SATA+ unit

      i      The model of DVR unit is depending on your purchase.

          (2) Remote Control (batteries included)
          (3) Quick Installation Guide
          (4) Power Cord
           * The power cord varies depending on the standard power outlet of the country where
           it is sold.
          (5) Power Adapter
          (6) Internal HDD holder (8 screws are inculded)
          (7) Software CD (User Manual included)

1.2       Features and Specifications
  Key Features
  - Lightweight and Compact size (1/5 of general DVR net weight)
  - Multi-functional front panel design (only for EB1304NET SATA+)
  - Thermal testing verification approved
  - Heat-resistance material
  - Supports standard 3.5” SATA HDD
  - Embedded Linux and RTOS
  - MPEG4 video compression
  - JavaViewer on mobile phone
  - Supports PTZ control

                                               1
-   Supports UPnP (Universal plug and play)
-   Remote Software Integration: CM3000, Remote Console, WebViewer, PDAViewer,
    HandyViewer, and SmartViewer ( for Symbian / Windows Smart phone)
- Non-PC stand-alone network digital video recorder
- On Screen Display(OSD) control menu
Video Feature
- 4 composite video inputs (BNC connector)
- 1 Composite & 1 VGA outputs
- Video compression: MPEG4
- Video Format: NTSC and PAL
- 1 channel audio input/output
- Display resolution:720 x 480/720 x 576 (NTSC/PAL)
- Display frame rate:Total 120/100 fps (NTSC/PAL)
- Hue/Brightness/contrast/Saturation adjustable
Recording resolution:
- Full D1: 720 x 480/720 x 576 (NTSC/PAL)
- CIF: 360 x 240/360 x288 (NTSC/PAL)
Recording frame rate:
- Full D1: 60/50 fps (NTSC/PAL)
- CIF: 120/100 fps (NTSC/PAL)
Recording mode:
- Schedule recording (00:00~24:00 set by hour)
- Continuous /Motion / Sensor recording
- Auto recycle recording
- Auto record enabling
Remote access
- Support CMS (CM3000)

    i      If you need CMS application, please contact your local sales dealer for forwarder
           information.
-   Support PDAViewer
-   Support Remote Console & WebViewer
-   Password authentication mechanism
Playback Mode
 - Video search by date/time/event
 - Infinite event list for easy search
 - A-B video repeat playback
 - Free Playback Application Software:
 - Playback from pen drive/ external HDDx1
 - Playback and backup on any PC with Windows 2000/XP/Vista
 - Converting files to AVI format enabling to playback on Windows Media Player
 - Video segment selectable for repeating payback and backup
 - Enabling quick HDD to HDD backup
 - Watermark function for image verification
I/O
 - 4 Sensor inputs
 - 1 Relay output controlling alarm, lock, light, or other devices
 - Operating Temperature: 5~40 degree


                                           2
1.3      Front Panel
1.3.1 EB1304NET SATA


 Name                             Function

 (1) DVR Power LED                Light when the unit is power on

 (2) HDD LED                      Indicate the hard disk running state. Light when the HDD is running
                                  (Read/Write)
 (3) IR Sensor                    Receive signal from the remote control to operate the unit
 (4) IR Sensor Port               To connect extended IR sensor cable
 (5) USB 2.0 Port                 Connect to pen drive / external hard disk for backup

                                    i         If the external hard disk is first time using, please format to FAT32
                                              format.


1.3.2 EB1304NET SATA+
                                                                           (6)


                                                                                              (10)


                      (1)(2)(3)   (4)   (5)                      (7) (8)         (9)

 Name                               Function

 (1) DVR Power LED                  Light when the unit is power on

 (2) HDD LED                        Indicate the hard disk running state. Light when the HDD is running
                                    (Read/Write)
 (3) IR Sensor                      Receive signal from the remote control to operate the unit
 (4) IR Sensor Port                 To connect extended IR sensor cable
 (5) USB 2.0 Port                   Connect to pen drive / external hard disk for backup

                                        i       If the external hard disk is first time using, please format to FAT32
                                                format.


                                                             3
Name                     Function
(6) 1/2/3/4/Quad         Use these buttons in playback mode to switch to display each channel in
                         full screen or view all channels at the same time
                         Use the buttons in setting password of OSD menu to:


                            For ”1”         For “2”         For “3”        For “4”         For “0”

(7) Record   REC         Start video recording. To stop recording, press


(8) Menu                 Call up and exit the OSD main and sub menu

(9) UP/DOWN/SELECT
                         Use the UP and DOWN buttons to change setting and move to the left
                         and right, and SELECT to enter or make a selection

(10) Playback/OSD Menu   Use the buttons in playback mode to:
     Control Buttons
                                       Display the play list and play the recorded video


                                       Wind back the video playback at the speed of 2x, 4x, 8x or
                                       16x


                                       Fast play the video playback at the speed of 2x, 4x, 8x or
                                       16x


                                       Temporarily freeze the video playback


                                       Stop video playback

                         Use the buttons in navigating OSD menu to :


                                       Move to the left and right


                                       Change the setting


                                       Make a selection


                                             4
1.4      Back Panel


Name                      Function
(1)   RJ-45 port          :   Ethernet connection port
(2)   CH1/CH2/CH3/CH4     :   Input the video camera signal and display it on channel 1/2/3/4
(3)   TV Out              :   Output the video signal to other video output device through BNC port
                                        The DVR unit support 2 video output ports and you can only select
                                        to output the video either from the VGA OUT or VIDEO OUT

(4)   VGA OUT             :   Output the video signal to a CRT or LCD monitor
(5)   Audio Out/In        :   -       Input the audio signal from audio output device which it has a power
                                      supply by itself. The audio is embedded with channel 1
                              -       Output the audio signal to a audio out device which it has a power
                                      supply by itself

                                  i      The DVR doesn’t supply the power to external audio in/out
                                         devices.

(6)   Sensor In & Alarm   :   Support up to 4 sensor device and 1 relay device (Relay: 1A @ 125V
      Out                     AC/30V DC)
(7)   RS485                   For PTZ camera connection
(8)   TV-VGA Switch       :   Switch to select the video output. Make sure to set the video output before
                              turning on the unit
(9)   12V DC              :   Connect the power adapter into this port


                                                     5
1.5           Setting Up the DVR Unit
1.5.1 Installing the Hard Disk
The DVR unit allows user to install one SATA hard disk.
              For hard disk spec, please referring to http://www.avermedia.com/AVerDiGi/ →
     i        Products→ AVerDiGi EB Series → AVerDiGi EB1304NET SATA series → Hardware
              Recommendations


              The “compatible hard disks” indicated in the above recommendation list only means
              that these commercially available hard disks were tested with AVerMedia products and
              functioned well under normal operation conditions. AVerMedia does not guarantee or
              provide warranties, explicitly, implied or statutory with respect to the reliability of the
              hard disk function or its compatibility. In no event AVerMedia shall be liable for
              damages, with respect to any business interruption of clients, lost profits, loss of
              programs or other data on your information handling system or otherwise. This includes
              direct, indirect, incidental, special, or consequential damages, resulting from the
              incompatibility caused by the usage of these hard disks, even if AVerMedia has
              expressly advised about the risk of such damages. The entire risk arising out of the use
              of any information attached here with is borne by the recipient.

Follow the illustrated instructions below to install the hard disk:
1.       Loosen all screws                             2.   Push the cover backward and lift


3.       Secure the brackets on the hard disk          4.   Connect the the SATA cable and the power
                                                            connector to the hard disk


                                                      6
5.   Secure the hard disk inside the unit then replace 6.   Push the cover forward and secure the cover
     unit cover


7. You may now connect all the cables. When the power is connected, the Power LED light          turns on

1.5.2 Adjust Fan Speed
The DVR provides 3 speed of fan for user to adjust by actual condition.
1. Loosen all screws                                   2. Push the cover backward and lift


3. Move the pin cover to the pin. 3x is maximum, 2x 4. Push the cover forward and secure the cover
   is medium and 1x is low.                            after adjust the fan speed.


                                                      7
1.5.3 Connecting Devices
The back panel of the DVR unit, user can connect up to 4 video cameras, 4 sensor devices, 1 alarm
device and output video to a TV or CRT/LCD monitor. Connecting the unit to a pen drive or external
hard disk through USB interface for backup, then use the bundled software enables user to transfer,
playback and segment the video. Follow the illustration below to make the connection:


        Each time you change the video display output or video system (NTSC/PAL), the power
        must be turned off and on to reset the DVR unit.


                                                8
1.5.4 Connecting the Sensor device/Relay device /PTZ Camera
The Sensor, Alarm, and RS485 port enable you to connect 4 sensor inputs, 1 relay outputs, and
PTZ camera. Just connect the external sensor, relay, and PTZ camera pin directly to the pinhole.
Check the table below and locate which pinhole is assigned to sensor input and relay output.
                  1 2 3 4 5 6 7 8 9 10 11 12 13 14


                 1 G 2 G 3 G 4 G OUT TX TX RX RX
                                      + - + +
                            Sensor                   Alarm        RS485
The signal from the sensor (i.e., infrared sensors, smoke detectors, proximity sensors, door
sensors, etc.) is being transmitted to the unit and this triggers the system to respond and
send signal to relay device (i.e., alarm, telephone etc).
                       Pin #                  Definition
                       1              Sensor 1 signal
                       2              Sensor 1 Ground signal
                       3              Sensor 2 signal
                       4              Sensor 2 Ground signal
                       5              Sensor 3 signal
                       6              Sensor 3 Ground signal
                       7              Sensor 4 signal
                       8              Sensor 4 Ground signal
                       9              Relay signal
                       10             Relay signal
                       11             RS485 TX+
                       12             RS485 TX-
                       13             RS485 RX+
                       14             RS485 RX-


                                               9
Chapter 2             Operating the DVR unit
2.1      Familiarizing the Remote Control Buttons
Use the Remote control to operate the OSD menu on surveillance screen.
                                       Button         Function
                                                      A functional key for multiple DVR system
                                       (1)       FN
                                                      remote control
                                                      Switch to Channel 1
                                       (2)       1
                                                      As a number key for entering password
                                                      Switch to Channel 2
                                       (3)       3
                                                      As a number key for entering password
                                                      Switch to Channel 3
                                       (4)       7
                                                      As a number key for entering password
                                                      Switch to Channel 4
                                       (5)       9
                                                      As a number key for entering password
                                                      Switch to QUAD mode
                                       (6)       5
                                                      As a number key for entering password


Button           Function
         2

         4

(7)      6       As a number key for entering password

         8

         0

                 Set a playing recorded video from A point to B point segment and repeat
(8)      A-B
                 playing on surveillance screen(See 2.1.1)

(9)              Pause the playing

(10)             To play the video
          ▲


(11)             Decrease the video playback at the speed of 2x, 4x 8x or 16x
         ▼
         ▼


(12)             Fast play the video playback at the speed of 2x, 4x 8x or 16x
         ▼
         ▼


(13)             Stop playing / Stop recording

(14)             USB backup(see 2.1.2)


                                                 10
Button                  Function


             ▼
                         To move the selection to the left and right
            ▼
 (15)
            ▲
                         To go up and down and select the items in the menu list or change the settings
            ▼


 (16)                    To enter the OSD Main menu / Exit from the main menu or sub-menu display
           ZOOM+

                         To zoom in view of PTZ camera
 (17)      ZOOM-

                         To zoom out view of PTZ camera

                         PTZ camera control button. Press     PTZ      + camera channel
 (18)      PTZ
                         button( 1     2    3     4 )can enter PTZ mode to control PTZ camera.(see 2.1.3)
           SPEED+

                         To speed up movement of PTZ camera lens
 (19)      SPEED-

                         To speed down movement of PTZ camera lens
           FOCUS +

                         To focus in PTZ camera lens
 (20)      FOCUS -

                         To focus out PTZ camera lens

                         Make a selection
 (21)
                         Enter sub-menu

 (22)      REC           Start video recording


2.1.1 Using AB Repeat Function
AB Repeat function allow user to set a video
segment from A to B point and play on the
surveillance screen until user stop. User also
can backup AB Repeat file to pen drive or
external hard disk (See 2.1.2).
1. Press                (play button) to call out the
                    ▲


   SEARCH MODE menu to find the
   recorded video that user wants to
   playback.
2. Select TIME SEARCH or EVENT LIST.
    - TIME SEARCH (search by date and time): select the date and time from where you
          want to begin the video playback.
    - EVENT LIST (search by condition): select from the list.
3. During the playback, press              A-B   to set the A point of video segment. And then, press
    A-B    again to set the B point of video segment. On the surveillance screen will display


                                                         11
“A-B” and repeat playing the AB point video segment which user has set. To cancel AB
    repeat, press   A-B    again.

2.1.2 Using USB Backup Button
User can press            button to backup the AB Repeat video
file.
1. Set the AB Repeat file (see 2.1.1).
                                                                              USB BAKCUP
                                                                              YES (SELECT) / NO(ME NU )

2. Plug in pen drive or external hard disk to DVR system.
3. During the AB Repeat playback, press             button.
4. And then, press           (YES) to start backup file or press
        (NO) to exit backup mode.


    i   - If the external hard disk is first time using, please format to FAT32 format.
        - The external hard disk needs to be powered by external power.

2.1.3 Controlling PTZ Camera
Using remote control, user can easily control PTZ camera at local site. Before starting,
please go to OSD menu to enable PTZ control (see 3.1 Menu Function: PTZ Setup).
2.1.3.1 To Enter the PTZ Mode
To control PTZ camera, user need to enter the PTZ mode first. Press                      PTZ     button, and
camera channel number button ( 1           2   3        4 ).   The surveillance monitor will switch to
single screen and display “PTZ mode” on the screen.


To exit PTZ mode, press        PTZ   and   0   button. Also, when user doesn’t have any action
over 1 minute, the system will automatically exit PTZ mode.
2.1.3.2 To Set Preset Position
User can set 9 preset positions for PTZ camera. Using 1                    to 9        button to set the


                                                   12
preset position.
1. Press    PTZ       and camera channel number button ( 1             2   3   4   ) to enter PTZ
   mode.
2. Using ▲ , ▼ ,       and       to adjust the PTZ camera to the position that user


                         ▼


                                      ▼
   wants.
3. Press any number button over 3 seconds and the position will be saved.
4. To move the PTZ camera to preset position, just press the number button.
2.1.3.3 To Control PTZ Camera
To move, adjust focus, and zoom in/out camera lens can be done by using some function
buttons on the remote control.
                         To move the PTZ camera lens to the right
                  ▼


                         To move the PTZ camera lens to the left
              ▼


               ▲         To move the PTZ camera lens to go up

               ▼         To move the PTZ camera lens to go down
             ZOOM+

                         To zoom in PTZ camera
              ZOOM-

                         To zoom out PTZ camera
             SPEED-

                         To speed down movement of PTZ camera lens
             SPEED+

                         To speed up movement of PTZ camera lens
             FOCUS +

                         To focus in PTZ camera lens
             FOCUS -

                         To focus out PTZ camera lens


2.2      Using the DVR for the First Time
Upon connecting the power, the unit automatically detects the status of the hard disk. The
hard disk must be formatted before user can use it with EB1304NET SATA. If you are
prompt to format the hard disk, press     (select) for YES to format the hard disk and
      (menu) for NO to remain unchanged.
                                 HARD DISKS INFORMATION
                                 VERSION   S3 . 01. 01. 00. 03
                                 HDD CHECKING . . .
                                 MASTER HDD
                                      SIZE     76GB      509MB
                                 HDD FORMAT YES (SELECT) / NO (MENU)


                                                    13
2.2.1 Set up the System Date and Time
Before starting record video, adjust the date and time first.
1. Press          to call up the OSD menu and then use                    ▲    and     ▼    to go up and down
   and select Submenu. And then, press                          or       to confirm the selection.


                                                                     ▲
2. In Submenu, use         ▲       and  to go up and down and select the Time Setup and
                                             ▼

   press          again to make a selection. And then, use ▲ and ▼ to select the Date
   and press          or    ▲       to confirm the selection.                  TIME SETUP
                                                                               DATE                  2007 / 03 / 12
                                                                               TIME                  15 : 45 : 57
                                                                               AUTO SYNC TIME        OFF

3. To adjust the date, use               ▼       and        or           and   TIME ZONE             GMT


                                                       ▼


                                                                     ▼
                                                                     ▼
                                                                               LAST SYNC TIME        2007 / 03 / 12
                                                                                                     12 : 00 : 00
                                                                               DAYLIGHT SAVING
                                                                               DELETE RECORDED FILES OLDER THAN
          buttons to move the selection to the left and right.
                                                                                                           10 DAYS
      ▼
      ▼


4. To adjust Time, follow the above step 2 and 3.
5. Press          to go back to main menu after adjustment.

2.3           Surveillance Screen
To know if the channel is being recorded, the “ ” record symbol would appear beside the
channel number. The (microphone) and          (speaker) indicate that the audio is available.
The information below the screen shows the current date and time, recording mode (record
schedule setting), and the percentage of the used hard disk space.


                Full Screen Preview                                        Quad mode Preview

When you are in full screen preview, press the following buttons on the remote control to
switch to different channel, or preview all 4 channels:

          1                    3                        7                      9                       5
  CH1: Camera1         CH2: Camera 2               CH3: Camera 3         CH4: Camera 4          QUAD: 4-Channel


                                                           14
2.4        Playback the Video
The DVR system can record and playback video simultaneously. Therefore, user don’t
need to stop recording while playback the video.
1.    Press
                    ▼
                                                                                    SEARCH METHOD
                                                                                    TIME SEARCH
2.    Use the        ▲           and   ▼    buttons to go up and down and           EVENT LIST

      select TIME SEARCH or EVENT LIST. Then, press
      or            to make a selection.
           ▼


TIME SEARCH (search by date and time):                                              TIME SEARCH
                                                                                    HARD DISK :         MASTER
1.    Use the           ▲        and   ▼     buttons and select SEARCH
                                                                                    START TIME : 2006 / 05 / 04         10 : 00 : 01
      TIME. Then press                       or          again to make the
                                                   ▼


                                                                                    END TIME   : 2006 / 05 / 05         13 : 08 : 13

      selection.                                                                    SEARCH TIME : 2006 / 05 / 04        10 : 00 : 01

2.    In the SEARCH TIME, user may now select the date and
      time from where you want to begin the video playback.


      Use the                and           buttons to move the selection to the left and right. Use the                     and
                    ▼


                                       ▼


                                                                                                                        ▲              ▼

      buttons to select the date and time. Then press                    or           again to make the selection.
                                                                                ▼


3.    To start video playback, the time in second must be set. Use the                          buttons to move the selection
                                                                                           ▼


      to the right most. Use the              ▲    and    ▼    buttons and select the time in second. Then press
      or        .
           ▼


EVENT LIST (search by event):                                                   EVENT LIST
                                                                                HARD DISK :             MASTER
1.    Use the           ▲        and   ▼     buttons to select from the list.
                                                                                S      2006 / 05 / 03    13 : 26 : 34   13 : 26 : 50
      Press                 or         again to make the selection. User
                                   ▼


                                                                                A      2006 / 05 / 03    13 : 00 : 01   13 : 16 : 46
                                                                                A      2006 / 05 / 03    12 : 00 : 01   13 : 00 : 01
                    and                    to go next page or back to           B      2006 / 05 / 03    11 : 48 : 37   12 : 00 : 00
                                                                                A      2006 / 05 / 03    11 : 30 : 23   11 : 31 : 18
                                                                                A      2006 / 05 / 03    11 : 29 : 47   11 : 30 : 13
      previous page.                                                            S      2006 / 05 / 03    11 : 28 : 55   11 : 28 : 58
                                                                                B      2006 / 05 / 03    11 : 28 : 33   11 : 28 : 55
2.    Listed below are the following recording conditions:                      A      2006 / 05 / 03    11 : 25 : 41   11 : 28 : 32
                                                                                A      2006 / 05 / 03    11 : 23 : 26   11 : 23 : 30
      A – Always Recording
      It records non-stop and automatically continue recording
      when interrupted
      S – Sensor Recording
      It records when the sensor has triggered
      M – Motion Recording
      It records when any movement has detected
      B – Button Recording
      It records when the REC record button is pressed
3.    The “ ” play symbol would appear beside the channel number when you are previewing in
      playback mode.


                                                                 15
Chapter 3                              OSD Navigation Tree
The follow figure is an OSD menu tree map. To call out the OSD menu, press                                                                                                 on the
remote control.
  MAIN MENU                              RECORD SCHEDULE                                       RECORD SCHEDULE                                           PASSWORD SETUP
  CAMERA SELECT        1   2   3   4     00 : 00 - 01 : 00 ALWAYS REC                                                                          CURRENT
  RECORD SELECT        1   2   3   4     01 : 00 - 02 : 00 ALWAYS REC                          13 : 00 - 14 : 00    ALWAYS REC                 NEW
  RECORD MODE        D
                     D1                  02 : 00 - 03 : 00 ALWAYS REC                          14 : 00 - 15 : 00    ALWAYS REC                 CONFIRM
  VIDEO FORMAT       MPEG4               03 : 00 - 04 : 00 ALWAYS REC                          15 : 00 - 16 : 00    ALWAYS REC
  RECORD FRAMERATE   60                  04 : 00 - 05 : 00 ALWAYS REC                          16 : 00 - 17 : 00    ALWAYS REC
  VIDEO QUALITY      GOOD                05 : 00 - 06 : 00 ALWAYS REC                          17 : 00 - 18 : 00    ALWAYS REC
                                         06 : 00 - 07 : 00 ALWAYS REC                          18 : 00 - 19 : 00    ALWAYS REC
  RECORD SCHEDULE
                                         07 : 00 - 08 : 00 ALWAYS REC                          19 : 00 - 20 : 00    ALWAYS REC
  SUBMENU
                                         08 : 00 - 09 : 00 ALWAYS REC                          20 : 00 - 21 : 00    ALWAYS REC
  HARD DRIVE SETUP
                                         09 : 00 - 10 : 00 ALWAYS REC                          21 : 00 - 22 : 00    ALWAYS REC
  SENSOR SETUP                                                                                 22 : 00 - 23 : 00
                                         10 : 00 - 11 : 00 ALWAYS REC                                               ALWAYS REC
  MOTION SETUP                                                                                 23 : 00 - 00 : 00    ALWAYS REC
                                         11 : 00 - 12 : 00 ALWAYS REC
  NETWORK SETUP
                                         12 : 00 - 13 : 00 ALWAYS REC
  USB BACKUP
  LANGUAGE SETUP     ENGLISH


                                         SUBMENU                                                                   PASSWORD SETUP                        SET NW PASSWORD
                                         PASSWORD CHANGE                                       SUPERUSER                                       CURRENT
                                         VIDEO ADJUSTMENT                                      USER(NETWORK)                                   NEW
                                         TIME SETUP                                                                                            CONFIRM
                                         AUTO RECORD            ON
                                         AUTO SCAN
                                         PASSWORD SETUP         NO
                                         AUDIO RECORD           ON
                                         AUDIO MUTE             OFF
                                         VIDEO SYSTEM           NTSC
                                         MULTIPLE REMOTE        OFF
                                         REMOTE ID              1
                                         PTZ SETUP
                                         CHANNEL NAME SETTING
                                                                     S3. 01. 01. 00. 03


                                         HARD DRIVE SETUP                                      VIDEO ADJUSTMENT
                                         OVERWRITE ENABLED   NO                                CAMERA                                 1
                                         HD1 SIZE   37    GB    78MB                           BRIGHTNESS                             050
                                         HD1 USED   16    GB   219MB        21%                CONTRAST                               050
                                         HD1 FORMAT                                            HUE                                    000
                                                                                               SATURATION                             024
                                                                                               RESET TO DEFAULT VALUE


                                         SENSOR SETUP                                          AUTO SCAN
                                         SENSOR REC TIME        010 SEC                        AUTO                                   OFF
                                         ALARM OUT TIME         010 SEC                        CHANNEL-1                              10 SEC
                                         CHANNEL - 1            NOT INSTALLED                  CHANNEL-2                              10 SEC
                                         CHANNEL - 2            NOT INSTALLED                  CHANNEL-3                              10 SEC
                                                                                               CHANNEL-4                              10 SEC
                                         CHANNEL - 3            NOT INSTALLED
                                         CHANNEL - 4            NOT INSTALLED
                                         VIDEO LOSS ALARM       1    2   3    4


                                         MOTION SETUP                                          PTZ SETUP
                                         MOTION CAMERA            1   2       3      4         CAMER A                      1
                                         SENSITIVITIY           HI                             PTZ CONTRO L                 OFF
                                         MOTION RECORD TIME     010 SEC                        PTZ ID                       000
                                                                                               PRO TOCO L                   PELCO-D
                                                                                               BAUD R ATE                   2400
                                                                                               AUTO PAN                     1-1
                                                                                               DWEL L TIME                  05 SEC


                                         NETWORK SETUP                                         CHANNEL       NAME SETTING
                                         IP MODE                STATIC                         CHANNEL      1 NAME            CH01
                                         NW ENABLE                1    2      3      4         CHANNEL      2 NAME            CH02
                                         VIDEO PORT             5001                           CHANNEL      3 NAME            CH03
                                         UPGRADE PORT           5005                           CHANNEL      4 NAME            CH04
                                         USER                   1
                                         SET NW PASSWORD


                                         USB BACKUP
                                         TIME SET
                                         START :                2006/09/23 17:00:02
                                         END :                  2006/09/26 18:00:00
                                         BACKUP CHANNEL           1     2    3      4
                                         BACKUP SIZE            73G 89MB
                                         BACKUP EXECUTE


                                                                                          16
3.1         Menu Function
If the unit is currently recording the video, user may have to stop video recording to change
the settings. Use remote control to navigate in the OSD menu. The red frame turns yellow
when you are making a selection.
  OSD MENU                                        Description
  MAIN ME NU                                      CAMERA SELECT
  C AME R A S E L E C T       1    2      3   4
  R E C OR D S E L E C T      1    2      3   4   Enable/disable the channel number to display the video on the
                            D1
  R E C OR D MODE
  V IDE O F OR MAT          MP E G 4              surveillance screen
  R E C OR D F R AME R AT E       60
  V IDE O QUAL IT Y         G OOD                 RECORD SELECT
  R E C OR D S C HE DUL E
  S UB ME NU                                      Enable/disable the channel number to record video
  HAR D DR IV E S E TUP
  S E NS OR S E T UP
                                                             The channels which could be recorded should be
  MOT ION S E T UP
  NE T W OR K S E T UP
  US B B AC K UP
                                                     i       enabled in the CAMERA SELECT first.
  L ANG UAG E S E T UP      E NG L IS H
                                                  RECORD MODE
                                                  Select D1/CIF recording mode
                                                  Under D1 mode, the video recording is in full screen resolution
                                                  and takes turns from one channel to the next one when Auto
                                                  Scan enables. Each channel is recorded only at a maximum
                                                  frame rate of 15fps. User can switch to view the video in single
                                                  full screen or QUAD screen
                                                  Whereas in CIF mode, video recording is at a lower resolution,
                                                  but each video is recorded in 30fps/25fps (NTSC/PAL). User
                                                  can switch to view the video in single full screen or QUAD
                                                  screen
                                                  VIDEO FORMAT
                                                  The recorded video is in MPEG4 format
                                                  RECORD FRAME RATE
                                                  Set the number of frames per second to be recorded. Refer to
                                                  the table below for the available record frame rate settings. The
                                                  higher the frame rate is, it uses more hard disk space
                                                         Video Standard
                                                                            NTSC                  PAL
                                                   Record Mode

                                                   D1                     60, 20, 4            48, 20, 4
                                                   CIF                    120, 60, 40, 20, 4   100, 48, 20, 4

                                                  VIDEO QUALITY
                                                  Select the video quality setting from BEST, HIGH, MEDIUM,
                                                  GOOD, NORMAL or LOW.
                                                  BEST – best record quality but less record hours
                                                  LOW – longest record hour but quality is ordinary
                                                  NORMAL – allows you to record more hours but the quality of
                                                  the recorded video is moderate.
                                                  LANGUAGE SETUP
                                                  Select from the available languages


                                                              17
OSD MENU                                              Description
R E C OR D     S C HE DUL E                           RECORD SCHEDULE
00 : 00 - 01   : 00 AL W A Y S   REC
01 : 00 - 02   : 00 AL W A Y S   REC                  By default, in 24 hours, the recording schedule is set to always
02 : 00 - 03
03 : 00 - 04
               : 00 AL W A Y S
               : 00 AL W A Y S
                                 REC
                                 REC
                                                      record every hour. Refer to the table below to customize the
04 : 00 - 05   : 00 AL W A Y S   REC                  recoding condition
05 : 00 - 06   : 00 AL W A Y S   REC
06 : 00 - 07   : 00 AL W A Y S   REC                   Condition              Description
07 : 00 - 08   : 00 AL W A Y S   REC
08 : 00 - 09   : 00 AL W A Y S   REC
09 : 00 - 10   : 00 AL W A Y S   REC                   NO REC                 Disable video recording
10 : 00 - 11   : 00 AL W A Y S   REC
11 : 00 - 12   : 00 AL W A Y S   REC
12 : 00 - 13   : 00 AL W A Y S   REC                   ALWAYS REC             Record non-stop

                                                       MOTION REC             Start recording when any movement is detected

                                                       SENSOR REC             Start recording when the sensor has triggered

                                                       BUTTON      REC        Start recording when the record button is pressed

S UB ME NU
P AS S WOR D C HANG E                                 PASSWORD CHANGE
V IDE O ADJ US T ME NT                                Set a security combination number. There are two type of user
TIME SETUP
AUT O R E C OR D       ON                             password – SUPERUSER and USER.
AUT O S C AN                                          P AS S WOR D SETUP
P AS S WOR D S E T UP  NO                             S UP E R US E R
AUDIO R E C OR D       ON                             US E R (NE T WOR K )
AUDIO MUT E            OF F
V IDE O S Y S T E M    NT S C
MUT IP L E R E MOT E   OF F
R E MOTE ID            1
PTZ SETUP
CHANNEL NAME SETTING
                                 S3. 01. 01. 00. 03


                                                      Use the number button on the remote control to enter the
                                                      password. Or use ▲ and ▼ button to the select the
                                                      security combination number. Press                       or         button to
                                                                                                                     ▼
                                                      confirm.
                                                      SUPERUSER
                                                      Superuser has the authority of formatting hard disk, changing
                                                      system settings, remote monitor the DVR system and changes
                                                      the system settings. The factory default password is 111111.
                                                      P AS S WOR D S E T UP
                                                      C UR R E NT
                                                      NE W
                                                      C ONF IR M


                                                                   18
OSD MENU                                         Description
S UB ME NU                                       USER(NETWORK)
P AS S WOR D C HANG E
V IDE O ADJ US T ME NT                           The login account for remote connection through the internet.
TIME SETUP
AUT O R E C OR D       ON
                                                 User account only can view and playback recorded video by
AUT O S C AN                                     Web viewer (ex: Internet Explorer), but no authority to change
P AS S WOR D S E T UP  NO                        the DVR system’s setting. The factory default password is
AUDIO R E C OR D       ON
AUDIO MUT E            OF F                      111111.
V IDE O S Y S T E M    NT S C
MUT IP L E R E MOT E   OF F                      P AS S WOR D S E T UP
R E MOTE ID            1                         C UR R E NT
PTZ SETUP                                        NE W
CHANNEL NAME SETTING                             C ONF IR M
                            S3. 01. 01. 00. 03


                                                 VIDEO ADJUSTMENT
                                                 Select the camera number and set to adjust the video
                                                 brightness, contrast, hue, and saturation value
                                                 VIDEO ADJUSTMENT
                                                 CAMERA                       1
                                                 BRIGHTNESS                   083
                                                 CONTRAST                     142
                                                 HUE                          130
                                                 SATUR ATION                  130
                                                 RESET TO DEFAULT VALUE       NO


TIME SETUP
DATE                     2007 / 03 / 12          TIME SETUP
                         15 : 45 : 57
TIME                                             Setup system date, time, daylight saving, and enable auto
AUTO SYNC TIME           OFF
TIME ZONE                GMT                     synchronize time through network.
LAST SYNC TIME           2007 / 03 / 12
                         12 : 00 : 00            DATE
DAYLIGHT SAVING
DELETE RECORDED FILES OLDER THAN
                                                 Set the current date
                            10 DAYS
                                                 TIME
                                                 Set the current time
                                                 AUTO SYNC TIME
                                                 Enable/disable time synchronization automatically through
                                                 network. The DVR system will auto synchronize time from NTP
                                                 servers. The first time synchronize will be 6 hours later after
                                                 system power up. When the daylight saving is enabling, the
                                                 auto time synchronization will be stopped.
                                                            -    User need to setup the NTP server’s URL or IP address.
                                                    i            Please go to 8.1.1.1 System Setting #(3) NTP
                                                                 Setting to setup the NTP server.
                                                            -    If the NTP server doesn’t setup, the auto synchronize
                                                                 time function will not work correctly.

                                                 TIME ZONE
                                                 Select the time synchronization time zone. The time zone will
                                                 base on GMT (Greenwich Mean Time) time zone.
                                                 LAST SYNC TIME
                                                 Display the latest time synchronization date and time.


                                                            19
OSD MENU                                        Description
TIME SETUP                                      DELETE RECORDED FILES OLDER THAN 0 DAYS
DATE                    2007 / 03 / 12
                        15 : 45 : 57
TIME
AUTO SYNC TIME
                                                Set a period of time to delete recorded files that save on hard
                        OFF
TIME ZONE               GMT                     disk.
LAST SYNC TIME          2007 / 03 / 12
                        12 : 00 : 00
DAYLIGHT SAVING
DELETE RECORDED FILES OLDER THAN
                            10 DAYS


DAYLIGHT SAVING                                 DAYLIGHT SAVING
DAYLIGHT SAVING         OFF
START                   2008 / 01 /01           To enable/disable daylight saving function.
                        00 : 00
END                     2008 / 06 /30
                        00 : 00                 START
TIME OFFSET             00 : 00
                                                Setup daylight start up date and time.
                                                END
                                                Setup daylight stop date and time.
                                                TIME OFFSET
                                                Assign a time that it is for daylight saving time offset in your time
                                                zone. For example: if the time zone is in U.S. Eastern, the time
                                                offset is 1 hour.

S UB ME NU                                      AUTO RECORD
P AS S WOR D C HANG E
V IDE O ADJ US T ME NT                          Enable/disable auto continue recording when interrupted (i.e.,
TIME SETUP
AUT O R E C OR D       ON                       power breakdown, video playback or configuration setup). It
AUT O S C AN
P AS S WOR D S E T UP  NO
                                                continue recording after 10 second of idleness. This is
AUDIO R E C OR D       ON                       applicable in Always Record mode
AUDIO MUT E            OF F
V IDE O S Y S T E M    NT S C                   AUTO SCAN
MUT IP L E R E MOT E   OF F
R E MOTE ID            1
PTZ SETUP                                       Enable/disable auto cycle switch to display the next channel
CHANNEL NAME SETTING
                           S3. 01. 01. 00. 03   when in full screen preview. User can set different switch time
                                                for each channel. The time range is from 5 ~30 seconds.
                                                AUTO SCAN
                                                AUTO SCAN            OFF
                                                CHANNEL - 1          10 SEC
                                                CHANNEL - 2          10 SEC
                                                CHANNEL - 3          10 SEC
                                                CHANNEL - 4          10 SEC


                                                PASSWORD SETUP
                                                Enable/disable full system password protection. This would
                                                prevent unauthorized user to stop video recording, change
                                                system settings and formatting the hard disk
                                                AUDIO RECORD
                                                Enable/disable audio recording. To record sound, make sure
                                                the audio input device(ex: microphone) is connected to the unit


                                                              20
OSD MENU                                        Description
S UB ME NU                                      AUDIO MUTE
P AS S WOR D C HANG E
V IDE O ADJ US T ME NT                          Enable/disable to hear audio sound. To hear sound, make sure
TIME SETUP                                      the unit is connected to an audio output device (ex: speaker). If
AUT O R E C OR D       ON
AUT O S C AN
                                                user recorded video in audio mute status, there is no sound
P AS S WOR D S E T UP  NO                       when playback
AUDIO R E C OR D       ON
AUDIO MUT E            OF F
V IDE O S Y S T E M
MUT IP L E R E MOT E
R E MOTE ID
                       NT S C
                       OF F
                       1
                                                     i         The audio input and output device need to be
                                                               powered by external power.
PTZ SETUP
CHANNEL NAME SETTING                            VIDEO SYSTEM
                           S3. 01. 01. 00. 03
                                                DVR system will auto detect the video system and display
                                                MUTLIPLE REMOTE
                                                Enable/disable multiple DVR system remote control. When user
                                                has more than one DVR system, user can use MULTIPLE
                                                REMOTE function to control all DVR system by single remote
                                                control.
                                                REMOTE ID
                                                Assign the ID number for multiple DVR system remote controls.
                                                When there are more than one DVR systems, user can enable
                                                MULTIPLE REMOTE function, and then assign REMOTE ID to
                                                each DVR system. Then, user can just use one remote control
                                                to control all DVR system by pressing REMOTE ID. To remote
                                                control multiple DVR systems, press             FN   and number key
                                                (remote ID number) on the remote control.

PTZ SETUP                                       PTZ SETUP
CAMERA                 1
PTZ CONTROL            OFF                      To enable PTZ camera control by remote control and setup PTZ
PTZ ID                 000                      camera parameters.
PROTOCOL               PELCO-D
BAUD RATE              2400                     1.       Press          and select SUBMENU → PTZ SETUP.
AUTO PAN               1-1
DWELL TIME             05 SEC
                                                2.       Use the ▲ and ▼ to go up and down to select the
                                                         item and change the parameter value.

                                                3.       Use            or       button to enter the configure mode.
                                                                    ▼


                                                                             ▼
                                                                             ▼


                                                         Press          or         button to confirm the selection.
                                                                             ▲


                                                CAMERA
                                                Select the channel of PTZ camera. If the PTZ camera is
                                                connecting on channel 1, then select the camera 1 for PTZ
                                                video to be display on channel 1.
                                                PTZ CONTROL
                                                To enable/disable PTZ camera can be controlled by remote
                                                control at local site.
                                                PTZ ID
                                                Assign an ID to PTZ camera. The ID range is from 001 to 255
                                                but is limiting by protocol of PTZ camera. Please refer to your
                                                PTZ camera user’s manual for more detail of PTZ ID
                                                assignment.

                                                     i     We suggest assigning PTZ camera ID start from 5 to avoid
                                                           conflict with ID of camera channels.


                                                               21
OSD MENU                         Description
PTZ SETUP                        PROTOCOL
CAMERA                 1
PTZ CONTROL            OFF       Select the protocol of PTZ camera. The protocol will be
PTZ ID                 000       differenced that depends on the brand of PTZ camera. The
PROTOCOL               PELCO-D
BAUD RATE              2400      DVR system currently supports 2 protocols ─ PELCO-D and
AUTO PAN               1-1       PELCO-P. Please refer to your PTZ camera user manual to
DWELL TIME             05 SEC
                                 make sure which protocol is using for.
                                 BAUD RATE
                                 To setup the baud rate of PTZ camera. For more detail, please
                                 refer to your PTZ camera’s user manual.
                                 AUTO PAN
                                 Select the preset number to assign an auto move direction for
                                 the PTZ camera. For example: 1-3 means the PTZ camera will
                                 auto move from preset position 1, 2 and 3.
                                 DWELL TIME
                                 Set a time that how long the IP PTZ camera stays in that
                                 position before it moves to the next one.
CHANNEL    NAME SETTING          CHANNEL NAME SETTING
CHANNEL   1 NAME        CH01
CHANNEL    2 NAME       CH02     User can define name of each channel. Channel name can be 7
CHANNEL    3 NAME       CH03     digit long that include A~Z, 0~9, space, and dash (-).
CHANNEL    4 NAME       CH04


                                          22
OSD MENU                              Description
HARD DRIVE SETUP
OVERWRITE ENABLED      YES
                                      OVERWRITE ENABLED
HDD SIZE            1560,12MB
HDD USED                 250MB   1%   Enable/disable overwriting the earliest record when the hard
HDD FORMAT                            disk space runs out. By default, the HDD overwrite setting is
                                      enabled
                                      HDD FORMAT
                                      For security purpose, you may have to enter the password to
                                      format hard disk
                                      To format hard disk:
                                      1. Use the      ▲    and      ▼      buttons to go up and down and
* HDD SIZE shows the total capacity
                                         select HDD FORMAT. Then press                    or


                                                                                               ▼
  of the hard disk.
* HDD USED shows the amount of        2. In the CHECK PASSWORD screen, press                       or       .


                                                                                                        ▼
  space that has been used.
                                         Then use the ▲ and ▼ buttons to select the
                                         security combination number. Repeat till you key in the last
                                         number. Also, user can use the number button on the
                                         remote control to enter the password. Press        or


                                                                                                        ▼
                                         button again to make the selection. To move the selection
                                         to the left and right, use ▲ and ▼ buttons
                                          CHECK PASSWORD
                                          ENTER PASSWORD


                                      3. After entering the last number, the system will format the
                                         hard disk
                                      4. It is done when the “HDD FORMAT COMPLETED” appears
                                           HARD DR IVE SETUP
                                           OVERWRITE ENAB LED    YES
                                           HD D SIZE                   156 ,012 MB
                                           HD D USED                          0MB    0%
                                           HD D FORMAT


                                           HDD   FORMAT COMPLETED


                                                 Formatting the hard disk will permanently delete all the
                                                 records and can no longer be retrieved


                                                 23
OSD MENU                                      Description
SENSOR SETUP
SENSOR REC TIME    010   SEC                  SENSOR REC TIME
ALARM OUT TIME     010   SEC                  Set the amount of time (in second) to start record when the
CHANNEL - 1        NOT    INSTALLED
CHANNEL - 2        NOT    INSTALLED           sensor has triggered
CHANNEL - 3        NOT    INSTALLED
CHANNEL - 4        NOT    INSTALLED           ALARM OUT TIME
VIDEO LOSS ALARM    1     2   3       4
                                              Set the amount of time (in second) to continue sending the
                                              alarm once triggered
                                              CHANNEL 1~4
                                              Customize the initial state of the attached sensor. Refer to the
                                              table below to customize the sensor state
                                               Condition           Description
                                               NOT INSTALLED       Indicates that there is no sensor connected

                                               NORMAL OPEN         Indicates that the initial state of the sensor is
                                                                   normal open. Video recording initiates when
                                                                   there is a changes in the sensor state

                                               NORMAL CLOSE        Indicates that the initial state of the sensor is
                                                                   normal close. Video recording initiates when
                                                                   there is a changes in the sensor state

                                              VIDEO LOSS ALARM
                                              Select the channel when the video loss that the DVR system will send
                                              out a alarm
MOTION SETUP
MOTION CAMERA        1   2        3       4   MOTION CAMERA
SENSITIVITIY       MEDIUM                     Enable/disable the channel number to detect motion.
MOTION RECORD TIME 010 SEC
                                              SENSITIVITY
                                              Set the sensitivity level. The sensitivity is from H (High), 9~ 2
                                              and L (Low).
                                              MOTION RECORD TIME
                                              Set the amount of time (in second) to record when motion is
                                              detected.


NETWORK SETUP
IP MODE            STATIC                     NETWORK SETUP
NW ENABLE            1    2       3       4   Setup the network parameters for the internet or intranet remote
VIDEO PORT         0080
UPGARDE PORT       5005                       monitor or playback.
                                              IP MODE
                                              The system provides 3 types of IP setup mode – Static, DHCP,
                                              and PPPOE.
                                              Use     ▲     and   ▼   buttons to go up and down and select IP
                                              MODE, and then press           . Use     ▲     and        ▼       buttons to
                                              change the selections and press                 or                to make a
                                                                                                        ▼


                                              selection.
                                                    STATIC: Assigns a constant IP address for the DVR
                                                    system. Use ▲ and ▼ buttons to go up and down
                                                    and select items, and then press               or            to make
                                                                                                            ▼


                                                    selection. Use         and         to move left and right to
                                                                      ▼


                                                                                   ▼


                                                    select or enter the configuration value.
                                                    - IP ADDRESS: Assign a constant IP address which a real
                                                      IP addresses give from ISP to DVR system.


                                                           24
OSD MENU                         Description
NETWORK SETUP                       - SUBNET: It is a bitmask used to identify the sub network
IP MODE         DHCP                     and how many bits provide room for host addresses.
NW ENABLE         1  2   3   4
VIDEO PORT      0080                     Enter the subnet mask of the IP address which user has
UPGARDE PORT    5005                     assigned to DVR system.
                                    -    GATEWAY: A network device act as a passageway to
                                         internet. Enter the network gateway IP address
                                    -    DNS: Domain Name Server translates domain names
                                         (such as www.abb.com.tw) to IP addresses. Enter the IP
                                         address of DNS if it is available.
                                    -    MAC ADDRESS: Only for user information. Don’t need to
                                         enter the MAC address.
                                    -    When all parameters are set, select the CHANGE to
                                         confirm the configuration.
                                            NE T WOR K INF OR MAT ION
                                            IP ADDR E S S           192. 168.153 .100
                                            S UB NE T                255.255.255 . 255
                                            G ATE WAY               192. 168. 153 . 254
                                            DNS                     192. 168. 153 . 1
                                            MAC ADDR E S S          00. 00 .00 . 00.00. 00
                                            C HANG E


                                    DHCP: Assign the IP address by local DHCP server to
                                    DVR system. Use ▲ and ▼ buttons to go up and
                                    down and select DHCP, and then press                       or           to


                                                                                                     ▼
                                    make selection.
                                                   The DHCP (Dynamic Host Configuration Protocol) is a
                                        i          set of rules used by a communications device (such as
                                                   a computer, router or networking adaptor) to allow the
                                                   device to request and get an Internet address from a
                                                   server which has a list of addresses available for
                                                   assignment

                                    The DVR system will try to get an IP address from the
                                    DHCP server. A message window will show up as below:


                                         G E T IP N O W ! W A IT IN G . . .


                                    When DVR system gets an IP address from DHCP server,
                                    the information will display as below:
                                        NE T WOR K INF OR MAT ION
                                        IP ADDR E S S           192. 168.153 .100
                                        S UB NE T                255.255.255 . 255
                                        G ATE WAY               192. 168. 153 . 254
                                        DNS                     192. 168. 153 . 1
                                        MAC ADDR E S S          00. 00 .00 . 00.00. 00


                                                25
OSD MENU                          Description
NETWORK SETUP                           PPPOE: Point-to-Point Protocol over Ethernet is a network
IP MODE         PPPOE
NW ENABLE         1   2   3   4         protocol for encapsulating PPP frames in Ethernet frames.
VIDEO PORT      0080                    It is used mainly with ADSL services. If your network is
UPGARDE PORT    5005                    using ADSL service connecting to internet, and then, select
                                        PPPOE mode. Use ▲ and ▼ buttons to go up and
                                        down and select PPPOE, and then press       or        to


                                                                                                                          ▼
                                        make selection. A message window will show up as below:


                                             G E T IP N O W ! W A IT IN G . . .


                                        When DVR system get an IP address, the information will
                                        display as below:
                                            NE T WOR K INF OR MAT ION
                                            IP ADDR E S S           192. 168.153 .100
                                            S UB NE T                255.255.255 . 255
                                            G ATE WAY               192. 168. 153 . 254
                                            DNS                     192. 168. 153 . 1
                                            MAC ADDR E S S          00. 00 .00 . 00.00. 00
                                            C HANG E


                                  NW ENABLE
                                  Allow internet remote user to playback or monitor the channels.
                                  Without enabling the network function, the channels cannot be
                                  playback or monitor from remote site.

                                        i               1 is Channel 1              2 is Channel 2
                                                        3 is Channel 3              4 is Channel 4

                                  Use         ▲       and         ▼       buttons to go up and down and select
                                  NW ENABLE (network enable), and then press                                         or
                                                                                                                              ▼


                                  and                to move to the selection. Use                    and            buttons
                                              ▼


                                                                                                  ▲           ▼

                                  to change the selections values and press                                     or                to
                                                                                                                          ▼


                                  confirm.
                                  VIDEO PORT
                                  A port for the remote connection. Any port can be assigned as a
                                  video port, except the ports already used by the network
                                  services. The default video port is 80.
                                  Use         ▲       and         ▼       buttons to go up and down and select
                                  VIDEO PORT, and then press                                 or         and          to move
                                                                                                  ▼


                                                                                                               ▼


                                  to the selection. Use                     ▲     and   ▼         buttons to change the
                                  selections values and press                           or            to confirm.
                                                                                                  ▼


                                                   26
OSD MENU                                           Description
NETWORK SETUP                                      UPGRADE PORT
IP MODE                  STATIC
NW ENABLE                  1    2         3    4   A port for the remote update DVR system firmware. Any port
VIDEO PORT               0080                      can be assigned as an upgrade port, except the ports are
UPGARDE PORT             5005
                                                   already used by the network services. The default upgrade port
                                                   is 5005. For Upgrading DVR firmware, please contact your local
                                                   dealer.
                                                                     Please DO NOT cut off the power of the DVR system
                                                            i        while the firmware is upgrading. Power failure will cause
                                                                     the permanent damage of the DVR system.

                                                   Use           ▲     and      ▼   buttons to go up and down and select
                                                   UPGRADE PORT, and then press                                or            and            to


                                                                                                                        ▼


                                                                                                                                       ▼
                                                   move to the selection. Use             ▲        and     ▼        buttons to change
                                                   the selections values and press                        or             to confirm.


                                                                                                                   ▼
USB BAKCUP                                         USB BACKUP
TIME SET
 START
                                                   Using USB device (ex. Pen drive or External Hard disk) to
             : 2006 / 05 / 04   10 : 00 : 01
 END         : 2006 / 05 / 05   13 : 08 : 13       backup partial recorded video and playback on PC.
BACKUP CHANNEL       1     2        3      4       Use           ▲     and      ▼   buttons to go up and down and select
BACKUP SIZE                             89MB
BACKUP EXECUTE
                                                   USB BACKUP, and then press                             or            . Use              and


                                                                                                                                   ▼
                                                                                                                   ▼
                                                                to move left and right. And, use                    and              buttons
                                                        ▼


                                                                                                           ▲                 ▼

                                                   to change the value and press                     or                to confirm.


                                                                                                               ▼
                                                                  - Remember to plug in the USB device before
                                                        i           starting to backup.
                                                                  - If the external hard disk is first time using, please
                                                                    format to FAT32 format.
                                                                  - The DVR system supports external hard disk
                                                                    capacity up to 32GB.
                                                                  - The external hard disk needs to be power by
                                                                    external power.
                                                   1.           Select the START TIME and END TIME.
                                                   2.           Select the channels which user wants to backup.
                                                   3.           The DVR system will display the system hard disk space
                                                                and backup file size.
                                                   4.           And then, select BACKUP EXECUTE to start backup
                                                                video to the USB device.
                                                   5.           When backup is done, press any key to back to main
                                                                menu.


                                                                 USB BACKUP !
                                                                 USAGE OF USB WIL L STOP NETWORK
                                                                 FUNCTIONS!
                                                                 YES(SELECT) / NO(MENU)


                                                   6.           To view the backup             file,      using         USB      Playback
                                                                Application(see 4.3)


                                                                     27
Chapter 4              Using the USB Playback Console
4.1       Recommended system requirements
     Pentium®4 2.4GHZ or above
     Windows®2000/ XP/Vista
     DDR 256 MB
     Graphic function must support DirectDraw
     Audio card or built-in
     Speaker
     1 available USB2.0 port

4.2       Installing the USB Playback Console
To install the USB Playback Console:
1. Place Installation CD into the CD-ROM drive. When the installation main screen
     appears, click Install USB Playback Console and then follow the on screen
     instructions


2.   Select the language you prefer


3.   Click OK to install the application
4.   Click Exit to close the installation main screen. You may plug in the pen drive or
     connect the external hard disk to the PC now.


                                           28
4.3       Running the USB Playback Console
To run the application, click the             icon on the PC desktop


                                                                                             (13)
                                                                                             (12)
                                                                                             (11)
                                                                                             (10)
                                                                                             (9)
                                                                                             (8)

               (14)                                                                          (7)
               (15)                                                                          (6)
                (1)


                      (2) (3)                               (4)                  (5)
  Name                      Function
  (1)   Exit                    Exit/ Minimize the application or chose Cancel to go back to the
                                application.
                                About: shows DVR application version information.


  (2) Progress bar              Show the progress of the file being played. You may move the bar to seek
                                at any location of the track.
  (3) Split Screen Mode         Select from different screen view to playback the recorded video file of the
                                entire camera or one camera on screen.
  (4)   Playback                Begin: Move at the beginning of the recorded video file.
        Controller              Previous: Go back to the previous frame by frame.
                                Slower: Play the recorded video file at the speed of 2x, 4x, or 8x.
                                Rewind: Wind back the recorded video file.
                                Pause: Briefly stop playing the recorded video file.
                                Play: Play the recorded video file.
                                Faster: Play the recorded video file at the speed of 2x, 4x, 8x, or 16x
                                Next: Go to the next frame by frame.
                                End: Go to the end of the recorded video file.

                                                     29
Eb1304 Net Sata&Sata+ Manual  En

Contenu connexe

Tendances

MSI S100 manual guide PDF download (English) / User Guide
MSI S100 manual guide PDF download (English) / User GuideMSI S100 manual guide PDF download (English) / User Guide
MSI S100 manual guide PDF download (English) / User Guidemanualsheet
 
Panduan pelanggan fast net cable modem motorola sb5101
Panduan pelanggan fast net cable modem motorola sb5101Panduan pelanggan fast net cable modem motorola sb5101
Panduan pelanggan fast net cable modem motorola sb5101Thomas Ra Urus
 
Sdr h85 manual with my post-its
Sdr h85 manual with my post-itsSdr h85 manual with my post-its
Sdr h85 manual with my post-itsJames bonfoey
 
Digital Watchdog DWC-HD321M4TIR User Manual
Digital Watchdog DWC-HD321M4TIR User ManualDigital Watchdog DWC-HD321M4TIR User Manual
Digital Watchdog DWC-HD321M4TIR User ManualJMAC Supply
 
Samsung mobile device health and safety and warranty guide
Samsung mobile device health and safety and warranty guide Samsung mobile device health and safety and warranty guide
Samsung mobile device health and safety and warranty guide Saima Ashiq
 
Datavideo PD-3 Power Distribution Center
Datavideo PD-3 Power Distribution CenterDatavideo PD-3 Power Distribution Center
Datavideo PD-3 Power Distribution CenterAV ProfShop
 
Manual Smart water leakage sensor Z-Wave Plus - Zipato
Manual Smart water leakage sensor Z-Wave Plus - ZipatoManual Smart water leakage sensor Z-Wave Plus - Zipato
Manual Smart water leakage sensor Z-Wave Plus - ZipatoDomotica daVinci
 
Datavideo PD-1 Power Distribution System
Datavideo PD-1 Power Distribution SystemDatavideo PD-1 Power Distribution System
Datavideo PD-1 Power Distribution SystemAV ProfShop
 
사토프린터 SATO WS4 감열 데스크탑 바코드프린터 매뉴얼
사토프린터 SATO WS4 감열 데스크탑 바코드프린터 매뉴얼사토프린터 SATO WS4 감열 데스크탑 바코드프린터 매뉴얼
사토프린터 SATO WS4 감열 데스크탑 바코드프린터 매뉴얼HION IT
 
Avtron Pinhole Lens Camera Aa 4522 p-fs-manual
Avtron Pinhole Lens Camera Aa 4522 p-fs-manualAvtron Pinhole Lens Camera Aa 4522 p-fs-manual
Avtron Pinhole Lens Camera Aa 4522 p-fs-manualAvtron
 
Instruction Manual ATN DNVM Series NV Monocular | Optics Trade
Instruction Manual ATN DNVM Series NV Monocular | Optics TradeInstruction Manual ATN DNVM Series NV Monocular | Optics Trade
Instruction Manual ATN DNVM Series NV Monocular | Optics TradeOptics-Trade
 
Zipato tablet with wall holder installation manual
Zipato tablet with wall holder installation manualZipato tablet with wall holder installation manual
Zipato tablet with wall holder installation manualDomotica daVinci
 
1 pdfsam hdcsd60-mul
1 pdfsam hdcsd60-mul1 pdfsam hdcsd60-mul
1 pdfsam hdcsd60-mulguestd659f9
 
Mc100 installation guide
Mc100 installation guideMc100 installation guide
Mc100 installation guideNetPlus
 
Concise User Guide for 8928/8930A
Concise User Guide for 8928/8930AConcise User Guide for 8928/8930A
Concise User Guide for 8928/8930ADukaneAVMarketing
 

Tendances (19)

MSI S100 manual guide PDF download (English) / User Guide
MSI S100 manual guide PDF download (English) / User GuideMSI S100 manual guide PDF download (English) / User Guide
MSI S100 manual guide PDF download (English) / User Guide
 
Panduan pelanggan fast net cable modem motorola sb5101
Panduan pelanggan fast net cable modem motorola sb5101Panduan pelanggan fast net cable modem motorola sb5101
Panduan pelanggan fast net cable modem motorola sb5101
 
Sdr h85 manual with my post-its
Sdr h85 manual with my post-itsSdr h85 manual with my post-its
Sdr h85 manual with my post-its
 
Digital Watchdog DWC-HD321M4TIR User Manual
Digital Watchdog DWC-HD321M4TIR User ManualDigital Watchdog DWC-HD321M4TIR User Manual
Digital Watchdog DWC-HD321M4TIR User Manual
 
Samsung mobile device health and safety and warranty guide
Samsung mobile device health and safety and warranty guide Samsung mobile device health and safety and warranty guide
Samsung mobile device health and safety and warranty guide
 
Datavideo PD-3 Power Distribution Center
Datavideo PD-3 Power Distribution CenterDatavideo PD-3 Power Distribution Center
Datavideo PD-3 Power Distribution Center
 
Paragon manual
Paragon manualParagon manual
Paragon manual
 
Em sg500v1
Em sg500v1Em sg500v1
Em sg500v1
 
Manual Smart water leakage sensor Z-Wave Plus - Zipato
Manual Smart water leakage sensor Z-Wave Plus - ZipatoManual Smart water leakage sensor Z-Wave Plus - Zipato
Manual Smart water leakage sensor Z-Wave Plus - Zipato
 
Datavideo PD-1 Power Distribution System
Datavideo PD-1 Power Distribution SystemDatavideo PD-1 Power Distribution System
Datavideo PD-1 Power Distribution System
 
사토프린터 SATO WS4 감열 데스크탑 바코드프린터 매뉴얼
사토프린터 SATO WS4 감열 데스크탑 바코드프린터 매뉴얼사토프린터 SATO WS4 감열 데스크탑 바코드프린터 매뉴얼
사토프린터 SATO WS4 감열 데스크탑 바코드프린터 매뉴얼
 
Avtron Pinhole Lens Camera Aa 4522 p-fs-manual
Avtron Pinhole Lens Camera Aa 4522 p-fs-manualAvtron Pinhole Lens Camera Aa 4522 p-fs-manual
Avtron Pinhole Lens Camera Aa 4522 p-fs-manual
 
Instruction Manual ATN DNVM Series NV Monocular | Optics Trade
Instruction Manual ATN DNVM Series NV Monocular | Optics TradeInstruction Manual ATN DNVM Series NV Monocular | Optics Trade
Instruction Manual ATN DNVM Series NV Monocular | Optics Trade
 
Zipato tablet with wall holder installation manual
Zipato tablet with wall holder installation manualZipato tablet with wall holder installation manual
Zipato tablet with wall holder installation manual
 
Manual Intercom - Fibaro
Manual Intercom - FibaroManual Intercom - Fibaro
Manual Intercom - Fibaro
 
1 pdfsam hdcsd60-mul
1 pdfsam hdcsd60-mul1 pdfsam hdcsd60-mul
1 pdfsam hdcsd60-mul
 
Dmcfz28
Dmcfz28Dmcfz28
Dmcfz28
 
Mc100 installation guide
Mc100 installation guideMc100 installation guide
Mc100 installation guide
 
Concise User Guide for 8928/8930A
Concise User Guide for 8928/8930AConcise User Guide for 8928/8930A
Concise User Guide for 8928/8930A
 

Similaire à Eb1304 Net Sata&Sata+ Manual En

허니웰스캐너 Honeywell 3800r 1D 유선바코드스캐너 매뉴얼
허니웰스캐너 Honeywell 3800r 1D 유선바코드스캐너 매뉴얼허니웰스캐너 Honeywell 3800r 1D 유선바코드스캐너 매뉴얼
허니웰스캐너 Honeywell 3800r 1D 유선바코드스캐너 매뉴얼HION IT
 
허니웰스캐너 Honeywell 3800i 1D 유선바코드스캐너 매뉴얼
허니웰스캐너 Honeywell 3800i 1D 유선바코드스캐너 매뉴얼허니웰스캐너 Honeywell 3800i 1D 유선바코드스캐너 매뉴얼
허니웰스캐너 Honeywell 3800i 1D 유선바코드스캐너 매뉴얼HION IT
 
아보패널PC ARBOR IOT-500 5인치 안드로이드 고정식 산업용패널PC 매뉴얼
아보패널PC ARBOR IOT-500 5인치 안드로이드 고정식 산업용패널PC 매뉴얼아보패널PC ARBOR IOT-500 5인치 안드로이드 고정식 산업용패널PC 매뉴얼
아보패널PC ARBOR IOT-500 5인치 안드로이드 고정식 산업용패널PC 매뉴얼HION IT
 
Msi k9 n_series_manual
Msi k9 n_series_manualMsi k9 n_series_manual
Msi k9 n_series_manualescuelaem
 
01v96i en om_b0
01v96i en om_b001v96i en om_b0
01v96i en om_b0andijuda
 
Hikvision DS-2CD2432F-IW English User Manual
Hikvision DS-2CD2432F-IW English User ManualHikvision DS-2CD2432F-IW English User Manual
Hikvision DS-2CD2432F-IW English User ManualSecurityCameraTalk
 
Instruction manual | Flir Scout II Series | Optics Trade
Instruction manual | Flir Scout II Series | Optics TradeInstruction manual | Flir Scout II Series | Optics Trade
Instruction manual | Flir Scout II Series | Optics TradeOptics-Trade
 
Sony PMW-EX3 Operation Manual
Sony PMW-EX3 Operation ManualSony PMW-EX3 Operation Manual
Sony PMW-EX3 Operation ManualAV ProfShop
 
Jual Miring!! Total Station Focus 8?? Call 087778355373-0856180442
Jual Miring!! Total Station Focus 8?? Call 087778355373-0856180442Jual Miring!! Total Station Focus 8?? Call 087778355373-0856180442
Jual Miring!! Total Station Focus 8?? Call 087778355373-0856180442ALAMSURVEY
 
Dahua HD IR Vandal Proof Network Dome Camera
Dahua HD IR Vandal Proof Network Dome CameraDahua HD IR Vandal Proof Network Dome Camera
Dahua HD IR Vandal Proof Network Dome CameraDomotica daVinci
 
Manual Laptop W240-W250HU.pdf
Manual Laptop W240-W250HU.pdfManual Laptop W240-W250HU.pdf
Manual Laptop W240-W250HU.pdfmhernandezv2012
 
operating instructions for sony a6300.pdf
operating instructions for sony a6300.pdfoperating instructions for sony a6300.pdf
operating instructions for sony a6300.pdfPulkit878643
 
MSI PX60 Prestige (GTX 950M) User Manual PDF Download (English) / User Guide
    MSI PX60 Prestige (GTX 950M) User Manual PDF Download (English) / User Guide    MSI PX60 Prestige (GTX 950M) User Manual PDF Download (English) / User Guide
MSI PX60 Prestige (GTX 950M) User Manual PDF Download (English) / User Guidemanualsheet
 
Cambium network ptp 810 series 01 00 user guide
Cambium network ptp 810 series 01 00 user guideCambium network ptp 810 series 01 00 user guide
Cambium network ptp 810 series 01 00 user guideAdvantec Distribution
 
8928 a 8930a_usermanual_concise
8928 a 8930a_usermanual_concise8928 a 8930a_usermanual_concise
8928 a 8930a_usermanual_conciseSchoolVision Inc.
 
8928 a 8930a_usermanual_concise
8928 a 8930a_usermanual_concise8928 a 8930a_usermanual_concise
8928 a 8930a_usermanual_conciseSchoolVision Inc.
 
Domo hikvision analogos ds 2af5268
Domo hikvision analogos ds 2af5268Domo hikvision analogos ds 2af5268
Domo hikvision analogos ds 2af5268jasar1780
 

Similaire à Eb1304 Net Sata&Sata+ Manual En (20)

허니웰스캐너 Honeywell 3800r 1D 유선바코드스캐너 매뉴얼
허니웰스캐너 Honeywell 3800r 1D 유선바코드스캐너 매뉴얼허니웰스캐너 Honeywell 3800r 1D 유선바코드스캐너 매뉴얼
허니웰스캐너 Honeywell 3800r 1D 유선바코드스캐너 매뉴얼
 
허니웰스캐너 Honeywell 3800i 1D 유선바코드스캐너 매뉴얼
허니웰스캐너 Honeywell 3800i 1D 유선바코드스캐너 매뉴얼허니웰스캐너 Honeywell 3800i 1D 유선바코드스캐너 매뉴얼
허니웰스캐너 Honeywell 3800i 1D 유선바코드스캐너 매뉴얼
 
아보패널PC ARBOR IOT-500 5인치 안드로이드 고정식 산업용패널PC 매뉴얼
아보패널PC ARBOR IOT-500 5인치 안드로이드 고정식 산업용패널PC 매뉴얼아보패널PC ARBOR IOT-500 5인치 안드로이드 고정식 산업용패널PC 매뉴얼
아보패널PC ARBOR IOT-500 5인치 안드로이드 고정식 산업용패널PC 매뉴얼
 
Msi k9 n_series_manual
Msi k9 n_series_manualMsi k9 n_series_manual
Msi k9 n_series_manual
 
01v96i en om_b0
01v96i en om_b001v96i en om_b0
01v96i en om_b0
 
Hikvision DS-2CD2432F-IW English User Manual
Hikvision DS-2CD2432F-IW English User ManualHikvision DS-2CD2432F-IW English User Manual
Hikvision DS-2CD2432F-IW English User Manual
 
Instruction manual | Flir Scout II Series | Optics Trade
Instruction manual | Flir Scout II Series | Optics TradeInstruction manual | Flir Scout II Series | Optics Trade
Instruction manual | Flir Scout II Series | Optics Trade
 
Sony PMW-EX3 Operation Manual
Sony PMW-EX3 Operation ManualSony PMW-EX3 Operation Manual
Sony PMW-EX3 Operation Manual
 
Jual Miring!! Total Station Focus 8?? Call 087778355373-0856180442
Jual Miring!! Total Station Focus 8?? Call 087778355373-0856180442Jual Miring!! Total Station Focus 8?? Call 087778355373-0856180442
Jual Miring!! Total Station Focus 8?? Call 087778355373-0856180442
 
Datavideo DAC-7
Datavideo DAC-7Datavideo DAC-7
Datavideo DAC-7
 
Dahua HD IR Vandal Proof Network Dome Camera
Dahua HD IR Vandal Proof Network Dome CameraDahua HD IR Vandal Proof Network Dome Camera
Dahua HD IR Vandal Proof Network Dome Camera
 
Manual Laptop W240-W250HU.pdf
Manual Laptop W240-W250HU.pdfManual Laptop W240-W250HU.pdf
Manual Laptop W240-W250HU.pdf
 
operating instructions for sony a6300.pdf
operating instructions for sony a6300.pdfoperating instructions for sony a6300.pdf
operating instructions for sony a6300.pdf
 
MSI PX60 Prestige (GTX 950M) User Manual PDF Download (English) / User Guide
    MSI PX60 Prestige (GTX 950M) User Manual PDF Download (English) / User Guide    MSI PX60 Prestige (GTX 950M) User Manual PDF Download (English) / User Guide
MSI PX60 Prestige (GTX 950M) User Manual PDF Download (English) / User Guide
 
Cambium network ptp 810 series 01 00 user guide
Cambium network ptp 810 series 01 00 user guideCambium network ptp 810 series 01 00 user guide
Cambium network ptp 810 series 01 00 user guide
 
8928 a 8930a_usermanual_concise
8928 a 8930a_usermanual_concise8928 a 8930a_usermanual_concise
8928 a 8930a_usermanual_concise
 
8928 a 8930a_usermanual_concise
8928 a 8930a_usermanual_concise8928 a 8930a_usermanual_concise
8928 a 8930a_usermanual_concise
 
Domo hikvision analogos ds 2af5268
Domo hikvision analogos ds 2af5268Domo hikvision analogos ds 2af5268
Domo hikvision analogos ds 2af5268
 
Placa msi 7135
Placa msi 7135Placa msi 7135
Placa msi 7135
 
Panasonic dmc-fz28
Panasonic   dmc-fz28Panasonic   dmc-fz28
Panasonic dmc-fz28
 

Dernier

NAB Show Exhibitor List 2024 - Exhibitors Data
NAB Show Exhibitor List 2024 - Exhibitors DataNAB Show Exhibitor List 2024 - Exhibitors Data
NAB Show Exhibitor List 2024 - Exhibitors DataExhibitors Data
 
20220816-EthicsGrade_Scorecard-JP_Morgan_Chase-Q2-63_57.pdf
20220816-EthicsGrade_Scorecard-JP_Morgan_Chase-Q2-63_57.pdf20220816-EthicsGrade_Scorecard-JP_Morgan_Chase-Q2-63_57.pdf
20220816-EthicsGrade_Scorecard-JP_Morgan_Chase-Q2-63_57.pdfChris Skinner
 
14680-51-4.pdf Good quality CAS Good quality CAS
14680-51-4.pdf  Good  quality CAS Good  quality CAS14680-51-4.pdf  Good  quality CAS Good  quality CAS
14680-51-4.pdf Good quality CAS Good quality CAScathy664059
 
Appkodes Tinder Clone Script with Customisable Solutions.pptx
Appkodes Tinder Clone Script with Customisable Solutions.pptxAppkodes Tinder Clone Script with Customisable Solutions.pptx
Appkodes Tinder Clone Script with Customisable Solutions.pptxappkodes
 
Psychic Reading | Spiritual Guidance – Astro Ganesh Ji
Psychic Reading | Spiritual Guidance – Astro Ganesh JiPsychic Reading | Spiritual Guidance – Astro Ganesh Ji
Psychic Reading | Spiritual Guidance – Astro Ganesh Jiastral oracle
 
Environmental Impact Of Rotary Screw Compressors
Environmental Impact Of Rotary Screw CompressorsEnvironmental Impact Of Rotary Screw Compressors
Environmental Impact Of Rotary Screw Compressorselgieurope
 
Horngren’s Financial & Managerial Accounting, 7th edition by Miller-Nobles so...
Horngren’s Financial & Managerial Accounting, 7th edition by Miller-Nobles so...Horngren’s Financial & Managerial Accounting, 7th edition by Miller-Nobles so...
Horngren’s Financial & Managerial Accounting, 7th edition by Miller-Nobles so...ssuserf63bd7
 
business environment micro environment macro environment.pptx
business environment micro environment macro environment.pptxbusiness environment micro environment macro environment.pptx
business environment micro environment macro environment.pptxShruti Mittal
 
Excvation Safety for safety officers reference
Excvation Safety for safety officers referenceExcvation Safety for safety officers reference
Excvation Safety for safety officers referencessuser2c065e
 
How Generative AI Is Transforming Your Business | Byond Growth Insights | Apr...
How Generative AI Is Transforming Your Business | Byond Growth Insights | Apr...How Generative AI Is Transforming Your Business | Byond Growth Insights | Apr...
How Generative AI Is Transforming Your Business | Byond Growth Insights | Apr...Hector Del Castillo, CPM, CPMM
 
WSMM Technology February.March Newsletter_vF.pdf
WSMM Technology February.March Newsletter_vF.pdfWSMM Technology February.March Newsletter_vF.pdf
WSMM Technology February.March Newsletter_vF.pdfJamesConcepcion7
 
Memorándum de Entendimiento (MoU) entre Codelco y SQM
Memorándum de Entendimiento (MoU) entre Codelco y SQMMemorándum de Entendimiento (MoU) entre Codelco y SQM
Memorándum de Entendimiento (MoU) entre Codelco y SQMVoces Mineras
 
Cyber Security Training in Office Environment
Cyber Security Training in Office EnvironmentCyber Security Training in Office Environment
Cyber Security Training in Office Environmentelijahj01012
 
GUIDELINES ON USEFUL FORMS IN FREIGHT FORWARDING (F) Danny Diep Toh MBA.pdf
GUIDELINES ON USEFUL FORMS IN FREIGHT FORWARDING (F) Danny Diep Toh MBA.pdfGUIDELINES ON USEFUL FORMS IN FREIGHT FORWARDING (F) Danny Diep Toh MBA.pdf
GUIDELINES ON USEFUL FORMS IN FREIGHT FORWARDING (F) Danny Diep Toh MBA.pdfDanny Diep To
 
trending-flavors-and-ingredients-in-salty-snacks-us-2024_Redacted-V2.pdf
trending-flavors-and-ingredients-in-salty-snacks-us-2024_Redacted-V2.pdftrending-flavors-and-ingredients-in-salty-snacks-us-2024_Redacted-V2.pdf
trending-flavors-and-ingredients-in-salty-snacks-us-2024_Redacted-V2.pdfMintel Group
 
Pitch Deck Teardown: Xpanceo's $40M Seed deck
Pitch Deck Teardown: Xpanceo's $40M Seed deckPitch Deck Teardown: Xpanceo's $40M Seed deck
Pitch Deck Teardown: Xpanceo's $40M Seed deckHajeJanKamps
 
Unveiling the Soundscape Music for Psychedelic Experiences
Unveiling the Soundscape Music for Psychedelic ExperiencesUnveiling the Soundscape Music for Psychedelic Experiences
Unveiling the Soundscape Music for Psychedelic ExperiencesDoe Paoro
 
Types of Cyberattacks - ASG I.T. Consulting.pdf
Types of Cyberattacks - ASG I.T. Consulting.pdfTypes of Cyberattacks - ASG I.T. Consulting.pdf
Types of Cyberattacks - ASG I.T. Consulting.pdfASGITConsulting
 
Technical Leaders - Working with the Management Team
Technical Leaders - Working with the Management TeamTechnical Leaders - Working with the Management Team
Technical Leaders - Working with the Management TeamArik Fletcher
 
Strategic Project Finance Essentials: A Project Manager’s Guide to Financial ...
Strategic Project Finance Essentials: A Project Manager’s Guide to Financial ...Strategic Project Finance Essentials: A Project Manager’s Guide to Financial ...
Strategic Project Finance Essentials: A Project Manager’s Guide to Financial ...Aggregage
 

Dernier (20)

NAB Show Exhibitor List 2024 - Exhibitors Data
NAB Show Exhibitor List 2024 - Exhibitors DataNAB Show Exhibitor List 2024 - Exhibitors Data
NAB Show Exhibitor List 2024 - Exhibitors Data
 
20220816-EthicsGrade_Scorecard-JP_Morgan_Chase-Q2-63_57.pdf
20220816-EthicsGrade_Scorecard-JP_Morgan_Chase-Q2-63_57.pdf20220816-EthicsGrade_Scorecard-JP_Morgan_Chase-Q2-63_57.pdf
20220816-EthicsGrade_Scorecard-JP_Morgan_Chase-Q2-63_57.pdf
 
14680-51-4.pdf Good quality CAS Good quality CAS
14680-51-4.pdf  Good  quality CAS Good  quality CAS14680-51-4.pdf  Good  quality CAS Good  quality CAS
14680-51-4.pdf Good quality CAS Good quality CAS
 
Appkodes Tinder Clone Script with Customisable Solutions.pptx
Appkodes Tinder Clone Script with Customisable Solutions.pptxAppkodes Tinder Clone Script with Customisable Solutions.pptx
Appkodes Tinder Clone Script with Customisable Solutions.pptx
 
Psychic Reading | Spiritual Guidance – Astro Ganesh Ji
Psychic Reading | Spiritual Guidance – Astro Ganesh JiPsychic Reading | Spiritual Guidance – Astro Ganesh Ji
Psychic Reading | Spiritual Guidance – Astro Ganesh Ji
 
Environmental Impact Of Rotary Screw Compressors
Environmental Impact Of Rotary Screw CompressorsEnvironmental Impact Of Rotary Screw Compressors
Environmental Impact Of Rotary Screw Compressors
 
Horngren’s Financial & Managerial Accounting, 7th edition by Miller-Nobles so...
Horngren’s Financial & Managerial Accounting, 7th edition by Miller-Nobles so...Horngren’s Financial & Managerial Accounting, 7th edition by Miller-Nobles so...
Horngren’s Financial & Managerial Accounting, 7th edition by Miller-Nobles so...
 
business environment micro environment macro environment.pptx
business environment micro environment macro environment.pptxbusiness environment micro environment macro environment.pptx
business environment micro environment macro environment.pptx
 
Excvation Safety for safety officers reference
Excvation Safety for safety officers referenceExcvation Safety for safety officers reference
Excvation Safety for safety officers reference
 
How Generative AI Is Transforming Your Business | Byond Growth Insights | Apr...
How Generative AI Is Transforming Your Business | Byond Growth Insights | Apr...How Generative AI Is Transforming Your Business | Byond Growth Insights | Apr...
How Generative AI Is Transforming Your Business | Byond Growth Insights | Apr...
 
WSMM Technology February.March Newsletter_vF.pdf
WSMM Technology February.March Newsletter_vF.pdfWSMM Technology February.March Newsletter_vF.pdf
WSMM Technology February.March Newsletter_vF.pdf
 
Memorándum de Entendimiento (MoU) entre Codelco y SQM
Memorándum de Entendimiento (MoU) entre Codelco y SQMMemorándum de Entendimiento (MoU) entre Codelco y SQM
Memorándum de Entendimiento (MoU) entre Codelco y SQM
 
Cyber Security Training in Office Environment
Cyber Security Training in Office EnvironmentCyber Security Training in Office Environment
Cyber Security Training in Office Environment
 
GUIDELINES ON USEFUL FORMS IN FREIGHT FORWARDING (F) Danny Diep Toh MBA.pdf
GUIDELINES ON USEFUL FORMS IN FREIGHT FORWARDING (F) Danny Diep Toh MBA.pdfGUIDELINES ON USEFUL FORMS IN FREIGHT FORWARDING (F) Danny Diep Toh MBA.pdf
GUIDELINES ON USEFUL FORMS IN FREIGHT FORWARDING (F) Danny Diep Toh MBA.pdf
 
trending-flavors-and-ingredients-in-salty-snacks-us-2024_Redacted-V2.pdf
trending-flavors-and-ingredients-in-salty-snacks-us-2024_Redacted-V2.pdftrending-flavors-and-ingredients-in-salty-snacks-us-2024_Redacted-V2.pdf
trending-flavors-and-ingredients-in-salty-snacks-us-2024_Redacted-V2.pdf
 
Pitch Deck Teardown: Xpanceo's $40M Seed deck
Pitch Deck Teardown: Xpanceo's $40M Seed deckPitch Deck Teardown: Xpanceo's $40M Seed deck
Pitch Deck Teardown: Xpanceo's $40M Seed deck
 
Unveiling the Soundscape Music for Psychedelic Experiences
Unveiling the Soundscape Music for Psychedelic ExperiencesUnveiling the Soundscape Music for Psychedelic Experiences
Unveiling the Soundscape Music for Psychedelic Experiences
 
Types of Cyberattacks - ASG I.T. Consulting.pdf
Types of Cyberattacks - ASG I.T. Consulting.pdfTypes of Cyberattacks - ASG I.T. Consulting.pdf
Types of Cyberattacks - ASG I.T. Consulting.pdf
 
Technical Leaders - Working with the Management Team
Technical Leaders - Working with the Management TeamTechnical Leaders - Working with the Management Team
Technical Leaders - Working with the Management Team
 
Strategic Project Finance Essentials: A Project Manager’s Guide to Financial ...
Strategic Project Finance Essentials: A Project Manager’s Guide to Financial ...Strategic Project Finance Essentials: A Project Manager’s Guide to Financial ...
Strategic Project Finance Essentials: A Project Manager’s Guide to Financial ...
 

Eb1304 Net Sata&Sata+ Manual En

  • 1. ® AVerMedia AVerDiGi EB1304NET SATA + EB1304NET SATA User Manual Oct.2008
  • 2. FCC NOTICE (Class A) This device complies with Part 15 of the FCC Rules. Operation is subject to the following two conditions: (1) this device may not cause harmful interference, and (2) this device must accept any interference received, including interference that may cause undesired operation. .Federal Communications Commission Statement NOTE- This equipment has been tested and found to comply with the limits for a Class A digital device, pursuant to Part 15 of the FCC Rules. These limits are designed to provide reasonable protection against harmful interference in a residential installation. This equipment generates uses and can radiate radio frequency energy and, if not installed and used in accordance with the instructions, may cause harmful interference to radio communications. However, there is no guarantee that interference will not occur in a particular installation. If this equipment does cause harmful interference to radio or television reception, which can be determined by tuning the equipment off and on, the user is encouraged to try to correct the interference by one or more of the following measures: Reorient or relocate the receiving antenna. Increase the separation between the equipment and receiver. Connect the equipment into an outlet on a circuit different from that to which the receiver is connected. Consult the dealer or an experienced radio/television technician for help. Class A ITE Class A ITE is a category of all other ITE which satisfies the class A ITE limits but not the class B ITE limits. Such equipment should not be restricted in its sale but the following warning shall be included in the instructions for use: Warning --This is a class A product. In a domestic environment this product may cause radio interference in which case the user may be required to take adequate measures. European Community Compliance Statement (Class A) This product is herewith confirmed to comply with the requirements set out in the Council Directives on the Approximation of the laws of the Member States relating to Electromagnetic Compatibility Directive 2004/108/EEC. Warning - This is a Class A product. In a domestic environment this product may cause radio interference in which case the user may be required to take adequate measures to correct this interference. DISCLAIMER No warranty or representation, either expressed or implied, is made with respect to the contents of this documentation, its quality, performance, merchantability, or fitness for a particular purpose. Information presented in this documentation has been carefully checked for reliability; however, no responsibility is assumed for inaccuracies. The information contained in this documentation is subject to change without notice. In no event will AVerMedia be liable for direct, indirect, special, incidental, or consequential damages arising out of the use or inability to use this product or documentation, even if advised of the possibility of such damages. TRADEMARKS AVerMedia, being authorized AVerMedia Information, Inc. to use, is registered trademarks of AVerMedia TECHNOLOGIES, Inc. IBM PC is a registered trademark of International Business Machines Corporation. Macintosh is a registered trademark of Apple Computer, Inc. Microsoft is a registered trademark and Windows is a trademark of Microsoft Corporation. All other products or corporate names mentioned in this documentation are for identification and explanation purposes only, and may be trademarks or registered trademarks of their respective owners. COPYRIGHT © 2008 by AVerMedia INFORMATION, Inc. All rights reserved. No part of this publication may be reproduced, transmitted, transcribed, stored in a retrieval system, or translated into any language in any form by any means without the written permission of AVerMedia TECHNOLOGIES, Inc. The mark of Crossed-out wheeled bin indicates that this product must not be disposed of with your other household waste. Instead, you need to dispose of the waste equipment by handing it over to a designated collection point for the recycling of waste electrical and electronic equipment. For more information about where to drop off your waste equipment for recycling, please contact your household waste disposal service or the shop where you purchased the product. Battery Safety Information - Store the batteries in a cool dry place. - Do not dispose of used batteries in domestic waste. Dispose of batteries at special collection points or return to point of sale if applies. - Remove the batteries during long periods of non-use. Always remove exhausted batteries from the remote control. Battery leakage and corrosion can damage this remote control, dispose of batteries safely. - Do not mix old and new batteries. - Do not mix different types of batteries: alkaline, standard (carbon-zinc) or rechargeable (nickel-cadmium). - Do not dispose of batteries in a fire. The batteries may explode or leak. - Never short circuit the battery terminals.
  • 3. WARNING TO REDUCE RISK OF FIRE OR ELECTRIC SHOCK, DO NOT EXPOSE THIS APPLIANCE TO RAIN OR MOISTURE CAUTION IF THERE IS ANY DAMAGE, SHORTAGE OR INAPPROPRIATE ITEM IN THE PACKAGE, PLEASE CONTACT WITH YOUR LOCAL DEALER. WARRANTY VOID FOR ANY UNAUTHORIZED PRODUCT MODIFICATION NOTICE - INFORMATION IN THIS DOCUMENT IS SUBJECT TO CHANGE WITHOUT NOTICE. - THE INFORMATION CONTAINED HEREIN IS TO BE CONSIDERED FOR REFERENCT ONLY. LIGHTNING WARNING − TO AVOID THE LIGHTNING STRIKE, STRONGLY SUGGEST INSTALLING THE LIGHTNING ROD AT LIGHTNING FREQUENTLY AREA. − FOR ADDED PROTECTION, UNPLUG THE DVR UNIT DURING THE LIGHTNING STORM. THIS MAY PREVENT TO DAMAGE THE DVR UNIT DUE TO THE LIGHTNING.
  • 4. Table of Contents Chapter 1 Introduction................................................................................ 1 1.1 Package Content.................................................................................................. 1 1.2 Features and Specifications ................................................................................. 1 1.3 Front Panel........................................................................................................... 3 1.3.1 EB1304NET SATA ........................................................................................... 3 1.3.2 EB1304NET SATA+ .......................................................................................... 3 1.4 Back Panel ........................................................................................................... 5 1.5 Setting Up the DVR Unit....................................................................................... 6 1.5.1 Installing the Hard Disk .................................................................................... 6 1.5.2 Adjust Fan Speed............................................................................................. 7 1.5.3 Connecting Devices ......................................................................................... 8 1.5.4 Connecting the Sensor device/Relay device /PTZ Camera ............................. 9 Chapter 2 Operating the DVR unit ........................................................... 10 2.1 Familiarizing the Remote Control Buttons .......................................................... 10 2.1.1 Using AB Repeat Function ..............................................................................11 2.1.2 Using USB Backup Button ............................................................................. 12 2.1.3 Controlling PTZ Camera ................................................................................ 12 2.1.3.1 To Enter the PTZ Mode .............................................................................. 12 2.1.3.2 To Set Preset Position ................................................................................ 12 2.1.3.3 To Control PTZ Camera ............................................................................. 13 2.2 Using the DVR for the First Time........................................................................ 13 2.2.1 Set up the System Date and Time ................................................................. 14 2.3 Surveillance Screen ........................................................................................... 14 2.4 Playback the Video............................................................................................. 15 Chapter 3 OSD Navigation Tree ............................................................... 16 3.1 Menu Function.................................................................................................... 17 Chapter 4 Using the USB Playback Console .......................................... 28 4.1 Recommended system requirements ................................................................. 28 4.2 Installing the USB Playback Console ................................................................. 28 4.3 Running the USB Playback Console .................................................................. 29 4.3.1 To Cut and Save the Portion of the Recorded Video...................................... 31 4.3.2 Playback DVR Recorded File from Hard Disk................................................ 31 4.3.3 Playback Backup File(*.dvr) ........................................................................... 32 4.3.4 Playback Backup File (*.avf) .......................................................................... 32 Chapter 5 Backup Recorded Video File .................................................. 33 5.1 Familiarizing with HDD Backup Application ........................................................ 33 5.2 To Backup Recorded Video File ......................................................................... 34 Chapter 6 ImageVerification..................................................................... 35
  • 5. 6.1 To Run the ImageVerification.............................................................................. 35 Chapter 7 iEnhance................................................................................... 36 7.1 To Use iStable .................................................................................................... 37 Chapter 8 Using the Remote Programs .................................................. 38 8.1 Familiarizing the Web Viewer Buttons ................................................................ 39 8.1.1 To Setup Remote System Setting .................................................................. 41 8.1.1.1 System Setup ............................................................................................. 41 8.1.1.2 Camera Setup ............................................................................................ 42 8.1.1.3 Record Setup ............................................................................................. 43 8.1.1.4 Alarm/Sensor Setup ................................................................................... 45 8.1.1.5 Network Setup............................................................................................ 47 8.1.1.6 Password Change ...................................................................................... 49 8.2 Familiarizing the Remote Console Buttons......................................................... 50 To Setup Remote Console Setting ............................................................................. 51 8.3 Using the Remote Playback ............................................................................... 52 8.3.1 Familiarizing the Local Playback Buttons....................................................... 53 8.3.2 Familiarizing the Download and Playback Buttons ........................................ 55 8.3.2.1 To Cut and Save the Wanted Portion of the Recorded Video ..................... 56 8.3.2.2 To Search Using the Visual Search ............................................................ 56 8.3.2.3 To Search Using the Intelligent Search ...................................................... 57 Chapter 9 Using HandyViewer to Access DVR server........................... 58 9.1 Using PDA Viewer to Access DVR Server.......................................................... 58 9.1.1 To install PDAViewer thru ActiveSync ............................................................ 58 9.1.2 To install PDAViewer from the Internet........................................................... 59 9.1.3 To Use the PDAViewer................................................................................... 60 9.1.4 To Playback in PDA Viewer............................................................................ 61 9.2 Using JavaViewer to Access DVR Server .......................................................... 62 9.2.1 To Use the JAVAViewer.................................................................................. 63 Appendix A Registering Domain Name ...................................................................... 64 Appendix B Network Service Port .............................................................................. 65
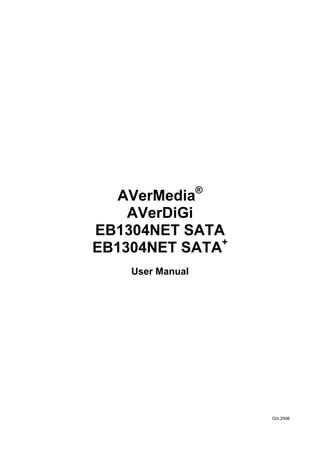
  • 6. Chapter 1 Introduction 1.1 Package Content AVe rDiG AVerM i EB ed ® Quic 130 ia k In 4NE stalla TS ATA tion Guid e A B (1) (2) (3) (4) (5) (6) (7) (1) DVR Unit A: AVerDiGi EB1304NET SATA unit B: AVerDiGi EB1304NET SATA+ unit i The model of DVR unit is depending on your purchase. (2) Remote Control (batteries included) (3) Quick Installation Guide (4) Power Cord * The power cord varies depending on the standard power outlet of the country where it is sold. (5) Power Adapter (6) Internal HDD holder (8 screws are inculded) (7) Software CD (User Manual included) 1.2 Features and Specifications Key Features - Lightweight and Compact size (1/5 of general DVR net weight) - Multi-functional front panel design (only for EB1304NET SATA+) - Thermal testing verification approved - Heat-resistance material - Supports standard 3.5” SATA HDD - Embedded Linux and RTOS - MPEG4 video compression - JavaViewer on mobile phone - Supports PTZ control 1
  • 7. - Supports UPnP (Universal plug and play) - Remote Software Integration: CM3000, Remote Console, WebViewer, PDAViewer, HandyViewer, and SmartViewer ( for Symbian / Windows Smart phone) - Non-PC stand-alone network digital video recorder - On Screen Display(OSD) control menu Video Feature - 4 composite video inputs (BNC connector) - 1 Composite & 1 VGA outputs - Video compression: MPEG4 - Video Format: NTSC and PAL - 1 channel audio input/output - Display resolution:720 x 480/720 x 576 (NTSC/PAL) - Display frame rate:Total 120/100 fps (NTSC/PAL) - Hue/Brightness/contrast/Saturation adjustable Recording resolution: - Full D1: 720 x 480/720 x 576 (NTSC/PAL) - CIF: 360 x 240/360 x288 (NTSC/PAL) Recording frame rate: - Full D1: 60/50 fps (NTSC/PAL) - CIF: 120/100 fps (NTSC/PAL) Recording mode: - Schedule recording (00:00~24:00 set by hour) - Continuous /Motion / Sensor recording - Auto recycle recording - Auto record enabling Remote access - Support CMS (CM3000) i If you need CMS application, please contact your local sales dealer for forwarder information. - Support PDAViewer - Support Remote Console & WebViewer - Password authentication mechanism Playback Mode - Video search by date/time/event - Infinite event list for easy search - A-B video repeat playback - Free Playback Application Software: - Playback from pen drive/ external HDDx1 - Playback and backup on any PC with Windows 2000/XP/Vista - Converting files to AVI format enabling to playback on Windows Media Player - Video segment selectable for repeating payback and backup - Enabling quick HDD to HDD backup - Watermark function for image verification I/O - 4 Sensor inputs - 1 Relay output controlling alarm, lock, light, or other devices - Operating Temperature: 5~40 degree 2
  • 8. 1.3 Front Panel 1.3.1 EB1304NET SATA Name Function (1) DVR Power LED Light when the unit is power on (2) HDD LED Indicate the hard disk running state. Light when the HDD is running (Read/Write) (3) IR Sensor Receive signal from the remote control to operate the unit (4) IR Sensor Port To connect extended IR sensor cable (5) USB 2.0 Port Connect to pen drive / external hard disk for backup i If the external hard disk is first time using, please format to FAT32 format. 1.3.2 EB1304NET SATA+ (6) (10) (1)(2)(3) (4) (5) (7) (8) (9) Name Function (1) DVR Power LED Light when the unit is power on (2) HDD LED Indicate the hard disk running state. Light when the HDD is running (Read/Write) (3) IR Sensor Receive signal from the remote control to operate the unit (4) IR Sensor Port To connect extended IR sensor cable (5) USB 2.0 Port Connect to pen drive / external hard disk for backup i If the external hard disk is first time using, please format to FAT32 format. 3
  • 9. Name Function (6) 1/2/3/4/Quad Use these buttons in playback mode to switch to display each channel in full screen or view all channels at the same time Use the buttons in setting password of OSD menu to: For ”1” For “2” For “3” For “4” For “0” (7) Record REC Start video recording. To stop recording, press (8) Menu Call up and exit the OSD main and sub menu (9) UP/DOWN/SELECT Use the UP and DOWN buttons to change setting and move to the left and right, and SELECT to enter or make a selection (10) Playback/OSD Menu Use the buttons in playback mode to: Control Buttons Display the play list and play the recorded video Wind back the video playback at the speed of 2x, 4x, 8x or 16x Fast play the video playback at the speed of 2x, 4x, 8x or 16x Temporarily freeze the video playback Stop video playback Use the buttons in navigating OSD menu to : Move to the left and right Change the setting Make a selection 4
  • 10. 1.4 Back Panel Name Function (1) RJ-45 port : Ethernet connection port (2) CH1/CH2/CH3/CH4 : Input the video camera signal and display it on channel 1/2/3/4 (3) TV Out : Output the video signal to other video output device through BNC port The DVR unit support 2 video output ports and you can only select to output the video either from the VGA OUT or VIDEO OUT (4) VGA OUT : Output the video signal to a CRT or LCD monitor (5) Audio Out/In : - Input the audio signal from audio output device which it has a power supply by itself. The audio is embedded with channel 1 - Output the audio signal to a audio out device which it has a power supply by itself i The DVR doesn’t supply the power to external audio in/out devices. (6) Sensor In & Alarm : Support up to 4 sensor device and 1 relay device (Relay: 1A @ 125V Out AC/30V DC) (7) RS485 For PTZ camera connection (8) TV-VGA Switch : Switch to select the video output. Make sure to set the video output before turning on the unit (9) 12V DC : Connect the power adapter into this port 5
  • 11. 1.5 Setting Up the DVR Unit 1.5.1 Installing the Hard Disk The DVR unit allows user to install one SATA hard disk. For hard disk spec, please referring to http://www.avermedia.com/AVerDiGi/ → i Products→ AVerDiGi EB Series → AVerDiGi EB1304NET SATA series → Hardware Recommendations The “compatible hard disks” indicated in the above recommendation list only means that these commercially available hard disks were tested with AVerMedia products and functioned well under normal operation conditions. AVerMedia does not guarantee or provide warranties, explicitly, implied or statutory with respect to the reliability of the hard disk function or its compatibility. In no event AVerMedia shall be liable for damages, with respect to any business interruption of clients, lost profits, loss of programs or other data on your information handling system or otherwise. This includes direct, indirect, incidental, special, or consequential damages, resulting from the incompatibility caused by the usage of these hard disks, even if AVerMedia has expressly advised about the risk of such damages. The entire risk arising out of the use of any information attached here with is borne by the recipient. Follow the illustrated instructions below to install the hard disk: 1. Loosen all screws 2. Push the cover backward and lift 3. Secure the brackets on the hard disk 4. Connect the the SATA cable and the power connector to the hard disk 6
  • 12. 5. Secure the hard disk inside the unit then replace 6. Push the cover forward and secure the cover unit cover 7. You may now connect all the cables. When the power is connected, the Power LED light turns on 1.5.2 Adjust Fan Speed The DVR provides 3 speed of fan for user to adjust by actual condition. 1. Loosen all screws 2. Push the cover backward and lift 3. Move the pin cover to the pin. 3x is maximum, 2x 4. Push the cover forward and secure the cover is medium and 1x is low. after adjust the fan speed. 7
  • 13. 1.5.3 Connecting Devices The back panel of the DVR unit, user can connect up to 4 video cameras, 4 sensor devices, 1 alarm device and output video to a TV or CRT/LCD monitor. Connecting the unit to a pen drive or external hard disk through USB interface for backup, then use the bundled software enables user to transfer, playback and segment the video. Follow the illustration below to make the connection: Each time you change the video display output or video system (NTSC/PAL), the power must be turned off and on to reset the DVR unit. 8
  • 14. 1.5.4 Connecting the Sensor device/Relay device /PTZ Camera The Sensor, Alarm, and RS485 port enable you to connect 4 sensor inputs, 1 relay outputs, and PTZ camera. Just connect the external sensor, relay, and PTZ camera pin directly to the pinhole. Check the table below and locate which pinhole is assigned to sensor input and relay output. 1 2 3 4 5 6 7 8 9 10 11 12 13 14 1 G 2 G 3 G 4 G OUT TX TX RX RX + - + + Sensor Alarm RS485 The signal from the sensor (i.e., infrared sensors, smoke detectors, proximity sensors, door sensors, etc.) is being transmitted to the unit and this triggers the system to respond and send signal to relay device (i.e., alarm, telephone etc). Pin # Definition 1 Sensor 1 signal 2 Sensor 1 Ground signal 3 Sensor 2 signal 4 Sensor 2 Ground signal 5 Sensor 3 signal 6 Sensor 3 Ground signal 7 Sensor 4 signal 8 Sensor 4 Ground signal 9 Relay signal 10 Relay signal 11 RS485 TX+ 12 RS485 TX- 13 RS485 RX+ 14 RS485 RX- 9
  • 15. Chapter 2 Operating the DVR unit 2.1 Familiarizing the Remote Control Buttons Use the Remote control to operate the OSD menu on surveillance screen. Button Function A functional key for multiple DVR system (1) FN remote control Switch to Channel 1 (2) 1 As a number key for entering password Switch to Channel 2 (3) 3 As a number key for entering password Switch to Channel 3 (4) 7 As a number key for entering password Switch to Channel 4 (5) 9 As a number key for entering password Switch to QUAD mode (6) 5 As a number key for entering password Button Function 2 4 (7) 6 As a number key for entering password 8 0 Set a playing recorded video from A point to B point segment and repeat (8) A-B playing on surveillance screen(See 2.1.1) (9) Pause the playing (10) To play the video ▲ (11) Decrease the video playback at the speed of 2x, 4x 8x or 16x ▼ ▼ (12) Fast play the video playback at the speed of 2x, 4x 8x or 16x ▼ ▼ (13) Stop playing / Stop recording (14) USB backup(see 2.1.2) 10
  • 16. Button Function ▼ To move the selection to the left and right ▼ (15) ▲ To go up and down and select the items in the menu list or change the settings ▼ (16) To enter the OSD Main menu / Exit from the main menu or sub-menu display ZOOM+ To zoom in view of PTZ camera (17) ZOOM- To zoom out view of PTZ camera PTZ camera control button. Press PTZ + camera channel (18) PTZ button( 1 2 3 4 )can enter PTZ mode to control PTZ camera.(see 2.1.3) SPEED+ To speed up movement of PTZ camera lens (19) SPEED- To speed down movement of PTZ camera lens FOCUS + To focus in PTZ camera lens (20) FOCUS - To focus out PTZ camera lens Make a selection (21) Enter sub-menu (22) REC Start video recording 2.1.1 Using AB Repeat Function AB Repeat function allow user to set a video segment from A to B point and play on the surveillance screen until user stop. User also can backup AB Repeat file to pen drive or external hard disk (See 2.1.2). 1. Press (play button) to call out the ▲ SEARCH MODE menu to find the recorded video that user wants to playback. 2. Select TIME SEARCH or EVENT LIST. - TIME SEARCH (search by date and time): select the date and time from where you want to begin the video playback. - EVENT LIST (search by condition): select from the list. 3. During the playback, press A-B to set the A point of video segment. And then, press A-B again to set the B point of video segment. On the surveillance screen will display 11
  • 17. “A-B” and repeat playing the AB point video segment which user has set. To cancel AB repeat, press A-B again. 2.1.2 Using USB Backup Button User can press button to backup the AB Repeat video file. 1. Set the AB Repeat file (see 2.1.1). USB BAKCUP YES (SELECT) / NO(ME NU ) 2. Plug in pen drive or external hard disk to DVR system. 3. During the AB Repeat playback, press button. 4. And then, press (YES) to start backup file or press (NO) to exit backup mode. i - If the external hard disk is first time using, please format to FAT32 format. - The external hard disk needs to be powered by external power. 2.1.3 Controlling PTZ Camera Using remote control, user can easily control PTZ camera at local site. Before starting, please go to OSD menu to enable PTZ control (see 3.1 Menu Function: PTZ Setup). 2.1.3.1 To Enter the PTZ Mode To control PTZ camera, user need to enter the PTZ mode first. Press PTZ button, and camera channel number button ( 1 2 3 4 ). The surveillance monitor will switch to single screen and display “PTZ mode” on the screen. To exit PTZ mode, press PTZ and 0 button. Also, when user doesn’t have any action over 1 minute, the system will automatically exit PTZ mode. 2.1.3.2 To Set Preset Position User can set 9 preset positions for PTZ camera. Using 1 to 9 button to set the 12
  • 18. preset position. 1. Press PTZ and camera channel number button ( 1 2 3 4 ) to enter PTZ mode. 2. Using ▲ , ▼ , and to adjust the PTZ camera to the position that user ▼ ▼ wants. 3. Press any number button over 3 seconds and the position will be saved. 4. To move the PTZ camera to preset position, just press the number button. 2.1.3.3 To Control PTZ Camera To move, adjust focus, and zoom in/out camera lens can be done by using some function buttons on the remote control. To move the PTZ camera lens to the right ▼ To move the PTZ camera lens to the left ▼ ▲ To move the PTZ camera lens to go up ▼ To move the PTZ camera lens to go down ZOOM+ To zoom in PTZ camera ZOOM- To zoom out PTZ camera SPEED- To speed down movement of PTZ camera lens SPEED+ To speed up movement of PTZ camera lens FOCUS + To focus in PTZ camera lens FOCUS - To focus out PTZ camera lens 2.2 Using the DVR for the First Time Upon connecting the power, the unit automatically detects the status of the hard disk. The hard disk must be formatted before user can use it with EB1304NET SATA. If you are prompt to format the hard disk, press (select) for YES to format the hard disk and (menu) for NO to remain unchanged. HARD DISKS INFORMATION VERSION S3 . 01. 01. 00. 03 HDD CHECKING . . . MASTER HDD SIZE 76GB 509MB HDD FORMAT YES (SELECT) / NO (MENU) 13
  • 19. 2.2.1 Set up the System Date and Time Before starting record video, adjust the date and time first. 1. Press to call up the OSD menu and then use ▲ and ▼ to go up and down and select Submenu. And then, press or to confirm the selection. ▲ 2. In Submenu, use ▲ and to go up and down and select the Time Setup and ▼ press again to make a selection. And then, use ▲ and ▼ to select the Date and press or ▲ to confirm the selection. TIME SETUP DATE 2007 / 03 / 12 TIME 15 : 45 : 57 AUTO SYNC TIME OFF 3. To adjust the date, use ▼ and or and TIME ZONE GMT ▼ ▼ ▼ LAST SYNC TIME 2007 / 03 / 12 12 : 00 : 00 DAYLIGHT SAVING DELETE RECORDED FILES OLDER THAN buttons to move the selection to the left and right. 10 DAYS ▼ ▼ 4. To adjust Time, follow the above step 2 and 3. 5. Press to go back to main menu after adjustment. 2.3 Surveillance Screen To know if the channel is being recorded, the “ ” record symbol would appear beside the channel number. The (microphone) and (speaker) indicate that the audio is available. The information below the screen shows the current date and time, recording mode (record schedule setting), and the percentage of the used hard disk space. Full Screen Preview Quad mode Preview When you are in full screen preview, press the following buttons on the remote control to switch to different channel, or preview all 4 channels: 1 3 7 9 5 CH1: Camera1 CH2: Camera 2 CH3: Camera 3 CH4: Camera 4 QUAD: 4-Channel 14
  • 20. 2.4 Playback the Video The DVR system can record and playback video simultaneously. Therefore, user don’t need to stop recording while playback the video. 1. Press ▼ SEARCH METHOD TIME SEARCH 2. Use the ▲ and ▼ buttons to go up and down and EVENT LIST select TIME SEARCH or EVENT LIST. Then, press or to make a selection. ▼ TIME SEARCH (search by date and time): TIME SEARCH HARD DISK : MASTER 1. Use the ▲ and ▼ buttons and select SEARCH START TIME : 2006 / 05 / 04 10 : 00 : 01 TIME. Then press or again to make the ▼ END TIME : 2006 / 05 / 05 13 : 08 : 13 selection. SEARCH TIME : 2006 / 05 / 04 10 : 00 : 01 2. In the SEARCH TIME, user may now select the date and time from where you want to begin the video playback. Use the and buttons to move the selection to the left and right. Use the and ▼ ▼ ▲ ▼ buttons to select the date and time. Then press or again to make the selection. ▼ 3. To start video playback, the time in second must be set. Use the buttons to move the selection ▼ to the right most. Use the ▲ and ▼ buttons and select the time in second. Then press or . ▼ EVENT LIST (search by event): EVENT LIST HARD DISK : MASTER 1. Use the ▲ and ▼ buttons to select from the list. S 2006 / 05 / 03 13 : 26 : 34 13 : 26 : 50 Press or again to make the selection. User ▼ A 2006 / 05 / 03 13 : 00 : 01 13 : 16 : 46 A 2006 / 05 / 03 12 : 00 : 01 13 : 00 : 01 and to go next page or back to B 2006 / 05 / 03 11 : 48 : 37 12 : 00 : 00 A 2006 / 05 / 03 11 : 30 : 23 11 : 31 : 18 A 2006 / 05 / 03 11 : 29 : 47 11 : 30 : 13 previous page. S 2006 / 05 / 03 11 : 28 : 55 11 : 28 : 58 B 2006 / 05 / 03 11 : 28 : 33 11 : 28 : 55 2. Listed below are the following recording conditions: A 2006 / 05 / 03 11 : 25 : 41 11 : 28 : 32 A 2006 / 05 / 03 11 : 23 : 26 11 : 23 : 30 A – Always Recording It records non-stop and automatically continue recording when interrupted S – Sensor Recording It records when the sensor has triggered M – Motion Recording It records when any movement has detected B – Button Recording It records when the REC record button is pressed 3. The “ ” play symbol would appear beside the channel number when you are previewing in playback mode. 15
  • 21. Chapter 3 OSD Navigation Tree The follow figure is an OSD menu tree map. To call out the OSD menu, press on the remote control. MAIN MENU RECORD SCHEDULE RECORD SCHEDULE PASSWORD SETUP CAMERA SELECT 1 2 3 4 00 : 00 - 01 : 00 ALWAYS REC CURRENT RECORD SELECT 1 2 3 4 01 : 00 - 02 : 00 ALWAYS REC 13 : 00 - 14 : 00 ALWAYS REC NEW RECORD MODE D D1 02 : 00 - 03 : 00 ALWAYS REC 14 : 00 - 15 : 00 ALWAYS REC CONFIRM VIDEO FORMAT MPEG4 03 : 00 - 04 : 00 ALWAYS REC 15 : 00 - 16 : 00 ALWAYS REC RECORD FRAMERATE 60 04 : 00 - 05 : 00 ALWAYS REC 16 : 00 - 17 : 00 ALWAYS REC VIDEO QUALITY GOOD 05 : 00 - 06 : 00 ALWAYS REC 17 : 00 - 18 : 00 ALWAYS REC 06 : 00 - 07 : 00 ALWAYS REC 18 : 00 - 19 : 00 ALWAYS REC RECORD SCHEDULE 07 : 00 - 08 : 00 ALWAYS REC 19 : 00 - 20 : 00 ALWAYS REC SUBMENU 08 : 00 - 09 : 00 ALWAYS REC 20 : 00 - 21 : 00 ALWAYS REC HARD DRIVE SETUP 09 : 00 - 10 : 00 ALWAYS REC 21 : 00 - 22 : 00 ALWAYS REC SENSOR SETUP 22 : 00 - 23 : 00 10 : 00 - 11 : 00 ALWAYS REC ALWAYS REC MOTION SETUP 23 : 00 - 00 : 00 ALWAYS REC 11 : 00 - 12 : 00 ALWAYS REC NETWORK SETUP 12 : 00 - 13 : 00 ALWAYS REC USB BACKUP LANGUAGE SETUP ENGLISH SUBMENU PASSWORD SETUP SET NW PASSWORD PASSWORD CHANGE SUPERUSER CURRENT VIDEO ADJUSTMENT USER(NETWORK) NEW TIME SETUP CONFIRM AUTO RECORD ON AUTO SCAN PASSWORD SETUP NO AUDIO RECORD ON AUDIO MUTE OFF VIDEO SYSTEM NTSC MULTIPLE REMOTE OFF REMOTE ID 1 PTZ SETUP CHANNEL NAME SETTING S3. 01. 01. 00. 03 HARD DRIVE SETUP VIDEO ADJUSTMENT OVERWRITE ENABLED NO CAMERA 1 HD1 SIZE 37 GB 78MB BRIGHTNESS 050 HD1 USED 16 GB 219MB 21% CONTRAST 050 HD1 FORMAT HUE 000 SATURATION 024 RESET TO DEFAULT VALUE SENSOR SETUP AUTO SCAN SENSOR REC TIME 010 SEC AUTO OFF ALARM OUT TIME 010 SEC CHANNEL-1 10 SEC CHANNEL - 1 NOT INSTALLED CHANNEL-2 10 SEC CHANNEL - 2 NOT INSTALLED CHANNEL-3 10 SEC CHANNEL-4 10 SEC CHANNEL - 3 NOT INSTALLED CHANNEL - 4 NOT INSTALLED VIDEO LOSS ALARM 1 2 3 4 MOTION SETUP PTZ SETUP MOTION CAMERA 1 2 3 4 CAMER A 1 SENSITIVITIY HI PTZ CONTRO L OFF MOTION RECORD TIME 010 SEC PTZ ID 000 PRO TOCO L PELCO-D BAUD R ATE 2400 AUTO PAN 1-1 DWEL L TIME 05 SEC NETWORK SETUP CHANNEL NAME SETTING IP MODE STATIC CHANNEL 1 NAME CH01 NW ENABLE 1 2 3 4 CHANNEL 2 NAME CH02 VIDEO PORT 5001 CHANNEL 3 NAME CH03 UPGRADE PORT 5005 CHANNEL 4 NAME CH04 USER 1 SET NW PASSWORD USB BACKUP TIME SET START : 2006/09/23 17:00:02 END : 2006/09/26 18:00:00 BACKUP CHANNEL 1 2 3 4 BACKUP SIZE 73G 89MB BACKUP EXECUTE 16
  • 22. 3.1 Menu Function If the unit is currently recording the video, user may have to stop video recording to change the settings. Use remote control to navigate in the OSD menu. The red frame turns yellow when you are making a selection. OSD MENU Description MAIN ME NU CAMERA SELECT C AME R A S E L E C T 1 2 3 4 R E C OR D S E L E C T 1 2 3 4 Enable/disable the channel number to display the video on the D1 R E C OR D MODE V IDE O F OR MAT MP E G 4 surveillance screen R E C OR D F R AME R AT E 60 V IDE O QUAL IT Y G OOD RECORD SELECT R E C OR D S C HE DUL E S UB ME NU Enable/disable the channel number to record video HAR D DR IV E S E TUP S E NS OR S E T UP The channels which could be recorded should be MOT ION S E T UP NE T W OR K S E T UP US B B AC K UP i enabled in the CAMERA SELECT first. L ANG UAG E S E T UP E NG L IS H RECORD MODE Select D1/CIF recording mode Under D1 mode, the video recording is in full screen resolution and takes turns from one channel to the next one when Auto Scan enables. Each channel is recorded only at a maximum frame rate of 15fps. User can switch to view the video in single full screen or QUAD screen Whereas in CIF mode, video recording is at a lower resolution, but each video is recorded in 30fps/25fps (NTSC/PAL). User can switch to view the video in single full screen or QUAD screen VIDEO FORMAT The recorded video is in MPEG4 format RECORD FRAME RATE Set the number of frames per second to be recorded. Refer to the table below for the available record frame rate settings. The higher the frame rate is, it uses more hard disk space Video Standard NTSC PAL Record Mode D1 60, 20, 4 48, 20, 4 CIF 120, 60, 40, 20, 4 100, 48, 20, 4 VIDEO QUALITY Select the video quality setting from BEST, HIGH, MEDIUM, GOOD, NORMAL or LOW. BEST – best record quality but less record hours LOW – longest record hour but quality is ordinary NORMAL – allows you to record more hours but the quality of the recorded video is moderate. LANGUAGE SETUP Select from the available languages 17
  • 23. OSD MENU Description R E C OR D S C HE DUL E RECORD SCHEDULE 00 : 00 - 01 : 00 AL W A Y S REC 01 : 00 - 02 : 00 AL W A Y S REC By default, in 24 hours, the recording schedule is set to always 02 : 00 - 03 03 : 00 - 04 : 00 AL W A Y S : 00 AL W A Y S REC REC record every hour. Refer to the table below to customize the 04 : 00 - 05 : 00 AL W A Y S REC recoding condition 05 : 00 - 06 : 00 AL W A Y S REC 06 : 00 - 07 : 00 AL W A Y S REC Condition Description 07 : 00 - 08 : 00 AL W A Y S REC 08 : 00 - 09 : 00 AL W A Y S REC 09 : 00 - 10 : 00 AL W A Y S REC NO REC Disable video recording 10 : 00 - 11 : 00 AL W A Y S REC 11 : 00 - 12 : 00 AL W A Y S REC 12 : 00 - 13 : 00 AL W A Y S REC ALWAYS REC Record non-stop MOTION REC Start recording when any movement is detected SENSOR REC Start recording when the sensor has triggered BUTTON REC Start recording when the record button is pressed S UB ME NU P AS S WOR D C HANG E PASSWORD CHANGE V IDE O ADJ US T ME NT Set a security combination number. There are two type of user TIME SETUP AUT O R E C OR D ON password – SUPERUSER and USER. AUT O S C AN P AS S WOR D SETUP P AS S WOR D S E T UP NO S UP E R US E R AUDIO R E C OR D ON US E R (NE T WOR K ) AUDIO MUT E OF F V IDE O S Y S T E M NT S C MUT IP L E R E MOT E OF F R E MOTE ID 1 PTZ SETUP CHANNEL NAME SETTING S3. 01. 01. 00. 03 Use the number button on the remote control to enter the password. Or use ▲ and ▼ button to the select the security combination number. Press or button to ▼ confirm. SUPERUSER Superuser has the authority of formatting hard disk, changing system settings, remote monitor the DVR system and changes the system settings. The factory default password is 111111. P AS S WOR D S E T UP C UR R E NT NE W C ONF IR M 18
  • 24. OSD MENU Description S UB ME NU USER(NETWORK) P AS S WOR D C HANG E V IDE O ADJ US T ME NT The login account for remote connection through the internet. TIME SETUP AUT O R E C OR D ON User account only can view and playback recorded video by AUT O S C AN Web viewer (ex: Internet Explorer), but no authority to change P AS S WOR D S E T UP NO the DVR system’s setting. The factory default password is AUDIO R E C OR D ON AUDIO MUT E OF F 111111. V IDE O S Y S T E M NT S C MUT IP L E R E MOT E OF F P AS S WOR D S E T UP R E MOTE ID 1 C UR R E NT PTZ SETUP NE W CHANNEL NAME SETTING C ONF IR M S3. 01. 01. 00. 03 VIDEO ADJUSTMENT Select the camera number and set to adjust the video brightness, contrast, hue, and saturation value VIDEO ADJUSTMENT CAMERA 1 BRIGHTNESS 083 CONTRAST 142 HUE 130 SATUR ATION 130 RESET TO DEFAULT VALUE NO TIME SETUP DATE 2007 / 03 / 12 TIME SETUP 15 : 45 : 57 TIME Setup system date, time, daylight saving, and enable auto AUTO SYNC TIME OFF TIME ZONE GMT synchronize time through network. LAST SYNC TIME 2007 / 03 / 12 12 : 00 : 00 DATE DAYLIGHT SAVING DELETE RECORDED FILES OLDER THAN Set the current date 10 DAYS TIME Set the current time AUTO SYNC TIME Enable/disable time synchronization automatically through network. The DVR system will auto synchronize time from NTP servers. The first time synchronize will be 6 hours later after system power up. When the daylight saving is enabling, the auto time synchronization will be stopped. - User need to setup the NTP server’s URL or IP address. i Please go to 8.1.1.1 System Setting #(3) NTP Setting to setup the NTP server. - If the NTP server doesn’t setup, the auto synchronize time function will not work correctly. TIME ZONE Select the time synchronization time zone. The time zone will base on GMT (Greenwich Mean Time) time zone. LAST SYNC TIME Display the latest time synchronization date and time. 19
  • 25. OSD MENU Description TIME SETUP DELETE RECORDED FILES OLDER THAN 0 DAYS DATE 2007 / 03 / 12 15 : 45 : 57 TIME AUTO SYNC TIME Set a period of time to delete recorded files that save on hard OFF TIME ZONE GMT disk. LAST SYNC TIME 2007 / 03 / 12 12 : 00 : 00 DAYLIGHT SAVING DELETE RECORDED FILES OLDER THAN 10 DAYS DAYLIGHT SAVING DAYLIGHT SAVING DAYLIGHT SAVING OFF START 2008 / 01 /01 To enable/disable daylight saving function. 00 : 00 END 2008 / 06 /30 00 : 00 START TIME OFFSET 00 : 00 Setup daylight start up date and time. END Setup daylight stop date and time. TIME OFFSET Assign a time that it is for daylight saving time offset in your time zone. For example: if the time zone is in U.S. Eastern, the time offset is 1 hour. S UB ME NU AUTO RECORD P AS S WOR D C HANG E V IDE O ADJ US T ME NT Enable/disable auto continue recording when interrupted (i.e., TIME SETUP AUT O R E C OR D ON power breakdown, video playback or configuration setup). It AUT O S C AN P AS S WOR D S E T UP NO continue recording after 10 second of idleness. This is AUDIO R E C OR D ON applicable in Always Record mode AUDIO MUT E OF F V IDE O S Y S T E M NT S C AUTO SCAN MUT IP L E R E MOT E OF F R E MOTE ID 1 PTZ SETUP Enable/disable auto cycle switch to display the next channel CHANNEL NAME SETTING S3. 01. 01. 00. 03 when in full screen preview. User can set different switch time for each channel. The time range is from 5 ~30 seconds. AUTO SCAN AUTO SCAN OFF CHANNEL - 1 10 SEC CHANNEL - 2 10 SEC CHANNEL - 3 10 SEC CHANNEL - 4 10 SEC PASSWORD SETUP Enable/disable full system password protection. This would prevent unauthorized user to stop video recording, change system settings and formatting the hard disk AUDIO RECORD Enable/disable audio recording. To record sound, make sure the audio input device(ex: microphone) is connected to the unit 20
  • 26. OSD MENU Description S UB ME NU AUDIO MUTE P AS S WOR D C HANG E V IDE O ADJ US T ME NT Enable/disable to hear audio sound. To hear sound, make sure TIME SETUP the unit is connected to an audio output device (ex: speaker). If AUT O R E C OR D ON AUT O S C AN user recorded video in audio mute status, there is no sound P AS S WOR D S E T UP NO when playback AUDIO R E C OR D ON AUDIO MUT E OF F V IDE O S Y S T E M MUT IP L E R E MOT E R E MOTE ID NT S C OF F 1 i The audio input and output device need to be powered by external power. PTZ SETUP CHANNEL NAME SETTING VIDEO SYSTEM S3. 01. 01. 00. 03 DVR system will auto detect the video system and display MUTLIPLE REMOTE Enable/disable multiple DVR system remote control. When user has more than one DVR system, user can use MULTIPLE REMOTE function to control all DVR system by single remote control. REMOTE ID Assign the ID number for multiple DVR system remote controls. When there are more than one DVR systems, user can enable MULTIPLE REMOTE function, and then assign REMOTE ID to each DVR system. Then, user can just use one remote control to control all DVR system by pressing REMOTE ID. To remote control multiple DVR systems, press FN and number key (remote ID number) on the remote control. PTZ SETUP PTZ SETUP CAMERA 1 PTZ CONTROL OFF To enable PTZ camera control by remote control and setup PTZ PTZ ID 000 camera parameters. PROTOCOL PELCO-D BAUD RATE 2400 1. Press and select SUBMENU → PTZ SETUP. AUTO PAN 1-1 DWELL TIME 05 SEC 2. Use the ▲ and ▼ to go up and down to select the item and change the parameter value. 3. Use or button to enter the configure mode. ▼ ▼ ▼ Press or button to confirm the selection. ▲ CAMERA Select the channel of PTZ camera. If the PTZ camera is connecting on channel 1, then select the camera 1 for PTZ video to be display on channel 1. PTZ CONTROL To enable/disable PTZ camera can be controlled by remote control at local site. PTZ ID Assign an ID to PTZ camera. The ID range is from 001 to 255 but is limiting by protocol of PTZ camera. Please refer to your PTZ camera user’s manual for more detail of PTZ ID assignment. i We suggest assigning PTZ camera ID start from 5 to avoid conflict with ID of camera channels. 21
  • 27. OSD MENU Description PTZ SETUP PROTOCOL CAMERA 1 PTZ CONTROL OFF Select the protocol of PTZ camera. The protocol will be PTZ ID 000 differenced that depends on the brand of PTZ camera. The PROTOCOL PELCO-D BAUD RATE 2400 DVR system currently supports 2 protocols ─ PELCO-D and AUTO PAN 1-1 PELCO-P. Please refer to your PTZ camera user manual to DWELL TIME 05 SEC make sure which protocol is using for. BAUD RATE To setup the baud rate of PTZ camera. For more detail, please refer to your PTZ camera’s user manual. AUTO PAN Select the preset number to assign an auto move direction for the PTZ camera. For example: 1-3 means the PTZ camera will auto move from preset position 1, 2 and 3. DWELL TIME Set a time that how long the IP PTZ camera stays in that position before it moves to the next one. CHANNEL NAME SETTING CHANNEL NAME SETTING CHANNEL 1 NAME CH01 CHANNEL 2 NAME CH02 User can define name of each channel. Channel name can be 7 CHANNEL 3 NAME CH03 digit long that include A~Z, 0~9, space, and dash (-). CHANNEL 4 NAME CH04 22
  • 28. OSD MENU Description HARD DRIVE SETUP OVERWRITE ENABLED YES OVERWRITE ENABLED HDD SIZE 1560,12MB HDD USED 250MB 1% Enable/disable overwriting the earliest record when the hard HDD FORMAT disk space runs out. By default, the HDD overwrite setting is enabled HDD FORMAT For security purpose, you may have to enter the password to format hard disk To format hard disk: 1. Use the ▲ and ▼ buttons to go up and down and * HDD SIZE shows the total capacity select HDD FORMAT. Then press or ▼ of the hard disk. * HDD USED shows the amount of 2. In the CHECK PASSWORD screen, press or . ▼ space that has been used. Then use the ▲ and ▼ buttons to select the security combination number. Repeat till you key in the last number. Also, user can use the number button on the remote control to enter the password. Press or ▼ button again to make the selection. To move the selection to the left and right, use ▲ and ▼ buttons CHECK PASSWORD ENTER PASSWORD 3. After entering the last number, the system will format the hard disk 4. It is done when the “HDD FORMAT COMPLETED” appears HARD DR IVE SETUP OVERWRITE ENAB LED YES HD D SIZE 156 ,012 MB HD D USED 0MB 0% HD D FORMAT HDD FORMAT COMPLETED Formatting the hard disk will permanently delete all the records and can no longer be retrieved 23
  • 29. OSD MENU Description SENSOR SETUP SENSOR REC TIME 010 SEC SENSOR REC TIME ALARM OUT TIME 010 SEC Set the amount of time (in second) to start record when the CHANNEL - 1 NOT INSTALLED CHANNEL - 2 NOT INSTALLED sensor has triggered CHANNEL - 3 NOT INSTALLED CHANNEL - 4 NOT INSTALLED ALARM OUT TIME VIDEO LOSS ALARM 1 2 3 4 Set the amount of time (in second) to continue sending the alarm once triggered CHANNEL 1~4 Customize the initial state of the attached sensor. Refer to the table below to customize the sensor state Condition Description NOT INSTALLED Indicates that there is no sensor connected NORMAL OPEN Indicates that the initial state of the sensor is normal open. Video recording initiates when there is a changes in the sensor state NORMAL CLOSE Indicates that the initial state of the sensor is normal close. Video recording initiates when there is a changes in the sensor state VIDEO LOSS ALARM Select the channel when the video loss that the DVR system will send out a alarm MOTION SETUP MOTION CAMERA 1 2 3 4 MOTION CAMERA SENSITIVITIY MEDIUM Enable/disable the channel number to detect motion. MOTION RECORD TIME 010 SEC SENSITIVITY Set the sensitivity level. The sensitivity is from H (High), 9~ 2 and L (Low). MOTION RECORD TIME Set the amount of time (in second) to record when motion is detected. NETWORK SETUP IP MODE STATIC NETWORK SETUP NW ENABLE 1 2 3 4 Setup the network parameters for the internet or intranet remote VIDEO PORT 0080 UPGARDE PORT 5005 monitor or playback. IP MODE The system provides 3 types of IP setup mode – Static, DHCP, and PPPOE. Use ▲ and ▼ buttons to go up and down and select IP MODE, and then press . Use ▲ and ▼ buttons to change the selections and press or to make a ▼ selection. STATIC: Assigns a constant IP address for the DVR system. Use ▲ and ▼ buttons to go up and down and select items, and then press or to make ▼ selection. Use and to move left and right to ▼ ▼ select or enter the configuration value. - IP ADDRESS: Assign a constant IP address which a real IP addresses give from ISP to DVR system. 24
  • 30. OSD MENU Description NETWORK SETUP - SUBNET: It is a bitmask used to identify the sub network IP MODE DHCP and how many bits provide room for host addresses. NW ENABLE 1 2 3 4 VIDEO PORT 0080 Enter the subnet mask of the IP address which user has UPGARDE PORT 5005 assigned to DVR system. - GATEWAY: A network device act as a passageway to internet. Enter the network gateway IP address - DNS: Domain Name Server translates domain names (such as www.abb.com.tw) to IP addresses. Enter the IP address of DNS if it is available. - MAC ADDRESS: Only for user information. Don’t need to enter the MAC address. - When all parameters are set, select the CHANGE to confirm the configuration. NE T WOR K INF OR MAT ION IP ADDR E S S 192. 168.153 .100 S UB NE T 255.255.255 . 255 G ATE WAY 192. 168. 153 . 254 DNS 192. 168. 153 . 1 MAC ADDR E S S 00. 00 .00 . 00.00. 00 C HANG E DHCP: Assign the IP address by local DHCP server to DVR system. Use ▲ and ▼ buttons to go up and down and select DHCP, and then press or to ▼ make selection. The DHCP (Dynamic Host Configuration Protocol) is a i set of rules used by a communications device (such as a computer, router or networking adaptor) to allow the device to request and get an Internet address from a server which has a list of addresses available for assignment The DVR system will try to get an IP address from the DHCP server. A message window will show up as below: G E T IP N O W ! W A IT IN G . . . When DVR system gets an IP address from DHCP server, the information will display as below: NE T WOR K INF OR MAT ION IP ADDR E S S 192. 168.153 .100 S UB NE T 255.255.255 . 255 G ATE WAY 192. 168. 153 . 254 DNS 192. 168. 153 . 1 MAC ADDR E S S 00. 00 .00 . 00.00. 00 25
  • 31. OSD MENU Description NETWORK SETUP PPPOE: Point-to-Point Protocol over Ethernet is a network IP MODE PPPOE NW ENABLE 1 2 3 4 protocol for encapsulating PPP frames in Ethernet frames. VIDEO PORT 0080 It is used mainly with ADSL services. If your network is UPGARDE PORT 5005 using ADSL service connecting to internet, and then, select PPPOE mode. Use ▲ and ▼ buttons to go up and down and select PPPOE, and then press or to ▼ make selection. A message window will show up as below: G E T IP N O W ! W A IT IN G . . . When DVR system get an IP address, the information will display as below: NE T WOR K INF OR MAT ION IP ADDR E S S 192. 168.153 .100 S UB NE T 255.255.255 . 255 G ATE WAY 192. 168. 153 . 254 DNS 192. 168. 153 . 1 MAC ADDR E S S 00. 00 .00 . 00.00. 00 C HANG E NW ENABLE Allow internet remote user to playback or monitor the channels. Without enabling the network function, the channels cannot be playback or monitor from remote site. i 1 is Channel 1 2 is Channel 2 3 is Channel 3 4 is Channel 4 Use ▲ and ▼ buttons to go up and down and select NW ENABLE (network enable), and then press or ▼ and to move to the selection. Use and buttons ▼ ▲ ▼ to change the selections values and press or to ▼ confirm. VIDEO PORT A port for the remote connection. Any port can be assigned as a video port, except the ports already used by the network services. The default video port is 80. Use ▲ and ▼ buttons to go up and down and select VIDEO PORT, and then press or and to move ▼ ▼ to the selection. Use ▲ and ▼ buttons to change the selections values and press or to confirm. ▼ 26
  • 32. OSD MENU Description NETWORK SETUP UPGRADE PORT IP MODE STATIC NW ENABLE 1 2 3 4 A port for the remote update DVR system firmware. Any port VIDEO PORT 0080 can be assigned as an upgrade port, except the ports are UPGARDE PORT 5005 already used by the network services. The default upgrade port is 5005. For Upgrading DVR firmware, please contact your local dealer. Please DO NOT cut off the power of the DVR system i while the firmware is upgrading. Power failure will cause the permanent damage of the DVR system. Use ▲ and ▼ buttons to go up and down and select UPGRADE PORT, and then press or and to ▼ ▼ move to the selection. Use ▲ and ▼ buttons to change the selections values and press or to confirm. ▼ USB BAKCUP USB BACKUP TIME SET START Using USB device (ex. Pen drive or External Hard disk) to : 2006 / 05 / 04 10 : 00 : 01 END : 2006 / 05 / 05 13 : 08 : 13 backup partial recorded video and playback on PC. BACKUP CHANNEL 1 2 3 4 Use ▲ and ▼ buttons to go up and down and select BACKUP SIZE 89MB BACKUP EXECUTE USB BACKUP, and then press or . Use and ▼ ▼ to move left and right. And, use and buttons ▼ ▲ ▼ to change the value and press or to confirm. ▼ - Remember to plug in the USB device before i starting to backup. - If the external hard disk is first time using, please format to FAT32 format. - The DVR system supports external hard disk capacity up to 32GB. - The external hard disk needs to be power by external power. 1. Select the START TIME and END TIME. 2. Select the channels which user wants to backup. 3. The DVR system will display the system hard disk space and backup file size. 4. And then, select BACKUP EXECUTE to start backup video to the USB device. 5. When backup is done, press any key to back to main menu. USB BACKUP ! USAGE OF USB WIL L STOP NETWORK FUNCTIONS! YES(SELECT) / NO(MENU) 6. To view the backup file, using USB Playback Application(see 4.3) 27
  • 33. Chapter 4 Using the USB Playback Console 4.1 Recommended system requirements Pentium®4 2.4GHZ or above Windows®2000/ XP/Vista DDR 256 MB Graphic function must support DirectDraw Audio card or built-in Speaker 1 available USB2.0 port 4.2 Installing the USB Playback Console To install the USB Playback Console: 1. Place Installation CD into the CD-ROM drive. When the installation main screen appears, click Install USB Playback Console and then follow the on screen instructions 2. Select the language you prefer 3. Click OK to install the application 4. Click Exit to close the installation main screen. You may plug in the pen drive or connect the external hard disk to the PC now. 28
  • 34. 4.3 Running the USB Playback Console To run the application, click the icon on the PC desktop (13) (12) (11) (10) (9) (8) (14) (7) (15) (6) (1) (2) (3) (4) (5) Name Function (1) Exit Exit/ Minimize the application or chose Cancel to go back to the application. About: shows DVR application version information. (2) Progress bar Show the progress of the file being played. You may move the bar to seek at any location of the track. (3) Split Screen Mode Select from different screen view to playback the recorded video file of the entire camera or one camera on screen. (4) Playback Begin: Move at the beginning of the recorded video file. Controller Previous: Go back to the previous frame by frame. Slower: Play the recorded video file at the speed of 2x, 4x, or 8x. Rewind: Wind back the recorded video file. Pause: Briefly stop playing the recorded video file. Play: Play the recorded video file. Faster: Play the recorded video file at the speed of 2x, 4x, 8x, or 16x Next: Go to the next frame by frame. End: Go to the end of the recorded video file. 29