
Recommandé
Contenu connexe
Tendances
Tendances (14)
En vedette
En vedette (20)
Similaire à Phim Tat Trong Excel
Similaire à Phim Tat Trong Excel (20)
Plus de guest3c41775
Plus de guest3c41775 (20)
Dernier
Dernier (20)
Phim Tat Trong Excel
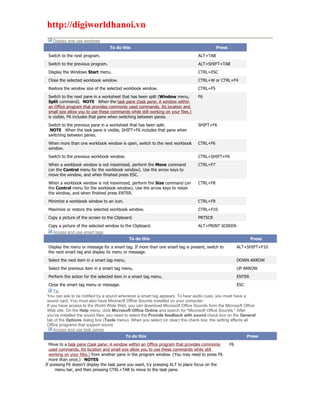
- 1. http://digiworldhanoi.vn Display and use windows To do this Press Switch to the next program. ALT+TAB Switch to the previous program. ALT+SHIFT+TAB Display the Windows Start menu. CTRL+ESC Close the selected workbook window. CTRL+W or CTRL+F4 Restore the window size of the selected workbook window. CTRL+F5 Switch to the next pane in a worksheet that has been split (Window menu, F6 Split command). NOTE When the task pane (task pane: A window within an Office program that provides commonly used commands. Its location and small size allow you to use these commands while still working on your files.) is visible, F6 includes that pane when switching between panes. Switch to the previous pane in a worksheet that has been split. SHIFT+F6 NOTE When the task pane is visible, SHIFT+F6 includes that pane when switching between panes. When more than one workbook window is open, switch to the next workbook CTRL+F6 window. Switch to the previous workbook window. CTRL+SHIFT+F6 When a workbook window is not maximized, perform the Move command CTRL+F7 (on the Control menu for the workbook window). Use the arrow keys to move the window, and when finished press ESC. When a workbook window is not maximized, perform the Size command (on CTRL+F8 the Control menu for the workbook window). Use the arrow keys to resize the window, and when finished press ENTER. Minimize a workbook window to an icon. CTRL+F9 Maximize or restore the selected workbook window. CTRL+F10 Copy a picture of the screen to the Clipboard. PRTSCR Copy a picture of the selected window to the Clipboard. ALT+PRINT SCREEN Access and use smart tags To do this Press Display the menu or message for a smart tag. If more than one smart tag is present, switch to ALT+SHIFT+F10 the next smart tag and display its menu or message. Select the next item in a smart tag menu. DOWN ARROW Select the previous item in a smart tag menu. UP ARROW Perform the action for the selected item in a smart tag menu. ENTER Close the smart tag menu or message. ESC Tip You can ask to be notified by a sound whenever a smart tag appears. To hear audio cues, you must have a sound card. You must also have Microsoft Office Sounds installed on your computer. If you have access to the World Wide Web, you can download Microsoft Office Sounds from the Microsoft Office Web site. On the Help menu, click Microsoft Office Online and search for "Microsoft Office Sounds." After you've installed the sound files, you need to select the Provide feedback with sound check box on the General tab of the Options dialog box (Tools menu). When you select (or clear) this check box, the setting affects all Office programs that support sound. Access and use task panes To do this Press Move to a task pane (task pane: A window within an Office program that provides commonly F6 used commands. Its location and small size allow you to use these commands while still working on your files.) from another pane in the program window. (You may need to press F6 more than once.) NOTES If pressing F6 doesn't display the task pane you want, try pressing ALT to place focus on the menu bar, and then pressing CTRL+TAB to move to the task pane.
- 2. http://digiworldhanoi.vn In a worksheet that has been split (Window menu, Split command), F6 includes the split panes when switching between panes. When a menu or toolbar (toolbar: A bar with buttons and options that you use to carry out CTRL+TAB commands. To display a toolbar, press ALT and then SHIFT+F10.) is active, move to a task pane. (You may need to press CTRL+TAB more than once.) When a task pane is active, select the next or previous option in the task pane TAB or SHIFT+TAB Display the full set of commands on the task pane menu CTRL+SPACEBAR Move among choices in a selected submenu; move among certain options in a group of DOWN ARROW or UP options ARROW Open the selected menu, or perform the action assigned to the selected button SPACEBAR or ENTER Open a shortcut menu (shortcut menu: A menu that shows a list of commands relevant to a SHIFT+F10 particular item. To display a shortcut menu, right-click an item or press SHIFT+F10.); open a drop-down menu for the selected gallery item When a menu or submenu is visible, select the first or last command on the menu or HOME or END submenu Scroll up or down in the selected gallery list PAGE UP or PAGE DOWN Move to the top or bottom of the selected gallery list CTRL+HOME or CTRL+END Access and use menus and toolbars To do this Press Select the menu bar (menu bar: The horizontal bar below the title bar that F10 or ALT contains the names of menus. A menu bar can be the built-in menu bar or a custom menu bar.), or close an open menu and submenu at the same time. When a toolbar is selected, select the next or previous button or menu on TAB or SHIFT+TAB the toolbar. When a toolbar is selected, select the next or previous toolbar. CTRL+TAB or CTRL+SHIFT+TAB Open the selected menu, or perform the action for the selected button or ENTER command. Display the shortcut menu (shortcut menu: A menu that shows a list of SHIFT+F10 commands relevant to a particular item. To display a shortcut menu, right- click an item or press SHIFT+F10.) for the selected item. Display the Control menu for the Excel window. ALT+SPACEBAR When a menu or submenu is open, select the next or previous command. DOWN ARROW or UP ARROW Select the menu to the left or right. When a submenu is open, switch LEFT ARROW or RIGHT between the main menu and the submenu. ARROW Select the first or last command on the menu or submenu. HOME or END Close an open menu. When a submenu is open, close only the submenu. ESC Display the full set of commands on a menu. CTRL+DOWN ARROW Show or hide the Standard toolbar. CTRL+7 NOTE You can select any menu command on the menu bar or on a displayed toolbar with the keyboard. To select the menu bar, press ALT. Then to select a toolbar, press CTRL+TAB repeatedly until you select the toolbar you want. Press the underlined letter in the menu that contains the command you want. In the menu that appears, press the underlined letter in the command that you want. Resize and move toolbars and task panes Press ALT to select the menu bar (menu bar: The horizontal bar below the title bar that contains the names of menus. A menu bar can be the built-in menu bar or a custom menu bar.). Press CTRL+TAB repeatedly to select the toolbar (toolbar: A bar with buttons and options that you use to carry out commands. To display a toolbar, press ALT and then SHIFT+F10.) or task pane (task pane: A window within an
- 3. http://digiworldhanoi.vn Office program that provides commonly used commands. Its location and small size allow you to use these commands while still working on your files.) you want. Do one of the following: Resize a toolbar In the toolbar, press CTRL+SPACE to display the Toolbar Options menu. Select the Size command, and then press ENTER. Use the arrow keys to resize the toolbar. Move a toolbar In the toolbar, press CTRL+SPACE to display the Toolbar Options menu. Select the Move command, and then press ENTER. Use the arrow keys to position the toolbar. Press CTRL+ the arrow keys to move one pixel at a time. To undock the toolbar, press DOWN ARROW repeatedly. To dock the toolbar vertically on the left or right side, press LEFT ARROW or RIGHT ARROW respectively when the toolbar is all the way to the left or right side. Resize a task pane In the task pane, press CTRL+SPACE to display a menu of additional commands. Use the DOWN ARROW key to select the Size command, and then press ENTER. Use the arrow keys to resize the task pane. Use CTRL+ the arrow keys to resize by one pixel at a time. Move a task pane In the task pane, press CTRL+SPACE to display a menu of additional commands. Use the DOWN ARROW key to select the Move command, and then press ENTER. Use the arrow keys to position the task pane. Use CTRL+ the arrow keys to move one pixel at a time. When you are finished moving or resizing, press ESC. Use dialog boxes To do this Press Move to the next option or option group. TAB Move to the previous option or option group. SHIFT+TAB Switch to the next tab in a dialog box. CTRL+TAB or CTRL+PAGE DOWN Switch to the previous tab in a dialog box. CTRL+SHIFT+TAB or CTRL+PAGE UP Move between options in an open drop-down list, or between options in a group Arrow keys of options. Perform the action for the selected button, or select or clear the selected check SPACEBAR box. Open the list if it is closed and move to that option in the list. First letter of an option in a drop- down list Select an option, or select or clear a check box. ALT+ the underlined letter in an option Open the selected drop-down list. ALT+DOWN ARROW Perform the action for the default command button in the dialog box (the button ENTER with the bold outline, often the OK button). Cancel the command and close the dialog box. ESC Use edit boxes within dialog boxes An edit box is a blank in which you type or paste an entry, such as your user name or the path (path: The route that the operating system uses to locate a folder or file; for example, C:House financesMarch.doc.) to a folder. To do this Press Move to the beginning of the entry. HOME Move to the end of the entry. END Move one character to the left or right. LEFT or RIGHT ARROW Move one word to the left. CTRL+LEFT ARROW Move one word to the right. CTRL+RIGHT ARROW Select or unselect one character to the left. SHIFT+LEFT ARROW Select or unselect one character to the right. SHIFT+RIGHT ARROW
- 4. http://digiworldhanoi.vn Select or unselect one word to the left. CTRL+SHIFT+LEFT ARROW Select or unselect one word to the right. CTRL+SHIFT+RIGHT ARROW Select from the insertion point to the beginning of the entry. SHIFT+HOME Select from the insertion point to the end of the entry. SHIFT+END Use the Open, Save As, and Insert Picture dialog boxes The Open, Insert Picture, and Save As dialog boxes support standard dialog box keyboard shortcuts. (To view standard shortcuts for dialog boxes, refer to the Use Dialog Boxes and Use Edit Boxes Within Dialog Boxes sections in the main Keyboard Shortcuts topic.) These dialog boxes also support the shortcuts below. To do this Press ALT+1 Go to the previous folder ALT+2 Up One Level button: open the folder up one level above the open folder ALT+3 Search the Web button: close the dialog box and open your Web search page (search page: A page from which you can find and go to other Internet sites or to documents on an intranet. Many search pages provide various ways to search, such as by topic, by keyword, or by matches to user queries.) ALT+4 Delete button: delete the selected folder or file ALT+5 Create New Folder button: create a new folder ALT+6 Views button: switch among available folder views Tools button: show the Tools menu ALT+7 or ALT+L Display a shortcut menu (shortcut menu: A menu that shows a list of commands relevant to a SHIFT+F10 particular item. To display a shortcut menu, right-click an item or press SHIFT+F10.) for a selected item such as a folder or file Move between options or areas in the dialog box TAB Open the Look in list F4 or ALT+I Refresh the file list F5 Use the Help task pane and Help window The Help Pane is a task pane that provides access to all Office Help content. As a task pane, the Help Pane appears as part of the active application. The Help window displays topics and other Help content and appears as a window next to, but separate from, the active application. In the Help task pane To do this Press Display the Help task pane. F1 Switch between the Help task pane and the active application. NOTE In a F6 worksheet that has been split (Window menu, Split command), F6 includes the split panes when switching between panes. Select the next item in the Help task pane. TAB Select the previous item in the Help task pane. SHIFT+TAB Perform the action for the selected item. ENTER In a Table of Contents, select the next and previous item, respectively. DOWN and UP ARROW In a Table of Contents, expand and collapse the selected item, respectively. RIGHT and LEFT ARROW Move back to the previous task Pane. ALT+LEFT ARROW Move forward to the next task Pane. ALT+RIGHT ARROW Open the menu of Pane options. CTRL+SPACEBAR Close and reopen the current task pane. CTRL+F1 Expand a +/- list. RIGHT ARROW
- 5. http://digiworldhanoi.vn Collapse a +/- list. LEFT ARROW In the Help window To do this Press Select the next hidden text or hyperlink, or Show All or Hide All at the top of a topic TAB Select the previous hidden text or hyperlink, or the Browser View button at the top of a SHIFT+TAB Microsoft Office Web site article Perform the action for the selected Show All, Hide All, hidden text, or hyperlink ENTER Move back to the previous Help topic. ALT+LEFT ARROW Move forward to the next Help topic. ALT+RIGHT ARROW Print the current Help topic. CTRL+P Scroll small amounts up and down, respectively, within the currently-displayed Help topic. UP ARROW AND DOWN ARROW Scroll larger amounts up and down, respectively, within the currently-displayed Help topic. PAGE UP AND PAGE DOWN Change whether the Help window appears connected to (tiled) or separate from (untiled) ALT+U the active application. Display a menu of commands for the Help window; requires that the Help window have SHIFT+F10 active focus (click an item in the Help window). Keys for workbooks and worksheets Preview and print To do this Press Display the Print dialog box. CTRL+P or CTRL+SHIFT+F12 Use the following keys in print preview (to get to print preview, press ALT+F, then press V): To do this Press Move around the page when zoomed in. Arrow keys Move by one page when zoomed out. PAGE UP or PAGE DOWN Move to the first page when zoomed out. CTRL+UP ARROW or CTRL+LEFT ARROW Move to the last page when zoomed out. CTRL+DOWN ARROW or CTRL+RIGHT ARROW Work with worksheets To do this Press Insert a new worksheet. SHIFT+F11 or ALT+SHIFT+F1 Move to the next sheet in the workbook. CTRL+PAGE DOWN Move to the previous sheet in the workbook. CTRL+PAGE UP Select the current and next sheet. To cancel selection of multiple sheets, press SHIFT+CTRL+PAGE DOWN CTRL+PAGE DOWN or, to select a different sheet, press CTRL+PAGE UP. Select the current and previous sheet. SHIFT+CTRL+PAGE UP Rename the current sheet (Format menu, Sheet submenu, Rename command). ALT+O, H, R Move or copy the current sheet (Edit menu, Move or Copy Sheet command). ALT+E, M Delete the current sheet (Edit menu, Delete Sheet command). ALT+E, L Move and scroll within worksheets To do this Press Move one cell up, down, left, or right. Arrow keys Move one cell to the right. TAB Move one cell to the left. SHIFT+TAB Move to the edge of the current data region (data region: A range of cells that contains data CTRL+arrow key and that is bounded by empty cells or worksheet borders.).
- 6. http://digiworldhanoi.vn Move to the beginning of the row. HOME Move to the beginning of the worksheet. CTRL+HOME Move to the last cell on the worksheet, in the bottom-most used row of the rightmost used CTRL+END column. Move down one screen. PAGE DOWN Move up one screen. PAGE UP Move one screen to the right. ALT+PAGE DOWN Move one screen to the left. ALT+PAGE UP Switch to the next pane in a worksheet that has been split (Window menu, Split command). F6 NOTE When the task pane (task pane: A window within an Office program that provides commonly used commands. Its location and small size allow you to use these commands while still working on your files.) is visible, F6 includes that pane when switching between panes. Switch to the previous pane in a worksheet that has been split. NOTE When the task pane is SHIFT+F6 visible, SHIFT+F6 includes that pane when switching between panes . Scroll to display the active cell. CTRL+BACKSPACE Display the Go To dialog box. F5 Display the Find dialog box. SHIFT+F5 Repeat the last Find action (same as Find Next). SHIFT+F4 Move between unlocked cells on a protected worksheet. TAB Move within a selected range To do this Press Move from top to bottom within the selected range. ENTER Move from bottom to top within the selected range. SHIFT+ENTER Move from left to right within the selected range. If cells in a single TAB column are selected, move down. Move from right to left within the selected range. If cells in a single SHIFT+TAB column are selected, move up. Move clockwise to the next corner of the selected range. CTRL+PERIOD In nonadjacent selections, switch to the next selection to the right. CTRL+ALT+RIGHT ARROW Switch to the next nonadjacent selection to the left. CTRL+ALT+LEFT ARROW NOTE You can change the direction of movement after pressing ENTER or SHIFT+ENTER: press ALT+T and then O (Tools menu, Options command), press CTRL+TAB until the Edit tab is selected, and then change the Move selection after Enter settings. Move and scroll in End mode END appears in the status bar when End mode is selected. To do this Press Turn End mode on or off. END key Move by one block of data within a row or column. END+arrow key Move to the last cell on the worksheet, in the bottom-most used row of the rightmost used column. END+HOME Move to the rightmost nonblank cell in the current row. This key sequence does not work if you have END+ENTER turned on transition navigation keys (Tools menu, Options command, Transition tab). Move and scroll with SCROLL LOCK on When you use scrolling keys (such as PAGE UP and PAGE DOWN) with SCROLL LOCK off, cell selection moves the distance you scroll. To scroll without changing which cells are selected , turn on SCROLL LOCK first. To do this Press Turn SCROLL LOCK on or off. SCROLL LOCK Move to the cell in the upper-left corner of the window. HOME Move to the cell in the lower-right corner of the window. END
- 7. http://digiworldhanoi.vn Scroll one row up or down. UP ARROW or DOWN ARROW Scroll one column left or right. LEFT ARROW or RIGHT ARROW Keys for selecting data and cells Select cells, rows and columns, and objects To do this Press Select the entire column. CTRL+SPACEBAR Select the entire row. SHIFT+SPACEBAR Select the entire worksheet. If the worksheet contains data, CTRL+A CTRL+A selects the current region. Pressing CTRL+A a second time selects the entire worksheet. With multiple cells selected, select only the active cell. SHIFT+BACKSPACE Selects the entire worksheet. If the worksheet contains data, CTRL+SHIFT+SPACEBAR CTRL+SHIFT+SPACEBAR selects the current region. Pressing CTRL+SHIFT+SPACEBAR a second time selects the entire worksheet. When an object is selected, CTRL+SHIFT+SPACEBAR selects all objects on a worksheet Alternate between hiding objects, displaying objects, and CTRL+6 displaying placeholders for objects. Select cells with specific characteristics To do this Press Select the current region around the active cell (the data area enclosed by blank rows and CTRL+SHIFT+* blank columns). In a PivotTable report, select the entire PivotTable report. (asterisk) Select the array (array: Used to build single formulas that produce multiple results or that CTRL+/ operate on a group of arguments that are arranged in rows and columns. An array range shares a common formula; an array constant is a group of constants used as an argument.) containing the active cell. Select all cells that contain comments. CTRL+SHIFT+O (the letter O) In a selected row, select the cells that don't match the formula or static value in the active CTRL+ cell. In a selected column, select the cells that don't match the formula or static value in the active CTRL+SHIFT+| cell. Select all cells directly referenced by formulas in the selection. CTRL+[ (opening bracket) Select all cells directly or indirectly referenced by formulas in the selection. CTRL+SHIFT+ { (opening brace) Select cells that contain formulas that directly reference the active cell. CTRL+] (closing bracket) Select cells that contain formulas that directly or indirectly reference the active cell. CTRL+SHIFT+} (closing brace) Select the visible cells in the current selection. ALT+; (semicolon) Extend a selection To do this Press Turn extend mode on or off. In extend mode, EXT appears in the status line, and the F8 arrow keys extend the selection. Add another range of cells to the selection; or use the arrow keys to move to the start of SHIFT+F8 the range you want to add, and then press F8 and the arrow keys to select the next range. Extend the selection by one cell. SHIFT+arrow key Extend the selection to the last nonblank cell in the same column or row as the active cell. CTRL+SHIFT+arrow key Extend the selection to the beginning of the row. SHIFT+HOME
- 8. http://digiworldhanoi.vn Extend the selection to the beginning of the worksheet. CTRL+SHIFT+HOME Extend the selection to the last used cell on the worksheet (lower-right corner). CTRL+SHIFT+END Extend the selection down one screen. SHIFT+PAGE DOWN Extend the selection up one screen. SHIFT+PAGE UP Extend the selection to the last nonblank cell in the same column or row as the active cell. END+SHIFT+arrow key Extend the selection to the last used cell on the worksheet (lower-right corner). END+SHIFT+HOME Extend the selection to the last cell in the current row. This key sequence does not work if END+SHIFT+ENTER you have turned on transition navigation keys (Tools menu, Options command, Transition tab). Extend the selection to the cell in the upper-left corner of the window. SCROLL LOCK+SHIFT+HOME Extend the selection to the cell in the lower-right corner of the window. SCROLL LOCK+SHIFT+END Keys for entering, editing, formatting, and calculating data Enter data To do this Press Complete a cell entry and select the cell below. ENTER Start a new line in the same cell. ALT+ENTER Fill the selected cell range with the current entry. CTRL+ENTER Complete a cell entry and select the previous cell above. SHIFT+ENTER Complete a cell entry and select the next cell to the right. TAB Complete a cell entry and select the previous cell to the left. SHIFT+TAB Cancel a cell entry. ESC Move one character up, down, left, or right. Arrow keys Move to the beginning of the line. HOME Repeat the last action. F4 or CTRL+Y Create names (name: A word or string of characters that represents a cell, range of cells, CTRL+SHIFT+F3 formula, or constant value. Use easy-to-understand names, such as Products, to refer to hard to understand ranges, such as Sales!C20:C30.) from row and column labels. Fill down. CTRL+D Fill to the right. CTRL+R Define a name. CTRL+F3 Insert a hyperlink (hyperlink: Colored and underlined text or a graphic that you click to go to a CTRL+K file, a location in a file, a Web page on the World Wide Web, or a Web page on an intranet. Hyperlinks can also go to newsgroups and to Gopher, Telnet, and FTP sites.). Enter the date. CTRL+; (semicolon) Enter the time. CTRL+SHIFT+: (colon) Display a drop-down list of the values in the current column of a range. ALT+DOWN ARROW Undo the last action. CTRL+Z Enter special characters Press F2 to edit the cell, turn on NUM LOCK, and then press the following keys by using the numeric key pad: To do this Press Enters the cent character ¢. ALT+0162 Enters the pound sterling character £. ALT+0163 Enters the yen symbol ¥. ALT+0165 Enters the euro symbol €. ALT+0128
- 9. http://digiworldhanoi.vn Enter and calculate formulas To do this Press Start a formula. = (equal sign) Move the insertion point into the Formula Bar when editing in a cell is turned off. F2 In the Formula Bar, delete one character to the left. BACKSPACE Complete a cell entry from the cell or Formula Bar. ENTER Enter a formula as an array formula (array formula: A formula that performs multiple CTRL+SHIFT+ENTER calculations on one or more sets of values, and then returns either a single result or multiple results. Array formulas are enclosed between braces { } and are entered by pressing CTRL+SHIFT+ENTER.). Cancel an entry in the cell or Formula Bar. ESC In a formula, display the Insert Function dialog box. SHIFT+F3 When the insertion point is to the right of a function name in a formula, display the CTRL+A Function Arguments dialog box. When the insertion point is to the right of a function name in a formula, insert the CTRL+SHIFT+A argument names and parentheses. Paste a defined name (name: A word or string of characters that represents a cell, range F3 of cells, formula, or constant value. Use easy-to-understand names, such as Products, to refer to hard to understand ranges, such as Sales!C20:C30.) into a formula. Insert an AutoSum formula with the SUM function. ALT+= (equal sign) Copy the value from the cell above the active cell into the cell or the Formula Bar. CTRL+SHIFT+" (quotation mark) Copies a formula from the cell above the active cell into the cell or the Formula Bar. CTRL+' (apostrophe) Alternate between displaying cell values and displaying formulas. CTRL+` (single left quotation mark) Calculate all worksheets in all open workbooks. NOTE When a portion of a formula is F9 selected, calculate the selected portion. You can then press ENTER or CTRL+SHIFT+ENTER (for array formulas) to replace the selected portion with the calculated value. Calculate the active worksheet. SHIFT+F9 Calculate all worksheets in all open workbooks, regardless of whether they have changed CTRL+ALT+F9 since the last calculation. Rechecks dependent formulas and then calculates all cells in all open workbooks, CTRL+ALT+SHIFT+F9 including cells not marked as needing to be calculated. Edit data To do this Press Edit the active cell and position the insertion point at the end of the cell contents. F2 Start a new line in the same cell. ALT+ENTER Edit the active cell and then clear it, or delete the preceding character in the active cell as you edit BACKSPACE cell contents. Delete the character to the right of the insertion point, or delete the selection. DELETE Delete text to the end of the line. CTRL+DELETE Display the Spelling dialog box. F7 Edit a cell comment. SHIFT+F2 Complete a cell entry and select the next cell below. ENTER Undo the last action. CTRL+Z Cancel a cell entry. ESC
- 10. http://digiworldhanoi.vn When the AutoCorrect Smart Tags is displayed, undo or redo the last automatic correction. CTRL+SHIFT+Z Insert, delete, and copy cells To do this Press Copy the selected cells. CTRL+C Display the Microsoft Office Clipboard (multiple copy and paste). CTRL+C, immediately followed by another CTRL+C Cut the selected cells. CTRL+X Paste copied cells. CTRL+V Clear the contents of the selected cells. DELETE Delete the selected cells. CTRL+HYPHEN Insert blank cells. CTRL+SHIFT+PLUS SIGN Format data To do this Press Display the Style dialog box. ALT+' (apostrophe) Display the Format Cells dialog box. CTRL+1 Apply the General number format. CTRL+SHIFT+~ Apply the Currency format with two decimal places (negative CTRL+SHIFT+$ numbers in parentheses). Apply the Percentage format with no decimal places. CTRL+SHIFT+% Apply the Exponential number format with two decimal places. CTRL+SHIFT+^ Apply the Date format with the day, month, and year. CTRL+SHIFT+# Apply the Time format with the hour and minute, and AM or PM. CTRL+SHIFT+@ Apply the Number format with two decimal places, thousands CTRL+SHIFT+! separator, and minus sign (–) for negative values. Apply or remove bold formatting. CTRL+B Apply or remove italic formatting. CTRL+I Apply or remove underlining. CTRL+U Apply or remove strikethrough. CTRL+5 Hide the selected rows. CTRL+9 Unhide any hidden rows within the selection. CTRL+SHIFT+( (opening parenthesis) Hide the selected columns. CTRL+0 (zero) Unhide any hidden columns within the selection. CTRL+SHIFT+) (closing parenthesis) Apply the outline border to the selected cells. CTRL+SHIFT+& Remove the outline border from the selected cells. CTRL+SHIFT+_ Use the Border tab in the Format Cells dialog box Press CTRL+1 to display this dialog box. To do this Press Apply or remove the top border. ALT+T Apply or remove the bottom border. ALT+B Apply or remove the left border. ALT+L Apply or remove the right border. ALT+R If cells in multiple rows are selected, apply or remove the horizontal divider. ALT+H If cells in multiple columns are selected, apply or remove the vertical divider. ALT+V
- 11. http://digiworldhanoi.vn Apply or remove the downward diagonal border. ALT+D Apply or remove the upward diagonal border. ALT+U Keys for filtering, outlining, and managing ranges Use data forms (Data menu, Form command) To do this Press Move to the same field in the next record. DOWN ARROW Move to the same field in the previous record. UP ARROW Move to each field in the record, then to each command button. TAB and SHIFT+TAB Move to the first field in the next record. ENTER Move to the first field in the previous record. SHIFT+ENTER Move to the same field 10 records forward. PAGE DOWN Start a new, blank record. CTRL+PAGE DOWN Move to the same field 10 records back. PAGE UP Move to the first record. CTRL+PAGE UP Move to the beginning or end of a field. HOME or END Extend selection to the end of a field. SHIFT+END Extend selection to the beginning of a field. SHIFT+HOME Move one character left or right within a field. LEFT ARROW or RIGHT ARROW Select the character to the left within a field. SHIFT+LEFT ARROW Select the character to the right within a field. SHIFT+RIGHT ARROW Filter ranges (Data menu, AutoFilter command) To do this Press In the cell that contains the drop-down arrow, displays the AutoFilter list for the current ALT+DOWN ARROW column. Selects the next item in the AutoFilter list. DOWN ARROW Selects the previous item in the AutoFilter list. UP ARROW Closes the AutoFilter list for the current column. ALT+UP ARROW Selects the first item (All) in the AutoFilter list. HOME Selects the last item in the AutoFilter list. END Filters the range based on the item selected from the AutoFilter list. ENTER Show, hide, and outline data To do this Press Groups rows or columns. ALT+SHIFT+RIGHT ARROW Ungroups rows or columns. ALT+SHIFT+LEFT ARROW Displays or hides the outline symbols. CTRL+8 Hides the selected rows. CTRL+9 Unhides any hidden rows within the selection. CTRL+SHIFT+( (opening parenthesis) Hides the selected columns. CTRL+0 (zero) Unhides any hidden columns within the selection. CTRL+SHIFT+) (closing parenthesis) Keys for PivotTable and PivotChart reports Lay out a report onscreen Press F10 to make the menu bar active. Press CTRL+TAB or CTRL+SHIFT+TAB to make the PivotTable Field List active. Press the DOWN ARROW or UP ARROW key to select the field you want. Press RIGHT ARROW or LEFT ARROW to open or close a field that can be expanded. Press TAB to select the Add To list, and then press DOWN ARROW to open the list.
- 12. http://digiworldhanoi.vn Press DOWN ARROW or UP ARROW to select the area where you want to move the field, and then press ENTER. Press TAB to select the Add To button, and then press ENTER. Use the PivotTable and PivotChart Wizard – Layout dialog box To display this dialog box, press TAB until Layout is selected in Step 3 of the PivotTable and PivotChart Wizard. To do this Press Selects the previous or next field button in the list on the right. UP or DOWN ARROW With two or more columns of field buttons, selects the button to the left or LEFT or RIGHT ARROW right. Moves the selected field into the Row area. ALT+R Moves the selected field into the Column area. ALT+C Moves the selected field into the Data area. ALT+D Moves the selected field into the Page area. ALT+P Displays the PivotTable Field dialog box for the selected field. ALT+L Display and hide items in a field To do this Press Displays the drop-down list for a field in a PivotTable or PivotChart report. Use the arrow keys to ALT+DOWN ARROW select the field. Selects the previous item in the range. UP ARROW Selects the next item in the range. DOWN ARROW For an item that has lower-level items available, displays the lower-level items. RIGHT ARROW For an item that has lower-level items displayed, hides the lower-level items. LEFT ARROW Selects the first visible item in the list. HOME Selects the last visible item in the list. END Closes the list and displays the selected items. ENTER Checks, double-checks, or clears a check box in the list. Double-check selects both an item and SPACEBAR all of its llower-level items. Switches between the list, the OK button, and the Cancel button. TAB Change the layout of a report To do this Press Selects an entire PivotTable report. CTRL+SHIFT+* (asterisk) Groups the selected items in a PivotTable field. ALT+SHIFT+RIGHT ARROW Ungroups grouped items in a PivotTable field. ALT+SHIFT+LEFT ARROW Keys for charts Create charts and select chart elements To do this Press Creates a chart of the data in the current range. F11 or ALT+F1 Selects a chart sheet: selects the next sheet in the workbook, until the chart sheet you want is CTRL+PAGE DOWN selected. Selects a chart sheet: selects the previous sheet in the workbook, until the chart sheet you want CTRL+PAGE UP is selected. Select the previous group of elements in a chart. DOWN ARROW Selects the next group of elements in a chart. UP ARROW Selects the next element within a group. RIGHT ARROW Selects the previous element within a group. LEFT ARROW Select an embedded chart Display the Drawing toolbar: Press ALT+V, press T, press DOWN ARROW until Drawing is selected, and then press ENTER. Press F10 to make the menu bar active.
- 13. http://digiworldhanoi.vn Press CTRL+TAB or CTRL+SHIFT+TAB to select the Drawing toolbar. Press the RIGHT ARROW key to select the Select Objects button on the Drawing toolbar. Press CTRL+ENTER to select the first object. Press the TAB key to cycle forward (or SHIFT+TAB to cycle backward) through the objects until round sizing handles (sizing handle: One of the small circles or squares that appears at the corners and sides of a selected object. You drag these handles to change the size of the object.) appear on the embedded chart you want to select. Press CTRL+ENTER to make the chart active so that you can select elements within it. Keys for drawing objects and other objects When both the Reviewing and Drawing toolbars are onscreen, ALT+U switches between the Review command and the AutoShapes command, and ENTER performs the selected command. Select a drawing object When you're editing text in a drawing object, you can select the next or previous object by pressing TAB or SHIFT+TAB. Starting from a worksheet, do the following: Press F10, press CTRL+TAB to select the Drawing toolbar, and then press RIGHT ARROW to select the Select Objects button. Press CTRL+ENTER to select the first drawing object. Press the TAB key to cycle forward (or SHIFT+TAB to cycle backward) through the objects until sizing handles appear on the object you want to select. If an object is grouped, TAB selects the group, then each object within the group, and then the next object. To switch back to the worksheet when an object is selected, press ESC. Insert an AutoShape Press ALT+U to select the AutoShapes menu on the Drawing toolbar. Use the arrow keys to move to the category of AutoShapes you want, and then press the RIGHT ARROW key. Use the arrow keys to select the AutoShape you want. Press CTRL+ENTER. To format the AutoShape, press CTRL+1 to display the Format AutoShape dialog box. Insert a text box Press F10, press CTRL+TAB to select the Drawing toolbar, and then press RIGHT ARROW to select the Text Box button. Press CTRL+ENTER. Type the text you want in the text box. Do one of the following: To return to the worksheet when you are finished typing, press ESC twice. To format the text box, press ESC, and then press CTRL+1 to display the Format Text Box dialog box. When you finish formatting, press ENTER, and then press ESC to return to the worksheet. Insert WordArt Press ALT+I, then press P, then press W (Insert menu, Picture submenu, WordArt command). Use the arrow keys to select the WordArt style you want, and then press ENTER. Type the text you want, and then use the TAB key to select other options in the dialog box. Press ENTER to insert the WordArt object. To format the WordArt object, use the tools on the Word Art toolbar, or press CTRL+1 to display the Format WordArt dialog box. Rotate a drawing object Select the drawing object you want to rotate. Press CTRL+1 to display the Format menu for the object, and then press CTRL+TAB to select the Size tab. Press ALT+T to select the Rotation box. Use the arrow keys to select the amount of rotation you want. Change the size of a drawing object Select the drawing object you want to resize. Press CTRL+1 to display the Format menu for the object, and then press CTRL+TAB to select the Size tab. Select the options you want to change the size. Move a drawing object Select the drawing object you want to move. Press the arrow keys to move the object. To position the object precisely, press CTRL+ an arrow key to move the object in one-pixel increments. Copy drawing objects and their attributes To make a copy of a drawing object, select the object and press CTRL+D. To copy attributes such as fill color and line style from one object to another, do the following: Select the drawing object with the attributes you want to copy. For AutoShapes with text, the text format is copied along with the other attributes. Press CTRL+SHIFT+C to copy the object attributes. Press TAB or SHIFT+TAB to select the object you want to copy the attributes to. Press CTRL+SHIFT+V to copy the attributes to the object. Keys for use with speech, e-mail, macros, and other languages Use speech recognition and text-to-speech To do this Press
- 14. http://digiworldhanoi.vn Switches between command mode and dictation mode. CTRL Stops reading when text is being read aloud. ESC Send e-mail messages To use keys to send e-mail messages, you must configure Microsoft Outlook as your default e-mail program. Most of these keys do not work with Outlook Express. To do this Press When cell A1 is selected, moves to the Introduction box in the e-mail SHIFT+TAB message header. In the message header, moves to the Subject, Bcc (if displayed), Cc, To, and From (if displayed) boxes, then to the address book for the Bcc, Cc, To, and From boxes, and then to cell A1. Sends the e-mail message. ALT+S Opens the Address Book. CTRL+SHIFT+B Opens the Options menu for access to the Options, Bcc Field, and From ALT+O Field commands. Opens the Outlook Message Options dialog box (Options menu, Options ALT+P command). Checks the names in the To, Cc, and Bcc boxes against the Address Book. ALT+K Opens the Address Book for the To box. ALT+PERIOD Opens the Address Book for the Cc box. ALT+C If the Bcc box is displayed, opens the Address Book for the Bcc box. ALT+B Goes to the Subject box. ALT+J Creates a message flag. CTRL+SHIFT+G Adds interactivity to the range or sheet being sent. ALT+A Work with macros To do this Press Displays the Macro dialog box. ALT+F8 Displays the Visual Basic Editor. ALT+F11 Inserts a Microsoft Excel 4.0 macro sheet. CTRL+F11 Work with multiple national languages To do this Press Switches to right-to-left paragraph direction (the text must contain only neutral CTRL+RIGHT SHIFT characters (neutral characters: Characters that do not have strong right-to-left or left-to- right language attributes. Numerals are an example of neutral characters.)). Switches to left-to-right paragraph direction (the text must contain only neutral CTRL+LEFT SHIFT characters). In Japanese text for which you've displayed phonetic guides, moves the pointer into the ALT+SHIFT+UP ARROW phonetic guides. Moves the pointer from the phonetic guides back to the parent string of characters. ALT+SHIFT+DOWN ARROW Enter a unicode character. NUM LOCK, ALT+numeric pad numbers Pressed immediately after typing the hexadecimal code for a unicode character, converts ALT+X the numbers to the character. Pressed immediately following a unicode character, converts the character to its hexadecimal code.