SlideShare a Scribd company logo
1 of 37
Download to read offline
Safety Messages                                                            Damage Prevention Messages
Your safety and the safety of others is very important. We have provided   You will also see other important messages that are preceded by the word
important safety messages in this manual and on the Honda CRF250R.         NOTICE.
Please read these messages carefully.
                                                                           This word means:
A safety message alerts you to potential hazards that could hurt you or
others. Each safety message is preceded by a safety alert symbol   and                             Your Honda CRF250R or other property can be
one of three words, DANGER, WARNING, or CAUTION.                                                   damaged if you don’t follow instructions.

These mean:                                                                The purpose of these messages is to help prevent damage to your Honda
                                                                           CRF250R, other property, or the environment.
                              You WILL be KILLED or SERIOUSLY HURT
                              if you don’t follow instructions.

                              You CAN be KILLED or SERIOUSLY HURT
                              if you don’t follow instructions.

                              You CAN be HURT if you don’t follow
                              instructions.


Each message tells you what the hazard is, what can happen and what you
can do to avoid or reduce injury.
Honda Racing Corporation (HRC)
2010 CRF250R PGM-FI Setting Tool Manual


All information in this publication is based on the latest product information available at the time of approval for printing.
Honda Racing Corporation reserves the right to make changes at any time without notice and without incurring any obligation.
No part of this publication may be reproduced without written permission.
Important Information
• This kit is sold as is without warranty, and the entire risk as to quality and performance is with the buyer.
• This kit is designed and manufactured to enhance the performance of the Honda CRF250R. As stated in the CRF250R Owner’s Manual this motorcycle, should be
  used only in an organized competitive event on a closed course, which is conducted by a recognized sanctioning body or by permit issued by the local govern-
  ment authority having jurisdiction.


•   This kit is not suitable for use with any other parts.
•   This setting tool is only for use with the 2010 CRF250R.
•   The Warn switch cannot be used on this vehicle.
•   A connection record remains in the ECM once your PC and ECU are connected with this setting tool.

PGM-FI Setting Tool Kit Contents
• Serial-USB Interface Unit Assy.
• Software CD-ROM
• PGM-FI Setting Tool Manual (this manual)

Battery
• Prepare a fully charged 12 V battery before setting the PGM-FI.
• Honda Recommends using YUASA YTX5 or YTX7 batteries.
Table of Contents


System Requirements and Communication                                   Change TH (Throttle) Segmentation . . . . . . 15
Attachment . . . . . . . . . . . . . . . . . . . . . . . . 2            Change Engine Speed Segmentation . . . . . 15
USB Driver Installation . . . . . . . . . . . . . . . 2             Change Setting Procedure . . . . . . . . . . .        .   .   16
     Detection of Serial Interface Unit . . . . . . . . 4              Changing Air-fuel Ratio (on Map Screen) .          .   .   16
Setting Tool Software Install . . . . . . . . . . 6                    How to Change Air-fuel Ratio . . . . . . . .       .   .   16
Setting Tool Operation . . . . . . . . . . . . . . . 8                 How to Change Data of All Area . . . . . . .       .   .   17
     Functional Descriptions . . . . . . . . . . . . . . . 8            Changing Amount of Injected Fuel
     Before You Begin . . . . . . . . . . . . . . . . . . . 8           (Graph Display) . . . . . . . . . . . . . . . . . . . . 18
Initial Start Up . . . . . . . . . . . . . . . . . . . . . . 9      Changing Ignition Timing . . . . . . . . . . . . .            22
Setting Tool Menu . . . . . . . . . . . . . . . . . . . 10             Changing Ignition Timing (on Map Screen) .                 22
     File Menu . . . . . . . . . . . . . . . . . . . . . . . . 10      How to Adjust Ignition Timing . . . . . . . . . .          22
     CommPort Menu . . . . . . . . . . . . . . . . . . . 11            How to Change Data of All Area . . . . . . . . .           23
     Data Transmit Menu . . . . . . . . . . . . . . . . . 11           Changing Ignition Timing (Graph Display) . .               24
     Language Menu . . . . . . . . . . . . . . . . . . . . 11       Transferring Setting Data . . . . . . . . . . . . .           28
     Help Menu . . . . . . . . . . . . . . . . . . . . . . . 11        Transmitting Data (PC to ECU) . . . . . . . . . .          28
Connecting to the Motorcycle . . . . . . . . . . 12                    Receiving Data (ECU to PC) . . . . . . . . . . . .         29
File Operation . . . . . . . . . . . . . . . . . . . . . . 13       Troubleshooting . . . . . . . . . . . . . . . . . . . . .     30
     Opening a File . . . . . . . . . . . . . . . . . . . . . 13
     Save a File . . . . . . . . . . . . . . . . . . . . . . . 14
Changing Setting . . . . . . . . . . . . . . . . . . . . 15


                                                                                                                                       1
2010 CRF250R PGM-FI Setting Tool
System Requirements and Communication Attachment                                  USB Driver Installation
This section covers the computer requirements and connection procedures.
                                                                                  Use the USB driver included in PGM-FI Setting Tool CD-ROM or download it
System Requirements                                                               from HRC Web site (http://www.honda.co.jp/HRC/).

• Microsoft Windows compatible PC                                                 1. Open the USB driver’s folder and double click “CP210x_VCP_Win2K_XP_S2K3.exe”
• OS: Windows 2000/XP/Vista                                                          to begin installation.
        Mac OSX (10.5.6 or higher, Windows XP/Vista running on Boot Camp
        Ver.2.1)
• CPU: Pentium 200MHz or higher (recommended)
• Main memory: 32MB or more (recommended)
• Display: 1024 x 768 or higher resolution (recommended)
• CD-ROM: CD-ROM drive is required (the product includes a CD-R)
• Serial port: USB port is required (to communicate with ECU)


                                                                                  2. When the following window opens, click “Next”.


The attachment

• UNIT ASSY., SERIAL-USB I/F: 38880-N1C-770


USB driver installation is needed before installing this setting tool software.
Follow the installation procedure included in the software CD-ROM for driver
installation.


2
2010 CRF250R PGM-FI Setting Tool


3. When the License Agreement window opens, click “I accept the terms of the    5. The Ready to Install the Program window opens, click “Install” to installa-
   license agreement”.                                                             tion.


4. The Choose Destination Location window will open. To install in the desti-   6. The USB driver is then installed on the “C” drive.
   nation folder, click "Next" to continue installation.


                                                                                                                                                            3
2010 CRF250R PGM-FI Setting Tool


7. Click “Finish” to finish the installation.                                 Detection of Serial Interface Unit

                                                                              1. Connect the Serial Interface Unit (USB) to the USB port of your PC.


8. Make sure the “C:SiLabs” folder appears on the “C” drive. The USB driver   2. When the hardware detection wizard starts, click the radio button “Install
   installation is then complete.                                                from a list or specified location (Advanced)”, then click “Next”.


4
2010 CRF250R PGM-FI Setting Tool


3. Check “COM and LPT” port using Device Manager, and make sure the dri-
   ver is installed correctly.

Note the COM port number for easy set-up using the PGM-FI setting tool.


The “CP210x_VCP_Win2K_XP_S2K3.exe” file is not necessary after installing
the driver correctly, delete it as necessary.


                                                                                                          5
2010 CRF250R PGM-FI Setting Tool

Setting Tool Software Installation
                                                                                  3. In the window that appears, click “Next” to continue the setup.
Note:
• Exit all other programs before starting installation.
• Install this setting tool by the user of the administrator authority.

1. Put the CD-ROM in the CD-ROM drive and click on the CD-ROM icon.
2. In the window that appears, double-click “setup” to install the application.

• If the CD-ROM was never removed, it may be necessary to open the CD-ROM
  driver and reinstall the disc, click on the program “10CRF450R”, then double
  click on the “setup” icon to install the application.


                                                                                  4. Enter your User Name and Organization in the text fields. Click “Next” to
                                                                                     continue with the installation.


6
2010 CRF250R PGM-FI Setting Tool


5. Note the folder and name, etc., for installing the application, then click   7. When installation is complete, click “Finish” and exit the install program.
   “Install.”


                                                                                8. After the installation is complete, create a shortcut to this program and put
6. A window like the one below appears and the installation continues.             it on the desktop.


                                                                                                                                                              7
2010 CRF250R PGM-FI Setting Tool

Setting Tool Operation
                                                                                     Before You Begin
Functional Descriptions
When you start the setting tool, the window below appears.                           • Note that the Data Edit Selector (No. 10 in the previous illustration) is a pull
                                                                                       down menu.
    (1)      (2)   (3)   (4) (5)              (6)          (7)


                                                          (8)
                                (9)                                  (10)
                                                                                     Click “ ” as shown in the figure above and a menu will appear below.
                                                                                     You can then highlight and edit items.


                         (11)              (12)            (13)

 No.                Name                                Function
 (1)      File                        Reading and writing the saved setting data.
 (2)      Comm Port                   Selects communication port (default: COM 1).
 (3)      Data Transmit               Transfers setting data from ECU.
          (read/write)                Transfers setting data to ECU.
  (4)     Language menu               Selects menu language.
  (5)     Help                        Displays setting tool version.
  (6)     File information display    Displays information on the setting file.
  (7)     Open File                   Reads in setting data saved before.
  (8)     Save File                   Saves setting data you have changed.
  (9)     Data Edit Selector          Selects an item to change.
 (10)     Data display area           Displays setting data.
 (11)     Data Read                   Transfers setting data from ECU.
 (12)     Data Write                  Transfers setting data to ECU.
 (13)     Quit                        Quit setting tool without data saving.


8
2010 CRF250R PGM-FI Setting Tool

Initial Start Up
                                                                                            When you open the default file, the “Read Data” and “Write Data” buttons are
• When you start the application for the first time, you will see the following             active.
  display. The “Read Data” and “Write Data” buttons are not active at this time.


                       Click the Open file button to locate the file 10CRF250R.E2P,
                       then open it.
                       Note: Be careful not to delete all files in the data directory. If
                       you do, this program cannot be used any more.
                       To use this program again, you will need to reinstall it.


                                                                                            You must press the “Data Write” button first, before transferring the data
Read in default file with “Open File.”                                                      between the ECU using the setting tool.
C:Program files10CRF250R10CRF250.E2P                                                      By this operation, the ECU can read or write the setting data.

                                                                                            Important:
                                                                                            If you press the “Data read” button first, the setting tool can not transfer the
                                                                                            setting data with the ECU.

                                                                                            When you start up the program the next time, it automatically opens the last
                                                                                            file you used.

                                                                                            Important:
                                                                                            In case the default file is not displayed with "Open file", refer to
                                                                                            Troubleshooting No. 4 on page 30.


                                                                                                                                                                          9
2010 CRF250R PGM-FI Setting Tool

Setting Tool Menu
                                                                                       CommPort Menu
File Menu


                                                                                                                 When you click “CommPort”, a pulldown
                                                                                                                 menu of communication ports appears.
                                                                                                                 You can select from COM1 to 16.
                                  When you click “File”, you can select
                                  “OpenFile...”, “SaveFile...” or “Quit”.                                                    Current setting is shown.


“OpenFile...”   Same function as for the “Open File” button. Loading the data
                file.
“SaveFile...”   Same function as for the “Save File” button. Writing the edited
                data to data file.                                                     Checking Device Manager
“Quit”          Same function as for the “Quit” button. Quit setting tool. Before
                quitting the setting tool, save the edited data using the “Save
                File” button. If you quit the setting tool without saving, the edit-
                ed data will be cancelled.


                                                                                                                      Open the system properties of your PC to
                                                                                                                      check the communication port setting.
                                                                                                                      The port setting should be the same as the
                                                                                                                      setting tool.
                                                                                                                      (If the communication port [COM1] is
                                                                                                                      marked with “X”, communication is not
                                                                                                                      possible).


10
2010 CRF250R PGM-FI Setting Tool


Data Transmit Menu                                                              Help Menu


                                                                                                   When selecting “About” in the “Help”
                                       By checking “DataTransmit”, you can
                                                                                                   menu, the setting tool version informa-
                                       select “DataRead” or “DataWrite.”
                                                                                                   tion appears.


“DataRead”    Same function as the “Data Read” button. Loads the data from
              the ECU.
“DataWrite”   Same function as the “Data Write” button. Writes the edited
              data to the ECU.

Language Menu


                                       When Clicking "Language", you can
                                       select English or Japanese as the set-
                                       ting tool language.


“English”     Sets the menu language to English.
“Japanese”    Sets the menu language to Japanese.


                                                                                                                                       11
2010 CRF250R PGM-FI Setting Tool

Connecting to the Motorcycle
                                                                               3. Connect a fully charged 12 V battery to the Serial I/F eyelets.
1. Remove the connector cap from the DLC 4P (Red) connector behind the right
   radiator shroud.                                                            Note:
                                                                               • Do not start the engine with the I/F cord attached.
                                                                               • Always use a fully charged 12V battery. If the battery voltage is insufficient
                                                                                 or the battery is disconnected during the setting, errors will occur in the set-
                                                                                 ting data.
                                                                               • The Warn switch is not used with Fi Setting tool software 09 and 10CRF450R.
                                                                               • Honda recommends using YUASA YTX5 or YTX7 batteries.


                                                                                                                                  GREEN


                                  4P (RED) CONNECTOR


2. Connect the SERIAL-USB I/F 4P (Red) connector to the DLC 4P (Red) con-                                    RED
   nector.
                                                                               4. Connect the “UNIT ASSY., SERIAL-USB I/F: 38880-N1C-770” to the USB port
                                                                                  of your PC.


                                                                                                                                             WARN SWITCH
Avoid damaging the SERIAL-USB I/F harness, do not touch the harness with the
                                                                                                                                             (Do not use)
exhaust pipe while it is hot.


                                                                                                                                     POWER SWITCH


                     4P (RED) CONNECTOR


12
2010 CRF250R PGM-FI Setting Tool

File Operation
                                                                                    Open Button
Opening a File                                                                     When the reading is correct, the file will be opened in the setting tool window
                                                                                   and is ready for use.
When you click “Open File”, a list of files appear.
Select a file you wish to use and click Open. The data will then be opened in      When a reading error is occurrs:
the setting tool.


                                                                                   If the specified E2P file is not found, the message above appears.
              Select a file and
              click “OK.”


                                                                                   If a different base vehicle’s model year data is opened,, a "ECU Data Type is
                                                                                   incorrect" window is displayed.
                                                                                   Refer to troubleshooting No. 5.
                                        Cancel Button


                                       If the process of “Open File” is aborted,
                                       the window above appears.                   If the file format error occurs while reading the E2P file, the message above
                                       Click “OK” to continue.                     appears.
                                                                                   Refer to troubleshooting No. 6.
                                                                                   Note:
                                                                                   • The displayed data is default data.
                                                                                       2010: 10CRF250.E2P


                                                                                                                                                              13
2010 CRF250R PGM-FI Setting Tool


Save a File
                                                                                     Save Button
When you click “Save File”, a list of files already saved will appear and ask you
to input a file name. Type a file name and click “OK” to save your file.            When a file is saved correctly:

Note:
• You can use up to 8 characters for a file name.


                                                                                    When the E2P file is saved, the message above appears.

                                                                                    When file saving error occurs:


                                                                                    If you try to use more than 8 characters for a file name, the message above
                                                                                    appears.
                                                                                    To continue “Save File”, click “OK” and type a file name with 8 or less charac-
Note:                                                                               ters.
• Be sure to put the cursor before “.E2P” when you
  type in a file name. If you omit the extension                                     Cancel Button
  (.E2P), you cannot open it (it will be not listed.)


                                                                                    If the Save File process is aborted, the message above appears.
                                                                                    Click “OK” to continue.

                                                                                    When using Windows VISTA, the saved file might not be displayed by the file
                                                                                    explorer.
                                                                                    If you want to move or copy saved file, click “compatibility files button”.
                                                                                    Then the saved file is displayed, you can move or copy the file.

14
2010 CRF250R PGM-FI Setting Tool

Changing Setting
                                                                               Changing Engine Speed Segmentation
Changing TH (Throttle) Segmentation


Click “ ” as shown in the figure above and select “FI Map (number of per-
cent)” from the pull down menu.


                                                                               You can arbitrarily change engine speed segmentation.
                                                                               Engine speed segmentation can be changed like TH segmentation.
                                                                               For example, if you click on 10,000 min-1 (rpm), the scale above appears.
                                                                               You can change 10 rpm ranges excluding the extreme ends: 1,500 min-1 (rpm)
                                                                               and 13,500 min-1 (rpm).

                                                                               Use the mouse or left/right arrow keys to select a point, enter a value, and press
                                                                               the “Enter” key.
                                                                               You can only make changes within the zone of the scale.
                                                                               When a change is made to either throttle percentage or the engine rpm range,
                                                                               it is changed for both Fi and IG adjustment areas.
                                                                               You cannot make separate segmentation settings for the Fi Map and Ignition
TH (throttle) position can arbitrarily be changed.                             Map.
If you click TH segmentation, for example 60%, the scale like the one above
appears.                                                                       Note: TH and engine speed segmentation can only be changed on the Fi Map
You can change the 6 TH settings, excluding 0% and 100%.                       and Ignition Map screens.

Use the mouse or the up/down arrow keys to make changes, and press the
“Enter“ key to save them.
You can cancel the setting change by clicking the “Cancel“ key.
You can only make changes within the zone of the scale.

When a change is made to either throttle percentage or the engine rpm range,
it is changed for both the Fi and IG adjustment areas.


                                                                                                                                                             15
2010 CRF250R PGM-FI Setting Tool

Change Setting Procedure
                                                                             How to Change Air-fuel Ratio
You can change the air-fuel ratio on the map screen or the graph screen.

Changing Air-fuel Ratio (on Map Screen)
                                                                                              Make changes using the mouse or the
The screen below appears when selecting the FI Map (number of percent). To                    up/down arrow keys.
the change the data, click where the TH position meets engine speed.                          Click “Enter“ for the changes to take effect.
                                                                                              Click “Cancel“ to abort the process.


                                                                                                  You can change values in the range from -30% to +30%.
                                                                                                  0% is the standard setting.

                                                                                                  Important:
                                                                                                  • On the standard CRF250R, we recommend using the
                                                                                                    values in the -7% to +7% range. If you adjust the val-
                                                                                                    ues outside of the recommended range, the correct
                                                                                                    performance cannot be obtained.
                                                                                                  • A significant effect can be obtained by changing the
                                                                                                    mixture ratio by 1 - 2%.


The scale below appears.


                                                                                                                     After change


16
2010 CRF250R PGM-FI Setting Tool


Recommended values of the Fi map are in the range from –7% to +7%.             How to Change Data of All Area
If you adjust the values to out of recommended range, the setting values are
shown in red.


                                                                               When you click “All area Data change,“ the screen like above appears.
                                                                               This screen enables you to off-set all data. Click the “Enter“ key for the change
                                                                               to take effect.

If the setting values are out of recommended range, the following alert mes-   Be aware, however, that this operation sets all data to a zero (0) value.
sage appears when the Save File or Data Write button are clicked.
To continue the setting, click “Yes”.


                                                                                                                                                            17
2010 CRF250R PGM-FI Setting Tool


Changing Amount of Injected Fuel (Graph Display)        When you select “Fi Map (graph mode)”, the screen below appears.

The Graph mode displays a horizontal axis of the map.


                                                        To change the data, select the TH position you want to adjust.
                                                        The present setting is graphically displayed, along with engine speed by TH
                                                        positions.
                                                        Click on the engine speed you want to adjust.
                                                        When selecting an rpm box, the color will change, and it can then be adjusted.
                                                        Use the up/down arrow keys to make changes.
                                                        The changes made here are also reflected in the map display.


18
2010 CRF250R PGM-FI Setting Tool


Recommended values of the Fi map are in the range from –7% to +7%.             When you select “Fi Map (3D graph)”, the screen below appears.
If you adjust the values to out of recommended range, the setting values are
shown in red.


If the setting values are out of recommended range, the following alert mes-
sage appears when the Save File or Data Write buttons are clicked.
To continue the setting, click “Yes”.

                                                                               You can change the graph color and graph size by selecting the options on both
                                                                               side of the graph.


                                                                                                                                                         19
2010 CRF250R PGM-FI Setting Tool


Grayscale                                                 Line
Displays in grayscale (cannot select Pilot Style Line).   Displays in lines only. Note: Color map style will automatically set to None
                                                          (Blue).


Single color
Displays in a single color (blue).                        Drag
                                                          Using the mouse, you can drag the graphic while pressing the [Shift] key
                                                          ([Shift]+Drag).


20
2010 CRF250R PGM-FI Setting Tool


Zoom in/out                                                                  Save Image
Using the mouse, you can zoom in or zoom out on the graphic while pressing   The displayed data on the screen can be saved as a bitmap (.BMP) files.
the [Alt] key ([Alt]+Drag).


The setting cannot be changed on 3D graph screen.


                                                                                                                                                       21
2010 CRF250R PGM-FI Setting Tool

Changing Ignition Timing
                                                                               How to Adjust Ignition Timing
You can adjust the ignition timing on the map screen or on the graph screen.

Changing ignition timing (on map screen)                                                        Use the mouse or the up/down arrow keys to
                                                                                                make changes.
When you select “Ignition Map” (number of percent), the screen below                            Click “Enter” for the changes to take effect.
appears. To adjust the data, click where the desired TH opening meets                           Click “Cancel” to abort the process.
engine speed.

                                                                                                    You can adjust values in the 4˚ to -12˚ range.
                                                                                                    0˚ is the standard setting.

                                                                                                    Important:
                                                                                                    • On the standard CRF250R, we recommend changing
                                                                                                      the range values as follows:
                                                                                                      – up to 4,900 min-1 (rpm): from 4˚ to -4˚.
                                                                                                      – more than 5,000 min-1 (rpm): from 2˚ to -2˚.
                                                                                                      If you adjust the values outside of the recommended
                                                                                                      range, the correct performance cannot be obtained.
                                                                                                    • A significant effect can be obtained by changing the
                                                                                                      ignition timing by 1 to 2˚.


The scale below appears.


                                                                                                                      After change


22
2010 CRF250R PGM-FI Setting Tool


HRC recommend values in the following ranges:                                  How to Change Data of All Area
– up to 4,900 min-1 (rpm):        from -4˚ to +4˚.
– more than 5,000 min-1 (rpm): from -2˚ to +2˚.
If you adjust the values to out of recommended range, the setting values are
shown in red.


                                                                               When you click “All area Data change“, the screen above appears.
                                                                               This screen enables you to off-set all data. Click the “Enter“ key for the changes
                                                                               to take effect.
                                                                               Be aware however, that clicking the “Enter“ key changes all the values to zero
                                                                               (0).

If the setting values are out of recommended range, the following alert mes-
sage appears when the Save File or Data Write buttons are clicked.
To continue the setting, click “Yes”.


                                                                                                                                                             23
2010 CRF250R PGM-FI Setting Tool


Changing Ignition Timing (Graph Display)   The Graph mode displays a horizontal axis of the map.


                                           When selecting the “IG Map“, (graph mode), the screen below appears.
                                           To change the data, select the TH position you want to adjust.
                                           The current settings are displayed, along with engine speed by TH position.
                                           Click on the engine speed values that you want to adjust.

                                           When selecting an rpm box, the color will change, and it can then be adjusted.
                                           Use the up/down arrow keys to make changes.
                                           Changes made here are also reflected in the map display.


24
2010 CRF250R PGM-FI Setting Tool


Recommend values of the IG map is in the range from –7% to +7%.                 When selecting “IG Map (3D graph)”, the screen below appears.
If you adjust the values out of the recommended range, the setting values are
shown in red.


If the setting values are out of recommended range, the following alert mes-
sage appears when the Save File or Data Write buttons are clicked.
To continue the setting, click “Yes”.

                                                                                Change graph color and size by selecting the options on the sides of the graph.


                                                                                                                                                           25
2010 CRF250R PGM-FI Setting Tool


Grayscale                                                 Line
Displays in grayscale (cannot select Pilot Style Line).   Displays in lines only (Color map style will automatically none).


Single color                                              Drag
Displays in a single color (blue).                        Using the mouse, you can drag the graphic while pressing the [Shift] key
                                                          ([Shift]+Drag).


26
2010 CRF250R PGM-FI Setting Tool


Zoom in/out                                                                 Save Image
Using the mouse, you can zoom in or zoom out while pressing the [Alt] key   The displayed data on the screen can be saved as a bitmap (.BMP) files.
([Alt]+Drag).


The setting cannot be changed on 3D graph screen.


                                                                                                                                                      27
2010 CRF250R PGM-FI Setting Tool

Transferring Setting Data
                                                                                If the communication could not be completed, the following window appears.
Transmitting Data (PC to ECU)                                                   Check the connection and communication settings, then retry communication
                                                                                again by clicking on “Data Write”.


                                                                                After transferring the setting data, disconnect the UNIT ASSY., SERIAL-USB I/F
                                                                                from the vehicle.
                                                                                Install the DLC connector cap to the DLC connector.


                                     When you click “Data Write”, the fol-
                                     lowing window will appear.


                                Turn the UNIT ASSY., SERIAL I/F power
                                switch turned to ON, then click “OK” or press
                                the “Enter key”.


                                Click “OK” or press the “Enter” key.


         Sending data to ECU

                                If the communication is correctly completed,
                                the following window appears. You can then
                                turn the power switch OFF.


28
2010 CRF250R PGM-FI Setting Tool


Receiving Data (ECU to PC)


By clicking “Data Read”, you can retrieve the setting data from the ECU.
Use the same procedure as Data Write and the screen below appears.


                                       File name becomes “ECU Read data” when the
                                       data retrieval is completed.


                                                   Note 1:
                                                   In this state, “Data Write” cannot
                                                   be performed.
 Contents of the display changes                   Note 2:
 to the setting data in ECU, and its               If you save or change the data
 file name is displayed here.                      once, you will be able to transmit
                                                   into ECU.


                                                                                                                     29
2010 CRF250R PGM-FI Setting Tool

Troubleshooting
                                                                                 *1: CD-ROM drive
No.        State                  Cause                 Action to take
 1.   Unable to install     Don’t know how      Refer to *1: CD-ROM drive                                    If you click the My
                            to operate                                                                       Computer icon, a win-
                            CD-ROM drive is     Troubleshoot your computer                                   dow like the one on
                            not recognized      and try installation again.                                  the left appears.
                            Defect of CD-ROM    Please contact Authorized                                    Click CD-ROM, then
                            (deep scratch,      Honda Motorcycle Dealer.                                     click SETUPEX and
                            etc.)                                                                            installation will start.
 2.   Unable to run         Unsupported OS      This tool runs on windows                                    If the CD-ROM icon is
      the tool                                  2000/XP/VISTA.                                               not displayed in the
 3.   Unable to com-        The serial port     Refer to *2: How to check                                    window, your PC
      municate with         setting is incor-   serial port                                                  might       not       be
      ECU                   rect                                                                             equipped with a CD-
                            ECU power sup-      Check battery connection.                                    ROM drive, or is not
                            ply is turned off   Check battery charging condi-                                recognizing one.
                                                tion                                                         Consult the instruc-
                                                Check serial interface power                                 tion manual of your
                                                switch.                                                      PC to confirm this.
                            Incorrect serial    Check connection (Refer to the
                            interface con-      page on connection with the
                            nection             vehicle)
                            Data read out       The retrieved data cannot be     *2: How to check COM port
                            from ECU can-       retransmitted as it is.
                            not be transmit-    In order to transmit retrieved                               Click “View system
                            ted.                data, you should save it once.                               information” in the
                                                (Refer to the page on data                                   System Tasks.
                                                reception)                                                   (Depending on the
 4.   Default file is not                        Refer to *3: Opening the                                    Operating System).
      displayed at first                         default file
      startup
 5.   Wrong file for-       Broken reading      Please contact Authorized
      mat                   E2P file..          Honda Motorcycle Dealer


30
2010 CRF250R PGM-FI Setting Tool


*2: How to check serial port (cont.)

Windows XP


                                                    Click “Device Manager”.


                              Unable to communicate when the “x” mark appears
                              on the communication port (COM1). Also unable to
                              communicate if the COM port is differs from the tool
                              setting.


                                                                                                                  31
2010 CRF250R PGM-FI Setting Tool


*2: How to check serial port (cont.)

Windows VISTA


                                                         If there is an "X" on the Communication Port (COM4),
Open the Control Panel and click “Hardware and Sound.”
                                                         or if the COM port is different from the Setting Tool
Click “Device Manager.”
                                                         program, the program will not communicate with
                                                         the ECU.


32
2010 CRF250R PGM-FI Setting Tool


*3: Opening the default file
When you open "Open File" when starting up for the first time.


                                   Normally 10CRF250.E2P is displayed as
                                   the default, however, it's not displayed in
                                   this picture.


Countermeasure: Open the directory including the tool, and change the file
name.


                              It exists as a file, but does not display on the tool.


Select "10CRF250.E2P" and change the file name.
e.g.: Change the file name from "10CRF250.E2P" to "10CRF251.E2P"
The file name is not specified if the name includes 8 letters or less.
Now you can open the file.


                                                                                                                    33
Memo

More Related Content

What's hot

Literacias dos media como pesquisar no google
Literacias dos media como pesquisar no googleLiteracias dos media como pesquisar no google
Literacias dos media como pesquisar no googleRainha Maga
 
Perfil do profissional de UX no Brasil
Perfil do profissional de UX no BrasilPerfil do profissional de UX no Brasil
Perfil do profissional de UX no BrasilUXPA São Paulo
 
Apresentação de tecnologia de produtos cosméticos
Apresentação de tecnologia de produtos cosméticosApresentação de tecnologia de produtos cosméticos
Apresentação de tecnologia de produtos cosméticosGIDEONE Moura Santos Ferreira
 
Manual de Identidade Visual do BNDES
Manual de Identidade Visual do BNDESManual de Identidade Visual do BNDES
Manual de Identidade Visual do BNDESBeto Lima Branding
 
E commerce e estudo de caso Amazon
E commerce e estudo de caso AmazonE commerce e estudo de caso Amazon
E commerce e estudo de caso AmazonWilliam Farias
 
Manual-Identidad-Corporativa-RENATA-3.pdf
Manual-Identidad-Corporativa-RENATA-3.pdfManual-Identidad-Corporativa-RENATA-3.pdf
Manual-Identidad-Corporativa-RENATA-3.pdfCarlosRojas675634
 
Curso Arquitetura de Informação @ iMasters Jan 2013
Curso Arquitetura de Informação @ iMasters Jan 2013Curso Arquitetura de Informação @ iMasters Jan 2013
Curso Arquitetura de Informação @ iMasters Jan 2013Instituto Faber-Ludens
 
Manual de Identidad corporativa Visual
Manual de Identidad corporativa VisualManual de Identidad corporativa Visual
Manual de Identidad corporativa VisualRenzo Albinoo
 
Usabilidade aula-02. Metas e princípios
Usabilidade aula-02. Metas e princípiosUsabilidade aula-02. Metas e princípios
Usabilidade aula-02. Metas e princípiosAlan Vasconcelos
 
Manual de identidade visual - Perfumaria linus
Manual de identidade visual -  Perfumaria linusManual de identidade visual -  Perfumaria linus
Manual de identidade visual - Perfumaria linusSamuel Elias
 
Sistemas de organização e rotulação
Sistemas de organização e rotulaçãoSistemas de organização e rotulação
Sistemas de organização e rotulaçãoInstituto Faber-Ludens
 
Redes Sociais - Computação Gráfica - 2022
Redes Sociais - Computação Gráfica - 2022Redes Sociais - Computação Gráfica - 2022
Redes Sociais - Computação Gráfica - 2022Renato Melo
 
Digital 2021 Paraguay (January 2021) v01
Digital 2021 Paraguay (January 2021) v01Digital 2021 Paraguay (January 2021) v01
Digital 2021 Paraguay (January 2021) v01DataReportal
 
Priorização de Portfólio de Projetos com o MS EPM
Priorização de Portfólio de Projetos com o MS EPMPriorização de Portfólio de Projetos com o MS EPM
Priorização de Portfólio de Projetos com o MS EPMAllan Rocha
 

What's hot (20)

Literacias dos media como pesquisar no google
Literacias dos media como pesquisar no googleLiteracias dos media como pesquisar no google
Literacias dos media como pesquisar no google
 
Perfil do profissional de UX no Brasil
Perfil do profissional de UX no BrasilPerfil do profissional de UX no Brasil
Perfil do profissional de UX no Brasil
 
Apresentação de tecnologia de produtos cosméticos
Apresentação de tecnologia de produtos cosméticosApresentação de tecnologia de produtos cosméticos
Apresentação de tecnologia de produtos cosméticos
 
Marca São Paulo | Brandbook
Marca São Paulo | BrandbookMarca São Paulo | Brandbook
Marca São Paulo | Brandbook
 
Manual de Identidade Visual do BNDES
Manual de Identidade Visual do BNDESManual de Identidade Visual do BNDES
Manual de Identidade Visual do BNDES
 
Manual corporativo mendoza
Manual corporativo mendozaManual corporativo mendoza
Manual corporativo mendoza
 
Obeya
ObeyaObeya
Obeya
 
E commerce e estudo de caso Amazon
E commerce e estudo de caso AmazonE commerce e estudo de caso Amazon
E commerce e estudo de caso Amazon
 
Modelo de-diagnostico-estrategico
Modelo de-diagnostico-estrategicoModelo de-diagnostico-estrategico
Modelo de-diagnostico-estrategico
 
Manual-Identidad-Corporativa-RENATA-3.pdf
Manual-Identidad-Corporativa-RENATA-3.pdfManual-Identidad-Corporativa-RENATA-3.pdf
Manual-Identidad-Corporativa-RENATA-3.pdf
 
Curso Arquitetura de Informação @ iMasters Jan 2013
Curso Arquitetura de Informação @ iMasters Jan 2013Curso Arquitetura de Informação @ iMasters Jan 2013
Curso Arquitetura de Informação @ iMasters Jan 2013
 
Manual de Identidad corporativa Visual
Manual de Identidad corporativa VisualManual de Identidad corporativa Visual
Manual de Identidad corporativa Visual
 
Usabilidade aula-02. Metas e princípios
Usabilidade aula-02. Metas e princípiosUsabilidade aula-02. Metas e princípios
Usabilidade aula-02. Metas e princípios
 
Manual de identidade visual - Perfumaria linus
Manual de identidade visual -  Perfumaria linusManual de identidade visual -  Perfumaria linus
Manual de identidade visual - Perfumaria linus
 
IMPLEMENTANDO GOVERNANÇA ÁGIL EM TI
IMPLEMENTANDO GOVERNANÇA ÁGIL EM TIIMPLEMENTANDO GOVERNANÇA ÁGIL EM TI
IMPLEMENTANDO GOVERNANÇA ÁGIL EM TI
 
Sistemas de organização e rotulação
Sistemas de organização e rotulaçãoSistemas de organização e rotulação
Sistemas de organização e rotulação
 
Redes Sociais - Computação Gráfica - 2022
Redes Sociais - Computação Gráfica - 2022Redes Sociais - Computação Gráfica - 2022
Redes Sociais - Computação Gráfica - 2022
 
Heineken
HeinekenHeineken
Heineken
 
Digital 2021 Paraguay (January 2021) v01
Digital 2021 Paraguay (January 2021) v01Digital 2021 Paraguay (January 2021) v01
Digital 2021 Paraguay (January 2021) v01
 
Priorização de Portfólio de Projetos com o MS EPM
Priorização de Portfólio de Projetos com o MS EPMPriorização de Portfólio de Projetos com o MS EPM
Priorização de Portfólio de Projetos com o MS EPM
 

Viewers also liked

Bab 11-sistem-injeksi-121001221458-phpapp01
Bab 11-sistem-injeksi-121001221458-phpapp01Bab 11-sistem-injeksi-121001221458-phpapp01
Bab 11-sistem-injeksi-121001221458-phpapp01Andri Prasetyo
 
Jobsheet Pemeriksaan Sistem Starter Pada Kendaraan
Jobsheet Pemeriksaan Sistem Starter Pada KendaraanJobsheet Pemeriksaan Sistem Starter Pada Kendaraan
Jobsheet Pemeriksaan Sistem Starter Pada KendaraanCharis Muhammad
 
Membongkar dan merakit alternator
Membongkar dan merakit alternatorMembongkar dan merakit alternator
Membongkar dan merakit alternatorZainal Abidin
 
Pemeriksaan sistem pengisian
Pemeriksaan sistem pengisianPemeriksaan sistem pengisian
Pemeriksaan sistem pengisiannanik setiyowati
 
Jobsheet Overhaul Alternator Dan Regulator
Jobsheet Overhaul Alternator Dan RegulatorJobsheet Overhaul Alternator Dan Regulator
Jobsheet Overhaul Alternator Dan RegulatorCharis Muhammad
 
Jobsheet Pemeriksaan Sistem Pengisian Pada Kendaraan
Jobsheet Pemeriksaan Sistem Pengisian Pada KendaraanJobsheet Pemeriksaan Sistem Pengisian Pada Kendaraan
Jobsheet Pemeriksaan Sistem Pengisian Pada KendaraanCharis Muhammad
 
Bab 10-pengapian-elektronik
Bab 10-pengapian-elektronikBab 10-pengapian-elektronik
Bab 10-pengapian-elektronikSlamet Setiyono
 
12. sistem pengisian
12. sistem pengisian12. sistem pengisian
12. sistem pengisianMUGI YONO
 
Bab 23-sistem-kontrol-parkir
Bab 23-sistem-kontrol-parkirBab 23-sistem-kontrol-parkir
Bab 23-sistem-kontrol-parkirSlamet Setiyono
 
Bab 21-power-window-alarm
Bab 21-power-window-alarmBab 21-power-window-alarm
Bab 21-power-window-alarmSlamet Setiyono
 
Jobsheet Pemeriksaan Sistem Pengapian Pada Kendaraan
Jobsheet Pemeriksaan Sistem Pengapian Pada KendaraanJobsheet Pemeriksaan Sistem Pengapian Pada Kendaraan
Jobsheet Pemeriksaan Sistem Pengapian Pada KendaraanCharis Muhammad
 
Job Sheet Pembongkaran, pemeriksaan dan perakitan starter
Job Sheet Pembongkaran, pemeriksaan dan perakitan starterJob Sheet Pembongkaran, pemeriksaan dan perakitan starter
Job Sheet Pembongkaran, pemeriksaan dan perakitan starterCharis Muhammad
 
Jobsheet Overhaul Motor Starter
Jobsheet Overhaul Motor StarterJobsheet Overhaul Motor Starter
Jobsheet Overhaul Motor StarterCharis Muhammad
 
Perbaikan sistem pengapian
Perbaikan sistem pengapianPerbaikan sistem pengapian
Perbaikan sistem pengapianAhmad Faozi
 
Avanza wiring diagram
Avanza wiring diagramAvanza wiring diagram
Avanza wiring diagramAbdul Shobir
 

Viewers also liked (19)

Bab 11-sistem-injeksi-121001221458-phpapp01
Bab 11-sistem-injeksi-121001221458-phpapp01Bab 11-sistem-injeksi-121001221458-phpapp01
Bab 11-sistem-injeksi-121001221458-phpapp01
 
Jobsheet Pemeriksaan Sistem Starter Pada Kendaraan
Jobsheet Pemeriksaan Sistem Starter Pada KendaraanJobsheet Pemeriksaan Sistem Starter Pada Kendaraan
Jobsheet Pemeriksaan Sistem Starter Pada Kendaraan
 
Membongkar dan merakit alternator
Membongkar dan merakit alternatorMembongkar dan merakit alternator
Membongkar dan merakit alternator
 
Pemeriksaan sistem pengisian
Pemeriksaan sistem pengisianPemeriksaan sistem pengisian
Pemeriksaan sistem pengisian
 
Jobsheet Overhaul Alternator Dan Regulator
Jobsheet Overhaul Alternator Dan RegulatorJobsheet Overhaul Alternator Dan Regulator
Jobsheet Overhaul Alternator Dan Regulator
 
Jobsheet Pemeriksaan Sistem Pengisian Pada Kendaraan
Jobsheet Pemeriksaan Sistem Pengisian Pada KendaraanJobsheet Pemeriksaan Sistem Pengisian Pada Kendaraan
Jobsheet Pemeriksaan Sistem Pengisian Pada Kendaraan
 
Power window guru
Power window guruPower window guru
Power window guru
 
Bab 10-pengapian-elektronik
Bab 10-pengapian-elektronikBab 10-pengapian-elektronik
Bab 10-pengapian-elektronik
 
12. sistem pengisian
12. sistem pengisian12. sistem pengisian
12. sistem pengisian
 
Bab 17-automatic-ac
Bab 17-automatic-acBab 17-automatic-ac
Bab 17-automatic-ac
 
Bab 23-sistem-kontrol-parkir
Bab 23-sistem-kontrol-parkirBab 23-sistem-kontrol-parkir
Bab 23-sistem-kontrol-parkir
 
Bab 21-power-window-alarm
Bab 21-power-window-alarmBab 21-power-window-alarm
Bab 21-power-window-alarm
 
Jobsheet Pemeriksaan Sistem Pengapian Pada Kendaraan
Jobsheet Pemeriksaan Sistem Pengapian Pada KendaraanJobsheet Pemeriksaan Sistem Pengapian Pada Kendaraan
Jobsheet Pemeriksaan Sistem Pengapian Pada Kendaraan
 
Job Sheet Pembongkaran, pemeriksaan dan perakitan starter
Job Sheet Pembongkaran, pemeriksaan dan perakitan starterJob Sheet Pembongkaran, pemeriksaan dan perakitan starter
Job Sheet Pembongkaran, pemeriksaan dan perakitan starter
 
Jobsheet Overhaul Motor Starter
Jobsheet Overhaul Motor StarterJobsheet Overhaul Motor Starter
Jobsheet Overhaul Motor Starter
 
Bab 11-sistem-injeksi
Bab 11-sistem-injeksiBab 11-sistem-injeksi
Bab 11-sistem-injeksi
 
Perbaikan sistem pengapian
Perbaikan sistem pengapianPerbaikan sistem pengapian
Perbaikan sistem pengapian
 
Avanza wiring diagram
Avanza wiring diagramAvanza wiring diagram
Avanza wiring diagram
 
Cat.dcs.sis.controller
Cat.dcs.sis.controllerCat.dcs.sis.controller
Cat.dcs.sis.controller
 

Similar to Manual E

creative 1130
creative 1130creative 1130
creative 1130lobo9000
 
Drv10 lab3 pf755_pcam
Drv10 lab3 pf755_pcamDrv10 lab3 pf755_pcam
Drv10 lab3 pf755_pcamconfidencial
 
Bluetooth quick start_guide / Controlanything India
Bluetooth quick start_guide / Controlanything IndiaBluetooth quick start_guide / Controlanything India
Bluetooth quick start_guide / Controlanything IndiaDcube Tech Ventures
 
FMC920-quick manual-V2.7.pdf
FMC920-quick manual-V2.7.pdfFMC920-quick manual-V2.7.pdf
FMC920-quick manual-V2.7.pdfbnspbogor2
 
Kyocera FS-C-5030-N Operation Guide
Kyocera FS-C-5030-N Operation GuideKyocera FS-C-5030-N Operation Guide
Kyocera FS-C-5030-N Operation GuidePeter Thayer
 
Motorola air defense mobile 6.1 install guide
Motorola air defense mobile 6.1 install guideMotorola air defense mobile 6.1 install guide
Motorola air defense mobile 6.1 install guideAdvantec Distribution
 
Faronics Deep Freeze Server Standard User Guide
Faronics Deep Freeze Server Standard User GuideFaronics Deep Freeze Server Standard User Guide
Faronics Deep Freeze Server Standard User GuideFaronics
 
Bc875 plg manual101
Bc875 plg manual101Bc875 plg manual101
Bc875 plg manual101Ahmad Syaugi
 
Ncomputing m300-giai-phap-tieti-kiem[ncomputing.123vietnam.vn]
Ncomputing m300-giai-phap-tieti-kiem[ncomputing.123vietnam.vn]Ncomputing m300-giai-phap-tieti-kiem[ncomputing.123vietnam.vn]
Ncomputing m300-giai-phap-tieti-kiem[ncomputing.123vietnam.vn]Gia sư Đức Trí
 
HP Micro Server remote access card user manual
HP Micro Server remote access card user manualHP Micro Server remote access card user manual
HP Micro Server remote access card user manualMark Rosenau
 
Lenze manual global drive gdc en
Lenze manual global drive gdc enLenze manual global drive gdc en
Lenze manual global drive gdc enCharles Santos
 
ATEQ Quickset TPMS Reset Relearn Tool User Manual
ATEQ Quickset TPMS Reset Relearn Tool User ManualATEQ Quickset TPMS Reset Relearn Tool User Manual
ATEQ Quickset TPMS Reset Relearn Tool User ManualTim Miller
 
Eding_CNC_Software_installation_manual.pdf
Eding_CNC_Software_installation_manual.pdfEding_CNC_Software_installation_manual.pdf
Eding_CNC_Software_installation_manual.pdfNusratIqbal9
 
Actron CP9680 User Manual
Actron CP9680 User ManualActron CP9680 User Manual
Actron CP9680 User ManualTim Miller
 
Deep Freeze Standard User Guide
 Deep Freeze Standard User Guide Deep Freeze Standard User Guide
Deep Freeze Standard User GuideFaronics
 
Client install
Client installClient install
Client installmrt Londeh
 
Wfc878r eop hwsg_npd6407-00_en
Wfc878r eop hwsg_npd6407-00_enWfc878r eop hwsg_npd6407-00_en
Wfc878r eop hwsg_npd6407-00_enHerrySyafitri
 

Similar to Manual E (20)

creative 1130
creative 1130creative 1130
creative 1130
 
Drv10 lab3 pf755_pcam
Drv10 lab3 pf755_pcamDrv10 lab3 pf755_pcam
Drv10 lab3 pf755_pcam
 
Bluetooth quick start_guide / Controlanything India
Bluetooth quick start_guide / Controlanything IndiaBluetooth quick start_guide / Controlanything India
Bluetooth quick start_guide / Controlanything India
 
FMC920-quick manual-V2.7.pdf
FMC920-quick manual-V2.7.pdfFMC920-quick manual-V2.7.pdf
FMC920-quick manual-V2.7.pdf
 
Kyocera FS-C-5030-N Operation Guide
Kyocera FS-C-5030-N Operation GuideKyocera FS-C-5030-N Operation Guide
Kyocera FS-C-5030-N Operation Guide
 
Motorola air defense mobile 6.1 install guide
Motorola air defense mobile 6.1 install guideMotorola air defense mobile 6.1 install guide
Motorola air defense mobile 6.1 install guide
 
Faronics Deep Freeze Server Standard User Guide
Faronics Deep Freeze Server Standard User GuideFaronics Deep Freeze Server Standard User Guide
Faronics Deep Freeze Server Standard User Guide
 
Bc875 plg manual101
Bc875 plg manual101Bc875 plg manual101
Bc875 plg manual101
 
Ncomputing m300-giai-phap-tieti-kiem[ncomputing.123vietnam.vn]
Ncomputing m300-giai-phap-tieti-kiem[ncomputing.123vietnam.vn]Ncomputing m300-giai-phap-tieti-kiem[ncomputing.123vietnam.vn]
Ncomputing m300-giai-phap-tieti-kiem[ncomputing.123vietnam.vn]
 
HP Micro Server remote access card user manual
HP Micro Server remote access card user manualHP Micro Server remote access card user manual
HP Micro Server remote access card user manual
 
Lenze manual global drive gdc en
Lenze manual global drive gdc enLenze manual global drive gdc en
Lenze manual global drive gdc en
 
Yoga 6 13are_ug_en
Yoga 6 13are_ug_enYoga 6 13are_ug_en
Yoga 6 13are_ug_en
 
ATEQ Quickset TPMS Reset Relearn Tool User Manual
ATEQ Quickset TPMS Reset Relearn Tool User ManualATEQ Quickset TPMS Reset Relearn Tool User Manual
ATEQ Quickset TPMS Reset Relearn Tool User Manual
 
Eding_CNC_Software_installation_manual.pdf
Eding_CNC_Software_installation_manual.pdfEding_CNC_Software_installation_manual.pdf
Eding_CNC_Software_installation_manual.pdf
 
Actron CP9680 User Manual
Actron CP9680 User ManualActron CP9680 User Manual
Actron CP9680 User Manual
 
Deep Freeze Standard User Guide
 Deep Freeze Standard User Guide Deep Freeze Standard User Guide
Deep Freeze Standard User Guide
 
Jumper t16 manual
Jumper t16 manualJumper t16 manual
Jumper t16 manual
 
Client install
Client installClient install
Client install
 
Oc130 v4hp3000ug
Oc130 v4hp3000ugOc130 v4hp3000ug
Oc130 v4hp3000ug
 
Wfc878r eop hwsg_npd6407-00_en
Wfc878r eop hwsg_npd6407-00_enWfc878r eop hwsg_npd6407-00_en
Wfc878r eop hwsg_npd6407-00_en
 

Manual E

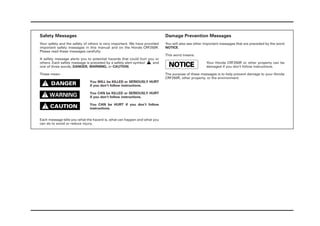
  • 1. Safety Messages Damage Prevention Messages Your safety and the safety of others is very important. We have provided You will also see other important messages that are preceded by the word important safety messages in this manual and on the Honda CRF250R. NOTICE. Please read these messages carefully. This word means: A safety message alerts you to potential hazards that could hurt you or others. Each safety message is preceded by a safety alert symbol and Your Honda CRF250R or other property can be one of three words, DANGER, WARNING, or CAUTION. damaged if you don’t follow instructions. These mean: The purpose of these messages is to help prevent damage to your Honda CRF250R, other property, or the environment. You WILL be KILLED or SERIOUSLY HURT if you don’t follow instructions. You CAN be KILLED or SERIOUSLY HURT if you don’t follow instructions. You CAN be HURT if you don’t follow instructions. Each message tells you what the hazard is, what can happen and what you can do to avoid or reduce injury.
  • 2. Honda Racing Corporation (HRC) 2010 CRF250R PGM-FI Setting Tool Manual All information in this publication is based on the latest product information available at the time of approval for printing. Honda Racing Corporation reserves the right to make changes at any time without notice and without incurring any obligation. No part of this publication may be reproduced without written permission.
  • 3. Important Information • This kit is sold as is without warranty, and the entire risk as to quality and performance is with the buyer. • This kit is designed and manufactured to enhance the performance of the Honda CRF250R. As stated in the CRF250R Owner’s Manual this motorcycle, should be used only in an organized competitive event on a closed course, which is conducted by a recognized sanctioning body or by permit issued by the local govern- ment authority having jurisdiction. • This kit is not suitable for use with any other parts. • This setting tool is only for use with the 2010 CRF250R. • The Warn switch cannot be used on this vehicle. • A connection record remains in the ECM once your PC and ECU are connected with this setting tool. PGM-FI Setting Tool Kit Contents • Serial-USB Interface Unit Assy. • Software CD-ROM • PGM-FI Setting Tool Manual (this manual) Battery • Prepare a fully charged 12 V battery before setting the PGM-FI. • Honda Recommends using YUASA YTX5 or YTX7 batteries.
  • 4. Table of Contents System Requirements and Communication Change TH (Throttle) Segmentation . . . . . . 15 Attachment . . . . . . . . . . . . . . . . . . . . . . . . 2 Change Engine Speed Segmentation . . . . . 15 USB Driver Installation . . . . . . . . . . . . . . . 2 Change Setting Procedure . . . . . . . . . . . . . 16 Detection of Serial Interface Unit . . . . . . . . 4 Changing Air-fuel Ratio (on Map Screen) . . . 16 Setting Tool Software Install . . . . . . . . . . 6 How to Change Air-fuel Ratio . . . . . . . . . . 16 Setting Tool Operation . . . . . . . . . . . . . . . 8 How to Change Data of All Area . . . . . . . . . 17 Functional Descriptions . . . . . . . . . . . . . . . 8 Changing Amount of Injected Fuel Before You Begin . . . . . . . . . . . . . . . . . . . 8 (Graph Display) . . . . . . . . . . . . . . . . . . . . 18 Initial Start Up . . . . . . . . . . . . . . . . . . . . . . 9 Changing Ignition Timing . . . . . . . . . . . . . 22 Setting Tool Menu . . . . . . . . . . . . . . . . . . . 10 Changing Ignition Timing (on Map Screen) . 22 File Menu . . . . . . . . . . . . . . . . . . . . . . . . 10 How to Adjust Ignition Timing . . . . . . . . . . 22 CommPort Menu . . . . . . . . . . . . . . . . . . . 11 How to Change Data of All Area . . . . . . . . . 23 Data Transmit Menu . . . . . . . . . . . . . . . . . 11 Changing Ignition Timing (Graph Display) . . 24 Language Menu . . . . . . . . . . . . . . . . . . . . 11 Transferring Setting Data . . . . . . . . . . . . . 28 Help Menu . . . . . . . . . . . . . . . . . . . . . . . 11 Transmitting Data (PC to ECU) . . . . . . . . . . 28 Connecting to the Motorcycle . . . . . . . . . . 12 Receiving Data (ECU to PC) . . . . . . . . . . . . 29 File Operation . . . . . . . . . . . . . . . . . . . . . . 13 Troubleshooting . . . . . . . . . . . . . . . . . . . . . 30 Opening a File . . . . . . . . . . . . . . . . . . . . . 13 Save a File . . . . . . . . . . . . . . . . . . . . . . . 14 Changing Setting . . . . . . . . . . . . . . . . . . . . 15 1
  • 5. 2010 CRF250R PGM-FI Setting Tool System Requirements and Communication Attachment USB Driver Installation This section covers the computer requirements and connection procedures. Use the USB driver included in PGM-FI Setting Tool CD-ROM or download it System Requirements from HRC Web site (http://www.honda.co.jp/HRC/). • Microsoft Windows compatible PC 1. Open the USB driver’s folder and double click “CP210x_VCP_Win2K_XP_S2K3.exe” • OS: Windows 2000/XP/Vista to begin installation. Mac OSX (10.5.6 or higher, Windows XP/Vista running on Boot Camp Ver.2.1) • CPU: Pentium 200MHz or higher (recommended) • Main memory: 32MB or more (recommended) • Display: 1024 x 768 or higher resolution (recommended) • CD-ROM: CD-ROM drive is required (the product includes a CD-R) • Serial port: USB port is required (to communicate with ECU) 2. When the following window opens, click “Next”. The attachment • UNIT ASSY., SERIAL-USB I/F: 38880-N1C-770 USB driver installation is needed before installing this setting tool software. Follow the installation procedure included in the software CD-ROM for driver installation. 2
  • 6. 2010 CRF250R PGM-FI Setting Tool 3. When the License Agreement window opens, click “I accept the terms of the 5. The Ready to Install the Program window opens, click “Install” to installa- license agreement”. tion. 4. The Choose Destination Location window will open. To install in the desti- 6. The USB driver is then installed on the “C” drive. nation folder, click "Next" to continue installation. 3
  • 7. 2010 CRF250R PGM-FI Setting Tool 7. Click “Finish” to finish the installation. Detection of Serial Interface Unit 1. Connect the Serial Interface Unit (USB) to the USB port of your PC. 8. Make sure the “C:SiLabs” folder appears on the “C” drive. The USB driver 2. When the hardware detection wizard starts, click the radio button “Install installation is then complete. from a list or specified location (Advanced)”, then click “Next”. 4
  • 8. 2010 CRF250R PGM-FI Setting Tool 3. Check “COM and LPT” port using Device Manager, and make sure the dri- ver is installed correctly. Note the COM port number for easy set-up using the PGM-FI setting tool. The “CP210x_VCP_Win2K_XP_S2K3.exe” file is not necessary after installing the driver correctly, delete it as necessary. 5
  • 9. 2010 CRF250R PGM-FI Setting Tool Setting Tool Software Installation 3. In the window that appears, click “Next” to continue the setup. Note: • Exit all other programs before starting installation. • Install this setting tool by the user of the administrator authority. 1. Put the CD-ROM in the CD-ROM drive and click on the CD-ROM icon. 2. In the window that appears, double-click “setup” to install the application. • If the CD-ROM was never removed, it may be necessary to open the CD-ROM driver and reinstall the disc, click on the program “10CRF450R”, then double click on the “setup” icon to install the application. 4. Enter your User Name and Organization in the text fields. Click “Next” to continue with the installation. 6
  • 10. 2010 CRF250R PGM-FI Setting Tool 5. Note the folder and name, etc., for installing the application, then click 7. When installation is complete, click “Finish” and exit the install program. “Install.” 8. After the installation is complete, create a shortcut to this program and put 6. A window like the one below appears and the installation continues. it on the desktop. 7
  • 11. 2010 CRF250R PGM-FI Setting Tool Setting Tool Operation Before You Begin Functional Descriptions When you start the setting tool, the window below appears. • Note that the Data Edit Selector (No. 10 in the previous illustration) is a pull down menu. (1) (2) (3) (4) (5) (6) (7) (8) (9) (10) Click “ ” as shown in the figure above and a menu will appear below. You can then highlight and edit items. (11) (12) (13) No. Name Function (1) File Reading and writing the saved setting data. (2) Comm Port Selects communication port (default: COM 1). (3) Data Transmit Transfers setting data from ECU. (read/write) Transfers setting data to ECU. (4) Language menu Selects menu language. (5) Help Displays setting tool version. (6) File information display Displays information on the setting file. (7) Open File Reads in setting data saved before. (8) Save File Saves setting data you have changed. (9) Data Edit Selector Selects an item to change. (10) Data display area Displays setting data. (11) Data Read Transfers setting data from ECU. (12) Data Write Transfers setting data to ECU. (13) Quit Quit setting tool without data saving. 8
  • 12. 2010 CRF250R PGM-FI Setting Tool Initial Start Up When you open the default file, the “Read Data” and “Write Data” buttons are • When you start the application for the first time, you will see the following active. display. The “Read Data” and “Write Data” buttons are not active at this time. Click the Open file button to locate the file 10CRF250R.E2P, then open it. Note: Be careful not to delete all files in the data directory. If you do, this program cannot be used any more. To use this program again, you will need to reinstall it. You must press the “Data Write” button first, before transferring the data Read in default file with “Open File.” between the ECU using the setting tool. C:Program files10CRF250R10CRF250.E2P By this operation, the ECU can read or write the setting data. Important: If you press the “Data read” button first, the setting tool can not transfer the setting data with the ECU. When you start up the program the next time, it automatically opens the last file you used. Important: In case the default file is not displayed with "Open file", refer to Troubleshooting No. 4 on page 30. 9
  • 13. 2010 CRF250R PGM-FI Setting Tool Setting Tool Menu CommPort Menu File Menu When you click “CommPort”, a pulldown menu of communication ports appears. You can select from COM1 to 16. When you click “File”, you can select “OpenFile...”, “SaveFile...” or “Quit”. Current setting is shown. “OpenFile...” Same function as for the “Open File” button. Loading the data file. “SaveFile...” Same function as for the “Save File” button. Writing the edited data to data file. Checking Device Manager “Quit” Same function as for the “Quit” button. Quit setting tool. Before quitting the setting tool, save the edited data using the “Save File” button. If you quit the setting tool without saving, the edit- ed data will be cancelled. Open the system properties of your PC to check the communication port setting. The port setting should be the same as the setting tool. (If the communication port [COM1] is marked with “X”, communication is not possible). 10
  • 14. 2010 CRF250R PGM-FI Setting Tool Data Transmit Menu Help Menu When selecting “About” in the “Help” By checking “DataTransmit”, you can menu, the setting tool version informa- select “DataRead” or “DataWrite.” tion appears. “DataRead” Same function as the “Data Read” button. Loads the data from the ECU. “DataWrite” Same function as the “Data Write” button. Writes the edited data to the ECU. Language Menu When Clicking "Language", you can select English or Japanese as the set- ting tool language. “English” Sets the menu language to English. “Japanese” Sets the menu language to Japanese. 11
  • 15. 2010 CRF250R PGM-FI Setting Tool Connecting to the Motorcycle 3. Connect a fully charged 12 V battery to the Serial I/F eyelets. 1. Remove the connector cap from the DLC 4P (Red) connector behind the right radiator shroud. Note: • Do not start the engine with the I/F cord attached. • Always use a fully charged 12V battery. If the battery voltage is insufficient or the battery is disconnected during the setting, errors will occur in the set- ting data. • The Warn switch is not used with Fi Setting tool software 09 and 10CRF450R. • Honda recommends using YUASA YTX5 or YTX7 batteries. GREEN 4P (RED) CONNECTOR 2. Connect the SERIAL-USB I/F 4P (Red) connector to the DLC 4P (Red) con- RED nector. 4. Connect the “UNIT ASSY., SERIAL-USB I/F: 38880-N1C-770” to the USB port of your PC. WARN SWITCH Avoid damaging the SERIAL-USB I/F harness, do not touch the harness with the (Do not use) exhaust pipe while it is hot. POWER SWITCH 4P (RED) CONNECTOR 12
  • 16. 2010 CRF250R PGM-FI Setting Tool File Operation Open Button Opening a File When the reading is correct, the file will be opened in the setting tool window and is ready for use. When you click “Open File”, a list of files appear. Select a file you wish to use and click Open. The data will then be opened in When a reading error is occurrs: the setting tool. If the specified E2P file is not found, the message above appears. Select a file and click “OK.” If a different base vehicle’s model year data is opened,, a "ECU Data Type is incorrect" window is displayed. Refer to troubleshooting No. 5. Cancel Button If the process of “Open File” is aborted, the window above appears. If the file format error occurs while reading the E2P file, the message above Click “OK” to continue. appears. Refer to troubleshooting No. 6. Note: • The displayed data is default data. 2010: 10CRF250.E2P 13
  • 17. 2010 CRF250R PGM-FI Setting Tool Save a File Save Button When you click “Save File”, a list of files already saved will appear and ask you to input a file name. Type a file name and click “OK” to save your file. When a file is saved correctly: Note: • You can use up to 8 characters for a file name. When the E2P file is saved, the message above appears. When file saving error occurs: If you try to use more than 8 characters for a file name, the message above appears. To continue “Save File”, click “OK” and type a file name with 8 or less charac- Note: ters. • Be sure to put the cursor before “.E2P” when you type in a file name. If you omit the extension Cancel Button (.E2P), you cannot open it (it will be not listed.) If the Save File process is aborted, the message above appears. Click “OK” to continue. When using Windows VISTA, the saved file might not be displayed by the file explorer. If you want to move or copy saved file, click “compatibility files button”. Then the saved file is displayed, you can move or copy the file. 14
  • 18. 2010 CRF250R PGM-FI Setting Tool Changing Setting Changing Engine Speed Segmentation Changing TH (Throttle) Segmentation Click “ ” as shown in the figure above and select “FI Map (number of per- cent)” from the pull down menu. You can arbitrarily change engine speed segmentation. Engine speed segmentation can be changed like TH segmentation. For example, if you click on 10,000 min-1 (rpm), the scale above appears. You can change 10 rpm ranges excluding the extreme ends: 1,500 min-1 (rpm) and 13,500 min-1 (rpm). Use the mouse or left/right arrow keys to select a point, enter a value, and press the “Enter” key. You can only make changes within the zone of the scale. When a change is made to either throttle percentage or the engine rpm range, it is changed for both Fi and IG adjustment areas. You cannot make separate segmentation settings for the Fi Map and Ignition TH (throttle) position can arbitrarily be changed. Map. If you click TH segmentation, for example 60%, the scale like the one above appears. Note: TH and engine speed segmentation can only be changed on the Fi Map You can change the 6 TH settings, excluding 0% and 100%. and Ignition Map screens. Use the mouse or the up/down arrow keys to make changes, and press the “Enter“ key to save them. You can cancel the setting change by clicking the “Cancel“ key. You can only make changes within the zone of the scale. When a change is made to either throttle percentage or the engine rpm range, it is changed for both the Fi and IG adjustment areas. 15
  • 19. 2010 CRF250R PGM-FI Setting Tool Change Setting Procedure How to Change Air-fuel Ratio You can change the air-fuel ratio on the map screen or the graph screen. Changing Air-fuel Ratio (on Map Screen) Make changes using the mouse or the The screen below appears when selecting the FI Map (number of percent). To up/down arrow keys. the change the data, click where the TH position meets engine speed. Click “Enter“ for the changes to take effect. Click “Cancel“ to abort the process. You can change values in the range from -30% to +30%. 0% is the standard setting. Important: • On the standard CRF250R, we recommend using the values in the -7% to +7% range. If you adjust the val- ues outside of the recommended range, the correct performance cannot be obtained. • A significant effect can be obtained by changing the mixture ratio by 1 - 2%. The scale below appears. After change 16
  • 20. 2010 CRF250R PGM-FI Setting Tool Recommended values of the Fi map are in the range from –7% to +7%. How to Change Data of All Area If you adjust the values to out of recommended range, the setting values are shown in red. When you click “All area Data change,“ the screen like above appears. This screen enables you to off-set all data. Click the “Enter“ key for the change to take effect. If the setting values are out of recommended range, the following alert mes- Be aware, however, that this operation sets all data to a zero (0) value. sage appears when the Save File or Data Write button are clicked. To continue the setting, click “Yes”. 17
  • 21. 2010 CRF250R PGM-FI Setting Tool Changing Amount of Injected Fuel (Graph Display) When you select “Fi Map (graph mode)”, the screen below appears. The Graph mode displays a horizontal axis of the map. To change the data, select the TH position you want to adjust. The present setting is graphically displayed, along with engine speed by TH positions. Click on the engine speed you want to adjust. When selecting an rpm box, the color will change, and it can then be adjusted. Use the up/down arrow keys to make changes. The changes made here are also reflected in the map display. 18
  • 22. 2010 CRF250R PGM-FI Setting Tool Recommended values of the Fi map are in the range from –7% to +7%. When you select “Fi Map (3D graph)”, the screen below appears. If you adjust the values to out of recommended range, the setting values are shown in red. If the setting values are out of recommended range, the following alert mes- sage appears when the Save File or Data Write buttons are clicked. To continue the setting, click “Yes”. You can change the graph color and graph size by selecting the options on both side of the graph. 19
  • 23. 2010 CRF250R PGM-FI Setting Tool Grayscale Line Displays in grayscale (cannot select Pilot Style Line). Displays in lines only. Note: Color map style will automatically set to None (Blue). Single color Displays in a single color (blue). Drag Using the mouse, you can drag the graphic while pressing the [Shift] key ([Shift]+Drag). 20
  • 24. 2010 CRF250R PGM-FI Setting Tool Zoom in/out Save Image Using the mouse, you can zoom in or zoom out on the graphic while pressing The displayed data on the screen can be saved as a bitmap (.BMP) files. the [Alt] key ([Alt]+Drag). The setting cannot be changed on 3D graph screen. 21
  • 25. 2010 CRF250R PGM-FI Setting Tool Changing Ignition Timing How to Adjust Ignition Timing You can adjust the ignition timing on the map screen or on the graph screen. Changing ignition timing (on map screen) Use the mouse or the up/down arrow keys to make changes. When you select “Ignition Map” (number of percent), the screen below Click “Enter” for the changes to take effect. appears. To adjust the data, click where the desired TH opening meets Click “Cancel” to abort the process. engine speed. You can adjust values in the 4˚ to -12˚ range. 0˚ is the standard setting. Important: • On the standard CRF250R, we recommend changing the range values as follows: – up to 4,900 min-1 (rpm): from 4˚ to -4˚. – more than 5,000 min-1 (rpm): from 2˚ to -2˚. If you adjust the values outside of the recommended range, the correct performance cannot be obtained. • A significant effect can be obtained by changing the ignition timing by 1 to 2˚. The scale below appears. After change 22
  • 26. 2010 CRF250R PGM-FI Setting Tool HRC recommend values in the following ranges: How to Change Data of All Area – up to 4,900 min-1 (rpm): from -4˚ to +4˚. – more than 5,000 min-1 (rpm): from -2˚ to +2˚. If you adjust the values to out of recommended range, the setting values are shown in red. When you click “All area Data change“, the screen above appears. This screen enables you to off-set all data. Click the “Enter“ key for the changes to take effect. Be aware however, that clicking the “Enter“ key changes all the values to zero (0). If the setting values are out of recommended range, the following alert mes- sage appears when the Save File or Data Write buttons are clicked. To continue the setting, click “Yes”. 23
  • 27. 2010 CRF250R PGM-FI Setting Tool Changing Ignition Timing (Graph Display) The Graph mode displays a horizontal axis of the map. When selecting the “IG Map“, (graph mode), the screen below appears. To change the data, select the TH position you want to adjust. The current settings are displayed, along with engine speed by TH position. Click on the engine speed values that you want to adjust. When selecting an rpm box, the color will change, and it can then be adjusted. Use the up/down arrow keys to make changes. Changes made here are also reflected in the map display. 24
  • 28. 2010 CRF250R PGM-FI Setting Tool Recommend values of the IG map is in the range from –7% to +7%. When selecting “IG Map (3D graph)”, the screen below appears. If you adjust the values out of the recommended range, the setting values are shown in red. If the setting values are out of recommended range, the following alert mes- sage appears when the Save File or Data Write buttons are clicked. To continue the setting, click “Yes”. Change graph color and size by selecting the options on the sides of the graph. 25
  • 29. 2010 CRF250R PGM-FI Setting Tool Grayscale Line Displays in grayscale (cannot select Pilot Style Line). Displays in lines only (Color map style will automatically none). Single color Drag Displays in a single color (blue). Using the mouse, you can drag the graphic while pressing the [Shift] key ([Shift]+Drag). 26
  • 30. 2010 CRF250R PGM-FI Setting Tool Zoom in/out Save Image Using the mouse, you can zoom in or zoom out while pressing the [Alt] key The displayed data on the screen can be saved as a bitmap (.BMP) files. ([Alt]+Drag). The setting cannot be changed on 3D graph screen. 27
  • 31. 2010 CRF250R PGM-FI Setting Tool Transferring Setting Data If the communication could not be completed, the following window appears. Transmitting Data (PC to ECU) Check the connection and communication settings, then retry communication again by clicking on “Data Write”. After transferring the setting data, disconnect the UNIT ASSY., SERIAL-USB I/F from the vehicle. Install the DLC connector cap to the DLC connector. When you click “Data Write”, the fol- lowing window will appear. Turn the UNIT ASSY., SERIAL I/F power switch turned to ON, then click “OK” or press the “Enter key”. Click “OK” or press the “Enter” key. Sending data to ECU If the communication is correctly completed, the following window appears. You can then turn the power switch OFF. 28
  • 32. 2010 CRF250R PGM-FI Setting Tool Receiving Data (ECU to PC) By clicking “Data Read”, you can retrieve the setting data from the ECU. Use the same procedure as Data Write and the screen below appears. File name becomes “ECU Read data” when the data retrieval is completed. Note 1: In this state, “Data Write” cannot be performed. Contents of the display changes Note 2: to the setting data in ECU, and its If you save or change the data file name is displayed here. once, you will be able to transmit into ECU. 29
  • 33. 2010 CRF250R PGM-FI Setting Tool Troubleshooting *1: CD-ROM drive No. State Cause Action to take 1. Unable to install Don’t know how Refer to *1: CD-ROM drive If you click the My to operate Computer icon, a win- CD-ROM drive is Troubleshoot your computer dow like the one on not recognized and try installation again. the left appears. Defect of CD-ROM Please contact Authorized Click CD-ROM, then (deep scratch, Honda Motorcycle Dealer. click SETUPEX and etc.) installation will start. 2. Unable to run Unsupported OS This tool runs on windows If the CD-ROM icon is the tool 2000/XP/VISTA. not displayed in the 3. Unable to com- The serial port Refer to *2: How to check window, your PC municate with setting is incor- serial port might not be ECU rect equipped with a CD- ECU power sup- Check battery connection. ROM drive, or is not ply is turned off Check battery charging condi- recognizing one. tion Consult the instruc- Check serial interface power tion manual of your switch. PC to confirm this. Incorrect serial Check connection (Refer to the interface con- page on connection with the nection vehicle) Data read out The retrieved data cannot be *2: How to check COM port from ECU can- retransmitted as it is. not be transmit- In order to transmit retrieved Click “View system ted. data, you should save it once. information” in the (Refer to the page on data System Tasks. reception) (Depending on the 4. Default file is not Refer to *3: Opening the Operating System). displayed at first default file startup 5. Wrong file for- Broken reading Please contact Authorized mat E2P file.. Honda Motorcycle Dealer 30
  • 34. 2010 CRF250R PGM-FI Setting Tool *2: How to check serial port (cont.) Windows XP Click “Device Manager”. Unable to communicate when the “x” mark appears on the communication port (COM1). Also unable to communicate if the COM port is differs from the tool setting. 31
  • 35. 2010 CRF250R PGM-FI Setting Tool *2: How to check serial port (cont.) Windows VISTA If there is an "X" on the Communication Port (COM4), Open the Control Panel and click “Hardware and Sound.” or if the COM port is different from the Setting Tool Click “Device Manager.” program, the program will not communicate with the ECU. 32
  • 36. 2010 CRF250R PGM-FI Setting Tool *3: Opening the default file When you open "Open File" when starting up for the first time. Normally 10CRF250.E2P is displayed as the default, however, it's not displayed in this picture. Countermeasure: Open the directory including the tool, and change the file name. It exists as a file, but does not display on the tool. Select "10CRF250.E2P" and change the file name. e.g.: Change the file name from "10CRF250.E2P" to "10CRF251.E2P" The file name is not specified if the name includes 8 letters or less. Now you can open the file. 33
  • 37. Memo