
Recommandé
Contenu connexe
Tendances
Tendances (20)
En vedette
En vedette (20)
Similaire à From Word
Similaire à From Word (20)
Dernier
Dernier (9)
From Word
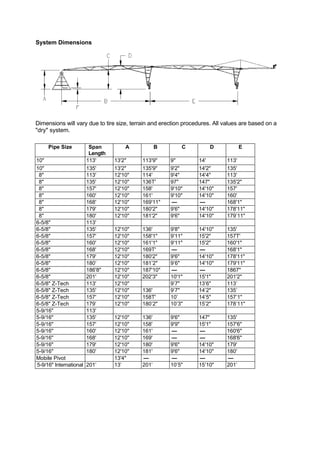
- 1. System Dimensions Dimensions will vary due to tire size, terrain and erection procedures. All values are based on a quot;dryquot; system. Pipe Size Span A B C D E Length 10quot; 113' 13'2quot; 113'9quot; 9quot; 14' 113' 10quot; 135' 13'2quot; 135'9quot; 9'2quot; 14'2quot; 135' 8quot; 113' 12'10quot; 114' 9'4quot; 14'4quot; 113' 8quot; 135' 12'10quot; 136T' 97quot; 147quot; 135'2quot; 8quot; 157' 12'10quot; 158' 9'10quot; 14'10quot; 157' 8quot; 160' 12'10quot; 161' 9'10quot; 14'10quot; 160' 8quot; 168' 12'10quot; 169'11quot; — — 168'1quot; 8quot; 179' 12'10quot; 180'2quot; 9'6quot; 14'10quot; 178'11quot; 8quot; 180' 12'10quot; 181'2quot; 9'6quot; 14'10quot; 179’11quot; 6-5/8quot; 113' 6-5/8quot; 135' 12'10quot; 136' 9'8quot; 14'10quot; 135' 6-5/8quot; 157' 12'10quot; 158'1quot; 9'11quot; 15'2quot; 157T' 6-5/8quot; 160' 12'10quot; 161'1quot; 9'11quot; 15'2quot; 160'1quot; 6-5/8quot; 168' 12'10quot; 169T' — — 168'1quot; 6-5/8quot; 179' 12'10quot; 180'2quot; 9'6quot; 14'10quot; 178'11quot; 6-5/8quot; 180’ 12'10quot; 181’2quot; 9’6quot; 14'10quot; 179'11quot; 6-5/8quot; 186'8quot; 12'10quot; 187'10quot; — — 1867quot; 6-5/8quot; 201' 12'10quot; 202'3quot; 10'1quot; 15'1quot; 201'2quot; 6-5/8quot; Z-Tech 113' 12'10quot; 9’7quot; 13’6quot; 113’ 6-5/8quot; Z-Tech 135' 12'10quot; 136' 9’7quot; 14’2quot; 135’ 6-5/8quot; Z-Tech 157' 12'10quot; 158T' 10’ 14’5quot; 157’1quot; 6-5/8quot; Z-Tech 179’ 12'10quot; 180’2quot; 10’3quot; 15’2quot; 178’11quot; 5-9/16quot; 113' 5-9/16quot; 135' 12'10quot; 136' 9'6quot; 147quot; 135' 5-9/16quot; 157' 12'10quot; 158' 9'9quot; 15'1quot; 157'6quot; 5-9/16quot; 160' 12'10quot; 161' — — 160'6quot; 5-9/16quot; 168' 12'10quot; 169' — — 168'6quot; 5-9/16quot; 179' 12'10quot; 180' 9'6quot; 14'10quot; 179' 5-9/16quot; 180' 12'10quot; 181' 9'6quot; 14'10quot; 180' Mobile Pivot 13'4quot; — — — — 5-9/16quot; International 201’ 13’ 201’ 10’5quot; 15’10quot; 201’
- 2. System Dimensions, Metric Dimensions will vary due to tire size, terrain and erection procedures. All values are based on a quot;dryquot; system. Pipe Size Span Span A (m) B (m) C (m) D (m) E (m) Length Length (m) 10quot; 113' 34.44 4.01 34.67 0.23 4.27 34.44 10quot; 135' 41.15 4.01 41.38 2.79 4.32 41.15 8quot; 113' 34.44 3.91 34.75 2.84 4.37 34.44 8quot; 135' 41.15 3.91 41.48 2.92 4.45 41.20 8quot; 157' 47.85 3.91 48.16 3.00 4.52 47.85 8quot; 160' 48.77 3.91 49.07 3.00 4.52 48.77 8quot; 168' 51.21 3.91 51.79 --- --- 51.23 8quot; 179' 54.56 3.91 54.91 2.90 4.52 54.53 8quot; 186' 8quot; 56.90 3.91 57.25 --- --- 56.87 6-5/8quot; 113' 34.44 6-5/8quot; 135' 41.15 3.91 41.45 2.95 4.52 41.15 6-5/8quot; 157' 47.85 3.91 48.18 3.02 4.62 47.88 6-5/8quot; 160' 48.77 3.91 49.10 3.02 4.62 48.79 6-5/8quot; 168' 51.21 3.91 51.54 --- --- 51.23 6-5/8quot; 179' 54.56 3.91 54.91 2.90 4.52 54.53 6-5/8quot; 186'8quot; 56.90 3.91 57.25 --- --- 56.87 6-5/8quot; 201' 61.26 3.91 61.34 3.07 4.60 61.01 5-9/16quot; 113' 34.44 5-9/16quot; 135' 41.15 3.91 41.45 2.90 4.45 41.15 5-9/16quot; 157' 47.85 3.91 48.16 2.97 4.60 48.01 5-9/16quot; 160' 48.77 3.91 49.07 --- --- 48.92 5-9/16quot; 179' 54.56 3.91 54.86 2.90 4.52 54.56 Mobile Pivot 4.06 --- --- --- ---
- 3. Center Points Type Size A - Height B - Elbow C - Pad D - Bolt E - Bolt to Pad Outside Separation Diagonal Edge Compact 6-5/8quot; 12’10quot; 12quot; 9’ 4-1/2quot; 7’ 1/2quot; 9’ 11-1/2quot; Compact 5-9/16quot; 12’10quot; 12quot; 9’ 4-1/2quot; 7’ 1/2quot; 9’ 11-1/2quot; Standard 5-9/16quot; 12’10quot; 12quot; 12’6quot; 10’1-3/4quot; 14’4-1/4quot; Standard 6-5/8quot; 12’10quot; 12quot; 12’6quot; 10’1-3/4quot; 14’4-1/4quot; Heavy-Duty 5-9/16quot; 12’10quot; 12quot; 14’ 10’1-3/4quot; 14’4-1/4quot; Heavy-Duty 6-5/8quot; 12’10quot; 12quot; 14’ 10’1-3/4quot; 14’4-1/4quot; Heavy-Duty 8quot; 12’10quot; 12quot; 14’ 10’1-3/4quot; 14’4-1/4quot; Heavy-Duty 10quot; 12’10quot; 13 1/4quot; 14’ 10’1-3/4quot; 14’4-1/4quot; Mid-Size 5-9/16quot; 15’10quot; 12quot; 17’ 12’10 3/4quot; 18’3quot; Mid-Size 6-5/8quot; 15’10quot; 12quot; 17’ 12’10 3/4quot; 18’3quot; Mid-Size 8quot; 15’10quot; 12quot; 17’ 12’10 3/4quot; 18’3quot; Tall 5-9/16quot; 23’ 6quot; 12quot; 21’ 17’2quot; 24’ 2-1/2quot; Tall 6-5/8quot; 23’ 6quot; 12quot; 21’ 17’2quot; 24’ 2-1/2quot; Tall 8quot; 23’ 6quot; 12quot; 21’ 17’2quot; 24’ 2-1/2quot; 3 Wheel Mobile 5-9/16quot; 13’ 4quot; 39quot; --- --- --- 3 Wheel Mobile 6-5/8quot; 13’ 4quot; 39quot; --- --- --- 3 Wheel Mobile 8quot; 13’ 4quot; 39quot; --- --- --- 4 Wheel Mobile 5-9/16quot; 14’ 6quot; 2’ 8quot; --- --- --- 4 Wheel Mobile 6-5/8quot; 14’ 6quot; 2’ 8quot; --- --- --- 4 Wheel Mobile 8quot; 14’ 6quot; 2’ 8quot; --- --- --- 2 Wheel Agri-Tow 6-5/8quot; 12’10quot; --- --- --- ---
- 4. Overhang Lengths Dimensions will vary due to tire size, terrain and erection procedures. All values are based on a quot;dryquot; system. Overhang Length A B C D 11' 14' 17'6quot; 11'5quot; 22' 25' 17'6quot; 11'5quot; 33' 36' 17'6quot; 11'5quot; 44' 47' 17'6quot; 11'5quot; 55' 58' 22' 11'4quot; 66' 69' 22' 11'4quot; 88' 91' 22' 11'4quot; ST85E End Gun 2'0quot; P100 End Gun 2'4quot; P100 w/Booster Pump 3'0quot; Overhang Length on a Z- A B C D Tech Span 11' 14' 17'6quot; 12'4quot; 22' 25' 17'6quot; 127quot; 33' 36' 17'6quot; 12'11quot; 44' 47' 17'6quot; 13'5quot; 55' 58' 22' 13’9quot; 66' 69' 22' 13’ 88' 91' 22' 14’5quot; ST85E End Gun 2'0quot; P100 End Gun 2'4quot; P100 w/Booster Pump 3'0quot; Overhang Lengths, Metric (Standard Pivot) Overhang Length A B C D 11' 4.27 5.33 3.48 22' 7.62 5.33 3.48 33' 10.97 5.33 3.48 44' 14.33 5.33 3.48 55' 17.68 6.71 66' 21.03 6.71 88' 27.74 6.71 ST85E End Gun 0.61 P100 End Gun 0.71 P100 w/Booster Pump 0.91
- 5. Span Weights Span Span Span Weight Shipping Weight Size Length/Ft Dry Wet 10quot; 113 3,909 7,593 To estimate the shipping weight of a 10quot; 135 4,129 8,529 machine, add 25 lbs. to each span selected for shipping containers and dunnage. 8quot; 8quot; 113 3,474 5,789 This will give the total span weight for a 8quot; 8quot; 135 3,741 6,506 machine with 11.2 tires. For a 44’ overhang, 8quot; 157 4,211 7,426 add 660 lbs. The actual shipping weight will 160 4,275 7,551 vary due to options ordered. See examples 168 4,303 7,645 below. 8quot; 179 4,442 8,109 8quot; 180 4,559 8,130 6 5/8quot; 135 3,545 5,419 6 5/8quot; 157 3,914 6,089 6 5/8quot; 160 3,951 6,167 6 5/8quot; 168 4,097 6,424 6 5/8quot; 179 4,477 6,959 6 5/8quot; 180 4,502 6,973 6 5/8” 186’8” 4,594 7,145 6 5/8quot; 201 4,747 7,530 6 5/8quot; Z-Tech 135 3,300 5,178 6 5/8quot; Z-Tech 157 3,618 5,797 6 5/8quot; Z-Tech 179 4,117 6,603 5 9/16quot; 135 3,145 4,459 5 9/16quot; 157 3,453 4,979 5 9/16quot; 160 3,494 5,050 5 9/16quot; 168 3,602 5,128 5 9/16quot; 179 3,751 5,489 5 9/16quot; 180 3,772 5,499 Examples: (Gen II Galvanized) 7 towers of which 3 towers are 179’ w/6-5/8quot; and 4 towers are 179’w/5-9/16quot; = Approx. 30,000 lbs. 10 towers of which 5 towers are 135’ w/6-5/8quot; and 5 towers are 135’ w/5-9/16quot; = Approx. 34,000 lbs. 18 towers of which 12 towers are 135’ w/8quot;, 3 towers are 135’ w/6-5/8quot; and 3 towers are 135’ w/5-9/16quot; = Approx. 57,000 lbs.
- 6. Component Weights (10 lbs/4.536 KG and Over) Part Number Description LB. KG. 03-0030-1 Head Weldment, Pivot 137.0 62.1 03-0070-7 Riser Weldment, Pivot 75.0 34.0 03-0106-9 Tie, Tower, 5th, Hi-Clearance, 41 1/2” 13.7 6.2 03-0110-1 Mount Weldment, Gearbox, Left 32.8 14.9 03-0120-0 Mount Weldment, Gearbox, Right 32.8 14.9 03-0129-1 Pipe, Polyethylene, 2-1/2 I.D. x 29’ 18.2 8.3 03-0337-0 Rod, Truss, Headed, 11/16” 28.0 12.7 03-0513-6 Tie, Tower, Stabilizer Attachment, 36-3/4” 11.9 5.4 03-0680-3 Joint, Pivot End, 8” w/Outlet 46.9 21.3 03-0682-9 Joint, Pivot End, 8”, Swivel, w/Outlet 26.8 12.2 03-0683-7 Joint, Tower End, 8”, w/Anchor 53.6 24.3 03-0685-2 Joint, Tower End, 8” x 6-5/8”, w/Anchor 48.9 22.2 03-0690-2 Joint, Pivot End, 6-5/8”, Swivel, w/Outlet 22.9 10.4 03-0692-8 Joint, Tower End, 6-5/8”, w/Anchor 47.8 21.7 03-0695-1 Joint, Tower End, 6-5/8” x 5-9/16”, w/Anchor 39.4 17.9 03-0699-3 Joint, Pivot End, 5-9/16”, w/Outlet 34.8 15.8 03-0702-5 Joint, Pivot End, 5-9/16”, Swivel, w/Outlet 17.2 7.8 03-0703-3 Joint, Tower End, 5-9/16”, w/Anchor 36.8 16.7 03-0706-6 Joint, Last Tower, w/Anchor 43.9 19.9 03-0728-0 Angle, Stabilizer, Second, 18’ 68.0 30.8 03-0758-7 Frame, Drive Tube, Solid Mount 185.0 83.9 03-0759-5 Frame, Drive Tube, Swivel Mount 162.0 73.5 03-0810-6 Tie, Pivot, 2nd From Bottom 14.7 6.7 03-0892-4 Angle, Mast, 66’/88’ Overhang, w/Anchor Joint 52.0 23.6 03-0893-2 Leg, Overhang, w/Anchor Joint, 84” 17.4 7.9 03-0920-3 Elbow Weld, Pivot, 6-5/8” 147.0 66.7 03-0954-2 Joint, Tower End, 10” 64.5 29.3 03-0962-5 Joint, Pivot End, Solid, 10” w/Outlet 52.5 23.8 03-0964-1 Joint, Tower End, 10” x 8”, Reduction 61.0 27.7 03-0979-9 Head Weldment, Pivot, 10” 132.0 59.9 03-0986-4 Riser Weldment, Pivot, 10” 95.0 43.1 03-1110-0 Brace, Truss Side, 51-1/2” 10.8 4.9 03-1280-1 Frame, Drive Tube, Low Profile 132.0 59.9 03-1282-7 Frame, Drive Tube, Hi-Clearance 270.0 122.5 03-2431-9 Leg, Pivot, 11’ 75.0 34.0 03-4184-2 Motor Assembly, 3/4 HP, 43 RPM 61.8 28.0
- 7. Part Number Description LB. KG. 03-4206-3 Head Weldment, Mobile Pivot 89.0 40.4 03-4225-3 Tongue Weldment, Mobile Pivot 100.0 45.4 03-4240-2 Brace, Leg, Mobile Pivot, 15’ 7” 89.0 40.4 03-4529-8 Caster Assy, Right, Mobile Pivot 124.5 56.5 03-4530-6 Caster Assy, Left, Mobile Pivot 123.0 55.8 03-4531-4 Caster Assy, Front, Mobile Pivot 128.4 58.2 03-4600-7 Leg, Heavy-Duty, Pivot, 11’ 110.0 49.9 03-4606-4 Brace, Lower, Riser, 61”, Mobile Pivot 12.5 5.7 03-4810-2 Generator Assy, 9 HP, TRI, 5 KW 804.0 364.7 03-4811-0 Generator Assy, 17 HP, TR 2, 10 KW 919.0 416.9 03-4812-8 Generator Assy, 23 HP, TS 3, 10 KW 978.0 443.6 03-4813-6 Generator Assy, 27 HP, TR 3, 12 KW 1035.0 469.5 03-4814-4 Generator Assy, 27 HP, TR 3, 15 KW 433.88 196.8 03-4840-9 Wheel Assy, 11.2 x 24, Right 120.0 54.4 03-4841-7 Wheel Assy, 11.2 x 24, Left 120.0 54.4 03-4842-5 Wheel Assy, 14.9 x 24, Right 156.0 70.8 03-4843-3 Wheel Assy, 14.9 x 24, Left 156.0 70.8 03-4844-1 Wheel Assy, 11 x 24.5, Recap, Right 170.0 77.1 03-4845-8 Wheel Assy, 11 x 24.5, Recap, Left 170.0 77.1 03-4853-2 Motor Assy, 1-1/2 HP, 86 RPM 74.5 33.8 03-4899-5 Ring Assy, Collector, 11 Wire 34.3 15.6 03-4984-5 Motor Assy, 1 HP, 30 RPM 72.8 33.0 03-5388-8 Tube Weldment, Horizontal 50.1 22.7 03-5389-6 Tube Weldment, Vertical 74.8 33.9 03-6707-8 Rod, Truss, Headed, 3/4”, Gr. 60 33.1 15.0 03-6709-4 Brace, Truss, 63-1/2” 13.2 6.0 03-6710-2 Brace, Truss, 81-1/4” 11.5 5.2 03-6711-0 Brace, Truss, 97-3/4” 13.6 6.2 03-6712-8 Brace, Truss, 101-3/4” 13.7 6.2 03-6714-4 Tie, Truss, 95-1/2” 10.3 4.7 03-6715-1 Tie, Truss, 123-1/2” 16.7 7.6 03-6716-9 Tie, Truss, 129-1/2” 13.7 6.2 03-6741-7 Leg, Tower, 11’ 65.3 29.6 03-6743-3 Angle, Stabilizer, 19’ 4-1/2” 75.0 34.0 03-6793-8 Coupler, 5-9/16”, Swivel Mount 29.4 13.3 03-6811-8 Coupler Weldment, 8”, Swivel Mount 56.8 25.8 03-6828-2 Elbow Weldment, Pivot, 5-9/16” 138.0 62.6 03-6837-3 Elbow Weldment, Pivot 8” 148.0 67.1
- 8. Part Number Description LB. KG. 03-6841-5 Leg, Tower, Low Profile, 83-1/4” 41.6 18.9 03-6917-3 Cable Electrical, 4#10, 6#14, 118.5’ 46.0 20.9 03-6918-1 Cable, Electrical, 4#10, 6#14, 140.5’ 53.8 24.4 03-6919-9 Cable, Electrical, 4#10, 6#14, 162.5’ 62.5 28.4 03-6920-7 Cable, Electrical, 4#10, 6#14, 184.5’ 70.7 32.1 03-6923-1 Cable, Electrical, 4#10, 6#14, 171’ 66.0 29.9 03-6924-9 Cable, Electrical, 4#10, 6#14, 193’ 73.3 33.2 03-6926-4 Cable, Electrical, 4#10, 6#14, 206.5’ 80.0 36.3 03-6927-2 Cable, Electrical, 4#12, 6#14, 118.5’ 38.5 17.5 03-6928-0 Cable, Electrical, 4#12, 6#14, 140.5’ 43.0 19.5 03-6929-8 Cable, Electrical, 4#12, 6#14, 162.5’ 50.0 22.7 03-6930-6 Cable, Electrical, 4#12, 6#14, 184.5’ 55.9 25.4 03-6933-0 Cable, Electrical, 4#12, 6#14, 171’ 52.0 23.6 03-6934-8 Cable, Electrical, 4#12, 6#14, 193’ 57.2 25.9 03-6936-3 Cable, Electrical, 4#12, 6#14, 206.5’ 62.0 28.1 03-6939-7 Tie, Pivot, Bottom, 92” 19.4 8.8 03-7162-5 Riser Weldment, Mobile Pivot 112.0 50.8 03-7164-1 Leg Weldment, Mobile Pivot 120.2 54.5 03-7293-8 Leg, Tower, Hi-Clearance, 15’ 7” 155.0 70.3 03-7959-4 Skid Weldment, Towable Pivot 60.0 27.2 03-7989-1 Ring Assy, Collector, 10 Wire 31.7 14.4 03-7990-9 Ring Assy, Collector, 10W, Mobile Pivot 34.3 15.6 03-8135-0 Cable, Electrical, 4#14, 6#18, 206.5 41.3 18.7 03-8137-6 Cable, Electrical, 4#14, 6#18, 193’ 38.6 17.5 03-8138-4 Cable, Electrical, 4#14, 6#18, 171’ 34.2 15.5 03-8141-8 Cable, Electrical, 4#14, 6#18, 184.5’ 38.7 17.6 03-8142-6 Cable, Electrical, 4#14, 6#18, 162.5’ 32.5 14.7 03-8143-4 Cable, Electrical, 4#14, 6#18, 140.5’ 28.1 12.7 03-8144-2 Cable, Electrical, 4#14, 6#18, 118.5’ 27.7 12.6 03-8164-0 Cable, Electrical, 4#14, 6#18, 206.5’, NS 31.0 14.1 03-8170-7 Cable, Electrical, 4#14, 6#18, 184.5’, NS 27.7 12.6 03-8171-5 Cable, Electrical, 4#14, 6#18, 162.5’ 24.4 11.1 03-8172-3 Cable, Electrical, 4#14, 6#18, 140.5’ 21.1 9.6 03-8173-1 Cable, Electrical, 4#14, 6#18, 118.5’ 17.8 8.1 03-8198-8 Pipe, Overhang, 4” x 22’, 90” Outlets 110.0 49.9 03-8209-3 Cable, Overhang, w/Pin, 82’ 5-1/2” 23.6 10.7 03-8210-1 Cable, Overhang, 1st Outboard, 43’ 14.2 6.4 03-8212-7 Cable, Overhang, 3rd Outboard, 85’ 3/4” 11.4 5.2
- 9. Part Number Description LB. KG. 03-8215-0 Cable, 66’/88’, w/Pin 15.0 6.8 03-8242-4 Pipe Weld, 36” x 6-5/8”, Span Ext. 34.4 15.6 03-8245-7 Pipe Weld, 36” x 5-9/16”, Span Ext. 23.0 10.4 03-8247-3 Pipe Weld, 36” x 8”, Span Ext. 42.0 19.1 04-0063-0 Strap, Pivot Riser 10.9 4.9 04-0691-8 Coupler, 6-5/8”, Swivel Mount 36.3 16.5 04-0716-3 Shaft, Drive, 7/8”, 59-1/4” 12.9 5.9 04-4227-7 Plate Weld, Front Caster 23.9 10.8 04-4466-1 Plate Weld, Rear Caster 25.1 11.4 04-4830-8 Extension, Frame 13.5 6.1 04-5205-2 Rod, Safety, Trip, 10’ Long 15.1 6.8 04-5206-0 Bracket, Safety, Trip, 52” Long 15.0 6.8 04-6029-5 Ring, 5-9/16” Alignment 12.5 5.7 04-6758-9 Ring, 6-5/8” Alignment 22.9 10.4 04-6814-0 Ring Weld, Octagon, 8” 35.7 16.2 04-7165-6 Bracket, Main Panel 16.9 7.7 06-2506-1 Pump, Booster, 130 GPM 63.6 28.8 06-3502-9 Pump, Booster, 200 GPM 133.3 60.5 06-4281-9 Pipe, Polyethylene, 2-1/2 I.D. x 40’ 25.2 11.4 10-0052-0 Panel, Control, Auto-Rev/Stop 10.3 4.7 10-0678-2 Pipe, Overhang, 5-9/16” x 11’ 75.0 34.0 10-4566-5 Hitch Weld, Towing 37.7 17.1 10-4571-5 Tongue Weld, Agri-Tow 24.4 11.1 10-5029-3 Sign, Zimmatic 19.2 8.7 10-5582-1 Brace, Diagonal, Tower, 52-3/8” 11.6 5.3 10-9008-3 Joint, End, Safety Rod Mount 11.8 5.4 10-9186-7 Pipe, Safety, 5-9/16” x 22’ 145.0 65.8 10-9194-1 Shield, Collector Ring, 10” 22.1 10.0 10-9195-8 Weld, Collector Ring, Support 11.2 5.1 10-9438-2 Hose, Flex, 3/4” I.D. 36.0 16.3 10-9689-0 Frame, Cover, Engine, Front 11.6 5.3 10-9690-8 Cover, Engine, Front 31.0 14.1 10-9693-2 Frame Weld, Rear, Generator Cover 18.9 8.6 10-9695-7 Cover, Generator, Rear 14.3 6.5 10-9745-0 Brace, Angle, Mobile Pivot, 70-1/4” 23.0 10.4 10-9808-6 Mount Weldment, 10” Collector Ring 12.0 5.4 10-9813-6 Angle, Stabilizer, Hi-Clearance, 20’ 8-1/4” 132.0 59.9 10-9814-4 Tie, Truss, 51-1/2” 15.4 7.0
- 10. Part Number Description LB. KG. 10-9815-1 Brace, Truss, 77-1/2”, R.H. 20.9 9.5 10-9816-9 Brace, Truss, 74-1/4”, L.H. 19.9 9.0 10-9817-7 Brace, Diagonal, Hi-Clearance, 57” 15.1 6.8 11-0037-9 Pipe Weldment, 12” x 6-5/8” Span Ext. 16.7 7.6 11-0062-7 Joint, Pivot End, 6-5/8”, w/Outlet 44.3 20.1 11-0169-0 Beam, Weldment, 4 Wheel Mobile Pivot 165.0 74.8 11-0170-8 Angle, Tie, 112”, 4 Wheel Mobile Pivot 70.0 31.8 11-0171-6 Angle, Tongue, 120”, 4 Wheel Mobile Pivot 62.0 28.1 11-0174-0 Tongue Weldment, 4 Wheel Mobile Pivot 13.0 5.9 11-0176-5 Angle, Crosstie, Tongue, 60” 31.0 14.1 11-0312-6 Assembly, 8”, Encoder Drive 13.1 5.9 11-0345-6 Assembly, 10”, Encoder Drive 16.2 7.3 11-0460-3 Cable Assy, 4 Wheel Mobile Pivot, 22’ 22.7 10.3 11-0814-1 Tube Weldment, Torque, 119-3/4” 77.0 34.9 11-0843-0 Winch Plate Weldment 14.7 6.7 11-0902-4 Anchor Weldment, Pivot, 10” 16.4 7.4 11-0984-2 Spindle Assembly, 4 WMP 52.1 23.6 11-0993-3 Wheel Assy, 16” x 8 Bolt, Recap 60.0 27.2 11-1226-7 Valve, 2” Aqua, 425 Nozzle 13.4 6.1 11-1736-5 Gearbox, Towable, Heavy-Duty 119.8 54.3 11-1789-4 Bar, Alignment, Non-Wire 14.9 6.8 11-2249-8 Riser, Internal, 10” 10.9 4.9 11-2250-6 Elbow Weld, 10”, Pivot 178.0 80.7 11-2251-4 Riser Weld, 10” 103.0 46.7 11-3326-3 Guard Weld, Crop, Rev-Tow 16.1 7.3 11-3648-0 Pipe, Half, 6-5/8”, 90” Outlets 205.0 93.0 11-3649-8 Pipe, Span, 6-5/8”, 90” Outlets 410.0 186.0 11-3650-6 Pipe, Half, 5-9/16”, 90” Outlets 150.0 68.0 11-3651-4 Pipe, Span, 5-9/16”, 90” Outlets 300.0 136.1 11-3654-8 Pipe Half, 8”, 90” Outlets 240.0 108.9 11-3655-5 Pipe, Span, 8”, 90” Outlets 480.0 217.7 11-3656-3 Pipe, Half, 10”, 90” Outlets 300.0 136.1 11-3657-1 Pipe, Span, 10”, 90” Outlets 595.0 269.9 11-3658-9 Pipe, 6-5/8” x 11’ Extension 125.0 56.7 11-3659-7 Pipe, 6-5/8” x 7’ 8” Extension 82.7 37.5 11-3816-3 Leg, Super-Hi Tower, 18’ 10-3/8” 188.0 85.3 11-3823-9 Tie, Tower, 5th, 36-7/8” 19.3 8.8 11-3826-2 Tie, Tower, 8th, 49-1/2” 10.2 4.6
- 11. Part Number Description LB. KG. 11-3827-0 Stabilizer, Tower, 138-1/16” 75.0 34.0 11-3828-8 Stabilizer, R., Reinforce, 68-13/16” 14.4 6.5 11-3829-6 Stabilizer, L., Reinforce, 66-1/16” 13.8 6.3 11-3830-4 Stabilizer, Right, 243-7/8” 126.0 57.2 11-3831-2 Stabilizer, Left, 243-7/8” 126.0 57.2 11-3839-5 Frame, Drive Tube, Super Hi-Clearance 305.0 138.3 11-3941-9 Shaft, Drive, 7/8”, 86-3/4” 18.8 8.5 11-3943-5 Shaft, Drive, 7/8”, 102-5/8” 22.4 10.2 11-4054-0 Stabilizer, Plate, Lower, Super Hi-Clearance 11.2 5.1 11-4055-7 Stabilizer, Plate, Upper, Super Hi-Clearance 27.8 12.6 11-4317-1 End Gun, Komet, 101 SL. RV, 18 Deg. 19.5 8.8 11-5491-3 Wheel Assy, 11 x 22.5 Recap, Right 175.0 79.4 11-5492-1 Wheel Assy, 11 x 22.5 Recap, Left 175.0 79.4 11-6133-0 Elbow, Pivot, 6-5/8”, Stainless Steel 124.0 56.2 11-6152-0 Elbow, 8” x 90 Deg., Stainless Steel 17.0 7.7 11-6157-9 Riser Weld, Pivot, Stainless Steel 72.0 33.0 11-7827-6 Panel, FieldBOSS, 480 Volt 105.0 47.6 11-7829-2 Panel, FieldBOSS, 380 Volt, CE 105.0 47.6 11-8391-0 Panel, FieldBASIC, 480 Volt 105.0 47.6 11-8393-0 Panel, FieldBASIC, 380 Volt, CE 105.0 47.6 11-8409-0 Gearbox, PowerDrive, Non-Tow 130.0 59.00 13-3057-0 Pipe, Half, 6-5/8”, 90” Outlets, .096 185.0 83.9 13-3058-0 Pipe, Span, 6-5/8”, 90” Outlets, .096 346.0 156.9 13-3059-0 Pipe, Half, 6-5/8”, 30” Outlets, .096 185.0 83.9 13-3060-0 Pipe, Span, 6-5/8”, 30” Outlets, .096 346.0 156.9 13-5725-0 Head Weldment, Pivot 129.3 58.7 14-1714-0 Track, Assembly, Turf 550 248.8 14-1715-0 Track, Assembly, Ag 10-Bar 550 248.8 66-2249-2 Elbow, Steel, 8” x 90 Deg. 16.9 7.7 88-4648-7 End Gun, Nelson, P150R 40.4 18.3 88-5265-9 End Gun, Nelson, SR100 27.6 12.5 88-5280-8 End Gun, Nelson, SRNV100 32.1 14.6
- 12. Structural Component Specifications Pivot (4 Leg) Optional Legs Ties 4quot; x 4quot; x 1/4quot; 4quot; x 4quot; x 3/8quot; Riser 2quot; x 2quot; x 3/16quot; Elbow 8quot; O.D. Tubing 8quot; O.D. Cast 10quot; Pivot (4 Leg) Legs 4quot; x 4quot; x 3/8quot; 2quot; Ties x 2quot; x 3/16quot; 10quot; Riser O.D. Tubing 10quot; Elbow O.D. Cast Towers Drive Tube 6-5/8quot; x 11 Ga. Tubing 13.0 Ft. Wheel Base Standard 8.6 Ft. Wheel Base Low Profile 17.7 Ft. Wheel Base High Profile Tower Legs 3quot; x 4quot; x 1/4quot; 4quot; x 4quot; x 3/8quot; Hi-Clearance Heavy-Duty 1-1/2quot; x Braces 1-1/2quot; x 1/8quot; (Standard Tower) 2quot; x 2quot; x 3/16quot; (Medium and High Clearance Tower) Spans Pipe 10quot; 10quot; O.D. x 11 Ga. (.107 Min.) 8quot; O.D. x 8quot; 11 Ga. (.107 Min.) 6-5/8quot; O.D. x 11 Ga. 6-5/8quot; 5-9/16quot; O.D. x 12 Ga. (.097 Min.) 5-9/16quot; 5-9/16quot; O.D. x 4 MM (International Only) 5-9/16quot; O.D. x 11 Ga. (International Only) Truss Braces 10quot;, 8quot;, 6-5/8quot;, 5-9/16quot; 2quot; x 2quot; x 3/16quot; Braces 2quot; x 2quot; x 1/8quot; Braces 1-1/2quot; x 1-1/2quot; x 1/8quot; Ties 2quot; x 2quot; x 1/8quot; 3rd Tie Truss Rods 10quot; - 135’ 8quot; - 3/4quot; Diameter, A572-Gr. 60 168’-179’ 3/4quot; Diameter, A572-Gr. 60 6-5/8quot; - 201’ 3/4quot; Diameter, A572-Gr. 60 10quot; - 113’ 11/16quot; Diameter, A572-Gr. 60 8quot; - 113’, 135’, 157’ 6-5/8quot; - 11/16quot; Diameter, A572-Gr. 60 113’, 135’, 157’, 179’ 11/16quot; Diameter, A572-Gr. 60 5-9/16quot;-113’, 135’, 157’, 179’, 201’ 11/16quot; Diameter, A572-Gr. 60
- 13. Z-Tech Structural Component Specifications Compact Pivot Point Legs 4quot; x 4quot; x 1/4quot; Ties 2quot; x 2quot; x 1/8quot; Riser 8quot; O.D. Tubing Elbow 8quot; O.D. Cast Z-Tech Spans Pipe 6-5/8quot; 6-5/8quot; O.D. x 12 Ga. (.097 Min.) Truss Braces 2quot; x 2quot; x 1/8quot; Braces Truss Ties 1-1/2quot; x 1-1/2quot; x 1/8quot; Truss Rods 11/16quot;, Grade 60 Recommended Torque Values for Cap Screws Grade 2 Grade 5 Grade 8 1/4” Coarse 5 ft. lbs. 8 ft. lbs. 12 ft. lbs. Fine 6 ft. lbs. 10 ft. lbs. 14 ft. lbs. 5/16” Coarse 11 ft. lbs. 17 ft. lbs. 24 ft. lbs. Fine 13 ft. lbs. 19 ft. lbs. 27 ft. lbs. 3/8” Coarse 18 ft. lbs. 31 ft. lbs. 44 ft. lbs. Fine 20 ft. lbs. 35 ft. lbs. 49 ft. lbs. 7/16” Coarse 28 ft. lbs. 49 ft. lbs. 70 ft. lbs. Fine 30 ft. lbs. 55 ft. lbs. 78 ft. lbs. 1/2” Coarse 39 ft. lbs. 75 ft. lbs. 105 ft. lbs. Fine 41 ft. lbs. 85 ft. lbs. 120 ft. lbs. 9/16” Coarse 51 ft. lbs. 110 ft. lbs. 155 ft. lbs. Fine 55 ft. lbs. 120 ft. lbs. 170 ft. lbs. 5/8” Coarse 83 ft. lbs. 150 ft. lbs. 210 ft. lbs. Fine 95 ft. lbs. 170 ft. lbs. 240 ft. lbs. 3/4” Coarse 105 ft. lbs. 270 ft. lbs. 375 ft. lbs. Fine 115 ft. lbs. 295 ft. lbs. 420 ft. lbs. 7/8” Coarse 160 ft. lbs. 395 ft. lbs. 605 ft. lbs. Fine 175 ft. lbs. 435 ft. lbs. 675 ft. lbs. 1” Coarse 235 ft. lbs. 590 ft. lbs. 910 ft. lbs. Fine 250 ft. lbs. 660 ft. lbs. 980 ft. lbs.
- 14. Section 1 - 4-Leg Pivot Alternate Concrete Pad for Towable Systems NOTE^ Local soil conditions must be considered before selecting pad. Pad with lf reduced concrete should not be used on light soils. Maximum System Length for this Pad is 1350’ to Last Wheel Track. PART NO. 3-1270-2 ANCHOR CHAIN 12 12quot; OF CHAIN ON TOP OF CONCRETE. 12' 6 10' 10quot;±2quot; 10' 10 ±2 12' 6quot; CENTER THE REINFORCEMENT ASSEMBLY INTO THE FOOTING. POSITION 2quot; DOWN FROM SURFACE. I 6quot; WIDE, 15quot; DEEP FOOTING BETWEEN CORNERS. 4 ' ' ..!; '■0,1 ' !' SECTION 3-B ; i 16 DIA. TYP r 15 3 Figure 1.7 SECTION A-A
- 15. Section 1 - 4-Leg Pivot Heavy Duty Non-Tow Pivot Assembly, 8”, 6-5/8”, 5-9/16” Heavy Duty Non-Tow Pivot Assembly, 8”, Stainless Steel NOTE: COAT THE PIVOT ELL WITH ON 8” STAINLESS STEEL PIVOTS, USE GREASE BEFORE INSTALLING THE 11-6157-9, RISER WELDMENT, PIVOT, PIVOT ELL INTO THE HEAD. AFTER STAINLESS STEEL, IN PLACE OF ITEM INSTALLING THE PIVOT ELL INTO THE PIVOT HEAD, PUMP ANOTHER #2. TUBE OF GREASE INTO THE PIVOT HEAD USING A TOTAL OF TWO TUBES OF GREASE. Ref. Part No. Description 1 3-0030-1 Head Weldment, Pivot 2 3-0070-7 Riser Weldment, Pivot 3 3-0810-6 Tie, Pivot, 2nd From Bottom 4 3-0830-4 Tie, Pivot, Top 5 3-1110-0 Brace, Truss Side, 51-1/2” 6 3-4600-7 Leg, Heavy Duty, Pivot 7 3-4772-4 Anchor Weldment, Pivot, Non-Tow 8 3-6939-7 Tie, Pivot Bottom, 92” 9 4-0063-0 Strap, Pivot Riser 10 4-4775-5 Washer, Rectangle, 15/16” x 2-1/2 x 3” 11 6-0804-2 Screw, 1/2-13 x 1-1/4”, Hex, Gr.5 12 6-0809-1 Screw, 3/4-10 x 2”, Hex, Gr.5 13 6-0839-8 Screw, 5/8-11 x 1-1/2”, Hex, Gr. 5 14 6-2416-3 Nut, 5/8-11, Lock 15 6-2417-1 Nut, 3/4-10, Lock
- 16. Ref. Part No. Description 16 6-2418-9 Nut, 1/2-13, Lock 17 11-0024-7 Nut, 7/8-9, Lock, Nylon Insert 18 11-0046-0 Decal, “Grease” 19 11-0470-2 Zerk, 5/16”, Drive-In 20 11-7827-6 Panel, FieldBOSS, 480 Volt 21 11-7829-2 Panel, FieldBOSS, 380 Volt, CE 22 11-8391-0 Panel, FieldBASIC, 480 Volt 23 11-8393-0 Panel, FieldBASIC, 380 Volt, CE 24 11-9461-0 Tie, Pivot, Panel Mount, Top 25 11-9462-0 Tie, Pivot, Panel Mount, Bottom 26 26-0760-4 Screw, 1/2-13 x 1-1/2”, Hex, Gr. 5 27 11-6157-9 Riser Weld., Pivot, Stainless Steel 28 13-3634-0 Panel, FieldVISION, 480V 29 13-5533-0 Panel, FieldVISION, 380V, CE
- 17. Section 1 - 4-Leg Pivot Non-Tow Pivot Assembly, 6-5/8”, 5-9/16”, Compact Pivot Non-Tow Pivot Assembly, 5-9/16”, Compact Pivot, Stainless Steel Ref. Original Description Ref. Original Description Part No. Part No. 1 3-0070-7 Riser, Pivot 18 10-3475-0 Panel, Mount, Top 2 6-0649-1 Tee, Pipe, 1/4” 19 11-3531-8 Tubing, Plas., 1/4”OD x.040” Wall 3 6-0652-5 Nipple Pipe, 1/4 x 2 20 11-7827-6 Panel, FieldBOSS, 480 Volt 4 6-0804-2 Screw, 1/2-13 x 1-1/4”, Hex, Gr. 5 21 11-7829-2 Panel, FieldBOSS, 380 Volt, CE 5 6-0809-1 Screw, 3/4-10 x 2”, Hex, Gr. 5 22 11-8391-0 Panel, FieldBASIC, 480V 6 6-0816-6 Washer, Lock, 3/4” 23 11-8393-0 Panel, FieldBASIC, 380 Volt, CE 7 6-0826-5 Nut, 3/4-10, Hex 24 13-3634-0 Panel, FieldVISION, 480V 8 6-0839-8 Screw, 5/8-11 x 1-1/2”, Hex, Gr. 5 25 13-5533-0 Panel, FieldVISION, 380V, CE 9 6-0840-6 Bolt, 1/4-20 x 2-1/2, J 26 13-5727-0 Leg, Pivot, 10’ 10 6-0841-4 Nut, 1/4-20, Hex 27 13-5859-0 Brace, Truss Side, 40-1/2” 11 6-0842-2 Washer, Flat, 1/4” 28 13-5860-0 Tie, Pivot, 2nd fm Bottom, 55-1/2” 12 6-0956-0 Connector, Hose, 1/4” x 1/4” MPT 29 13-5861-0 Tie, Truss, 70” 13 6-2159-9 Connector, Hose, 1/4” x 1/8” MPT 30 13-5725-0 Head Weldment, Pivot 14 6-2416-3 Nut, 5/8-11, Lock 31 13-5862-0 Strap, Pivot Riser 15 6-2418-9 Nut, 1/2-13, Lock 32 13-6473-0 Bracket, Panel Mount, Bottom 16 6-3343-8 Gauge, Pres., Liq-Filled, 0-160 33 26-0760-4 Screw, 1/2-13 x 1-1/2”, Hex, Gr. 5 17 6-4715-6 Gauge, Pres., Liq-Filled, 0-100 34 11-6157-9 Riser, Pivot, Stainless Steel Foot Options, Compact Pivot (Pivot Foot not interchangeable with Gen II standard pivot point) 84.5” Spacing bolt 78” Spacing bolt pattern pattern Chain Tie Down Option Ref. Part No. Description Ref. Part No. Description 1 6-0839-8 Screw, 5/8-11 x 1-1/2”, Hex, Gr. 5 6 6-2382-7 Hook, Eye Grab, 1/2” 2 6-2416-3 Nut, 5/8-11, Lock 7 13-5807-0 Anchor, Pivot, Non-Tow 3 4-2776-5 Bracket, Pivot Leg 8 13-9497-0 Angle, Bottom, Pivot 4 4-4775-5 Washer, Rectangle, 15/16” x 2-1/2 x 3” 9 13-9871-0 Anchor Weldment, Pivot 5 6-0011-4 Turnbuckle, 3/4 x 6 Clev.End,w/Pin
- 18. Section 1 - 4-Leg Pivot Single Panel Mounting NOTES: 1. THE TOP AND BOTTOM MOUNTING BRACKETS CAN BE USED TO MOUNT ANY 24quot; x 24quot; x 8quot;, OR 24quot; x 16quot; x 8quot; PANELS. 2.MOUNT THE TOP BRACKETS, ITEM #10, TO THE 3RD PIVOT TIE AND THE BOTTOM BRACKETS, ITEM #9, TO THE 2ND PIVOT TIE. LEAVE THE SCREWS LOOSE. 3.INSERT 2 EA. OF ITEM #4, 1/4-20 x 1quot; HEX SCREW INTO THE 2 WELD NUTS AT THE BOTTOM REAR OF THE ENCLOSURE AS SHOWN. THESE SCREWS WILL EXTEND OUT THE BOTTOM OF THE PANEL AND ALLOW THE BOTTOM BRACKET, ITEM #9, TO BOLT ON. FASTEN WITH ITEM #3, 1/4quot; LOCK WASHER AND ITEM #2, 1/4-20 NUT. 4. ATTACH THE TOP BRACKETS, ITEM #10 TO THE PANEL ENCLOSURE WITH 2 EA. ITEM #3, 1/4quot; LOCK WASHERS AND ITEM #5, 1/4-20 x 3/4quot; SCREWS. YOU CAN NOW TIGHTEN ALL FASTENERS. 5. PLUG THE 4 WELD NUTS IN THE LOWER FRONT OF THE PANEL WITH ITEM #6, 1/4-20 x 3/8quot; SCREWS. Ref. Part No. Description 1 Any 24” x 24” x 8” Panel 2 6-0841-4 Nut, 1/4-20, Hex 3 6-1510-4 Washer, Lock, 1/4” 4 6-3936-9 Screw, 1/4-20 x 1”, Hex, Gr. 5 5 10-2985-9 Screw, 1/4-20 x 3/4”, Hex, Gr. 5 6 11-3062-4 Screw, 1/4-20 x 3/8”, Hex, Type 23 7 11-9461-0 Tie, Pivot, Panel Mount, Top, 51 1/2” 8 11-9462-0 Tie, Pivot, Panel Mount, Bottom, 71 11/16” 9 11-9515-0 Bracket, Panel Mount, Lower 10 11-9516-0 Bracket, Panel Mount, Upper
- 19. Section 1 - 4-Leg Pivot Main Panel Accessibility NOTE: MAINTAIN A WORKING CLEARANCE IN FRONT OF MAIN PANEL. DISTANCES ARE MEASURED FROM THE ENCLOSURE FRONT. Figure 1.21 Pressure Switch Adjustment The pressure switch is located in the lower right corner of the main control panel. To adjust pressure switch, pressurize the system to its normal operating position. Then start the system with the Wet/Dry switch in Wet position. (End gun should be on if used.) Next slowly increase the pressure setting of the pressure
- 20. switch. Turn the knurled adjustment knob clockwise to increase the pressure. When the pressure switch setting becomes greater than the pivot pressure, the pivot will shut down. Turn the pressure adjustment knob counter clockwise to the desired low pressure shutdown setting. Figure 1.22 ADJUSTMENT KNOB
- 21. Section 1 - 4-Leg Pivot Elbow Assembly, 8”, 6-5/8”, 5-9/16” SEE REPAIR PARTS MISC. SECTION FOR ITEMS 1, 2 & 3. NOTE: COAT THE PIVOT ELL WITH GREASE BEFORE INSTALLING THE PIVOT ELL INTO THE HEAD. AFTER INSTALLING THE PIVOT ELL INTO THE PIVOT HEAD, PUMP ANOTHER TUBE OF GREASE INTO THE PIVOT HEAD USING A TOTAL OF TWO TUBES OF GREASE. Ref. Part No. Description 1 Coupler, 6-5/8”, Split 2 Coupler, 5-9/16”, Split 3 Coupler, 8”, Split 4 3-0030-1 Head Weldment, Pivot 5 4-0058-0 Bracket, Automatic Shutdown 6 3-0070-7 Riser Weldment, Pivot 7 3-0860-1 Bracket, Collector Ring Shield Holder 8 3-0920-3 Elbow Weldment, Pivot, 6-5/8” 9 3-4865-6 Band, Collector Ring 10 3-6828-2 Elbow Weldment, Pivot, 5-9/16” 11 3-6837-3 Elbow Weldment, Pivot, 8” 12 3-7989-1 Ring Assy, Collector 13 6-0120-3 Nut, 3/8-16, Hex 14 6-0200-3 Gasket, Collector Ring, Top 15 6-0210-2 Gasket, Collector Ring, Bottom 16 6-0794-5 Gasket, Deflector, 8” 17 6-0800-0 Screw, 5/16-18 x 3/8”, Hex 18 6-0804-2 Screw, 1/2-13 x 1-1/4”, Hex, Gr.5 19 6-0820-8 Washer, 1/2”, Rubber Seal 20 6-2418-9 Nut, 1/2-13, Lock 21 6-3091-3 Shield, Collector Ring 22 6-3658-9 Screw, 3/8-16 x 2-1/4”, Hex, Gr.5 23 9-0838-4 Connector, 3/4”, w/Nut 24 11-0046-0 Decal, “Grease” 25 11-0470-2 Zerk, 5/16”, Drive-In *26 11-3279-4 Ring, Shutdown Clamp 27 66-0640-4 Clamp, Ringlock, 8” Steel Coupler 28 66-1070-3 Gasket, Round Back 29 66-2249-2 Elbow, Steel, 8” x 90o 30 11-6659-4 Riser Weldment, 8” Mid-Size *NOTE: 11-3279-4 is required when pivot application requires auto-reverse or stop using kit #10-0233-6.
- 22. Section 1 - 4-Leg Pivot Elbow Assembly, 8”, 6-5/8”, Stainless Steel SEE REPAIR PARTS MISC. SECTION FOR ITEMS 1 & 2. NOTE: COAT THE PIVOT ELL WITH GREASE BEFORE INSTALLING THE PIVOT ELL INTO THE HEAD. AFTER INSTALLING THE PIVOT ELL INTO THE PIVOT HEAD, PUMP ANOTHER TUBE OF GREASE INTO THE PIVOT HEAD USING A TOTAL OF TWO TUBES OF GREASE. Ref. Part No. Description 1 Coupler, 6-5/8”, Split 2 Coupler, 8”, Split 3 3-0030-1 Head Weldment, Pivot 4 3-0860-1 Bracket, Collector Ring Shield Holder 5 3-4865-6 Band, Collector Ring 6 3-7989-1 Ring Assy, Collector 7 4-0058-0 Bracket, Automatic Shutdown 8 6-0120-3 Nut, 3/8-16, Hex 9 6-0200-3 Gasket, Collector Ring, Top 10 6-0210-2 Gasket, Collector Ring, Bottom 11 6-0794-5 Gasket, Deflector, 8” 12 6-0800-0 Screw, 5/16-18 x 3/8”, Hex 13 12-8163-0 Screw, 1/2-13 x 1-1/2”, Hex, S.S. 14 11-6141-3 Washer, 1/2”, Rubber Seal, S.S. 15 6-2418-9 Nut, 1/2-13, Lock 16 6-3091-3 Shield, Collector Ring 17 6-3658-9 Screw, 3/8-16 x 2-1/4”, Hex, Gr.5 18 9-0838-4 Connector, 3/4”, w/Nut 19 11-0046-0 Decal, “Grease” 20 11-0470-2 Zerk, 5/16”, Drive-In *21 11-3279-4 Ring, Shutdown Clamp 22 11-6133-0 Elbow Weldment, Pivot, 6-5/8” 23 11-6152-0 Elbow, Steel, 8” x 90o 24 11-6157-9 Riser Weldment, Pivot, Stainless Steel 25 11-6481-3 Elbow Weldment, Pivot, 8” 26 66-0640-4 Clamp, Ringlock, 8” Steel Coupler 27 66-1070-3 Gasket, Round Back *NOTE: 11-3279-4 is required when pivot application requires auto-reverse or stop using kit #10-0233-6.
- 23. Section 1 - 4-Leg Pivot Encoder Detail, Pivot, 8”, 6-5/8”, 5-9/16” (Elbow Section) Assembly Instructions, Encoder Drive (Not applicable to Mobile Pivot) Ref. Part No. Description 1. Install the pin gear in place of the shutdown 1 3-0030-1 Head Weldment, Pivot bracket with the pins up. Tighten bolts in 2 3-0070-7 Riser Weldment, Pivot slotted holes last to insure gear is concentric to 3 6-0794-5 Gasket, Deflector pivot elbow pipe. 4 6-0804-2 Screw, 1/2-13 x 1-1/4”, Hex, Gr. 5 NOTE: If holes do not line up, use a rat tail file 5 6-0820-8 Washer, 1/2”, Rubber Seal to increase the size of the holes in the pin gear 6 6-2221-7 Screw, 3/8-16 x 1”, Hex, Gr. 5 until bolts can be installed. 7 6-2418-9 Nut, 1/2-13 2.Assemble the encoder base to the mount weldment with the shoulder bolt provided in the kit. 8 6-4267-8 Nut, 1/4-20, Lock, Nylon Insert This hinged joint must pivot freely. A grease zerk 9 6-4364-3 Nut, 5/16”, Lock has been provided. Position the mount so solid 10 10-2985-9 Screw, 1/4-20 x 3/4”, Hex, Gr. 5 gear sits parallel with the pin gear and near the 11 11-0046-0 Decal, “Grease” middle of the pin length. 12 11-0334-0 Gear, Pin, 8” 3.Install the encoder panel on a pivot head leg 13 11-0470-2 Zerk, 5/16”, Drive-In gusset as shown. The appropriate leg gusset will 14 11-6015-9 Gear, 8”, 12 Gauge usually be the one which allows encoder panel to 15 11-6419-3 Screw, 5/8” x 3-1/2”, Socket Hd, Ptd. sit 90o to the main panel and away from the grease 16 11-6659-4 Riser Weldment, 8”, Mid-Size zerks in the head pipe. 17 12-9350-0 Mount, 8” Encoder 4.Make sure the gear will separate from contact with the pin gear by about 3/8” and the cover can 18 13-9490-0 Encoder Assy, Magnetic, Drive, be removed. If not, readjust. 19 66-1070-3 Gasket, Round Back
- 24. Section 1 - 4-Leg Pivot Collector Ring Mounting Slide the collector ring band (5) over the A. pivot head weldment (3), then slide the collector ring and shield assemblies (6) over the pivot head weldment. Proceed to lubricate and install the pivot B. elbow (1) as detailed in the Installation Manual. Loosen the nuts holding the collector ring C. brackets (12) and slide the brackets in so that they are flush against the tubing of the pivot head weldment (3), then re-tighten the nuts to hold the brackets (12) in this position. D. Raise the collector ring assembly making certain that the slot in the top bearing engages the drive pin on the underside of the top shield on the pivot elbow. Seat the collector ring firmly up against the shield. Slide the collector ring band (5) up around the collector ring brackets (12) and the pivot head weldment (3) as shown. Using the 3/8” screw (11) and the nut (7), clamp the collector ring (6) to the pivot head weldment (3). Slide the collector ring shield down and install the span cable. Slide collector ring shield up into position (insure gaskets are properly seated) and secure to pivot elbow with Items (9, 4). Route collector ring cable down the pivot and secure to structure with clamps provided. Connect cable in main control per Detail B and main panel terminal color code. Ref. Part No. Description 1 Elbow Weldment, Pivot 2 Cable, 1st Span 3 3-0030-1 Head Weldment, Pivot 4 3-0860-1 Bracket, Collector Ring Shield Holder 5 3-4865-6 Band, Collector Ring 6 3-7989-1 Ring Assy, Collector 7 6-0120-3 Nut, 3/8-16, Hex 8 6-0200-3 Gasket, Collector Ring, Top 9 6-0800-0 Screw, 5/16-18 x 3/8”, Hex 10 6-3091-3 Shield, Collector Ring 11 6-3658-9 Screw, 3/8-16 x 2 1/4”, Hex, Gr. 5 12 6-3866-8 Bracket, Collector Ring 13 6-3868-4 Spring, Brush, Collector Ring 14 9-0838-4 Connector, 3/4”, w/Nut 15 9-7610-0 Term Wire, C, 16-14, Spade 10, INS 16 9-7614-2 Term Wire, F, 10-12, Spade, 10, INS 17 9-9163-8 Brush, Collector Ring 18 9-9311-3 Term Wire, 22-18, Spade 10, INS #6 #7 #8 #9 #10 COLLECTOR RING YELLOW #1 BROWN #2 BLUE #3 RED #4 BLACK #5 COLOR CODE GREEN WHITE PURPLE ORANGE PINK TO CONNECT THE INCOMING 1ST SPAN CABLE TO THE COLLECTOR RING TERMINALS, SEE DETAIL quot;Aquot;. EACH COLLECTOR RING BRUSH SPRING (16) IS COLOR CODED WITH COLORED TAPE TO IDENTIFY WHICH SPAN CABLE CONDUCTOR IS TO BE TERMINATED THERE. TO TERMINATE, ATTACH A TERMINAL (15, 16 & 18) TO THE CONDUCTOR USING A PHILLIPS SCREW DRIVER. LOOSEN THE TERMINAL SCREW AND POSITION THE TERMINAL (15, 16 & 18) ATTACHED TO THE CONDUCTOR AS SHOWN AND TIGHTEN THE TERMINAL SCREW. TB2 MAIN #5 - PURPLE PANEL #9 - BROWN TERMINAL #10 - GREEN COLOR CODE #1 - PINK #2 - YELLOW #3 - ORANGE #4 - WHITE TB4 MAIN PANEL TERMINAL COLOR CODE #6 - BLACK #7
- 25. - RED #8 - BLUE
- 26. Section 1 - 4-Leg Pivot 10” Riser Assembly TO CONNECT THE INCOMING 1ST SPAN CABLE TO THE COLLECTOR RING TERMINALS, SEE DETAIL quot;Aquot;. EACH COLLECTOR RING BRUSH SPRING (16) IS COLOR CODED WITH COLORED TAPE TO IDENTIFY WHICH SPAN CABLE CONDUCTOR IS TO BE TERMINATED THERE. TO TERMINATE, ATTACH A TERMINAL (21, 22 & 25) TO THE CONDUCTOR USING A PHILLIPS SCREW DRIVER. LOOSEN THE TERMINAL SCREW AND POSITION THE TERMINAL (21, 22 & 25) ATTACHED TO THE CONDUCTOR AS SHOWN AND TIGHTEN THE TERMINAL SCREW. TB2 MAIN PANEL TERMINAL COLOR CODE Section 1 - 4-Leg Pivot Collector Ring Mounting
- 27. Figure 1.31 Ref. Part No. Description 1 6-0120-3 Nut, 3/8-16, Hex 2 6-0813-3 Washer, Lock, 3/8” 3 9-0838-4 Connector, 3/4”, w/Nut 4 10-7720-5 Bolt, 3/8-16 x 1-1/2” RHSN, Gr. 5 5 10-9657-7 Coupling, Pipe, Steel, 1” 6 10-9848-2 Rod, Threaded, 3/8-16 x 6” 7 11-1784-5 Flange, Wedgetite Seal 8 11-1785-2 Gasket, Wedgetite Seal 9 11-1787-8 Nut, Lock, 1”, NPT 10 11-2249-8 Riser, 10” 11 11-2251-4 Riser Weldment, 10” 12 86-0600-6 Bushing, Hex, 1” x 3/4”
- 28. Section 1 - 4-Leg Pivot Installation, Main Panel Ref. Part No. Description 1 Pivot Structure, Center 2 3-0070-7 Riser Weldment, Pivot 3 6-0649-1 Tee, Pipe, 1/4”
- 29. 4 6-0652-5 Nipple, Pipe, 1/4” x 2” 5 6-0841-4 Nut, 1/4-20, Hex 6 6-0956-0 Connector Hose, 1/4” x 1/4” 7 6-1510-4 Washer, Lock, 1/4” 8 6-3936-9 Screw, 1/4-20 x 1”, Hex, Gr. 5 9 6-2159-9 Connector Hose, 1/4” x 1/8” 10 6-4715-6 Gauge, Press, Liq-Fill, 0-100 PSI 11 11-2251-4 Riser Weldment, Pivot, 10” 12 11-3569-8 Gauge, Press, Liq-Fill, 0-30 PSI 13 11-7827-6 Panel, FieldBOSS, 480 Volt 14 11-7829-2 Panel, FieldBOSS, 480 Volt, CE 15 11-8335-7 Tubing, 1/4” O.D., Nylon, 6’ 16 11-8391-0 Panel, FieldBASIC, 480V 17 11-8393-0 Panel, FieldBASIC, 380 Volt, CE 18 11-9515-0 Bracket, Panel Mount, Lower 19 11-9516-0 Bracket, Panel Mount, Upper 20 13-3634-0 Panel, FieldVISION, 480V 21 13-5533-0 Panel, FieldVISION, 380V, CE
- 30. Panel Mounting and Feeder Circuit Installation Refer to the Panel Mounting Detail illustration above and pages 1-27 thru 29 for proper panel to pivot structure attachment. It is recommended that the panel be mounted to the side of the pivot structure where incoming feeder conductors will be supplied. For connection of the incoming feeder circuit, refer to the Underground Feeder Circuit Installation Diagram and the Feeder Circuit Wiring Diagram above. This irrigation system must be connected to a four-wire grounded electrical service. The feeder circuit installation and grounding for this irrigation system must be installed in accordance with the “National Electrical Code” and all applicable local codes.
- 31. Section 1 - 4-Leg Pivot Terminating the Grounding Electrode Conductor The bend radius of the grounding electrode wire should not be less than 8 inches. Ref. Part No. Description 1 9-9156-2 Nut, Conduit, 1/2”, Lock 2 11-2510-3 Connector, 1/2”, .12-.19 NOTE: The connector and nut are included in main panel hardware kits.
- 32. Section 1 - 4-Leg Pivot Transducer, Setra Ref. Part No. Description 1 06-0648-3 Elbow, Street, 1/4” x 90o, Galv. 2 06-2532-7 Clamp, Hose, Worm Drive, Sz. 12 3 09-0822-8 Tie, Cable, Plastic, 14-1/2” Long 4 11-4393-2 Nipple, Pipe, 1/4” x 2-1/2”, Galv. 5 11-5533-2 Filter, 1/4” Y-Line Str., 100 Mesh 6 14-2714-0 Transducer, 0-150 PSI, Setra 7 14-3760-0 Conduit, Liq, T, Non-metallic, 3/4” 8 14-3762-0 Connector, 3/4”x 90o, Liq, Tight
- 33. Section 3 - Spans Typical Installation with the Stabilizer Tie NOTE: Identification for Left and Right Stabilizer Ties: Side Identification: Center Pivot: At pivot point, looking toward end of machine, to your left side, mount L stabilizer tie, to your right side, mount R stabilizer tie (see Detail E). Lateral Systems: (Any free standing span) Looking toward end of machine, to your Left side, mount L stabilizer tie, to your Right side, mount R stabilizer tie. Ref. Part No. Description 1 3-0337-0 Rod, Truss, Headed, 11/16” 2 3-6707-8 Rod, Truss, Headed, 3/4”, Gr. 60 3 6-2418-9 Nut, 1/2-13, Lock 4 10-5892-4 Anchor, Rod, 2 Pc, w/o Holes 5 10-5893-2 Anchor, Rod, 2 Pc, w/Holes 6 10-5894-0 Screw, 1/2-13 x 2-1/4”, Hex, Gr. 5 7 26-0760-4 Screw, 1/2-13 x 1-1/2”, Hex, Gr. 5 8 6-0804-2 Screw, 1/2-13 x 1-1/4”, Hex, Gr. 5 Typical Installation at the Joints Figure 3.7 Ref. Part No. Description 1 6-2418-9 Nut, 1/2-13, Lock 2 10-5892-4 Anchor, Rod, 2 Pc, w/o Holes 3 10-5894-0 Screw, 1/2-13 x 2-1/4”, Hex, Gr. 5
- 34. Section 3 - Spans
- 35. Span Assembly (Pipe Identification)
- 36. Ref. Part No. Description 1 3-0913-8 Pipe, Half, 8”, 30” Outlets 2 3-0917-9 Pipe, Span, 8”, 30” Outlets 3 3-0949-2 Pipe, Span, 10”, 30” Outlets 4 3-0953-4 Pipe, Half, 10”, 30” Outlets 5 6-0795-2 Gasket, Flange, 8” 6 6-0803-4 Screw, 3/8-16 x 1-1/2”, Hex, Gr. 5 7 6-0807-5 Screw, 5/8-11 x 2”, Hex, Gr. 5 8 6-2416-3 Nut, 5/8-11, Lock 9 6-2418-9 Nut, 1/2-13, Lock 10 6-3285-1 Gasket, Flange, Zimmatic, 5-9/16” 11 6-3419-6 Nut, 3/8-16, Flange, Toplock 12 6-4486-4 Gasket, 6-5/8”, Pipe Flange 13 6-4697-6 Gasket, 10”, Pipe Flange 14 11-3355-2 Pipe, Half, 6-5/8”, 30” Outlets 15 11-3356-0 Pipe, Span, 6-5/8”, 30” Outlets 16 11-3648-0 Pipe, Half, 6-5/8”, 90” Outlets
- 37. Ref. Part No. Description 17 11-3649-8 Pipe, Span, 6-5/8”, 90” Outlets 18 11-3650-6 Pipe, Half, 5-9/16”, 90” Outlets 19 11-3651-4 Pipe, Span, 5-9/16”, 90” Outlets 20 11-3652-2 Pipe, Half, 5-9/16”, 30” Outlets 21 11-3653-0 Pipe, Span, 5-9/16”, 30” Outlets 22 11-3654-8 Pipe, Half, 8”, 90” Outlets 23 11-3655-5 Pipe, Span, 8”, 90” Outlets 24 11-3656-3 Pipe, Half, 10”, 90” Outlets 25 11-3657-1 Pipe, Span, 10”, 90” Outlets 26 11-7852-4 Pipe, Tower End, 10”, 30” Outlets 27 11-7853-2 Pipe, Tower End, 8”, 30” Outlets 28 12-3321-0 Pipe, Tower End, 8”, 90” Outlets 29 12-3322-0 Pipe, Tower End, 10”, 90” Outlets 30 26-0760-4 Screw, 1/2-13 x 1-1/2”, Hex, Gr. 5
- 38. CD O o 00 T3 C/>
- 39. Section 3 - Spans Span Assembly (Truss Assembly) Electrical Cable Lengths International Electrical Cable Lengths Span Lengths Cable Lengths (Non-Shielded Cable) 201’ 206.5 Part Number Span Lengths Cable Lengths 179’ 184.5 3-8164-0 201’ 206.5 157’ 162.5 3-8170-7 179’ 184.5 135’ 140.5 3-8171-5 157’ 162.5 113’ 118.5 3-8172-3 135’ 140.5 3-8173-1 113’ 118.5 Rod Diameter Length Pipe Diameter 5 9/16 6 5/8 8 10 113’ 11/16 11/16 11/16 11/16 135’ 11/16 11/16 11/16 3/4 157’ 11/16 11/16 11/16 179’ 11/16 11/16 3/4 201’ 3/4 Ref. Part No. Description 1 3-0337-0 Rod, Truss, Headed, 11/16” 2 3-0498-0 Plate, Truss Angle, 6-5/8” 3 3-0499-8 Plate, Truss Angle, 5-9/16” 4 3-0514-4 Plate, Truss Angle, 8” 5 3-1023-5 Plate, 10” Solid Truss 6 3-6707-8 Rod, Truss, Headed, 3/4”, Gr. 60 7 3-6709-4 Brace, Truss, 63-1/2” 8 3-6710-2 Brace, Truss, 81-1/4” 9 3-6711-0 Brace, Truss, 97-3/4” 10 3-6712-8 Brace, Truss, 101-3/4” 11 3-6713-6 Tie, Truss, 62-1/2” 12 3-6714-4 Tie, Truss, 95-1/2” 13 3-6715-1 Tie, Truss, 123-1/2” 14 3-6716-9 Tie, Truss, 129-1/2” 15 3-6917-3 Cable, Elec., 4#10, 6#14, 118.5’ 16 3-6918-1 Cable, Elec., 4#10, 6#14, 140.5’ 17 3-6919-9 Cable, Elec., 4#10, 6#14, 162.5’ 18 3-6920-7 Cable, Elec., 4#10, 6#14, 184.5’ 19 3-6926-4 Cable, Elec., 4#10, 6#14, 206.5’
- 40. Ref. Part No. Description 20 3-6927-2 Cable, Elec., 4#12, 6#14, 118.5’ 21 3-6928-0 Cable, Elec., 4#12, 6#14, 140.5’ 22 3-6929-8 Cable, Elec., 4#12, 6#14, 162.5’ 23 3-6930-6 Cable, Elec., 4#12, 6#14, 184.5’ 24 3-6936-3 Cable, Elec., 4#12, 6#14, 206.5’ 25 3-8135-0 Cable, Elec., 4#14, 6#18, 206.5’ 26 3-8141-8 Cable, Elec., 4#14, 6#18, 184.5’ 27 3-8142-6 Cable, Elec., 4#14, 6#18, 162.5’ 28 3-8143-4 Cable, Elec., 4#14, 6#18, 140.5’ 29 3-8144-2 Cable, Elec., 4#14, 6#18, 118.5’ 30 6-0804-2 Screw, 1/2-13 x 1-1/4”, Hex, Gr. 5 31 6-0839-8 Screw, 5/8-11 x 1-1/2”, Hex, Gr. 5 32 6-2418-9 Nut, 1/2-13, Lock 33 10-5892-4 Anchor, Rod, 2 Pc, w/o Holes 34 10-5893-2 Anchor, Rod, 2 Pc, w/Holes 35 10-5894-0 Screw, 1/2-13 x 2-1/4”, Hex, Gr. 5 36 11-4529-1 Nut, 1/2-13, Flange, Toplock 37 11-6927-5 Rod, Truss, 11/16”, Hot Dipped (Int’l Only) 38 11-6928-3 Rod,Truss,3/4”,Gr. 60,Hot Dipped(Int’l Only)
- 41. CO TJ a> MAKE SURE SPANS ARE NOT TILTED WHEN TIGHTENING BOLTS. IF THERE 3 > (A (A (D 3 TJ E 3 I. IS A TILT TO THE SPAN, LOOSEN BOLTS, LEVEL SPAN, AND RE-TIGHTEN BOLTS.
- 42. Section 3 - Spans Span Assembly (Pipe Identification) Ref. Part No. Description 1 3-0913-8 Pipe, Half, 8”, 30” Outlets 2 3-0917-9 Pipe, Span, 8”, 30” Outlets 3 3-8242-4 Pipe, 36” x 6-5/8”, Span Ext. 4 3-8245-7 Pipe, 36” x 5-9/16”, Span Ext. 5 3-8247-3 Pipe, 36” x 8”, Span Ext. 6 6-0795-2 Gasket, Flange, 8” 7 6-0803-4 Screw, 3/8-16 x 1-1/2”, Hex, Gr. 5
- 43. 8 6-0807-5 Screw, 5/8-11 x 2”, Hex, Gr. 5 9 6-2416-3 Nut, 5/8-11, Lock 10 6-2418-9 Nut, 1/2-13, Lock 11 6-3285-1 Gasket, Flange, Zimmatic, 5-9/16” 12 6-3419-6 Nut, 3/8-16, Flange, Toplock 13 6-4486-4 Gasket, 6-5/8”, Pipe Flange 14 11-0037-9 Pipe, 12” x 6-5/8” Span Ext. 15 11-0039-5 Pipe, 12” x 5-9/16” Span Ext. 16 11-3355-2 Pipe, Half, 6-5/8”, 30” Outlets 17 11-3356-0 Pipe, Span, 6-5/8”, 30” Outlets 18 11-3438-6 Pipe, 12” x 8” Span Ext.
- 44. Ref. Part No. Description 19 11-3648-0 Pipe, Half, 6-5/8”, 90” Outlets 20 11-3649-8 Pipe, Span, 6-5/8”, 90” Outlets 21 11-3650-6 Pipe, Half, 5-9/16”, 90” Outlets 22 11-3651-4 Pipe, Span, 5-9/16”, 90” Outlets 23 11-3652-2 Pipe, Half, 5-9/16”, 30” Outlets 24 11-3653-0 Pipe, Span, 5-9/16”, 30” Outlets 25 11-3654-8 Pipe, Half, 8”, 90” Outlets 26 11-3655-5 Pipe, Span, 8”, 90” Outlets 27 11-3658-9 Pipe, Extension, 6-5/8 x 11’ 28 11-3659-7 Pipe, Extension, 6-5/8 x 7’ 8” 29 11-3660-5 Pipe, Extension, 8” x 7’ 8” 30 11-3663-9 Pipe, Extension, 8” x 11’ 31 11-4776-8 Pipe, Extension, 5-9/16” x 7’8” 32 11-7853-2 Pipe, Tower End, 8”, 30” Outlets 33 11-8243-5 Pipe, Extension, 5-9/16” x 11’ 34 12-3321-0 Pipe, Tower End, 8”, 90” Outlets 35 26-0760-4 Screw, 1/2-13 x 1-1/2”, Hex, Gr. 5
- 46. Section 3 - Spans Span Assembly (Truss Assembly) Electrical Cable Lengths Span Lengths Cable Lengths 186’8” 193 180’ 184.5 168’ 184.5 160’ 171 Rod Diameter Length Pipe Diameter 5 9/16 6 5/8 8 10 160’ 11/16 11/16 168’ 11/16 3/4 180’ 11/16 11/16 3/4 186’8” 11/16 3/4 Ref. Part No. Description 1 3-0337-0 Rod, Truss, Headed, 11/16” 2 3-0498-0 Plate, Truss Angle, 6-5/8”, Sl. Hole 3 3-0499-8 Plate, Truss Angle, 5-9/16”, Sl. Hole 4 3-0514-4 Plate, Truss Angle, 8” 5 3-6707-8 Rod, Truss, Headed, 3/4”, Gr. 60 6 3-6709-4 Brace, Truss, 63-1/2” 7 3-6710-2 Brace, Truss, 81-1/4” 8 3-6711-0 Brace, Truss, 97-3/4” 9 3-6712-8 Brace, Truss, 101-3/4” 10 3-6713-6 Tie, Truss, 62-1/2” 11 3-6714-4 Tie, Truss, 95-1/2” 12 3-6715-1 Tie, Truss, 123-1/2” 13 3-6716-9 Tie, Truss, 129-1/2” 14 3-6923-1 Cable, Elec., 4#10, 6#14, 171’ Ref. Part No. Description 15 3-6924-9 Cable, Elec., 4#10, 6#14, 193’ 16 3-6930-6 Cable, Elec., 4#12, 6#14, 184.5’ 18 3-6934-8 Cable, Elec., 4#12, 6#14, 193’ 17 3-6933-0 Cable, Elec., 4#12, 6#14, 171’ 19 3-8137-6 Cable, Elec., 4#14, 6#18, 193’ 20 3-8138-4 Cable, Elec., 4#14, 6#18, 171’ 21 3-8141-8 Cable, Elec., 4#14, 6#18, 184’.5” 22 3-8249-9 Rod, Truss, Headed, 7/8” x 36” Ext. 23 6-0803-4 Screw, 3/8-16 x 1-1/2”, Hex, Gr. 5 24 6-0804-2 Screw, 1/2-13 x 1-1/4”, Hex, Gr. 5 25 6-0839-8 Screw, 5/8-11 x 1-1/2”, Hex, Gr. 5 26 6-2418-9 Nut, 1/2-13, Lock 27 10-5892-4 Anchor, Rod, 2 Pc, w/o Holes 28 10-5893-2 Anchor, Rod, 2 Pc, w/Holes 29 10-5894-0 Screw, 1/2-13 x 2-1/4”, Hex, Gr. 5 30 10-8277-5 Rod, Truss, Headed, 7/8” x 42-3/4” 31 10-8279-1 Rod, Truss, Headed, 7/8” x 63” 32 11-0041-1 Rod Weldment, Headed, 9-3/4” x 7/8” 33 11-4529-1 Nut, 1/2-13, Flange, Toplock
- 47. Section 4 - Joint Assemblies Joint Assembly, Solid, 6-5/8”
- 48. Ref. Part No. Description 1 3-0692-8 Joint, Tower End, 6-5/8”, w/Anchor 2 3-1320-5 Rod, Linkage Control 3 3-6760-7 Mount, Tower Panel 4 3-7986-7 Panel, Tower Control, Std, 10 Wire 5 3-7987-5 Panel, Tower Control, Next-Last, 10 Wire 6 4-6758-9 Ring, 6-5/8” Alignment 7 6-0240-9 Nut, 5/16-24, Hex 8 6-0262-3 Nut, 5/16-18, Lock, Nylon Insert 9 6-0470-2 Joint, Ball, Quick Disconnect 10 6-0802-6 Screw, 5/16-18 x 1”, Hex 11 6-0803-4 Screw, 3/8-16 x 1-1/2”, Hex, Gr. 5 12 6-0812-5 Washer, Lock, 5/16” 13 6-0822-4 Nut, 5/16-18, Hex 14 6-2417-1 Nut, 3/4-10, Lock
- 49. Ref. Part No. Description 15 6-3419-6 Nut, 3/8-16, Flange, Top Lock 16 6-3146-5 Screw, 5/16-18 x 1-1/2”, Hex, Gr. 5 17 6-3509-4 Plug, Drain, 20-75 PSI, Multi-Press.(Red) 18 6-4012-8 Screw, 3/4-10 x 2”, Hex, Gr. 5 19 6-4411-2 Joint, Adjuster, Ball Swivel 20 6-4490-6 Gasket, Boot, 6-5/8” 21 6-4491-4 Coupler, Half, Zimmatic, 6-5/8” 22 11-0062-7 Joint, Pivot End, 6-5/8”, w/Outlet 23 11-1244-0 Nut, 1/4-28, Lock, Nylon Insert 24 11-3324-8 Plug,Drain, 50-150 PSI, High-Press.(White) 25 11-3466-7 Plug, Drain, 5-30 PSI, Low-Press. (Black) 26 11-6098-5 Joint, Pivot End, 6-5/8”, Stainless Steel 27 11-6099-3 Joint, Tower End, 6-5/8”, w/Anchor, S.S. NOTE: Items 4 and 5, Panel, Tower Control, Std, 10 Wire, CE part number is 11-7326-9. Panel, Tower Control, Next-Last, 10 Wire, CE part number is 11-7327-7.
- 50. Ref. Part No. Description 1 6-1910-6 Screw, 3/8-16 x 2quot;, Hex, Gr. 5 2 6-2417-1 Nut, 3/4-10, Lock 3 6-3419-6 Nut, 3/8-16, Flange, Toplock 4 6-4010-2 Washer, Flat, 3/4quot; 5 10-1551-0 Anchor, Cable, Upper 6 10-1559-3 Arm Weldment, Wire Alignment 7 10-7621-5 Fulcrum Weldment, 5-9/16quot; 8 10-7619-9 Fulcrum Weldment, 6-5/8quot;-8quot;-10quot;
- 51. Section 5 - Alignment Wire Alignment, Cam Retainer
- 52. Figure 5.3 Installation Instructions 1.Remove right rear 5/16” mounting screw. 2.Insert cam retainer 12-1715-0. 3.Replace 5/16” screw. 4.When securing, make certain cam retainer arm points to center of cam as shown. NOTE^ Installation of cam retainer is an important safety feature. In case of wire <f alignment malfunction to cam arm, the presence of this retainer will ensure proper safety shutdown.
- 53. Section 5 - Alignment Tower Alignment Tower alignment can be accomplished in either forward (clockwise) or reverse (counter clockwise) direction. In the illustrations above the forward direction is indicated. With the machine running in the forward direction, sight a line from the first tower (motor 1) through tower three (motor 3) as shown. Motor 2 should start when it is in position 2A and stop in position 2B as shown in the first illustration. However, if tower two (motor 2) starts and stops too late as in the second illustration, adjust the control rod on tower two.
- 54. To move the tower to the right as would be required in this example, move the 5/16” adjustment nuts on the tower panel control rod to the right (the same direction as you wish to move the tower). It is recommended that two wrenches be used to break loose the adjustment nuts. Approximately four threads of movement will move the tower one motor width. After moving the nuts to the desired distance and direction, make certain that the nuts have been retightened against the swivel ball joint adjuster.
- 55. 6 Tower Assemblies Low Profile Tower NOTE: Before tightening the bolts which attach the tower legs to the drive tube, lower the tower assembly to the ground with only enough pressure to allow the camber (wheel tilt) to settle out of the drive train. This procedure allows the wheel assemblies to “straighten up” resulting in less pull on the pivot point. Figure 6.1 Ref. Part No. Description Ref. Part No. Description 1 3-1280-1 Frame, Drive Tube, Low Profile 12 6-0839-8 Screw, 5/8-11 x 1-1/2”, Hex, Gr. 5 2 3-6737-5 Cable, Electric, 4#14 x 14’ 13 6-2416-3 Nut, 5/8-11, Lock 3 3-6743-3 Angle, Stabilizer, 19’ 4-1/2” 14 6-2418-9 Nut, 1/2-13, Lock 4 3-6751-6 Clamp, Upper Half, 6-5/8” Leg 15 6-2515-2 Clip, Speed, “S” 5 3-6752-4 Clamp, Lower Half, 6-5/8” Leg 16 6-3590-4 Tube, Drive Shaft Cover 6 3-6753-2 Clamp, Upper Half, 5-9/16” Leg 17 6-4009-4 Washer, Flat, 5/8” 7 3-6754-0 Clamp, Lower Half, 5-9/16” Leg 18 6-3589-6 Bell, Drive Shaft End 8 3-6841-5 Leg, Tower, Low Profile 19 11-3942-7 Shaft, Drive, 7/8”, 35-1/8” 9 3-6843-1 Tie, Tower, Bottom, Low Profile 20 26-0760-4 Screw, 1/2-13 x 1-1/2”, Hex, Gr. 5 10 3-6844-9 Tie, Tower, Top 21 26-1091-3 Clamp, Hose, Worm Drive 11 6-0804-2 Screw, 1/2-13 x 1-1/4”, Hex, Gr. 5
- 56. Section 6 - Tower Assemblies
- 57. Tower Legs and Stabilizer Angles, 6-5/8” and 5-9/16” (cont’d.) NOTE: Identification for Left and Right Stabilizer Ties: Side Identification: Center Pivot: At pivot point, looking toward end of machine, to your left side, mount L stabilizer tie, to your right side, mount R stabilizer tie (see “Identification of Stabilizer Ties” drawings on page 6-8). Lateral Systems: (Any free standing span) Looking toward end of machine, to your Left side, mount L stabilizer tie, to your Right side, mount R stabilizer tie (see “Identification of Stabilizer Ties” drawings on page 6-8). Ref. Part No. Description 9 3-6749-0 Support, Stabilizer, 6-5/8” 1 3-0513-6 Tie, Tower, Stabilizer Attachment 10 3-6751-6 Clamp, Upper Half, 6-5/8” Leg 2 3-1190-2 Cable, Electric, 4#14 x 18’ 4” 11 3-6752-4 Clamp, Lower Half, 6-5/8” Leg 3 3-2344-4 Tie, Tower, Top, 44-3/8” 12 3-6753-2 Clamp, Upper Half, 5-9/16” Leg 4 3-2346-9 Tie, Tower, 2nd From Bottom, 25-1/4” 13 3-6754-0 Clamp, Lower Half, 5-9/16” Leg 5 3-2347-7 Tie, Tower, Bottom, 15-3/4” 6 3-6741-7 Leg, Tower, 11’ 7 3-6743-3 Angle, Stabilizer, 19’ 4-1/2” 8 3-6748-2 Support, Stabilizer, 5-9/16”
- 58. Ref. Part No. Description 14 4-0295-8 Tie, Stabilizer Angle, Left, 10-13/16” 15 4-0348-5 Tie, Stabilizer Angle, Right, 10-13/16” 16 6-0250-8 Washer, Flat, 3/8” 17 6-0804-2 Screw, 1/2-13 x 1-1/4”, Hex, Gr. 5 18 6-0818-2 Washer, Flat, 5/8” 19 6-0839-8 Screw, 5/8-11 x 1 1/2”, Hex, Gr. 5 20 6-2221-7 Screw, 3/8-16 x 1”, Hex, Gr. 5 21 6-2416-3 Nut, 5/8-11, Lock 22 6-2418-9 Nut, 1/2-13, Lock 23 6-2515-2 Clip, Speed, “S” 24 6-3419-6 Nut, 3/8-16, Flange, Toplock 25 26-0760-4 Screw, 1/2-13 x 1-1/2”, Hex, Gr. 5
- 59. Section 6 - Tower Assemblies Medium Clearance Tower, Non-Tow
- 60. Ref. Part No. Description 1 3-4649-4 Tie, Tower, 1st, 13-15/16” 2 3-4650-2 Tie, Tower, 2nd, 20-1/8” 3 3-3231-2 Cable, Electric, 4#14 x 27’ 4 3-6743-3 Angle, Stabilizer, 19’ 4-1/2” 5 6-0250-8 Washer, Flat, 3/8” 6 6-0804-2 Screw, 1/2-13 x 1-1/4”, Hex, Gr. 5 7 6-0839-8 Screw, 5/8-11 x 1-1/2”, Gr. 5 8 6-2221-7 Screw, 3/8-16 x 1”, Hex, Gr. 5 9 6-2416-3 Nut, 5/8-11, Lock 10 6-2418-9 Nut, 1/2-13, Lock 11 6-2515-2 Clip, Speed, “S” 12 6-3419-6 Nut, 3/8-16, Flange, Toplock 13 6-3423-8 Screw, 1/2-13 x 1-3/4”, Gr. 5
- 61. Ref. Part No. Description 14 6-3589-6 Bell, Drive Shaft End, 5-1/4” 15 6-4378-3 Bell, Drive Shaft End, 4-1/8” O.D. 16 11-0231-8 Shim, Stabilizer Angle 17 13-9168-0 Frame, Drive Tube, Med. Clear, Non-Tow 18 13-9171-0 Leg, Tower, 4 x 3, Medium Clearance 19 13-9172-0 Tie, Tower, 3rd, Med. Clear. , 26-3/4” 20 13-9173-0 Tie, Tower, 4th, Med. Clear. , 40-1/8” 21 13-9174-0 Shaft, Drive, 7/8”, 73-1/4” 22 13-9186-0 Tie, Tower, 5th, Med. Clear. , 41-1/2” 23 13-9217-0 Tube, Driveshaft, 1-1/2” x 68” 24 13-9431-0 Support, Stab., 6-5/8”/ 8”, Med.-Clear. 25 26-1091-3 Clamp, Hose, Worm Drive, Size #24
- 62. Section 6 - Tower Assemblies Tower Legs Attachment, 6-5/8”, 8” TOWER LEGS ATTACHMENT, 8quot; NOTE: Identification for Left and Right Stabilizer Ties: Side Identification: Center Pivot: At pivot point, looking toward end of machine to your left side, mount L stabilizer tie, to your right side, mount R stabilizer tie (see “Identification of Stabilizer Ties” drawings on page 6-8). Lateral Systems: (Any free standing span) Looking toward end of machine, to your left side, mount L stabilizer tie, to your right side, mount R stabilizer tie (see “Identification of Stabilizer Ties” drawings on page 6-8). Ref. Part No. Description Ref. Part No. Description 1 3-6751-6 Clamp, Upper Half, 6-5/8” Leg 7 6-0839-8 Screw, 5/8-11 x 1 1/2”, Hex, Gr. 5 2 3-6752-4 Clamp, Lower Half, 6-5/8” Leg 8 6-2416-3 Nut, 5/8-11, Lock 3 4-0295-8 Tie, Stabilizer Angle, Left, 10-13/16” 9 6-2418-9 Nut, 1/2-13, Lock 4 4-0348-5 Tie, Stabilizer Angle, Right, 10-13/16” 10 10-9813-6 Angle, Stabilizer, 20- 8 1/4” 5 6-0804-2 Screw, 1/2-13 x 1-1/4”, Hex, Gr. 5 11 26-0760-4 Screw, 1/2-13 x 1-1/2”, Hex, Gr. 5 6 6-0818-2 Washer, Flat, 5/8”
- 63. Section 6 - Tower Assemblies Identification of Stabilizer Ties LOOKING TOWARD END OF SYSTEM
- 64. 7 Drive Tube Assemblies Drive Tube Installation Capacity is one gallon per unit. Do not use any other weight and grade. There are two types of drive tubes, solid and swivel. Non-towable machines use solid mount drive tubes On the center drive gearmotors fill to the top of the oil and towable machines use swivel mount drive level/fill plug using one of the following ZIMMATIC tubes. Gear Oils: Gear Oil 20W GL-4(P/N 6-4767-7), Gear Oil 80W-90 GL-4(P/N 6-4765-1) or Gear Oil Bolt the tower legs to the drive tube with the motor 85W-140, GL-5(P/N 11-3131-7) depending upon mount bracket facing the last tower of the machine. operating conditions. Center drive gearmotors are NOTE: Do not tighten these bolts at this time! shipped with 20W GL-4 oil (.8 gallon per unit). On solid mount drive tubes, mount the gearbox to the drive tube and the tires to the gearbox. Note NOTE]) Total capacity per tower is lf that there are left and right tires. (See span approximately three gallons for both drawing). Next bolt the stabilizer angles to the gearboxes and motor. tower leg. On swivel drive tubes, fasten the gearbox mounts Non-Towable, 10-1250-9 (3/4”) and to the drive tube with the 1” pins. Mount the tires to the gearbox. Note that there are right and left tires. 10-0435-7 (7/8”) Towable, 11-4698-4 (See span drawing). Next bolt this assembly to the (7/8”) gearbox mount. [ NOTE]) Before tightening the bolts which ,f attach the tower legs to the drive tube, lower the tower assembly to the ground with only enough pressure to allow the camber (wheel tilt) to settle out of the drive train. This procedure allows the wheel assemblies to “straighten up” resulting in less pull on the pivot point. Next bolt on the tower ties and then tighten all bolts including those attaching the tower legs to the drive tube. Finally install the rest of the parts such as Center Drive and Gearbox Coupler motors, drive shafts, and guards, etc. Make certain that all bolts are tightened before moving to the next tower. Repeat this procedure for every tower. Figure 7.1 After the 3rd tower from end is raised, raise the last Install 3/8” pin in coupler insert prior to tower next and then go back and raise the second assembly. from last tower. This is to prevent any damage to the overhang pipe. Align wheels as shown in figure 7.20. NOTE^ When the non-towable coupler is lf installed Check all gearboxes for oil. If needed, fill to the top as shown with the of the worm drive gearboxes with ZIMMATIC gear indicated dimensions, the insert will oil 85W-140, GL-5(P/N 11-3131-7). be flush with the edge of the spline coupler.
- 65. Section 7 - Drive Tube Assemblies Installation Instructions, Towable Coupler, 11-4698-4 (Located at Final Drive Gearbox Only) Center Drive and Gearbox Coupler Figure 7.2 Assemble coupler, part number 11-4698-4 (7/8”). Do not tighten screws at this time (Figure 7.2). Install drive shaft bell washer part number 6-4590-3 on gearbox shaft and install coupler, 11-4698-4, on the gearbox using the hole closest to the end. Insert 3/8” screw through coupler and hole in gearbox shaft. (See Figure 7.3). NOTE^ Make certain that the coupler is installed so that the gearbox side of the insert quot; part number 11-4697-6 is correctly placed as shown in Figure 7.4. Tighten the four 1/4” screws and the 3/8” screw on the gearbox shaft to the proper torque settings.
- 66. Section 7 - Drive Tube Assemblies Figure 7.5 Assemble coupler half, 10-0435-7 (7/8”), as shown in Figure 7.5. Do not tighten screws at this time. NOTE^ Non-towable spline coupler, 10-0435-7, located at Center Drive only. Figure 7.6 Install coupler half on center drive shaft using second hole from end as shown. Insert 3/8” screw through coupler and center drive shaft. See Figure 7.6. NOTE^ Do not tighten screws at this time.
- 67. Section 7 - Drive Tube Assemblies Next insert one end of drive shaft into the coupler attached to the gearbox and slide on drive shaft cover and both end bells as shown in Figures 7.7 and 7.8. Assemble the right hand coupler half to the center drive coupler and drive shaft as shown in Figures 7.9 and 7.10.
- 68. Section 7 - Drive Tube Assemblies Tighten all remaining screws on gearbox shaft coupler and center drive coupler to 8 foot pounds of torque (1/4”bolt) and 31 foot pounds of torque (3/8” bolt). IMPORTANT NOTE: Prior to tightening coupler screws, make certain coupler arms are fully inserted onto center insert. See Figures 7.12 and 7.13 above.
- 69. Section 7 - Drive Tube Assemblies Slide both end bells out to the drive shaft bell washers and secure with worm drive clamp part number 26-1091-3. See Figures 7.14 and 7.15.
- 70. Section 7 - Drive Tube Assemblies Drive Tube Assembly - Non-Towable Figure 7.17 Ref. Part No. Description Ref. Part No. Description 1 3-0758-7 Frame, Drive Tube, Solid Mount 14 6-4378-3 Bell, Drive Shaft End, 4-1/8” 2 3-4184-2 Motor Assembly, 3/4 HP, 43 RPM 15 6-4442-7 Tube, Drive Shaft, 1-1/2” x 54” 3 3-4840-9 Wheel Assembly, 11.2 x 24”, Right 16 6-4590-3 Washer, Drive Shaft Bell 4 3-4841-7 Wheel Assembly, 11.2 x 24”, Left 17 10-0433-2 Insert, Drive Shaft Coupler 5 3-4842-5 Wheel Assembly, 14.9 x 24, Right 18 10-0435-7 Coupler, Kit, 7/8” Drive Shaft 6 3-4843-3 Wheel Assembly, 14.9 x 24, Left 19 10-1250-9 Coupler, Kit, 3/4” Drive Shaft 7 12-5327-0 Motor Assy, Lindsay CD, 1 HP, 59 RPM 20 10-1774-8 Shaft, Drive, 3/4”, 59-1/4” 8 3-4984-5 Motor Assembly, 1 HP, 30 RPM 21 11-5491-3 Wheel Assy, 11 x 22.5, R, Recap, Radial 9 4-0716-3 Shaft, Drive, 7/8”, 59-1/4” 22 11-5492-1 Wheel Assy, 11 x 22.5, L, Recap, Radial 10 6-3415-4 Screw, 3/8-16 x 1-1/4” Hex, Gr. 5 23 11-8409-0 Gearbox, PowerDrive, Non-Tow 11 6-0804-2 Screw, 1/2-13 x 1-1/4”, Hex, Gr. 5 24 26-1091-3 Clamp, Hose, Worm Drive 12 6-0814-1 Washer, Lock, 1/2” 25 6-3589-6 Bell, Drive Shaft End, 5-1/4” 13 6-3419-6 Nut, 3/8-16, Hex, Flange