Storyboard Final EDT 631
•Télécharger en tant que PPTX, PDF•
0 j'aime•431 vues

Storyboard Assignment: Create storyboard for final video tutorial project.

Recommandé
Contenu connexe
Tendances
Tendances (20)
En vedette
Similaire à Storyboard Final EDT 631
Similaire à Storyboard Final EDT 631 (20)
Dernier
Dernier (20)
Storyboard Final EDT 631
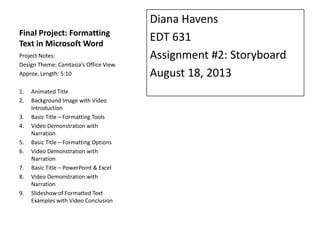
- 1. Final Project: Formatting Text in Microsoft Word Diana Havens EDT 631 Assignment #2: Storyboard August 18, 2013 Project Notes: Design Theme: Camtasia’s Office View. Approx. Length: 5:10 1. Animated Title 2. Background Image with Video Introduction 3. Basic Title – Formatting Tools 4. Video Demonstration with Narration 5. Basic Title – Formatting Options 6. Video Demonstration with Narration 7. Basic Title – PowerPoint & Excel 8. Video Demonstration with Narration 9. Slideshow of Formatted Text Examples with Video Conclusion
- 2. Title slide Transition In: Fade through black Audio: Camtasia – Blues Country Content: Office View – Animated Title, (screen capture shown on right). Transition Out: Fade through black
- 3. Introduction with Video Transition In: Fade through black Audio: No Background Audio Content: Video introduction over “formatting text” image (as shown on the right). Callouts: • Formatting Tools • Formatting Options • PowerPoint & Excel (shown at *, **, & *** in the transcript) Narration: See Transcript Transition Out : Fade through black Transcript: Hello, everyone. I want to talk to you about formatting text in your documents. Formatted text will make your documents look more professional and polished. In this digital age, this is extremely important. If you’re a student – you will need to know how to format your text and you’ll probably be given specific requirements from your instructor. Looking for a job? You need a professional resume with well-formatted text. In this video we will look at Microsoft Word. I’m going to show you where to find all your *formatting tools, the different **formatting options you have, and, briefly, formatting in **PowerPoint & Excel. Let’s get started.
- 4. Formatting Tools Transition In: Fade through black Audio: Camtasia – Blues Country Content: Office View – Basic Title Transition Out: Fade through black
- 5. Formatting Tools Transition In: Fade through black Audio: No background audio Content: Video capture of software demonstration (screen capture pictured on right). Pan/Zoom: Zoom in for details during demonstration. Narration: See Transcript Transition Out: Fade through Black Transcript: Before we get started formatting , I want to show you how to access the formatting tools. When you open a new document, the default tab you start with is the Home tab. On this tab you can find all your text formatting tools. You have tools here for the clipboard, font, paragraphs, and styles. I want you to notice that when you hover over these buttons it displays some information. For example, the bold button, shows you the keyboard shortcut which is another way to format text. The keyboard shortcut for Bold is ctrl + b, which means on your keyboard you hold down the control button while pressing b. Also, in the bottom of these groups is this little box, if you click on this it opens up a dialogue box with all your options for that section. Another way to format text is to right click and bring up the formatting menu. Finally, you can use the Styles group to apply predefined formatting to your selected text.
- 6. Formatting Tools Transition In: Fade through black Audio: Camtasia – Blues Country Content: Office View – Basic Title Transition Out: Fade through black
- 7. Formatting Options Transition In: Fade through black Audio: No background audio Content: Video capture of software demonstration (screen capture pictured on right). Pan/Zoom: Zoom in for details during demonstration. Narration: See Transcript Transition Out: Fade through Black Transcript: So now let’s take a look at the different options you have for formatting text. In this group you have the options to change the font type, size, and color. You can also make the text bold, use italics, and underline. There are also some other special effects and highlighting options that can be applied. To use one of these options, simply highlight the text you want to change and then press the formatting button that you want to use. You can also select your formatting without selecting any text and begin typing. Don’t worry if you apply formatting and you don’t like it. You can always hit undo to go back a step (or more), or you can select the text and click on this eraser button to remove the formatting. Moving on to the Paragraph group, here you have all your formatting tools that you would use for the whole paragraph. These include bullet points, numbered lists, alignment, and line spacing. Line spacing is really important in text formatting. This helps you break up your text so that it is not too close together and helps separate different sections more clearly. Again, you can access the line spacing formatting by clicking on this button, or open up the dialogue box for more options.
- 8. Formatting Tools Transition In: Fade through black Audio: Camtasia – Blues Country Content: Office View – Basic Title Transition Out: Fade through black
- 9. PowerPoint & Excel Transition In: Fade through black Audio: No background audio Content: Video capture of software demonstration (screen capture pictured on right). Pan/Zoom: Zoom in for details during demonstration. Narration: See Transcript Transition Out: Fade through Black Transcript: One of the great things about Microsoft Office is that it is easy to work in different programs. You’ll notice that Word, Excel and PowerPoint all have similar looking Home tabs. There are some groups that are program specific. For example, on the Excel Home tab there is a Cells group and on the PowerPoint Home tab there is a Slides group and you won’t find these groups on the Word home tab. However, all three programs have a Clipboard group, Font group, and Word and PowerPoint have a Paragraph group while Excel has an Alignment group that has some of the same options as the Paragraph group. These similarities mean that you’ll be able to apply what you’ve learned about text formatting in Microsoft Word when you use different programs in Microsoft Office.
- 10. End Slide Transition In: Fade through Black Audio: Camtasia – Blues Country (background - low) Content: Video conclusion next to slideshow of formatted text examples (as pictured on right). Narration: See Transcript Transition Out: Fade through Black Transcript: As you can see, there are a lot of different formatting options to choose from. Just remember, to produce a professional and polished looking document, keep your formatting easy to read and consistent. I recommend that you spend some time exploring all the different formatting options available to you. The more you practice and explore the formatting tools, the more comfortable you’ll get using them. So get out there, start practicing, be creative, and explore all that Word and Microsoft Office have to offer for formatting text. Thanks for watching and good luck!