Seal of Good Local Governance (SGLG) 2024Final.pptx
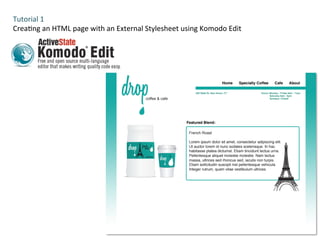
Tutorial1
1. Tutorial
1
Crea-ng
an
HTML
page
with
an
External
Stylesheet
using
Komodo
Edit
2. Step
1A:
You
MUST
have
access
to
the
folder
called
“dropsite”
which
I
have
provided.
Please
put
the
folder
on
your
external
drive.
Within
the
“dropsite”
folder,
there
should
be
another
folder
called
“img”.
Wi-n
the
“img”
folder
there
should
be
4
images:
bkg.gif
coffee.gif
logo.gif
tower.png
3. Step
1:
Open
Firefox
or
Safari
and
go
to:
hRp://www.ac-vestate.com/komodo-‐edit
Click
“Download
Komodo
Edit”
4. Step
2:
When
the
Komodo
Edit
dialogue
box
appears
double-‐click
the
Komodo
Edit
logo.
DO
NOT
aRempt
to
drag
Komodo
Edit
into
the
Applica-ons
folder.
When
the
next
dialogue
box
appears
click
“OPEN”
5. Step
3:
From
the
menu
select:
FILE
>
NEW
>
File
From
Template…
Step
4:
Select
“All
Languages”
folder
under
Categories.
Select
“HTML”
under
Templates
Click
“OPEN”
6. Your
page
should
look
like
this.
Step
5:
1.
Select:
FILE
>
SAVE
AS…
from
the
menu
2.
Save
your
file
as
index.html
in
the
folder
“dropsite”.
It
MUST
be
one
level
UP
from
the
“img”
folder.
Click
Save.
1
2
7. Step
6:
Again,
from
the
menu
select:
FILE
>
NEW
>
File
From
Template…
Step
7:
Select
“All
Languages”
folder
under
Categories.
Select
“CSS”
under
Templates
Click
“OPEN”
8. Step
8:
1.
Select:
FILE
>
SAVE
AS…
from
the
menu
2.
Save
your
file
as
styles.css
and
save
the
file
to
“dropsite”,
which
is
the
same
folder
you
saved
the
index.html
file.
Click
Save.
You
should
now
have
two
tabs
in
Komodo.
One
with
index.html
and
one
with
styles.css.
1
2
9. Step
9:
Make
sure
you
are
on
the
tab
for
index.html
1.
Click
on
the
Globe
icon,
this
is
the
Preview
op-on.
2.
A
dialogue
box
will
appear,
Select:
“Preview
with
this
file.”
Under
Preview
Using
field,
select
“In
a
Komodo
Tab”
This
will
give
you
a
preview
of
your
document
within
Komodo.
1
2
Step
10:
Between
the
<body>
and
</body>
tags
type:
<span>Hello
world!</span>
Next,
select
File
>
Save
from
the
menu
or
use
the
shortcut:
Command
⌘
S
to
SAVE.
Your
preview
screen
should
refresh
to
reflect
this
change.
10. Step
11:
Now,
let’s
put
the
<span>
we
created
within
a
<div>
with
an
id
of
“content”.
Between
the
<body>
and
<span>
type:
<div
id="content">
Aier
the
</span>
make
sure
to
close
your
div
using
</div>
Then,
select
File
>
Save
from
the
menu
or
use
the
shortcut:
Command
⌘
S
to
SAVE.
11. Step
12:
Between
the
<head>
tags
type:
<link
rel="stylesheet"
type="text/css"
href="styles.css"
/>
You
have
just
“linked”
the
stylesheet
file
we
created,
“styles.css”
with
this
HTML
page.
Now
the
styles
that
we
define
in
styles.css
will
apply
to
the
elements
we
create
in
this
HTML
page.
Don’t
forget
to
save
the
file
to
apply
this
change.
12. Step
13:
Go
to
the
styles.css
tab
and
type:
body{
font-‐family:
Arial,
sans-‐serif;
}
Save
the
file
to
apply
this
change.
So
far
we
have:
-‐
Created
our
HTML
document
and
our
CSS
document.
-‐
WriRen
our
first
bits
of
code
in
the
HTML
document.
-‐
Linked
the
HTML
document
to
our
CSS
document.
-‐
WriRen
our
first
CSS
selector
and
declara-on
in
our
CSS
document.
Now
that
we
are
a
bit
more
familiar
with
using
Komodo,
let’s
pick
up
the
pace
a
bit!
14. Before
we
con-nue,
let’s
break
it
down
into
divs:
body
coffee
logo
info
coffeeInfo
tower
featureTxt
infoLei
infoRight
nav
menu
content
15. Step
14:
Let’s
con-nue
with
the
body
selector
in
styles.css.
Type
the
following:
body{
height:
100%;
background:
#FFF
url(‘img/bkg.gif’)
repeat-‐x;
margin:
auto;
font-‐family:
Arial,
sans-‐serif;
}
Save
the
file
to
apply
this
change.
What
do
the
values
in
the
‘background’
property
mean?
#FFF
=
the
background
color
is
white
(#FFFFFF)
url(‘img/bkg.gif’)
=
use
bkg.gif
found
in
the
file
directory
“img”
as
a
background
image
repeat-‐x
=
repeat
the
image
horizontally
(x
axis)
TIP:
margin:
auto;
is
usually
a
good
way
to
prevent
a
gap
between
the
site
content
and
the
very
top
of
the
page.
16. Step
15:
Go
to
the
index.html
tab
Erase
<span>Hello
world!</span>
and
type
the
following
in
the
“content”
div:
<div
id="content">
<div
id="logo">
<img
src="img/logo.gif"/>
</div>
</div>
Save
the
file
to
apply
this
change.
This
means
that
we
put
the
image
logo.gif
within
its
own
div
named
“logo”.
17. Step
16:
Go
to
the
styles.css
tab.
We
are
now
going
to
style
the
content
div.
Remember,
we
can
customize
our
own
selectors
by
using
ID
or
CLASS.
The
ID
selector
is
used
to
specify
a
style
for
a
single,
unique
element.
The
ID
selector
uses
the
id
aRribute
of
the
HTML
element
(id=“example”)
and
is
defined
with
the
#
sign.
Type
the
following:
#content{
display:
block;
background-‐color:
#FFF;
width:
900px;
height:
760px;
margin:
auto;
}
Save
the
file
to
apply
this
change.
18. Step
17:
Go
to
the
index.html
tab
Now
let’s
create
the
“coffee”
div
with
the
coffee.gif
image.
Aier
the
closing
</div>
for
the
“logo”
div,
type
the
following:
<div
id="coffee">
<img
src="img/coffee.gif"/>
</div>
Save
the
file
to
apply
this
change.
19. Step
18
(example
images
on
next
page):
S-ll
in
the
index.html
tab
Create
the
“coffeeInfo”
div
aier
the
coffee
div.
<div
id="coffeeInfo">
French
Roast<br/>
Lorem
ipsum
dolor
sit
amet,
consectetur
adipiscing
elit.
Ut
auctor
lorem
id
nunc
sodales
scelerisque.
In
hac
habitasse
platea
dictumst.
Etiam
tincidunt
lectus
urna.
Pellentesque
aliquet
molestie
molestie.
Nam
lectus
massa,
ultrices
sed
rhoncus
sed,
iaculis
non
turpis.
Etiam
sollicitudin
suscipit
nisl
pellentesque
vehicula.
Integer
rutrum,
quam
vitae
vestibulum
ultrices.
</div>
Save
the
file
to
apply
this
change.
Tip:
You
can
get
Lorem
Ipsum
placeholder
text
by
going
to
:
www.lipsum.com
20. Tip:
HTML
comments
are
a
great
way
to
keep
track
of
which
div
you
are
in.
Use:
<!-‐-‐
to
open
a
comment
And:
-‐-‐>
to
close
a
comment
<!-‐-‐
example
-‐-‐>
Remember,
text
that
is
within
the
open
&
closing
comment
tags
WILL
NOT
show
up
on
your
webpage.
It
is
best
prac-ce
to
use
comments
for
your
closing
tag,
because
the
opening
tag
usually
is
described
by
the
class
or
id.
21. Step
19:
Go
to
the
styles.css
tab
Now
we’re
going
to
style
#coffeeInfo:
#coffeeInfo{
height:
226px;
width:
448px;
border:
3px
#13A8A2
solid;
padding:
12px
80px
12px
12px;
float:
right;
}
Save
the
file
to
apply
this
change.
Step
20:
Now
we’re
going
to
style
#logo:
#logo{
width:
240px;
height:
200px;
display:
block;
}
Save
the
file
to
apply
this
change.
22. Step
21:
Style
#coffee:
#coffee{
display:
block;
width:
283px;
height:
270px;
float:
left;
}
Save
the
file
to
apply
this
change.
Now,
#coffee
and
#coffeeInfo
should
be
next
to
each
other.
23. Step
22:
Let’s
fix
#coffeeInfo
to
look
more
like
the
finished
design.
Add
the
following
to
#coffeeInfo:
-‐webkit-‐border-‐radius:
5px;
border-‐radius:
5px;
margin-‐right:
20px;
Save
the
file
to
apply
this
change.