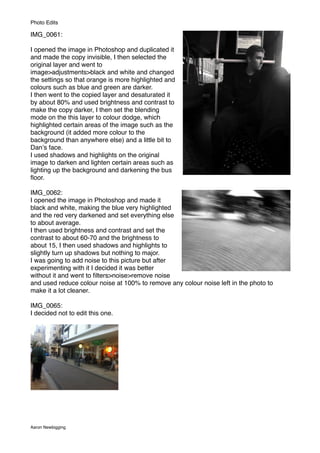
1. IMG_0061:
I opened the image in Photoshop and duplicated it
and made the copy invisible, I then selected the
original layer and went to
image>adjustments>black and white and changed
the settings so that orange is more highlighted and
colours such as blue and green are darker.
I then went to the copied layer and desaturated it
by about 80% and used brightness and contrast to
make the copy darker, I then set the blending
mode on the this layer to colour dodge, which
highlighted certain areas of the image such as the
background (it added more colour to the
background than anywhere else) and a little bit to
Danʼs face.
I used shadows and highlights on the original
image to darken and lighten certain areas such as
lighting up the background and darkening the bus
floor.
IMG_0062:
I opened the image in Photoshop and made it
black and white, making the blue very highlighted
and the red very darkened and set everything else
to about average.
I then used brightness and contrast and set the
contrast to about 60-70 and the brightness to
about 15, I then used shadows and highlights to
slightly turn up shadows but nothing to major.
I was going to add noise to this picture but after
experimenting with it I decided it was better
without it and went to filters>noise>remove noise
and used reduce colour noise at 100% to remove any colour noise left in the photo to
make it a lot cleaner.
IMG_0065:
I decided not to edit this one.
Photo Edits
Aaron Newbigging
2. IMG_0066:
I used the quick selection tool and selected all the
area around the blue bags and used refine edge
to make my selection neater, I then made this
area around the bin bags black and white, I then
deselected the area to carry on editing the photo
since if I added more contrast to a certain area it
might look strange when finished.
I then used Brightness and Contrast to make the
image a little more darker and add a little bit of
contrast to it.
IMG_0162:
This image I also did very little editing too, I
opened it into Photoshop and went to ʻBlack and
Whiteʼ, with Reds at -103 Yellows at 168 Greens
at 144 Cyans -68 Blues -68 Magentas at -200.
This brought out more details in the ground and
made the image look a lot better.
This also got rid of the greenish glow around the
object which makes it looks more professional.
IMG_0106:
I decided not to edit this one
IMG_0109:
The first thing I did on this image was open
Shadows and Highlights and turn the highlights
down a lot, this was so I could get more finger
details on the gravestone and the tree in the
background, I didnʼt increase the shadows
though since I didnʼt think they needed to be
changed, I then went to brightness and contrast
and added some more contrast and then the
edit was pretty much done.
Photo Edits
Aaron Newbigging
3. To finish I went to image>adjustments>curves and tweaked the settings on that just a little
bit to make the gravestone more highlighted than its background.
IMG_0129:
For this image I did 2 edits since I couldnʼt decide whether or not I should have it in black
or white so I decided to do make to edits and then compare them together.
Edit 1:
First I cropped the image so useless
background (negative space) was gone, I
used brightness and contrast and turned the
contrast up to about 45 and the brightness to
about 5 or 10, I then went to curves and
clicked the arrow next to RGB and selected
green and moved the curve up slightly making
the green more prominent, I also went to
colour balance to make the colours a bit more
balanced and green more highlighted.
I used shadows and highlights and turned
highlights down a bit and shadow up a bit,
since adding more contrast had made the
image a bit darker so I did this to correct it.
Edit2:
This is pretty much the same as the last edit
but I added a bit more brightness and
contrast and went to
image>adjustments>black and white, I set
everything to 100 then made the green about
250 to make the the green stand out a lot
more to the rest of the image.
After comparing the two edits I decided I
preferred the second edit over the first since it
fits in with the theme or graveyards.
IMG_0145:
This is one of my favorite pictures which I have taken, I really liked how the sky gets lighter
as it goes down and darker at the top and the contrast in this picture.
I made this black and white and made it so green was darker than the rest which gives it a
real gothic-horror feel.
The top right of the image was slightly over exposed so I used ʻcurvesʼ and shadows and
highlights to bring down the over exposed
area.
I didnʼt feel the I needed to do much work to
this since it was a great picture to start with,
but I prefer my edited version in black and
white, it looks like an old photo of a graveyard
which fits in with the theme pretty well.
I also used the ʻBurnʼ tool to darken the over
exposed area.
Another thing I also did is go to noise>reduce
noise and set reduce colour noise to 100% to
clean up certain grainy areas where colour
may have still been present.
Photo Edits
Aaron Newbigging
4. IMG_0162:
Edit1:
This photo was quite a simple edit, first I changed it to black and white and used the
different colour selections to brighten and dim certain parts of the photo, I made sure the
yellow in the photo wasnʼt to bright or dim. I then used shadow and highlights to just bring
down the highlighted areas a little bit so it wasnʼt to overpowering.
Edit2:
I took edit one and simply duplicated the edited version so I now have two of them and set
the blending mode to multiply which added a bit more contrast to the image and made it
darker which gave it a grainy feel
Photo Edits
Aaron Newbigging