Module 8 creating menu1
•Télécharger en tant que DOC, PDF•
0 j'aime•821 vues

This document provides instructions for creating a menu in Macromedia Flash using multiple scenes and buttons connected with action script. The objectives are to create multiple scenes, buttons, and connect the scenes using action script. The contents cover drawing shapes on the stage, adding text for different scenes, converting the text to symbol buttons, adding keyframes to change button states, testing the buttons, and saving the file.

Recommandé
Contenu connexe
Similaire à Module 8 creating menu1
Similaire à Module 8 creating menu1 (20)
Plus de Izatul Akma
Dernier
Dernier (20)
Module 8 creating menu1
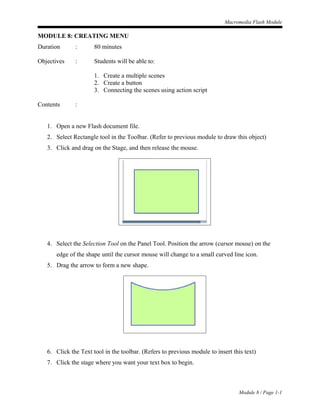
- 1. Macromedia Flash Module MODULE 8: CREATING MENU Duration : 80 minutes Objectives : Students will be able to: 1. Create a multiple scenes 2. Create a button 3. Connecting the scenes using action script Contents : 1. Open a new Flash document file. 2. Select Rectangle tool in the Toolbar. (Refer to previous module to draw this object) 3. Click and drag on the Stage, and then release the mouse. 4. Select the Selection Tool on the Panel Tool. Position the arrow (cursor mouse) on the edge of the shape until the cursor mouse will change to a small curved line icon. 5. Drag the arrow to form a new shape. 6. Click the Text tool in the toolbar. (Refers to previous module to insert this text) 7. Click the stage where you want your text box to begin. Module 8 / Page 1-1
- 2. Macromedia Flash Module 8. Begin typing in the box that appears. Type ‘Menu Utama’ in the box. 9. Repeat step 6 to 8. Type ‘scene2’, ‘scene3’ and ‘scene4’ on the stage. 10. Select Arrow tool (Selection Tool), and then right click at the ‘Scene1’ text. Choose ‘Convert to symbol’ at the pop up menu. 11. Give the name of symbol and then select the ‘Button’ option. Module 8 / Page 1-2
- 3. Macromedia Flash Module 12. Double click the ‘Scene1” text. You can see the ‘button’ environment. 13. Point your cursor to second frame (Over state) and then press F6 to quickly add keyframe. 14. Click once on ‘scene 2’ text, in the properties window, change the color text. 15. Point your cursor to third frame (Down state) and then press F6 to quickly add keyframe. Module 8 / Page 1-3
- 4. Macromedia Flash Module 16. Click once on ‘scene 2’ text, in the properties window , change the color text. 17. Point your cursor to background stage (make sure your cursor mouse is the Selection Tool mode), and then double click to back a normal environment. 18. Click the control menu, and then click test movie to test ‘scene1’ button. 19. Make the ‘scene3’ and ‘scene4’ text as a new button like above (step 10 – 17). 20. Save your movie as ‘ Menu ’ in your folder file. Module 8 / Page 1-4