This document provides guidelines for digitizing sheet music collections at the Lilly Library, including specifications for file formats, resolution, naming conventions, and scanning procedures. Key steps include wearing gloves, handling pages carefully, scanning pages sequentially in color or grayscale as needed, using consistent pixel dimensions within each item, and recording metadata in a scan log spreadsheet. The goal is to digitally capture all relevant content like illustrations, advertisements, and annotations, while preserving the original order and organization of the physical materials.
Transaction Management in Database Management System
Digital image specifications chart
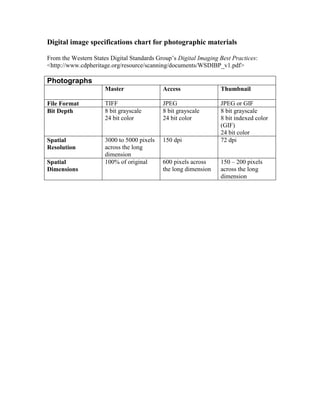
1. Digital image specifications chart for photographic materials
From the Western States Digital Standards Group’s Digital Imaging Best Practices:
<http://www.cdpheritage.org/resource/scanning/documents/WSDIBP_v1.pdf>
Photographs
Master Access Thumbnail
File Format TIFF JPEG JPEG or GIF
Bit Depth 8 bit grayscale
24 bit color
8 bit grayscale
24 bit color
8 bit grayscale
8 bit indexed color
(GIF)
24 bit color
Spatial
Resolution
3000 to 5000 pixels
across the long
dimension
150 dpi 72 dpi
Spatial
Dimensions
100% of original 600 pixels across
the long dimension
150 – 200 pixels
across the long
dimension
2. Digital imaging workflow
Planning phase
Define purpose of imaging project
Define master image specifications
Select scanning equipment
Develop and test procedures for digitization
Develop and test procedures for quality review
Determine technical metadata to be recorded
DOCUMENT
Production phase
Train employees in digitization and handling procedures
Ongoing digitization
Ongoing quality review
Ongoing metadata creation
Periodic equipment color characterization/calibration
Post-production phase
Store master images safely
Create derivatives
Review process for areas of improvement
3. 1
Scanning Sheet Music from the Lilly Library
To support the DLP's participation in an Open Archives Initiative metadata harvester for sheet music, we
are digitizing some sheet music from the Starr and DeVincent sheet music collections at the Lilly Library.
Sheet music is important for researchers not only for the music itself. Illustrated covers often show the
only known likenesses of famous performers or give insight into social history. Advertisements, samples,
lists of other publications and publisher addresses are used to date this and other sheet music. Annotations
by previous owners of the music are important as well. These scanning guidelines have been developed to
capture all relevant information for these and other forseeable uses.
1. WEAR CLEAN GLOVES.
2. These items are often in poor condition. Follow these handling guidelines:
o No food or drink while these items are out of their box!
o Use both hands to ensure you do not crease the pages.
o Handle via the borders to minimize the amount of ink you get on your gloves.
o Only fold pages their normal direction - DO NOT fold them backwards to get a single
page on the scanner platen.
o Be sure to keep the work area and the scanner platen clean of the inevitible small bits of
paper that will come off from handling. Inspect the scanner bed each time before placing
the page on it.
3. Turn on the Epson Expression 1640XL scanner and log into the computer running it. Open the
following applications and files:
o Adobe Photoshop
o Sheet music scan log from euterpedigitizelillysheetmusicsheetmusic.xls
o DMIC Internal web site with these instructions
4. In Photoshop, click File-->Import-->Silverfast (Microtek). If Photoshop doesn't recognize the
scanner, follow these instructions.
5. In Silverfast, you only need to check two settings:
o Frame tab -> Setting: SheetMusicColor (or SheetMusicGrayscale if your first scan should
be in grayscale)
o Option button -> General tab -> Option parameter: SheetMusic
These two settings should set all of the following:
o General tab
o Frame tab
o Option button -- General tab
o Option button -- Auto tab
o Option button -- CMS tab
o Option button -- Special tab
6. Determine the filename for the item and pages you have.
o Check the box the item was in to decide if the item is from the "DeVincent" or "Starr"
collection.
o For "DeVincent" items:
4. 2
On the back of the item should be a call number in pencil. The filename for each
page will be LL-SDV-aaabbb-c-dd.tif, where:
LL-SDV stands for Lilly Library Sam DeVincent collection. This helps
us organize files.
aaa is the three-digit box number from the item.
bbb is the three-digit item number from the item, with leading zeroes as
necessary.
c is the copy number from the item. If one is not listed, use "1".
dd is the page number within the item. Add a leading zero for the first
nine pages of the item. Ignore the printed page numbers and number
images sequentially starting from 1. Skip pages that are completely
blank. It is essential to mark one "x" on the spreadsheet in the "blank
page after" box for each blank page following a scanned one. For
example, if LL-SDV-025025-1-5.tif has two blank pages after it, put
two x-es in the "blank page after" box for LL-SDV-025025-1-5.tif.
o For "Starr" items, the filename is LL-SSM-aaaaaaa-b-cc.tif, where:
LL-SDV stands for Lilly Library Starr Sheet Music collection. This helps us
organize files.
aaaaaaa is the control number from the 001 field in the MARC record for this
item, minus the "BY" at the end. This control number will be three letters
followed by four numbers long.
b is the copy number from the item. If one is not listed, use "1".
cc is the page number within the item. Add a leading zero for the first nine pages
of the item. Ignore the printed page numbers and number images sequentially
starting from 1. Skip pages that are completely blank. It is essential to mark one
"x" on the spreadsheet in the "blank page after" box for each blank page
following a scanned one.
7. Scan every item in the box. We have multiple copies for many items in this collection. Almost
always they have different advertisements or covers. Scan every single copy in the box. If you
don't see a difference between copies, put this in the "notes" field of the scan log, but still scan
them both.
8. Don't worry if the item numbers on the sheets aren't sequential. We're not scanning the entire
collection.
9. Color:
o Switch back and forth between color and grayscale scanning in Silverfast by choosing
"SheetMusicGrayscale" or "SheetMusicColor" from the Settings box on the Frame tab.
Do not use the Scan Type box to make this change.
o Scan pages printed in color in 24-bit color. This includes illustrated cover pages, back
covers printed in only one color of ink, and any internal pages with colored printing or
annotations making meaningful use of color.
o Scan all internal musical notation pages in 8-bit grayscale, unless they are printed with
colored ink or contain meaningful color information.
o If you're unsure whether to scan in color or grayscale, ask. Generally we'll err on the side
of capturing rather than excluding color.
5. 3
10. Page size:
o Each page in a single item will be scanned with the exact same pixel dimensions.
o To determine these pixel dimensions, place the cover on the scanner platen as straight as
you can get it. It might help to separate the pages of the folio, but if you do this be careful
not to rip anything as these items are fragile, and make sure that you scan the pages in the
right order. DO NOT fold any page creases backwards!
o Prescan the cover.
o Adjust the bounding box so that it is exactly the same size as the item. Err on the side of
including a few pixels of black border if the item does not have straight edges, but don't
intentionally include a border.
o For all subsequent pages in this item, simply move the bounding box - DO NOT resize it.
This means each page will need to be very straight on the scanner bed.
o If you find any smaller slips of paper inserted into these sheets, notify Jenn.
11. After each page is prescanned and properly positioned, click "Scan".
12. When the page is done scanning, Silverfast will close and the image will be exported to
Photoshop. Do not crop or rotate the image (other than in 90-degree increments) in Photoshop as
this changes its pixel dimensions.
13. Click File-->Save as.
o Make sure you're in euterpedigitizelillysheetmusic<correct collection>
o File name: as determined earlier
o Format: TIFF (*.TIF;*.TIFF)
o As a Copy: unchecked
o ICC Profile: checked
o Click "Save"
o In the next dialog box:
Pick "IBM PC" byte order
Choose "None" for compression.
14. In the Scan Log spreadsheet, make sure you are on the right tab for the collection you're working
on, and record the information requested.
o Date: today's date
o Filename: as determined earlier, without the .tif extension
o Title: from the cover of the music
o Call number: penciled on the back cover of the music. Put it all on one line, without
carriage returns. One example is: Lilly M1 .D48 Box 201 No 1 Copy 2
o Image width: from Photoshop, choose Image -> Image Size. Record this number in
pixels. You'll only need to do this for the first page of each piece of music. For all
subsent pages, where you did not move the Silverfast bounding box, you can assume
these dimensions are the same as the last page scanned.
o Image height: from Photoshop, choose Image -> Image Size. Record this number in
pixels. You'll only need to do this for the first page of each piece of music. For all
subsent pages, where you did not move the Silverfast bounding box, you can assume
these dimensions are the same as the last page scanned.
6. 4
o File size (MB): from the info bar at the bottom of the Photoshop window.
o Initials: yours
o Blank page after?: Type one x in this cell for each blank page following this image that
you did not scan. This is VERY important.
o Notes: record anything out of the ordinary here
15. Be sure that when you return the item to its archival folder, all of its pages are in the right order
and that the items in the folder are also in the correct sequence.
16. Close the image. Go back to step 6 and repeat for the next page.