
Recommandé
Contenu connexe
Similaire à Adding serial issues_as_ individual_ itemsslideshow
Similaire à Adding serial issues_as_ individual_ itemsslideshow (20)
Adding serial issues_as_ individual_ itemsslideshow
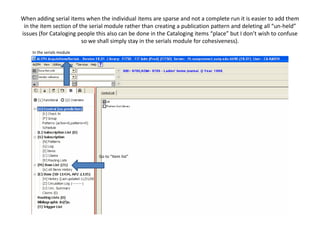
- 1. When adding serial items when the individual items are sparse and not a complete run it is easier to add them in the item section of the serial module rather than creating a publication pattern and deleting all “un-held” issues (for Cataloging people this also can be done in the Cataloging items “place” but I don’t wish to confuse so we shall simply stay in the serials module for cohesiveness). In the serials module Go to “Item list”
- 2. Once there is a list of issues it is easier to use “duplicate” but for the sake of training we will start with “new” and go through all the steps.
- 3. Begin with TAB 2; for instruction number two it is imperative that one chooses “ISSUE” otherwise the item will be separated from serial issues that viewed from the “check-in” screen; for number three if SPECP is not a choice then a SPECP location (852) must be created in the Cataloging module (instructions for this will be separate); for number four this only needs to be typed in if one doesn’t appear after choosing the Hol Link; for number five if there is a day date (as would be evident with semi monthly or weeklies) the day date will be entered after the month (no punctuation); for number six if “03” has been previously chosen or erroneously chosen it is Okay, they are essentially the same; for number seven, the levels of enumeration are very important as is the chronology, however it is easier to fill them out in TAB 5 because as you can see there is no place for chronology (which is accounted for in TAB 5) and it is easier to fill out the enumeration and chronology at the same time 6) “Item Status” is 02 1) Wand or type in barcode number 7) These two boxes will be “filled in” on TAB 5 3) Open arrow for “Hol Link “and 2) Next choose choose SPECP by double clicking material type; which MUST be “ISSUE” 4) Type in “0” for 5) When issues are created individually like this Call no. type (LC a description must be typed in; In the following call number) format: v.xx:no.xx (yyyy month)
- 4. So far so good; you do not need to choose “Add” yet; this is a bound volume so the description is slightly different (v.xx: nos.xx-xx (yyyy month-month and day date) or (vols. xx-xx: etc…) there are several possible emanations but hopefully you get the gist.
- 5. TAB 3: To get to TAB 3 simply click on the tab when you are finished with TAB 2; The only pertinent field here is the “OPAC Note” where one would qualify the bound volume; for example “complete run” or “vol. includes” or “vol. missing” (if the volume is missing more issues than it has I use the vol. includes; if the volume includes more issues I use vol. missing)
- 6. TAB 4: Filling in the arrival date is tantamount! It must be done otherwise the “issue” will be listed as “un-arrived” and terrible things will happen! The “Arrival Date” is the most important aspect here and must be done; click on the arrow to the right of the field
- 7. When you double click on “Today” the date will appear in the “Arrival Date” field Double click on “Today”
- 8. Filling out the enumeration and chronology levels is very important; This is how Aleph indexes the issues, actually Aleph indexes on the enumeration, it is the most important; If the issue/issues you are working with doesn’t/don’t have enumeration MAKE A NUMBERING SCHEME anyway in order for subsequent issues to file in ORDER; the numbering scheme you make up will not show up in the description however it will keep your issues in the correct order; if you are adding issues between already enumerated issues look here to see how your “new” issue will be quantified in order to fit ; One can always use a decimal! When finished click on “Add”! TAB 5 Fill out the enumeration levels to match the description; if you have a bound Do the same for the chronological levels volume use the first issue listed.
- 9. After clicking on “Add” , if you go back to TAB 2 you will see several fields were filled in automatically and you will see your issue in the items list.
- 10. For adding subsequent issue you may find it helpful to use the “Duplicate” function; The “Duplicate” function copies ALL fields to the “new” issue; eliminating the need to fill in all fields while just needing to change the pertinent fields. You would think the “Arrival Date” on TAB 4 would transfer but it doesn’t; Always remember the “Arrival Date”!
- 11. You will also see your newly created issue in the “Check In” area; Please note that the “Expected Arrival” is not filled in and that is fine most importantly the “Arrival” date is filled in.