SlideShare une entreprise Scribd logo
1  sur  5
Télécharger pour lire hors ligne
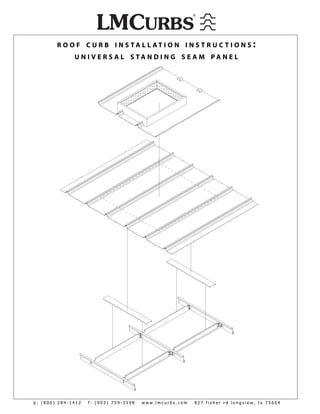
R O O F C U R B I N S TA L L AT I O N I N S T R U C T I O N S :
              U N I V E R S A L S TA N D I N G S E A M PA N E L


p: (800) 284-1412   f: (903) 759-3598   www.lmcurbs.com   827 fisher rd longview, tx 75604
ROOF CURB
                                                                                       INSTALLATION INSTRUCTIONS
                                                                                  UNIVERSAL STANDING SEAM PANEL

Installation Check List:
  _____Attach Sub-Frames                                                                                                        Step 1
  _____Layout Curb on Roof Panel                                                                                                Step 2
  _____Back-up Channels                                                                                                         Step 3
  _____Apply Sealants & Set Curb in Place                                                                                       Step 4
  _____Fasten Curb to Roof Panel                                                                                                Step 5
  _____Attach Cap Strips                                                                                                        Step 6
                                                                  PARTS LIST
                                   Flat Washer                                              Polyurethane Sealant Caulk

                                                                                            Triple Bead Sealant Tape
                                   Nut

                                                                                            14 Gauge Galvanized Steel Subframe
                                   Bolt                                                     5-1/2” tall
                                                                                            Length is equal to the purlin spacing minus
                                                                                            1-3/8”
                                   Mounting Clip
                                                                                            Cap Strip

                             #14 - 1 1/8” Neoprene
                                Self-Tap Screw
                                                                                            Back-up Channels( eld notch)


                                          BEGIN INSTALLATION
     1 ATTACH SUB-FRAMES (framed opening is already installed)
    Attach mounting clips to sub-frame and align the top of the sub-frame under                                                Roof Purlin
                                                                                                 Sub-frame
    vertical box of roof curb and ush to the bottom side of roof sheets. Use the
    mounting clip as a template, mark on purlin where 7/16” holes are to be drilled.
    Once holes are drilled, attach mounting clips to purlins using at washers, nuts,
    and bolts (see drawing 1.1). Finger tighten all hardware, then upset threads to
    secure nuts. Attach sub-frames to mounting clips using at washers, nuts, and                                         Drawing 1.2
    bolts (see drawing 1.2).                               Flat washer
                                                                                           Nut
                                                     3/8” x 1” Bolts


                                                                         Mounting clip


                                                        Drawing 1.1
                                                                                  Roof Purlin
    *NOTICE* Sub-frame max. loading 500 lbs.


     WARNING!                                                                                                                       Page 1
ALWAYS USE FALL PROTECTION WHILE
WORKING AROUND ROOF OPENINGS.
ROOF CURB
                                                                                               INSTALLATION INSTRUCTIONS
                                                                                          UNIVERSAL STANDING SEAM PANEL
     2 LAYOUT CURB ON ROOF PANEL
    Mark cut lines by setting roof curb(s) in place on roof panel (see
                                                                                                                                                        Cut Line
    drawing 2.1) (DO NOT USE LEAD PENCIL). Upslope cut line will be 3”                                                            s   7”
                                                                                                                              inu
                                                                                                                           rbm
    less than outer edge of curb base                           ange (see drawing 2.2).                         o   f cu
                                                                                                           g th
                                                                                                       Len
    Downslope cut line will be 4” less than outer edge of base ange (see
    drawing 2.2). Remove exterior panel leaving the insulation face
    showing (see drawing 2.3) and cleanup all metal shavings and debris.

                                               Top View
                                                                                      Roof Panel                                                       Drawing 2.1

    Roof Opening                                                        Layout throat opening on the insulation                                         Throat Opening
                                                                        and cut opening (see drawing 2.2).


        Insulation

                                                                                                   Cu
                                                                                                      rb
                                                                                                           Ba                                                                   ge
                                                                                                             se                                                             n
                                                                                                                Fla                                                     Fla
                                              Drawing 2.3                                                           ng
                                                                                                                      e                                         B   ase
                                                                                                                                                           rb
                                                                                                                                                         Cu
*Notice* Sub-frames and purlins not shown in the above picture.                                              Drawing 2.2
                                                                                                                                           Edge of roof opening
     3 BACK-UP CHANNELS
    Notch back-up channels (see drawing). Slide back-up channels under roof
    panel on top of sub-frames. Do not screw back-up channels to
    subframes. They will be secured when curb is fastened down.

     Cut leg of channel and fold under to form
     notch for sub-frame (typically 4 places).


                                                      Back-up Channel
                                                                                   Back-up channels in place                                       Drawing 3.1
                   Ce
                      nte
              Ou          rL
                tsid        ine
                    eD          of
                                   Su
                                                                          CONVERT TRIPLELOK SEAM TO QUADLOK (if needed)
                        im            b-F
                           en            ram                              Convert a TripleLok panel seam to a QuadLok. Use duck billed crimpers to
                              sio
                                 no          e                             atten the panel seam. Steps 1 through 3 below illustrate how to properly
                                    fB
                                       ack
                                           -up                            crimp the seam.
                                               Ch
                                                  a   nn
                                                         el


                                                                            TRIPLELOK SEAM


                                                                             QUADLOK SEAM                      Step 1                         Step 2                   Step 3


     WARNING!                                                                                                                                                                    Page 2
ALWAYS USE FALL PROTECTION WHILE
WORKING AROUND ROOF OPENINGS.
ROOF CURB
                                                                                    INSTALLATION INSTRUCTIONS
                                                                               UNIVERSAL STANDING SEAM PANEL
     4 APPLY SEALANTS & SET CURB IN PLACE                                     The upslope highs are to be
    Apply a strip of sealant tape and generous bead of caulk on the           installed UNDER the roof panel.
    upslope side of the roof curb and on downslope side of the roof
    panel before setting roof curb in place (see drawing 4.1). Position
    roof curb over roof opening and lower into place, shift curb to                Roof Curb
    align with sub-frames and roof panel.


                                                        Roof Panel
       The downslope highs are to be
       installed OVER the roof panel.

                                                                                                                    Caulk
                                                                                                                 (apply as shown)


                Caulk                                                                                       Sealant Tape
            (apply as shown)
                                                                      Drawing 4.1

*Notice* Sub-frames and purlins not shown in the above picture.


                                                                                                             Must ll end of standing
     5 FASTEN CURB TO ROOF PANEL                                                                                seam with caulk.

    Fasten curb to roof panel using #14 - 1 1/8” neoprene self-tap screw                       Roof Panel
    on 4” centers (see drawing 5.1). DO NOT FASTEN CURB OR ROOF
    PANEL TO SUB-FRAMES. Please ensure all self-tap screws are
    properly tightened before moving to the next step.


                                                                                                                     Self-Tap Screws

                                                                     Drawing 5.1


*Notice* Sub-frames and purlins not shown in the above picture.


     WARNING!                                                                                                                       Page 3
ALWAYS USE FALL PROTECTION WHILE
WORKING AROUND ROOF OPENINGS.
ROOF CURB
                                                                                          INSTALLATION INSTRUCTIONS
                                                                                     UNIVERSAL STANDING SEAM PANEL
     6 ATTACH CAP STRIPS

    Turn the cap strips upside down and apply sealant tape to the entrie length of both
    inside legs. Then run a bead of caulk down the middle of the cap strips and                                          Roof Panel

    at each end of cap strip (see drawing 6.1). Install cap strips over the
    curb/roof panel sidelap, fasten with screws alternating on 6”
    centers (staggered on both sides). The capstrip should
    extend approximately 6” past both upslope and
    downslope base of roof curb.


                                                 Cap strips furnished with curb
  Sealant tape Caulk                                                                  Cap Strips
                                                     Screws staggered 6” on center    (length varies)
  (both sides)

Curb base                                                Roof Panel                                     Sealant tape
                                                                                                        (both sides)


                                                                                                           Caulk
                                   Drawing 6.1                                                                         1” between each bead
                                                                                                                        of caulk at each end
      *Notice* Sub-frames and purlins not shown in the above picture.


     COMPLETED INSTALLATION


      **Clean up installation debris before leaving area.


     WARNING!                                                                                                                           Page 4
ALWAYS USE FALL PROTECTION WHILE
WORKING AROUND ROOF OPENINGS.

Contenu connexe

Tendances

Honeywell 5816-install-guide
Honeywell 5816-install-guideHoneywell 5816-install-guide
Honeywell 5816-install-guideAlarm Grid
 
Falk coupling molykote gn plus
Falk coupling molykote gn plusFalk coupling molykote gn plus
Falk coupling molykote gn plusProject Sales Corp
 
009 strucutre parts
009 strucutre parts009 strucutre parts
009 strucutre partsnobleglass
 
B lsp ceil_lbc309001_data_sheet
B lsp ceil_lbc309001_data_sheetB lsp ceil_lbc309001_data_sheet
B lsp ceil_lbc309001_data_sheetamthanhbosch
 
Fusion™ Flat Panel Mounts
Fusion™ Flat Panel MountsFusion™ Flat Panel Mounts
Fusion™ Flat Panel Mountschiefmfg
 
Honeywell 5869-install-guide
Honeywell 5869-install-guideHoneywell 5869-install-guide
Honeywell 5869-install-guideAlarm Grid
 

Tendances (9)

Honeywell 5816-install-guide
Honeywell 5816-install-guideHoneywell 5816-install-guide
Honeywell 5816-install-guide
 
Falk coupling molykote gn plus
Falk coupling molykote gn plusFalk coupling molykote gn plus
Falk coupling molykote gn plus
 
Yacht Accessories - Mundo Marino
Yacht Accessories - Mundo MarinoYacht Accessories - Mundo Marino
Yacht Accessories - Mundo Marino
 
009 strucutre parts
009 strucutre parts009 strucutre parts
009 strucutre parts
 
B lsp ceil_lbc309001_data_sheet
B lsp ceil_lbc309001_data_sheetB lsp ceil_lbc309001_data_sheet
B lsp ceil_lbc309001_data_sheet
 
Fusion™ Flat Panel Mounts
Fusion™ Flat Panel MountsFusion™ Flat Panel Mounts
Fusion™ Flat Panel Mounts
 
Honeywell 5869-install-guide
Honeywell 5869-install-guideHoneywell 5869-install-guide
Honeywell 5869-install-guide
 
850m Manual Web
850m Manual Web850m Manual Web
850m Manual Web
 
Bs1030b cb1e
Bs1030b cb1eBs1030b cb1e
Bs1030b cb1e
 

Similaire à Install roof curb for standing seam panel

LMCurbs Roof Curb Installation Instructions For Trapezodial Standing Seam
LMCurbs Roof Curb Installation Instructions For Trapezodial Standing SeamLMCurbs Roof Curb Installation Instructions For Trapezodial Standing Seam
LMCurbs Roof Curb Installation Instructions For Trapezodial Standing SeamLMCurbs©
 
LMCurbs Roof Curb Installation Instructions For R-Panel Metal Roof
LMCurbs Roof Curb Installation Instructions For R-Panel Metal RoofLMCurbs Roof Curb Installation Instructions For R-Panel Metal Roof
LMCurbs Roof Curb Installation Instructions For R-Panel Metal RoofLMCurbs©
 
Sca 1 manual-headlight-alignment-system
Sca 1 manual-headlight-alignment-systemSca 1 manual-headlight-alignment-system
Sca 1 manual-headlight-alignment-systemClark Heintz
 
Blinds First | How to install vertical blinds
Blinds First | How to install vertical blindsBlinds First | How to install vertical blinds
Blinds First | How to install vertical blindsBlinds First
 
Honeywell 710-install-guide
Honeywell 710-install-guideHoneywell 710-install-guide
Honeywell 710-install-guideAlarm Grid
 
thi cong vach ngan ve sinh compact
thi cong vach ngan ve sinh compactthi cong vach ngan ve sinh compact
thi cong vach ngan ve sinh compactTrần Khánh
 
Honeywell is216t-cur-install-guide
Honeywell is216t-cur-install-guideHoneywell is216t-cur-install-guide
Honeywell is216t-cur-install-guideAlarm Grid
 
CS Unitec Air Powered Concrete Cutting Chainsaw
CS Unitec Air Powered Concrete Cutting ChainsawCS Unitec Air Powered Concrete Cutting Chainsaw
CS Unitec Air Powered Concrete Cutting ChainsawCS Unitec
 
Basic ShoreMaster Kit Dock Instruction
Basic ShoreMaster Kit Dock InstructionBasic ShoreMaster Kit Dock Instruction
Basic ShoreMaster Kit Dock InstructionKurt Welch
 
Honeywell 5817cb-data-sheet
Honeywell 5817cb-data-sheetHoneywell 5817cb-data-sheet
Honeywell 5817cb-data-sheetAlarm Grid
 
Section 13 - Sub-surface Ready Access
Section 13 - Sub-surface Ready AccessSection 13 - Sub-surface Ready Access
Section 13 - Sub-surface Ready AccessY2Studio
 
11kV 33kV Heat Shrink Terminations - Outdoor Armour Earthing Kits XLPE AWA Si...
11kV 33kV Heat Shrink Terminations - Outdoor Armour Earthing Kits XLPE AWA Si...11kV 33kV Heat Shrink Terminations - Outdoor Armour Earthing Kits XLPE AWA Si...
11kV 33kV Heat Shrink Terminations - Outdoor Armour Earthing Kits XLPE AWA Si...Thorne & Derrick International
 
1. Heat Shrink Cable Termination (HV) - 11kV 33kV 3 Core XLPE BS6622 Cables
1. Heat Shrink Cable Termination (HV) - 11kV 33kV 3 Core XLPE BS6622 Cables1. Heat Shrink Cable Termination (HV) - 11kV 33kV 3 Core XLPE BS6622 Cables
1. Heat Shrink Cable Termination (HV) - 11kV 33kV 3 Core XLPE BS6622 CablesThorne & Derrick International
 
Honeywell 5819whs-5819brs-install-guide
Honeywell 5819whs-5819brs-install-guideHoneywell 5819whs-5819brs-install-guide
Honeywell 5819whs-5819brs-install-guideAlarm Grid
 

Similaire à Install roof curb for standing seam panel (20)

LMCurbs Roof Curb Installation Instructions For Trapezodial Standing Seam
LMCurbs Roof Curb Installation Instructions For Trapezodial Standing SeamLMCurbs Roof Curb Installation Instructions For Trapezodial Standing Seam
LMCurbs Roof Curb Installation Instructions For Trapezodial Standing Seam
 
LMCurbs Roof Curb Installation Instructions For R-Panel Metal Roof
LMCurbs Roof Curb Installation Instructions For R-Panel Metal RoofLMCurbs Roof Curb Installation Instructions For R-Panel Metal Roof
LMCurbs Roof Curb Installation Instructions For R-Panel Metal Roof
 
Beammmk
BeammmkBeammmk
Beammmk
 
Sca 1 manual-headlight-alignment-system
Sca 1 manual-headlight-alignment-systemSca 1 manual-headlight-alignment-system
Sca 1 manual-headlight-alignment-system
 
Blinds First | How to install vertical blinds
Blinds First | How to install vertical blindsBlinds First | How to install vertical blinds
Blinds First | How to install vertical blinds
 
Honeywell 710-install-guide
Honeywell 710-install-guideHoneywell 710-install-guide
Honeywell 710-install-guide
 
thi cong vach ngan ve sinh compact
thi cong vach ngan ve sinh compactthi cong vach ngan ve sinh compact
thi cong vach ngan ve sinh compact
 
Honeywell is216t-cur-install-guide
Honeywell is216t-cur-install-guideHoneywell is216t-cur-install-guide
Honeywell is216t-cur-install-guide
 
CS Unitec Air Powered Concrete Cutting Chainsaw
CS Unitec Air Powered Concrete Cutting ChainsawCS Unitec Air Powered Concrete Cutting Chainsaw
CS Unitec Air Powered Concrete Cutting Chainsaw
 
Basic ShoreMaster Kit Dock Instruction
Basic ShoreMaster Kit Dock InstructionBasic ShoreMaster Kit Dock Instruction
Basic ShoreMaster Kit Dock Instruction
 
Honeywell 5817cb-data-sheet
Honeywell 5817cb-data-sheetHoneywell 5817cb-data-sheet
Honeywell 5817cb-data-sheet
 
Section 13 - Sub-surface Ready Access
Section 13 - Sub-surface Ready AccessSection 13 - Sub-surface Ready Access
Section 13 - Sub-surface Ready Access
 
Screw and Barrel Inspection
Screw and Barrel InspectionScrew and Barrel Inspection
Screw and Barrel Inspection
 
54307684 beam-column
54307684 beam-column54307684 beam-column
54307684 beam-column
 
FrameWRX Installation Instructions
FrameWRX Installation InstructionsFrameWRX Installation Instructions
FrameWRX Installation Instructions
 
Exj 13
Exj 13Exj 13
Exj 13
 
11kV 33kV Heat Shrink Terminations - Outdoor Armour Earthing Kits XLPE AWA Si...
11kV 33kV Heat Shrink Terminations - Outdoor Armour Earthing Kits XLPE AWA Si...11kV 33kV Heat Shrink Terminations - Outdoor Armour Earthing Kits XLPE AWA Si...
11kV 33kV Heat Shrink Terminations - Outdoor Armour Earthing Kits XLPE AWA Si...
 
1. Heat Shrink Cable Termination (HV) - 11kV 33kV 3 Core XLPE BS6622 Cables
1. Heat Shrink Cable Termination (HV) - 11kV 33kV 3 Core XLPE BS6622 Cables1. Heat Shrink Cable Termination (HV) - 11kV 33kV 3 Core XLPE BS6622 Cables
1. Heat Shrink Cable Termination (HV) - 11kV 33kV 3 Core XLPE BS6622 Cables
 
Door Seal
Door SealDoor Seal
Door Seal
 
Honeywell 5819whs-5819brs-install-guide
Honeywell 5819whs-5819brs-install-guideHoneywell 5819whs-5819brs-install-guide
Honeywell 5819whs-5819brs-install-guide
 

Plus de LMCurbs©

LMCurbs Custom Snow Diverter in Production # 4
LMCurbs Custom Snow Diverter in Production # 4LMCurbs Custom Snow Diverter in Production # 4
LMCurbs Custom Snow Diverter in Production # 4LMCurbs©
 
LMCurbs Custom Snow Diverter in Production # 3
LMCurbs Custom Snow Diverter in Production # 3LMCurbs Custom Snow Diverter in Production # 3
LMCurbs Custom Snow Diverter in Production # 3LMCurbs©
 
LMCurbs Custom Snow Diverter in Production # 2
LMCurbs Custom Snow Diverter in Production # 2LMCurbs Custom Snow Diverter in Production # 2
LMCurbs Custom Snow Diverter in Production # 2LMCurbs©
 
LMCurbs Custom Snow Diverter in Production # 7
LMCurbs Custom Snow Diverter in Production # 7LMCurbs Custom Snow Diverter in Production # 7
LMCurbs Custom Snow Diverter in Production # 7LMCurbs©
 
LMCurbs Custom Snow Diverter in Production # 6
LMCurbs Custom Snow Diverter in Production # 6LMCurbs Custom Snow Diverter in Production # 6
LMCurbs Custom Snow Diverter in Production # 6LMCurbs©
 
LMCurbs Custom Snow Diverter in Production # 5
LMCurbs Custom Snow Diverter in Production # 5LMCurbs Custom Snow Diverter in Production # 5
LMCurbs Custom Snow Diverter in Production # 5LMCurbs©
 
LMCurbs Custom Snow Diverter in Production # 1
LMCurbs Custom Snow Diverter in Production # 1LMCurbs Custom Snow Diverter in Production # 1
LMCurbs Custom Snow Diverter in Production # 1LMCurbs©
 
S-5! ColorGard System Installation Instructions
S-5! ColorGard System Installation InstructionsS-5! ColorGard System Installation Instructions
S-5! ColorGard System Installation InstructionsLMCurbs©
 
S-5! ColorGard System
S-5! ColorGard SystemS-5! ColorGard System
S-5! ColorGard SystemLMCurbs©
 
LMCurbs Company Brochure
LMCurbs Company BrochureLMCurbs Company Brochure
LMCurbs Company BrochureLMCurbs©
 
LMCurbs Featured Products
LMCurbs Featured ProductsLMCurbs Featured Products
LMCurbs Featured ProductsLMCurbs©
 

Plus de LMCurbs© (11)

LMCurbs Custom Snow Diverter in Production # 4
LMCurbs Custom Snow Diverter in Production # 4LMCurbs Custom Snow Diverter in Production # 4
LMCurbs Custom Snow Diverter in Production # 4
 
LMCurbs Custom Snow Diverter in Production # 3
LMCurbs Custom Snow Diverter in Production # 3LMCurbs Custom Snow Diverter in Production # 3
LMCurbs Custom Snow Diverter in Production # 3
 
LMCurbs Custom Snow Diverter in Production # 2
LMCurbs Custom Snow Diverter in Production # 2LMCurbs Custom Snow Diverter in Production # 2
LMCurbs Custom Snow Diverter in Production # 2
 
LMCurbs Custom Snow Diverter in Production # 7
LMCurbs Custom Snow Diverter in Production # 7LMCurbs Custom Snow Diverter in Production # 7
LMCurbs Custom Snow Diverter in Production # 7
 
LMCurbs Custom Snow Diverter in Production # 6
LMCurbs Custom Snow Diverter in Production # 6LMCurbs Custom Snow Diverter in Production # 6
LMCurbs Custom Snow Diverter in Production # 6
 
LMCurbs Custom Snow Diverter in Production # 5
LMCurbs Custom Snow Diverter in Production # 5LMCurbs Custom Snow Diverter in Production # 5
LMCurbs Custom Snow Diverter in Production # 5
 
LMCurbs Custom Snow Diverter in Production # 1
LMCurbs Custom Snow Diverter in Production # 1LMCurbs Custom Snow Diverter in Production # 1
LMCurbs Custom Snow Diverter in Production # 1
 
S-5! ColorGard System Installation Instructions
S-5! ColorGard System Installation InstructionsS-5! ColorGard System Installation Instructions
S-5! ColorGard System Installation Instructions
 
S-5! ColorGard System
S-5! ColorGard SystemS-5! ColorGard System
S-5! ColorGard System
 
LMCurbs Company Brochure
LMCurbs Company BrochureLMCurbs Company Brochure
LMCurbs Company Brochure
 
LMCurbs Featured Products
LMCurbs Featured ProductsLMCurbs Featured Products
LMCurbs Featured Products
 

Dernier

Inspiring Through Words Power of Inspiration.pptx
Inspiring Through Words Power of Inspiration.pptxInspiring Through Words Power of Inspiration.pptx
Inspiring Through Words Power of Inspiration.pptxShubham Rawat
 
Call Girls in Govindpuri Delhi 💯Call Us 🔝8264348440🔝
Call Girls in Govindpuri Delhi 💯Call Us 🔝8264348440🔝Call Girls in Govindpuri Delhi 💯Call Us 🔝8264348440🔝
Call Girls in Govindpuri Delhi 💯Call Us 🔝8264348440🔝soniya singh
 
西伦敦大学毕业证学位证成绩单-怎么样做
西伦敦大学毕业证学位证成绩单-怎么样做西伦敦大学毕业证学位证成绩单-怎么样做
西伦敦大学毕业证学位证成绩单-怎么样做j5bzwet6
 
(No.1)↠Young Call Girls in Sikanderpur (Gurgaon) ꧁❤ 9711911712 ❤꧂ Escorts
(No.1)↠Young Call Girls in Sikanderpur (Gurgaon) ꧁❤ 9711911712 ❤꧂ Escorts(No.1)↠Young Call Girls in Sikanderpur (Gurgaon) ꧁❤ 9711911712 ❤꧂ Escorts
(No.1)↠Young Call Girls in Sikanderpur (Gurgaon) ꧁❤ 9711911712 ❤꧂ EscortsDelhi Escorts Service
 
(南达科他州立大学毕业证学位证成绩单-永久存档)
(南达科他州立大学毕业证学位证成绩单-永久存档)(南达科他州立大学毕业证学位证成绩单-永久存档)
(南达科他州立大学毕业证学位证成绩单-永久存档)oannq
 
Call Girls In Dwarka Sub City ☎️7838079806 ✅ 💯Call Girls In Delhi
Call Girls In Dwarka Sub City  ☎️7838079806 ✅ 💯Call Girls In DelhiCall Girls In Dwarka Sub City  ☎️7838079806 ✅ 💯Call Girls In Delhi
Call Girls In Dwarka Sub City ☎️7838079806 ✅ 💯Call Girls In DelhiSoniyaSingh
 
办理西悉尼大学毕业证成绩单、制作假文凭
办理西悉尼大学毕业证成绩单、制作假文凭办理西悉尼大学毕业证成绩单、制作假文凭
办理西悉尼大学毕业证成绩单、制作假文凭o8wvnojp
 
Call Girls In Karkardooma 83770 87607 Just-Dial Escorts Service 24X7 Avilable
Call Girls In Karkardooma 83770 87607 Just-Dial Escorts Service 24X7 AvilableCall Girls In Karkardooma 83770 87607 Just-Dial Escorts Service 24X7 Avilable
Call Girls In Karkardooma 83770 87607 Just-Dial Escorts Service 24X7 Avilabledollysharma2066
 
E J Waggoner against Kellogg's Pantheism 8.pptx
E J Waggoner against Kellogg's Pantheism 8.pptxE J Waggoner against Kellogg's Pantheism 8.pptx
E J Waggoner against Kellogg's Pantheism 8.pptxJackieSparrow3
 
Authentic No 1 Amil Baba In Pakistan Amil Baba In Faisalabad Amil Baba In Kar...
Authentic No 1 Amil Baba In Pakistan Amil Baba In Faisalabad Amil Baba In Kar...Authentic No 1 Amil Baba In Pakistan Amil Baba In Faisalabad Amil Baba In Kar...
Authentic No 1 Amil Baba In Pakistan Amil Baba In Faisalabad Amil Baba In Kar...Authentic No 1 Amil Baba In Pakistan
 
南新罕布什尔大学毕业证学位证成绩单-学历认证
南新罕布什尔大学毕业证学位证成绩单-学历认证南新罕布什尔大学毕业证学位证成绩单-学历认证
南新罕布什尔大学毕业证学位证成绩单-学历认证kbdhl05e
 

Dernier (12)

Inspiring Through Words Power of Inspiration.pptx
Inspiring Through Words Power of Inspiration.pptxInspiring Through Words Power of Inspiration.pptx
Inspiring Through Words Power of Inspiration.pptx
 
Call Girls in Govindpuri Delhi 💯Call Us 🔝8264348440🔝
Call Girls in Govindpuri Delhi 💯Call Us 🔝8264348440🔝Call Girls in Govindpuri Delhi 💯Call Us 🔝8264348440🔝
Call Girls in Govindpuri Delhi 💯Call Us 🔝8264348440🔝
 
西伦敦大学毕业证学位证成绩单-怎么样做
西伦敦大学毕业证学位证成绩单-怎么样做西伦敦大学毕业证学位证成绩单-怎么样做
西伦敦大学毕业证学位证成绩单-怎么样做
 
(No.1)↠Young Call Girls in Sikanderpur (Gurgaon) ꧁❤ 9711911712 ❤꧂ Escorts
(No.1)↠Young Call Girls in Sikanderpur (Gurgaon) ꧁❤ 9711911712 ❤꧂ Escorts(No.1)↠Young Call Girls in Sikanderpur (Gurgaon) ꧁❤ 9711911712 ❤꧂ Escorts
(No.1)↠Young Call Girls in Sikanderpur (Gurgaon) ꧁❤ 9711911712 ❤꧂ Escorts
 
(南达科他州立大学毕业证学位证成绩单-永久存档)
(南达科他州立大学毕业证学位证成绩单-永久存档)(南达科他州立大学毕业证学位证成绩单-永久存档)
(南达科他州立大学毕业证学位证成绩单-永久存档)
 
Call Girls In Dwarka Sub City ☎️7838079806 ✅ 💯Call Girls In Delhi
Call Girls In Dwarka Sub City  ☎️7838079806 ✅ 💯Call Girls In DelhiCall Girls In Dwarka Sub City  ☎️7838079806 ✅ 💯Call Girls In Delhi
Call Girls In Dwarka Sub City ☎️7838079806 ✅ 💯Call Girls In Delhi
 
办理西悉尼大学毕业证成绩单、制作假文凭
办理西悉尼大学毕业证成绩单、制作假文凭办理西悉尼大学毕业证成绩单、制作假文凭
办理西悉尼大学毕业证成绩单、制作假文凭
 
Call Girls In Karkardooma 83770 87607 Just-Dial Escorts Service 24X7 Avilable
Call Girls In Karkardooma 83770 87607 Just-Dial Escorts Service 24X7 AvilableCall Girls In Karkardooma 83770 87607 Just-Dial Escorts Service 24X7 Avilable
Call Girls In Karkardooma 83770 87607 Just-Dial Escorts Service 24X7 Avilable
 
E J Waggoner against Kellogg's Pantheism 8.pptx
E J Waggoner against Kellogg's Pantheism 8.pptxE J Waggoner against Kellogg's Pantheism 8.pptx
E J Waggoner against Kellogg's Pantheism 8.pptx
 
Authentic No 1 Amil Baba In Pakistan Amil Baba In Faisalabad Amil Baba In Kar...
Authentic No 1 Amil Baba In Pakistan Amil Baba In Faisalabad Amil Baba In Kar...Authentic No 1 Amil Baba In Pakistan Amil Baba In Faisalabad Amil Baba In Kar...
Authentic No 1 Amil Baba In Pakistan Amil Baba In Faisalabad Amil Baba In Kar...
 
Model Call Girl in Lado Sarai Delhi reach out to us at 🔝9953056974🔝
Model Call Girl in Lado Sarai Delhi reach out to us at 🔝9953056974🔝Model Call Girl in Lado Sarai Delhi reach out to us at 🔝9953056974🔝
Model Call Girl in Lado Sarai Delhi reach out to us at 🔝9953056974🔝
 
南新罕布什尔大学毕业证学位证成绩单-学历认证
南新罕布什尔大学毕业证学位证成绩单-学历认证南新罕布什尔大学毕业证学位证成绩单-学历认证
南新罕布什尔大学毕业证学位证成绩单-学历认证
 

Install roof curb for standing seam panel

  • 1. R O O F C U R B I N S TA L L AT I O N I N S T R U C T I O N S : U N I V E R S A L S TA N D I N G S E A M PA N E L p: (800) 284-1412 f: (903) 759-3598 www.lmcurbs.com 827 fisher rd longview, tx 75604
  • 2. ROOF CURB INSTALLATION INSTRUCTIONS UNIVERSAL STANDING SEAM PANEL Installation Check List: _____Attach Sub-Frames Step 1 _____Layout Curb on Roof Panel Step 2 _____Back-up Channels Step 3 _____Apply Sealants & Set Curb in Place Step 4 _____Fasten Curb to Roof Panel Step 5 _____Attach Cap Strips Step 6 PARTS LIST Flat Washer Polyurethane Sealant Caulk Triple Bead Sealant Tape Nut 14 Gauge Galvanized Steel Subframe Bolt 5-1/2” tall Length is equal to the purlin spacing minus 1-3/8” Mounting Clip Cap Strip #14 - 1 1/8” Neoprene Self-Tap Screw Back-up Channels( eld notch) BEGIN INSTALLATION 1 ATTACH SUB-FRAMES (framed opening is already installed) Attach mounting clips to sub-frame and align the top of the sub-frame under Roof Purlin Sub-frame vertical box of roof curb and ush to the bottom side of roof sheets. Use the mounting clip as a template, mark on purlin where 7/16” holes are to be drilled. Once holes are drilled, attach mounting clips to purlins using at washers, nuts, and bolts (see drawing 1.1). Finger tighten all hardware, then upset threads to secure nuts. Attach sub-frames to mounting clips using at washers, nuts, and Drawing 1.2 bolts (see drawing 1.2). Flat washer Nut 3/8” x 1” Bolts Mounting clip Drawing 1.1 Roof Purlin *NOTICE* Sub-frame max. loading 500 lbs. WARNING! Page 1 ALWAYS USE FALL PROTECTION WHILE WORKING AROUND ROOF OPENINGS.
  • 3. ROOF CURB INSTALLATION INSTRUCTIONS UNIVERSAL STANDING SEAM PANEL 2 LAYOUT CURB ON ROOF PANEL Mark cut lines by setting roof curb(s) in place on roof panel (see Cut Line drawing 2.1) (DO NOT USE LEAD PENCIL). Upslope cut line will be 3” s 7” inu rbm less than outer edge of curb base ange (see drawing 2.2). o f cu g th Len Downslope cut line will be 4” less than outer edge of base ange (see drawing 2.2). Remove exterior panel leaving the insulation face showing (see drawing 2.3) and cleanup all metal shavings and debris. Top View Roof Panel Drawing 2.1 Roof Opening Layout throat opening on the insulation Throat Opening and cut opening (see drawing 2.2). Insulation Cu rb Ba ge se n Fla Fla Drawing 2.3 ng e B ase rb Cu *Notice* Sub-frames and purlins not shown in the above picture. Drawing 2.2 Edge of roof opening 3 BACK-UP CHANNELS Notch back-up channels (see drawing). Slide back-up channels under roof panel on top of sub-frames. Do not screw back-up channels to subframes. They will be secured when curb is fastened down. Cut leg of channel and fold under to form notch for sub-frame (typically 4 places). Back-up Channel Back-up channels in place Drawing 3.1 Ce nte Ou rL tsid ine eD of Su CONVERT TRIPLELOK SEAM TO QUADLOK (if needed) im b-F en ram Convert a TripleLok panel seam to a QuadLok. Use duck billed crimpers to sio no e atten the panel seam. Steps 1 through 3 below illustrate how to properly fB ack -up crimp the seam. Ch a nn el TRIPLELOK SEAM QUADLOK SEAM Step 1 Step 2 Step 3 WARNING! Page 2 ALWAYS USE FALL PROTECTION WHILE WORKING AROUND ROOF OPENINGS.
  • 4. ROOF CURB INSTALLATION INSTRUCTIONS UNIVERSAL STANDING SEAM PANEL 4 APPLY SEALANTS & SET CURB IN PLACE The upslope highs are to be Apply a strip of sealant tape and generous bead of caulk on the installed UNDER the roof panel. upslope side of the roof curb and on downslope side of the roof panel before setting roof curb in place (see drawing 4.1). Position roof curb over roof opening and lower into place, shift curb to Roof Curb align with sub-frames and roof panel. Roof Panel The downslope highs are to be installed OVER the roof panel. Caulk (apply as shown) Caulk Sealant Tape (apply as shown) Drawing 4.1 *Notice* Sub-frames and purlins not shown in the above picture. Must ll end of standing 5 FASTEN CURB TO ROOF PANEL seam with caulk. Fasten curb to roof panel using #14 - 1 1/8” neoprene self-tap screw Roof Panel on 4” centers (see drawing 5.1). DO NOT FASTEN CURB OR ROOF PANEL TO SUB-FRAMES. Please ensure all self-tap screws are properly tightened before moving to the next step. Self-Tap Screws Drawing 5.1 *Notice* Sub-frames and purlins not shown in the above picture. WARNING! Page 3 ALWAYS USE FALL PROTECTION WHILE WORKING AROUND ROOF OPENINGS.
  • 5. ROOF CURB INSTALLATION INSTRUCTIONS UNIVERSAL STANDING SEAM PANEL 6 ATTACH CAP STRIPS Turn the cap strips upside down and apply sealant tape to the entrie length of both inside legs. Then run a bead of caulk down the middle of the cap strips and Roof Panel at each end of cap strip (see drawing 6.1). Install cap strips over the curb/roof panel sidelap, fasten with screws alternating on 6” centers (staggered on both sides). The capstrip should extend approximately 6” past both upslope and downslope base of roof curb. Cap strips furnished with curb Sealant tape Caulk Cap Strips Screws staggered 6” on center (length varies) (both sides) Curb base Roof Panel Sealant tape (both sides) Caulk Drawing 6.1 1” between each bead of caulk at each end *Notice* Sub-frames and purlins not shown in the above picture. COMPLETED INSTALLATION **Clean up installation debris before leaving area. WARNING! Page 4 ALWAYS USE FALL PROTECTION WHILE WORKING AROUND ROOF OPENINGS.