
Recommandé
Contenu connexe
En vedette
En vedette (16)
Dernier
Dernier (9)
Wedding Projects
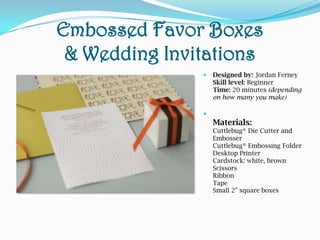
- 1. Embossed Favor Boxes & Wedding Invitations Designed by: Jordan FerneySkill level: BeginnerTime: 20 minutes (depending on how many you make) Materials:Cuttlebug® Die Cutter and EmbosserCuttlebug® Embossing FolderDesktop PrinterCardstock: white, brownScissorsRibbonTapeSmall 2" square boxes
- 2. Designed by: Jordan Ferney Skill level: Beginner Time: 20 minutes (depending on how many you make) Materials: Cuttlebug® Die Cutter and Embosser Cuttlebug® Embossing Folder Desktop Printer Cardstock: white, brown Scissors Ribbon Tape Small 2" square boxes
- 3. Invitation: After choosing envelope size, layout invitation and text accordingly on your computer until it looks nice. (We used a 5x7 or A7 piece of paper.) One common mistake is to make text too large, try to avoid that. Then print your invitations. If you have a large pile you may want to take it to a copy store and have it laser cut to save you time. Once the paper is cut down to fit inside the envelope you are ready to emboss.
- 4. Using Cuttlebug machine and Pebble Embossing Folder, follow directions to emboss the invitation.
- 9. Favors: Cut strips of brown cardstock.
- 10. Using Cuttlebug machine and Pebble Embossing Folder, lay half of the strip of paper in the folder. Following directions emboss the first half of the strips. Turn them over and repeat so that the whole length of the strip of paper is embossed.
- 13. Wrap strip of paper around favor box and secure with a small piece of tape.
- 14. For embellishment, tie a ribbon around the outside and tie in a bow.