Contenu connexe Similaire à Art on0508 (20) Plus de Jose Miguel Lopez Garcia Plus de Jose Miguel Lopez Garcia (20) 1. online beginner
exclusive wire
Try This on for size
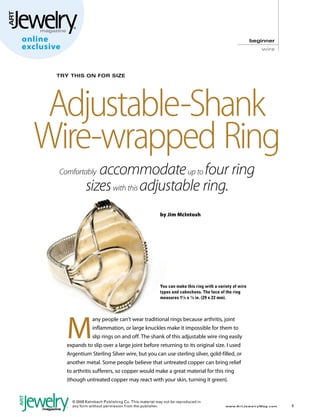
Adjustable-Shank
Wire-wrapped Ring
Comfortably accommodate up to four ring
sizes with this adjustable ring.
by Jim McIntosh
You can make this ring with a variety of wire
types and cabochons. The face of the ring
measures 11 ⁄ 8 x 7 ⁄ 8 in. (29 x 22 mm).
M
any people can’t wear traditional rings because arthritis, joint
inflammation, or large knuckles make it impossible for them to
slip rings on and off. The shank of this adjustable wire ring easily
expands to slip over a large joint before returning to its original size. I used
Argentium Sterling Silver wire, but you can use sterling silver, gold-filled, or
another metal. Some people believe that untreated copper can bring relief
to arthritis sufferers, so copper would make a great material for this ring
(though untreated copper may react with your skin, turning it green).
© 2008 Kalmbach Publishing Co. This material may not be reproduced in
any form without permission from the publisher. www.A r t J e w e l r y M a g . c o m
2. 1 2 3
4 5
Measure your cabochon. Cut a 4-in. Prepare the wire. Cut three strands of
(10.2 cm) piece of painter’s tape, and trim
a 1 ⁄8 -in. (3 mm)-wide strip from the long
22-gauge (0.6 mm) square wire to the
determined length. Straighten each wire
materials
■ Cabochon: 25 x 18 mm
side of the tape [1]. Set the wide strip aside by holding one end with your flatnose ■ Wire:
to use later. Beginning at the center of pliers and pulling the wire through a ■ 22-gauge (0.6 mm), square, dead-soft,
one long side of the cabochon, wrap the polishing cloth. 45 in. (1.1 m)
narrow piece of tape around the cabo- Hold the wires side by side, keeping ■ 21-gauge (0.7 mm), half-round, dead-
chon’s perimeter [2]. Trim the excess tape the sides square to each other. Secure the soft, 38 in. (96.5 cm)
so that the ends meet but do not overlap. wires with a piece of painter’s tape about
Use a fine-tip permanent marker to 3 in. (76 mm) from the wire ends. tools supplies
draw a line on the tape opposite where Starting at the taped end, run your ■ Painter’s tape
the tape ends meet. This marks the center fingers down the wires to make sure they ■ Permanent marker: fine tip
of the cabochon’s other long side. don’t overlap or twist. Secure the other ■ Wire cutters
Make additional lines about 5 ⁄64 in. end with tape about 3 in. (76 mm) from ■ Pliers: flatnose
(2 mm) to the right and left of the first the wire ends to create a wire bundle [4]. ■ Polishing cloth
Tape measure
line [3]. These lines represent how wide ■
■ Ring mandrel
you’ll make each wire wrap. Transfer the wrap lines. Open a tape
■ Rawhide mallet
Repeat the series of three lines at the measure to the length of your wire bundle.
■ Needle file
center of each short end of the cabochon. Place the marked painter’s tape below the ■ Finishing items (optional): flex shaft,
I made the width of my short-end wraps tape measure, aligning the tape’s center hard felt buff, rouge
narrower than the long-side wraps. mark with the tape measure’s midpoint.
Place the wire bundle below the tape suppliers
Determine the wire length. Remove [5]. Line up one end of the bundle with ■ Wire and cabochon (Rio Grande,
the tape from the stone and place it sticky- the end of the tape measure. Use a fine-tip 800.545.6566, www.riogrande.com)
side down on your work surface. To find permanent marker to transfer the marks
the amount of wire you need, note the on the tape to the bundle. I do not transfer
length of the tape. Multiply the length by the center mark of each line group.
2 and add 9 in. (22.9 cm).
© 2008 Kalmbach Publishing Co. This material may not be reproduced in
any form without permission from the publisher. www.A r t J e w e l r y M a g . c o m
3. Make the center wrap. Cut an 8-in.
(20.3 cm) piece of 21-gauge (0.7 mm)
half-round wire to use as your wrapping
wire. Using flatnose pliers, hold the
wrapping wire vertically approximately
½ in. (13 mm) from the top, with its flat
side facing you.
With your free hand, fold the long end
of the wrapping wire up over the pliers
and place it to the right of the short end.
6 7 Notice that it resembles a checkmark.
Hook the short end of the wrapping
wire over the bundle at the left line of the
center marks [6]. Use flatnose pliers to
press the wrapping wire in place.
With your fingers, bring the long end
of the wrapping wire over the bundle and
place it to the right of the short end. Press
the wrapping wire down on the bundle to
secure it [7].
Continue wrapping with the long end
of the wire until you reach the right line of
the center mark. I made seven wraps on
my ring.
sizing up
Make sure that the last wrap leaves the
tail of the wrapping wire on the same side
of the wire bundle as the wrap lines (the
side with the exposed wire ends will be the
the situation inside of the bezel).
When you’re sizing rings, you need to keep wire gauge in mind. As the wire Trim the ends of the wrapping wire so
gauge gets heavier, additional millimeters are added to a ring size’s that neither end extends past the edge of
circumference. The ring circumference in this chart is based on a wire the bundle. Press each wire end again with
thickness of 1.6 mm.
the pliers to set the wire.
Tension in the shank of the featured ring may leave a gap of several
millimeters between the shank end and the ring base, making the finished
ring slightly larger than anticipated. Since this ring is adjustable, you may
want to make the ring slightly smaller than your ideal size.
ring size chart
U.S. ring size Circumference Circumference for 1.6 mm
of finger (mm) material thickness (mm)
5 49.0 54.0
6 51.5 56.5
7 54.0 59.1
8 56.5 61.6
9 59.1 64.1
10 61.6 66.6
Source: The Contenti Company. Other sources show up to 0.5 mm variance.
© 2008 Kalmbach Publishing Co. This material may not be reproduced in
any form without permission from the publisher. www.A r t J e w e l r y M a g . c o m
4. 8 9 10
11 12
Make the left and right end wraps. If the end wraps aren’t centered on the the adjacent wrap [10], and then repeat
Make the left wrap as you did the center left and right ends of the cabochon, adjust on the other side of the center wrap.
wrap. I wrapped the wire around the them now. When they are centered, use Place the cabochon in the U-shaped
bundle five times for my end wrap. Trim flatnose pliers to set the loose ends by frame, with the back of the cabochon
the wires, but do not press the wire ends pressing them to the bundle. supported by the bends. Bring the two
against the bundle. Repeat to make the bottom wires together so they meet at the
right wrap. Make the cabochon supports. Hold the center of the cabochon’s right side, and
wire bundle in your nondominant hand use flatnose pliers to bend the wires at 90º
Form the bezel. Align the wire bundle and use flatnose pliers to grasp the bottom angles away from the center of the stone.
so that the center wrap is in the middle of wire on one side of the center wrap. The two wires should be parallel [11].
one long side of the cabochon [8], and Twist the pliers to make a small bend Remove the cabochon, and tape the
bend the wire bundle into a U shape [9]. toward the middle of the bezel. Repeat on two bottom wires together about 4 in.
(10.2 cm) from where the stone will sit [12].
Secure the top of the cabochon. Place
the cabochon in the bezel, and bend the
top wires to make a design on top of the
cabochon. See “That’s a Wrap,” page 5, for
tips on making a secure design.
When you are satisfied with your
design and have the stone securely in
the frame, bring the ends of the top wires
to the center of the cabochon’s right side
13 and bend them so that they align with
the bottom wires. Set the top wires to the
outside of the bottom wires, and tape all
four wires together [13].
Wrap the bezel’s center wires around
the cabochon, and then bend them so that
they align with the four-wire bundle. Place
the center wires to the outside of the
taped four-wire bundle, and tape all six
wires together [14]. These wires will form
14 the ring shank.
© 2008 Kalmbach Publishing Co. This material may not be reproduced in
any form without permission from the publisher. www.A r t J e w e l r y M a g . c o m
5. 15 16
17 18
Wrap the ring shank. Cut approximately Determine your ideal ring size (see Use wire cutters to trim the excess
30 in. (76.2 cm) of half-round wire for your “Sizing Up the Situation,” page 3) and note wrapping wire, and press the wire end
wrapping wire. Using flatnose pliers, hold the circumference. Measuring from the to the shank wires, using flatnose pliers.
the wrapping wire vertically approximately first wrap, find the circumference length Trim the excess wire from the shank
1 in. (25.5 mm) from its top end, with the on the shank wires and mark that point wires so they extend about ¼ in. (6.5 mm)
wire’s flat side facing you. with a fine-tip marker [16]. past the end of the wraps. Use pliers to
With your free hand, fold the long end Continue wrapping, pressing the wrap- grasp the shank-wire ends and fold them
of the wrapping wire up over the pliers ping wire to the shank wires every six to over the top of the ring shank, pressing
and place it to the right of the short end eight wraps until you reach the mark [17]. them tightly to the shank wraps [18].
so that it resembles a checkmark.
Holding the shank wires so that the
back of the cabochon faces you, hook the
wrapping wire over the shank wires [15],
with the short end on the back side of the
shank wires. Slide the wrapping wire as that’s a
close to the cabochon as possible.
To wrap the shank, use your fingers to
bring the long end of the wrapping wire
wrap
over the shank wires to the right of the To make a secure bezel for your cabochon, you need to think about where
short end. Keep the wrapping wire tight to place your wraps. In general, you can vary the placement of the wraps,
to the shank wires, but do not allow the but they should be evenly distributed to keep the wire bundle that makes
up the bezel wall intact. For the featured ring’s bezel, I made sure to wrap
shank wires to compress and overlap on one long side of the cabochon and at both small ends.
one another.
Continue wrapping, using flatnose Wrapping over the top of a cabochon serves two purposes: It’s decorative,
and it helps secure the cabochon in the bezel.
pliers to press the wrapping wire to the
shank wires every six to eight wraps to set When designing the top wraps of the cabochon, make sure that the swirls
it. After you’ve wrapped 1 ⁄2 in. (13 mm) of cover at least two-thirds of the cabochon to prevent the stone from
popping out of the bezel. If your design doesn’t cover two-thirds of the
the shank wires, remove the tape pieces cabochon’s surface, you will need to make angled bends in the wire on the
that are holding the shank wires together. top of the bezel just as you did on the bottom.
© 2008 Kalmbach Publishing Co. This material may not be reproduced in
any form without permission from the publisher. www.A r t J e w e l r y M a g . c o m
6. Process photos by Jim McIntosh.
19 20 21
Shape the ring shank. Using a ring 90º to bring it under the cabochon.
mandrel, hold the end of the wrapped With your fingers, squeeze the shank Jim McIntosh
shank at the mandrel’s mark for your ideal together to compress its diameter. Check has been making
size. Carefully bend the shank around the the size on the ring mandrel, and compress jewelry for over 6
mandrel, working from the end of the the shank until the ring is slightly smaller years. He says, “It
shank toward the cabochon [19]. Tuck than your ideal size. Compress the shank has always been
the shank end under the cabochon. until the end of the ring shank reaches my desire to push
the side where the shank meets the the envelope of
NOTE: You may need to remove the ring cabochon [21]. wire art as far as
from the mandrel to bring the open end Place the ring back on the mandrel possible.” He may be contacted via his
under the cabochon properly. at the mark for your ideal size. Using a Web site, www.macjewels.com.
rawhide mallet, lightly hammer the out-
Once you have the basic shape of the side of the ring shank to refine the shape
ring shank, remove the ring from the and work-harden the ring.
mandrel. Use flatnose pliers to carefully
grasp the shank wires where the shank File and polish the ring. Use a needle
meets the stone [20]. Bend the shank file to smooth any sharp wire ends. Polish
the wire with a polishing cloth, or apply
jeweler’s rouge according to the manufac-
turer’s instructions and then buff it with
a hard felt buff in a flex shaft.
© 2008 Kalmbach Publishing Co. This material may not be reproduced in
any form without permission from the publisher. www.A r t J e w e l r y M a g . c o m
7. Make jewelry
that makes a
statement . . .
your statement
Looking for projects that use different
materials such as metalwork, wirework,
stone, glass, polymer, and enamel? Then
Art Jewelry is the magazine for you!
Discover the secrets you need to create
breathtaking pieces that express your own
distinctive style like never before! Whether
you want to learn a new technique, try a
Subscribe
different material, or get ideas for your
own jewelry projects, there’s something for
Today!
you in Art Jewelry!
Order online at
www.artjewelrymag.com/promo
Enter code: I4XZ1
or call 800-533-6644
Monday-Friday, 8:30 a.m. - 5:00 p.m. Central Time.
Outside the U.S. and Canada, call 262-796-8776, ext. 661.
05X1017
I4XZ1

![1 2 3
4 5
Measure your cabochon. Cut a 4-in. Prepare the wire. Cut three strands of
(10.2 cm) piece of painter’s tape, and trim
a 1 ⁄8 -in. (3 mm)-wide strip from the long
22-gauge (0.6 mm) square wire to the
determined length. Straighten each wire
materials
■ Cabochon: 25 x 18 mm
side of the tape [1]. Set the wide strip aside by holding one end with your flatnose ■ Wire:
to use later. Beginning at the center of pliers and pulling the wire through a ■ 22-gauge (0.6 mm), square, dead-soft,
one long side of the cabochon, wrap the polishing cloth. 45 in. (1.1 m)
narrow piece of tape around the cabo- Hold the wires side by side, keeping ■ 21-gauge (0.7 mm), half-round, dead-
chon’s perimeter [2]. Trim the excess tape the sides square to each other. Secure the soft, 38 in. (96.5 cm)
so that the ends meet but do not overlap. wires with a piece of painter’s tape about
Use a fine-tip permanent marker to 3 in. (76 mm) from the wire ends. tools supplies
draw a line on the tape opposite where Starting at the taped end, run your ■ Painter’s tape
the tape ends meet. This marks the center fingers down the wires to make sure they ■ Permanent marker: fine tip
of the cabochon’s other long side. don’t overlap or twist. Secure the other ■ Wire cutters
Make additional lines about 5 ⁄64 in. end with tape about 3 in. (76 mm) from ■ Pliers: flatnose
(2 mm) to the right and left of the first the wire ends to create a wire bundle [4]. ■ Polishing cloth
Tape measure
line [3]. These lines represent how wide ■
■ Ring mandrel
you’ll make each wire wrap. Transfer the wrap lines. Open a tape
■ Rawhide mallet
Repeat the series of three lines at the measure to the length of your wire bundle.
■ Needle file
center of each short end of the cabochon. Place the marked painter’s tape below the ■ Finishing items (optional): flex shaft,
I made the width of my short-end wraps tape measure, aligning the tape’s center hard felt buff, rouge
narrower than the long-side wraps. mark with the tape measure’s midpoint.
Place the wire bundle below the tape suppliers
Determine the wire length. Remove [5]. Line up one end of the bundle with ■ Wire and cabochon (Rio Grande,
the tape from the stone and place it sticky- the end of the tape measure. Use a fine-tip 800.545.6566, www.riogrande.com)
side down on your work surface. To find permanent marker to transfer the marks
the amount of wire you need, note the on the tape to the bundle. I do not transfer
length of the tape. Multiply the length by the center mark of each line group.
2 and add 9 in. (22.9 cm).
© 2008 Kalmbach Publishing Co. This material may not be reproduced in
any form without permission from the publisher. www.A r t J e w e l r y M a g . c o m](data:image/gif;base64,R0lGODlhAQABAIAAAAAAAP///yH5BAEAAAAALAAAAAABAAEAAAIBRAA7)