1. RRRRRRRRRRRRRRRRRRRRRRRRRRR
projectlibrary
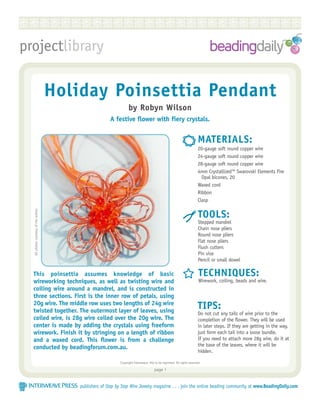
Holiday Poinsettia Pendant
by Robyn Wilson
A festive flower with fiery crystals.
MATERIALS:
20-gauge soft round copper wire
24-gauge soft round copper wire
28-gauge soft round copper wire
4mm Crystallized™ Swarovski Elements Fire
Opal bicones, 20
Waxed cord
Ribbon
Clasp
All photos courtesy of the author.
TOOLS:
Stepped mandrel
Chain nose pliers
Round nose pliers
Flat nose pliers
Flush cutters
Pin vise
Pencil or small dowel
This poinsettia assumes knowledge of basic TECHNIQUES:
wireworking techniques, as well as twisting wire and Wirework, coiling, beads and wire.
coiling wire around a mandrel, and is constructed in
three sections. First is the inner row of petals, using
20g wire. The middle row uses two lengths of 24g wire
twisted together. The outermost layer of leaves, using
TIPS:
Do not cut any tails of wire prior to the
coiled wire, is 28g wire coiled over the 20g wire. The completion of the flower. They will be used
center is made by adding the crystals using freeform in later steps. If they are getting in the way,
wirework. Finish it by stringing on a length of ribbon just form each tail into a loose bundle.
and a waxed cord. This flower is from a challenge If you need to attach more 28g wire, do it at
the base of the leaves, where it will be
conducted by beadingforum.com.au.
hidden.
Copyright Interweave Not to be reprinted. All rights reserved.
page 1
publishers of Step by Step Wire Jewelry magazine . . . join the online beading community at www.BeadingDaily.com
2. Holiday Poinsettia Pendant
Step 1: Flush cut and straighten approximately 20" of Step 3: Cut approximately 28" of 24g wire, fold in half,
20g wire. Using the tips of the round nose and twist using a pin vise. Trim off the
pliers, turn a P-shaped loop on one end. Using hardened end on one side of the wire, leaving
the 6mm step on the mandrel, form the top the loop at the other end. Starting from the
curve of the petal. Use the tips of the round looped end, and using the next step on the
nose pliers to form a curve at the base. Create mandrel, repeat Steps 1-2 with the twisted
seven petals. Tuck the tail through the P- wire to form the second flower. Trim the tail,
shaped loop. Using your fingers, manipulate it secure it, and tuck it in neatly.
into a circle to form the basic shape, and close
the loop tightly over the tail. Leave the tail
uncut.
Step 3
Step 1
Step 4: Place the first flower on top of the twisted one,
Step 2: Hold the shape in your non-dominant hand and using 28g wire, weave the two rows
with your thumb over the center. Use round together, again leaving a center circle. Reshape
nose pliers to create a little tip at the tops of the petals if necessary, and tilt them up
the petals by pressing down with the outer jaw. slightly.
Reinsert the pliers on the other side of the
petal, and repeat. Use the mandrel or pliers to
reshape the petals if necessary. Leave a circle
open in the center, and gently curve the petals
forward.
Step 4
Step 2
Copyright Interweave. Not to be reprinted. All rights reserved.
page 2
publishers of Step by Step Wire Jewelry magazine . . . join the online beading community at www.BeadingDaily.com
3. Holiday Poinsettia Pendant
Step 5: Cut approximately 24" of 20g wire, and make a Step 6: Nestle the petals in front of the leaves and,
P-shaped loop on one end. Use your fingers to using your fingers, form them into a flower
shape leaves gently around a pencil or small shape with all three elements nested together.
dowel. Form the leaves more loosely and in a While holding the layers together in your non-
rounder shape than the petals. Coil the 28g dominant hand, using your thumb to keep the
wire over this shape. You may need to reshape layers in place, use the tail of the 28g coiling
the leaves as you go. Slide the tail of the core wire to secure the leaves in place. Trim the tail
wire through the P-shaped loop, and secure it and tuck the end in neatly.
using the tail of the coiling wire. There should
be a tail of at least 6".
Step 6
Step 7: Cut a 24" length of 28g wire, fold it in half,
Step 5 and slip it through center edge of the flower.
Pull firmly to anchor it, and wrap around the
center circle of the flower. Repeat, going in the
opposite direction. Make sure that all the layers
are wrapped securely.
Step 7
Copyright Interweave. Not to be reprinted. All rights reserved.
page 3
publishers of Step by Step Wire Jewelry magazine . . . join the online beading community at www.BeadingDaily.com
4. Holiday Poinsettia Pendant
Step 8: Using the tails of the 28g wire, add the 4mm Step 10: Using the tail of 20g wire from Step 1, form a
crystals to fill in the center of the flower in a spiral to neaten the back of the flower. Spiral
freeform manner. Add more 28g wire as needed the end of the 24g, and the other 20g to cover
to fill in the center. the base of the bail. Attach the pendant to a
ribbon-and-cord necklace, and attach a clasp
on the ends.
Step 8
Step 9: Turn the pendant over. Using the tail of the 20g
wire from Step 1, straighten and coil it with the Step 10
24g wire. Do not trim this wire. Using your
fingers or round nose pliers, shape the coiled
wire into a bail, and secure it by twisting the
20g wire around the base of the bail. Do not ROBYN WILSON
trim the wire. You should have two tails of 20g lives in Melbourne,
wire, and one of 24g wire. Australia with her
husband, two cats, and an
adopted greyhound. She
took up jewelry making in
two years ago and is
mostly self-taught, while
also taking workshops at
Vine Creations. Robyn
enjoys working with metal
in most forms, and also
chain maille.
Step 9
Copyright Interweave. Not to be reprinted. All rights reserved.
page 4
publishers of Step by Step Wire Jewelry magazine . . . join the online beading community at www.BeadingDaily.com