Incoming and Outgoing Shipments in 3 STEPS Using Odoo 17
Process Journals 2
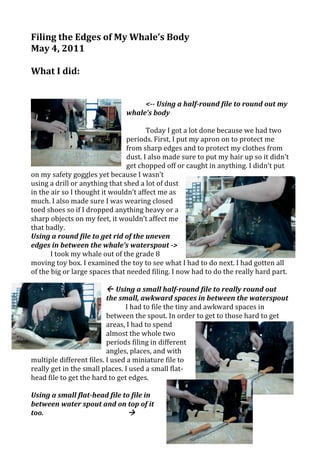
1. Filing
the
Edges
of
My
Whale’s
Body
May
4,
2011
What
I
did:
<--
Using
a
half-round
file
to
round
out
my
whale’s
body
Today
I
got
a
lot
done
because
we
had
two
periods.
First,
I
put
my
apron
on
to
protect
me
from
sharp
edges
and
to
protect
my
clothes
from
dust.
I
also
made
sure
to
put
my
hair
up
so
it
didn’t
get
chopped
off
or
caught
in
anything.
I
didn’t
put
on
my
safety
goggles
yet
because
I
wasn’t
using
a
drill
or
anything
that
shed
a
lot
of
dust
in
the
air
so
I
thought
it
wouldn’t
affect
me
as
much.
I
also
made
sure
I
was
wearing
closed
toed
shoes
so
if
I
dropped
anything
heavy
or
a
sharp
objects
on
my
feet,
it
wouldn’t
affect
me
that
badly.
Using
a
round
file
to
get
rid
of
the
uneven
edges
in
between
the
whale’s
waterspout
->
I
took
my
whale
out
of
the
grade
8
moving
toy
box.
I
examined
the
toy
to
see
what
I
had
to
do
next.
I
had
gotten
all
of
the
big
or
large
spaces
that
needed
filing.
I
now
had
to
do
the
really
hard
part.
Using
a
small
half-round
file
to
really
round
out
the
small,
awkward
spaces
in
between
the
waterspout
I
had
to
file
the
tiny
and
awkward
spaces
in
between
the
spout.
In
order
to
get
to
those
hard
to
get
areas,
I
had
to
spend
almost
the
whole
two
periods
filing
in
different
angles,
places,
and
with
multiple
different
files.
I
used
a
miniature
file
to
really
get
in
the
small
places.
I
used
a
small
flat-‐
head
file
to
get
the
hard
to
get
edges.
Using
a
small
flat-head
file
to
file
in
between
water
spout
and
on
top
of
it
too.
2. I
also
used
a
round
file
to
get
in
between
the
spaces
and
smooth
out
the
inside
of
the
spaces.
Finally,
I
used
a
regular
half-‐round
file
on
and
off
to
get
some
extra
edges
I
missed.
I
rolled
up
sanding
paper
and
used
it
to
sand
off
some
of
the
hard
to
reach
sharp
edges.
There
was
one
section
on
one
of
the
tails
fins
that
was
uneven
and
jagged.
Not
only
did
it
look
ugly
but
also
it
was
also
unsafe
for
children.
I
spent
at
least
thirty
minutes
trying
to
even
it
out
with
a
small
flat-‐head
file.
It
took
a
long
time,
but
I
got
it
done.
Towards
the
end
of
the
lesson,
when
I
was
almost
done,
I
pulled
started
using
the
half-‐round
file
at
different
angles
to
get
those
edges
smooth.
The
last
thing
I
did
was
start
making
my
off
center
wheels.
I
positioned
the
wheel
in
a
drill
vice
tight
so
it
doesn’t
fly
out.
I
put
my
safety
glasses
on
to
ensure
my
eyes
were
safe
from
all
dust.
Although,
I
barley
got
to
drill
anything
when
we
had
to
pack
up.
Using
a
pedestal
drill
to
drill
the
off
center
hole
in
my
wheel.
After
this,
the
period
had
ended,
and
it
was
time
to
pack
up.
I
put
my
apron
away
and
put
up
my
tools.
I
then
re-‐wrote
my
name
on
my
piece
of
wood
and
put
I
tin
the
Grade
8
Moving
Toy
project
box.
Finally,
I
cleaned
up
my
station
and
made
sure
everything
was
in
order.
Why?
I
used
a
tiny
half-‐round
file
because
I
needed
to
round
and
smooth
out
the
spaces
of
my
whale
that
a
normal
half-‐round
file
can’t
get
to.
I
used
a
larger
flat-‐
head
file
to
flatten
the
area
on
a
tail
fin
that
was
jagged
and
rough.
I
did
this
because
the
edge
was
not
very
pretty
and
it
was
sharp,
therefore
making
it
unsafe
for
children.
I
used
a
round
file
to
smooth
out
the
surface
and
any
extra
jagged
edges
inside
the
tight
spaces
of
my
whales
spout.
I
also
used
a
half-‐round
file
to
get
rid
of
any
extra
or
accessible
sharp
edges.
Finally,
I
used
a
pedestal
drill
to
drill
the
second
of
center
hole
in
my
whale’s
wheels.
I
need
off
center
wheels
to
give
the
illusion
my
whale
is
swimming
when
moving.
3.
What’s
Next?
Next
lesson,
I’m
going
to
finish
or
almost
get
my
off
center
wheels
done.
Because
I’m
not
sure
if
I
did
the
first
one
correctly,
(I’m
hoping
I
don’t
have
to
but)
I
think
I
might
have
to
make
another
one
otherwise.
The
off
center
wheels
could
take
me
all
next
period
or
they
could
take
me
just
a
fraction
of
it.
Regardless
though,
I
have
to
finish
the
wheels
sand
the
body;
drill
the
wheels
and
then
paint.
Emotion:
I
felt
really
good
about
today’s
lesson
because
I
finished
all
of
my
filing.
This
means
that
the
really
hard
work
is
done.
I
don’t
have
to
worry
about
not
finishing
on
time
or
being
behind
because
I’m
doing
really
well.
I
think
I
did
a
pretty
good
job
and
I
look
forward
to
making
the
wheels
and
painting
it!
AOI
&
Learner
Profile
I
was
knowledgeable
because
I
used
the
past
experience
I
had
with
rounding
edges
with
a
half-‐round
file
from
my
previous
lessons.
Environment
–
We
are
re-‐using
wood
and
using
small
pieces
for
other
projects
so
we
don’t
have
to
use
a
different
piece
every
time.
4. Filing
the
Edges
of
My
Whale’s
Body
May
4,
2011
What
I
did:
<--
Using
a
half-round
file
to
round
out
my
whale’s
body
Today
I
got
a
lot
done
because
we
had
two
periods.
First,
I
put
my
apron
on
to
protect
me
from
sharp
edges
and
to
protect
my
clothes
from
dust.
I
also
made
sure
to
put
my
hair
up
so
it
didn’t
get
chopped
off
or
caught
in
anything.
I
didn’t
put
on
my
safety
goggles
yet
because
I
wasn’t
using
a
drill
or
anything
that
shed
a
lot
of
dust
in
the
air
so
I
thought
it
wouldn’t
affect
me
as
much.
I
also
made
sure
I
was
wearing
closed
toed
shoes
so
if
I
dropped
anything
heavy
or
a
sharp
objects
on
my
feet,
it
wouldn’t
affect
me
that
badly.
Using
a
round
file
to
get
rid
of
the
uneven
edges
in
between
the
whale’s
waterspout
->
I
took
my
whale
out
of
the
grade
8
moving
toy
box.
I
examined
the
toy
to
see
what
I
had
to
do
next.
I
had
gotten
all
of
the
big
or
large
spaces
that
needed
filing.
I
now
had
to
do
the
really
hard
part.
Using
a
small
half-round
file
to
really
round
out
the
small,
awkward
spaces
in
between
the
waterspout
I
had
to
file
the
tiny
and
awkward
spaces
in
between
the
spout.
In
order
to
get
to
those
hard
to
get
areas,
I
had
to
spend
almost
the
whole
two
periods
filing
in
different
angles,
places,
and
with
multiple
different
files.
I
used
a
miniature
file
to
really
get
in
the
small
places.
I
used
a
small
flat-‐
head
file
to
get
the
hard
to
get
edges.
Using
a
small
flat-head
file
to
file
in
between
water
spout
and
on
top
of
it
too.
5. I
also
used
a
round
file
to
get
in
between
the
spaces
and
smooth
out
the
inside
of
the
spaces.
Finally,
I
used
a
regular
half-‐round
file
on
and
off
to
get
some
extra
edges
I
missed.
I
rolled
up
sanding
paper
and
used
it
to
sand
off
some
of
the
hard
to
reach
sharp
edges.
There
was
one
section
on
one
of
the
tails
fins
that
was
uneven
and
jagged.
Not
only
did
it
look
ugly
but
also
it
was
also
unsafe
for
children.
I
spent
at
least
thirty
minutes
trying
to
even
it
out
with
a
small
flat-‐head
file.
It
took
a
long
time,
but
I
got
it
done.
Towards
the
end
of
the
lesson,
when
I
was
almost
done,
I
pulled
started
using
the
half-‐round
file
at
different
angles
to
get
those
edges
smooth.
The
last
thing
I
did
was
start
making
my
off
center
wheels.
I
positioned
the
wheel
in
a
drill
vice
tight
so
it
doesn’t
fly
out.
I
put
my
safety
glasses
on
to
ensure
my
eyes
were
safe
from
all
dust.
Although,
I
barley
got
to
drill
anything
when
we
had
to
pack
up.
Using
a
pedestal
drill
to
drill
the
off
center
hole
in
my
wheel.
After
this,
the
period
had
ended,
and
it
was
time
to
pack
up.
I
put
my
apron
away
and
put
up
my
tools.
I
then
re-‐wrote
my
name
on
my
piece
of
wood
and
put
I
tin
the
Grade
8
Moving
Toy
project
box.
Finally,
I
cleaned
up
my
station
and
made
sure
everything
was
in
order.
Why?
I
used
a
tiny
half-‐round
file
because
I
needed
to
round
and
smooth
out
the
spaces
of
my
whale
that
a
normal
half-‐round
file
can’t
get
to.
I
used
a
larger
flat-‐
head
file
to
flatten
the
area
on
a
tail
fin
that
was
jagged
and
rough.
I
did
this
because
the
edge
was
not
very
pretty
and
it
was
sharp,
therefore
making
it
unsafe
for
children.
I
used
a
round
file
to
smooth
out
the
surface
and
any
extra
jagged
edges
inside
the
tight
spaces
of
my
whales
spout.
I
also
used
a
half-‐round
file
to
get
rid
of
any
extra
or
accessible
sharp
edges.
Finally,
I
used
a
pedestal
drill
to
drill
the
second
of
center
hole
in
my
whale’s
wheels.
I
need
off
center
wheels
to
give
the
illusion
my
whale
is
swimming
when
moving.
6.
What’s
Next?
Next
lesson,
I’m
going
to
finish
or
almost
get
my
off
center
wheels
done.
Because
I’m
not
sure
if
I
did
the
first
one
correctly,
(I’m
hoping
I
don’t
have
to
but)
I
think
I
might
have
to
make
another
one
otherwise.
The
off
center
wheels
could
take
me
all
next
period
or
they
could
take
me
just
a
fraction
of
it.
Regardless
though,
I
have
to
finish
the
wheels
sand
the
body;
drill
the
wheels
and
then
paint.
Emotion:
I
felt
really
good
about
today’s
lesson
because
I
finished
all
of
my
filing.
This
means
that
the
really
hard
work
is
done.
I
don’t
have
to
worry
about
not
finishing
on
time
or
being
behind
because
I’m
doing
really
well.
I
think
I
did
a
pretty
good
job
and
I
look
forward
to
making
the
wheels
and
painting
it!
AOI
&
Learner
Profile
I
was
knowledgeable
because
I
used
the
past
experience
I
had
with
rounding
edges
with
a
half-‐round
file
from
my
previous
lessons.
Environment
–
We
are
re-‐using
wood
and
using
small
pieces
for
other
projects
so
we
don’t
have
to
use
a
different
piece
every
time.
7.
Finishing
Drilling
My
Whale’s
Wheels
and
Sanding
the
Body
May
9,
2011
What
I
did:
Today
I
got
a
lot
done.
First,
I
put
my
apron
on
to
protect
me
from
sharp
edges
and
to
protect
my
clothes
from
dust.
I
also
made
sure
to
put
my
hair
up
so
it
didn’t
get
chopped
off
or
caught
in
anything.
I
didn’t
put
on
my
safety
goggles
yet
because
I
wasn’t
using
a
drill
or
anything
that
shed
a
lot
of
dust
in
the
air
so
I
thought
it
wouldn’t
affect
me
as
much.
Drilling
the
holes
in
my
whale’s
body
where
the
wheels
will
go.
I
also
made
sure
I
was
wearing
closed
toed
shoes
so
if
I
dropped
anything
heavy
or
a
sharp
objects
on
my
feet,
it
wouldn’t
affect
me
that
badly.
First
I
pulled
out
my
wheels
and
examined
them.
I
had
to
drill
the
actual
holes
into
my
whale’s
body
and
then
test
the
wheel
and
axles
together.
So
I
got
out
my
whale
and
put
the
wheel
on
to
see
where
the
hole
should
be
drilled.
I
was
careful
not
to
mark
the
area
to
far
from
the
edge
because
when
the
off
center
wheel
moves,
it
might
not
roll
correctly.
When
I
found
the
right
location
for
the
drilling,
I
marked
it
out
with
a
pencil
and
placed
it
under
the
drill.
I
also
measure
the
length
of
the
marked
out
location
so
I
could
make
it
identical
on
the
other
side
as
well.
The
first
time
I
lowered
the
drill,
I
drilled
only
a
little
on
the
surface
to
make
sure
it
was
in
place.
Using
a
wooden
mallet
and
glue
to
hit
the
axle
in
my
wheel.
Then
using
a
wet
cloth
to
get
the
extra
glue
off
-->
8. I
drilled
all
the
way
through
this
time.
I
continued
to
do
this
again.
Once
I
was
done
with
that,
I
needed
to
glue
and
hammer
in
my
axles
to
my
wheels.
I
picked
up
my
off
center
wheel
first
and
put
the
glue
on
the
edge
and
a
bit
on
the
inside.
I
put
in
the
axel
and
used
the
wooden
mallet
to
make
sure
the
axel
was
in
the
wheel
and
stayed.
I
then
used
a
wet
cloth
to
clean
off
any
unnecessary
glue.
I
tested
to
see
if
everything
fit
and
worked,
and
it
did.
I
needed
my
wheel’s
set
so
I
continued
to
sand
my
whale’s
body.
This
really
took
up
the
rest
of
the
period.
I
continued
to
sand
all
the
rough
areas
that
were
easy
to
get
to.
I
used
a
sanding
block
with
sanding
paper
for
it.
Using
a
sanding
block
and
sanding
paper
to
smooth
out
all
rough
edges
and
surfaces
of
my
whale.
Throughout
the
rest
of
the
period,
I
sanded
the
whole
whale’s
body.
I
even
got
the
hard
to
reach
places
in
between
the
spout
and
tail
with
just
sand
paper
and
not
the
sanding
block.
After
this,
the
period
had
ended,
and
it
was
time
to
pack
up.
I
put
my
apron
away
and
put
up
my
tools.
I
then
re-‐wrote
my
name
on
my
piece
of
wood
and
put
I
tin
the
Grade
8
Moving
Toy
project
box.
Finally,
I
cleaned
up
my
station
and
made
sure
everything
was
in
order.
Why?
I
used
a
large
drill
to
drill
in
the
holes
in
my
whale’s
body
because
I
had
to
make
the
holes
in
wheels
bigger
because
I
drilled
all
the
way
through.
I
used
a
wooden
mallet
to
hammer
in
the
axels
into
my
wheels
because
I
didn’t
think
that
just
glue
and
a
hard
push
would
have
been
enough
to
keep
the
axle
in
the
wheel.
I
used
a
sanding
block
to
sand
the
large
parts
because
it
gets
more
surface,
but
I
used
just
the
paper
to
get
the
tight
part
because
I
can
bend
it.
What’s
Next?
Next
class,
I
will
continue
sanding
until
I
don’t
need
to.
I
think
I
can
get
done
with
all
the
sanding
in
a
period
and
I
can
start
the
painting.
I
will
have
to
paint
in
more
than
one
coat
and
shades,
so
I
probably
won’t
be
able
to
finish
that
either.
But,
I’m
pretty
sure
that
I
can
get
the
sanding
done
and
I
can
begin
9. the
painting.
I
also
have
to
paint
and
insert
the
wheels.
But
I
look
forward
to
the
rest!
Emotion
I
felt
very
good
about
today’s
lesson.
I
felt
I
took
a
very
big
step
by
finishing
my
wheel’s
and
almost
finishing
my
sanding.
I’m
really
excited
that
I’m
close
to
being
done
and
I
look
forward
to
finishing
sanding,
painting,
and
the
wheels!
AOI
&
Learner
Profile
I
was
a
knowledgeable
because
I
used
my
previous
knowledge
of
the
tools
I
used
by
applying
that
knowledge
today
when
sanding
and
drilling
holes
in
my
whale.
Environment
–
We
are
re-‐using
wood
and
using
small
pieces
for
other
projects
so
we
don’t
have
to
use
a
different
piece
every
time.
10. Sanding
&
Painting
My
Whale’s
Body
May
11,
2011
What
I
did:
Today
I
started
a
whole
new
step
in
my
toy
making
process.
First,
I
put
my
apron
on
to
protect
me
from
sharp
edges
and
to
protect
my
clothes
from
dust.
I
also
made
sure
to
put
my
hair
up
so
it
didn’t
get
chopped
off
or
caught
in
anything.
I
didn’t
put
on
my
safety
goggles
yet
because
I
wasn’t
using
a
drill
or
anything
that
shed
a
lot
of
dust
in
the
air
so
I
thought
it
wouldn’t
affect
me
as
much.
Sanding
off
the
extra
rough
edges
of
my
whale’s
body
with
sanding
block.
I
began
with
sanding
again.
Although,
about
halfway
through
the
first
period
I
realized
that
everything
was
smooth.
So
I
asked
the
teacher
and
he
told
me
the
amount
I
had
done
was
really
good
and
I
could
start
painting.
I
examined
my
whale
and
decided
to
paint
the
spout
first.
Using
a
big
brush
and
the
lightest
color
first,
I
painted
the
whale’s
spout
an
almost
white
blue
I
remembered
that
I
always
have
to
paint
the
lighter
colors
first,
so
I
took
out
the
blue
and
white
paint.
I
took
out
two
paintbrushes,
one
small,
and
one
big.
On
the
cardboard,
I
mixed
the
blue
and
white
paint
to
get
a
slightly
tinted
blue
shade.
I
made
sure
to
paint
all
in
the
same
direction
so
the
paint
wouldn’t
glob
our
look
ugly.
Using
a
big
brush
and
continuing
to
paint
with
the
lighter
colors
first,
I
painted
the
whale’s
body
I
did
this
on
both
sides
with
the
big
brush,
and
switched
to
the
small
one
when
I
had
to
go
in
between
the
spout
and
body.
11. Once
I
was
done
with
the
spout,
I
moved
on
to
the
second
lightest
color,
which
was
the
part
of
the
whale’s
body
that
didn’t
have
water
painted
on.
I
added
more
blue
to
the
paint
mix
this
time,
giving
me
a
good
shade.
This
took
me
the
longest
because
not
only
did
I
have
many
tight
spaces,
but
I
also
had
to
be
careful
when
painting
near
the
water
section
because
I
didn’t
want
to
paint
on
it.
After
this,
I
only
had
about
ten
minutes
left
but
I
quickly
added
a
lot
more
blue
to
the
mix,
creating
a
very
dark
blue,
and
began
painting
the
water.
Using
a
big
brush
and
doing
the
darkest
color
last,
I
painted
the
ocean
on
my
whale,
I
did
not
finish
this
but
I
almost
did.
I
had
to
be
careful
when
painting
the
edges
of
the
water
because
I
didn’t
want
to
get
the
dark
paint
on
the
lighter
shade.
I
also
accidentally
got
some
of
the
dark
paint
in
the
spout
when
I
was
painting
in
between
but
I
was
told
I
could
sand
that
off.
After
this,
the
class
had
ended,
and
it
was
time
to
pack
up.
I
put
my
apron
away
and
put
up
my
tools.
I
then
re-‐wrote
my
name
on
my
piece
of
wood
and
put
I
tin
the
Grade
8
Moving
Toy
project
box.
Finally,
I
cleaned
up
my
station
and
made
sure
everything
was
in
order.
Why?
I
used
a
sanding
block
at
the
beginning
of
the
lesson
because
I
need
to
smooth
and
round
out
all
my
edges
to
ensure
my
toy
was
safe
and
good
looking.
I
painted
my
whale
in
different
shades
of
blue
because
I
wanted
the
different
body
parts
to
stand
out.
I
paint
with
two
different
brushes
so
I
didn’t
paint
too
off
the
edges
or
lines.
I
painted
with
the
light
colors
first
because
that
way
if
I
mess
up,
I
can
just
paint
over
it
with
the
darker
color.
What’s
Next?
12. In
the
next
lesson,
I
plan
on
finishing
the
body
of
my
whale’s
first
coat.
I
think
I
might
to
let
it
dry
before
putting
on
a
second
coat
so
I’ll
probably
paint
the
wheels
before
I
do
the
second
coat.
Then,
while
the
second
body
coat
is
drying;
I’ll
do
the
second
paint
coat
on
the
wheels.
I
also
need
to
attach
they
eyes
and
draw
the
mouth.
Then
I’ll
be
done
with
painting.
Finally,
I
need
to
sand
the
body
again
and
attach
the
wheels.
Then,
I’m
done.
Emotion
I
felt
very
good
about
today’s
lesson.
Today
I
began
a
whole
new
step
to
my
toy
making
process
and
I
love
seeing
the
whale
colored
and
bright.
I
look
forward
to
finishing
it!
AOI
&
Learner
Profile
I
was
a
knowledgeable
because
I
used
my
previous
knowledge
with
painting
to
properly
and
neatly
paint
my
whale.
Environment
–
We
are
re-‐using
wood
and
using
small
pieces
for
other
projects
so
we
don’t
have
to
use
a
different
piece
every
time.
13. Painting
My
Whale’s
Body
May
12,
2011
``
Today
I
only
did
one
thing.
First,
I
put
my
apron
on
to
protect
me
from
sharp
edges
and
to
protect
my
clothes
from
dust.
I
also
made
sure
to
put
my
hair
up
so
it
didn’t
get
chopped
off
or
caught
in
anything.
I
didn’t
put
on
my
safety
goggles
yet
because
I
wasn’t
using
a
drill
or
anything
that
shed
a
lot
of
dust
in
the
air
so
I
thought
it
wouldn’t
affect
me
as
much.
Painting
my
whale’s
body
a
dark
blue
with
a
large
brush
First
I
pulled
out
all
the
painting
tools
I
need
for
my
whale.
I
got
out
the
cardboard
piece
that
I
mixed
my
paint
on.
I
got
two
paintbrushes,
one
small
and
one
big
brush.
I
also
got
a
little
container
of
water
that
I
could
wet
or
clean
my
brush
with.
I
then
got
my
whale
out
and
examined
it.
I
had
painted
almost
all
of
it
except
for
the
small
little
edges
of
water.
First
I
mixed
the
paint
to
get
the
shade
that
the
water
part
of
the
body
was
painted
of.
Continuing
to
paint
my
whale’s
body
a
dark
blue
with
a
large
brush
and
using
a
painting
cardboard
to
mix
my
paint.
-‐-‐>
I
used
this
shade
to
finish
painting
the
body
of
my
whale
besides
the
hard
to
get
places.
For
these
I
once
again
got
my
small
paintbrush
and
began
to
mix
the
paint.
I
needed
the
same
very
dark
shade
of
blue
that
I
used
before
as
water.
I
mixed
very
little
white
with
the
blue
to
get
the
shade
I
was
looking
for.
I
began
painting
those
edges
with
the
paintbrush
very
carefully
so
I
didn’t
get
any
darker
paint
on
the
lighter
parts
of
the
body.
I
also
made
sure
to
paint
in
the
same
direction
to
avoid
making
the
paint
job
look
ugly
and
to
avoid
globs
of
paint
forming.
Using
a
small
brush
to
paint
the
hard
to
get
edges
of
my
whale’s
body
14. This
took
up
the
rest
of
the
period
but
I
finished
painting
my
whole
whale’s
body.
Although,
this
is
only
the
first
coat.
I
have
to
do
this
again
and
I
also
have
to
paint
the
wheels
the
same
shade
of
blue
as
the
lower
body
(water
section).
After
this,
the
class
had
ended,
and
it
was
time
to
pack
up.
I
put
my
apron
away
and
put
up
my
tools.
I
then
re-‐wrote
my
name
on
my
piece
of
wood
and
put
I
tin
the
Grade
8
Moving
Toy
project
box.
Finally,
I
cleaned
up
my
station
and
made
sure
everything
was
in
order.
Why?
I
used
the
darker
shade
of
blue
on
the
lower
body
because
I
needed
some
contrast
in
between
the
colors
to
show
that
the
whale
was
swimming,
and
that
the
darker
shade
is
the
water.
I
painted
in
all
the
same
directions
so
that
the
paint
job
would
look
professional
and
not
ugly
and
also
so
the
paint
wouldn’t
glob
and
layer
unevenly.
I
used
the
large
paintbrush
to
paint
the
large
areas
because
it’s
less
time
consuming
and
looks
better.
I
also
used
a
small
brush
to
paint
the
small
and
hard
to
reach
areas
because
a
large
paintbrush
might
accidently
paint
the
wrong
places
or
mess
up
the
paint
job.
What’s
Next?
In
the
next
lesson,
I
plan
on
painting
and
finishing
the
wheels.
I
will
paint
these
the
same
color
as
my
whales
lower
body
(water
or
ocean
section).
This
will
be
a
very
dark
blue.
Although
I
will
not
paint
the
entire
wheel
because
some
of
it
won’t
even
be
seen
so
there
is
no
point.
I
will
also
paint
the
second
coat
on
both
the
body
and
wheels.
After
that,
I
have
to
assemble
the
body
and
I’m
done!
I
look
forward
to
finishing
it.
Emotion
I
felt
good
about
today’s
lesson.
I
finished
the
first
complete
coat
of
my
whale’s
body.
This
to
me
shows
progress
in
my
work.
This
makes
me
very
happy,
fulfilled,
and
excited
for
my
work
and
what’s
happening
next.
AOI
&
Learner
Profile
15.
I
was
a
knowledgeable
because
I
used
my
previous
knowledge
with
painting
to
properly
and
neatly
paint
my
whale.
Environment
–
We
are
re-‐using
wood
and
using
small
pieces
for
other
projects
so
we
don’t
have
to
use
a
different
piece
every
time.
Continuing
to
Paint
My
Whale’s
Body
May
16,
2011
Today
I
only
did
one
thing.
First,
I
put
my
apron
on
to
protect
me
from
sharp
edges
and
to
protect
my
clothes
from
dust.
I
also
made
sure
to
put
my
hair
up
so
it
didn’t
get
chopped
off
or
caught
in
anything.
I
didn’t
put
on
my
safety
goggles
yet
because
I
wasn’t
using
a
drill
or
anything
that
shed
a
lot
of
dust
in
the
air
so
I
thought
it
wouldn’t
affect
me
as
much.
Using
a
small
brush
to
paint
the
second
coat
of
light
paint
on
my
whale’s
spout.
First
I
pulled
out
all
the
painting
tools
I
need
for
my
whale.
I
got
out
the
cardboard
piece
that
I
mixed
my
paint
on.
I
got
two
paintbrushes,
one
small
and
one
big
brush.
I
also
got
a
little
container
of
water
that
I
could
wet
or
clean
my
brush
with.
I
then
got
my
whale
out
and
examined
it.
I
needed
to
paint
the
second
coat
to
get
off
all
the
little
details
and
to
fix
any
not
painted
or
messed
up
parts.
First
I
mixed
the
paint
to
get
the
shade
that
the
water
part
of
the
body
was
painted
of.
Using
a
large
brush
to
paint
the
darker
shade
of
blue
on
my
whale’s
body.
(second
coat)
I
used
this
shade
to
finish
painting
the
second
coat
on
the
body
of
my
whale
besides
the
hard
to
get
places.
For
these
I
once
again
got
my
small
paintbrush
and
began
to
mix
the
paint.
I
needed
the
same
very
dark
shade
of
blue
that
I
used
before
as
water.
I
mixed
very
little
white
with
the
blue
to
get
the
shade
I
was
looking
for.
I
began
painting
those
edges
with
the
paintbrush
very
carefully
16. so
I
didn’t
get
any
darker
paint
on
the
lighter
parts
of
the
body.
I
also
made
sure
to
paint
in
the
same
direction
to
avoid
making
the
paint
job
look
ugly
and
to
avoid
globs
of
paint
forming.
The
second
coat
was
in
the
end
hard
to
do
because
it
was
harder
to
paint
on
top
of
a
first
coat.
This
took
up
the
rest
of
the
periods
but
I
finished
painting
my
whole
whale’s
second
coat
all
over
the
body.
I
also
have
to
paint
the
wheels
the
same
shade
of
blue
as
the
lower
body
(water
section).
Using
a
large
brush
to
paint
the
darkest
shade
of
blue
on
the
ocean
part
of
my
whale.
(second
coat)
After
this,
the
class
had
ended,
and
it
was
time
to
pack
up.
I
put
my
apron
away
and
put
up
my
tools.
I
then
re-‐
wrote
my
name
on
my
piece
of
wood
and
put
I
in
the
Grade
8
Moving
Toy
project
box.
Finally,
I
cleaned
up
my
station
and
made
sure
everything
was
in
order.
Why?
I
used
the
darker
shade
of
blue
on
the
lower
body
because
I
needed
some
contrast
in
between
the
colors
to
show
that
the
whale
was
swimming,
and
that
the
darker
shade
is
the
water.
I
painted
in
all
the
same
directions
so
that
the
paint
job
would
look
professional
and
not
ugly
and
also
so
the
paint
wouldn’t
glob
and
layer
unevenly.
I
used
the
large
paintbrush
to
paint
the
large
areas
because
it’s
less
time
consuming
and
looks
better.
I
also
used
a
small
brush
to
paint
the
small
and
hard
to
reach
areas
because
a
large
paintbrush
might
accidently
paint
the
wrong
places
or
mess
up
the
paint
job.
I
painted
a
second
coat
because
when
I
sand
the
whale
for
a
final
time,
I
need
to
get
the
lines
off
but
I
need
the
paint
to
be
thick
enough
not
to
completely
come
off
when
I
sand.
I
also
needed
to
cover
the
spots
I
missed
or
painted
the
wrong
color.
What’s
Next?
17. In
the
next
lesson,
I
plan
on
painting
and
finishing
the
wheels.
I
will
paint
these
the
same
color
as
my
whales
lower
body
(water
or
ocean
section).
This
will
be
a
very
dark
blue.
Although
I
will
not
paint
the
entire
wheel
because
some
of
it
won’t
even
be
seen
so
there
is
no
point.
I
will
also
paint
the
second
on
the
wheels
after
they
dry.
After
that,
I
have
to
assemble
the
body
and
I’m
done!
I
look
forward
to
finishing
it.
Emotion
I
felt
good
about
today’s
lesson.
I
finished
the
first
complete
coat
of
my
whale’s
body.
This
to
me
shows
progress
in
my
work.
This
makes
me
very
happy,
fulfilled,
and
excited
for
my
work
and
what’s
happening
next.
AOI
&
Learner
Profile
I
was
a
knowledgeable
because
I
used
my
previous
knowledge
with
painting
to
properly
and
neatly
paint
my
whale.
Environment
–
We
are
re-‐using
wood
and
using
small
pieces
for
other
projects
so
we
don’t
have
to
use
a
different
piece
every
time.
18. Sanding
and
Painting
My
Whale’s
Body
&
Wheels
May
18,
2011
Today
I
mostly
painted
but
I
sanded
as
well.
First,
I
put
my
apron
on
to
protect
me
from
sharp
edges
and
to
protect
my
clothes
from
dust.
I
also
made
sure
to
put
my
hair
up
so
it
didn’t
get
chopped
off
or
caught
in
anything.
I
didn’t
put
on
my
safety
goggles
yet
because
I
wasn’t
using
a
drill
or
anything
that
shed
a
lot
of
dust
in
the
air
so
I
thought
it
wouldn’t
affect
me
as
much.
Using
sand
paper
to
sand
the
rough
lines
of
my
whale’s
first
coat
of
paint.
First
I
pulled
out
all
my
painting
and
sanding
tools
and
examined
my
toy.
I
decided
that
I
needed
to
sand
the
layer
of
paint
on
my
whale
and
then
repaint
some
of
the
in
touched
parts.
So,
I
proceed
to
sand
my
wheel
for
about
ten
minutes.
After
my
whale’s
body
was
smooth,
I
started
retouching
up
the
areas
that
the
nail
board
had
damaged
or
just
area
that
needed
to
look
better.
I
did
this
on
the
second
and
third
section
of
my
whale,
and
plan
on
doing
the
spout
tomorrow
because
it
only
needs
a
couple
fixes.
Filling
in
the
holes
of
my
wheel
and
then
sanding
it
off
to
get
an
even
surface
After
this,
one
whole
period
had
ended.
I
need
to
paint
my
wheels
so
I
got
the
paint
ready.
Although
realized
two
things
needed
to
be
fixed.
One,
I
had
to
drill
the
large
hole
for
m$y
axle
in
my
other
regular
wheel,
and
also
fill
in
the
holes
that
will
be
showing
on
the
outside
of
the
wheel
in
with
wood
paste.
I
did
this
and
sanded
off
the
extra
bits
to
make
it
flat.
Then,
I
drilled
the
hole
into
my
wheel
using
a
pedestal
drill
and
a
large
drill.
I
did
not
got
all
the
way
through
this
time.
Once
I
was
done
with
this,
I
started
painting
my
wheels.
I
decided
to
paint
all
around
the
wheel
except
for
a
bit
off
the
edge
of
the
axles.
I
did
this
just
in
case
the
wood
in
the
back
showed
when
rolling.
Painting
the
wheels
without
19. axles
was
hard
because
I
had
to
wet
paint
all
over
the
wheel
and
putting
it
in
a
position
I
could
paint
in
without
getting
all
over
the
place
was
hard.
Fixing
any
little
mistakes
on
my
whale’s
body.
This
took
up
the
rest
of
the
period.
Using
a
pedestal
drill
to
drill
the
hole
where
my
axle
should
go
in
my
normal
wheel.
After
this,
the
class
had
ended,
and
it
was
time
to
pack
up.
I
put
my
apron
away
and
put
up
my
tools.
I
then
re-‐wrote
my
name
on
my
piece
of
wood
and
put
I
in
the
Grade
8
Moving
Toy
project
box.
Finally,
I
cleaned
up
my
station
and
made
sure
everything
was
in
order.
Painting
my
wheels
with
the
color
of
the
ocean.
Why?
I
sanded
my
whale
before
I
painted
again
because
when
I
sand
off
the
roughness,
it
creates
a
new
pattern
in
the
wood.
When
I
paint
the
next
layer,
the
paint
I
used
then
should
fill
in
the
new
pattern,
creating
a
fairly
smooth
surface.
I
re-‐painted
many
of
the
sections
of
my
whale
so
everything
looked
even
and
nice.
Also,
so
the
paint
would
last
longer.
I
used
wood
paste
to
fill
in
the
holes
of
my
wheels
because
the
paste
can
mold
into
a
position,
stay,
and
be
sanded
flat
20. to
fill
in
the
hole
perfectly
so
my
toy
looks
nicer.
I
drill
the
final
hole
one
of
my
regular
wheels
because
the
axle
needs
o
be
able
to
fit
in
the
wheel.
What’s
Next?
In
the
nest
period,
I
will
finish
all
the
painting
and
sanding
needed
to
be
done
on
the
body.
I
will
also
paint
the
second
coat
on
my
wheels.
This
is
all
I
predict
I
can
get
done
in
one
period.
After
that
though,
I
need
to
assemble
the
body,
glue
on
the
eyes,
and
draw
the
face
on
my
whale.
Then
I
will
be
done!
Emotion
I
had
mixed
feelings
about
this
lesson.
I’m
getting
sick
of
painting
the
body,
but
I
know
I’m
almost
done.
I’m
happy
I
painted
the
wheels
though.
I’m
looking
forward
to
the
next
lesson
because
I
know
I
can
get
a
lot
done!
AOI
&
Learner
Profile
I
was
a
knowledgeable
because
I
used
my
previous
knowledge
with
painting
to
properly
and
neatly
to
paint
my
whale.
Also
I
used
my
previous
knowledge
with
the
pedestal
drill
to
drill
a
hole
in
my
wheel.
Environment
–
We
are
re-‐using
wood
and
using
small
pieces
for
other
projects
so
we
don’t
have
to
use
a
different
piece
every
time.
21. Painting
the
2nd
Coat
on
My
Whale’s
Wheels,
Touching
Up
the
Body
With
Paint
&
Marking
Out
the
Area
for
my
Eyes
May
19th
2011
Today
I
mostly
painted,
but
I
marked
out
the
eyes
as
well.
First,
I
put
my
apron
on
to
protect
me
from
sharp
edges
and
to
protect
my
clothes
from
dust.
I
also
made
sure
to
put
my
hair
up
so
it
didn’t
get
chopped
off
or
caught
in
anything.
I
didn’t
put
on
my
safety
goggles
yet
because
I
wasn’t
using
a
drill
or
anything
that
shed
a
lot
of
dust
in
the
air
so
I
thought
it
wouldn’t
affect
me
as
much.
Getting
all
little
bits
of
paint
and
sharp
edges
out
of
the
holes
in
my
whale’s
body
First
I
pulled
out
all
my
painting
tools
and
examined
my
toy.
I
started
retouching
up
the
areas
that
the
nail
board
had
damaged
or
just
area
that
needed
to
look
better.
I
did
this
on
all
sections
of
my
whale,
and
plan
on
doing
the
spout
tomorrow
because
it
only
needs
a
couple
fixes.
After
this
I
needed
to
re-‐paint
my
wheels
so
I
got
the
paint
ready.
Once
I
was
done
with
this,
I
started
painting
my
wheels.
Touching
up
my
whale’s
body
and
wheels
with
different
shades
of
blue
I
decided
to
paint
all
around
the
wheel
except
for
a
bit
off
the
edge
of
the
axles.
I
did
this
just
in
case
the
wood
in
the
back
showed
when
rolling.
Painting
the
wheels
without
axles
was
hard
because
I
had
to
wet
paint
all
over
the
wheel
and
putting
it
in
a
position
I
could
paint
in
without
getting
all
over
the
place
was
hard.
I
also
sanded
or
scraped
off
some
of
the
dry
paint
off
my
axles
so
it
wouldn’t
affect
the
wheels
when
they
rolled.
This
took
up
the
rest
of
the
period.
After
this,
the
class
had
ended,
and
it
was
time
to
pack
up.
I
put
my
apron
away
and
put
up
my
tools.
I
then
re-‐wrote
my
name
on
my
piece
of
wood
and
22. put
I
in
the
Grade
8
Moving
Toy
project
box.
Finally,
I
cleaned
up
my
station
and
made
sure
everything
was
in
order.
Sanding
off
any
rough
edges
or
clumps
of
paint
on
my
whale’s
body.
Marking
out
the
area
where
my
whale’s
eyes
will
go
Why?
I
used
the
in
the
holes
of
my
whale’s
body
to
get
any
bits
of
paint
out
of
them
to
ensure
that
the
wheels
can
roll
when
I
put
them
in.
I
painted
the
second
coat
of
paint
on
my
whale’s
wheels
to
ensure
they
looked
nice.
I
also
re-‐painted
areas
of
my
whale’s
body
to
ensure
that
it
looked
good
and
had
no
rough
parts.
What’s
Next?
In
the
nest
periods,
I
will
make
sure
all
painting
is
done
for
good,
drill
the
holes
for
the
eyes,
put
in
the
eyes,
and
put
the
wheels
in.
After
that,
just
need
to
make
sure
everything
is
fine
and
I’m
done.
I
look
forward
to
finishing
it.
Emotion
I
had
mixed
feelings
about
this
lesson.
I’m
getting
sick
of
painting
the
body,
but
I
know
I’m
almost
done.
I’m
happy
I
painted
the
wheels
though.
I’m
looking
forward
to
the
next
lesson
because
I
know
I
can
get
a
lot
done!
AOI
&
Learner
Profile
23. I
was
a
knowledgeable
because
I
used
my
previous
knowledge
with
painting
to
properly
and
neatly
to
paint
my
whale.
Also
I
used
my
previous
knowledge
with
the
pedestal
drill
to
drill
a
hole
in
my
wheel.
Environment
–
We
are
re-‐using
wood
and
using
small
pieces
for
other
projects
so
we
don’t
have
to
use
a
different
piece
every
time.