SlideShare une entreprise Scribd logo
1  sur  26
Creating Wall Type Details using Parts and Assemblies
                                                            Using a combination of 2 new tools in Revit
                                                            2012, Parts and Assemblies, you can create
                                                            Details that show the wall types in your
                                                            projects with the layers of construction
                                                            pulled back.

                                                            First, create a small length of wall that you
                                                            want to detail, and place it on a Phase that
                                                            exists after your other project Phases. You
                                                            may want to name this Phase "Detailing" or
                                                            some other description that makes sense to
                                                            you. We place this wall on a later Phase so
                                                            it wont affect our current project.

                                                            Next, select the wall, and turn it into Parts
                                                            using the Parts tool in the Modify>Create
                                                            tab.

                                                            Then, select each layer of material, and in
                                                            Properties, turn on Shape Handles. Use the
                                                            shape handles to pull back the layers of
                                                            construction to reveal other layers.

                                                            Then select all the Parts for the wall, and
                                                            turn them into an Assembly by using the
                                                            Modify>Create>Assemblies tool.

Once they are an Assembly, you can right-click on the Assembly in the Project Browser and use the
Create Assembly Views option to make plans, sections, 3D views, and even schedules of the Parts.

Use the Annotate tab to add annotations to your views. Text, dimensions, keynotes, etc can all be added
to these views, including the 3D Assembly view.

Place the Assembly Views on an Assembly Sheet to create the detail sheet for that specific wall type.
Creating 3D Details
Creating 3D details of any part of a Revit project is easy! Use the Orient to View option located on the
right-click menu of the View Cube. But first, you need to make a view that you want to create the 3D
detail of. This can be any Revit plan, section, elevation, callout, or even another 3D view.

Making a 3D detail using a Callout:

    1. In a plan view, place a Call out (View Tab>Callout) around the objects you would like to see in a
       3D detail. Name your Call out View to easily locate it later.

    2. Switch to a 3D view, preferably the default 3D view or a new 3D view, or any 3D view that you
       don't mind changing the appearance of.

    3. Right-click on the View Cube, and choose Orient to View>Floor Plans and choose the Callout you
       just made and named,

    4. The current 3D view will move and change to a top-down 3D view, with a 3D section box placed
       at the same position as the border of the Callout, automatically cropping the 3D view.

    5. Using any navigation technique, whether it be an Orbit using the mouse, the View Cube, or a 3D
       Space Navigator device, re-orient this new top-down 3D view into an isometric view of your
       choice.

    6. Select the 3D Section Box to edit the crop extents of the 3D view.

    7. In Revit 2012, use the new "Save Orientation and Lock View" option from the view Control Bar
       at the bottom of the window.

    8. Add Annotations/Tags/Dimensions/etc. to your new 3D detail, and place on a sheet.

This technique can be used to orient a 3D view to a Detail section, a plan, sections, and more. Explore
the different options!
Custom Stairs Representation Based on Real Cases
This article provides five samples to explain how to customize the component based stair
documentation step by step. Component-based stairs can be created in Revit 2013. These examples are
as follows:


For sketch-based stairs, the path and cut mark are integrated with the stair as a whole part. However,
for component-based stairs, stair path is an independent annotation object, and there is an independent
type for the stair cut mark. These changes provide great flexibility for the stair documentation.

Below are some real case examples to elaborate how to use the new functions to achieve them.

Sample 1


Step 1:

Create a switchback assembled stair using the default type in the project:
Step 2:

Turn on the subcategory of <Above> Up Arrows:


It shows as:


Step 3:

Select the stair path, go to type properties, and customize the line shape at landing corner:
The stair is shown as:


Step 4:

Turn off categories of <Above> Riser Lines/ <Above> supports.
It becomes:


Step 5:

Customize the cut mark type; in the stair type properties, check the cut mark type as follows:
Stair represents as:


Sample 2


Step 1:

Create a switchback assembled stair using the default type in the project:
Step 2:

Turn on the subcategory of <Above> Up Arrows:


Step 3:

Customize the cut mark type; in the stair type properties, check the cut mark type as follows:
Cut marks become:


Step 4:

Select the stair path, and use the shape handles to move it to the appropriate location:
Step 5:

Turn off categories of <Above> Riser Lines/ <Above> supports.


The stair represents as what exactly shows in the sample drawing:


Sample 3
Step 1:

Create a switchback assembled stair using the default type in the project:


Step 2:

Turn off categories of <Above> Nosing Lines, <Above> Riser Lines, <Above> Supports ,and Riser Lines.
Stair shows as:


Step 3:

Select the stair path, and change the value of “Start Extension” in type properties:
It is shown as:


Step 3:

Change the cut mark type in stair type properties:
It shows as:


Sample 4


Step 1:

Create a switchback assembled stair using the default type in the project:
Step 2:

Turn off categories of <Above> Riser Lines, <Above> Supports:


It is shown as:
Step 3:

Customize the cut mark type in stairs type properties:


It is shown as:


Step 4:
Select the stair path, and customize its type properties:


Stair path will be shown as full step arrow:


Sample 5
Step 1:

Create a switchback assembled stair using the default type in the project:


Step 2:

Turn off all the <Above> related categories and Riser Lines:
It is shown as:


Step 3:

Customize the stair path by changing the parameters in its type properties. Please note the change of
the path family type to “Automatic Up/Down Direction”.
After that, the stair will be shown exactly like what’s in the sample drawing;
Placing Spot Elevations/Slope Annotations on Ramps
When in a plan view Revit will not allow you to directly annotate a ramp object with a spot elevation or
spot slope.

To get around this limitation it is possibel to place a spot slope or elevation annotation on an object such
as a floor and then move the annotation to the ramp object. Placing the annotation on the floor first
allows the annotation to report the correct values. When it is moved to the ramp object, the annotation
will report the values from the ramp object correctly as if it was originally placed on the ramp.

Once the annotation has been moved away from the floor object, the original floor can be deleted from
the project if desired.
Entourage using Detail Components
Giving your views some background or an "environment" can bring life to the views you create.


Use the attached detail componet families in your elevation and section views to provide some
environment. Attached below is a Graphic Linework Tree family and a Graphic Linework People Family.
Each family is a detail component family with different types used to define different graphic looks. Each
tree family also has a white mask that can be turned on an off at the instance level controling if the tree
is opaque or transparent. Each person type has this control as well and additional control so the pattern
of the figures clothing can be turned on or off, or a control to make the figure completly filled in black.
Keep in mind these families are detail components. Detail component families are view specific and
placed from the "Detail Component" tool on the Annotate tab of the ribbon. Detail components also are
always displayed "on top" of model elements in a view so if you uses these families in a situation where
the model needs to be "in front" of them you may have to make some modifications or use some
drafting tools in the view to "hide" portions of these families you don't want to see.

Use these families (and others you might create) to give your sections and elevations some architectural
graphic "flair"


The concept for this article and these families were orginally published in a blog by Robert Shamilevich.
Here is a link to the original translated (originally posted in Russian) post on the Art Architecture blog.

These familes used the originals posted and combined them into one famliy that uses different types to
provide the different looks for the people and trees.

Show off and share, create your own graphic linework detail componet entourage families and attach
them to this article. Be sure to update the article to let us know what you added.
before_and_after.PNG

No description

Elevation_w_detail_entourage.PNG

No description

Graphic_Linework_People.rfa

No description

Graphic_Linework_Tree.rfa

No description

Graphic_People_Samples.png

No description

Graphic_Tree_Samples.png

No description
Two Pick Family to Calculate Fire Exit Distance

                                            Use the example family to create a fire exiting diagram. The
                                            travel line family uses shared parameters in order to group
                                            the lines together and calculate the total length in a
                                            schedule.


                                                                                 Watch the video and
                                                                                 see how the lines are
                                                                                 placed in a project and
                                                                                 calculated for total
                                                                                 length in a schedule.
                                                                                 You can also download
                                                                                 the sample project so
                                                                                 you can experiment
                                                                                 examine how this
                                                                                 family is used in a
                                                                                 project. The example
                                                                                 project also includes a
tag that can be used to tag the undividual lines of the path with the path name and/or segment
distance.


exit_plan_schedule.png

Travel_Line.rfa

Fire_Exit_Line_Example_Project.rvt

Exiting_Tag.rfa
Optimal Performace Suggestions for Revit Architecture
I've comprised a list of suggestions for optimal performance regarding Revit Architecture. These were
pulled from many reading sources over the last year and have been made "standard" for my office for
best practice. I hope you find them useful!

        Regularly check and resolve Warnings. (Continue this process throughout entire project.)

* Manage Tab - Inquiry - Warnings

        Ensure all paths are pathed directly to project file, not "mapped" drives.

        All linked Revit files should also be pathed directly and then labeled "Absolute", (not relative).

* Manage Worksets - Revit Tab - Path Type (To the right side of Saved Path Column)

        Minimize the number of linked or imported dwg files.

* It's best to "clean-up" dwg's before importing.

* Turn off dwg files in perpendicular views, as it will only show as collinear lines in elevation, causing
performance degradation.

* Delete dwg's if unused or un-needed.

        "Clean-up" all linked files before linking them. (See Linking Files/ Models handout)

* Remove any un-used sheets, views, links, etc.

* Purge & Audit

        Create a family component instead of in-place families when possible, especially for repetitive
        components. Each in-place family has separate type attributes that Revit has to reference.

        Families require fewer resources than groups. Groups are powerful, but updating large
        quantities of group instances consumes significant computing resources.

        Where possible, avoid widespread use of voids in family geometry.

        Remove un-needed raster images and renderings.

        Avoid unnecessary Groups - delete from project browser.

        Wireframe and Shading can be 3 times faster than Hidden Line or Shading w/ Edges.

        Avoid hiding large quantities of individual elements in views.

        Delete unused views if at all possible.

Contenu connexe

Similaire à Creating wall type details using parts and assemblies

Revit drafting procedure
Revit drafting procedureRevit drafting procedure
Revit drafting procedureAnima M C
 
VensimPLE Quick Reference and Tutorial
VensimPLE Quick Reference and TutorialVensimPLE Quick Reference and Tutorial
VensimPLE Quick Reference and Tutorialjiali zhang
 
Methods used for Detailing in Revit
Methods used for Detailing in RevitMethods used for Detailing in Revit
Methods used for Detailing in RevitNI BT
 
Master AutoCAD with Expert Assignment Assistance!
Master AutoCAD with Expert Assignment Assistance!Master AutoCAD with Expert Assignment Assistance!
Master AutoCAD with Expert Assignment Assistance!AutoCAD Assignment Help
 
Utilizing Layers in AutoCAD Prototype Package
Utilizing Layers in AutoCAD Prototype PackageUtilizing Layers in AutoCAD Prototype Package
Utilizing Layers in AutoCAD Prototype PackageBrian Mitchell
 
StaadPro Manual by yousuf dinar
StaadPro Manual by yousuf dinarStaadPro Manual by yousuf dinar
StaadPro Manual by yousuf dinarYousuf Dinar
 
Tutorial 1 - Computer Aided Design (Final Release)
Tutorial 1 - Computer Aided Design (Final Release)Tutorial 1 - Computer Aided Design (Final Release)
Tutorial 1 - Computer Aided Design (Final Release)Charling Li
 
Civil 3D Visualization
Civil 3D VisualizationCivil 3D Visualization
Civil 3D VisualizationLarry Young
 
Ibwave propagation quick start guide
Ibwave propagation   quick start guideIbwave propagation   quick start guide
Ibwave propagation quick start guideVirak Sou
 
Introduction to CAD
Introduction to CADIntroduction to CAD
Introduction to CADsyar2604
 
Additional 3174 mp3174 - navisworks 2014 - quick reference guide
Additional 3174 mp3174 - navisworks 2014 - quick reference guideAdditional 3174 mp3174 - navisworks 2014 - quick reference guide
Additional 3174 mp3174 - navisworks 2014 - quick reference guideTrần Hoàng Quí
 
Practical work 6
Practical work 6Practical work 6
Practical work 6wkhairil80
 
Sheet metal design
Sheet metal designSheet metal design
Sheet metal designHien Dinh
 
SolidWorks report.pptx
SolidWorks report.pptxSolidWorks report.pptx
SolidWorks report.pptxMohakRanjan
 
3dsmaxdesign 2010 using_autodesk_revit_files00
3dsmaxdesign 2010 using_autodesk_revit_files003dsmaxdesign 2010 using_autodesk_revit_files00
3dsmaxdesign 2010 using_autodesk_revit_files00An Nam Education
 

Similaire à Creating wall type details using parts and assemblies (20)

Revit drafting procedure
Revit drafting procedureRevit drafting procedure
Revit drafting procedure
 
Revit Lesson 01A
Revit Lesson 01ARevit Lesson 01A
Revit Lesson 01A
 
VensimPLE Quick Reference and Tutorial
VensimPLE Quick Reference and TutorialVensimPLE Quick Reference and Tutorial
VensimPLE Quick Reference and Tutorial
 
Revit glossary terms
Revit glossary termsRevit glossary terms
Revit glossary terms
 
Revit easy from AutoCAD
Revit   easy from AutoCADRevit   easy from AutoCAD
Revit easy from AutoCAD
 
Methods used for Detailing in Revit
Methods used for Detailing in RevitMethods used for Detailing in Revit
Methods used for Detailing in Revit
 
Master AutoCAD with Expert Assignment Assistance!
Master AutoCAD with Expert Assignment Assistance!Master AutoCAD with Expert Assignment Assistance!
Master AutoCAD with Expert Assignment Assistance!
 
Utilizing Layers in AutoCAD Prototype Package
Utilizing Layers in AutoCAD Prototype PackageUtilizing Layers in AutoCAD Prototype Package
Utilizing Layers in AutoCAD Prototype Package
 
StaadPro Manual by yousuf dinar
StaadPro Manual by yousuf dinarStaadPro Manual by yousuf dinar
StaadPro Manual by yousuf dinar
 
iOS sprint 2
iOS sprint 2iOS sprint 2
iOS sprint 2
 
Tutorial 1 - Computer Aided Design (Final Release)
Tutorial 1 - Computer Aided Design (Final Release)Tutorial 1 - Computer Aided Design (Final Release)
Tutorial 1 - Computer Aided Design (Final Release)
 
Civil 3D Visualization
Civil 3D VisualizationCivil 3D Visualization
Civil 3D Visualization
 
Ibwave propagation quick start guide
Ibwave propagation   quick start guideIbwave propagation   quick start guide
Ibwave propagation quick start guide
 
Introduction to CAD
Introduction to CADIntroduction to CAD
Introduction to CAD
 
Additional 3174 mp3174 - navisworks 2014 - quick reference guide
Additional 3174 mp3174 - navisworks 2014 - quick reference guideAdditional 3174 mp3174 - navisworks 2014 - quick reference guide
Additional 3174 mp3174 - navisworks 2014 - quick reference guide
 
Practical work 6
Practical work 6Practical work 6
Practical work 6
 
Sheet metal design
Sheet metal designSheet metal design
Sheet metal design
 
PRO ENGINEER BASIC
PRO ENGINEER BASICPRO ENGINEER BASIC
PRO ENGINEER BASIC
 
SolidWorks report.pptx
SolidWorks report.pptxSolidWorks report.pptx
SolidWorks report.pptx
 
3dsmaxdesign 2010 using_autodesk_revit_files00
3dsmaxdesign 2010 using_autodesk_revit_files003dsmaxdesign 2010 using_autodesk_revit_files00
3dsmaxdesign 2010 using_autodesk_revit_files00
 

Dernier

TrustArc Webinar - How to Build Consumer Trust Through Data Privacy
TrustArc Webinar - How to Build Consumer Trust Through Data PrivacyTrustArc Webinar - How to Build Consumer Trust Through Data Privacy
TrustArc Webinar - How to Build Consumer Trust Through Data PrivacyTrustArc
 
Connecting the Dots for Information Discovery.pdf
Connecting the Dots for Information Discovery.pdfConnecting the Dots for Information Discovery.pdf
Connecting the Dots for Information Discovery.pdfNeo4j
 
UiPath Community: Communication Mining from Zero to Hero
UiPath Community: Communication Mining from Zero to HeroUiPath Community: Communication Mining from Zero to Hero
UiPath Community: Communication Mining from Zero to HeroUiPathCommunity
 
Varsha Sewlal- Cyber Attacks on Critical Critical Infrastructure
Varsha Sewlal- Cyber Attacks on Critical Critical InfrastructureVarsha Sewlal- Cyber Attacks on Critical Critical Infrastructure
Varsha Sewlal- Cyber Attacks on Critical Critical Infrastructureitnewsafrica
 
How to Effectively Monitor SD-WAN and SASE Environments with ThousandEyes
How to Effectively Monitor SD-WAN and SASE Environments with ThousandEyesHow to Effectively Monitor SD-WAN and SASE Environments with ThousandEyes
How to Effectively Monitor SD-WAN and SASE Environments with ThousandEyesThousandEyes
 
Abdul Kader Baba- Managing Cybersecurity Risks and Compliance Requirements i...
Abdul Kader Baba- Managing Cybersecurity Risks  and Compliance Requirements i...Abdul Kader Baba- Managing Cybersecurity Risks  and Compliance Requirements i...
Abdul Kader Baba- Managing Cybersecurity Risks and Compliance Requirements i...itnewsafrica
 
Generative AI - Gitex v1Generative AI - Gitex v1.pptx
Generative AI - Gitex v1Generative AI - Gitex v1.pptxGenerative AI - Gitex v1Generative AI - Gitex v1.pptx
Generative AI - Gitex v1Generative AI - Gitex v1.pptxfnnc6jmgwh
 
Use of FIDO in the Payments and Identity Landscape: FIDO Paris Seminar.pptx
Use of FIDO in the Payments and Identity Landscape: FIDO Paris Seminar.pptxUse of FIDO in the Payments and Identity Landscape: FIDO Paris Seminar.pptx
Use of FIDO in the Payments and Identity Landscape: FIDO Paris Seminar.pptxLoriGlavin3
 
Passkey Providers and Enabling Portability: FIDO Paris Seminar.pptx
Passkey Providers and Enabling Portability: FIDO Paris Seminar.pptxPasskey Providers and Enabling Portability: FIDO Paris Seminar.pptx
Passkey Providers and Enabling Portability: FIDO Paris Seminar.pptxLoriGlavin3
 
New from BookNet Canada for 2024: Loan Stars - Tech Forum 2024
New from BookNet Canada for 2024: Loan Stars - Tech Forum 2024New from BookNet Canada for 2024: Loan Stars - Tech Forum 2024
New from BookNet Canada for 2024: Loan Stars - Tech Forum 2024BookNet Canada
 
A Framework for Development in the AI Age
A Framework for Development in the AI AgeA Framework for Development in the AI Age
A Framework for Development in the AI AgeCprime
 
Bridging Between CAD & GIS: 6 Ways to Automate Your Data Integration
Bridging Between CAD & GIS:  6 Ways to Automate Your Data IntegrationBridging Between CAD & GIS:  6 Ways to Automate Your Data Integration
Bridging Between CAD & GIS: 6 Ways to Automate Your Data Integrationmarketing932765
 
[Webinar] SpiraTest - Setting New Standards in Quality Assurance
[Webinar] SpiraTest - Setting New Standards in Quality Assurance[Webinar] SpiraTest - Setting New Standards in Quality Assurance
[Webinar] SpiraTest - Setting New Standards in Quality AssuranceInflectra
 
Generative Artificial Intelligence: How generative AI works.pdf
Generative Artificial Intelligence: How generative AI works.pdfGenerative Artificial Intelligence: How generative AI works.pdf
Generative Artificial Intelligence: How generative AI works.pdfIngrid Airi González
 
2024 April Patch Tuesday
2024 April Patch Tuesday2024 April Patch Tuesday
2024 April Patch TuesdayIvanti
 
Potential of AI (Generative AI) in Business: Learnings and Insights
Potential of AI (Generative AI) in Business: Learnings and InsightsPotential of AI (Generative AI) in Business: Learnings and Insights
Potential of AI (Generative AI) in Business: Learnings and InsightsRavi Sanghani
 
A Deep Dive on Passkeys: FIDO Paris Seminar.pptx
A Deep Dive on Passkeys: FIDO Paris Seminar.pptxA Deep Dive on Passkeys: FIDO Paris Seminar.pptx
A Deep Dive on Passkeys: FIDO Paris Seminar.pptxLoriGlavin3
 
Merck Moving Beyond Passwords: FIDO Paris Seminar.pptx
Merck Moving Beyond Passwords: FIDO Paris Seminar.pptxMerck Moving Beyond Passwords: FIDO Paris Seminar.pptx
Merck Moving Beyond Passwords: FIDO Paris Seminar.pptxLoriGlavin3
 
MuleSoft Online Meetup Group - B2B Crash Course: Release SparkNotes
MuleSoft Online Meetup Group - B2B Crash Course: Release SparkNotesMuleSoft Online Meetup Group - B2B Crash Course: Release SparkNotes
MuleSoft Online Meetup Group - B2B Crash Course: Release SparkNotesManik S Magar
 
How AI, OpenAI, and ChatGPT impact business and software.
How AI, OpenAI, and ChatGPT impact business and software.How AI, OpenAI, and ChatGPT impact business and software.
How AI, OpenAI, and ChatGPT impact business and software.Curtis Poe
 

Dernier (20)

TrustArc Webinar - How to Build Consumer Trust Through Data Privacy
TrustArc Webinar - How to Build Consumer Trust Through Data PrivacyTrustArc Webinar - How to Build Consumer Trust Through Data Privacy
TrustArc Webinar - How to Build Consumer Trust Through Data Privacy
 
Connecting the Dots for Information Discovery.pdf
Connecting the Dots for Information Discovery.pdfConnecting the Dots for Information Discovery.pdf
Connecting the Dots for Information Discovery.pdf
 
UiPath Community: Communication Mining from Zero to Hero
UiPath Community: Communication Mining from Zero to HeroUiPath Community: Communication Mining from Zero to Hero
UiPath Community: Communication Mining from Zero to Hero
 
Varsha Sewlal- Cyber Attacks on Critical Critical Infrastructure
Varsha Sewlal- Cyber Attacks on Critical Critical InfrastructureVarsha Sewlal- Cyber Attacks on Critical Critical Infrastructure
Varsha Sewlal- Cyber Attacks on Critical Critical Infrastructure
 
How to Effectively Monitor SD-WAN and SASE Environments with ThousandEyes
How to Effectively Monitor SD-WAN and SASE Environments with ThousandEyesHow to Effectively Monitor SD-WAN and SASE Environments with ThousandEyes
How to Effectively Monitor SD-WAN and SASE Environments with ThousandEyes
 
Abdul Kader Baba- Managing Cybersecurity Risks and Compliance Requirements i...
Abdul Kader Baba- Managing Cybersecurity Risks  and Compliance Requirements i...Abdul Kader Baba- Managing Cybersecurity Risks  and Compliance Requirements i...
Abdul Kader Baba- Managing Cybersecurity Risks and Compliance Requirements i...
 
Generative AI - Gitex v1Generative AI - Gitex v1.pptx
Generative AI - Gitex v1Generative AI - Gitex v1.pptxGenerative AI - Gitex v1Generative AI - Gitex v1.pptx
Generative AI - Gitex v1Generative AI - Gitex v1.pptx
 
Use of FIDO in the Payments and Identity Landscape: FIDO Paris Seminar.pptx
Use of FIDO in the Payments and Identity Landscape: FIDO Paris Seminar.pptxUse of FIDO in the Payments and Identity Landscape: FIDO Paris Seminar.pptx
Use of FIDO in the Payments and Identity Landscape: FIDO Paris Seminar.pptx
 
Passkey Providers and Enabling Portability: FIDO Paris Seminar.pptx
Passkey Providers and Enabling Portability: FIDO Paris Seminar.pptxPasskey Providers and Enabling Portability: FIDO Paris Seminar.pptx
Passkey Providers and Enabling Portability: FIDO Paris Seminar.pptx
 
New from BookNet Canada for 2024: Loan Stars - Tech Forum 2024
New from BookNet Canada for 2024: Loan Stars - Tech Forum 2024New from BookNet Canada for 2024: Loan Stars - Tech Forum 2024
New from BookNet Canada for 2024: Loan Stars - Tech Forum 2024
 
A Framework for Development in the AI Age
A Framework for Development in the AI AgeA Framework for Development in the AI Age
A Framework for Development in the AI Age
 
Bridging Between CAD & GIS: 6 Ways to Automate Your Data Integration
Bridging Between CAD & GIS:  6 Ways to Automate Your Data IntegrationBridging Between CAD & GIS:  6 Ways to Automate Your Data Integration
Bridging Between CAD & GIS: 6 Ways to Automate Your Data Integration
 
[Webinar] SpiraTest - Setting New Standards in Quality Assurance
[Webinar] SpiraTest - Setting New Standards in Quality Assurance[Webinar] SpiraTest - Setting New Standards in Quality Assurance
[Webinar] SpiraTest - Setting New Standards in Quality Assurance
 
Generative Artificial Intelligence: How generative AI works.pdf
Generative Artificial Intelligence: How generative AI works.pdfGenerative Artificial Intelligence: How generative AI works.pdf
Generative Artificial Intelligence: How generative AI works.pdf
 
2024 April Patch Tuesday
2024 April Patch Tuesday2024 April Patch Tuesday
2024 April Patch Tuesday
 
Potential of AI (Generative AI) in Business: Learnings and Insights
Potential of AI (Generative AI) in Business: Learnings and InsightsPotential of AI (Generative AI) in Business: Learnings and Insights
Potential of AI (Generative AI) in Business: Learnings and Insights
 
A Deep Dive on Passkeys: FIDO Paris Seminar.pptx
A Deep Dive on Passkeys: FIDO Paris Seminar.pptxA Deep Dive on Passkeys: FIDO Paris Seminar.pptx
A Deep Dive on Passkeys: FIDO Paris Seminar.pptx
 
Merck Moving Beyond Passwords: FIDO Paris Seminar.pptx
Merck Moving Beyond Passwords: FIDO Paris Seminar.pptxMerck Moving Beyond Passwords: FIDO Paris Seminar.pptx
Merck Moving Beyond Passwords: FIDO Paris Seminar.pptx
 
MuleSoft Online Meetup Group - B2B Crash Course: Release SparkNotes
MuleSoft Online Meetup Group - B2B Crash Course: Release SparkNotesMuleSoft Online Meetup Group - B2B Crash Course: Release SparkNotes
MuleSoft Online Meetup Group - B2B Crash Course: Release SparkNotes
 
How AI, OpenAI, and ChatGPT impact business and software.
How AI, OpenAI, and ChatGPT impact business and software.How AI, OpenAI, and ChatGPT impact business and software.
How AI, OpenAI, and ChatGPT impact business and software.
 

Creating wall type details using parts and assemblies

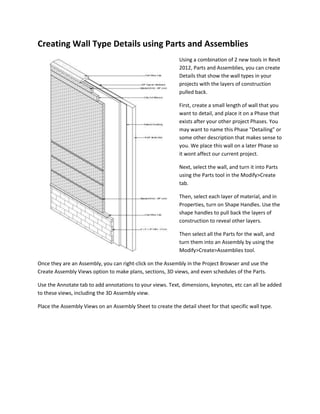
  • 1. Creating Wall Type Details using Parts and Assemblies Using a combination of 2 new tools in Revit 2012, Parts and Assemblies, you can create Details that show the wall types in your projects with the layers of construction pulled back. First, create a small length of wall that you want to detail, and place it on a Phase that exists after your other project Phases. You may want to name this Phase "Detailing" or some other description that makes sense to you. We place this wall on a later Phase so it wont affect our current project. Next, select the wall, and turn it into Parts using the Parts tool in the Modify>Create tab. Then, select each layer of material, and in Properties, turn on Shape Handles. Use the shape handles to pull back the layers of construction to reveal other layers. Then select all the Parts for the wall, and turn them into an Assembly by using the Modify>Create>Assemblies tool. Once they are an Assembly, you can right-click on the Assembly in the Project Browser and use the Create Assembly Views option to make plans, sections, 3D views, and even schedules of the Parts. Use the Annotate tab to add annotations to your views. Text, dimensions, keynotes, etc can all be added to these views, including the 3D Assembly view. Place the Assembly Views on an Assembly Sheet to create the detail sheet for that specific wall type.
  • 2. Creating 3D Details Creating 3D details of any part of a Revit project is easy! Use the Orient to View option located on the right-click menu of the View Cube. But first, you need to make a view that you want to create the 3D detail of. This can be any Revit plan, section, elevation, callout, or even another 3D view. Making a 3D detail using a Callout: 1. In a plan view, place a Call out (View Tab>Callout) around the objects you would like to see in a 3D detail. Name your Call out View to easily locate it later. 2. Switch to a 3D view, preferably the default 3D view or a new 3D view, or any 3D view that you don't mind changing the appearance of. 3. Right-click on the View Cube, and choose Orient to View>Floor Plans and choose the Callout you just made and named, 4. The current 3D view will move and change to a top-down 3D view, with a 3D section box placed at the same position as the border of the Callout, automatically cropping the 3D view. 5. Using any navigation technique, whether it be an Orbit using the mouse, the View Cube, or a 3D Space Navigator device, re-orient this new top-down 3D view into an isometric view of your choice. 6. Select the 3D Section Box to edit the crop extents of the 3D view. 7. In Revit 2012, use the new "Save Orientation and Lock View" option from the view Control Bar at the bottom of the window. 8. Add Annotations/Tags/Dimensions/etc. to your new 3D detail, and place on a sheet. This technique can be used to orient a 3D view to a Detail section, a plan, sections, and more. Explore the different options!
  • 3. Custom Stairs Representation Based on Real Cases This article provides five samples to explain how to customize the component based stair documentation step by step. Component-based stairs can be created in Revit 2013. These examples are as follows: For sketch-based stairs, the path and cut mark are integrated with the stair as a whole part. However, for component-based stairs, stair path is an independent annotation object, and there is an independent type for the stair cut mark. These changes provide great flexibility for the stair documentation. Below are some real case examples to elaborate how to use the new functions to achieve them. Sample 1 Step 1: Create a switchback assembled stair using the default type in the project:
  • 4. Step 2: Turn on the subcategory of <Above> Up Arrows: It shows as: Step 3: Select the stair path, go to type properties, and customize the line shape at landing corner:
  • 5. The stair is shown as: Step 4: Turn off categories of <Above> Riser Lines/ <Above> supports.
  • 6. It becomes: Step 5: Customize the cut mark type; in the stair type properties, check the cut mark type as follows:
  • 7. Stair represents as: Sample 2 Step 1: Create a switchback assembled stair using the default type in the project:
  • 8. Step 2: Turn on the subcategory of <Above> Up Arrows: Step 3: Customize the cut mark type; in the stair type properties, check the cut mark type as follows:
  • 9. Cut marks become: Step 4: Select the stair path, and use the shape handles to move it to the appropriate location:
  • 10. Step 5: Turn off categories of <Above> Riser Lines/ <Above> supports. The stair represents as what exactly shows in the sample drawing: Sample 3
  • 11. Step 1: Create a switchback assembled stair using the default type in the project: Step 2: Turn off categories of <Above> Nosing Lines, <Above> Riser Lines, <Above> Supports ,and Riser Lines.
  • 12. Stair shows as: Step 3: Select the stair path, and change the value of “Start Extension” in type properties:
  • 13. It is shown as: Step 3: Change the cut mark type in stair type properties:
  • 14. It shows as: Sample 4 Step 1: Create a switchback assembled stair using the default type in the project:
  • 15. Step 2: Turn off categories of <Above> Riser Lines, <Above> Supports: It is shown as:
  • 16. Step 3: Customize the cut mark type in stairs type properties: It is shown as: Step 4:
  • 17. Select the stair path, and customize its type properties: Stair path will be shown as full step arrow: Sample 5
  • 18. Step 1: Create a switchback assembled stair using the default type in the project: Step 2: Turn off all the <Above> related categories and Riser Lines:
  • 19. It is shown as: Step 3: Customize the stair path by changing the parameters in its type properties. Please note the change of the path family type to “Automatic Up/Down Direction”.
  • 20. After that, the stair will be shown exactly like what’s in the sample drawing;
  • 21. Placing Spot Elevations/Slope Annotations on Ramps When in a plan view Revit will not allow you to directly annotate a ramp object with a spot elevation or spot slope. To get around this limitation it is possibel to place a spot slope or elevation annotation on an object such as a floor and then move the annotation to the ramp object. Placing the annotation on the floor first allows the annotation to report the correct values. When it is moved to the ramp object, the annotation will report the values from the ramp object correctly as if it was originally placed on the ramp. Once the annotation has been moved away from the floor object, the original floor can be deleted from the project if desired.
  • 22. Entourage using Detail Components Giving your views some background or an "environment" can bring life to the views you create. Use the attached detail componet families in your elevation and section views to provide some environment. Attached below is a Graphic Linework Tree family and a Graphic Linework People Family. Each family is a detail component family with different types used to define different graphic looks. Each tree family also has a white mask that can be turned on an off at the instance level controling if the tree is opaque or transparent. Each person type has this control as well and additional control so the pattern of the figures clothing can be turned on or off, or a control to make the figure completly filled in black.
  • 23. Keep in mind these families are detail components. Detail component families are view specific and placed from the "Detail Component" tool on the Annotate tab of the ribbon. Detail components also are always displayed "on top" of model elements in a view so if you uses these families in a situation where the model needs to be "in front" of them you may have to make some modifications or use some drafting tools in the view to "hide" portions of these families you don't want to see. Use these families (and others you might create) to give your sections and elevations some architectural graphic "flair" The concept for this article and these families were orginally published in a blog by Robert Shamilevich. Here is a link to the original translated (originally posted in Russian) post on the Art Architecture blog. These familes used the originals posted and combined them into one famliy that uses different types to provide the different looks for the people and trees. Show off and share, create your own graphic linework detail componet entourage families and attach them to this article. Be sure to update the article to let us know what you added.
  • 24. before_and_after.PNG No description Elevation_w_detail_entourage.PNG No description Graphic_Linework_People.rfa No description Graphic_Linework_Tree.rfa No description Graphic_People_Samples.png No description Graphic_Tree_Samples.png No description
  • 25. Two Pick Family to Calculate Fire Exit Distance Use the example family to create a fire exiting diagram. The travel line family uses shared parameters in order to group the lines together and calculate the total length in a schedule. Watch the video and see how the lines are placed in a project and calculated for total length in a schedule. You can also download the sample project so you can experiment examine how this family is used in a project. The example project also includes a tag that can be used to tag the undividual lines of the path with the path name and/or segment distance. exit_plan_schedule.png Travel_Line.rfa Fire_Exit_Line_Example_Project.rvt Exiting_Tag.rfa
  • 26. Optimal Performace Suggestions for Revit Architecture I've comprised a list of suggestions for optimal performance regarding Revit Architecture. These were pulled from many reading sources over the last year and have been made "standard" for my office for best practice. I hope you find them useful! Regularly check and resolve Warnings. (Continue this process throughout entire project.) * Manage Tab - Inquiry - Warnings Ensure all paths are pathed directly to project file, not "mapped" drives. All linked Revit files should also be pathed directly and then labeled "Absolute", (not relative). * Manage Worksets - Revit Tab - Path Type (To the right side of Saved Path Column) Minimize the number of linked or imported dwg files. * It's best to "clean-up" dwg's before importing. * Turn off dwg files in perpendicular views, as it will only show as collinear lines in elevation, causing performance degradation. * Delete dwg's if unused or un-needed. "Clean-up" all linked files before linking them. (See Linking Files/ Models handout) * Remove any un-used sheets, views, links, etc. * Purge & Audit Create a family component instead of in-place families when possible, especially for repetitive components. Each in-place family has separate type attributes that Revit has to reference. Families require fewer resources than groups. Groups are powerful, but updating large quantities of group instances consumes significant computing resources. Where possible, avoid widespread use of voids in family geometry. Remove un-needed raster images and renderings. Avoid unnecessary Groups - delete from project browser. Wireframe and Shading can be 3 times faster than Hidden Line or Shading w/ Edges. Avoid hiding large quantities of individual elements in views. Delete unused views if at all possible.