SOA Fusion Middleware installation
•Télécharger en tant que DOCX, PDF•
0 j'aime•468 vues

Installation consists of 5 main steps: 1. Install Oracle WebLogic Server 2. Install Oracle SOA Suite 11.1.1.2.0 3. Install Oracle SOA Suite 11.1.1.3.0 Patchset 4. Install Oracle OSB 11.1.1.3.0 5. Create WebLogic Domain

Recommandé
Contenu connexe
Tendances
Tendances (19)
En vedette
En vedette (20)
Similaire à SOA Fusion Middleware installation
Similaire à SOA Fusion Middleware installation (20)
Dernier
Dernier (20)
SOA Fusion Middleware installation
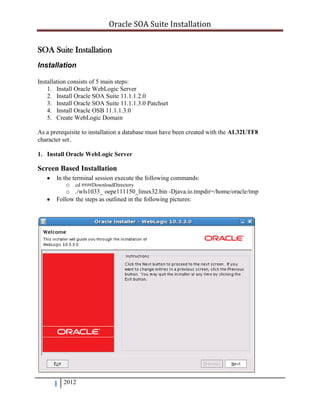
- 1. Oracle SOA Suite Installation SOA Suite Installation Installation Installation consists of 5 main steps: 1. Install Oracle WebLogic Server 2. Install Oracle SOA Suite 11.1.1.2.0 3. Install Oracle SOA Suite 11.1.1.3.0 Patchset 4. Install Oracle OSB 11.1.1.3.0 5. Create WebLogic Domain As a prerequisite to installation a database must have been created with the AL32UTF8 character set. 1. Install Oracle WebLogic Server Screen Based Installation In the terminal session execute the following commands: o cd ####DownloadDirectory o ./wls1033_ oepe111150_linux32.bin -Djava.io.tmpdir=/home/oracle/tmp Follow the steps as outlined in the following pictures: 1 2012
- 2. Oracle SOA Suite Installation Click on Next Change the home directory as per illustration above. Click on Next 2 2012
- 3. Oracle SOA Suite Installation Un-tick the “I wish to receive security updates” (except if installing on production box jdcbpelprd1). Click Yes Click on Next 3 2012
- 4. Oracle SOA Suite Installation Select Custom Click on Next 4 2012
- 5. Oracle SOA Suite Installation Deselect Evaulation Database and Oracle Enterprise Pack for Eclipse Click on Next Highlight SUN SDK 5 2012
- 6. Oracle SOA Suite Installation Click on Next Click on Next 6 2012
- 7. Oracle SOA Suite Installation Click on Next Wait for installation to complete 7 2012
- 8. Oracle SOA Suite Installation Untick the Run Quickstart checkbox Click on Done WebLogic server software has now been installed on this system. 2. Install Oracle SOA Suite 11.1.1.2.0 In the terminal session execute the following commands: o o o cd ####DownloadDirectory unzip ofm_soa_generic_11.1.1.2.0_disk1_1of1.zip Disk1/runInstaller –jreLoc /usr/app/oracle//Middleware/jdk160_18 Follow the steps as illustrated in the following illustrated steps. 8 2012
- 9. Oracle SOA Suite Installation Click on Next 9 2012
- 10. Oracle SOA Suite Installation Click on Next Ensure Oracle Middleware Home is set to /usr/app/oracle/Middleware 10 2012
- 11. Oracle SOA Suite Installation Click on Next Click on Install 11 2012
- 12. Oracle SOA Suite Installation Click on Next Click on Finish 12 2012
- 13. Oracle SOA Suite Installation 3. Install Oracle SOA Suite 11.1.1.3.0 Patchset Create a putty session to target host (user oracle) o o cd <software directory> unzip /ofm_soa_generic_11.1.1.3.0_disk1_1of1.zip –d ~/unpack o ~/unpack/Disk1/runInstaller –jreLoc /usr/app/oracle//Middleware/jdk160_18 Follow the steps as illustrated in the following illustrated steps. Click on Next 13 2012
- 14. Oracle SOA Suite Installation Ensure Oracle Middleware Home is set to /usr/app/oracle/Middleware Click on Next Click on Next 14 2012
- 15. Oracle SOA Suite Installation Click on Next 15 2012
- 16. Oracle SOA Suite Installation Click on Finish 4. Install Oracle OSB 11.1.1.3.0 In the terminal session execute the following commands: o o unzip ofm_osb_generic_11.1.1.3.0_disk1_1of1.zip –d ~/unpack ~/unpack/osb/Disk1/runInstaller –jreLoc /usr/app/oracle//Middleware/jdk160_18 Follow the steps as illustrated in the following illustrated steps. Click on Next 16 2012
- 17. Oracle SOA Suite Installation Select Custom radio button Click on Next Deselect Oracle Service Bus IDE and Oracle Service Bus Examples 17 2012
- 18. Oracle SOA Suite Installation Click on Next Click on Next Ensure Oracle Middleware Home is set to /usr/app/oracle/Middleware Click on Install 18 2012
- 19. Oracle SOA Suite Installation Click on Install 19 2012
- 20. Oracle SOA Suite Installation Click on Next Click on Finish 5. Create WebLogic Domain In the terminal session execute the following commands: o cd /usr/app/oracle/product/Middleware o wlserver_10.3/common/bin/config.sh Execute the steps as outlined in the screen shots below: 20 2012
- 21. Oracle SOA Suite Installation Click Next Tick Oracle SOA Suite, Oracle Enterprise Manager, and Oracle Business Activity Monitoring. Click Next 21 2012
- 22. Oracle SOA Suite Installation Click Next Enter the password for the weblogic server Add the password to the password safe Click Next 22 2012
- 23. Oracle SOA Suite Installation Production/UAT Environments Development Environments Select Production Mode Ensure JRockit is highlighted Click Next Ensure Sun JDK is highlighted. Click Next Tick each of the checkboxes on the left column Set the Vendor to Oracle Ensure the Driver is set to Oracle Driver for instance connections Enter the DBMS/Service field with the appropriate database name Enter the Host Name field with the host for the database Enter the Port field with the port number for accessing the database 23 2012
- 24. Oracle SOA Suite Installation Enter the Schema Password field (this must match what was entered in the repository creation utility) Now, for each of the entries in the list: o Individually select the list item o Change the Schema Owner prefix to the target prefix for the system as per the example screenshots below. Click Next 24 2012
- 25. Oracle SOA Suite Installation Etc… Click Next when all appropriate values have been changed 25 2012
- 26. Oracle SOA Suite Installation Click Next after all connections have a green tick Tick Administration Server, Managed Servers and Deployment Services Click on Next 26 2012
- 27. Oracle SOA Suite Installation Change Listen port to 7003 Tick SSL Enabled check box Change SSL listen port to 7004 Click Next 27 2012
- 28. Oracle SOA Suite Installation Check SSL enabled checkboxes for all managed servers Enter the port numbers as shown in the diagram Click Next 28 2012
- 29. Oracle SOA Suite Installation Click Next Click Delete 29 2012
- 30. Oracle SOA Suite Installation Click on Unix Machine tab Click Add 30 2012
- 31. Oracle SOA Suite Installation Enter machine name Enter dba as post bind group ID Enter oracle as post bind user ID Click on Next 31 2012
- 32. Oracle SOA Suite Installation Assign Admin Server, soa_server1, osb_server1 and bam_server1 to Machine column Click on Next Click Next 32 2012
- 33. Oracle SOA Suite Installation Click Next Click Create 33 2012
- 34. Oracle SOA Suite Installation Click Done 34 2012