El imperfecto progressivo: cómo expresar acciones pasadas en curso
•Télécharger en tant que PPTX, PDF•
1 j'aime•259 vues


Recommandé
Contenu connexe
Tendances
Tendances (20)
Similaire à El imperfecto progressivo: cómo expresar acciones pasadas en curso
Similaire à El imperfecto progressivo: cómo expresar acciones pasadas en curso (20)
Plus de Nancy Lewis-Means
Plus de Nancy Lewis-Means (20)
El imperfecto progressivo: cómo expresar acciones pasadas en curso
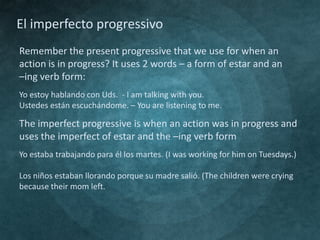
- 1. El imperfecto progressivo Remember the present progressive that we use for when an action is in progress? It uses 2 words – a form of estar and an –ing verb form: Yo estoy hablando con Uds. - I am talking with you. Ustedes están escuchándome. – You are listening to me. The imperfect progressive is when an action was in progress and uses the imperfect of estar and the –ing verb form Yo estaba trabajando para él los martes. (I was working for him on Tuesdays.) Los niños estaban llorando porque su madre salió. (The children were crying because their mom left.
- 2. The imperfect forms of estar are: Estaba Estábamos Estabas Estabais Estaba Estaban Remember to form the –ing form of a verb you do these steps: Drop the ‘ar’ off and add –ando (nadando, estudiando, etc.) Drop the ‘er’ or ‘ir’ off and add –iendo (comiendo, viviendo) If the infinitive ends in “-aer”, “-eer”, “-uir” you need a ‘y’ in instead of the ‘I’. Leer – leyendo Caer – cayendo Construir - construyendo
Notes de l'éditeur
- Textured and layered background(Intermediate)To reproduce the first background layer on this slide, do the following:On the Home tab, in the Slides group, click Layout, and then click Blank.Also on the Home tab, in the Drawing group, click Shapes, and then under Rectangles, click Rectangle.On the slide, drag to draw a rectangle.Select the rectangle. Under Drawing Tools, on the Format tab, in the Shape Styles group, click Shape Fill, point to Gradients, and then click More Gradients. In the FormatShape dialog box, click Fill in the left pane, in the Fill pane, click Gradient fill, and then do the following:In the Type list, select Linear.In the Angle box, enter 70°.Under Gradient stops, click Add gradient stop or Remove gradient stop until four stops appear in the slider.Also under Gradient stops, customize the gradient stops as follows:Select the first stop in the slider, and then do the following: In the Position box, enter 0%.Click the button next to Color, click More Colors, and then in the Colors dialog box, on the Custom tab, enter values for Red: 19, Green: 52, and Blue: 61.In the Transparency box, enter 0%. Select the next stop in the slider, and then do the following: In the Position box, enter 37%.Click the button next to Color, click More Colors, and then in the Colors dialog box, on the Custom tab, enter values for Red: 75, Green: 172, and Blue: 198.In the Transparency box, enter 0%. Select the next stop in the slider, and then do the following: In the Position box, enter 73%.Click the button next to Color, click More Colors, and then in the Colors dialog box, on the Custom tab, enter values for Red: 49, Green: 133, and Blue: 156.In the Transparency box, enter 0%. Select the last stop in the slider, and then do the following: In the Position box, enter 100%.Click the button next to Color, click More Colors, and then in the Colors dialog box, on the Custom tab, enter values for Red: 75, Green: 172, and Blue: 198.In the Transparency box, enter 0%. Also in the Format Shape dialog box, click Line Color in the left pane, in the Line Colorpane, select No line.Also in the Format Shape dialog box, click Size in the left pane, in the Size pane, under Size and rotate, enter 7.5” in the Height box and 10” in the Width box.On the Home tab, in the Drawing group, click Arrange, point to Align, and then do the following:Click Align to Slide.Click Align Middle. Click Align Center.To reproduce the second background layer on this slide, do the following:On the Home tab, in the Drawing group, click Shapes, and then under Rectangles click Rectangle.On the slide, drag to draw a rectangle.Select the rectangle. Under Drawing Tools, on the Format tab, in the Shape Styles group, click the Format Shape dialog box launcher. In the Format Shape dialog box, click Fill in the left pane, in the Fill pane, select Picture or texture fill, and then do the following:Click the button next to Texture and then click Brown Marble (third row).Clear the “Tile picture as texture” check box.UnderStretch options, in the Transparency box, enter 80%.Also in the Format Picture dialog box, click Line Color in the left pane, in the Line Colorpane, select No line.Also in the Format Picture dialog box, click Picture Corrections in the left pane, in the Picture Corrections pane, under Brightness and Contrast, enter 12% in the Brightness box and 44% in the Contrast box.Also in the Format Picture dialog box, click Picture Color in the left pane, in the Picture Color pane, under Recolor, click the button next to Presets, and then click Grayscale (first row).Also in the Format Picture dialog box, click Artistic Effects in the left pane, in the Artistic Effects pane, click the button next to Artistic Effect, click Glow Diffused (second row), and then do the following:In the Transparency box, enter 47%.In the Intensity box, enter 9.Also in the Format Picture dialog box, click Size in the left pane, in the Size pane, under Size and rotate, enter 7.5” in the Height box and 10” in the Width box.On the Home tab, in the Drawing group, click Arrange, point to Align, and then do the following:Click Align to Slide.Click Align Middle. Click Align Center.To reproduce the third background layer on this slide, do the following:On the Home tab, in the Drawing group, click Shapes, and then under Rectangles click Rectangle.On the slide, drag to draw a rectangle.Select the rectangle. Under Drawing Tools, on the Format tab, in the Shape Styles group, click the Format Shape dialog box launcher. In the Format Shape dialog box, click Fill in the left pane, in the Fill pane, select Picture or texture fill, and then do the following:Click the button next to Texture and then click Granite (third row).Select the “Tile picture as texture” check box.UnderTiling options, in the Transparency box, enter 95%.Also in the Format Picture dialog box, click Line Color in the left pane, in the Line Colorpane, select No line.Also in the Format Picture dialog box, click Picture Corrections in the left pane, in the Picture Corrections pane, under Brightness and Contrast, enter -20% in the Brightness box and 100% in the Contrast box.Also in the Format Picture dialog box, click Picture Color in the left pane, in the Picture Color pane, under Recolor, click the button next to Presets, and then click Grayscale (first row).Also in the Format Picture dialog box, click Artistic Effects in the left pane, in the Artistic Effects pane, click the button next to Artistic Effect, click Photocopy (fifth row), and then do the following:In the Transparency box, enter 30%.In the Intensity box, enter 3.Also in the Format Picture dialog box, click Size in the left pane, in the Size pane, under Size and rotate, enter 7.5” in the Height box and 10” in the Width box.On the Home tab, in the Drawing group, click Arrange, point to Align, and then do the following:Click Align to Slide.Click Align Middle. Click Align Center.To reproduce the fourth background layer on this slide, do the following:On the Home tab, in the Drawing group, click Shapes, and then under Rectangles, click Rectangle.On the slide, drag to draw a rectangle.Select the rectangle. Under Drawing Tools, on the Format tab, in the Shape Styles group, click Shape Fill, point to Gradients, and then click More Gradients. In the FormatShape dialog box, click Fill in the left pane, in the Fill pane, click Gradient fill, and then do the following:In the Type list, select Radial.In the Direction list, select FromCenter.Under Gradient stops, click Add gradient stopor Remove gradient stopuntil two stops appear in the slider.Also under Gradient stops, customize the gradient stops as follows:Select the first stop in the slider, and then do the following: In the Position box, enter 0%.Click the button next to Color, under Theme Colors, click Black, Text 1 (first row).In the Transparency box, enter 100%. Select the last stop in the slider, and then do the following: In the Position box, enter 100%.Click the button next to Color, click More Colors, and then in the Colors dialog box, on the Custom tab, enter values for Red: 36, Green: 25, and Blue: 15.In the Transparency box, enter 50%. Also in the Format Shape dialog box, click Line Color in the left pane, in the Line Colorpane, select No line.Also in the Format Shape dialog box, click Size in the left pane, in the Size pane, under Size and rotate, enter 7.5” in the Height box and 10” in the Width box.On the Home tab, in the Drawing group, click Arrange, point to Align, and then do the following:Click Align to Slide.Click Align Middle. Click Align Center.
- Textured and layered background(Intermediate)To reproduce the first background layer on this slide, do the following:On the Home tab, in the Slides group, click Layout, and then click Blank.Also on the Home tab, in the Drawing group, click Shapes, and then under Rectangles, click Rectangle.On the slide, drag to draw a rectangle.Select the rectangle. Under Drawing Tools, on the Format tab, in the Shape Styles group, click Shape Fill, point to Gradients, and then click More Gradients. In the FormatShape dialog box, click Fill in the left pane, in the Fill pane, click Gradient fill, and then do the following:In the Type list, select Linear.In the Angle box, enter 70°.Under Gradient stops, click Add gradient stop or Remove gradient stop until four stops appear in the slider.Also under Gradient stops, customize the gradient stops as follows:Select the first stop in the slider, and then do the following: In the Position box, enter 0%.Click the button next to Color, click More Colors, and then in the Colors dialog box, on the Custom tab, enter values for Red: 19, Green: 52, and Blue: 61.In the Transparency box, enter 0%. Select the next stop in the slider, and then do the following: In the Position box, enter 37%.Click the button next to Color, click More Colors, and then in the Colors dialog box, on the Custom tab, enter values for Red: 75, Green: 172, and Blue: 198.In the Transparency box, enter 0%. Select the next stop in the slider, and then do the following: In the Position box, enter 73%.Click the button next to Color, click More Colors, and then in the Colors dialog box, on the Custom tab, enter values for Red: 49, Green: 133, and Blue: 156.In the Transparency box, enter 0%. Select the last stop in the slider, and then do the following: In the Position box, enter 100%.Click the button next to Color, click More Colors, and then in the Colors dialog box, on the Custom tab, enter values for Red: 75, Green: 172, and Blue: 198.In the Transparency box, enter 0%. Also in the Format Shape dialog box, click Line Color in the left pane, in the Line Colorpane, select No line.Also in the Format Shape dialog box, click Size in the left pane, in the Size pane, under Size and rotate, enter 7.5” in the Height box and 10” in the Width box.On the Home tab, in the Drawing group, click Arrange, point to Align, and then do the following:Click Align to Slide.Click Align Middle. Click Align Center.To reproduce the second background layer on this slide, do the following:On the Home tab, in the Drawing group, click Shapes, and then under Rectangles click Rectangle.On the slide, drag to draw a rectangle.Select the rectangle. Under Drawing Tools, on the Format tab, in the Shape Styles group, click the Format Shape dialog box launcher. In the Format Shape dialog box, click Fill in the left pane, in the Fill pane, select Picture or texture fill, and then do the following:Click the button next to Texture and then click Brown Marble (third row).Clear the “Tile picture as texture” check box.UnderStretch options, in the Transparency box, enter 80%.Also in the Format Picture dialog box, click Line Color in the left pane, in the Line Colorpane, select No line.Also in the Format Picture dialog box, click Picture Corrections in the left pane, in the Picture Corrections pane, under Brightness and Contrast, enter 12% in the Brightness box and 44% in the Contrast box.Also in the Format Picture dialog box, click Picture Color in the left pane, in the Picture Color pane, under Recolor, click the button next to Presets, and then click Grayscale (first row).Also in the Format Picture dialog box, click Artistic Effects in the left pane, in the Artistic Effects pane, click the button next to Artistic Effect, click Glow Diffused (second row), and then do the following:In the Transparency box, enter 47%.In the Intensity box, enter 9.Also in the Format Picture dialog box, click Size in the left pane, in the Size pane, under Size and rotate, enter 7.5” in the Height box and 10” in the Width box.On the Home tab, in the Drawing group, click Arrange, point to Align, and then do the following:Click Align to Slide.Click Align Middle. Click Align Center.To reproduce the third background layer on this slide, do the following:On the Home tab, in the Drawing group, click Shapes, and then under Rectangles click Rectangle.On the slide, drag to draw a rectangle.Select the rectangle. Under Drawing Tools, on the Format tab, in the Shape Styles group, click the Format Shape dialog box launcher. In the Format Shape dialog box, click Fill in the left pane, in the Fill pane, select Picture or texture fill, and then do the following:Click the button next to Texture and then click Granite (third row).Select the “Tile picture as texture” check box.UnderTiling options, in the Transparency box, enter 95%.Also in the Format Picture dialog box, click Line Color in the left pane, in the Line Colorpane, select No line.Also in the Format Picture dialog box, click Picture Corrections in the left pane, in the Picture Corrections pane, under Brightness and Contrast, enter -20% in the Brightness box and 100% in the Contrast box.Also in the Format Picture dialog box, click Picture Color in the left pane, in the Picture Color pane, under Recolor, click the button next to Presets, and then click Grayscale (first row).Also in the Format Picture dialog box, click Artistic Effects in the left pane, in the Artistic Effects pane, click the button next to Artistic Effect, click Photocopy (fifth row), and then do the following:In the Transparency box, enter 30%.In the Intensity box, enter 3.Also in the Format Picture dialog box, click Size in the left pane, in the Size pane, under Size and rotate, enter 7.5” in the Height box and 10” in the Width box.On the Home tab, in the Drawing group, click Arrange, point to Align, and then do the following:Click Align to Slide.Click Align Middle. Click Align Center.To reproduce the fourth background layer on this slide, do the following:On the Home tab, in the Drawing group, click Shapes, and then under Rectangles, click Rectangle.On the slide, drag to draw a rectangle.Select the rectangle. Under Drawing Tools, on the Format tab, in the Shape Styles group, click Shape Fill, point to Gradients, and then click More Gradients. In the FormatShape dialog box, click Fill in the left pane, in the Fill pane, click Gradient fill, and then do the following:In the Type list, select Radial.In the Direction list, select FromCenter.Under Gradient stops, click Add gradient stopor Remove gradient stopuntil two stops appear in the slider.Also under Gradient stops, customize the gradient stops as follows:Select the first stop in the slider, and then do the following: In the Position box, enter 0%.Click the button next to Color, under Theme Colors, click Black, Text 1 (first row).In the Transparency box, enter 100%. Select the last stop in the slider, and then do the following: In the Position box, enter 100%.Click the button next to Color, click More Colors, and then in the Colors dialog box, on the Custom tab, enter values for Red: 36, Green: 25, and Blue: 15.In the Transparency box, enter 50%. Also in the Format Shape dialog box, click Line Color in the left pane, in the Line Colorpane, select No line.Also in the Format Shape dialog box, click Size in the left pane, in the Size pane, under Size and rotate, enter 7.5” in the Height box and 10” in the Width box.On the Home tab, in the Drawing group, click Arrange, point to Align, and then do the following:Click Align to Slide.Click Align Middle. Click Align Center.